Feather Op Amp Lab
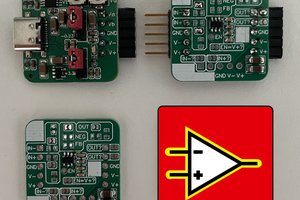
A custom Feather with SAM L21 microcontroller, paired with wings that let us interactively explore its integrated op amp peripheral.
A custom Feather with SAM L21 microcontroller, paired with wings that let us interactively explore its integrated op amp peripheral.
To make the experience fit your profile, pick a username and tell us what interests you.
We found and based on your interests.
OSO-MISC-23-008 Op Amp Breakout Wing.zipKiCad project for the Op Amp breakout wing.Zip Archive - 2.75 MB - 06/06/2023 at 17:56 |
|
|
OSO-FLOE-A1-DEV.zipKiCad project for the Feather Low Energy board.Zip Archive - 3.38 MB - 06/06/2023 at 17:50 |
|
I'd planned a whole thing with the Feather Op Amp Lab yesterday: there was this circuit I built with the original Pocket Op Amp Lab that measured the blood flow through a finger by shining an LED through it and detecting the transmittivity of flowing blood with a phototransistor. The difference in voltage is very small, and you need to add a low pass filter to cut down on some of the noise, but overall it's the perfect application for the Feather Op Amp Lab: a one-chip solution for measuring a subtle analog signal.
Unfortunately, somehow over the weekend I zapped my OLED wing, and it's no longer working. Which means I couldn't put this demo together in time for submission.
Nevertheless, I'm tossing my hat in the ring for the Op Amp Challenge, and in so doing, I'm open sourcing both the Feather Low Energy board that drives the Feather Op Amp Lab, and the Op Amp Breakout board that moves those pins to a convenient right angle header area at the right side of the wing. Files are attached to the project, but schematics are included below.
I'm releasing these as CC-BY-SA 4.0, which means you're free to make your own Feather Low Energy board, and you're also free to commercialize it and sell it. In fact: Microchip? Adafruit? If you want to make these, I would be thrilled to buy some from you. I run a business making objects — Oddly Specific Objects — but after looking into this, I realize I don't quite have the economy of scale to have these manufactured and still hit a price point that I feel good about. I'll likely keep making these boards for me, just because I have client projects and Oddly Specific gadgets that require a low energy, highly analog Feather.
But if someone wanted to build these, I'd be stoked to buy them rather than having to build them myself.
Anyway, just to recap the whole entry for the Op Amp Challenge:
I didn't get to do everything I wanted to do with this project by the deadline, but I'm still calling it a win in my book: this forced me to finally force Feather Low Energy into the world, and building the firmware in gossamer was a fantastic way to stress test what I've been trying to build there; it gave me a chance to add graphics support and OLED drivers to the framework, forced me to add support for a ton of peripherals, and generally just got me stoked about it in a way I hadn't been since I set it aside late last year.
So that's Feather Op Amp Lab. And this:
This update works best if you just understand visually what's going on here. I've set up the DAC on my SAM L21 Feather to feed into the first internal op amp. The DAC is outputting a 1 Hz square wave, and I've configured OPAMP0 as a voltage follower, so the output just follows the input. Up until now, I would have had to plug wires into the oscilloscope to visualize the analog waveform coming out of OPAMP0. But then of course, there's already an ADC inside this microcontroller. And a display. So yeah, TL;DR:
This is cool and all, but then it's not showing us anything we didn't know: if we output a level of 2 volts on the DAC, and OPAMP0 is a voltage follower, and we're measuring the output with an ADC, we're not really doing anything that interesting. We could have just plotted the value we wrote out, right?
To explore the possibilities of the Feather Op Amp Lab, let's configure OPAMP1 to do something with this sine wave. It's the same comparator circuit from last week: OPAMP0 buffers the DAC output, then we put that output on OPAMP1's positive input. The negative input goes to the resistor ladder, in this case configured to divide VCC in half.
This setup should turn our sine wave into a square wave with a 50% duty cycle. And sure, last week we visualized this on the oscilloscope. But with this week's addition, all we have to do is hold down on button B, and we can see the square wave output right there on the Feather Op Amp Lab's OLED — no external parts required!
The core of this feature is in one flag that we're able to set in each OPAMP's control register. Called ANAOUT, it controls an internal switch that either connects or disconnects the op amp's analog output to the ADC peripherals inside the microcontroller. It's depicted in a block diagram in the data sheet, titled “Interconnections of Analog Signal Components”:
In the end, it was a one-line function to add this feature to my op amp driver:
void opamp_set_analog_connection(uint16_t instance, bool connected) {
    OPAMP->OPAMPCTRL[instance].bit.ANAOUT = connected;
}
Again, it feels very simple looking and basic with just this simple comparator circuit, but I think the possibilities at play here are really exciting!
One of the joys of setting this up in Adafruit's Feather ecosystem is that there's a standardized board style for add-ons and breakouts: the FeatherWing. It's like, sure, I could solder to the Feather headers, or even plug into socket header in a wing doubler or tripler. But if, say, I wanted to turn this Feather Op Amp Lab into a microphone amplifier? I could just design a wing that connects the relevant op amp pins to a 1/8" jack, with all the necessary passives right there on the board.
I'm not quite there yet; for the moment, I mostly want to make with the prototyping. But keeping track of which pins are which is a drag; once I decided to put the analog reference pin on AREF and the DACs on A0 and A1, the ordering of the Op Amp pins became a mess:
Yeah. It's not satisfying at all. What I really want is to have all my op amp pins in a row, arranged in an order that mostly makes sense. So I made a FeatherWing.
There's a little white lie in the photo that I first posted to the project page. It depicts an OLED screen with a robust UI for operating the Feather Op Amp Lab, but the truth of it is, it's not exactly real. Oh sure, it ran on the L21 Feather, and it output those pixels to the SH1107 OLED, garbled top row and all. But it's a sketch I put together in Arduino that more or less just drew stuff to the screen. Getting the analog stuff to work in Arduinoland was uncharted territory.
To be clear, an Arduino core does exist for the SAM L21. Alas, the mere fact of it having to operate in the Arduino ecosystem means that it makes some choices that I wouldn't necessarily make myself. For a long time those were choices I could live with. But now I'm coming to a point where I need to build my own framework from whole cloth in order to do the things I want to do.
That's where gossamer comes in.
Read more »Whenever starting a new microcontroller project, one of the first things to do (after, y'know, picking out a microcontroller) is assigning pins to purposes. And on this one, I've had a lot of practice: I first envisioned making a SAM L21 Feather back in 2019, long before I had the skills to design a thing like that (at least to my standards of today).
Anyway, if you clicked the link to that tweet, you'd see a photo of a table from the data sheet, along with my four-year-old notes on what I thought each pin might do. Some of those pin assignments were set in stone; PA24 and PA25, for example, are the only USB-capable pins. Same with PA30 and PA31 for SWCLK and SWDIO. But beyond that, there's a lot of flexibility in how you choose to assign pins to the things you want to do, and especially for a dev board like a Feather, we want to choose to expose pins with the most functionality possible to the end user of our board.
It will not shock you to learn that years later, revisiting this project with more experience and skill, I made different choices. There's a lot to unpack here, but it might be easier to walk through this if we understand roughly what we're trying to do. First off, let's look at the top line of the pin mux table in the SAM L21 data sheet:
What it's telling us here is that while these pins can be general purpose IO pins, they can also be assigned to different peripheral functions that are described in that top header row. What are those peripherals? Let's walk from left to right, starting with the column named A:
Create an account to leave a comment. Already have an account? Log In.
Become a member to follow this project and never miss any updates
By using our website and services, you expressly agree to the placement of our performance, functionality, and advertising cookies. Learn More

 mihai.cuciuc
 Istantinople
 Gavin
Gavin
 Jeremy