Close
0%
0%

Nuclear Magnetic Resonance for Everyone

Explore the magnetic properties of hydrogen with this build guide

Similar projects worth following
Nuclear Magnetic Resonance (NMR) is a powerful technique at the core of chemistry and physics research. It offers valuable insights into atomic and molecular structures by investigating the magnetic properties of atomic nuclei. This guide will walk you through the process of building a user-friendly, portable device that can reliably detect NMR signals within Earth's magnetic field.

The Basics of MRI and NMR Spectroscopy

Detecting the fundamental signal underlying Magnetic Resonance Imaging (MRI) is surprisingly simple. In MRI, the Larmor frequency is crucial for understanding how the magnetic moments of nuclear spins align with or against an externally applied magnetic field, and how they subsequently precess around the direction of the magnetic field. This precession forms the basis for generating the signals used to create MRI images. Similarly, the Larmor frequency is essential to understanding Nuclear Magnetic Resonance (NMR) spectroscopy, a powerful analytical technique that exploits the magnetic properties of atomic nuclei to study the structure, dynamics, and interactions of molecules. In NMR, the Larmor frequency determines the rate at which nuclei precess around the magnetic field direction, and this precession is used to generate the signals that form the basis of the NMR spectrum.

Who was Larmor and how did he discover this frequency

https://mriquestions.com/who-was-larmor.html 

Earth's Field NMR

Just as in MRI machines and NMR spectrometers, which typically employ superconducting or powerful rare-earth magnets, some atoms within liquids also naturally precess in the Earth's magnetic field. The Larmor frequency is dependent on the strength of the applied field, so hydrogen atoms in the Earth's field exhibit a very low precession frequency. Conveniently, this frequency falls within the range suitable for a standard audio amplifier.

Earth's Field NMR entry at Wikipedia

A demonstration of 1D Magnetic Resonance Imaging in Earth's magnetic field. Although production of the Magritek TerraNova ceased by 2023, it remains the gold standard for commercial EFNMR/EFMRI systems.

A Simplified Approach to NMR Signal Detection

This guide aims to demonstrate how to use a widely available mid-range USB audio interface to bypass the immense complexities typically encountered when designing a reliable, portable, ultra-low noise amplifier and ADC suitable for detecting signals from hydrogen atoms within the Earth's magnetic field. By using only a manually operated three-way switch, we will also bypass the complexities of NMR pulse programming and eliminate the need for digital control circuitry. The system provides a minimal overhead approach to Free Induction Decay (T2) signal detection.

Polarization and Detection Coil Design

In addition to the design of the amplifier and ADC, the polarization and detection coil design is often another confounding technicality in Earth's Field NMR (EFNMR) system design. Many designs require two or more coils and necessitate fine wire with thousands of turns. This design, however, employs a short two-layer coil composed of relatively easy-to-wind 0.55mm wire, making the project more accessible for most people.
Signal Visualization and Software Tools

An overlooked component of the EFNMR signal detection process is the visualization of the received signals. By using a popular off-the-shelf audio interface with robust multi-platform drivers, we can connect directly to a phone, tablet or laptop and download free spectral analysis tools with high performance waterfall (STFT) outputs. These types of tools are ideal for detecting live, one-shot EFNMR signals, even indoors in medium-noise urban environments, with no additional hardware filtering or shielding needed. Most programming languages have libraries for USB audio devices, making the project suitable for custom software development.

Portability

Because EFNMR involves measuring the extremely subtle magnetic movements of atoms; magnetic interference is critical to success. The difference between successful signal detection or not can come down to a vertical or horizontal movement of only 30cm. It is crucial to be able to freely rotate the coil in order to navigate the local magnetic field. A general use EFNMR detection coil must be highly adjustable and mobile to ensure the...

Read more »

EFNMR-coil-3D-printable.stl

A 3D printable version of the EFNMR receiver and polarizer spool.

Standard Tesselated Geometry - 710.73 kB - 05/20/2023 at 02:52

Download

EFNMR-case-main-body-with-holes-3D-printable.stl

A 3D printable project case. It uses the drill holes featured in the document.

Standard Tesselated Geometry - 2.83 MB - 05/20/2023 at 02:52

Download

EFNMR-case-main-body-without-holes-3D-printable.stl

A 3D printable project case. No holes. For custom drilling.

Standard Tesselated Geometry - 2.45 MB - 05/20/2023 at 02:52

Download

EFNMR-case-top-lid-3D-printable.stl

A 3D printable lid for the case.

Standard Tesselated Geometry - 924.30 kB - 05/20/2023 at 02:52

Download

EFNMR-plans-dimensions-drill-solder.pdf

PDF of the drill and dimensions

Adobe Portable Document Format - 286.47 kB - 05/20/2023 at 02:58

Preview

View all 7 files

  • 1 × Behringer U-PHORIA UMC202HD 24-bit 192kHz USB Audio interface Native Instruments Komplete Audio 2 also performs the same. Any interface with a high-quality amplifier and low-noise ADC might work.
  • 1 × 110mm of plastic pipe, 40mm OD, 36mm ID 2mm wall thickness. STL file of the spool available too.
  • 1 × 24 AWG Enameled Copper Wire At least 41 meters or 80g. Outer diameter including coating is 0.55mm in this case
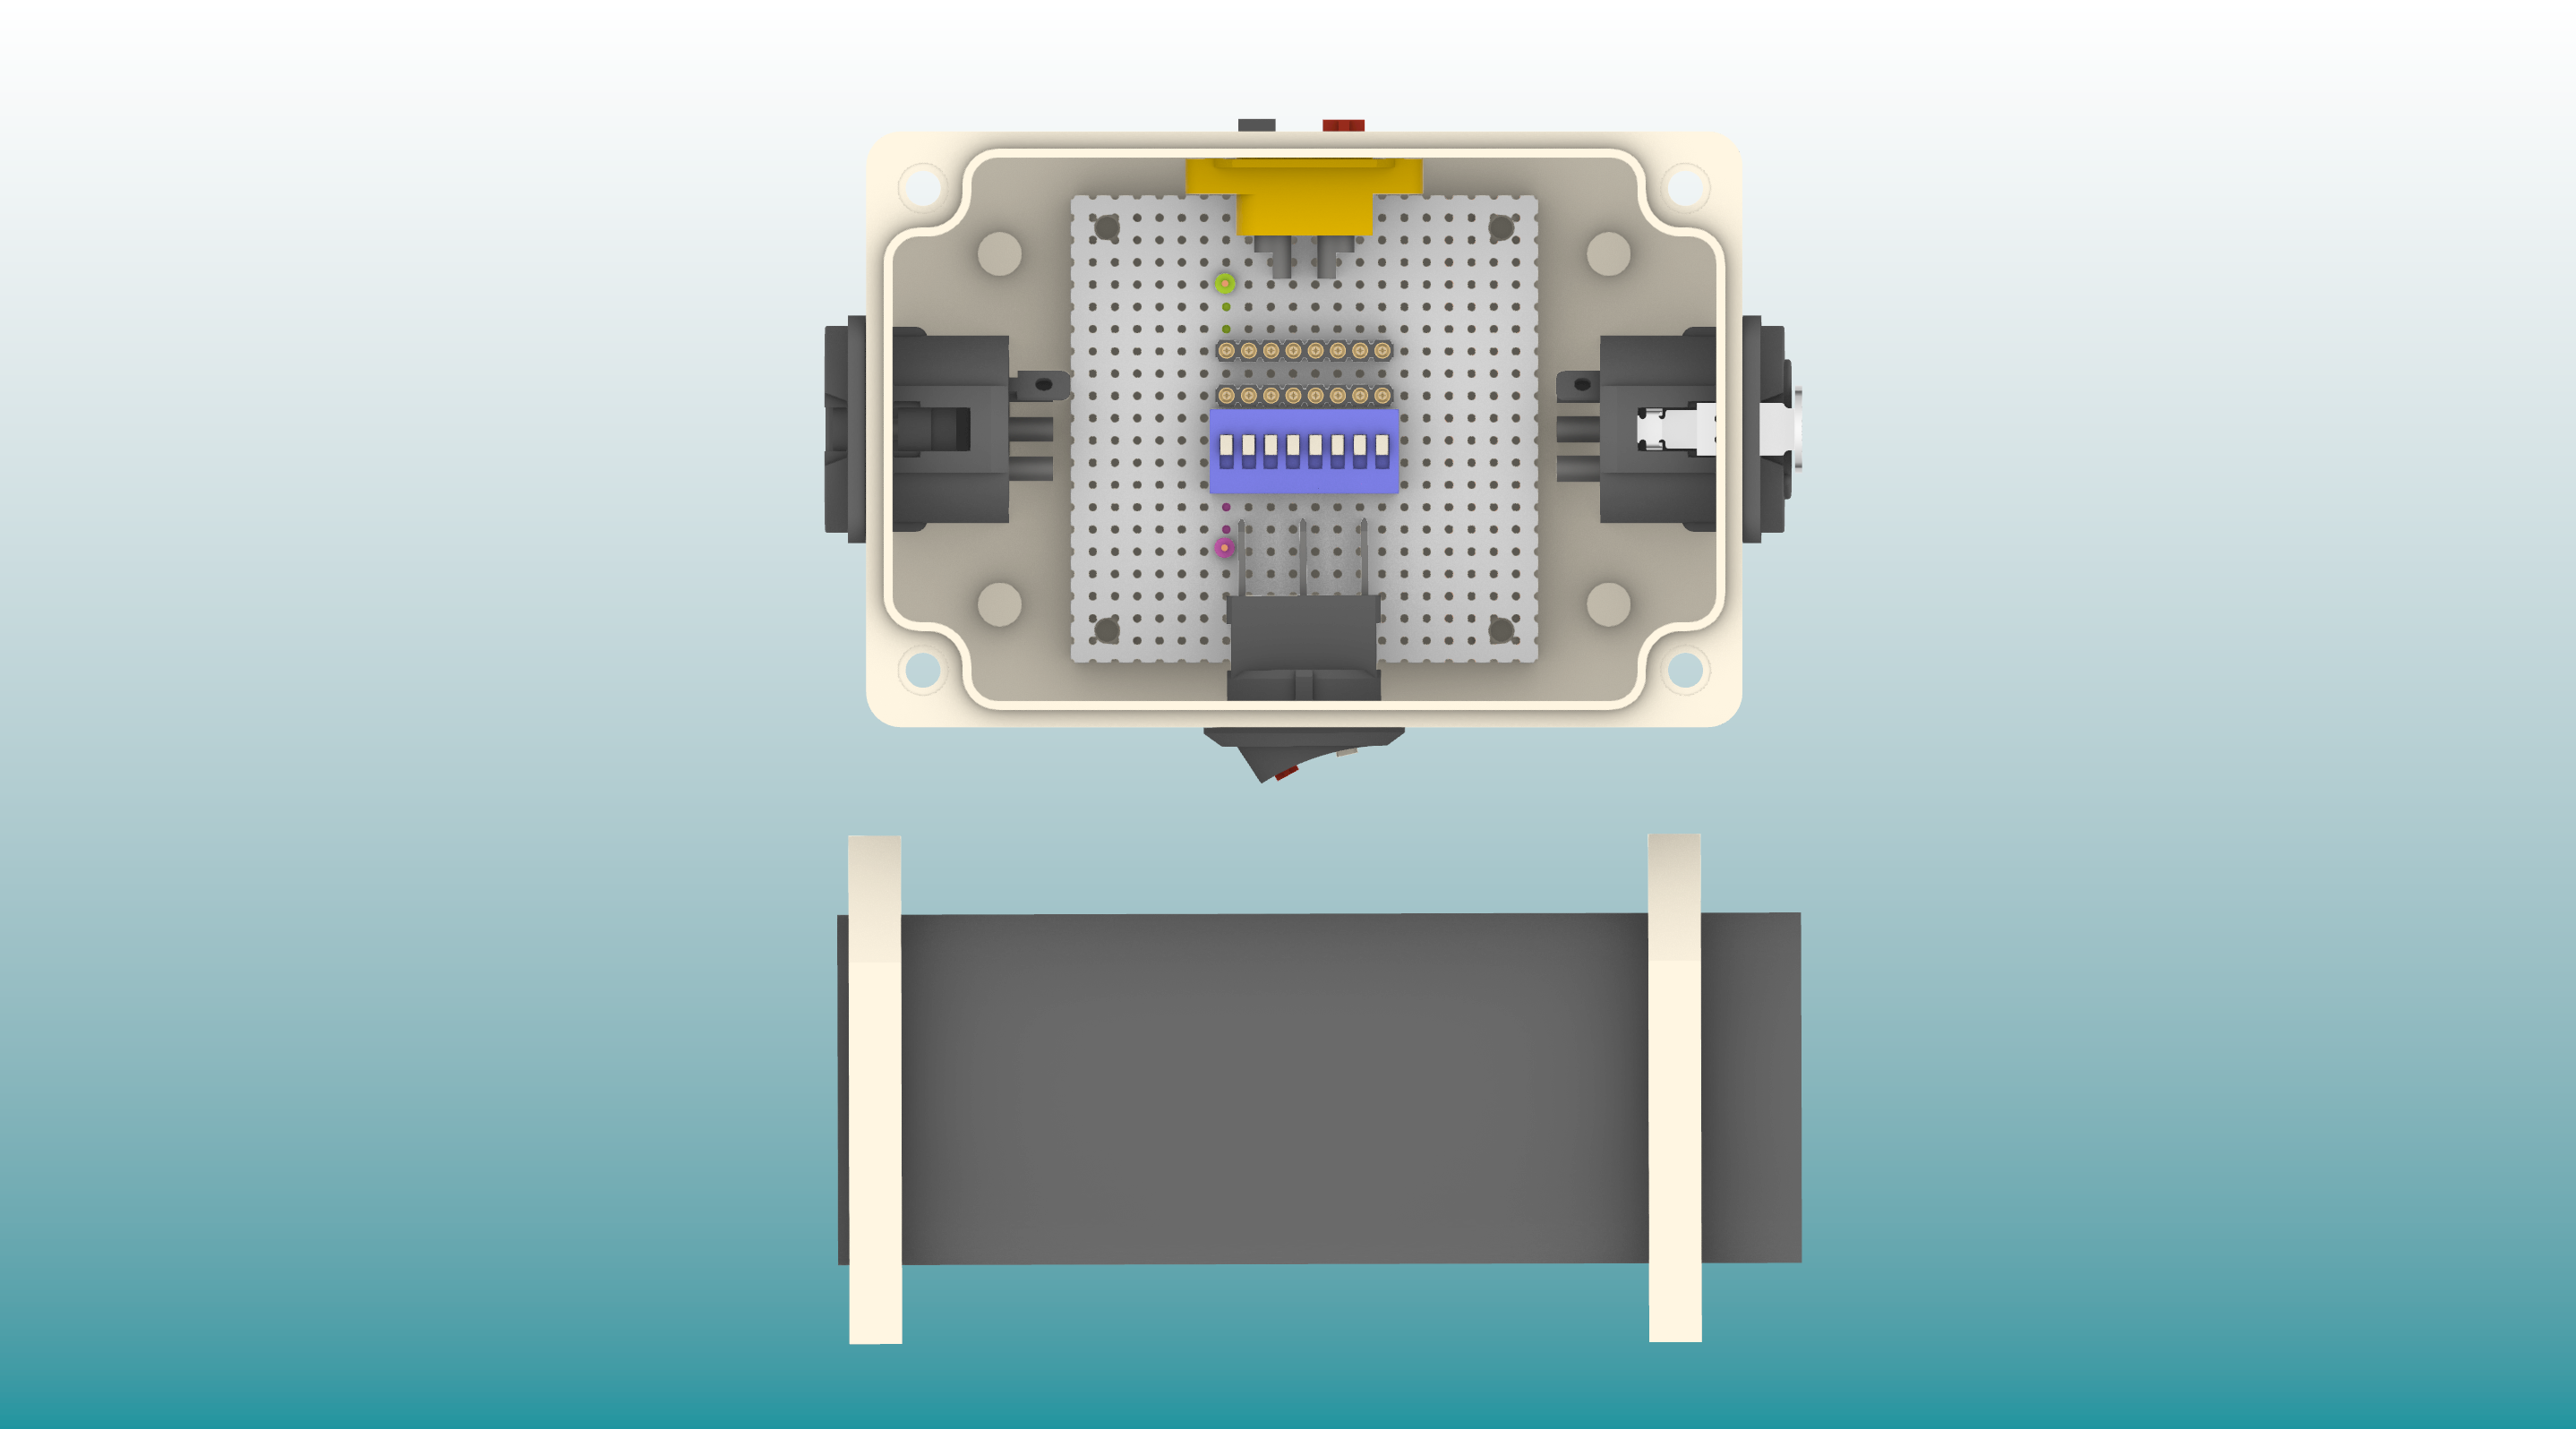
  • 1 × 100x68x50mm Junction/Project Box Wdely available, also available as a STL file
  • 1 × 2 meter XLR microphone cable with one M connector The bares wires of one end are soldered to the coil ends, the other end is XLR with 3 pins

View all 24 components

  • Welcome, explorers

    Andy Nicol05/20/2023 at 03:01 0 comments

    This is the first release of a long-term project that aims to replicate the functionality of the Magritek Terranova. The ultimate goal is to provide an open-source development platform for Earth's Field Nuclear Magnetic Resonance Spectroscopy and basic 3D imaging.

    The purpose of this release is to help lower the development time of projects involving low-field NMR by providing a minimal "hello world" example of a fully functioning EFNMR system. Until now, there have been no complete system designs which prioritise a rapid first detection of the Larmor frequency in a real-world situation. 

    This system can serve various purposes: it can act as a signal finder for a more elaborate EFNMR system, function as a basic proton magnetometer, be used as a science project for chemistry and physics students, offer a classroom demonstration for radiology students, or serve as a starting point for research.

    I have attempted to make the build guide as thorough as possible. Hopefully, almost everything has been specified, down to the screws needed. The instructions contain detailed descriptions of the coil winding process, methods for testing the coil reception, a coil tuning guide and setup instructions for the software featured in the article. Please let me know if anything seems unclear or incorrect, and I will do my best to amend things. 

    Since the design is mostly complete, I will use this log to update on interesting EFNMR experiments performed using the system. I also aim to share modifications and development of related hardware, hopefully working towards the end goal of basic 3D imaging. 

    Please like, follow and share if you support this project! 

    Andy

View project log

  • 1
    Acquire a USB amplifier/ADC sound interface

    This example uses a Behringer U-PHORIA UMC202HD for the NMR receiver system, it provides a very low noise amplifier, and a 192kHz 24-bit ADC, powered by 5V USB. It is widely available for around $100 USD. The similarly priced Native Instruments Komplete Audio 2 seems to perform the same, but has not been tested extensively. 

    The UMC202HD used for the development of this project seems to remain fully functional after thousands of polarization cycles, with no external protection diodes in place.

    https://www.behringer.com/behringer/product?modelCode=0805-AAI

    Recommended (free to download) software:

    For Windows - SDR# by Airspy

    https://airspy.com/download/

    A PC laptop can power the UMC202HD directly. However, in some cases, it may be beneficial to operate the interface using an external USB power bank. The UMC202HD is provided with a double-ended USB cable that enables connection to an external power supply.

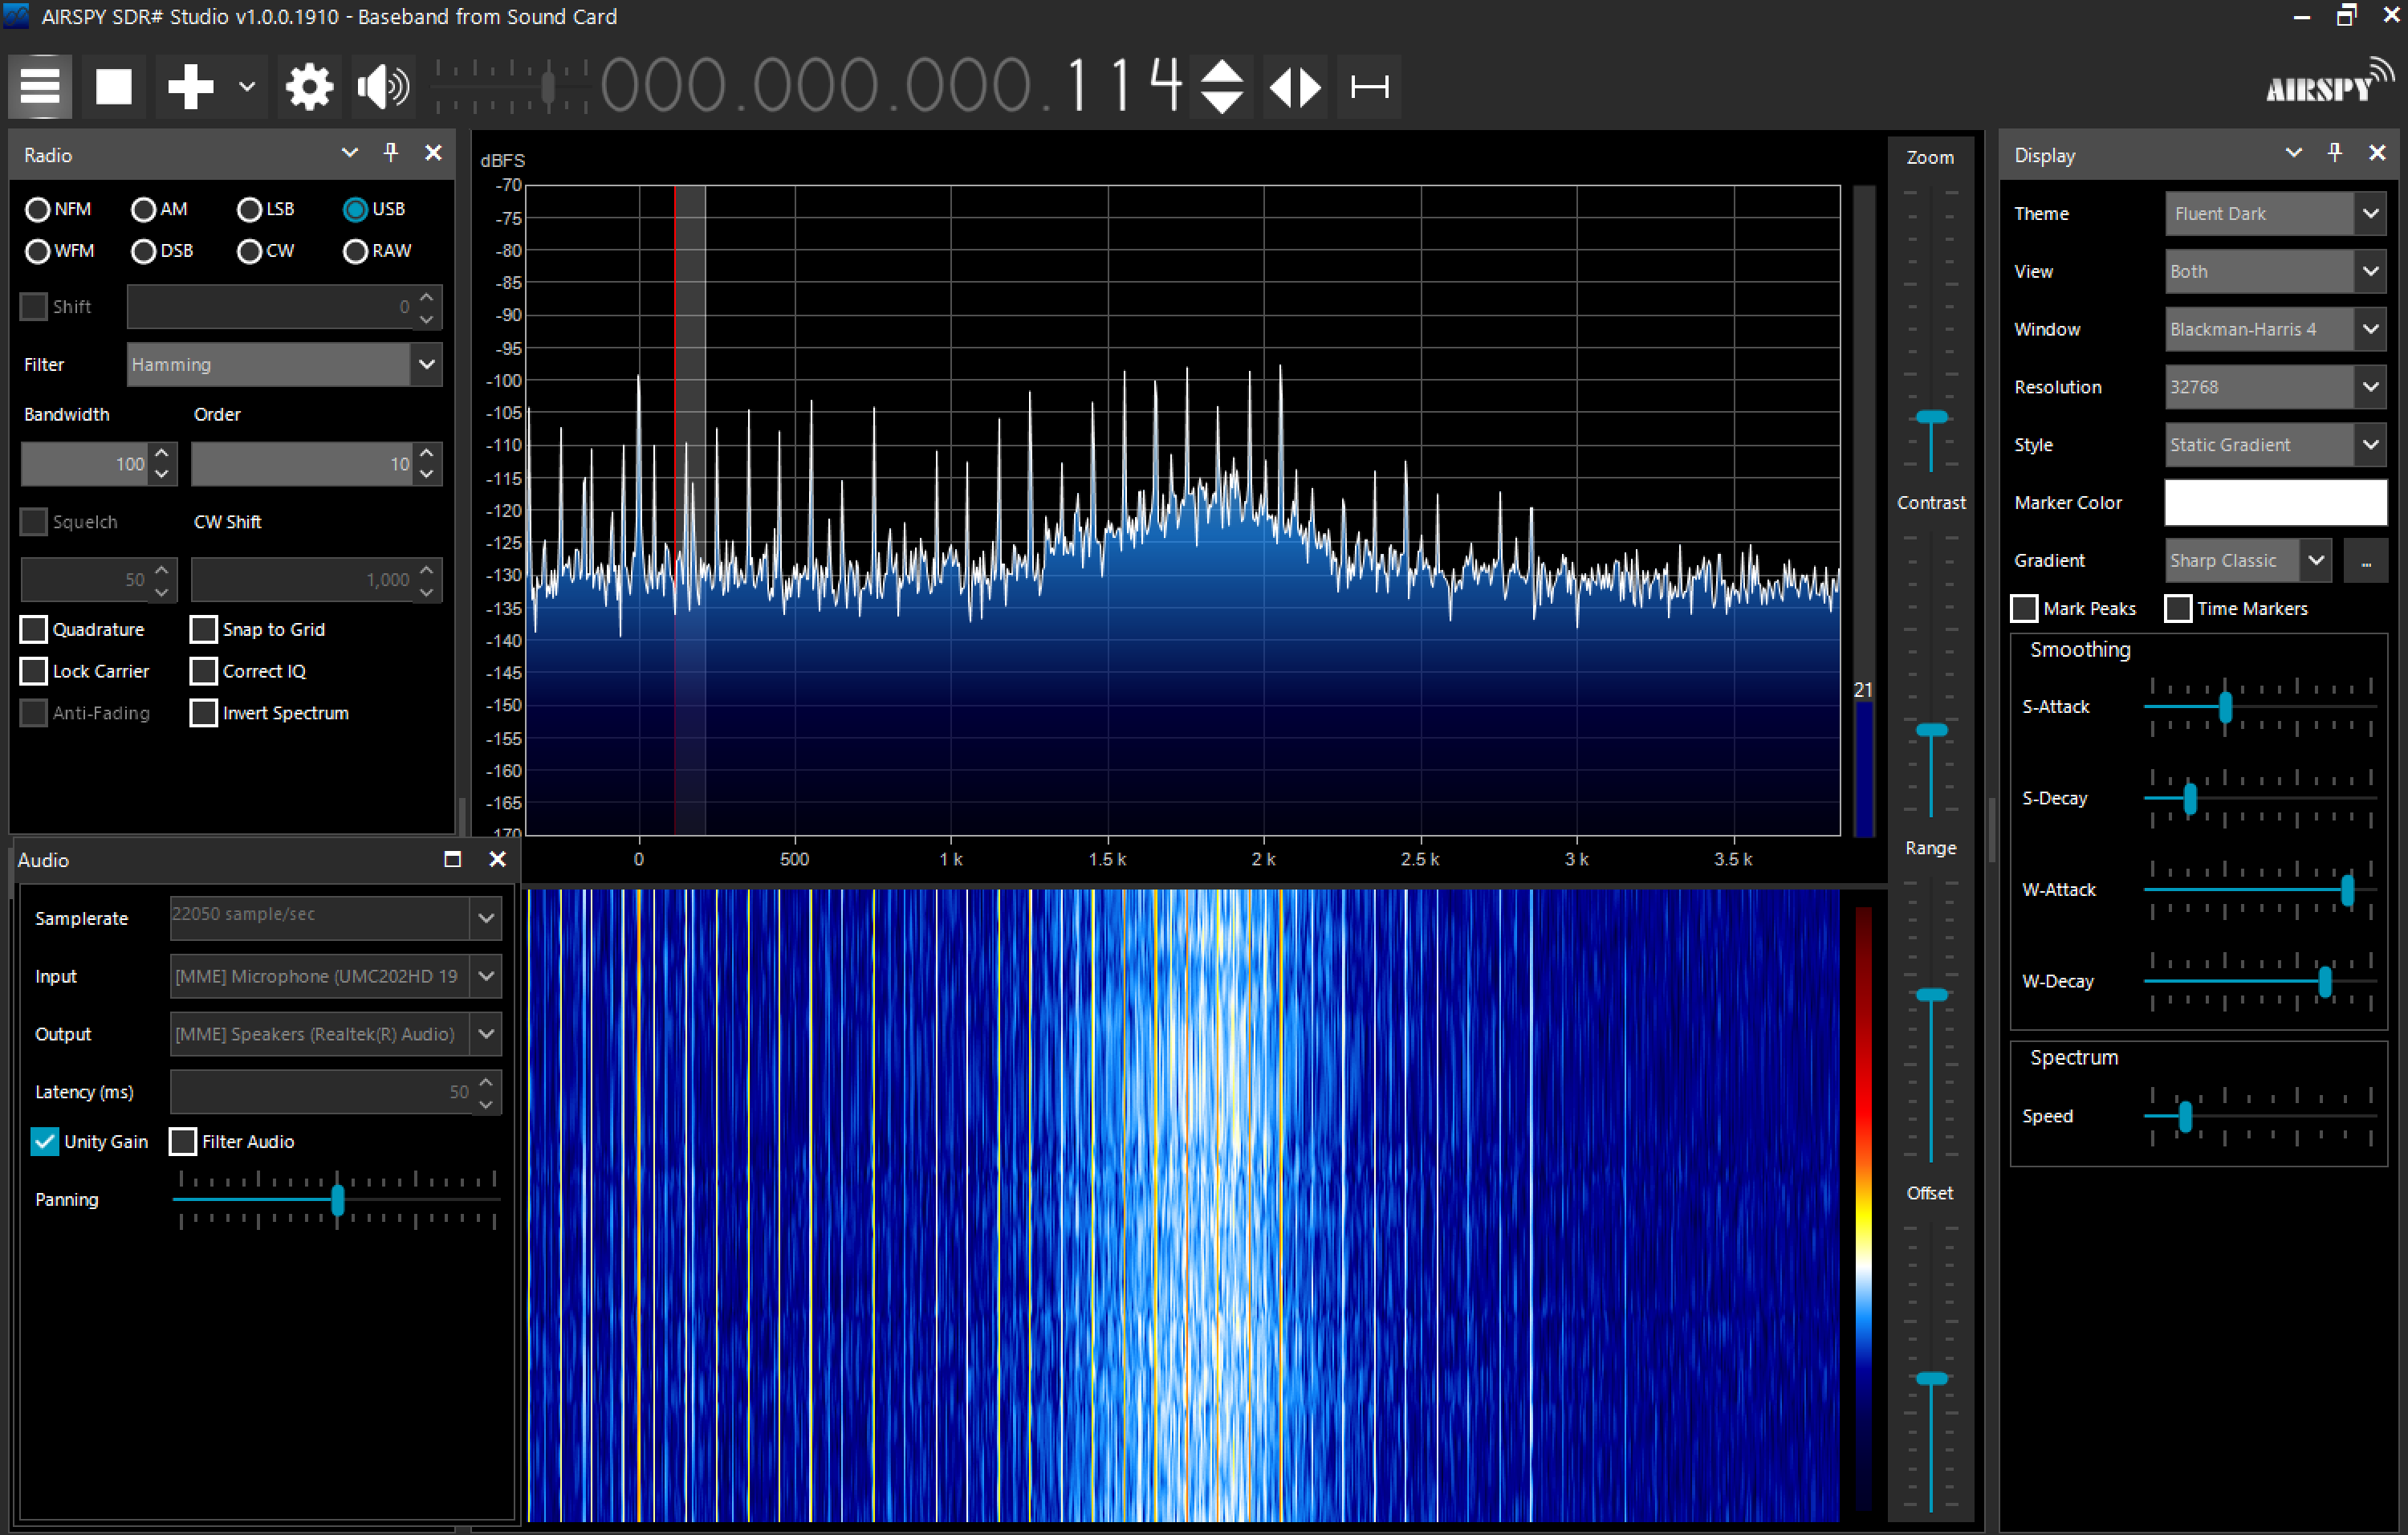
    SDR# should be set up as shown in the image below.

    Radio should be set to USB

    Source should be Baseband from Soundcard

    In the Audio settings panel, 'Input' should be from the UMC202HD

    For ios: Spectrumview by OxfordWaveResearch available on the App Store

    Running a UMC202HD from an older iPhone requires a 'Lightning to USB Camera Adapter', and an external USB battery to power the interface.

    Start by opening the Spectrumview app and initiating the spectrogram with the phone's mic as the default source. Power up the interface by plugging one end of the double-ended USB cable into a USB power source. Then, connect the other end of the USB cable to the camera adapter. The software should automatically recognize the interface and set it as the active source.

    The video below measures the noise performance of the UMC202HD and other audio interfaces of the same type:

  • 2
    Build the spool

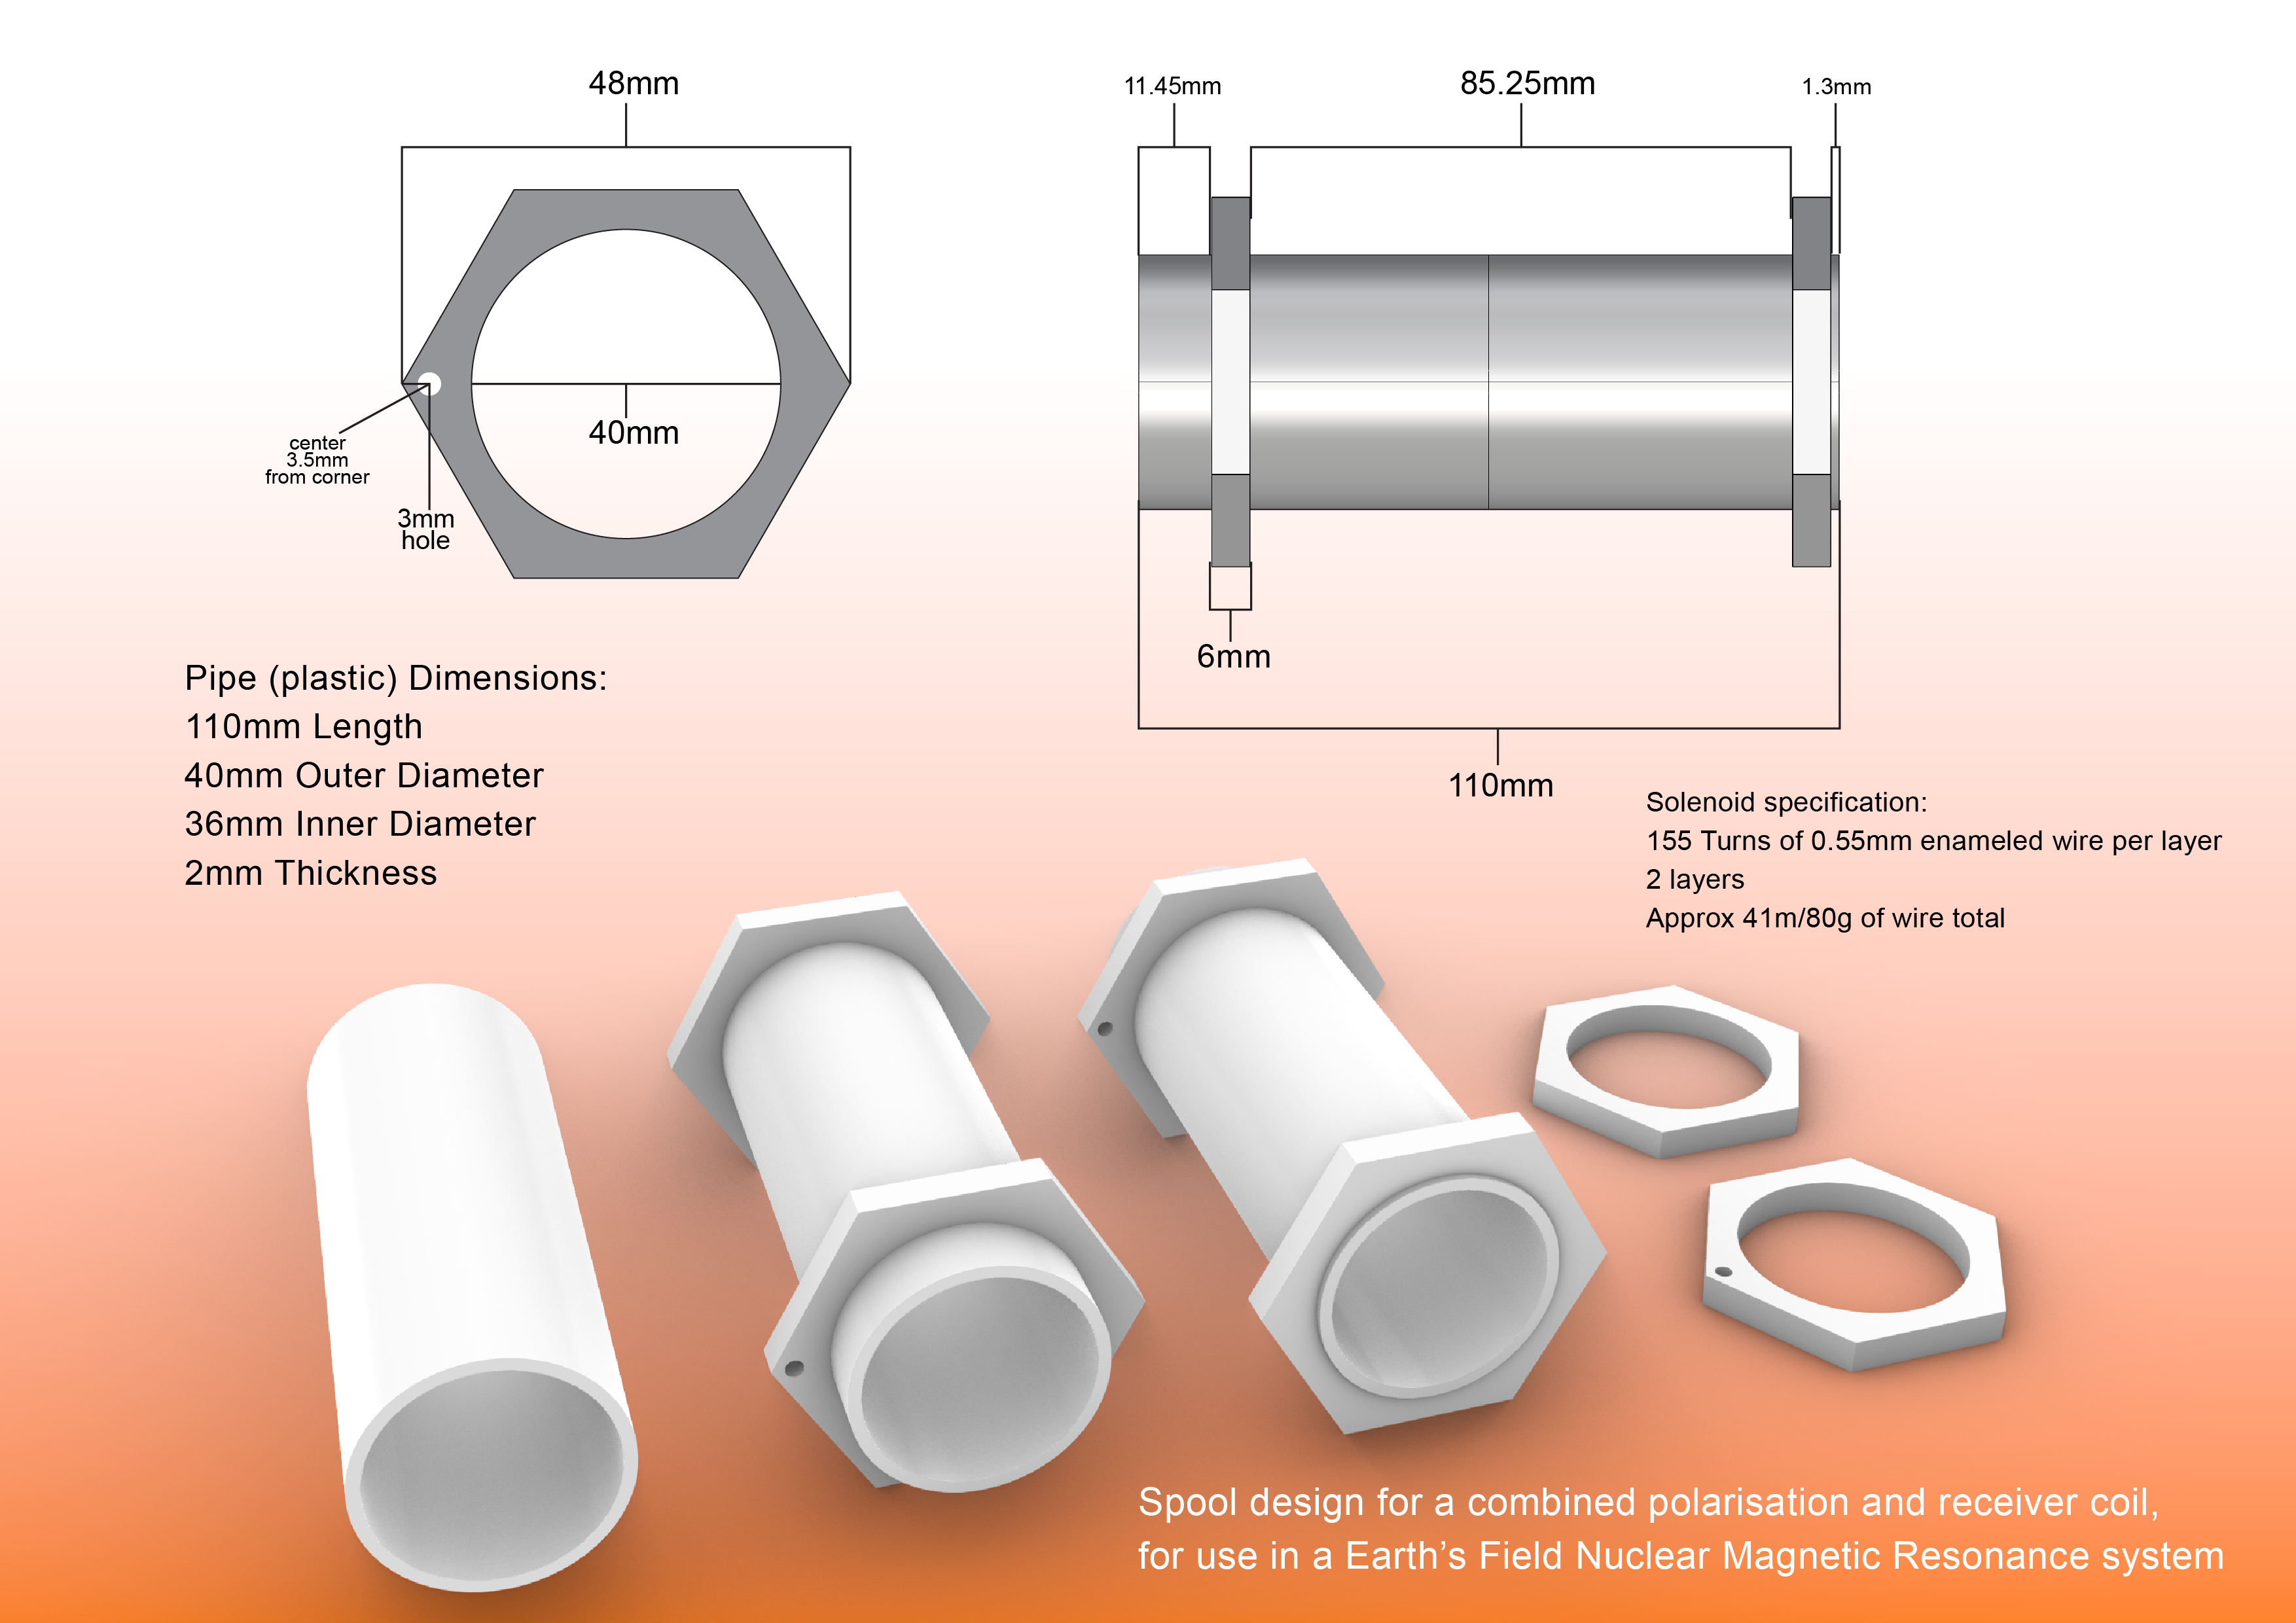
    The dimensions of the spool are not critical. Larger or smaller spools should work similarly. An exact wire length is not important. Coils with more layers might perform better. This spool was designed to be as minimal as possible, to make it easy to slot into shielding or additional solenoids. 

    The maximum sample volume is approximately 60ml. This coil can detect a signal using a water sample volume of 25ml, and it might be possible to use even smaller volumes. Although a 50ml centrifuge tube is slightly too long for the demonstrated coil, it is a good sample holder and is widely available.

    The spool in the videos used two 3mm thick pieces of ABS, laser cut and glued together to make each 6mm end piece. 

    The end pieces were glued to the tube using cyanoacrylate.

    You need:

    1 x 110mm of plastic pipe, 40mm OD, 36mm ID, 2mm wall thickness

    Some material for the end pieces

    A 3D printable STL file of the above spool is available here:

    https://cdn.hackaday.io/files/1911928179958528/EFNMR-coil-3D-printable.stl

    A pdf of the above image is available here:

    https://cdn.hackaday.io/files/1911928179958528/EFNMR-spool.pdf

  • 3
    Wind the coil and attach the XLR cable

    You need:

    24 AWG Enameled Copper Wire. At least 41 meters or 80g

    2 meter XLR microphone cable with one M connector (24AWG/0.5mm core)

    A soldering iron and some solder

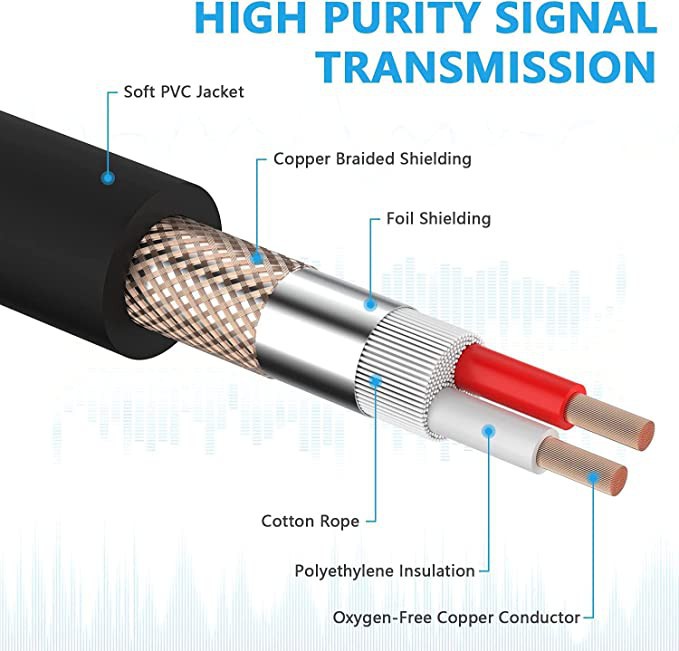
    Ensure that the XLR cable body does not contain any magnetic material. You can check this using the compass/magnetometer in a smartphone or a magnet. Any steel in the wire will disrupt the signal. You are looking for a cable with a core as pictured below, in 24AWG or larger diameter wire.  Stranded or solid core wire is acceptable.

    Winding Instructions:

    Maintaining constant tension on the winding wire and preventing the feeding spool from running freely are crucial for successfully winding a coil. The feeding spool requires some kind of tuneable friction, and the wire needs a spring or weight to maintain tension. Once this part is set up properly, rotating the spool in your hands to wind it becomes simple.

    Construction stages:

    Thread one end of the enameled wire through the inside of the hole at one end of the spool.

    Clamp this end to the section of the tube on the outside of the spool using a cable tie, removable hot glue, etc.

    Begin winding the coil in your preferred direction, clockwise or anti-clockwise.

    Apply a few drops of cyanoacrylate glue on top of the wire after a couple of turns to prevent it from running freely. If you need to pause winding for any reason, you can use cyanoacrylate to secure the wire in place and prevent a loss of tension if the coil is moved.

    Maintain moderate tension on the wire, manually pushing each new turn against the previous one as needed. The top layer should sit on top of the indents of the lower layer, so it's important that there are no gaps in the lower layer.

    The coil should be continuous like a standard solenoid. Wind all the way to the other end of the spool, move up a layer, then come back in the opposite direction. This creates a two-layer coil design.

    Once you've returned to the starting side, glue the final turns to maintain tension in the coil.

    Feed the end wire through the hole.

    Cut both ends of the enameled wire at the hole. Ideally, everything should be fixed in place by the cyanoacrylate.

    Detach the initial clamp from the spool and discard the cut wire.

    Strip the XLR wire and expose 14mm of the inner two coated wires (14mm is the distance to the spool hole).

    Clamp the end of the XLR cable to the pipe using a cable tie. Ensure the tie is tight as this will provide strain relief for the coil. Consider gluing the XLR cable to the pipe for additional strain relief.

    Feed the XLR wires through the hole.

    Remove the enamel coating from the coil wire ends.

    Finally, solder the XLR wires to the coil wires.

View all 11 instructions

Enjoy this project?

Share

Discussions

david lee wrote 03/21/2024 at 13:56 point

Hi Andy,

Nice project! Not sure if you are aware, but there is a company that makes an EFNMR spficially for teaching undergrad physics majors about the phenomenon. They specifically make instruments to be used in advanced undergraduate physics labs and have a couple of different NMR-based apparatus, including an EFNMR. Also, at the bottom of this webpage there are listed some "add'l resources" which make for interesting reading! https://www.teachspin.com/earths-field-nmr

  Are you sure? yes | no

Dan Maloney wrote 05/25/2023 at 23:20 point

Hey Andy --

Great project, and an excellent write-up. I just finished a feature on this, should publish soon. Great stuff!

  Are you sure? yes | no

Similar Projects

Does this project spark your interest?

Become a member to follow this project and never miss any updates