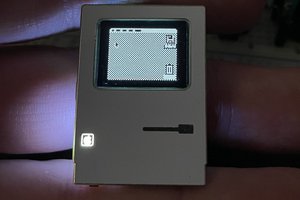
Finally, a cyberdeck for your cyberdeck.
To make the experience fit your profile, pick a username and tell us what interests you.
We found and based on your interests.
With more than three days to spare before I have to be on a plane to Pasadena, all 30 Cyberdeck SAOs have been built and flashed with the final firmware (including the four with a customized version).
I will likely do a post on the site that goes over the whole experience, but that will happen after Supercon since I'm sure there's some lessons to be learned once I start distributing these things in the wild.
All the development work is done (hardware wise, anyway), and now I'm in production mode. I've got all the parts sorted out in the order they get soldered, laser-cut jigs to hold the PCBs during different phases of construction, and a proper handheld programmer.
There's only two weeks to go before I need to be on plane to Supercon, but I'm feeling pretty good. I've even made some progress on how I'm going to pack them for the flight.
We're getting close now. The final PCB revision is in my hands, and beyond the fact that I somehow managed to mess up the export so part footprints weren't included in the back solder mask, I'm very happy with them. I've also got a proper programmer, and the firmware is close to being done.
In short, things are looking very good. The trick now is to figure out how to produce another ~28 of these things in the next two weeks at a quality level I'm happy with. This will involve creating some custom tooling and jigs, which I'll be posting about shortly.
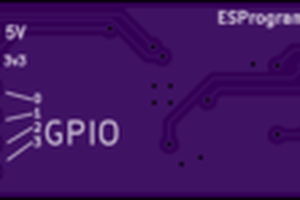
As mentioned before, I decided to put the programming interface into one of the unused (at least, for our badges) pins of the SAO connector. The idea was it would be easier and faster to just plug the SAO into its intended port after assembly, rather than hooking up to testpads or something.
Early tests were done with a suitably modified serial adapter, but looking for something a bit more robust, I eventually came up with this programmer/stand to use while working on the firmware, since it holds the SAO at a convenient angle next to my keyboard.
This worked, but was a bit fiddly as the connections were all done with jumper wire on the back. So long as it's sitting still it will probably be fine, but while assembling these things, I wanted something I could grab without worrying about ripping out a wire.
So here's the slightly more official version:
I figured if I was going to get boards made for it I might as well do it up right, so I added jumper to select between 5 and 3.3 V -- an SAO should never see 5 V, but in theory, I could program them at the higher voltage which apparently is faster. I also added some large test pads where I could clamp on leads to my meter and test the current being used by the SAO. Probably not necessary, but why not?
I used this new programmer a few times tonight, and it seems to work fine. But I do want to add a 3D printed plate on the back (which is why the screw holes are there), and potentially adapt the male USB A to something easier to use while handheld.
After a brief flirtation with using a flattened out DIP8 ATtiny85 (there should be a Hackaday post about this) that I'm calling the 1.x series, I've now got PCBs for the new 2.x version of the SAO in hand.
I'm overall very happy with these, but even still, I've already made a version 2.1 and sent that out for (final) fabrication. The main changes are a slight adjustment to the vertical position of the screen cut-out, and a solder jumper that will enable/disable the UPDI pin in the SAO header. In testing, I found that at least one badge with a 6-pin SAO header freaked out when the deck was plugged into it, so to stay on the safe side, I'm going to have a way for folks to easily disconnect the programming pin.
That said, 2.0 is good enough for distribution, and I'll be building at least a few of them. So if you're reading this post-Supercon and have one of these boards, you've got a pretty rare piece of kit. Just, you know, be careful about using it with 6-pin SAO badges...
After poking around and seeing what's out there, I've decided to go with the ATtiny3224. This will give me far more space to put in text and graphics, while also supporting the simplified single-pin programming interface. The 14 pin SOIC package is still easy enough to hand solder, though I might end up doing these on hotplate anyway.
Since I'll have the extra pins now, I might as well hook each of the LEDs up to one of them for independent PWM control. Don't know that I want to do flashing or fading, but I could at least support multiple brightness levels.
Also planning on breaking the programming pin out to the SOA header, so I don't have to come up with some kind of alternate interface to flash them. The plan is to use the 4-pin SAO header on the Supercon 2023 badge, so there's no chance of a conflict there, but I'm thinking it might be prudent to add a solder bridge flash enable just so the programming pin can be disconnected should it interfere with 6-pin SAO badges.
So why didn't anyone tell me that the SOIC-8 version of the ATtiny85 was so hard to come by? Most places have it on backorder until 2024, and even if you can find it, it's way more expensive than I anticipated. If this was a one-off thing I wouldn't mind (or at least, not as much), but $1.50+ a chip hurts when you're looking at putting together 20 to 30 units.
I briefly toyed with the idea of bending the pins on the DIP8 version of the ATtiny85 so I could surface mount it -- in fact I'll probably get some boards ordered for that just to see how it works. But have my doubts about that being viable option for anything other than prototypes.
So now I'm researching modern AVRs, which are not only more capable, but that I can actually get my hands on before Supercon. Clock ticking, gotta make a decision soon...
In the most basic form, the hardware is going to be the ATtiny, a button, a debounce circuit, and the OLED. I could even leave the button off, but I figure it will be worth the few extra cents per unit to be able to flip between a few different modes.
As a test, I've loaded Neuromancer up on a chip, and let it scroll through. Well, not all of it, of course. An ATiny85 has 8 kB of flash, so even if I don't put a bootloader on the chip, there's no way even the first chapter will fit. Still, it ends up being enough for the display to scroll it for awhile, so it looks pretty cool.
Behind the scenes, I wrote up a Python script which takes the text from the book and breaks it down into strings that are a maximum of 22 characters long. It then takes those strings and creates a PROGMEM array out of them, and finally generates a .h file I can load into the firmware project. I've added a variable that lets me configure how many lines of text it will churn through, so if I end up needing to shave off a few bytes, I can drop a couple lines off without having to reinvent the wheel each time.
There's no LEDs because I'm thinking in the name of simplicity I'll just tie those right to the power pins of the SAO header and have them be static. Don't have enough pins to control them individually, and while I could add a transistor to let me control all four of them with a single pin, I'm not sure it's worth it yet.
Poked around with the design a bit more. Slimmed out the overall "deck" by dropping a row of keys (all the cool cyberdecks have reduced keyboards anyway), and started looking at a way to add some LEDs to make it a bit more visually interesting.
Wasn't sure what the LEDs would look like at first, but my wife suggested to try and recreate the look of the lighted square buttons on the face of my first cyberdeck project, the reComputer 1000. To really make things difficult for myself (remember that diving in the deep end bit from last post?), I decided to use this as an excuse to experiment with putting reverse-mounted LEDs on the back of the board so the substrate acts as a diffuser. It's a common enough trick in the Badgelife world, but not something I've ever attempted personally. Should be interesting.
This updated render is pretty close to what I think the final hardware will look like. Maybe.
Thanks to the SAO Wall, there's always an incredible array of badge add-ons to check out at Supercon. Things have only improved since we started putting an SAO header on the badge in 2019.
I end up going home with several SAOs every year, some of which were created by the community specifically for Hackaday staff (thanks, BTW). But I always feel bad that I never have one of my own to give back in trade. So this year, I've decided to do something about it.
Since I've never made an SAO before, the wise thing would be to start small. But where's the fun in that? I'm going to start on the deep end, and risk a proper drowning. I went back and forth between a few different ideas, but I think it's only fitting that my first SAO is based on something that's really inspired me over the last couple of years: the cyberdeck.
Messing around in OpenSCAD, I've come up with a basic cyberdeck shape that's scaled around the common 0.91 inch 128x32 SSD1306 OLED display. My idea is drive the display with an ATtiny85, and have it show random cyberpunk things. Really like the idea of scrolling the first chapter of Gibson's Neuromancer, but I know the storage on the 85 is going to be limiting in that regard.
Create an account to leave a comment. Already have an account? Log In.
No formal BOM, but the button is a Würth 434331045822 (DigiKey PN: 732-7055-2-ND) which are nice, but way too expensive from domestic suppliers -- I paid ~50 cents each for them.
I've since asked around, and was recommended the Panasonic EVQ-P7J01P. Those are around 25 cents from DigiKey, and I've seen them as low as 14 cents from overseas suppliers. But I haven't personally tried one to see how it feels (I did really like the click of the Würth).
OGM! Tom, you only made 30 of these? I am so lucky to be a recipient of one of them. Once I returned home I showed everyone. My all time favorite SAO. Thanks. Peace...out
These came out great Tom! Thanks for sharing one of them with me at Supercon.
Become a member to follow this project and never miss any updates

 Jacob Creedon
 morgan
 Tom Nardi
 Aaron
Aaron
Tom, this SAO continues to live amongst my favorites. I'm also honored to have received one. Is there any BOM info you can link me to? In particular, the side-mount button P/N? Asking for a friend...