-
1Pressure sensor
First we begin with a weight sensor. ( A little advice: check that everything is functional because in our case we had to weld cables back in place). In order to build a scale using this weight sensor you need two plaques (ours is made out of thin wood but plexiglass works too) as well as small separators (so that the plaque does not directly touch the weight sensor) and you need to screw a plaque to each side of the weight sensor (be careful when screwing the plaques to make sure you screw both plaques opposite each other )
You have to then wire the weight sensor to an arduino card, in our case the best one is a leonardo arduino card (you can also test out different wirings with the Tinkercard website).
![]()
You can then test you’re component and it’s sensibility levels using the following code:
#include <Keyboard.h>
const int weightSensorPin = A0; // Replace with your actual pin for the weight sensor
const int thresholdHeavy = 600000; // Adjust this threshold based on your specific sensor and requirements
const int thresholdMedium = 570000;
const int thresholdLight = 200;void setup() {
Serial.begin(9600);
Keyboard.begin();
}void loop() {
int sensorValue = analogRead(weightSensorPin);if (sensorValue > thresholdHeavy) {
// Heavy weight detected, simulate pressing the up arrow key for a long time
Keyboard.press(KEY_UP_ARROW);
delay(5000); // Adjust delay as needed
Keyboard.release(KEY_UP_ARROW);
} else if (sensorValue > thresholdMedium) {
// Medium weight detected, no keypress
} else if (sensorValue > thresholdLight) {
// Weight between medium and light, simulate pressing the up arrow key for a shorter time
Keyboard.press(KEY_UP_ARROW);
delay(2000); // Adjust delay as needed
Keyboard.release(KEY_UP_ARROW);
} else {
// Light weight detected, simulate pressing the down arrow key
Keyboard.press(KEY_DOWN_ARROW);
delay(2000); // Adjust delay as needed
Keyboard.release(KEY_DOWN_ARROW);
}// Add any additional logic or conditions as needed
delay(500); // Adjust delay based on your requirements
}You can see that you also link your code to your keyboard.
-
2Motion sensor
Concerning the motion sensors, you just have to wire it to the arduino (same as before) and thanks to the code you’ll be able to transform it into data. 1 if something passes in front of the sensor and 0 if there’s nothing in front of the sensor. Then we'll translate it in order to make our car going right or left. In addition to the motion sensor you can add a buzzer that will make noise when you activate the motion sensor.
![]()
Here we have the final version the code where you can see how to make those sensors work.
#include <Keyboard.h>
#include "HX711.h"const int weightSensorPin = A0; // Replace with your actual pin for the weight sensor
const int thresholdHeavy = 600000; // Adjust this threshold based on your specific sensor and requirements
const int thresholdMedium = 570000;
const int thresholdLight = 200;const int DOUT_PIN = 2;
const int SCK_PIN = 3;void setup() {
Serial.begin(9600);
Keyboard.begin();
pinMode(7,INPUT); //left
pinMode(8,INPUT); //right
pinMode(6,OUTPUT); //buzzer
int l=0;
int r=0;
}
}void loop() {
int sensorValue = analogRead(weightSensorPin);
int l=0;
int r=0;if(digitalRead(7)==0){
Keyboard.press(KEY_LEFT_ARROW);
delay(100);
Keyboard.release(KEY_LEFT_ARROW);
tone(6, 10000, 500); //buzzer ring}
if(digitalRead(8)==0){
Keyboard.press(KEY_RIGHT_ARROW);
delay(100);
Keyboard.release(KEY_RIGHT_ARROW);
tone(6, 10000, 500); //buzzer ring
}
else{
l=0;
r=0;
Serial.println(l);
Serial.println(r);
}if (sensorValue > thresholdHeavy) {
// Heavy weight detected, simulate pressing the up arrow key for a long time
Keyboard.press(KEY_UP_ARROW);
delay(100); // Adjust delay as needed
Keyboard.release(KEY_UP_ARROW);
}
else if (sensorValue > thresholdMedium) {
Keyboard.press(KEY_UP_ARROW); // Medium weight detected
delay(500); // Adjust delay as needed
Keyboard.release(KEY_UP_ARROW);
}
else if (sensorValue > thresholdLight) {
// Weight between medium and light, no key pressed
}
else {
// Light weight detected, simulate pressing the down arrow key
Keyboard.press(KEY_DOWN_ARROW);
delay(100); // Adjust delay as needed
Keyboard.release(KEY_DOWN_ARROW);
}delay(100); // Adjust delay based on your requirements
} -
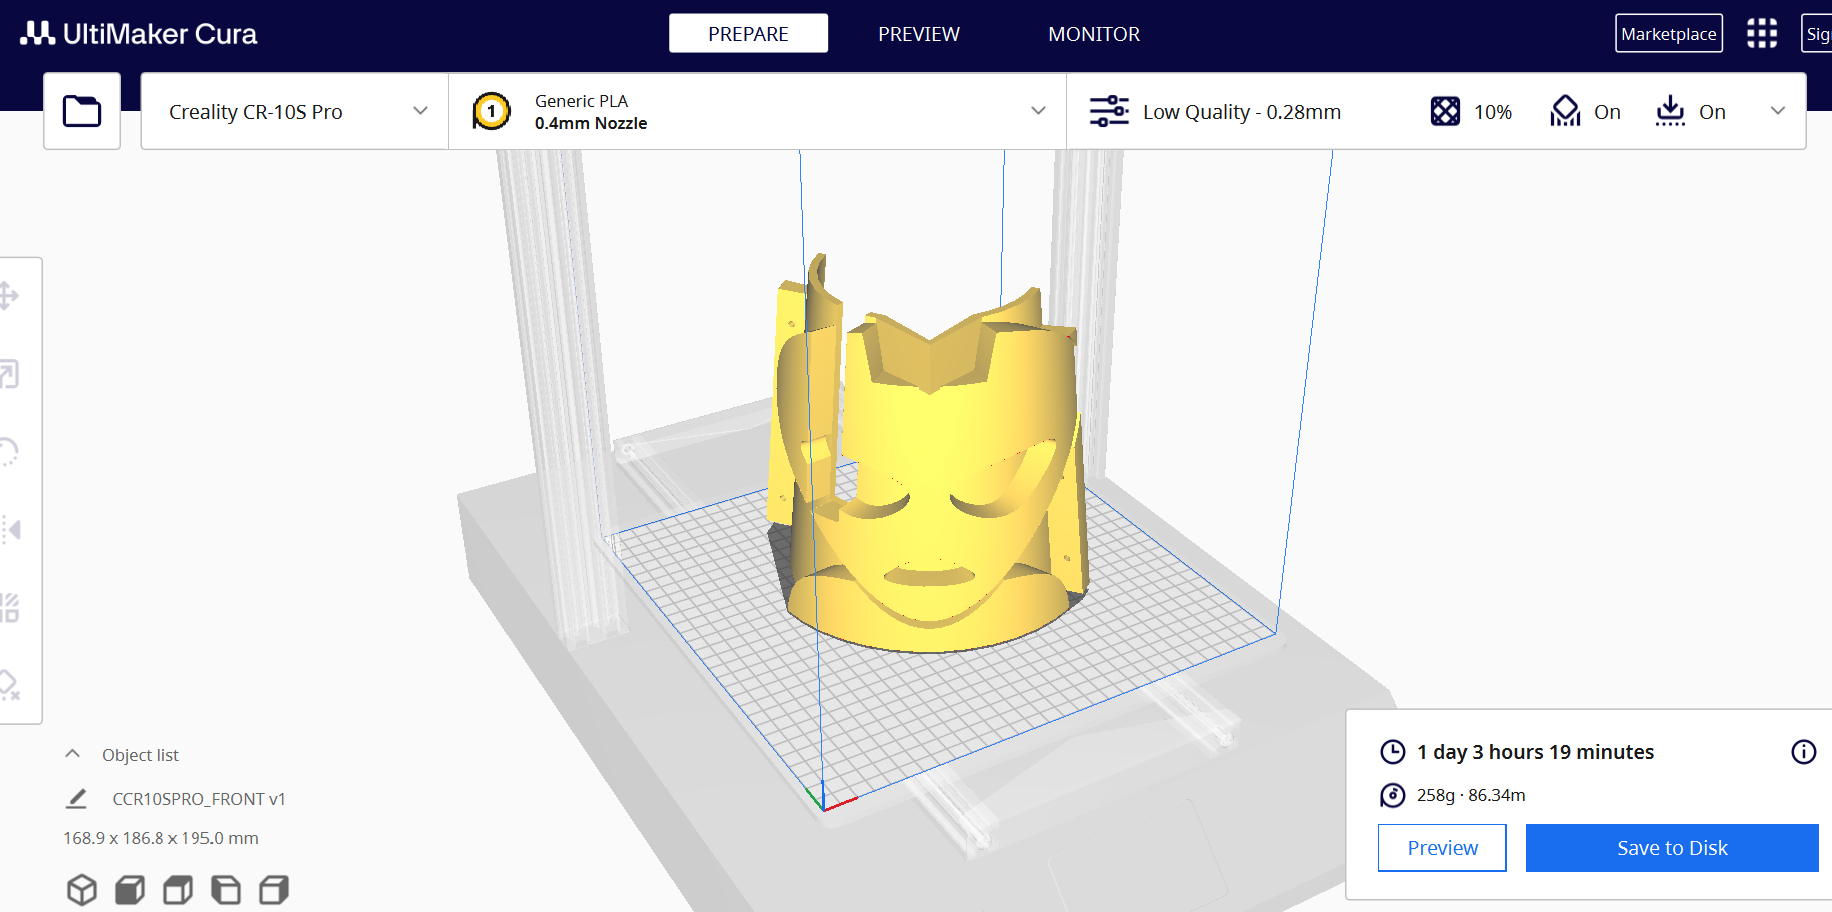
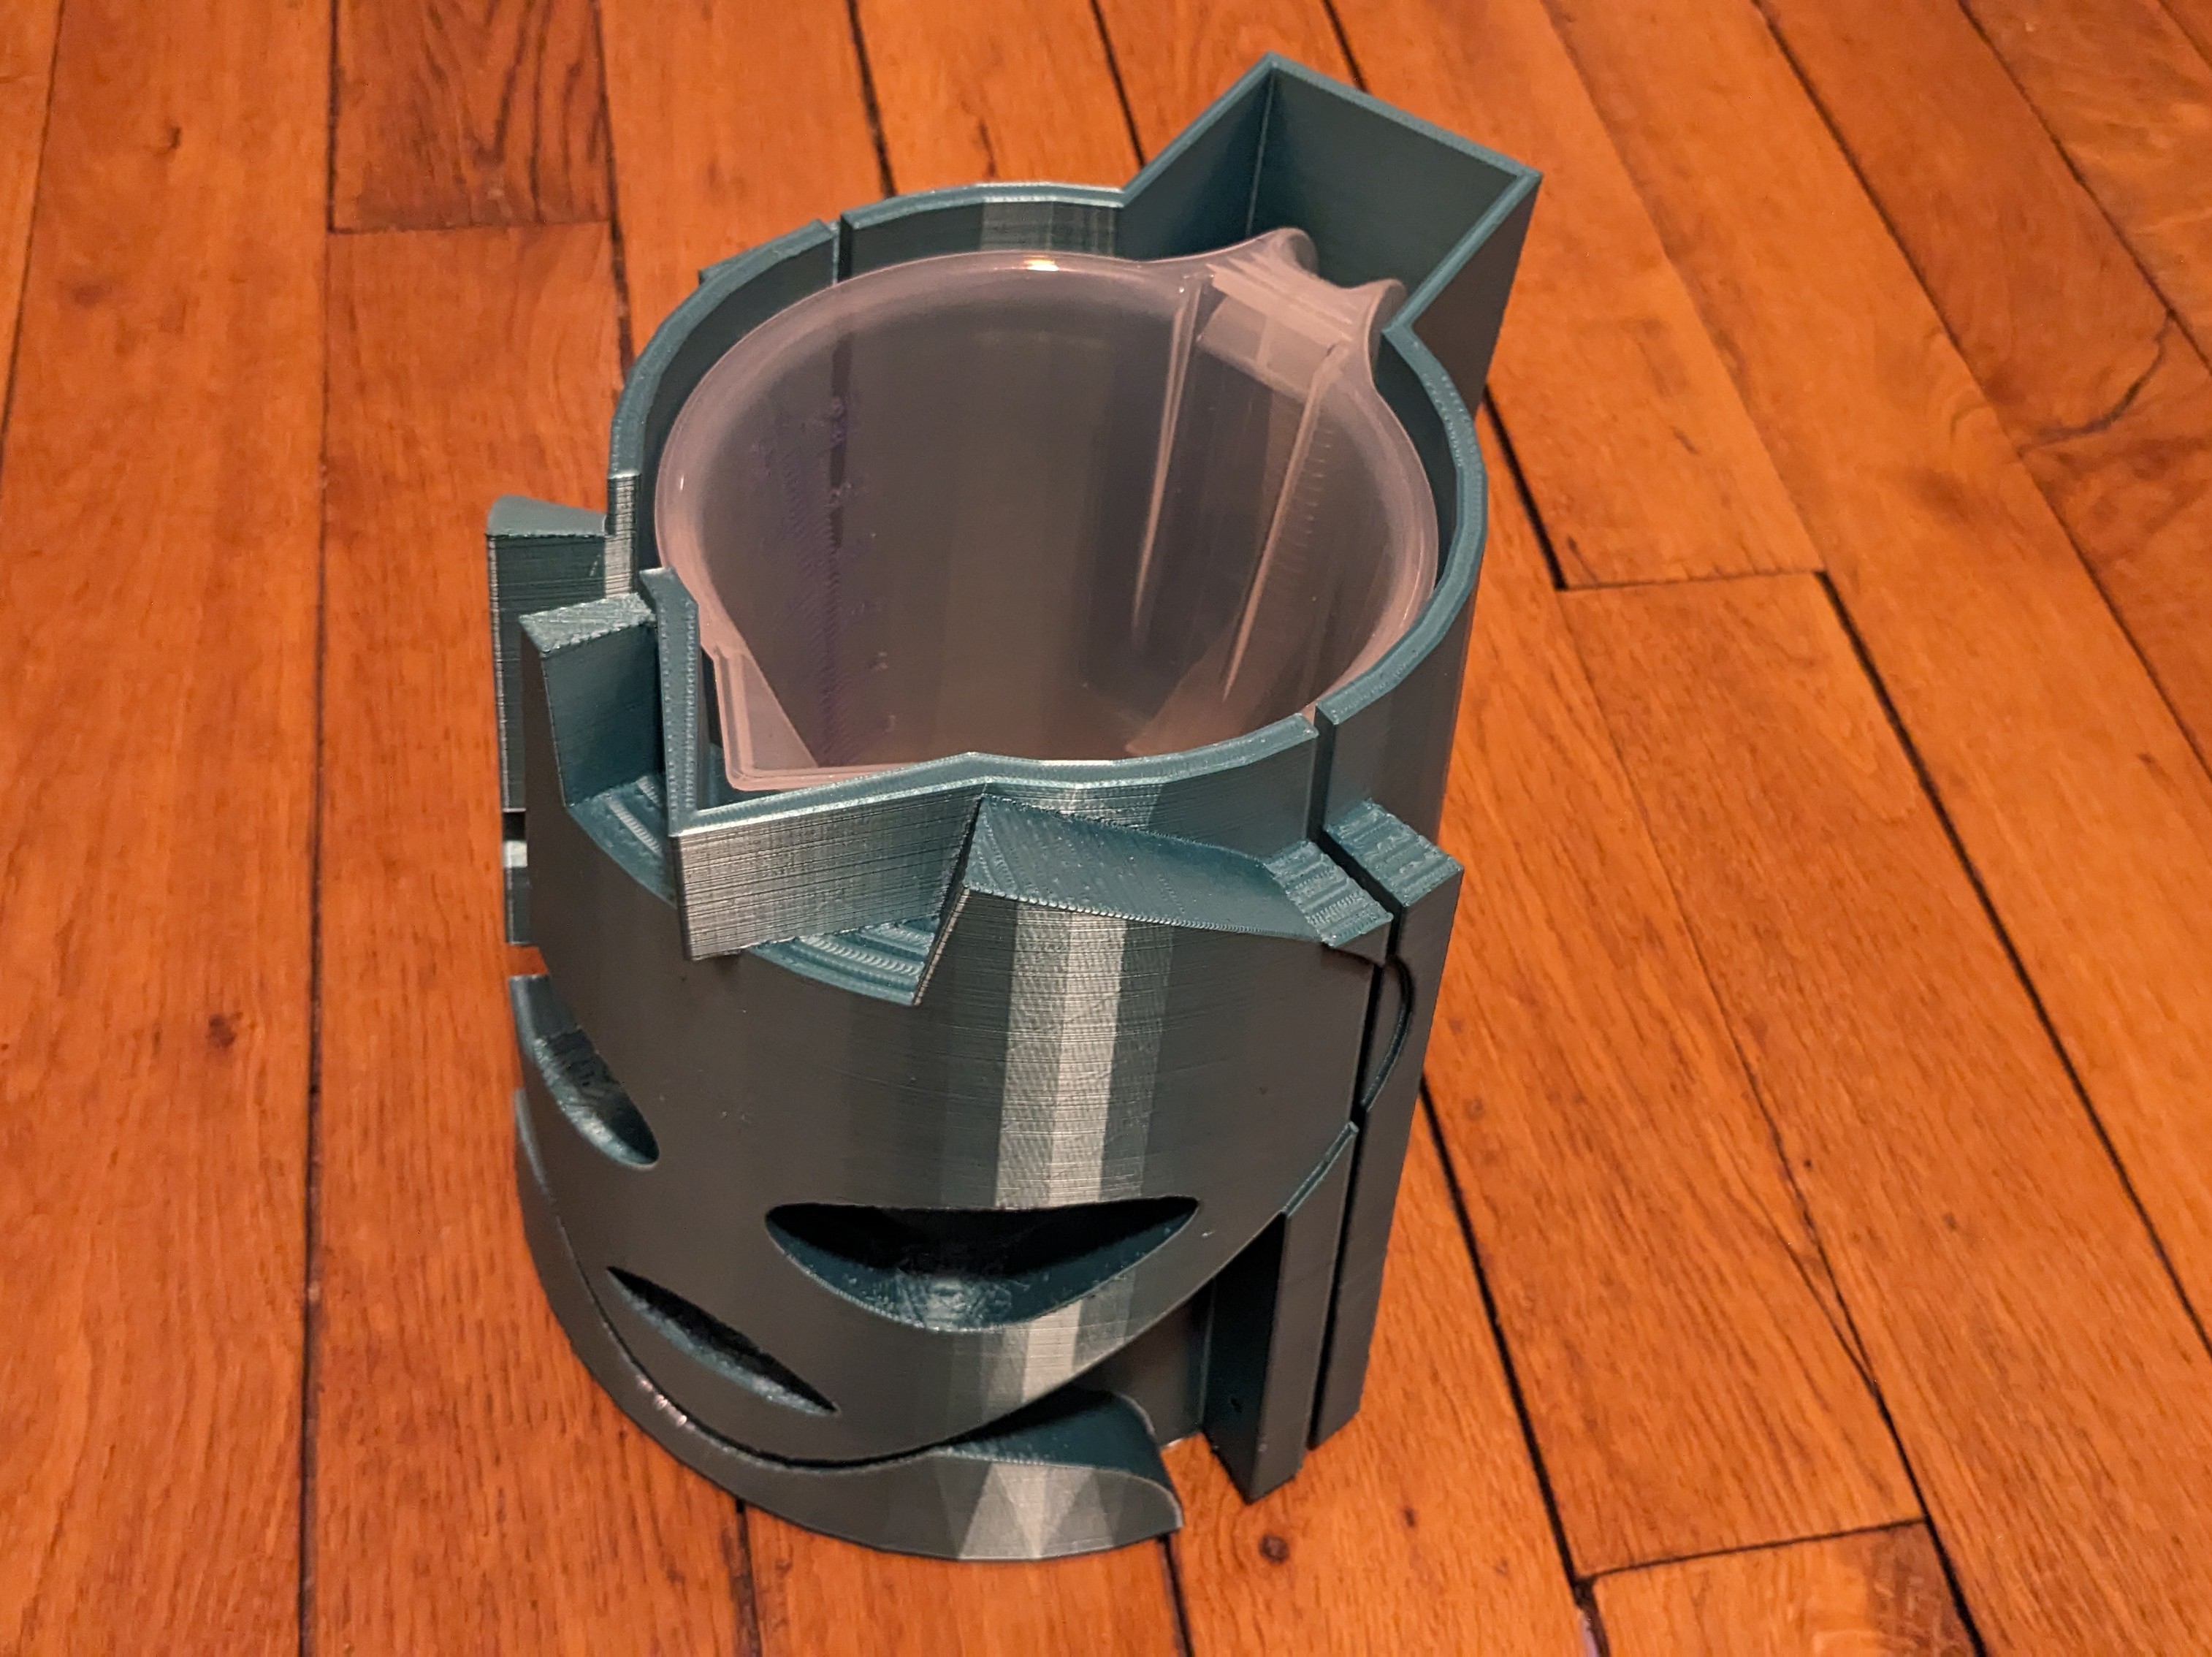
3Aesthetic part
In order to make our project more aesthetic and to hide the different cables, we decided to use a 3D printer to cover the different component of the motion sensor. To do so we used fusion 360 to modelized our cover.
![]()
![]()
Then concerning the motion sensors we decided to make to boxes to put the sensor a little bit higher so it would be easier to pass our hand in front of it. To do so we used a laser cutter.
![]()
Sky rider game controller
Interactive game controller for the Sky riders online game


Discussions
Become a Hackaday.io Member
Create an account to leave a comment. Already have an account? Log In.