Close
0%
0%

TAST-E, the robot with a sense of taste and smell

An animatronic robot head with an artificial tongue and nose

Similar projects worth following
The sense of smell and taste is essential for human survival. So why shouldn't robotics focus on them? After all, humanoid robotics is about recreating humans in as much detail as possible.

1. Animatronic robot head

10 servos provide different facial expressions, associated with taste and smell. 3D printed parts were completely dispensed with. The head consists of cut plastic plates, aluminum brackets, and two aluminum discs, whereby the upper one is guided by four mini furniture rollers to absorb the shear forces that would otherwise be transmitted entirely on the shaft of the pan servo.
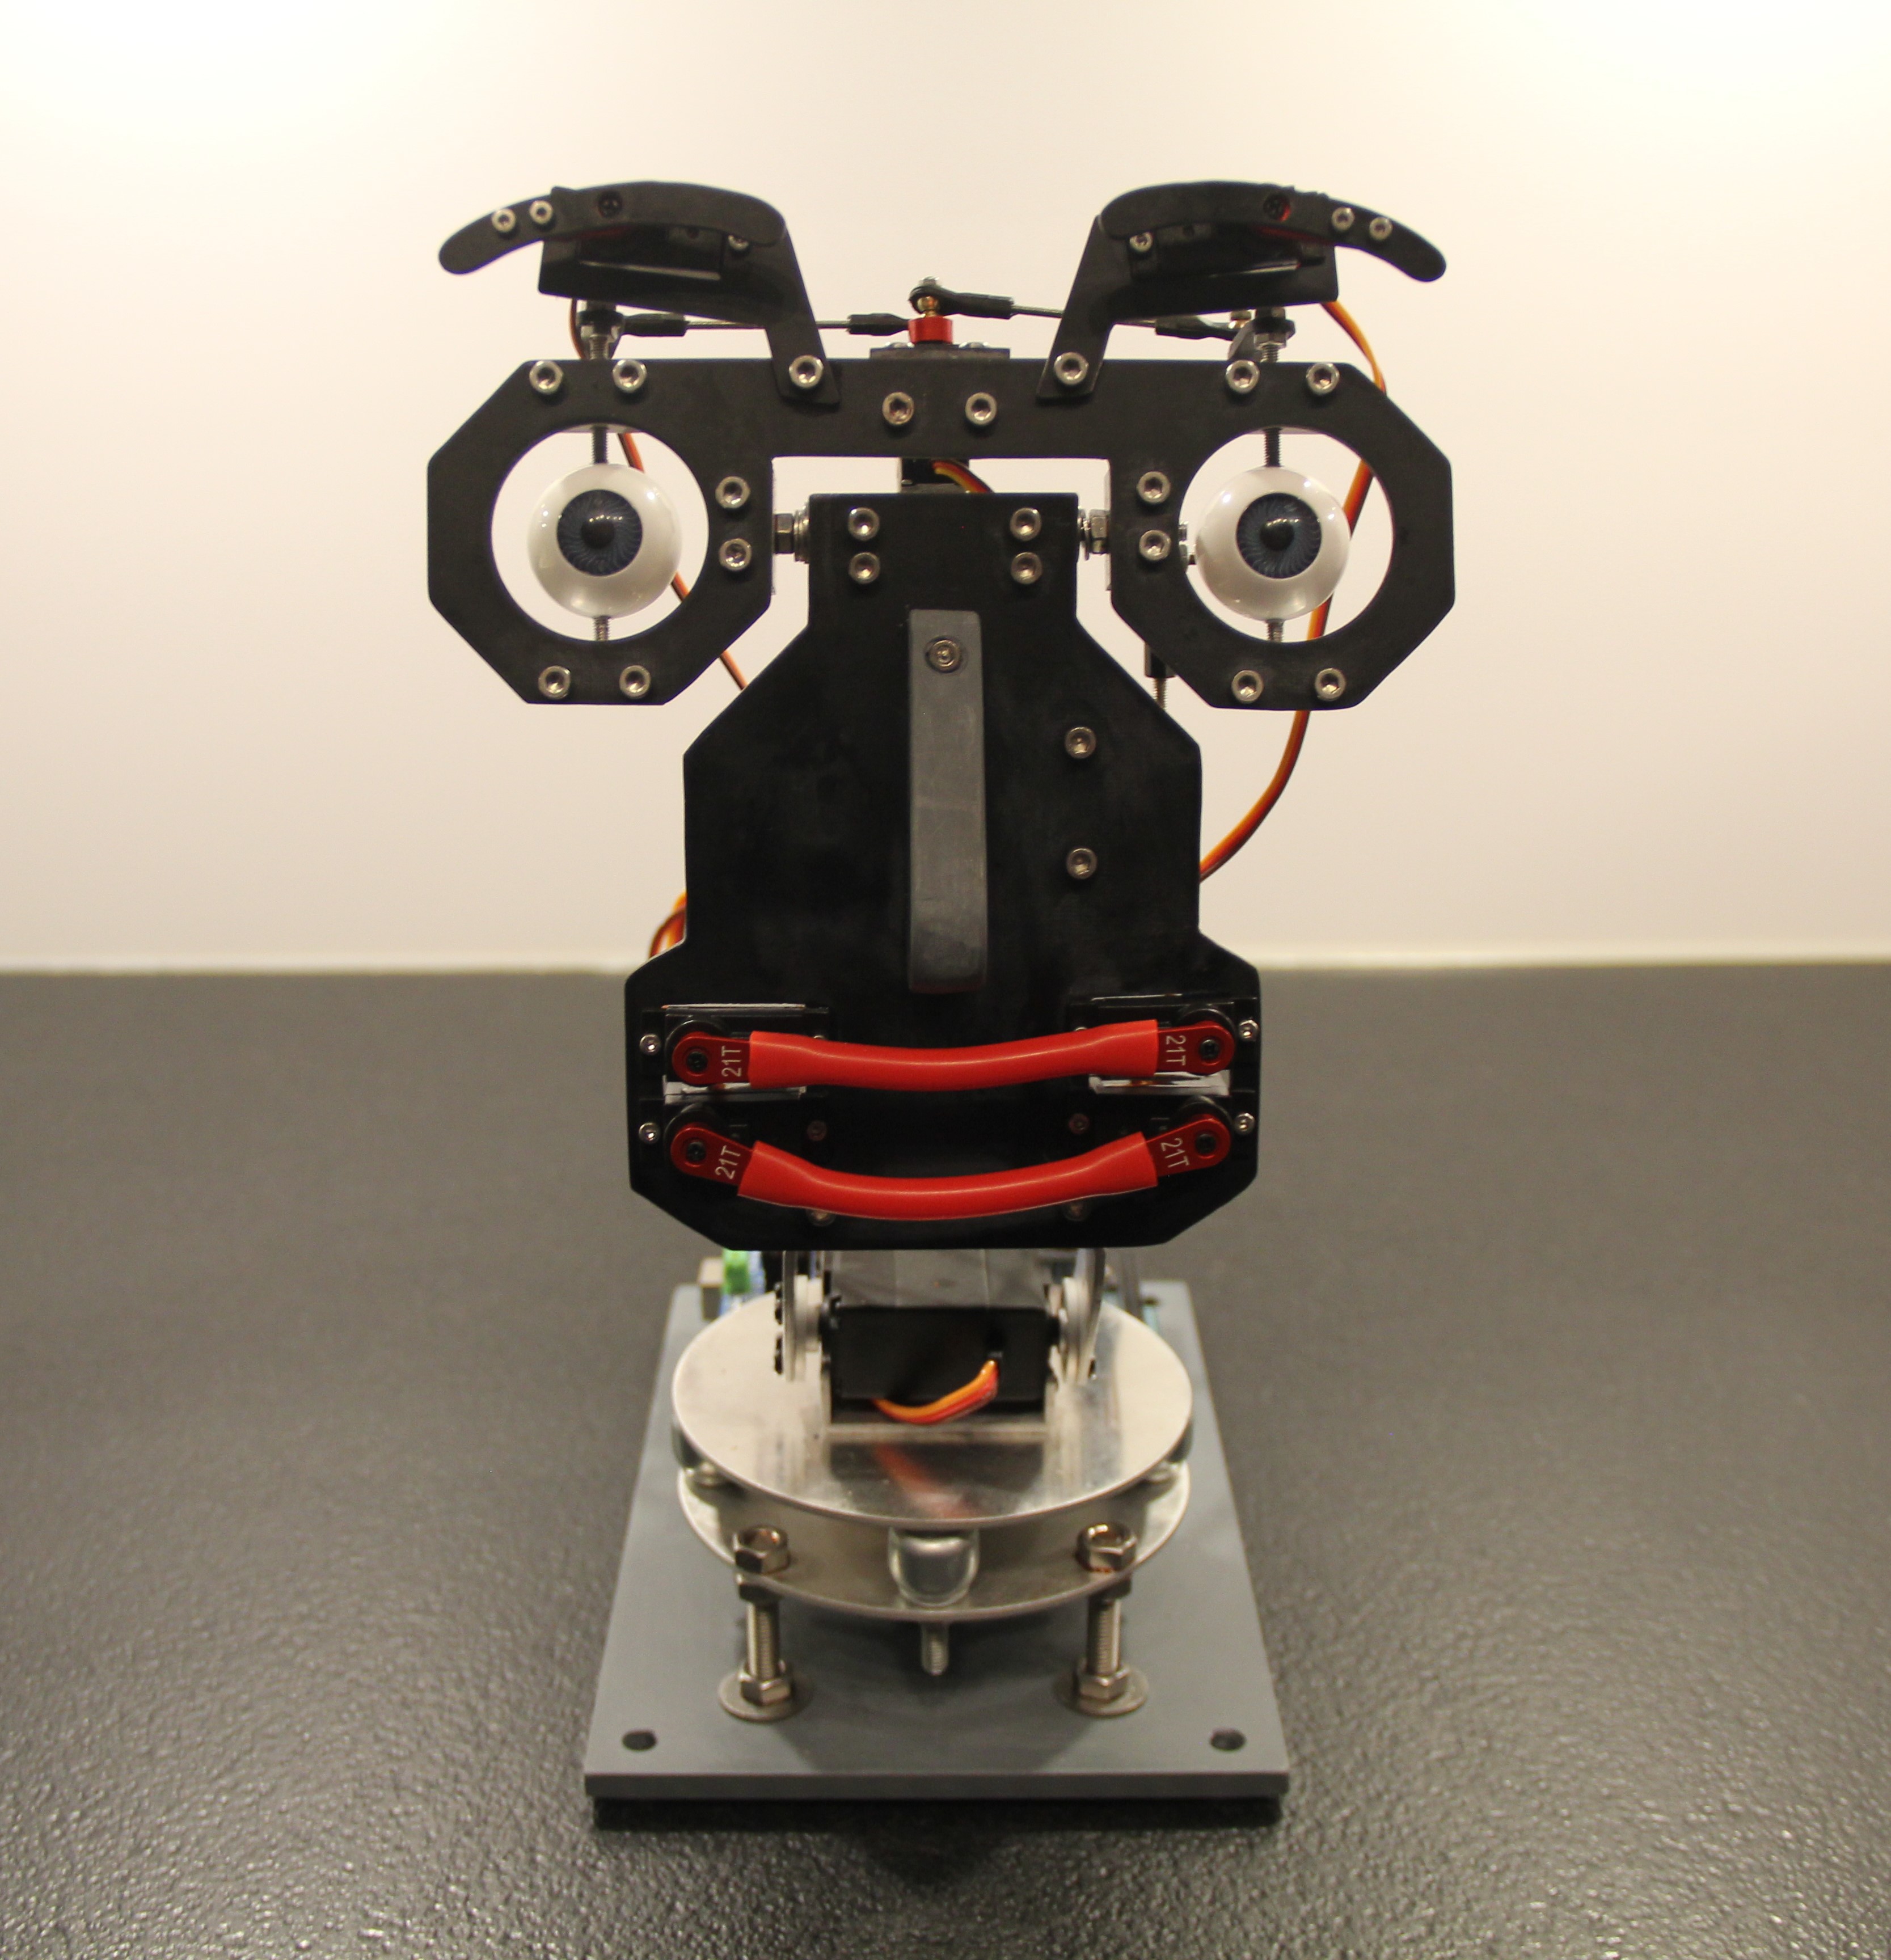
Fig. 1.1
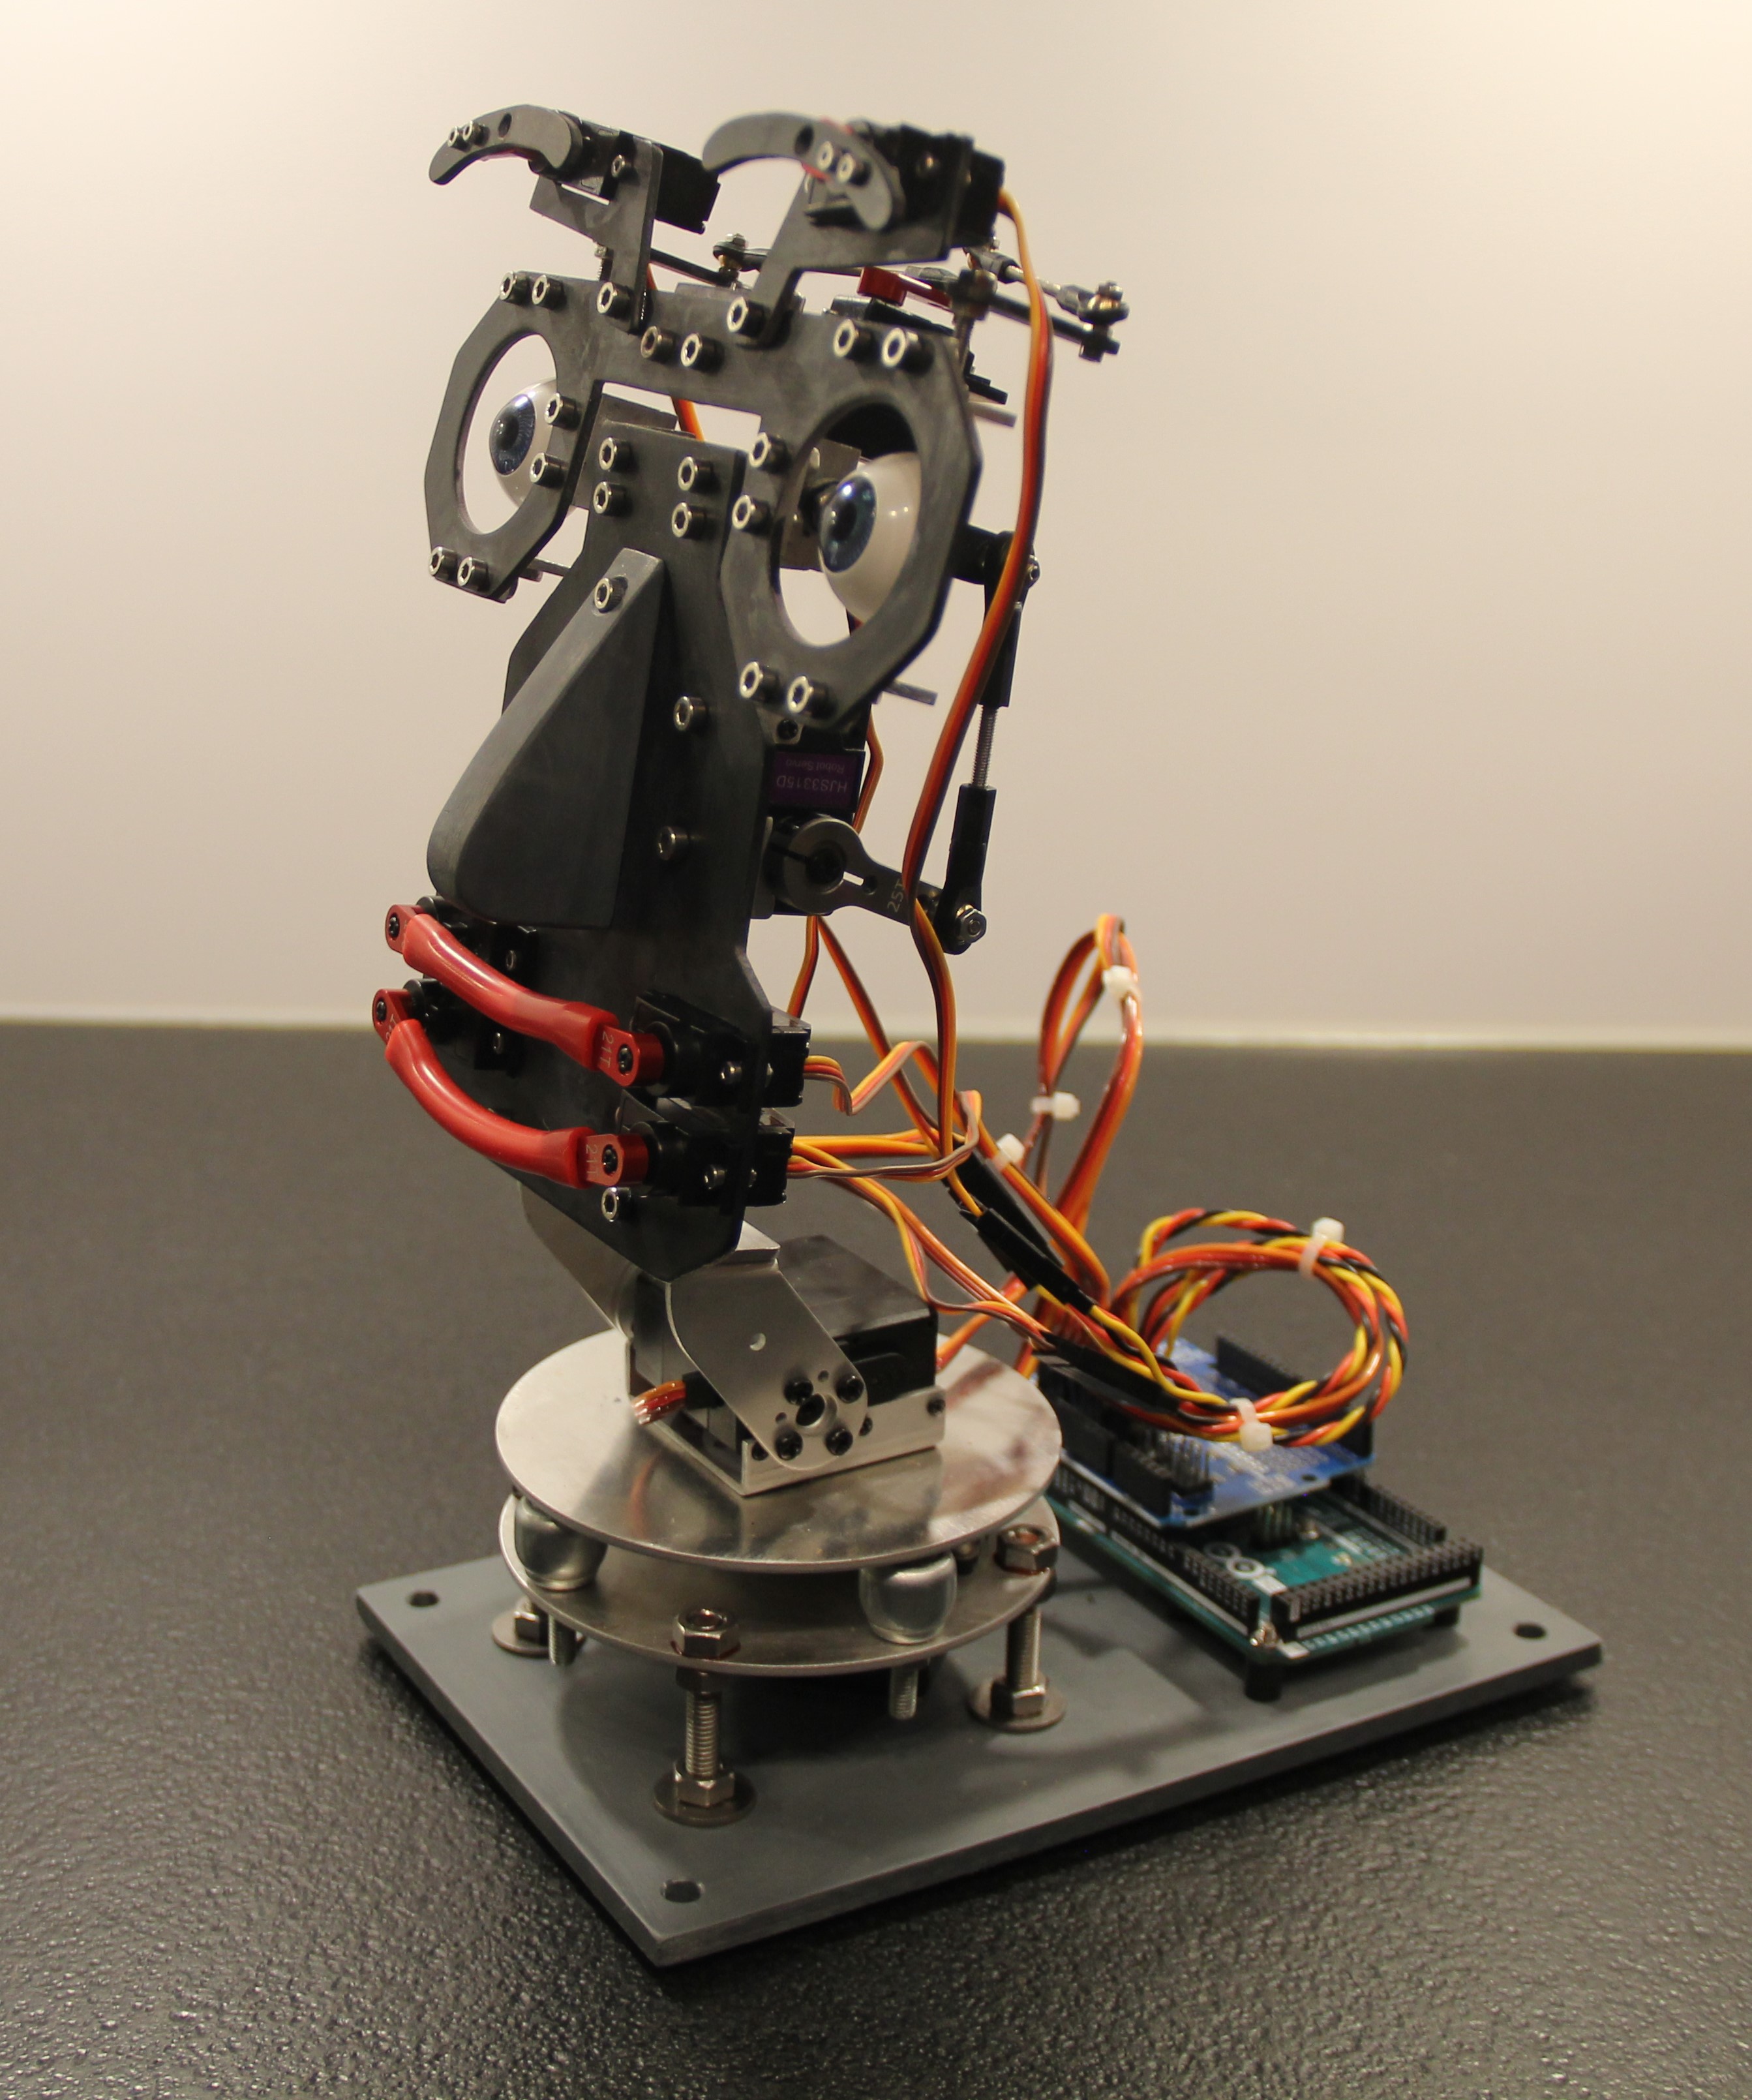
Fig. 1.2
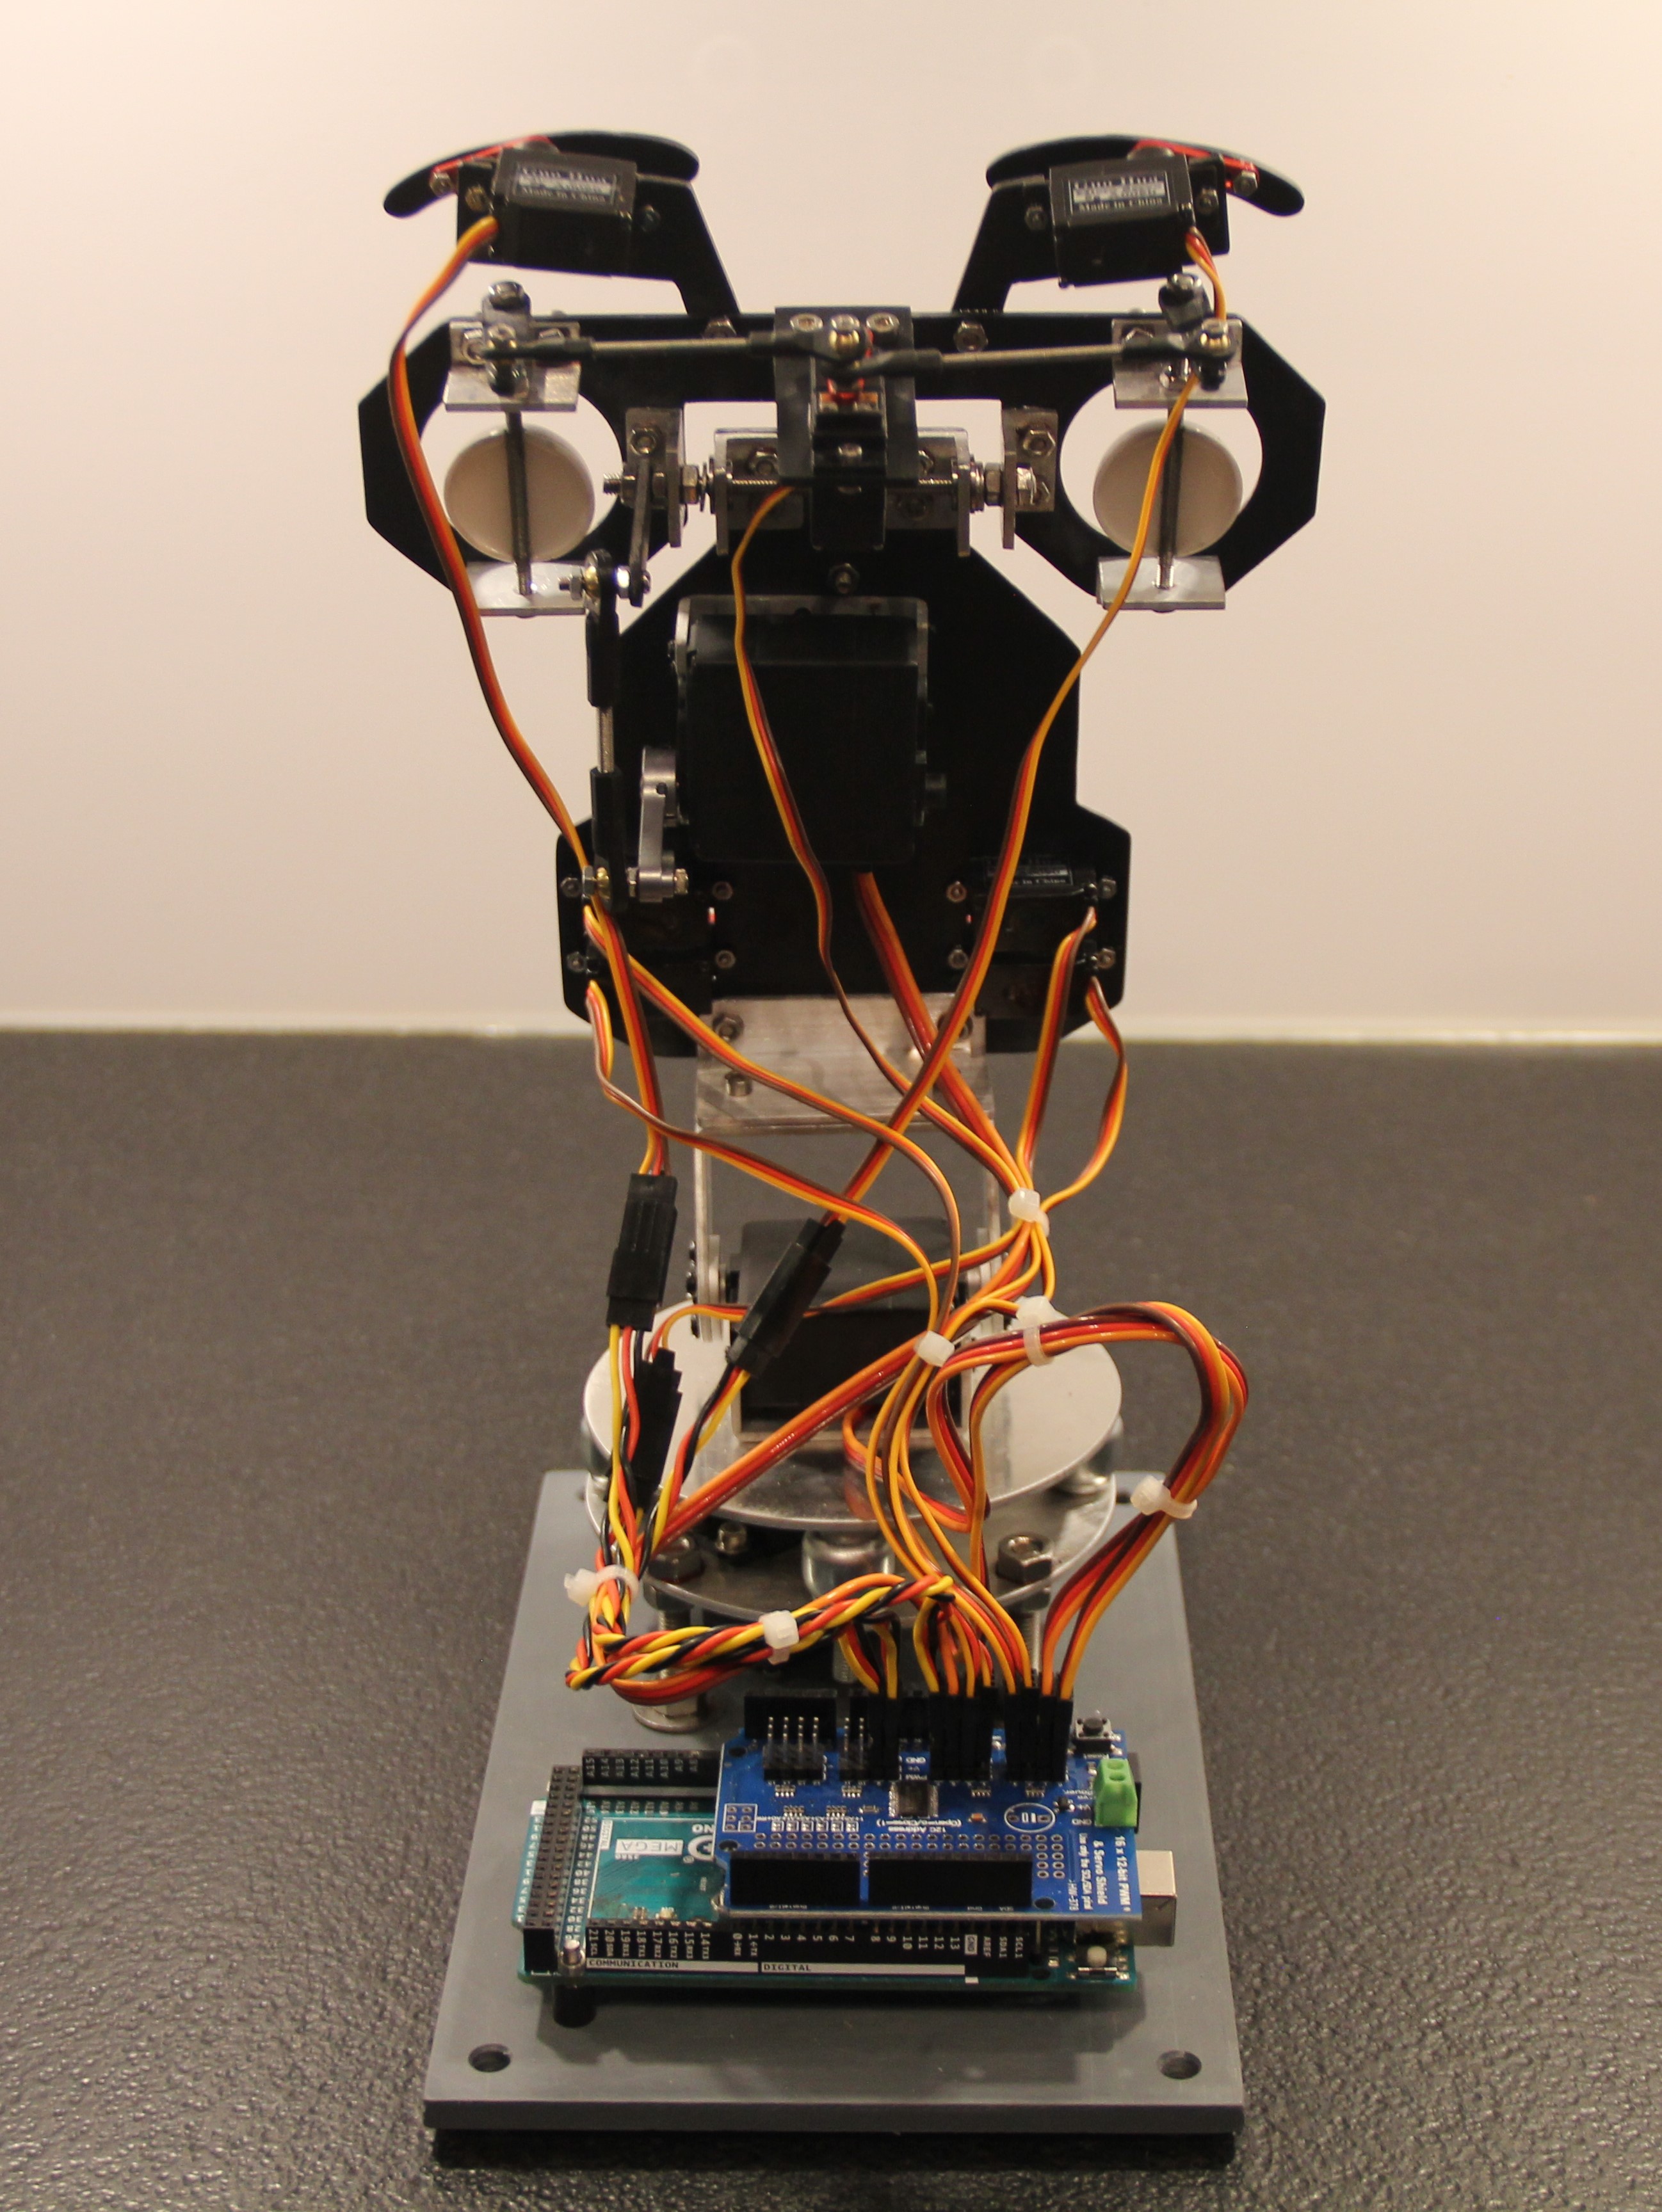
Fig. 1.3

Since I still had a brand new EMIC2 lying around, I decided to use it to realize the speech synthesis. A PAM8302 breakout board is used as the audio amplifier, which sits together with the EMIC2 on a carrier PCB board to make it easier to mount. The loudspeaker box was constructed from an ABS box, which you can get cheaply on Amazon and a VISATON K28.40 loudspeaker.
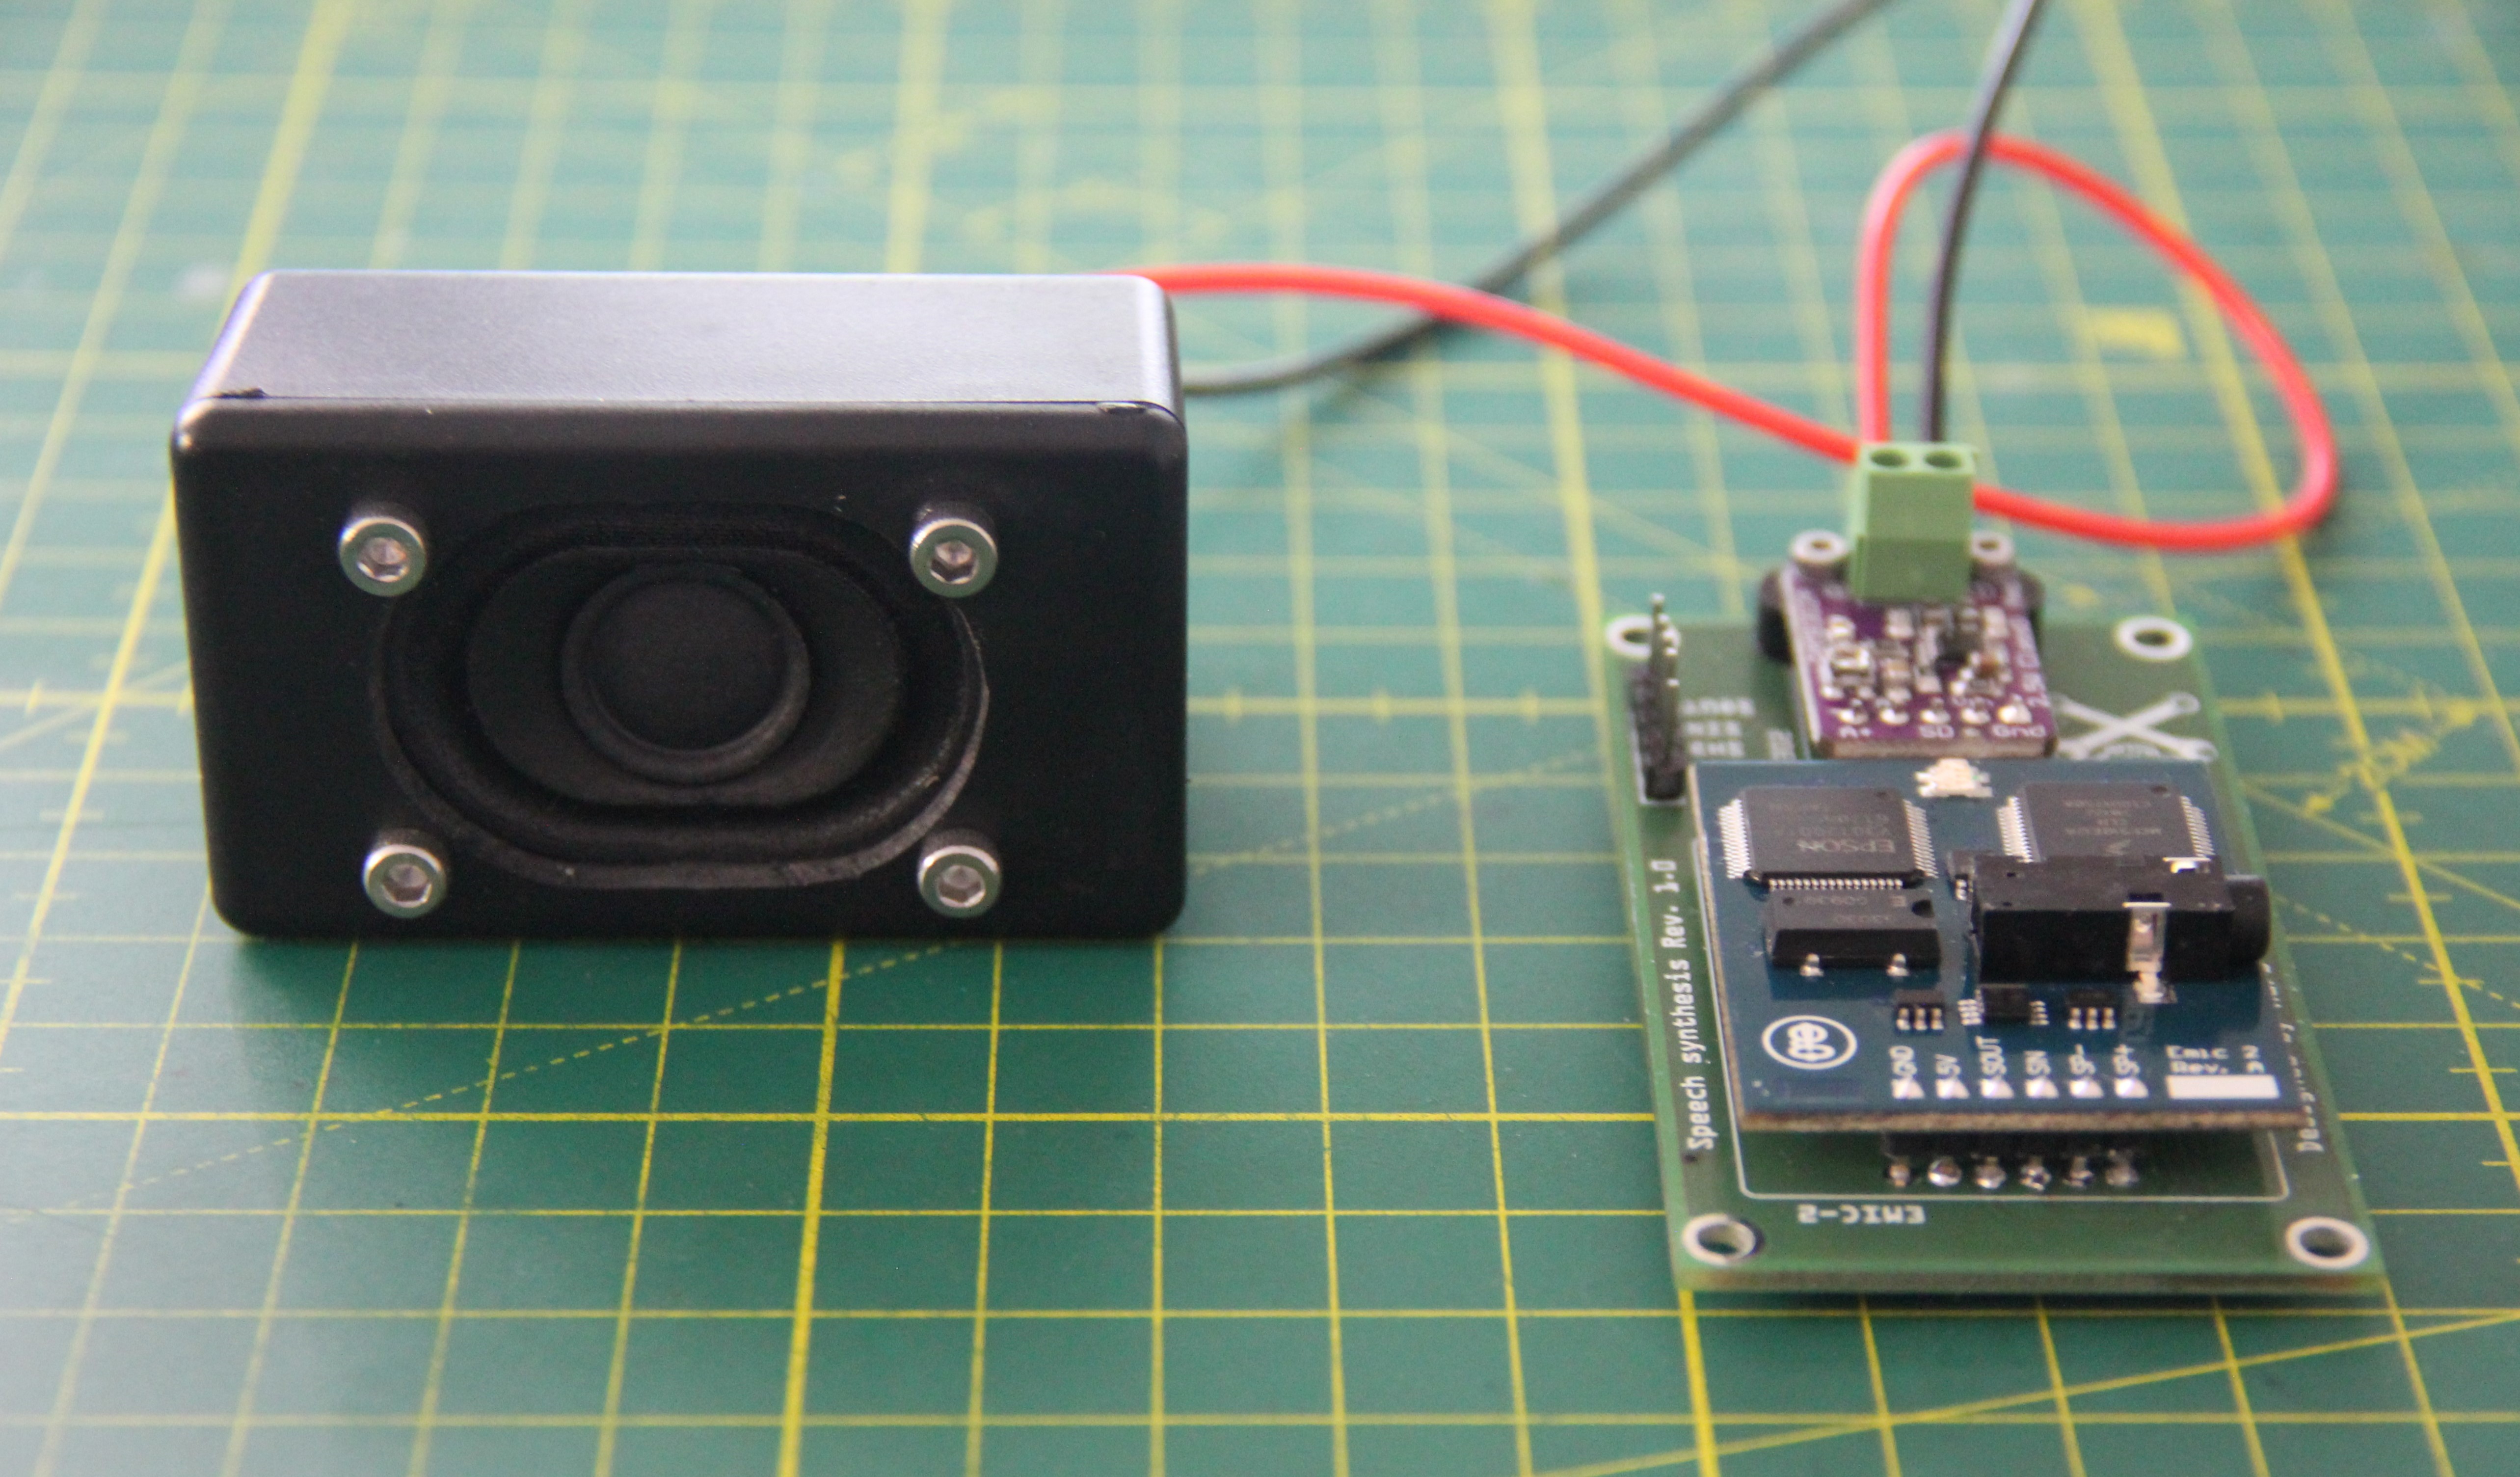
Fig. 1.4

2. Colorimetric receptors

Each colorimetric receptor is made of aluminum (AlMgSiBi) square material measuring 20 x 20 x 52 mm. A 10 mm test tube can be inserted into the upper hole. Another hole forms an optical channel through the test tube, in front of which color sensors or spectrometers can be placed. If the chemicals need to be mixed, a vibration motor can also be attached to the aluminum block.
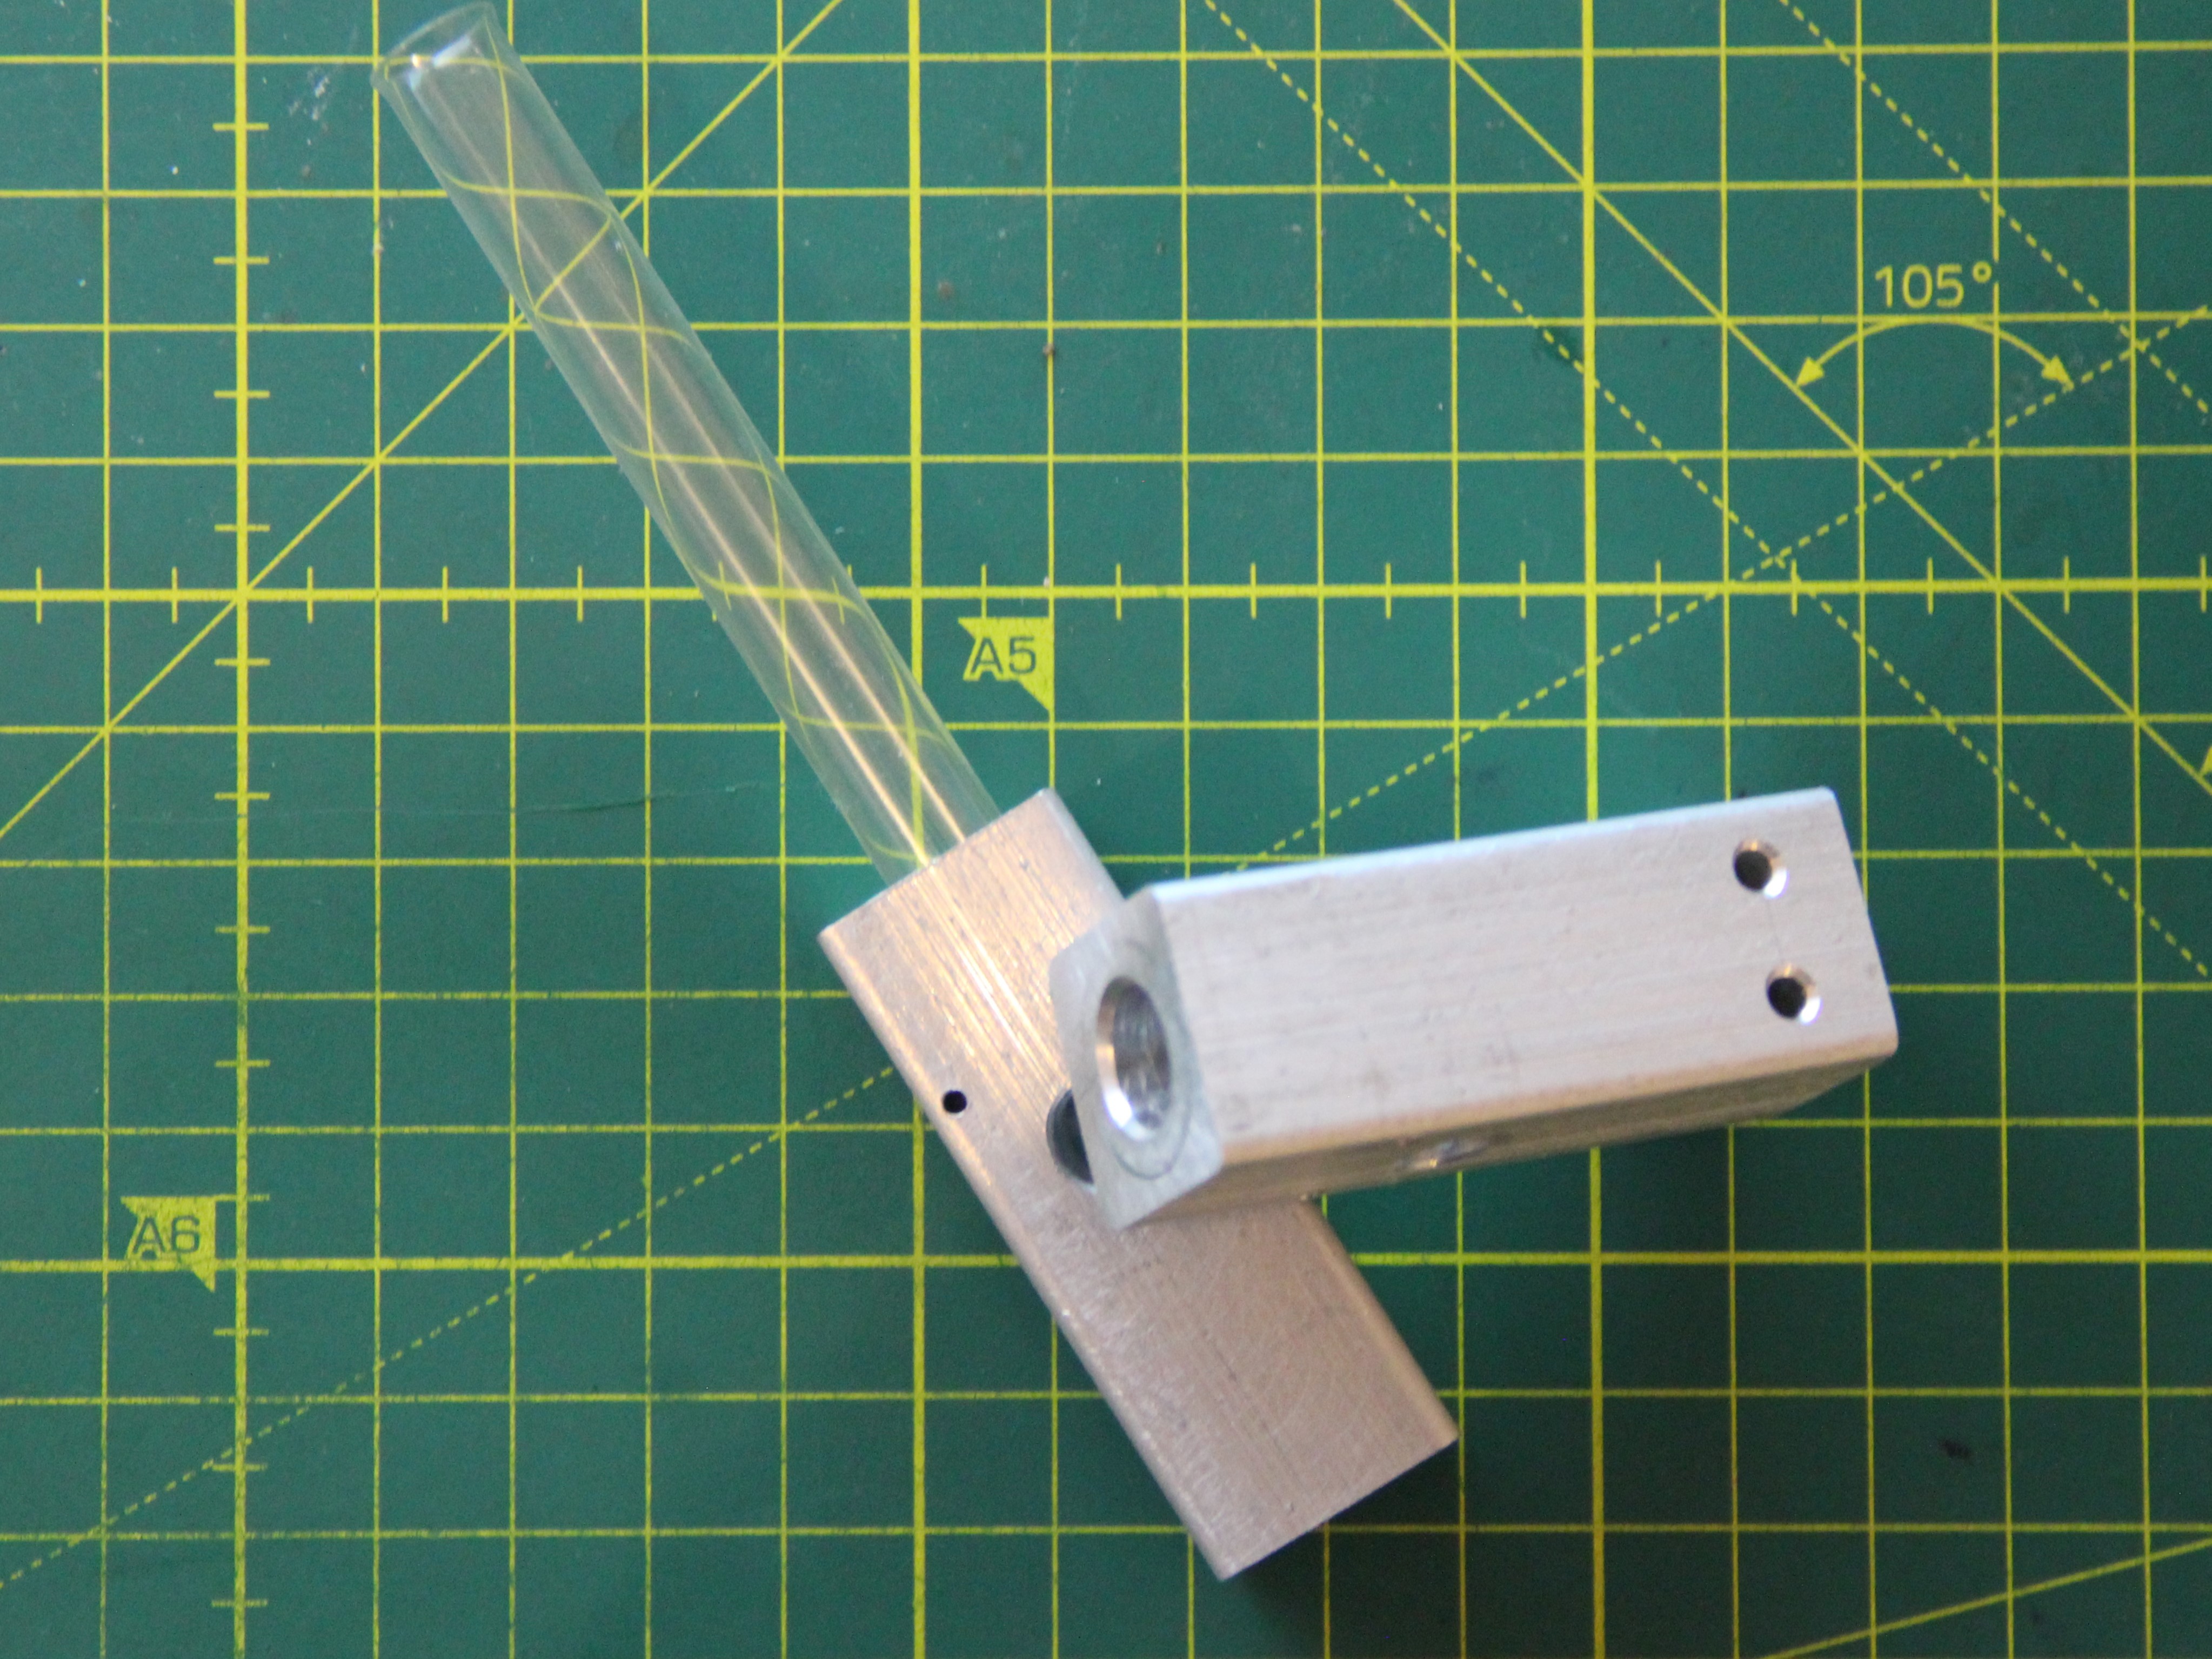
Fig. 2.1 Colorimetric receptor

Some chemical detection reactions require heat. This is why some colorimetric receptors can be heated. A 3D Hotend heating cartridge with the dimensions ⌀6 mm x 20 mm serves as the heating element. The heating cartridge can reach a temperature of up to 500°C. An encapsulated Pt1000 serves as the temperature sensor.
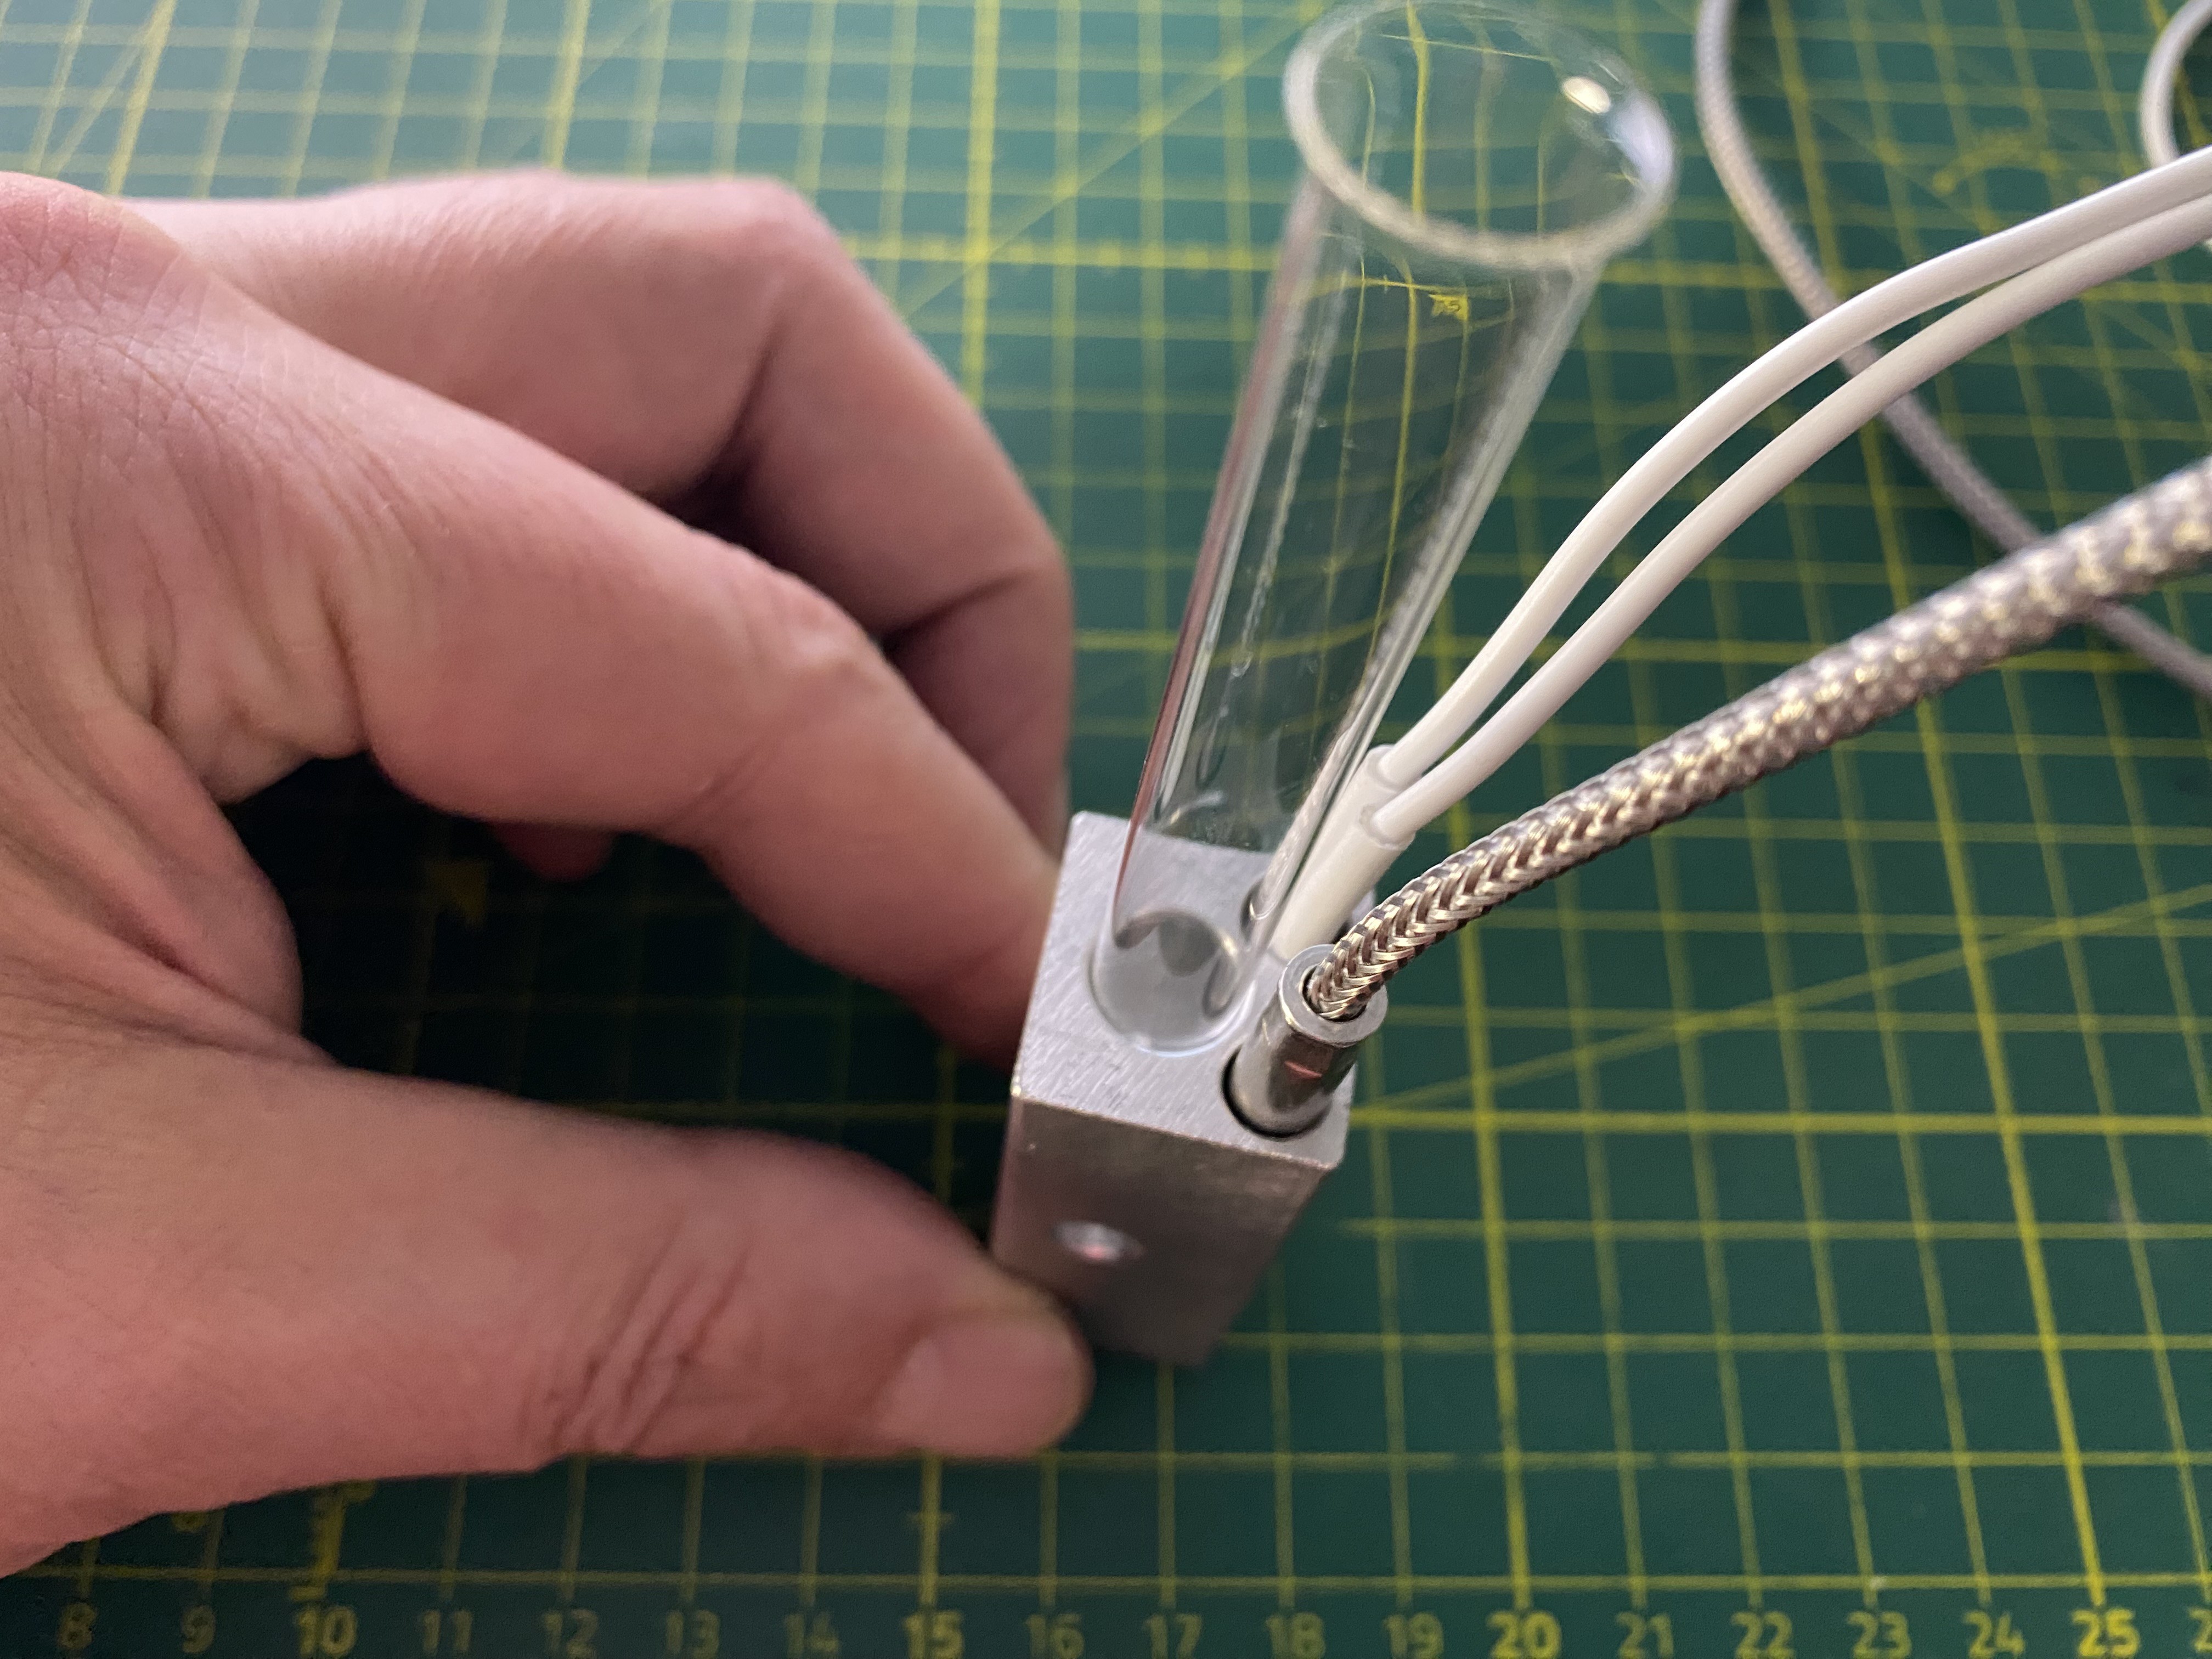
Fig. 2.2 Colorimetric receptor with heating function

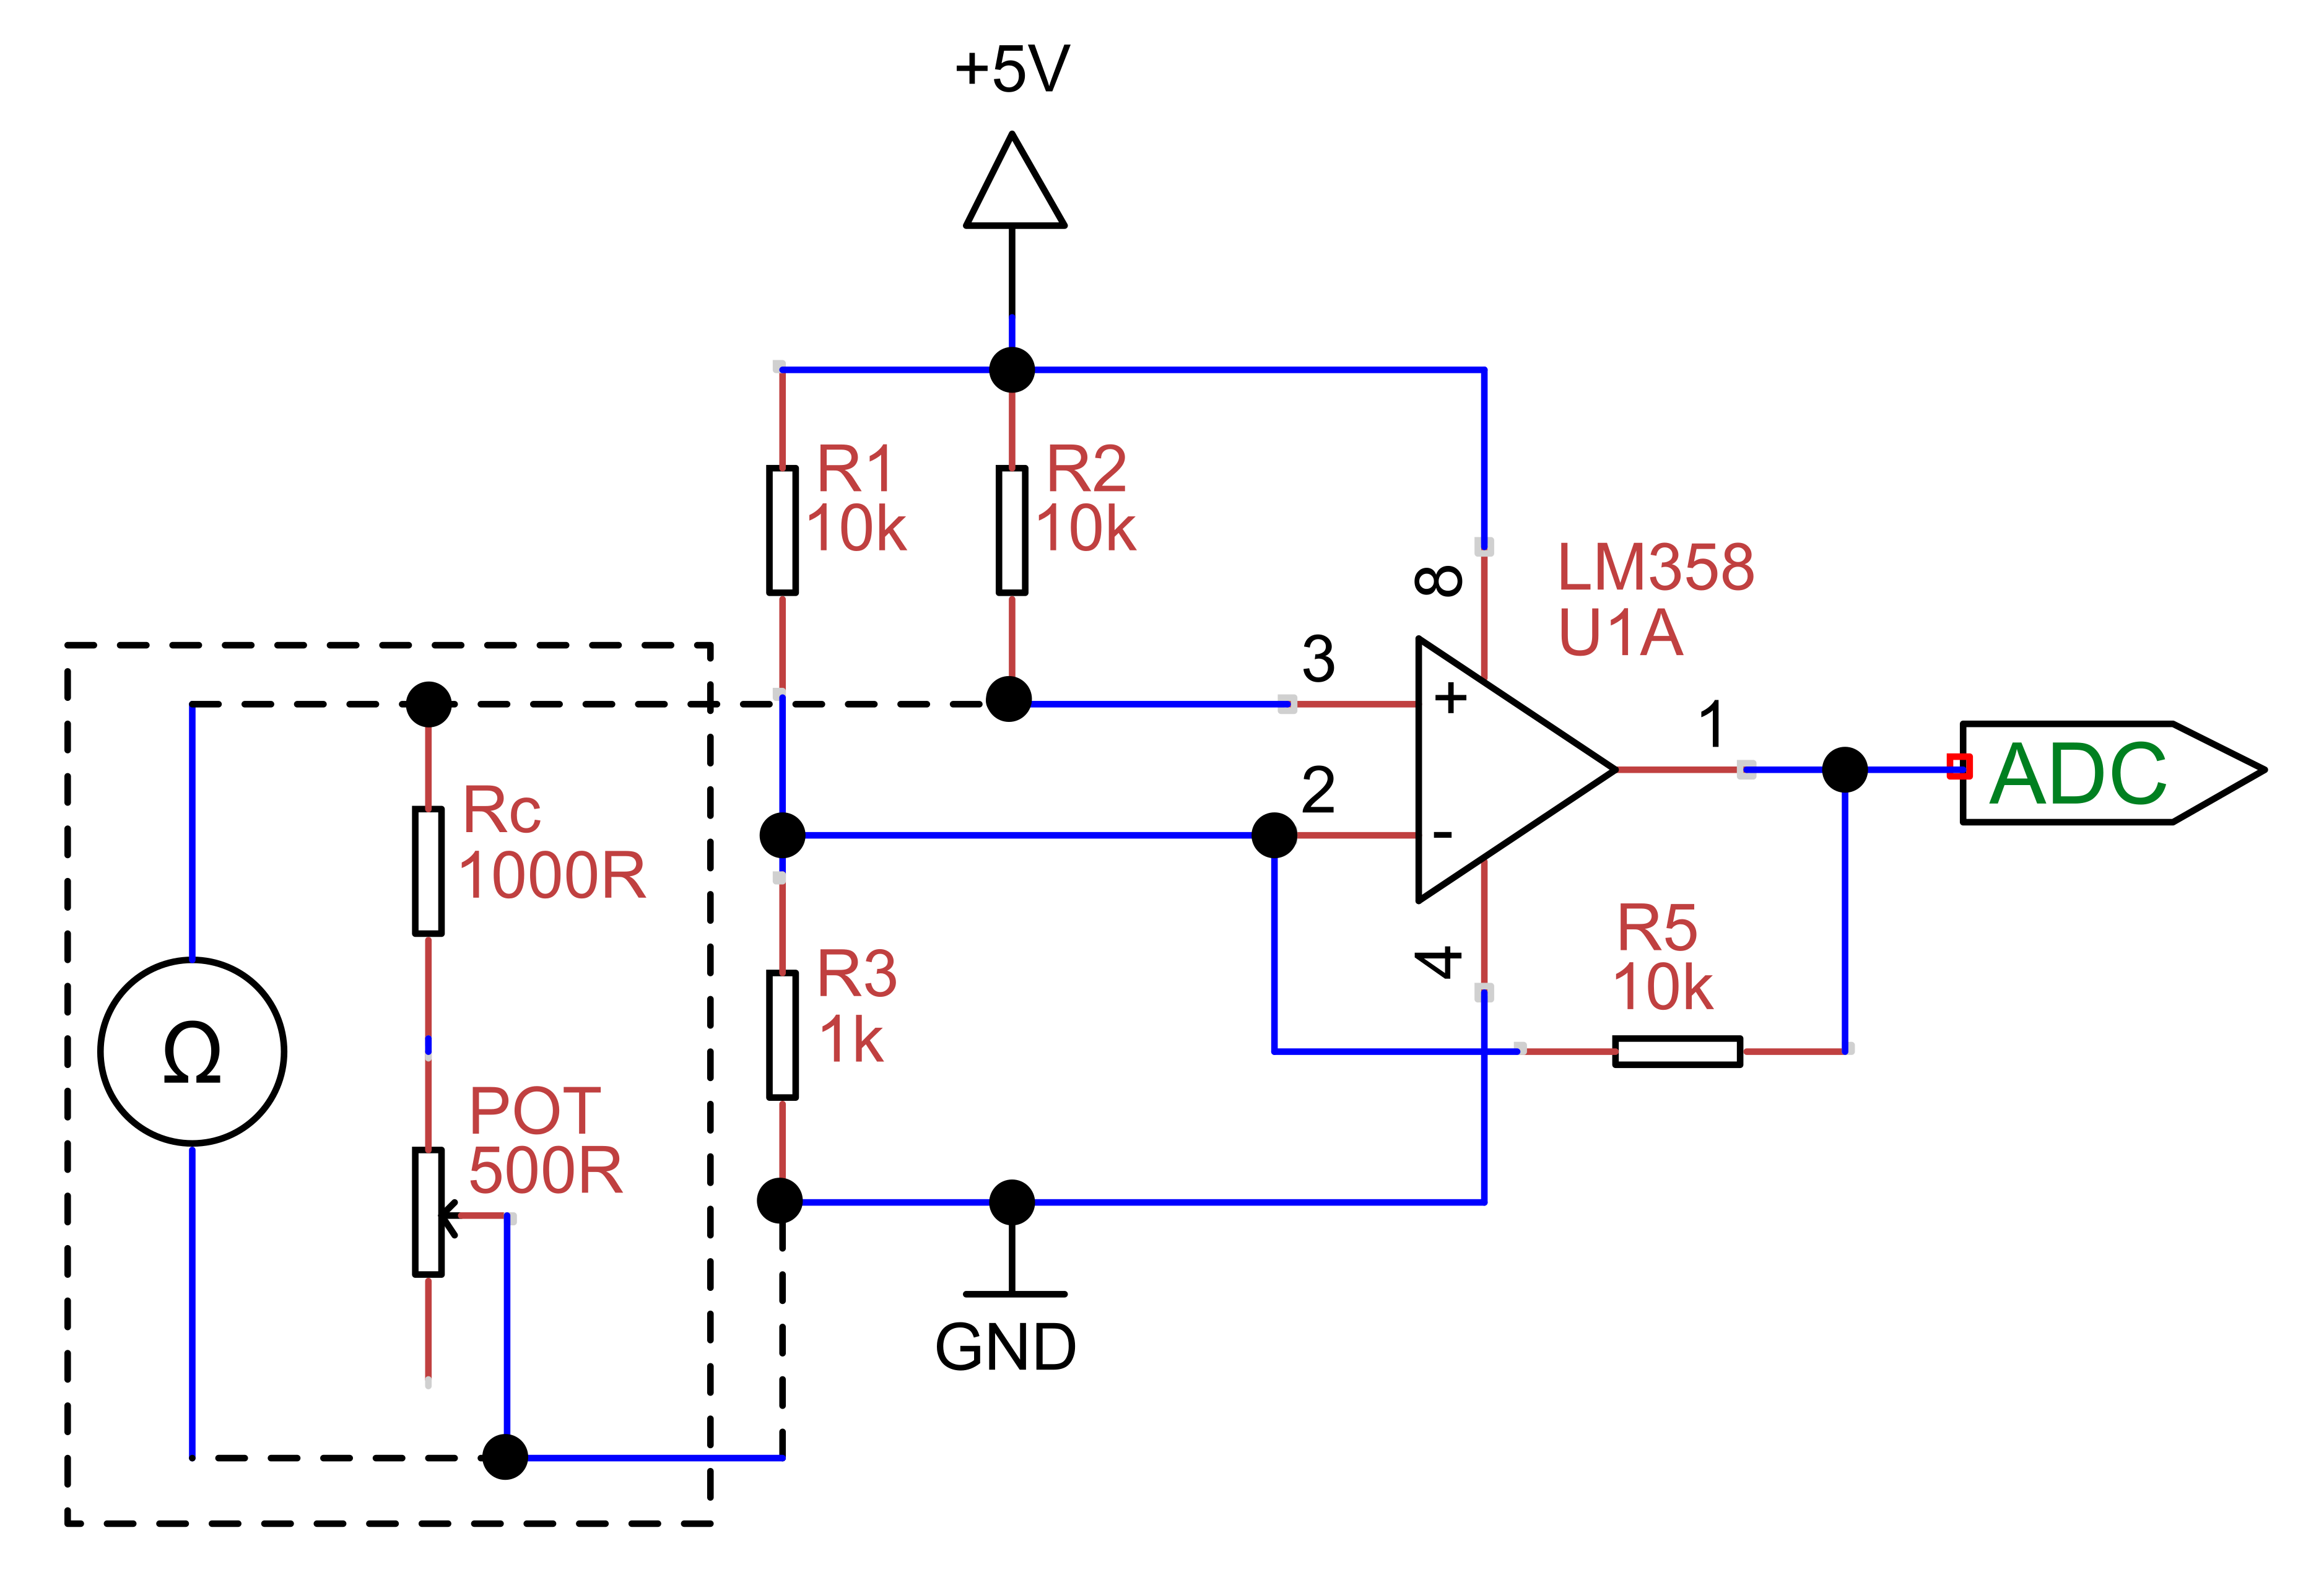
The Pt 1000 provides very accurate measurements and can be used at high temperatures. Another advantage is its linearity. As the voltage change is too small for a usable resolution, a corresponding amplifier is required that is linear to the input voltage. The following circuit diagram shows such an amplifier using an LM358 op-amp.
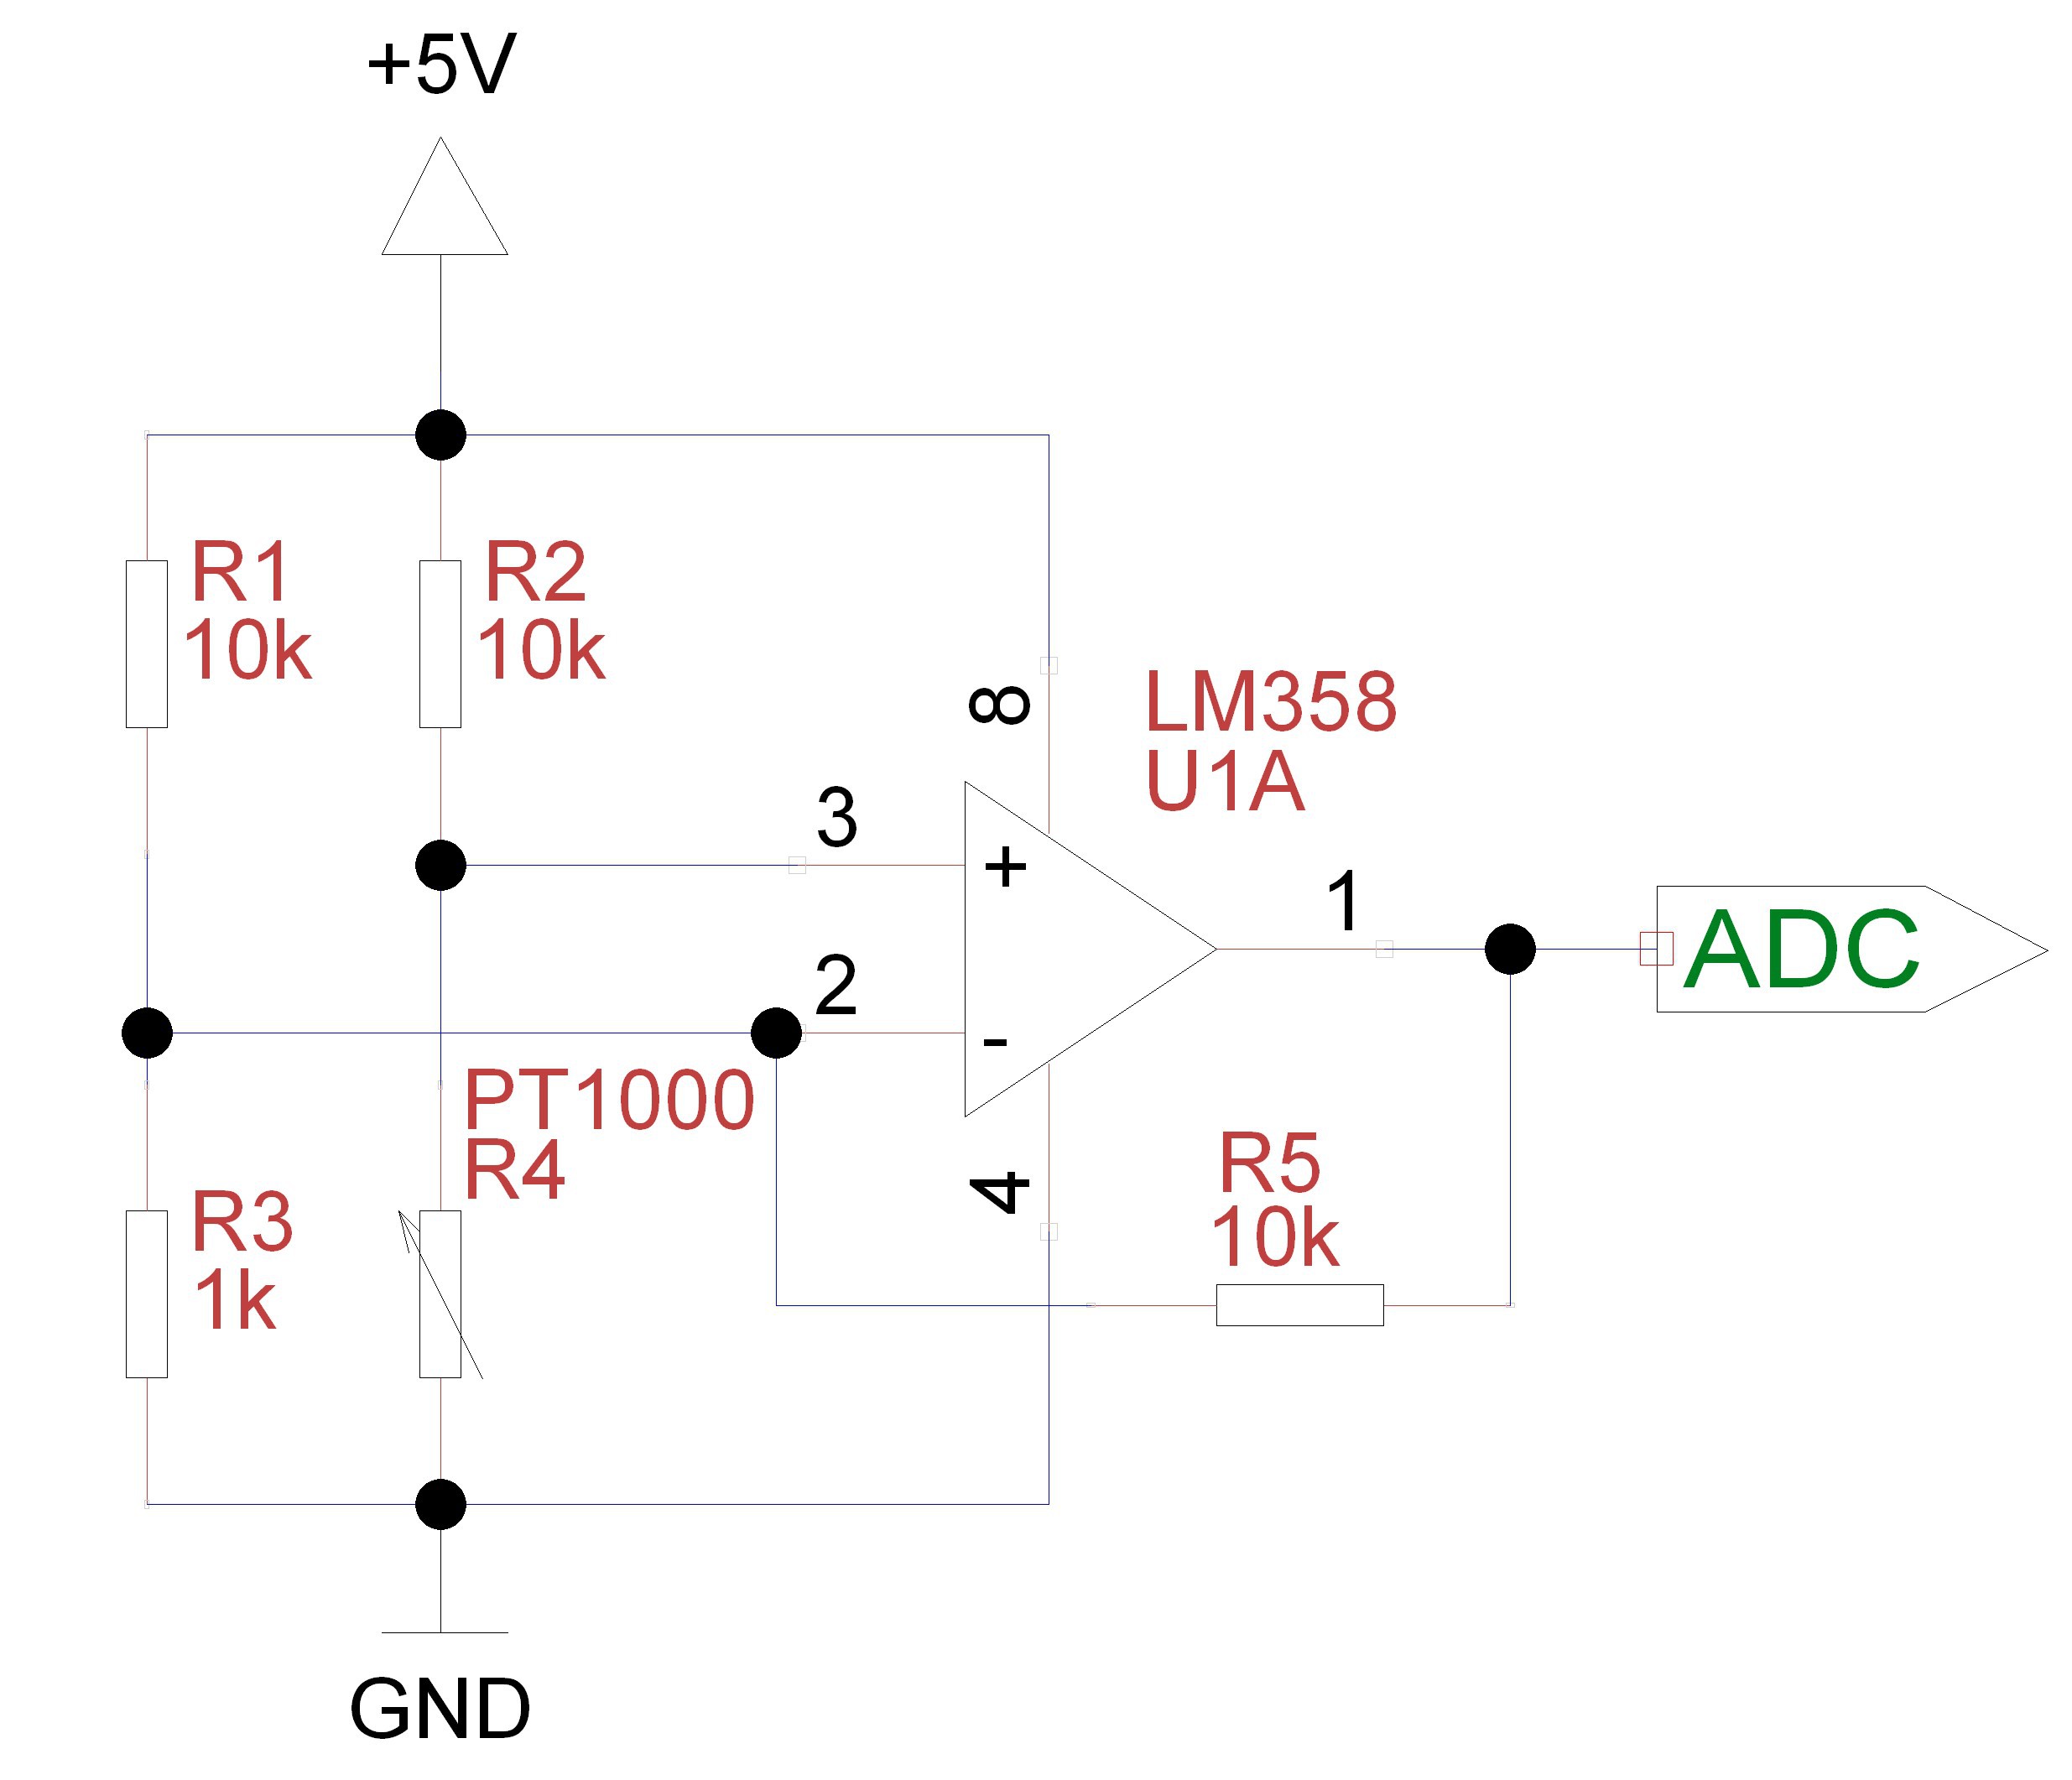
Fig. 2.3 Non-inverting amplifier with constant offset

The five specific tastes are detected by the colorimetric receptors:
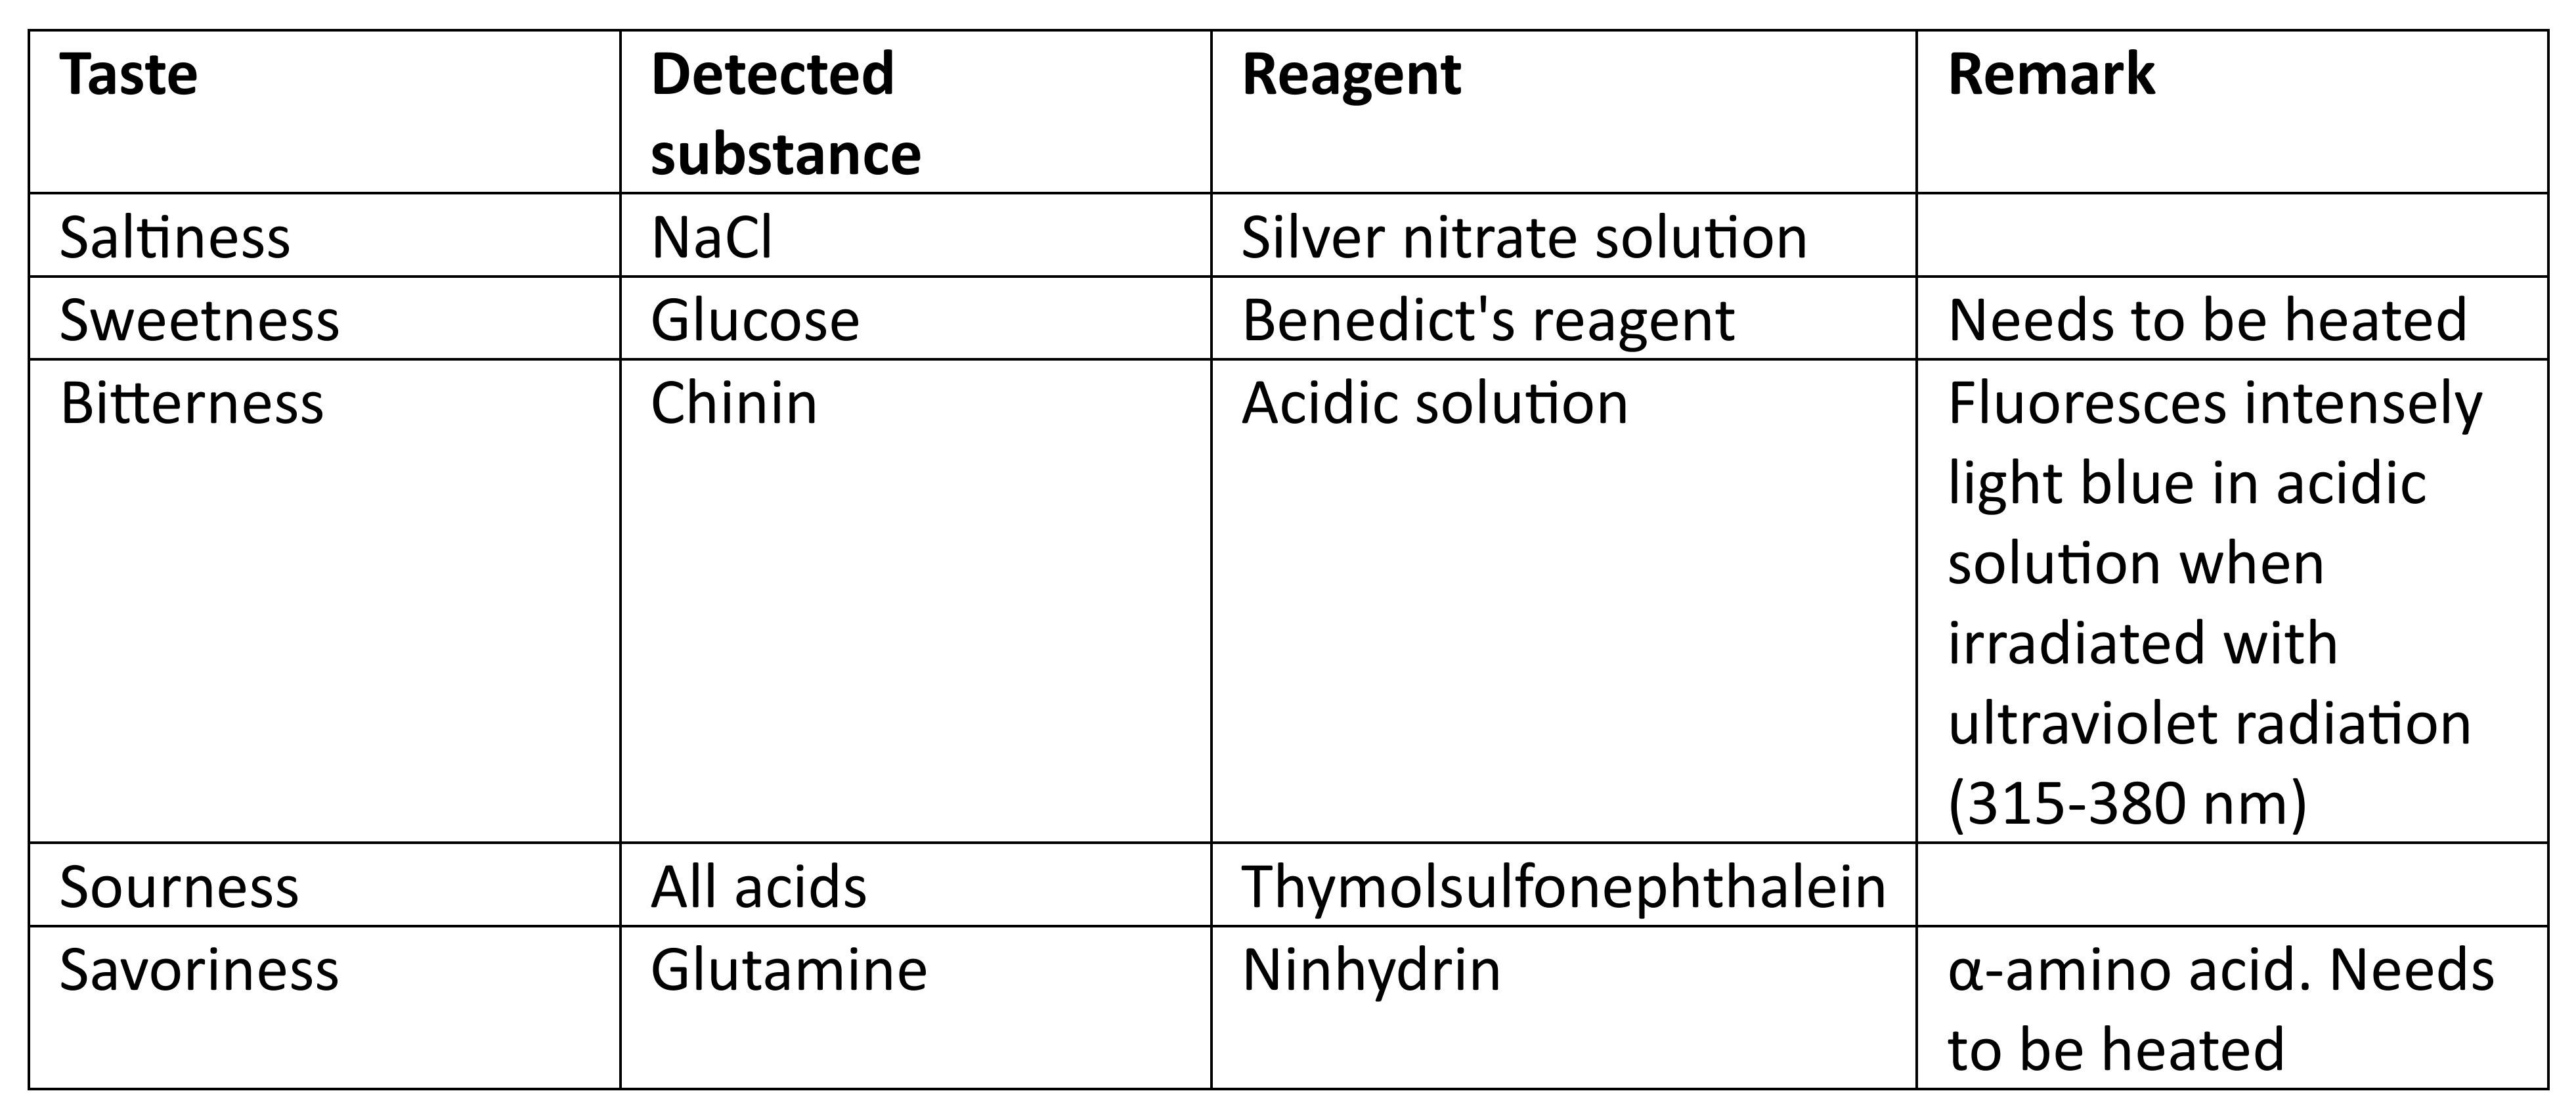
Piperine detection would also be possible using Dragendorff's reagent, but like the glucamine test, it is not specific. The alkaloid can be extracted from black pepper with ethanol or isopropyl alcohol and then crystallized.

Instead of thymol blue, a universal indicator can also be prepared from 20 mg phenolphthalein, 20 mg methyl red, 40 mg thymol blue, and 40 mg bromothymol blue dissolved in 100 ml ethanol.
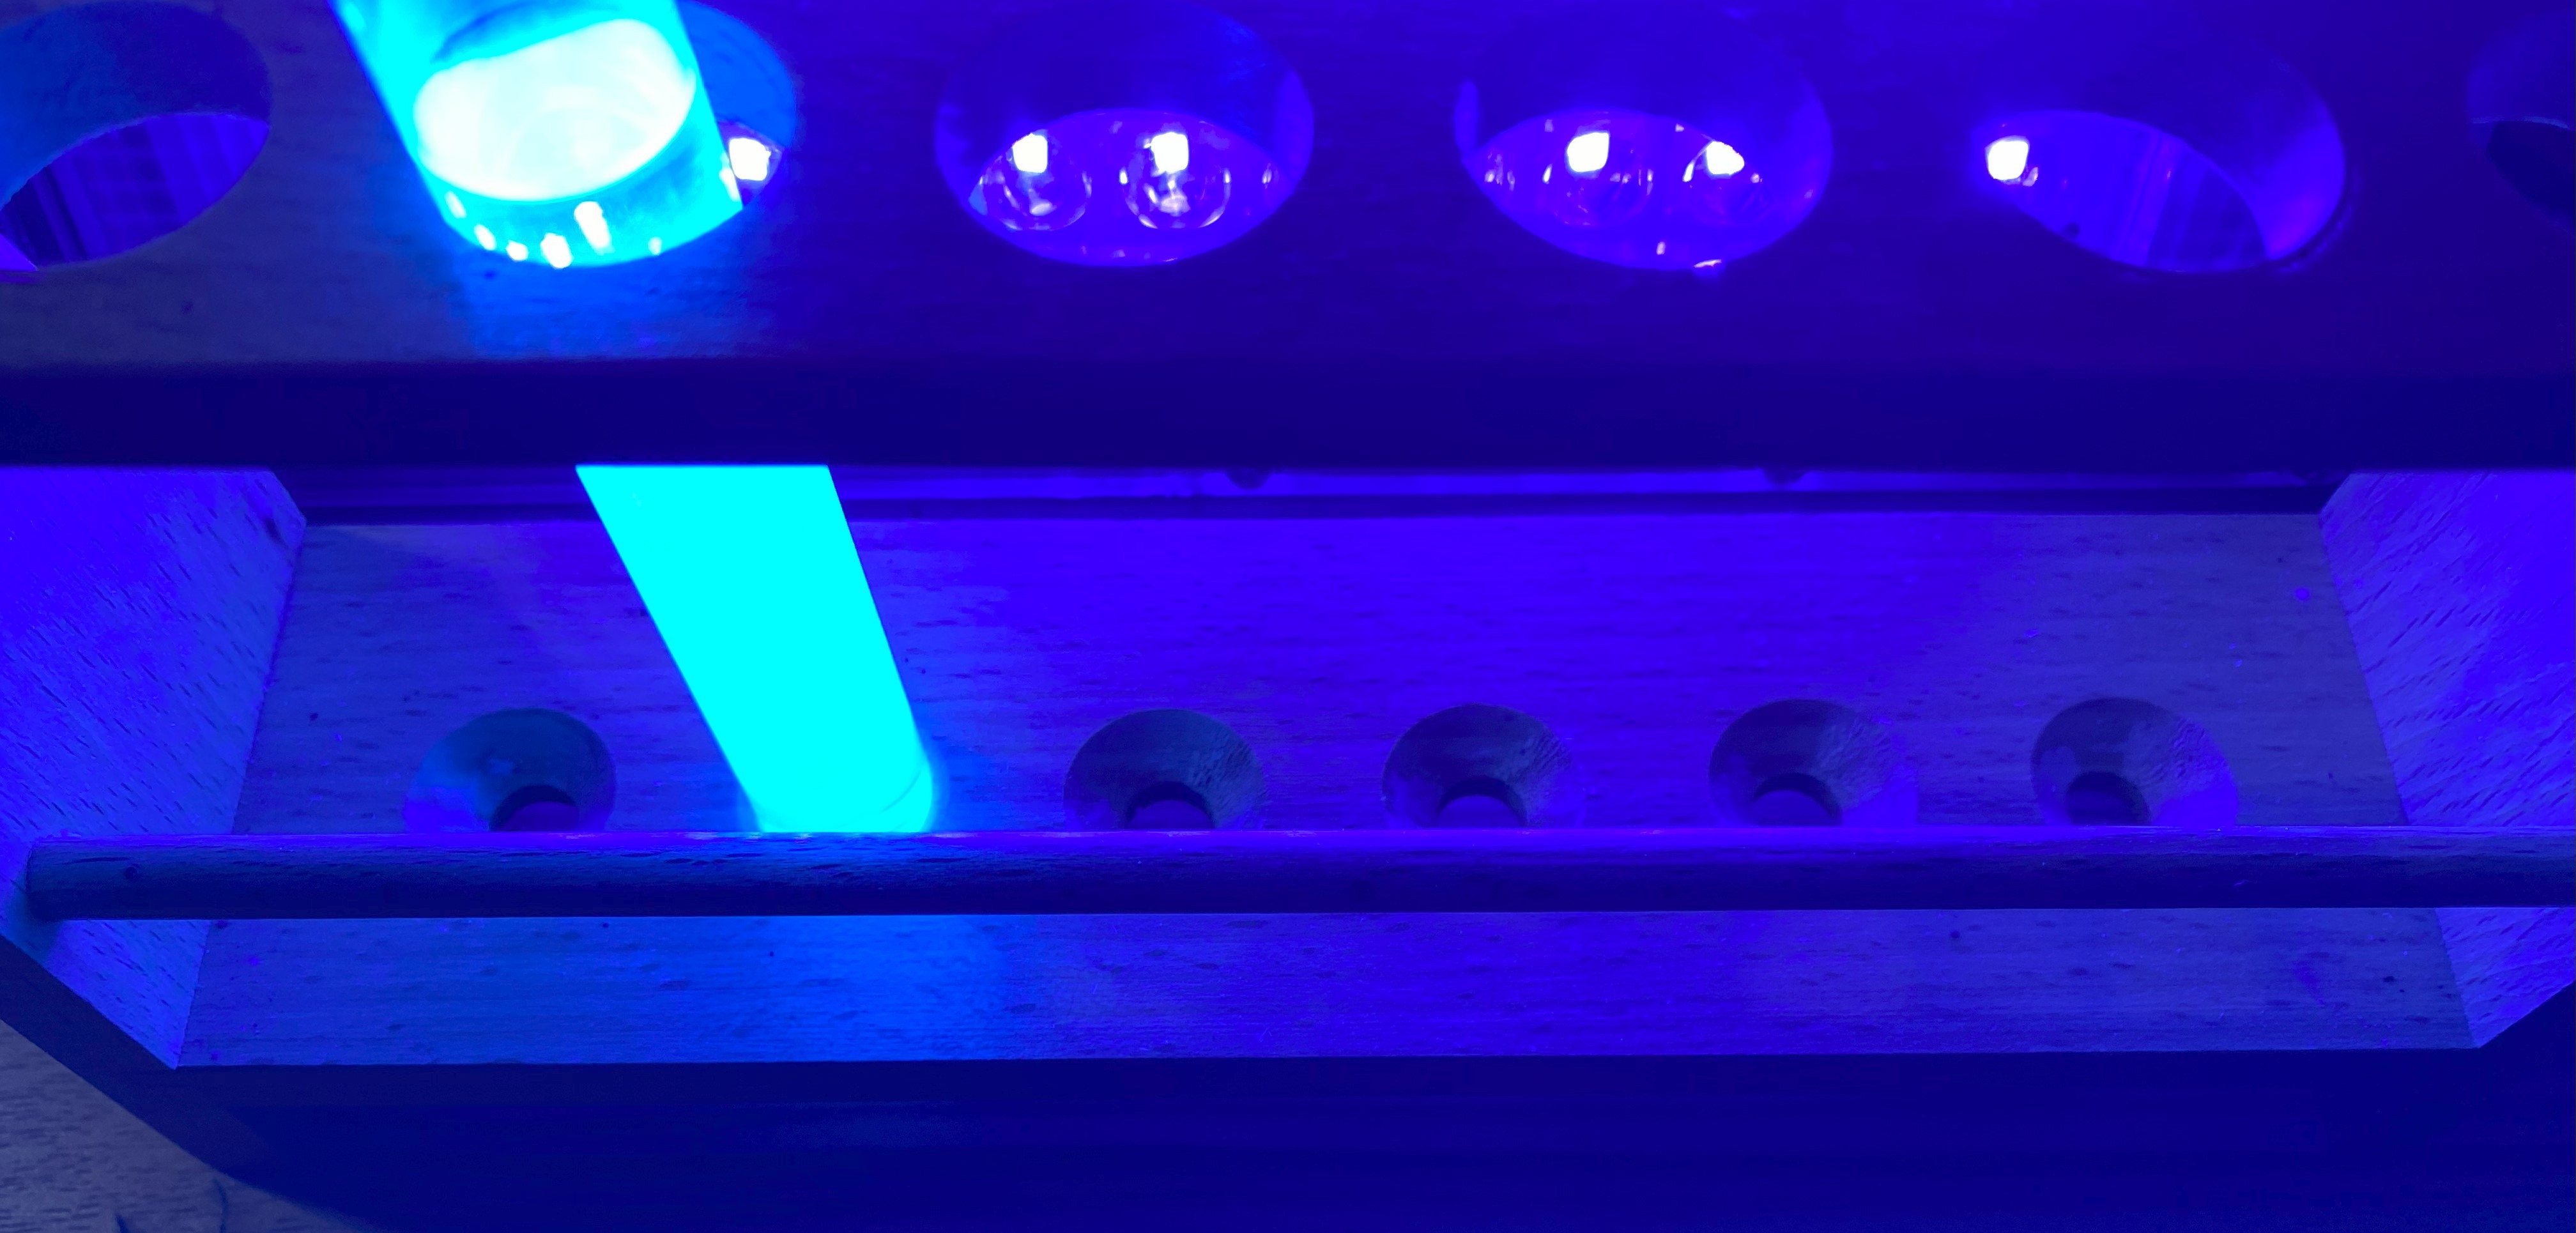
Fig. 2.4 Fluorescence of quinine dissolved in ethanol and acidified with formic acid under UV light
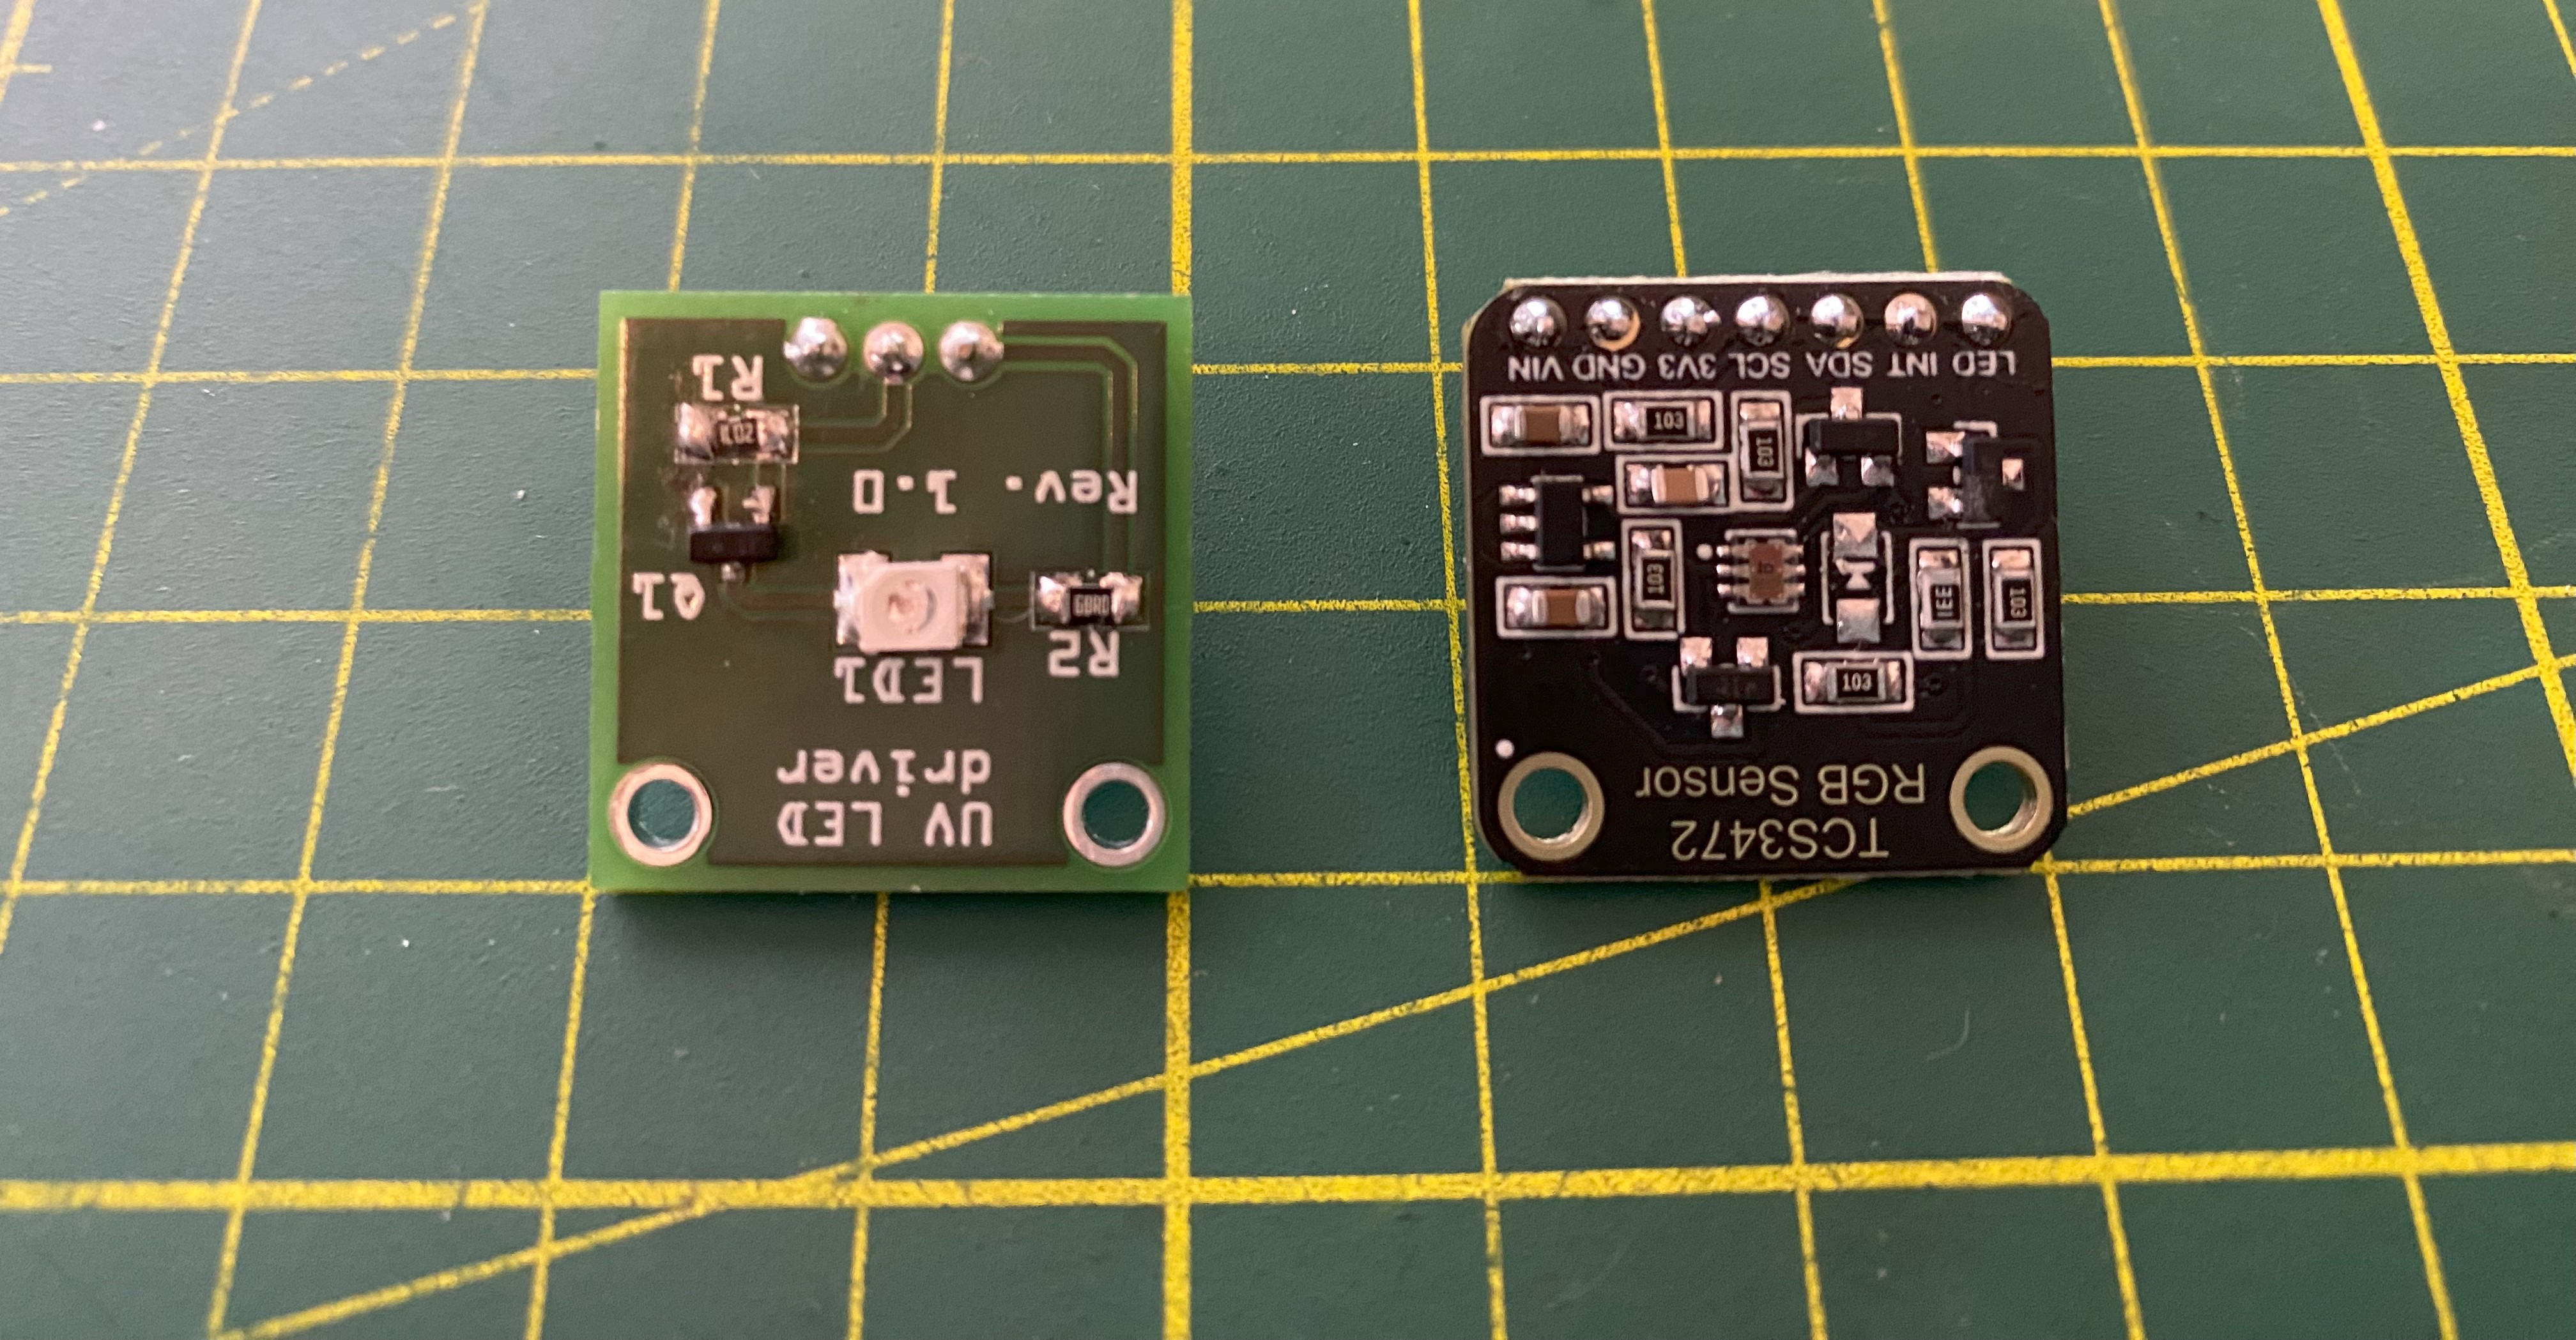
Fig. 2.5 UV-LED and TCS3472 color sensor breakout with desoldered LED
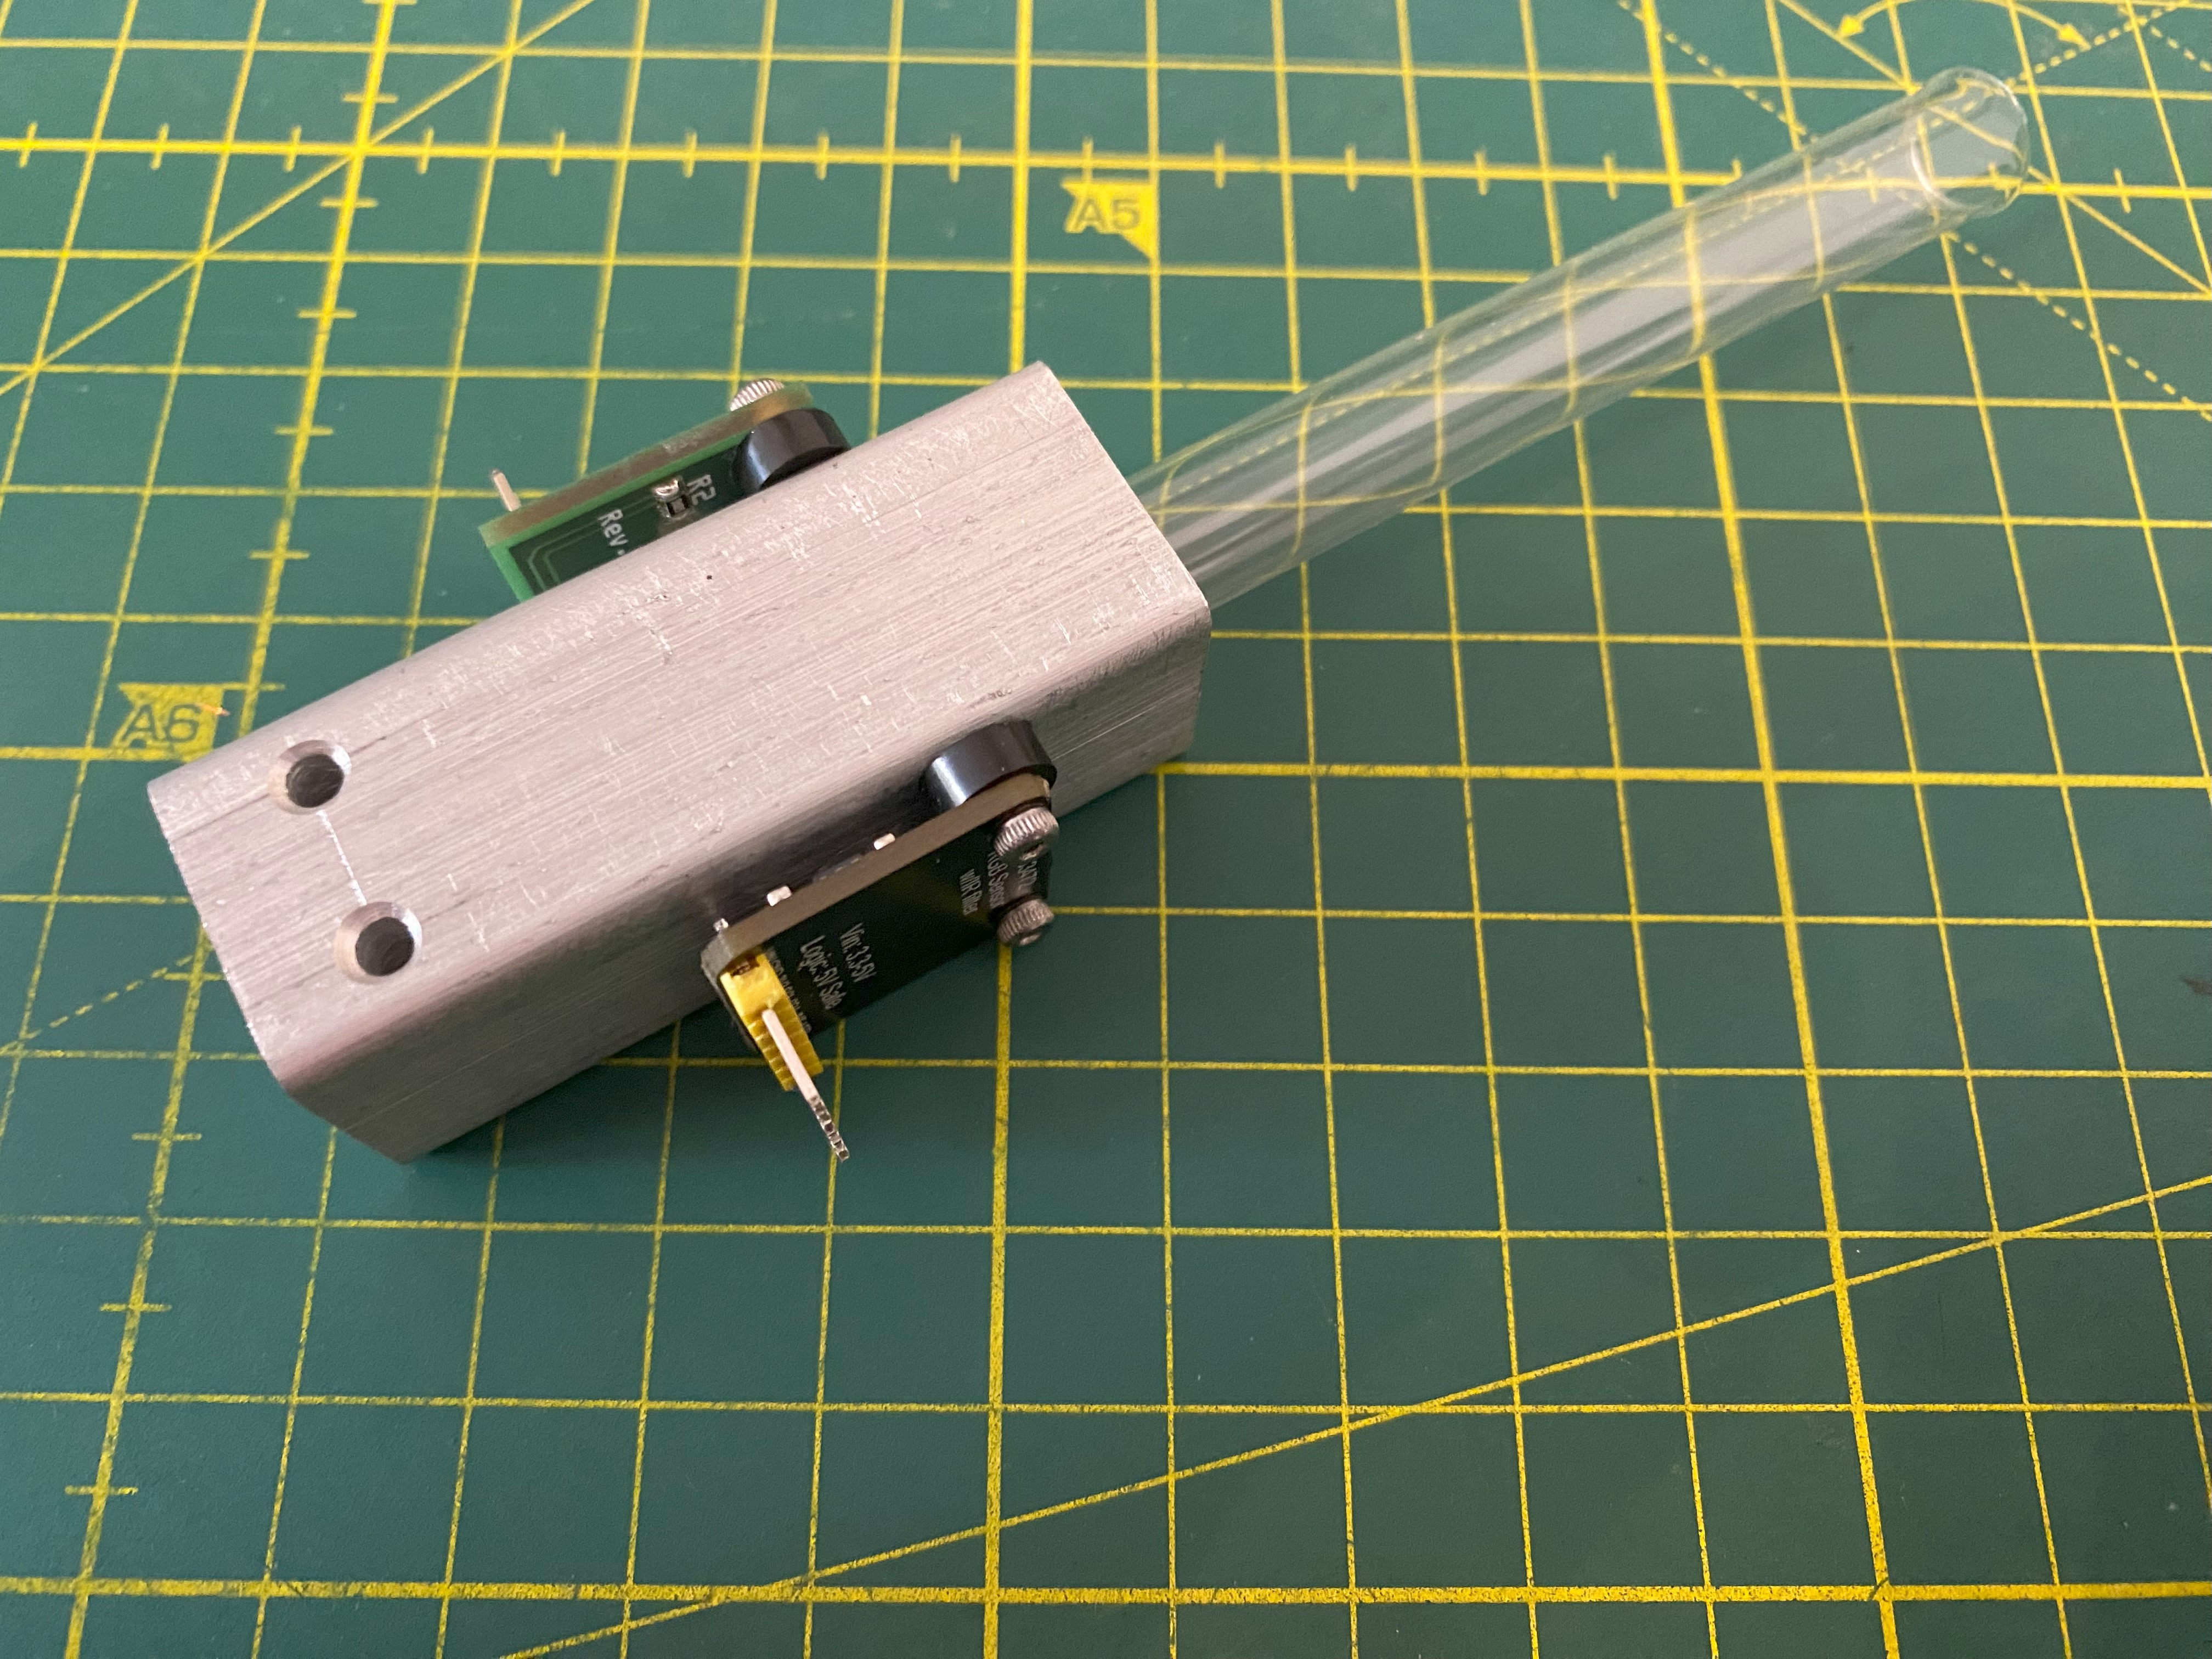
Fig. 2.6 Completely assembled quinine sensor
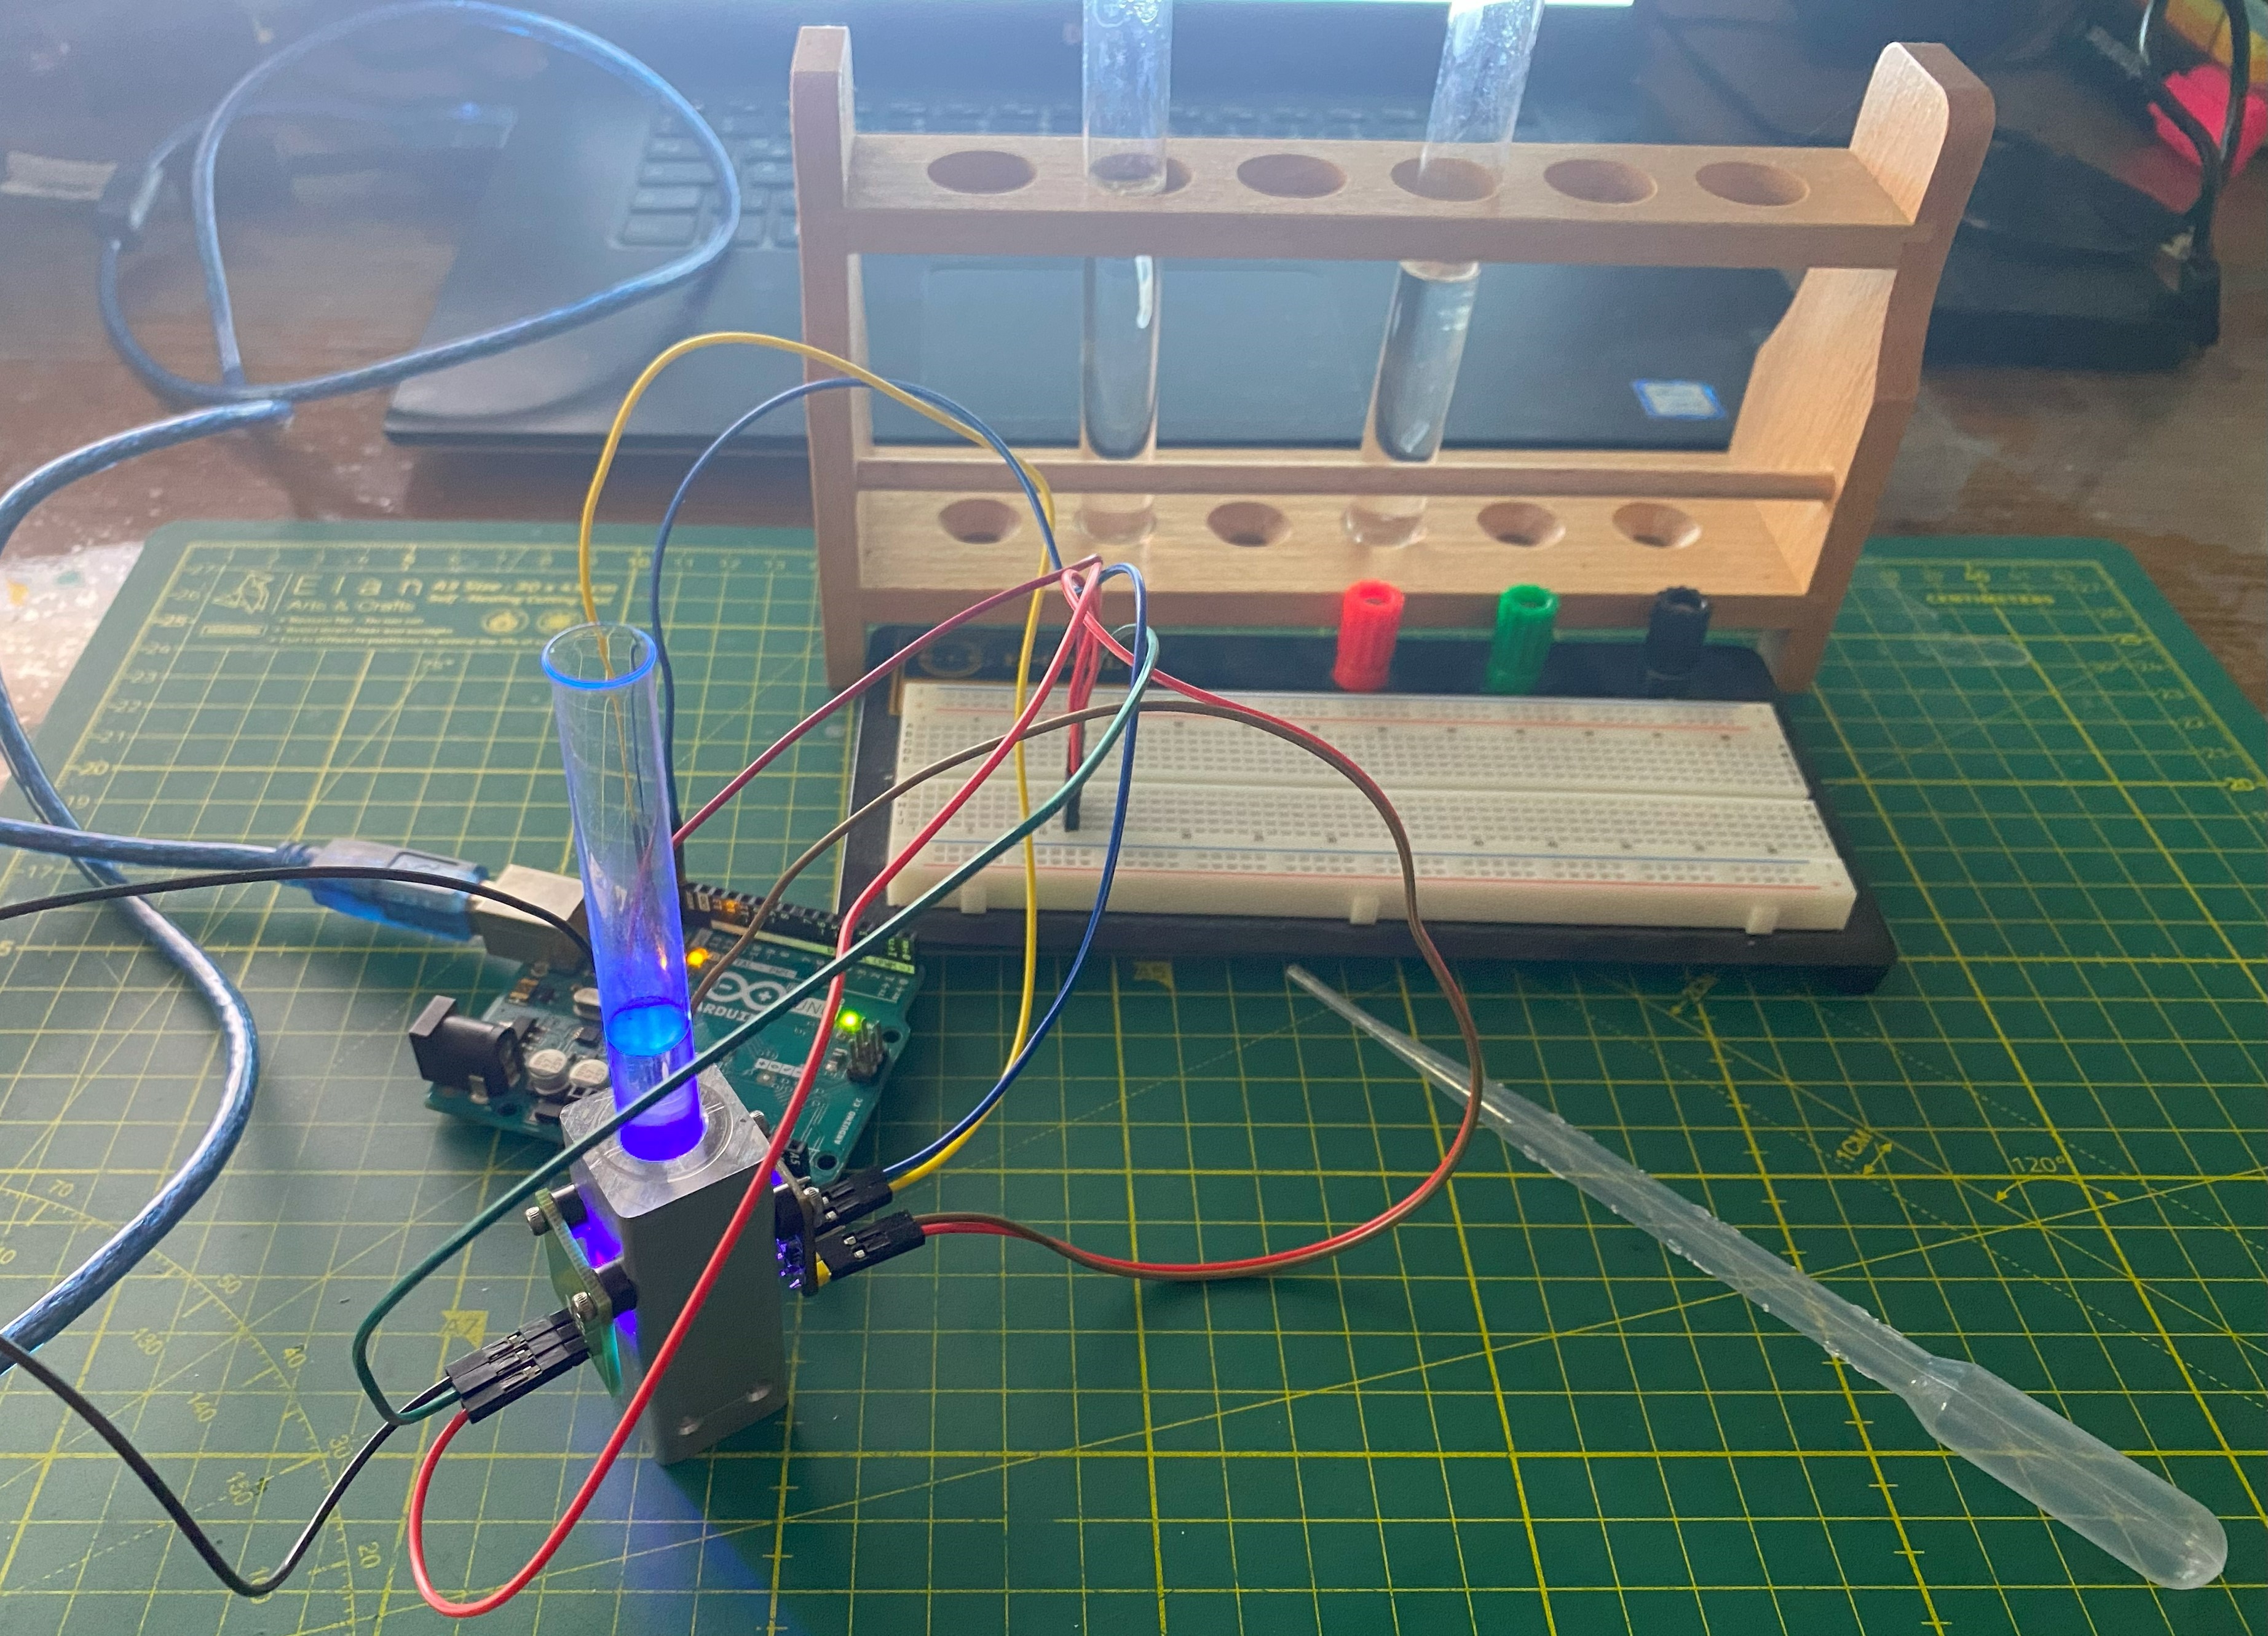
Fig. 2.7 Testing the quinine sensor

After several attempts, an ideal acid indicator was found. To do this, 40 mg bromothymol blue is dissolved in 20 ml ethanol and then diluted to 100 ml with tap water. The solution turns deep blue, as tap water is slightly alkaline. When diluted acid is added, the color immediately changes to yellow. This can be easily detected by the color sensor.

The Benedict reagent is prepared by dissolving 10 g sodium carbonate, 17.3 g sodium citrate, and 1.7 g copper(II) sulfate in 100 ml distilled water. It is recommended to use a magnetic stirrer.

The ninhydrin reagent is prepared by dissolving 0.5 g ninhydrin in 50 ml pure ethanol. Surprisingly, the ninhydrin reagent for glutamine turns an intense purple color within one minute at room temperature. That means that no heating is required.

3. Electronic nose

The multichannel gas sensor from Grove is used as the sensor. Four gas sensors are sitting on the top of the breakout board:

  • GM-102B MEMS NO2 gas sensor
  • GM-302B MEMS ethanol gas sensor
  • GM-502B MEMS VOC gas sensor
  • GM-702B MEMS CO/H2 gas sensor

Of course, all four gas sensors are also sensitive to other gases but are particularly sensitive to the gases...

Read more »

  • Servo smoothing via logistic function

    M. Bindhammer12/16/2023 at 16:30 0 comments

    Smoothed servo movements are necessary in robotics to make them appear more organic. For this purpose, I use the logistic function (sigmoid curve) with the equation:

    where x0 is the x value of the function's midpoint,  L is the supremum of the values of the function and k is the logistic growth rate or steepness of the curve.

    Fig. 1 Standard logistic function where L = 1, k = 1 and x0 = 0

    Of course, the logistics function is not yet usable in this way. Let x0 = 0 and f(x) = 0 if x = 0. These conditions lead to

    But we can also simply use

    then L is again our supremum.

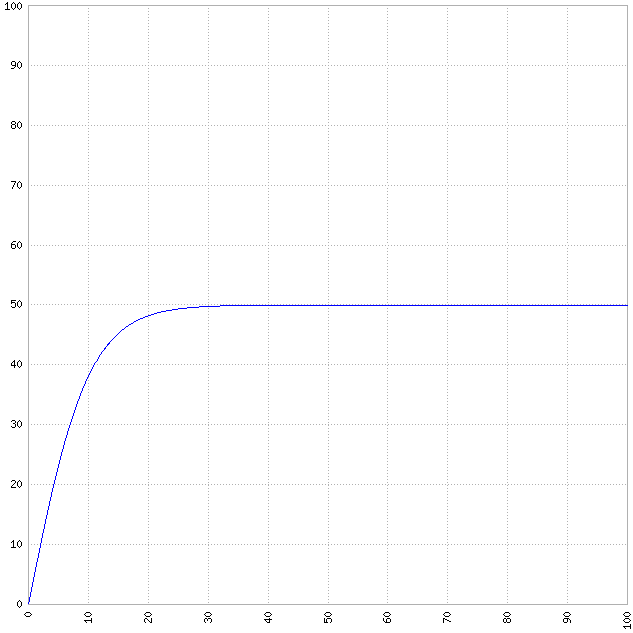
    Fig. 2 Modified logistic function where L = 50, and k = 0.2

    We now have a nice normal function instead of an often-used recursive function that we can use for servo smoothing (accelerate and decelerate).

  • Lip sync​

    M. Bindhammer12/05/2023 at 15:47 0 comments

    The following code lets the EMIC-2 speak what you enter into the serial monitor:

    #include <SoftwareSerial.h>
    
    #define rxPin   10  // Serial input (connects to Emic 2's SOUT pin)
    #define txPin   11  // Serial output (connects to Emic 2's SIN pin)
    
    // Set up a new SoftwareSerial port
    SoftwareSerial emicSerial =  SoftwareSerial(rxPin, txPin);
    
    void setup()  
    {
      // Define pin modes
      pinMode(rxPin, INPUT);
      pinMode(txPin, OUTPUT);
      // Set the data rate for the SoftwareSerial port
      emicSerial.begin(9600);
      Serial.begin(9600);
      /*
        When the Emic 2 powers on, it takes about 3 seconds for it to successfully
        initialize. It then sends a ":" character to indicate it's ready to accept
        commands. If the Emic 2 is already initialized, a CR will also cause it
        to send a ":"
      */
      emicSerial.println("P1");           // Select parser, P0: DECtalk, P1: Epson
      emicSerial.println("N4");           // Nx, select voice:  x = 0 to 8
      emicSerial.println("V5");           // Vx, set the audio output volume in dB from x = -48 (softest) to x = 18 (loudest).
      emicSerial.println("W200");         // Wx, set the speaking rate in words per minute from x = 75 (slowest) to x = 600 (fastest).
      emicSerial.print('\n');             // Send a CR in case the system is already up
      while (emicSerial.read() != ':');   // When the Emic 2 has initialized and is ready, it will send a single ':' character, so wait here until we receive it
      delay(10);                          // Short delay
      emicSerial.flush();                 // Flush the receive buffer
    }
    
    void loop()  
    {
      while (Serial.available() == 0); // Wait for data available
      String userInput = Serial.readString(); // Read until timeout
      userInput.trim(); // Remove any whitespace at the end of the String
      Serial.println(userInput);
      emicSerial.print('S');
      emicSerial.print(userInput);  
      emicSerial.print('\n');
      /*
        Wait here until the Emic 2 responds with a ":"
        indicating it's ready to accept the next command
      */
      while (emicSerial.read() != ':'); 
    }

    The problem with lip-synchronization is that there is no way on the software side to determine exactly when the EMIC-2 has finished the speech. The line

    while (emicSerial.read() != ':'); 

    is completely useless for that. It merely shows when the EMIC-2 is ready for new commands, which will come true long before the end of the speech. Others have already had this problem and I will solve it in the same way. I will use the audio output of the EMIC-2 to control the four servos that are responsible for the movement of the mouth. This requires a so-called envelop follower, which reproduces the volume envelope of an applied waveform.

    Fig. 1 A signal and its envelope marked with red

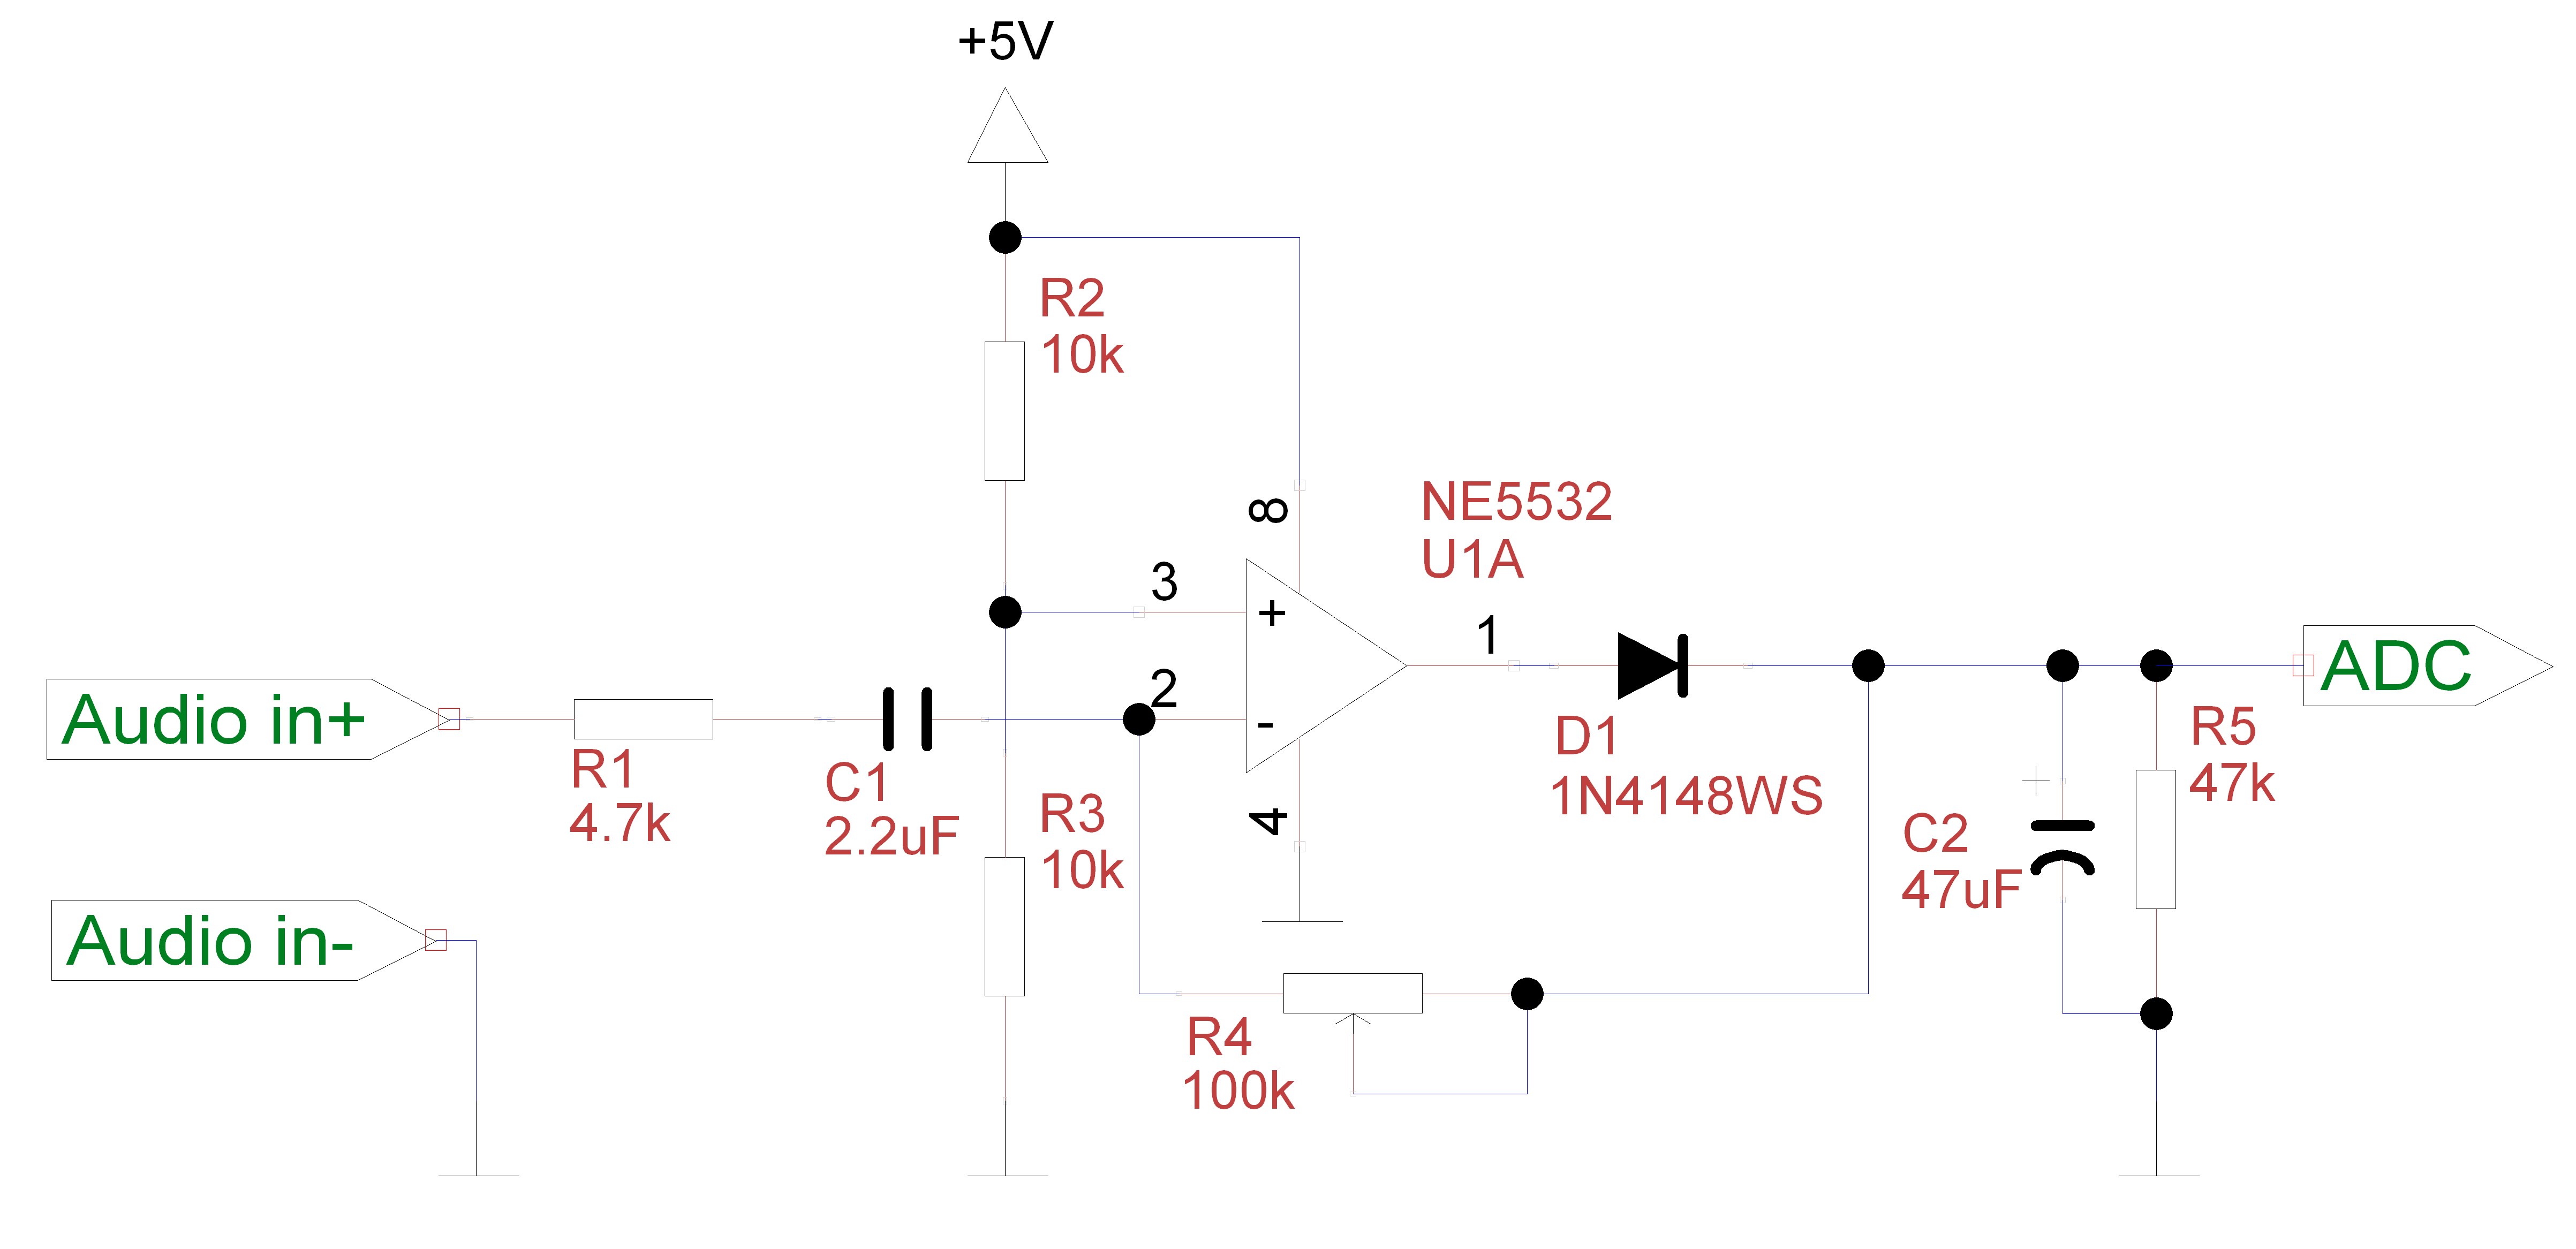
    Fig 2. shows such an envelope detector circuit.

    Fig. 2

    Apart from the operating voltage, it is only important that the opamp has a rail-to-rail output swing. The LMV358 can also be used, for example.

  • Videos​

    M. Bindhammer12/02/2023 at 11:38 0 comments

  • Extracting piperine from black pepper

    M. Bindhammer11/27/2023 at 19:42 0 comments

    Piperine is a piperidine alkaloid from the group of acid amide alkaloids. It is the amide of piperic acid and piperidine and forms a colorless to yellowish solid with a monoclinic crystal structure. It is the source of the pungent pepper flavor. In order to develop a reliable colorimetric test for piperine, I need the substance to be relatively pure. Out of interest, I have decided to isolate the piperine from the black pepper myself using various methods. The yield is not particularly high but sufficient for my experiments. Please check out the video for more information.

  • Modelling the Pt1000 temperature sensor & building a thermostat

    M. Bindhammer11/23/2023 at 18:03 0 comments

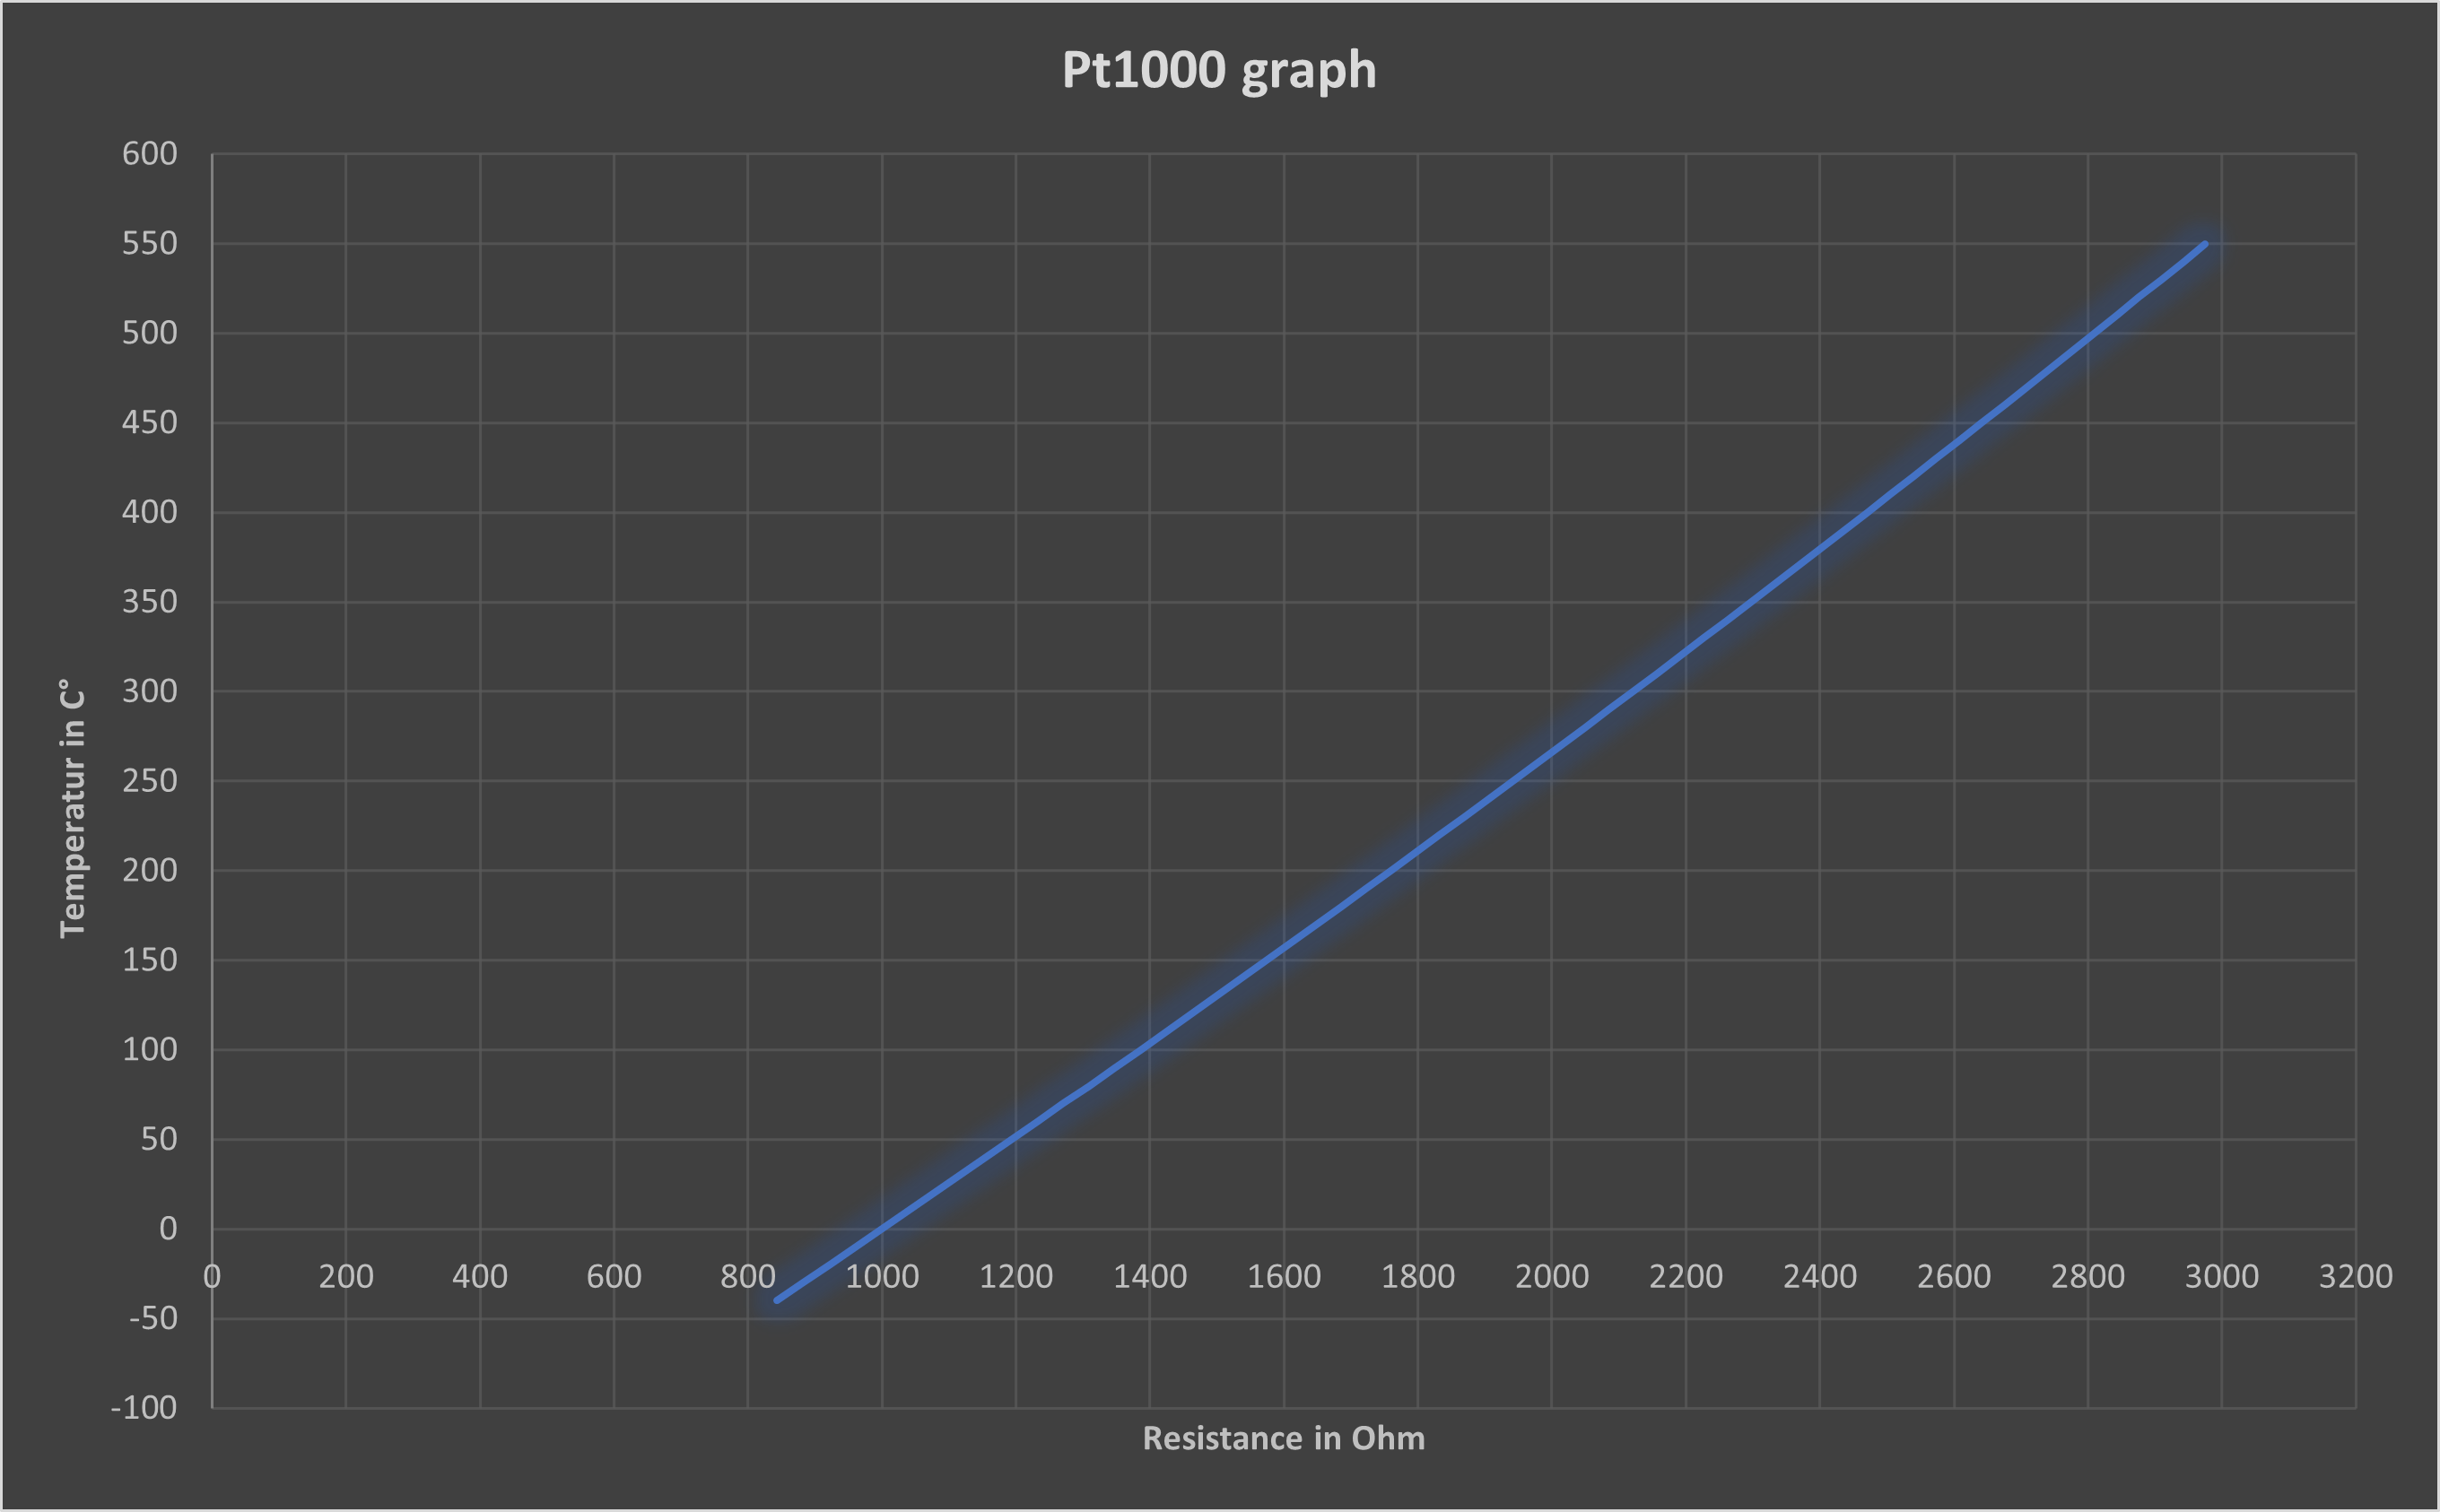
    The characteristic curve of the Pt1000 is as follows:

    Fig. 1

    It can be assumed to be a good approximation of a straight line. However, we can do little with this, as the microcontroller measures the voltage at the output of the opamp. The microcontroller maps the input voltages between 0 and 5 V to integer values between 0 and 1023. We do not need to convert the measured voltage back into volts, it is sufficient to make a note of the analogRead() values. During the measurements, the Pt1000 is simply replaced by a potentiometer whose resistance is set according to the characteristic curve of the Pt1000 so that it corresponds to a certain temperature, for example, 1000 Ω at 0 °C and 1385 Ω at 100 °C.

    Fig. 2

    If we assume in the best case that the analogRead() value is also linearly dependent on the temperature, two measuring points are sufficient and we can determine the corresponding linear equation using the two-point form:

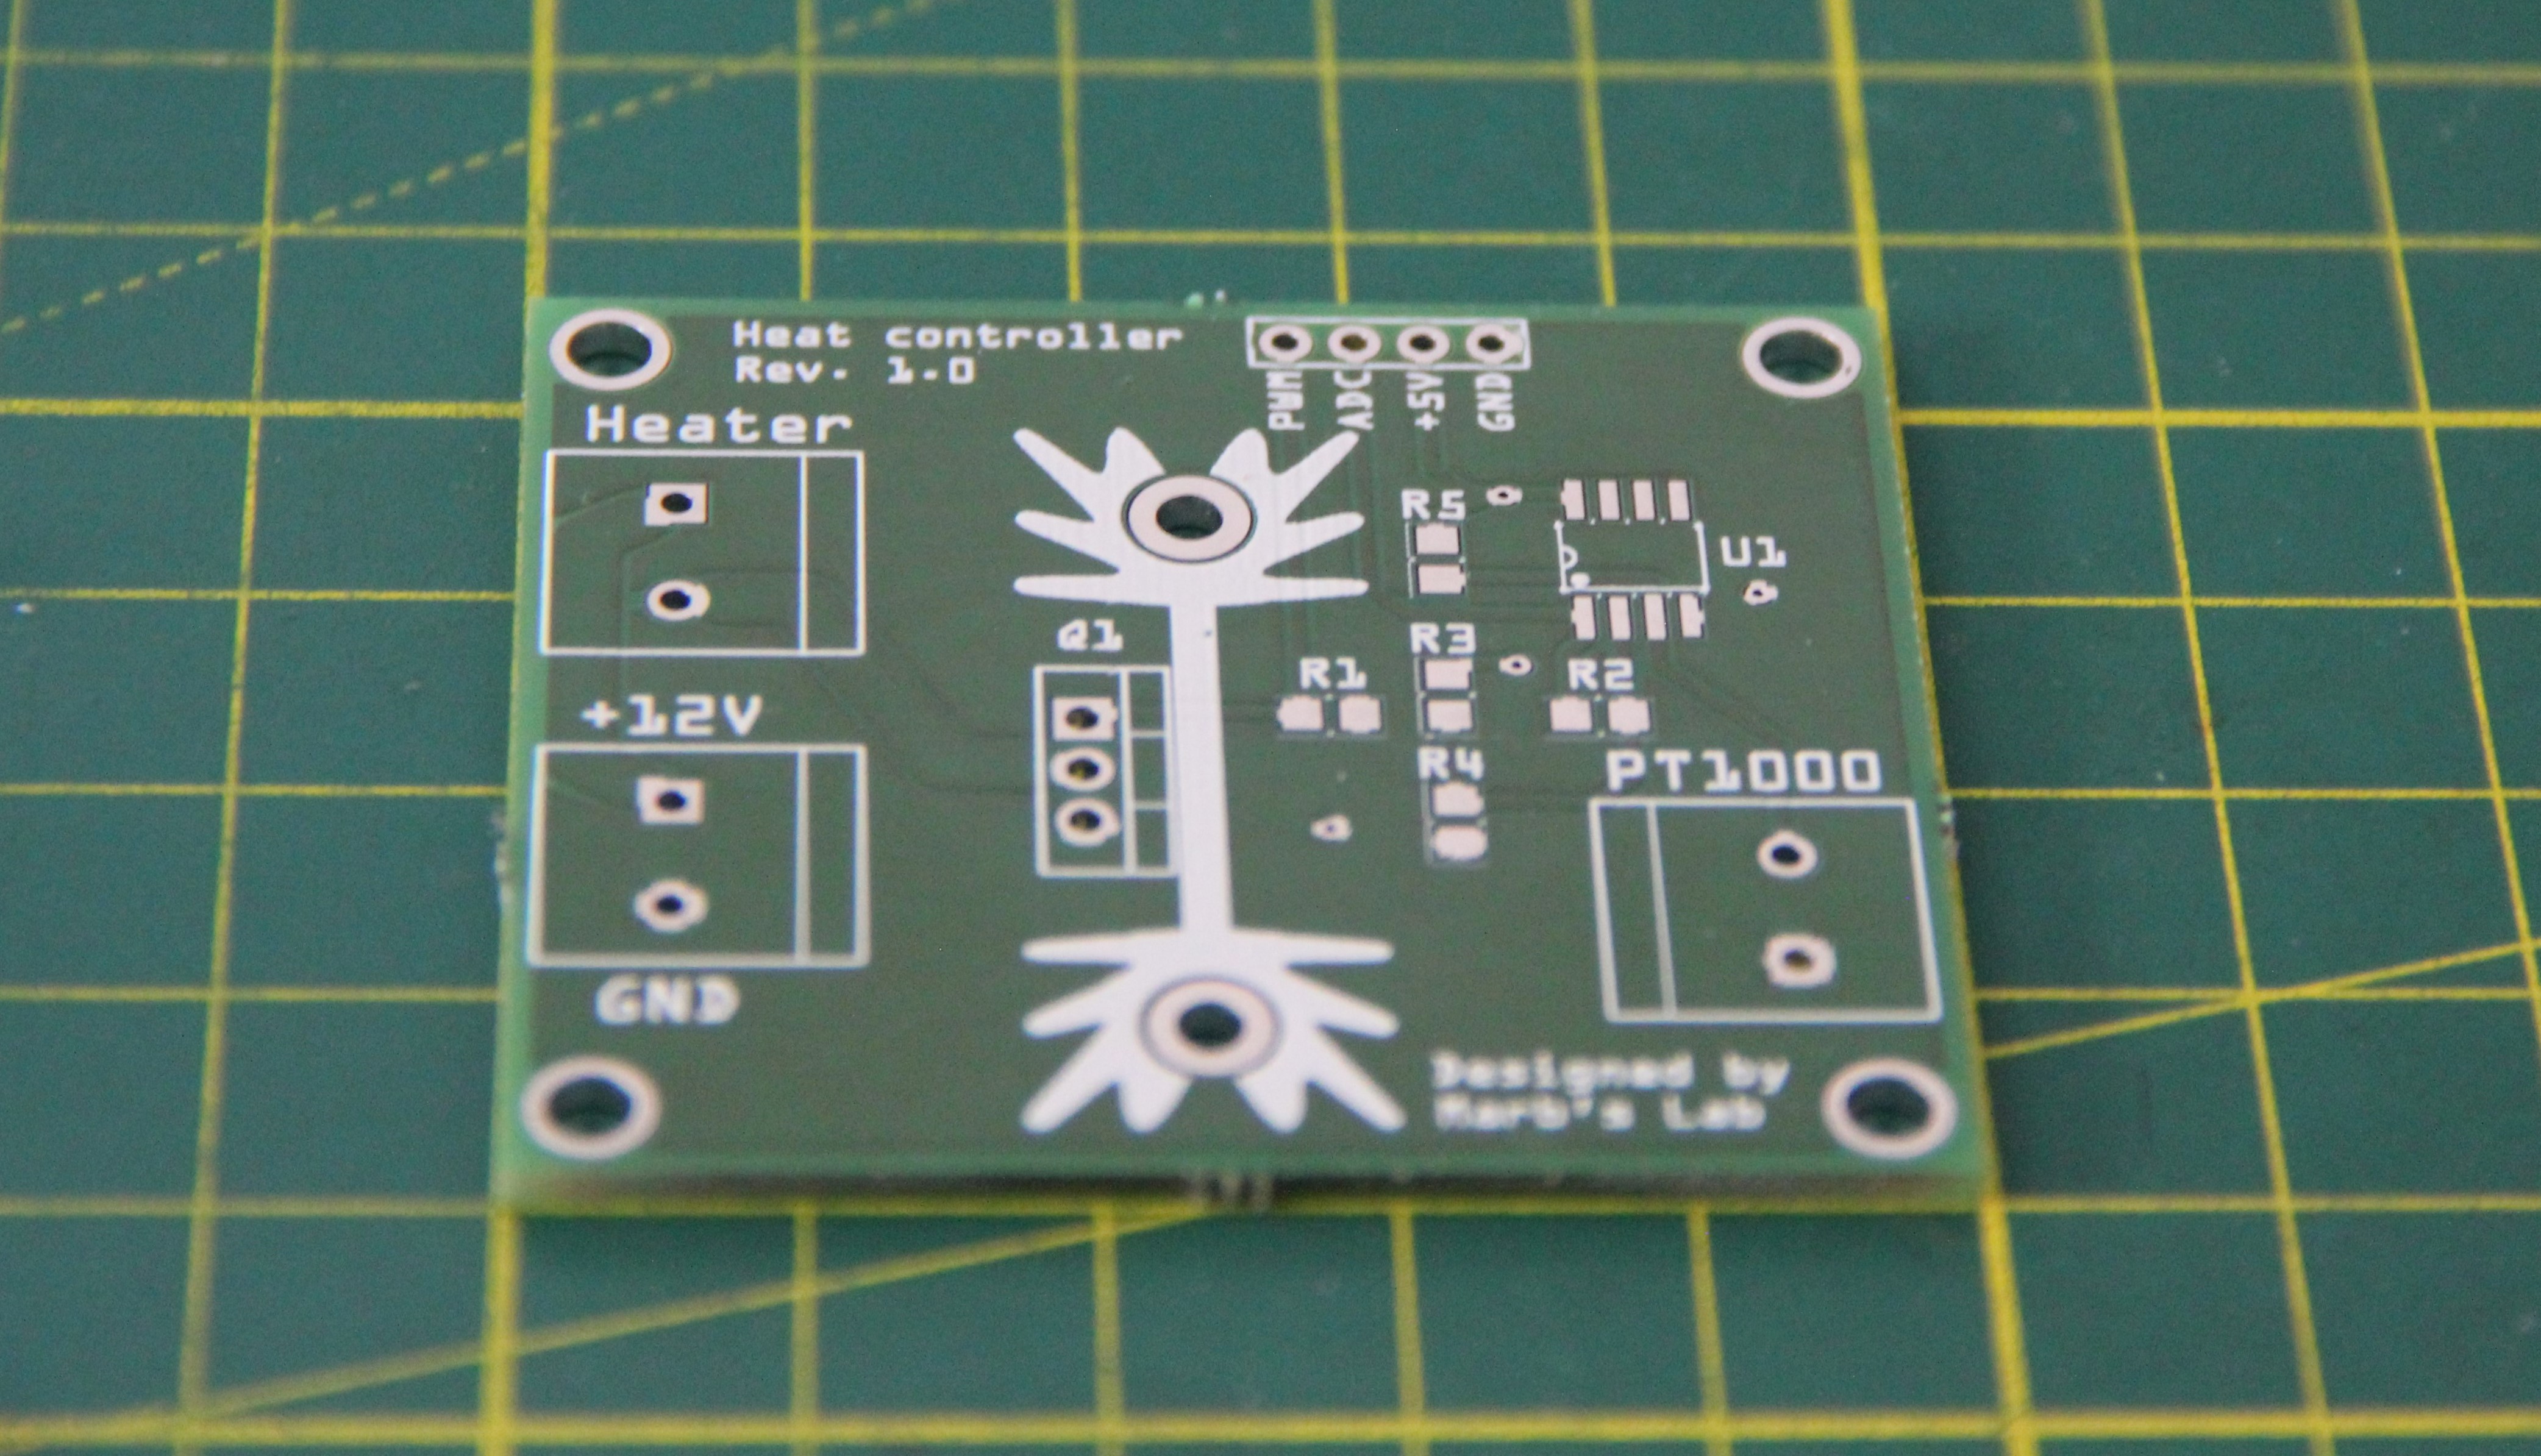
    A PCB was designed according to Fig. 2, with an additional logic level n-channel power MOSFET (RFP30N06LE) for switching the heating cartridge.

    Fig. 3

    Fig. 4

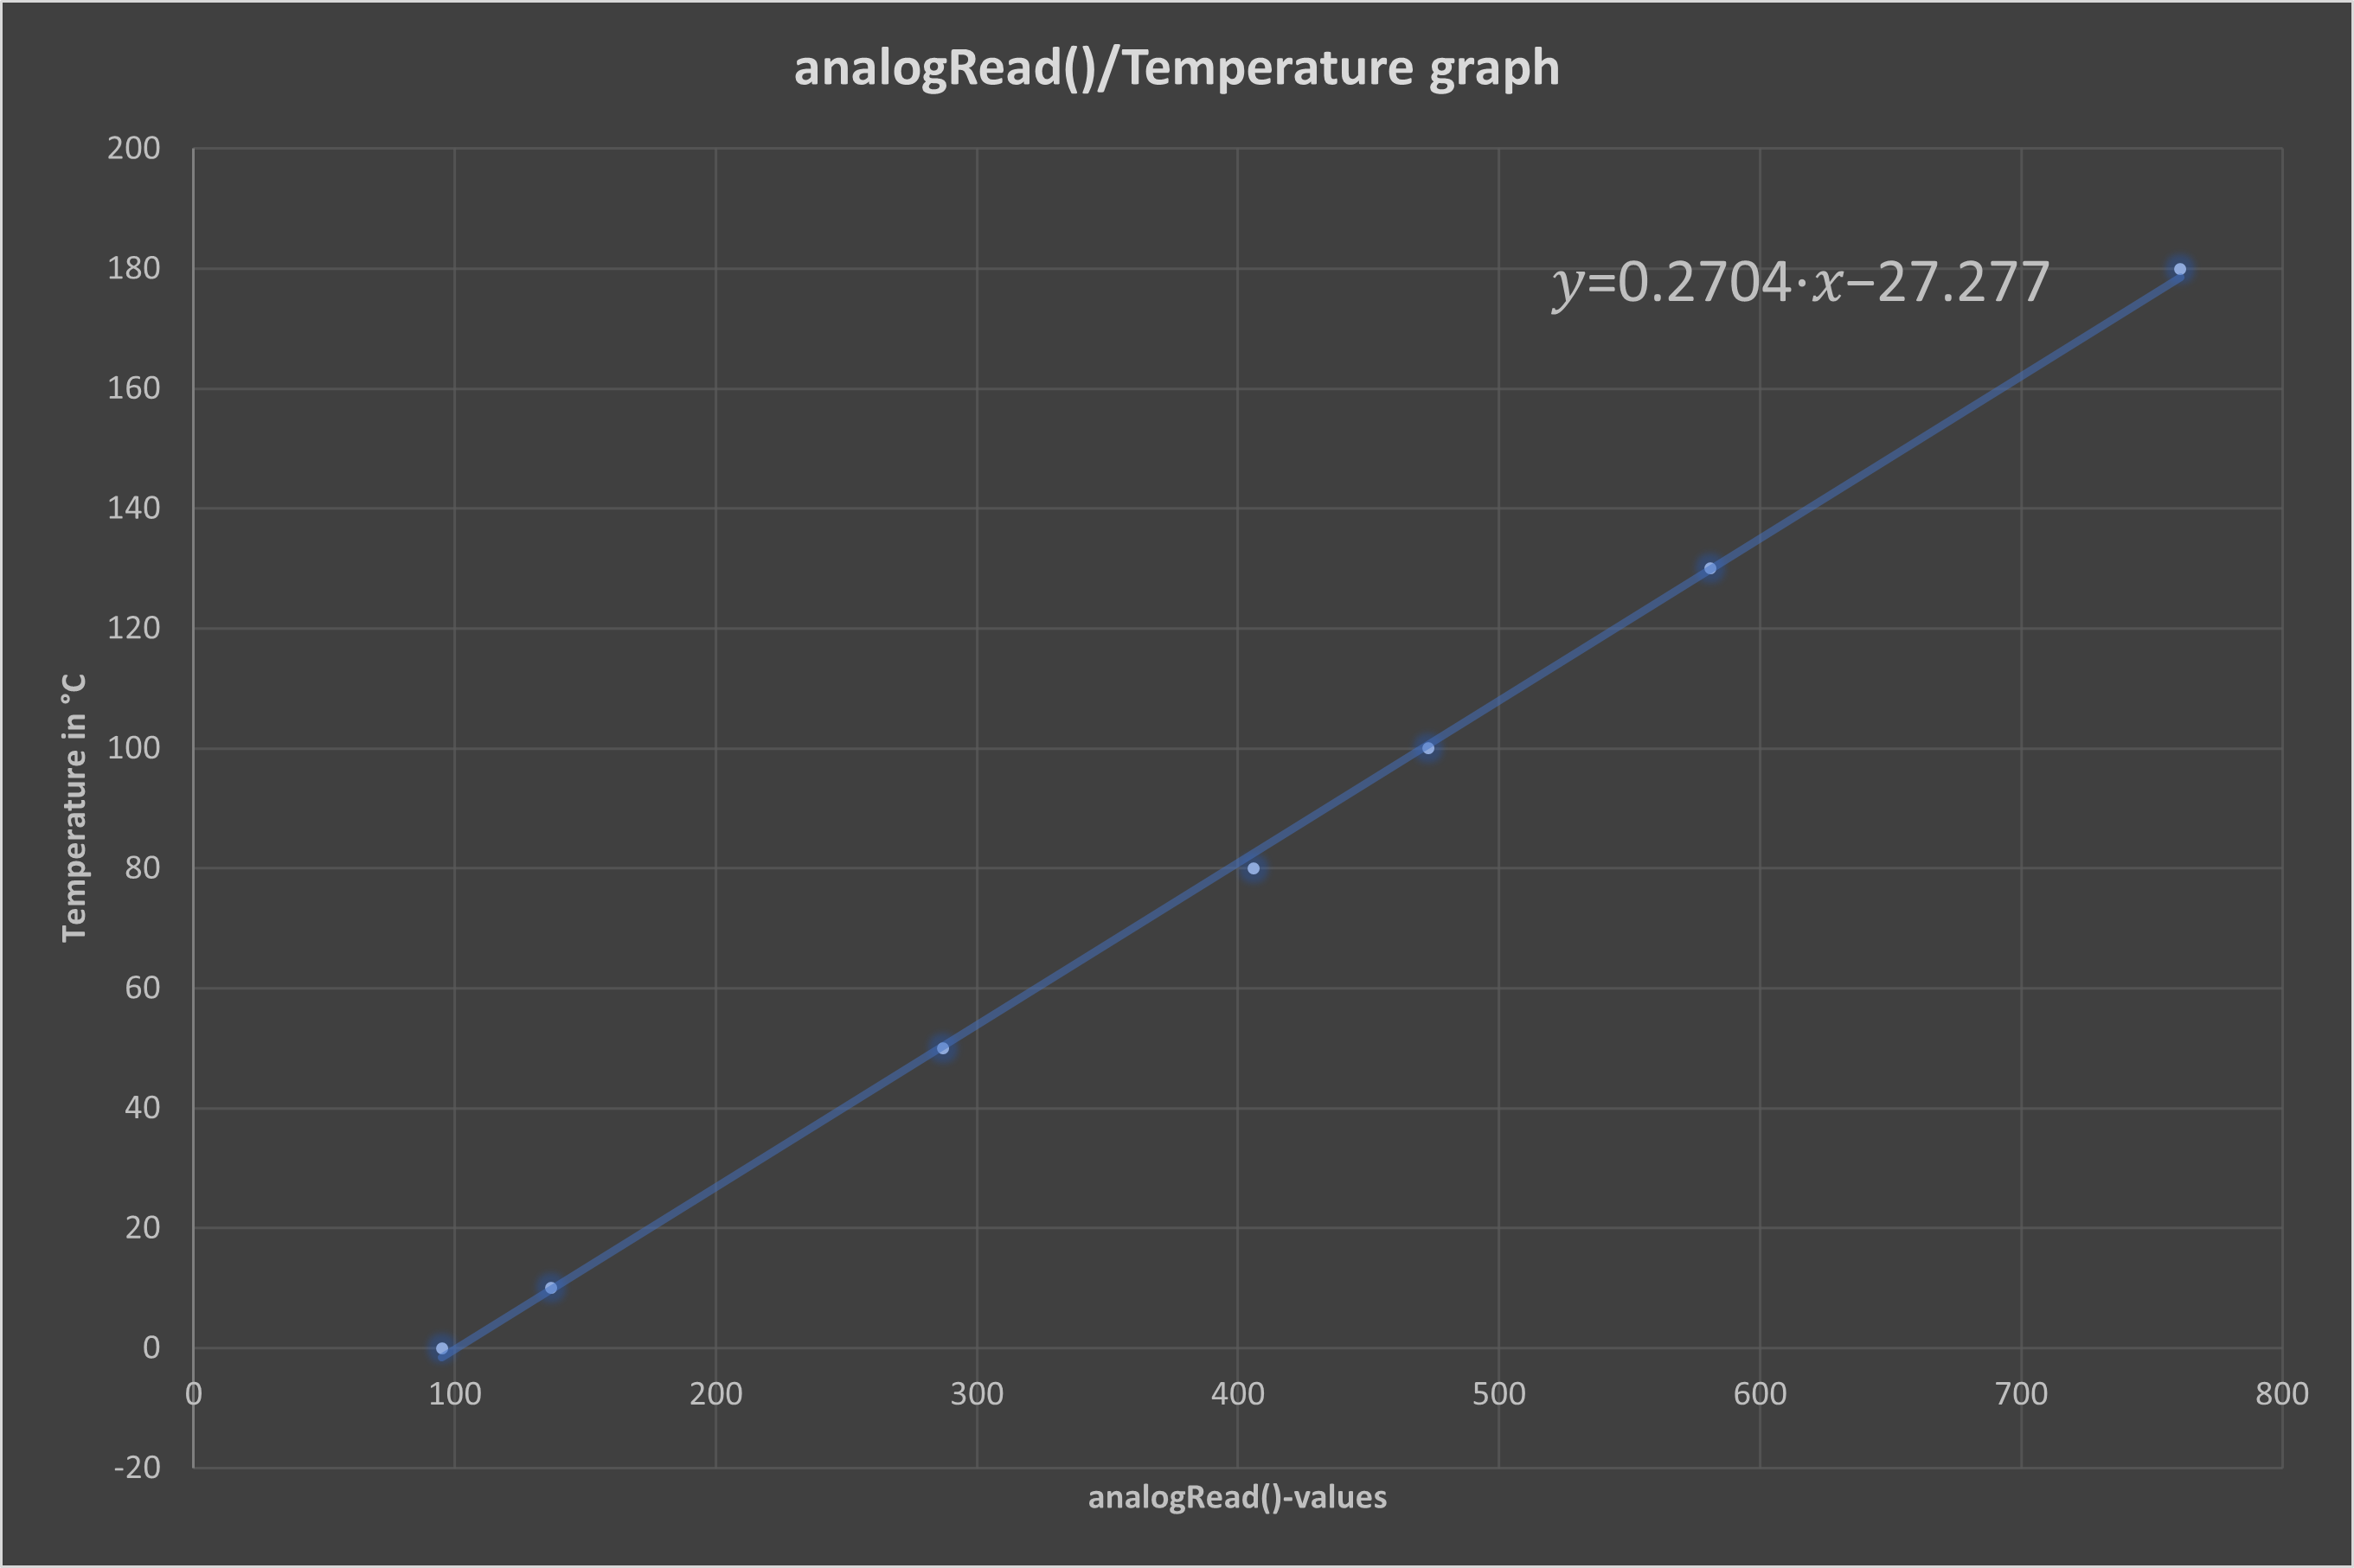
    After a few measurements, it is clear that our assumption of linearity is correct.

    Fig. 5

    Using linear regression, the following function is obtained:

    The maximum value of the analogRead()-value for this opamp configuration is 764, which corresponds to 3.73 V (10-bit ADC resolution, 5 V-microcontroller).

    Unfortunately, the Pt1000 I bought does not correspond to the characteristic curve in Fig. 1. I then noted the analogRead()-values at 100 °C and 12°C. To do this, the sensor was immersed in water at the corresponding temperatures (I used a laboratory thermometer to measure the water temperature), and the function was recalculated:

    In the meantime, I have developed the glucose receptor a little further. It was mounted on an aluminum plate and fitted with two heat sinks.

    Fig. 6

    I am using a PID algorithm to control the temperature. The code is mainly adapted from here.

    // Pins
    int PWM_pin = 9;
    
    // Variables
    float temperature_read = 0.0;
    float set_temperature = 100;
    float PID_error = 0;
    float previous_error = 0;
    float elapsedTime, Time, timePrev;
    int PID_value = 0;
    
    // PID constants
    int kp = 15.0;   int ki = 0.3;   int kd = 1.8;
    int PID_p = 0;    int PID_i = 0;    int PID_d = 0;
    
    
    void setup() {
      Serial.begin(9600);
      pinMode(PWM_pin,OUTPUT);
      // Set timer 2 divisor to 32 for PWM frequency of 980.39 Hz
      // on pin D9 and D10 (Arduino Mega)
      TCCR2B = TCCR2B & B11111000 | B00000011; 
      Time = millis(); 
    }
    
    
    void loop() {
      // First we read the real value of temperature
      int AD_C = 0;
      AD_C = analogRead(0);
      temperature_read = 0.3548 * AD_C - 45.839;
      // Next we calculate the error between the setpoint and the real value
      PID_error = set_temperature - temperature_read;
      // Calculate the P value
      PID_p = kp * PID_error;
      // Calculate the I value in a range on +-3
      if(-3 < PID_error <3)
      {
        PID_i = PID_i + (ki * PID_error);
      }
      // For derivative we need real time to calculate speed change rate
      timePrev = Time; // the previous time is stored before the actual time read
      Time = millis(); // actual time read
      elapsedTime = (Time - timePrev) / 1000; 
      // Now we can calculate the D calue
      PID_d = kd*((PID_error - previous_error)/elapsedTime);
      // Final total PID value is the sum of P + I + D
      PID_value = PID_p + PID_i + PID_d;
      // We define PWM range between 0 and 255
      if(PID_value < 0)
      {    PID_value = 0;    }
      if(PID_value > 255)  
      {    PID_value = 255;  }
      // Now we can write the PWM signal to the mosfet on digital pin D9
      analogWrite(PWM_pin, PID_value);
      Serial.println(PID_value);
      previous_error = PID_error; // Remember to store the previous error for next loop.
      delay(300);
      Serial.print("Set temperature: ");
      Serial.println(set_temperature);
      Serial.print("Real temperature: ");
      Serial.println (temperature_read);
      Serial.println("");
    }

    The constants must be determined experimentally.

View all 5 project logs

Enjoy this project?

Share

Discussions

John Opsahl wrote 11/27/2023 at 22:18 point

Great project! I have always wondered if there is a cheap way to "electronically sniff" whether a target substance is in a room. Like if you could create a device that could detect the presence of bananas in an environment. I would even settle for something that could detect bananas in the room while a banana was in a food processor or hot pot open to the air. 

  Are you sure? yes | no

M. Bindhammer wrote 11/28/2023 at 09:33 point

Thanks, John. Let's see which odors the robot can distinguish.

  Are you sure? yes | no

marblypup wrote 11/17/2023 at 16:40 point

Interesting! I recently read about a new "electronic nose": https://www.osmo.ai/
Probably costs a lot more than yours, though!
Now, if I could just get a cheap GC/MS :-D

  Are you sure? yes | no

M. Bindhammer wrote 11/17/2023 at 17:13 point

Over the next few days, I'll be writing a bit more about the electronic nose in my project. I have worked with GC/MS, LC/MS, and ICP/MS (Agilent) in my previous job. These are not only extremely expensive, the operator has to be specially trained on a device and the chemical preparation of the samples is time-consuming and complicated.

  Are you sure? yes | no

Similar Projects

Does this project spark your interest?

Become a member to follow this project and never miss any updates