 Brian Carbonette
-
1Step 1
Getting Started
Hardware
I've decided to use the Arduino MKR1000 as the hardware platform for this project, for a few reasons...
- Similarly sized form factor to dash button.
- 100% Arduino IDE compatible.
- Utilizes the Atmel ATWINC1500 WiFi Module(TLS capable w/ onboard SHA-256 encryption).
- ARM SAMD21 Cortex-M0 (256KB of Flash : ) ).
- LiPo Battery JST plug for portability.
That being said this library should work well with any ATWINC1500 WiFi enabled Arduino that uses the WiFi 101 library. Other options could include an Arduino Zero or Due sporting the WiFi101 shield, an Adafruit MO WiFi Feather, or really any Arduino with sufficient space, and Atmel's ATWINC1500 WiFi module.
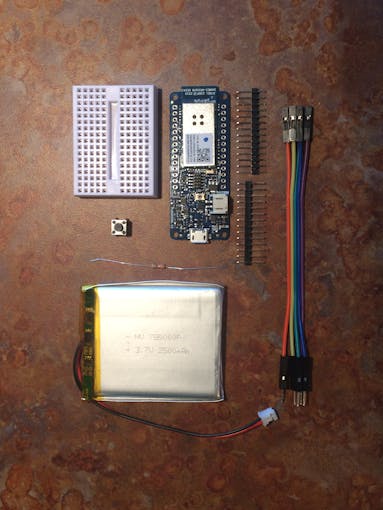
Here's what you'll need...
![Arduino MKR1000 w/ header pins, push button, female-male jumpers, resistor LiPo battery, breadboard]() Arduino MKR1000 w/ header pins, push button,
Arduino MKR1000 w/ header pins, push button,female-male jumpers, resistor LiPo battery, breadboard
The battery is of course optional and the resistor can be of any value really. We're just using it to pull down one of the push button pins to ground. The small push button will have 4 pins that are organized into two pairs. You'll want to bridge the gap in the breadboard by placing the button so that the longer gap between pins is utilized to span the space between the two sides of the breadboard.
-
2Step 2
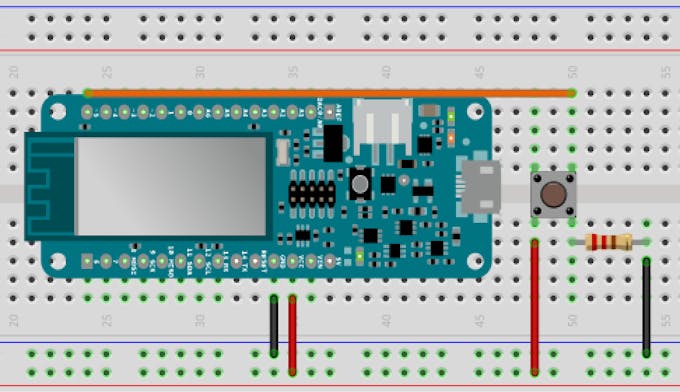
Time to wire up the breadboard like so...
![Fritzing Breadboard View]() Fritzing Breadboard View
Fritzing Breadboard ViewAny digital I/O pin will do for the pushbutton. Just remember to set
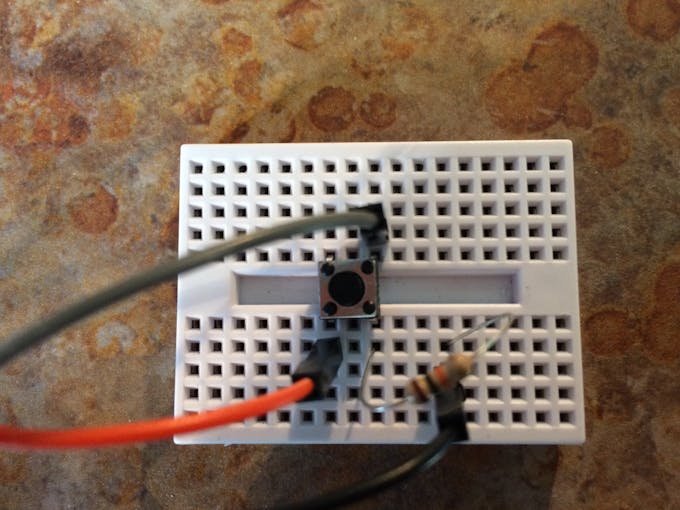
const int dashButton = 14; //DIO number of the pushbutton pinto whichever pin you end up choosing. I've used jumper cables and a smaller breadboard so my final configuration looks like this...
![Breadboard Arduino Dash Button]() Breadboard Arduino Dash Button
Breadboard Arduino Dash ButtonIf you feel like making this a bit more portable you can grab a prototype board, and a header plug to create a sort of push button shield for the MKR1000.
![Dash Button Shield]() Dash Button Shield
Dash Button Shield -
3Step 3
Software
The initial setup procedure and configuration does involve a good amount of steps but once you are set up and configured the development process becomes that much easier. I've written a full fledged getting started guide in the readme/wiki pages located at the AmazonDRS GitHub repo which I'll paraphrase in this section. If you haven't set up "Login with Amazon", AWS SNS, your dash device, or stepped through the authCodeGrant example sketch head over to the repo wiki and follow along. By the time you come back you should have...
- Imported the AmazonDRS library into your Arduino IDE, as well as the Arduino Wifi101 and ArduinoJson libraries.
- Created your LWA Security Profile, created a Dash Replenishment Device, and your Amazon Web Services Simple Notification Service configuration.
- Completed the LWA Authorization Code Grant process and exchanged your auth_code for your refresh token by running the authCodeGrant example sketch.
- Updated the AmazonTokens.h header file in your AmazonDRS library 'src' directory with values for...client id, client secret, refresh token, and redirect uri.
If you've made it this far you're ready to test your new Arduino dash button! Let's take a look at the sketch in detail.
-
4Step 4
Arduino Example Sketch
amazonDashButton
#include "AmazonDRS.h" AmazonDRS DRS = AmazonDRS(); //WiFi creds ----------------------------------------------------------------- char ssid[] = ""; // your network SSID (name) char pass[] = ""; // your network password //---------------------------------------------------------------------------- #define slotNumber 1 //dash buttons typically only serve one product/slot const int dashButton = 14; //DIO number of the pushbutton pin static long buttonHigh = 0; //millis of last button push for switch debounce static String slotStatus = "";//boolean if slot is available for replenishment static String slotId = ""; //unique slot id void setup() { Serial.begin(115200); while (!Serial) { ; // wait for serial port to connect. Needed for native USB port only } pinMode(dashButton, INPUT); //Start up DRS DRS.begin(ssid,pass); //initialize slots DRS.retrieveSubscriptionInfo(); //check slot statuses slotStatus = DRS.getSlotStatus(slotNumber); slotId = DRS.getSlotId(slotNumber); } void loop() { //Check for button push on the arduino dash button //if the slot status is true proceed to request replenishment for the associated slot if (buttonPushed()) { //Check if slot is available, if so replenish if(slotStatus == "true") //if the product in slot are available { //we have a match! replenish the products associated with that slot! DRS.requestReplenishmentForSlot(slotId); } else { Serial.print("Sorry, slot "); Serial.print(slotId); Serial.println(" is not available at this time"); } } } bool buttonPushed(void) { int buttonState = digitalRead(dashButton); if(buttonState && ((millis() - buttonHigh) > 5000)) { buttonHigh = millis(); Serial.println("Button pressed!!"); return true; } else { return false; } } -
5Step 5
Parsing through the example sketch...
The sketch starts out by including our libraries header file and instantiating our DRS object which we'll use to access the DRS API endpoints exposed by the library. The first lines you'll need to edit are the WiFi SSID and password.
//WiFi creds -----------------------------------------------------------------
char ssid[] = "yourSSIDhere"; //  your network SSID (name)
char pass[] = "yourPasswordHere";    // your network password
//----------------------------------------------------------------------------
Fill in these values so we can initialize DRS and connect our button to WiFi. Next we'll want to take note of some constants and global variables.
#define slotNumber 1 //dash buttons typically only serve one product/slotSlotNumber refers to the number representing the slot in your Dash Replenishment Device that you created earlier on. You may have created multiple slots for the device, currently this sketch is only configured to purchase one item from one slot. (Just like a dash button).
const int dashButton = 14;    //DIO number of the pushbutton pin
static long buttonHigh = 0;   //millis of last button push for switch debounce
These variables are used to handle details around the button push. Be sure to set dashButton = to whichever digital I/O pin you've decided to connect to your push button.
ButtonHigh is a sort of flag thats sole purpose is to prevent you from overloading the sketch/API with a burst of subsequent purchase requests. Switches can send some mixed signals when switching from pressed to released and vice versa. This just prevents those fluctuations from being processed as additional requests to purchase. You'll notice once the button press is registered it takes about 5 seconds for the switch to respond again. That magic happens here in the buttonPushed() function.
if(buttonState && ((millis() - buttonHigh) > 5000))Check out this great article on switch debounce if for some reason this topic really gets your juices flowing. The author does a great job of explaining this topic in detail and suggests a much more elegant software debounce solution that would come in handy for applications that require more frequent button pushes.
static String slotStatus = "";//boolean if slot is available for replenishment
static String slotId = "";    //unique slot id
SlotStatus and SlotId will store the information contained in the response of...
DRS.retrieveSubscriptionInfo(); //check slot statusesThis method is responsible for carrying out the /subscriptionInfo API endpoint. It'll return to us and store the slotId and slotStatus for the slotNumber we requested.
 slotStatus = DRS.getSlotStatus(slotNumber);
 slotId = DRS.getSlotId(slotNumber);
If for whatever reason that product isn't available our sketch will now be able to let us know. We also now possess the slotId which we'll need to pass to...
DRS.requestReplenishmentForSlot(slotId);
in order to place your order. If all goes well you'll receive an OrderPlacedNotification and an e-mail alerting your to the purchase. Any subsequent requests for replenishment will return an OrderInProgress response.
Ok, so burn this sketch on over to your Arduino and open up a serial terminal! Don't forget to set the baud rate to 115200. Give it a moment to connect to the network and update your the status of your devices slots. Then go ahed... push the button... do it!
Don't worry about actually purchasing something and having to cancel the order. Back when you created the "Login with Amazon" consent request we tagged the device as a test device. So we'll still receive purchase notifications as if the product was bought, but that's it. If you get a shipment notification you might want to back track!(and expect a surprise gift in a ~2days)
-
6Step 6
Yay!
You've done it! You've just initiated a purchase of a product on Amazon by pressing a pushbutton connected to an Arduino! This is great! But if you're like me this will start to get your mind racing on how else you can creatively "Push" the button and order things on Amazon.
Need some more inspiration? There are a bunch of great ideas bouncing around the Amazon DRS Developer Challenge. Also stay tuned for another project write up I'm working on which incorporates NFC! You can take a sneak peak by checking out the amazonDashNfc example sketch.
If you have any questions feel free to drop a line in the comments and I'll do my best to help out!
Enjoy!
Amazon Dash Button for Arduino!
A project using the AmazonDRS library for WiFi101 connected Arduinos. Just like the AWS IoT button, but completely open source!

Discussions
Become a Hackaday.io Member
Create an account to leave a comment. Already have an account? Log In.