Close
0%
0%

1Charger

OneCharger to rule them all; solar-panel, TEG, dynamo...

Similar projects worth following
A wattmeter and step-down charger for LiFePO4 batteries with CC &CV

* Vin = 4-30V ( peak 36V )
* CV / Vout 1.7-25V
* CC = 0.3 - 5A ( peak 10A )

The charging technique is simple CV and CC, and the LiFePO4 batteries are treated as if they were capacitors. The power source may be TEG (like the powerpot), solar panels, or a dynamo. It can also be charged quickly directly from a car battery. The supply current for the wattmeter is with :
NOKIA 5110 : 7.5 mA.
JLX12864G-086 : 15mA

The device is not (yet) a MPPT charger, even though the wattmeter circuit provides a good basis for taking that step in the future.

Extra feature, “or-ing” diodes:
By connecting several diodes (as many as you wish) in parallel to the primary blocking diode, it is possible to charge multiple batteries at once. However, the most discharged battery should be placed directly after the primary diode.

Background:

I wanted a charger for portable power that could be used with solar panels, TEG elements and dynamo. It was also important that the charger could take all available power. I quickly realized that LiFePO4 are the best batteries available. LiFePO4 batteries have a long shelf-life, can tolerate > 2000 charge cycles, and can accept high charge/discharge currents. They have very little internal resistance, not far from that of a super-capacitor. One of the toughest brands is the A123 Nanophosphate, with 7000 cycles at 1C before it is reduced to 80% of capacity (it can be used for spot welding or to start a car). I also wanted a wattmeter that could work down to 2.8 V (discharged LiFePO4). Long life and durability had highest priority.

Usage:

  • Adjust CV (Vout) on the step-down to battery float voltage
  • Adjust CC (current limit) for smaller batteries (or use 5 A to protect the charger)
  • Estimate min. Vin needed for: step-down = battery float voltage (Vout) + 1 V
  • Connect power source in serial or parallel to achieve sufficient Vin
  • Suggested open voltage: TEG = 2xVin (MPPT)
  • Suggested open voltage: solar panels = 1.25xVin (MPPT)
  • Protect your TEG and solar panels with reverse blocking diodes
  • When charging cells in series, use balancing circuit

Example:

Single cell LiFePO4 (8 Ah)
2x5 W solar panels (5.5 V)in parallel, or 2xTEG (12 V) in parallel (PPXspecial edition)
CV = 3.55 V ( most of the energy is between 3–3.4 V )
CC = 5 A (to protect circuit when charging from car battery)
Reverse blocking diodes in cables (solar panels and TEG)

Charger design:

The heart of the charger is the step-down converter from prodctodc. I have tried at least 10 different models and what I like about this one is it does not heat up much, has a high efficiency, and can take a lot of beating. The modifications I have made to this circuit are simple; I have just inserted a reverse blocking Schottky diode and then moved the voltage sense resistor to the new +Vout. I also replaced the 470 µF Sanyo capacitors with equivalents from Rubycon. This step is not necessary; it is only done as a precaution to ensure a long life. The original Sanyo capacitor has low ESR and seems to work fine. Finally, I inserted a 0.02 Ω current sense resistor before −Vin. This resistor is used by the wattmeter. By connecting several diodes (as many as you wish) in parallel to the primary blocking diode, it is possible to charge multiple batteries at once. However, the most discharged battery should be placed after the primary diode (with CV sense). This is very useful when you leave your basecamp for a while and want to charge several cells. This is also a poor man's balancing circuit; that is, the batteries will soon have equal charge. Personally, I prefer four single cell LiFePO4 that can be combined into one 12 V battery, instead of one hard–wired 12 V battery.

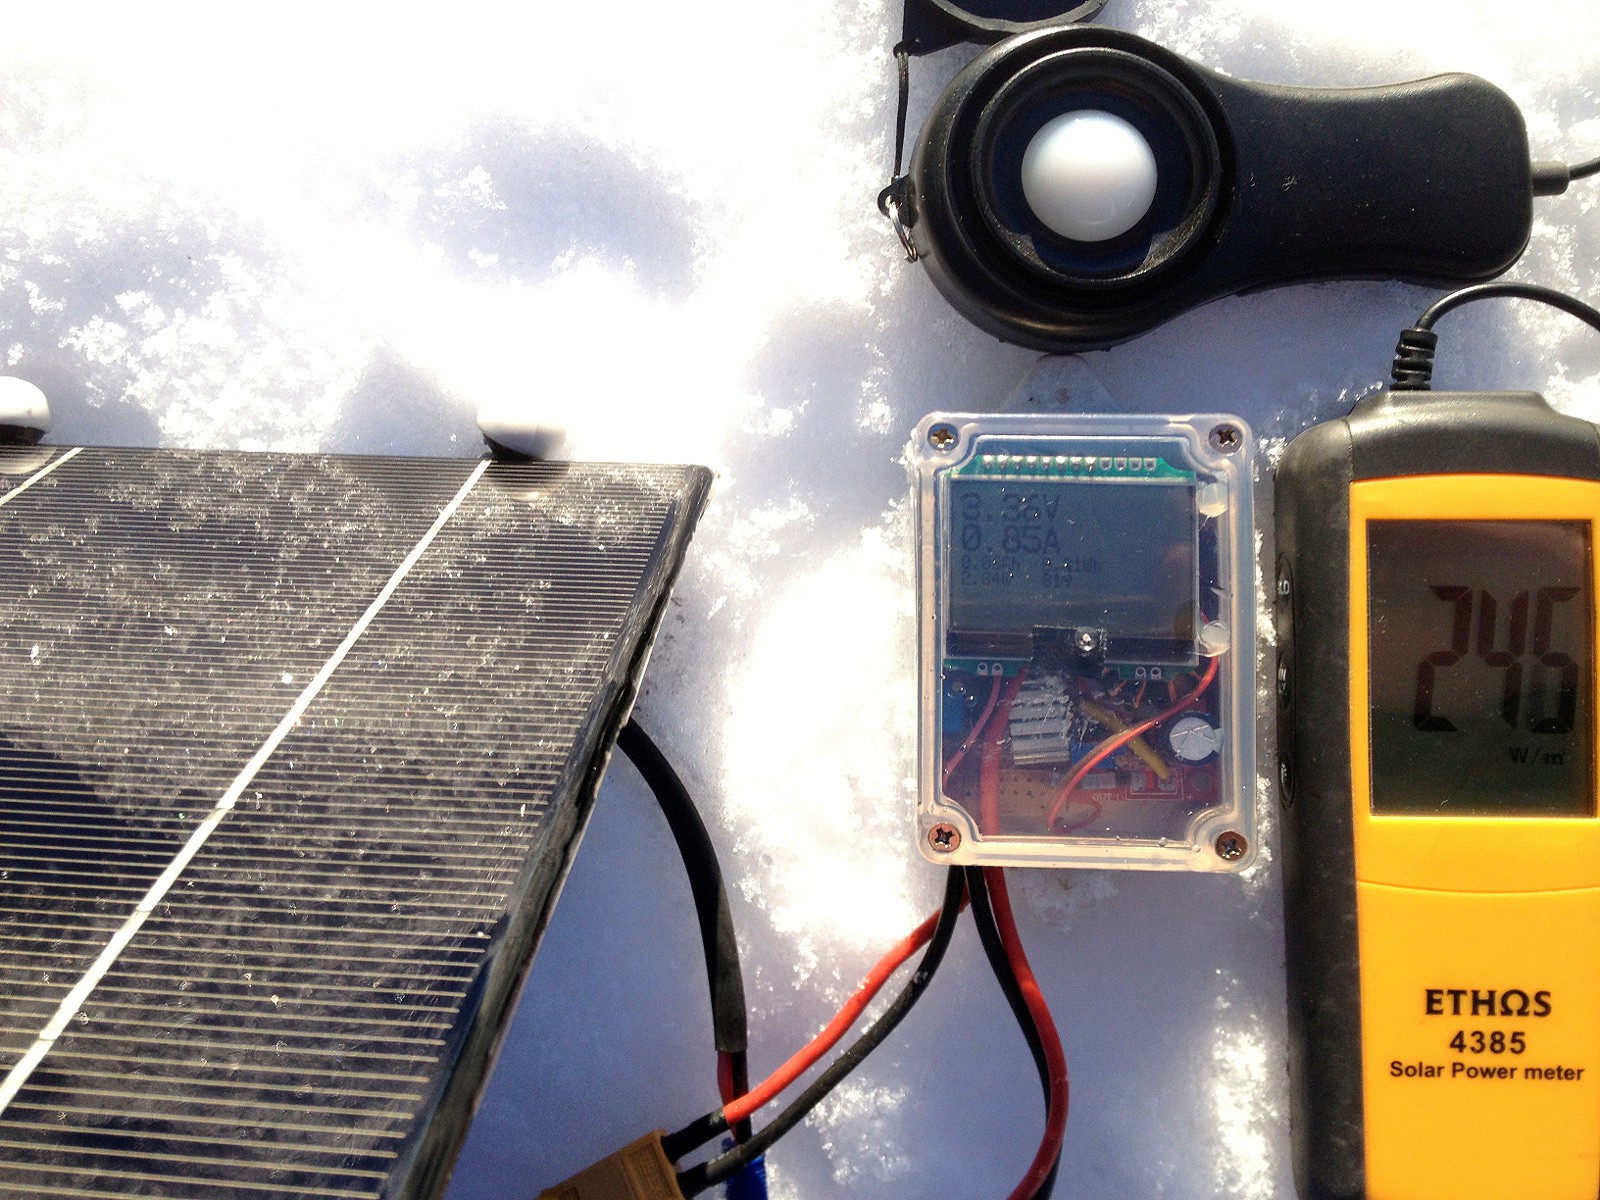
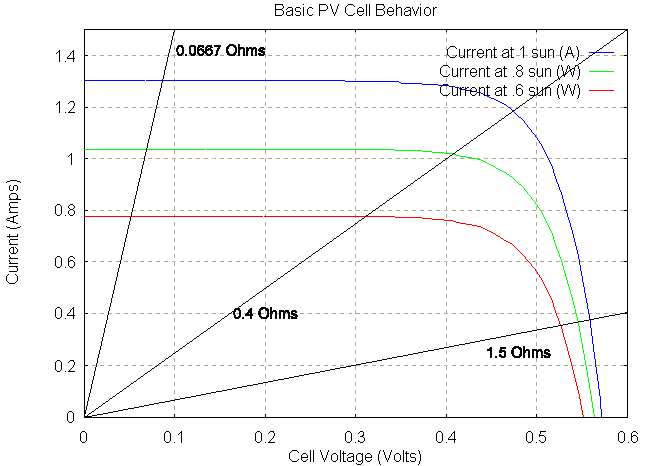
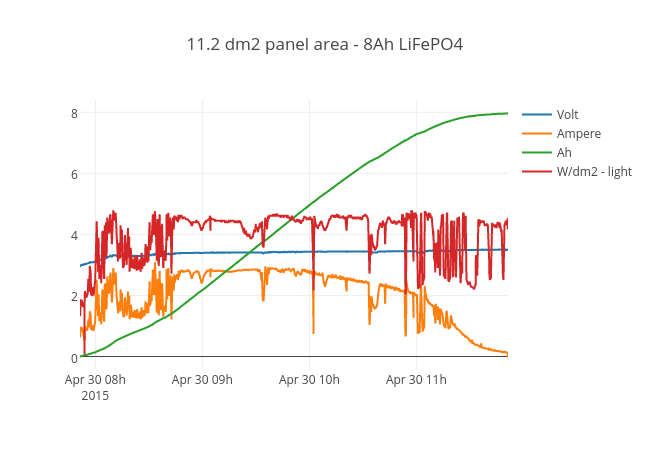
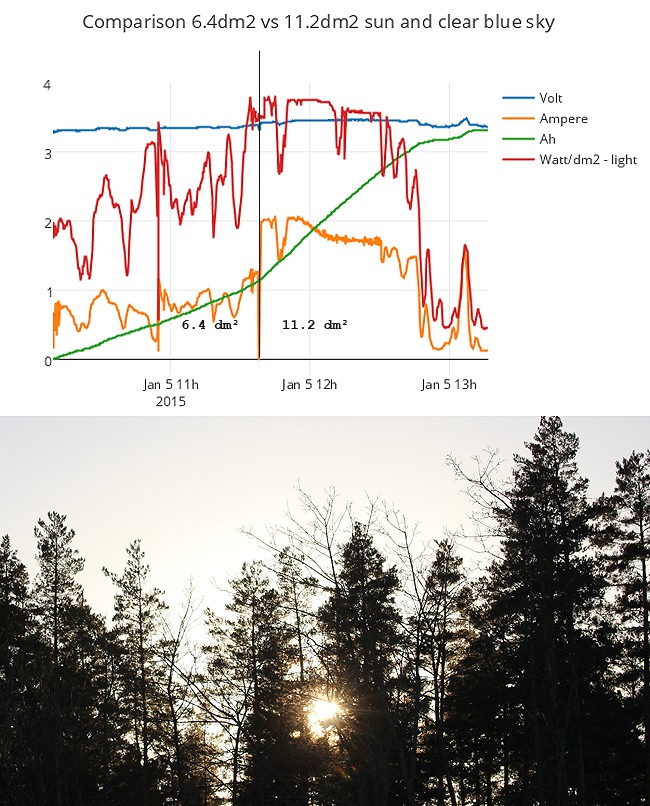
Charging a battery is similar to a short-circuit, where the CC is the current limit. When the power supply is too weak, Vin will break down to approximately 1 V above Vout (battery voltage). To achieve a kind of poor man's MPPT, one should select an appropriate open voltage for the power supply (solar panel = 1.25xVin). A better solution would be MPPT (a future improvement). However, it is still possible to catch 90% of available energy from a 5.5 V panel using this simple approach.

Wattmeter design:

The heart of the wattmeter is a Attiny861 which has differential gain x1, x8, x20, x32. This means there is no need for an op-amp. Attiny861 also has four different Voltage reference sections ( 1.1V, 2.56V, Vcc (3.3V),Aref ). This gives a lot of options. I prefer to use the internal 1.1V and 2.56V Vref ( since this makes the circuit less dependent on the 3.3V supply). The 3.3V (buck-boost) voltage supply to the wattmeter is a gutted ebay voltmeter. It also has a voltage divider. The wattmeter is supplied from the battery ( Vout ). The buck-boost circuit ensure 3.3V when battery voltage varies between 1.7-25V. And finally a low power...

Read more »

View all 8 components

View all 14 project logs

  • 1
    Step 1

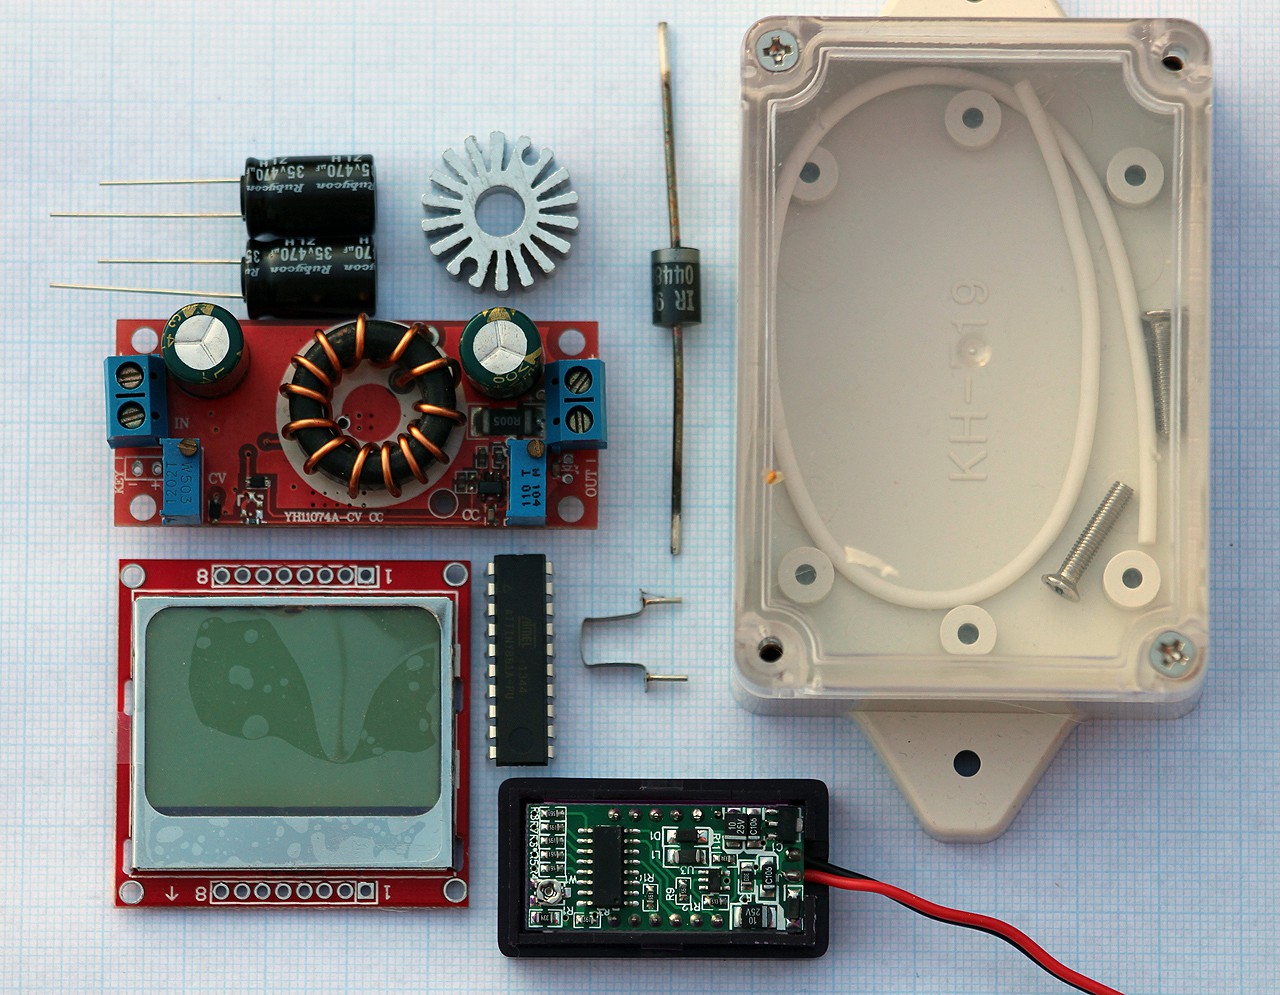
    Essential parts ( less is more ;-)

  • 2
    Step 2

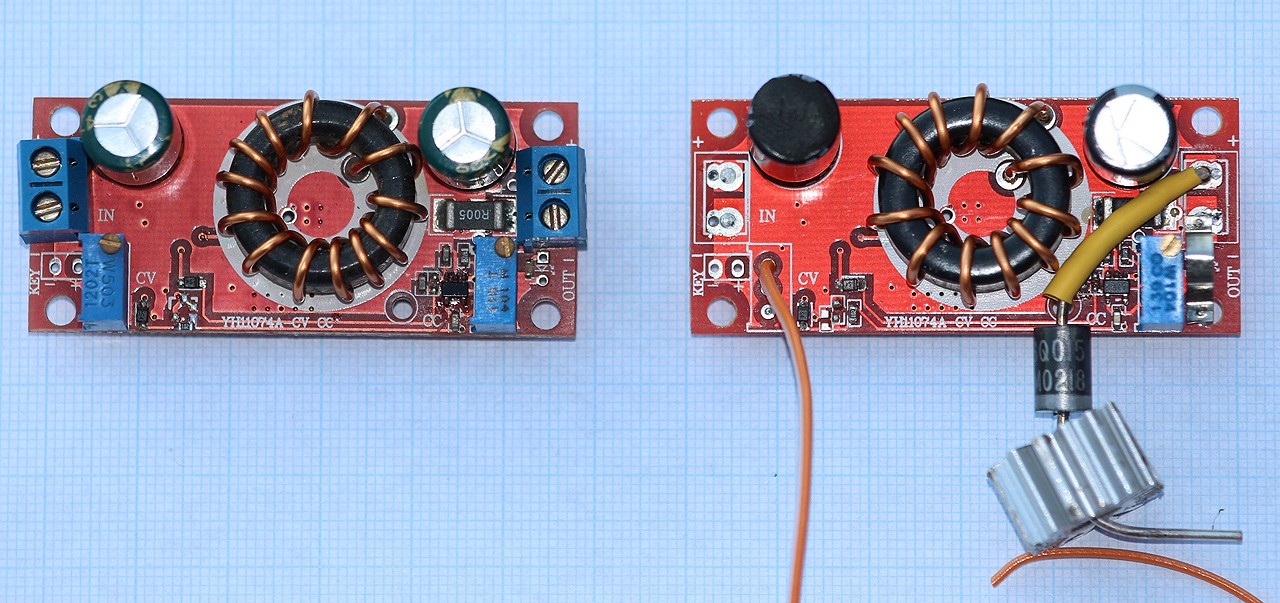
    Initial modifications to step-down circuit

    * Replace Sanyo capacitors with Rubycon 470µF ( optional )

    * Solder reverse blocking diode to Vout+

    * Desolder CV sense potentiometer and solder a wire ( orange )

    * Solder 0.02 Ω current sense resistor to Vout-

  • 3
    Step 3

     buck-boost (3.2)-3.3V from a gutted ebay voltmeter

    ( my guess is it's something similar to a Dickson Doubler with a 3.3V regulator )

    * Desolder CPU

    * Desolder LED ( 7-segment )

    * Solder wire to regulated voltage 3.3 V ( purple )

    * Solder wire to GND ( gray )

    * Solder wire to voltage divider ( yellow )

    * Apply voltage and verify you get 3.3V ( grey-purple) when you vary supply voltage 1.7-25V ( black-red ). Voltage sense( yellow) should vary accordingly if soldered correctly

View all 12 instructions

Enjoy this project?

Share

Discussions

Nathaniel VerLee wrote 07/23/2014 at 15:30 point
You minght consider checking these out: http://www.all-battery.com/Tenergy3.2V10Ah38120SLiFePO4EnergyCellRechargeableBattery-30074.aspx

They are similar to the A123s, cant get quite as high in terms of charge and discharge but they are a lot cheaper and easy to configure in packs with simple screws, washers and plates along with battery holders.

  Are you sure? yes | no

mr.jb wrote 07/23/2014 at 15:49 point
Thanx !! I'm very interested good LiFePO4. I'll check them out.
I prefer prismatic ... with aluminum case. But they rarely have A123 performance.
In the end, durability is my No1 concern.

  Are you sure? yes | no

davedarko wrote 07/18/2014 at 07:18 point
Can you post a schematic / logic-outline of your parts/boards used? Doesn't have to be very detailed but more of a setup sketch would be really cool!

  Are you sure? yes | no

davedarko wrote 07/29/2014 at 19:52 point
thx, hope you will keep it here for a while, because I will need some time figuring out all the other stuff first ;)

  Are you sure? yes | no

davedarko wrote 07/16/2014 at 21:55 point
Hey, do you have any reading material on lifepo4 batteries and how to charge them? I'm planning a bicycle computer project and figured those batteries would be great to use at german wheather conditions (can get goo hot or cold for lipos). Anyways great project!

  Are you sure? yes | no

mr.jb wrote 07/17/2014 at 10:59 point
Check out http://batteryuniversity.com/ ( for the true story ;-)

My approach is to avoid over/under voltage and stay between 2.9 - 3.55V
Most of the energy in a LiFePO4 is 3-3.4V. Charging with < 1-2C is probably more efficient than fast charging ( check the spec for your battery ). In short I treat the LiFePO4 battery like a capacitor. In my case I don't have a power source strong enough to stress it (except car battery )...my charger will break before. My reason for CC is to limit the stress on the charger,. Another reason is when I use it to charge other batteries like Li-ion ( 2s1p camera batteries ).

A123 Nanophosphate is probably one of the best brands on the market
http://www.batteryspace.com/prod-specs/6610_1.pdf
http://insideevs.com/a123-updates-next-gen-nanophosphate-ext-batteries-solves-lithium-battery-heat-issues/

Maximum Continuous Discharging :70A, 28.0C rate
Maximum Impulse Discharging (< 10 sec): 120A, 48.0C rate

10C>=1000 cycles
1C >=7000 cycles

I love this demonstration
https://www.youtube.com/watch?feature=player_detailpage&v=ECzEaTzqFsY&t=53

/JB

Note...when you charge a LiFePO4 battery with a PWM ( step-down circuit ) the load is similar to a short circuit ( due to very low inner resistance ).

  Are you sure? yes | no

davedarko wrote 07/18/2014 at 06:37 point
wow, quite a read. Thanks, definitely going to read that because I know nothing or less about batteries and have to get in to that.

  Are you sure? yes | no

Similar Projects

Does this project spark your interest?

Become a member to follow this project and never miss any updates