 grussell73
-
1Copy medslog file.
If you do not have an account already ensure you have a Google account (Free).
Once you have created the account you need to upload the Spreadsheet (which I've copied here as a file).
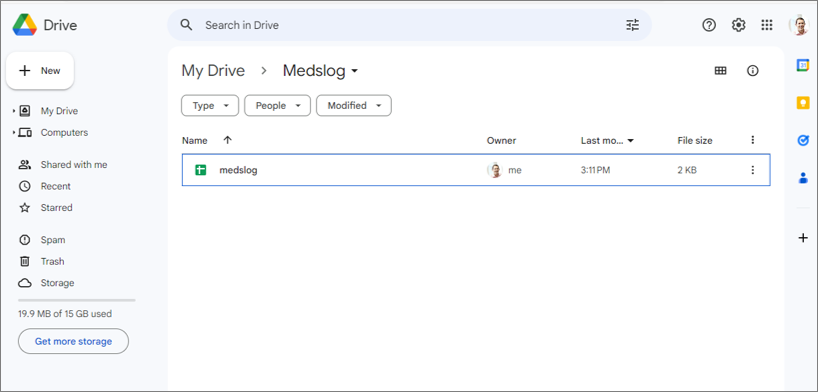
- The easiest way is go into Google Drive https://drive.google.com/
Setup the medslog.ods spreadsheet which will be used to store updates.
- Create a folder called Medslog
- Download the medslog.ods file from this project, and drag this file into your newly created folder.
![]()
- Double-click the newly copied medslog.ods in your Google Drive.
- In the top drop-down choose to Open in Google Sheets (this will now create another file in the same folder - if you wish you can now delete the original medslog.ods file)
- When you first open this document some of the calculations break. To fix this ensure cell G2 is empty. (click on G2 and hit delete). You should see the calculations automatically update. I've put some demo data in here so you can see the calculations working. You should see that cell I8 has the alert message (we will monitor this cell). Leave it for the time being to help us test the solution but before you go live you need to clear the demo data within only columns A to C (simply click the A at the top of the column, and drag your mouse across to the C, now hit delete)
- Because the spreadsheet uses time formulae it's important it automatically updates. Click on File, Settings, Calculation and choose "On change every minute". Also, turn on "Iterative calculation" (this is needed if you also want to link this to LED lights), And make sure the Locale is set to your timezone (under the general tab).
![]()
- Copy and make a note of the URL at the top of the web browser (it will look something like this https://docs.google.com/spreadsheets/d/1Z4xJAbbC-kigvrdF0arSEr7PoDVo-E-t8/edit#gid=0 )
Note: I've made this solution support up to 7 different door sensors. But feel free to customise if you wish. You could have sensors on house doors, add presence sensors or camera movement sensors, so you can check if someone is moving around at home. Aqara has a good selection.
-
2Setup Aqara account
In this solution, I chose to use Aqara door sensors and hub. These had a good rating on Amazon and in my tests have proved reliable and with a long battery-life of 2 years.
However, there are other door sensors that also link to IFTTT which could possibly be used.
Install the Aqara app on your mobile (registering for an Aqara account - make a note of these details)
Install the Aqara sensors by following their instructions. When you install the sensor give it a name that relates to the medication box (e.g. "fridge medication"). If you have multiple boxes to monitor, ensure each related sensor has a unique name.
The alerts will look like this:
[fridge medication] not opened, last opened at 11/11/2023 17:50
-
3Setup an IFTTT
Setup an IFTTT account. (free if you only need 1 sensor, and £2/month if you need more)
Get Started - IFTTT (click sign up)
The solution requires two applets to be created on IFTTT. The applets are simple programs which are a simple activity associated with an event. For instance "IF a door opens, THEN write to an online spreadsheet.". I've tried to keep the IFTTT solution very basic to keep it in the cheapest plan.
Create applet to update Google Sheets from door sensor events
- Create your first applet. Within IFTTT click "Create".
- Now add you first "If This" trigger by clicking "Add"
- Search for your door sensor manufacturer. If you also bought Aqara, search for "aqara" and click on the relevant location.
- Now choose the "Door and window sensor is open" trigger.
- Add your Aqara account
- Choose the sensor device and your done with the "IF" part.
- Now to setup the "Then" (this is what happens when the event occurs)
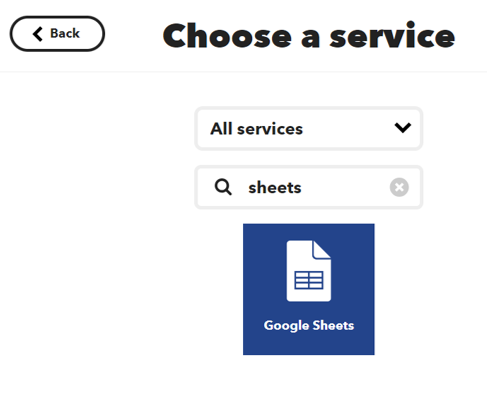
- Seach for Google Sheets
![]()
- You may need to add your Google account using the "Add new account" button.
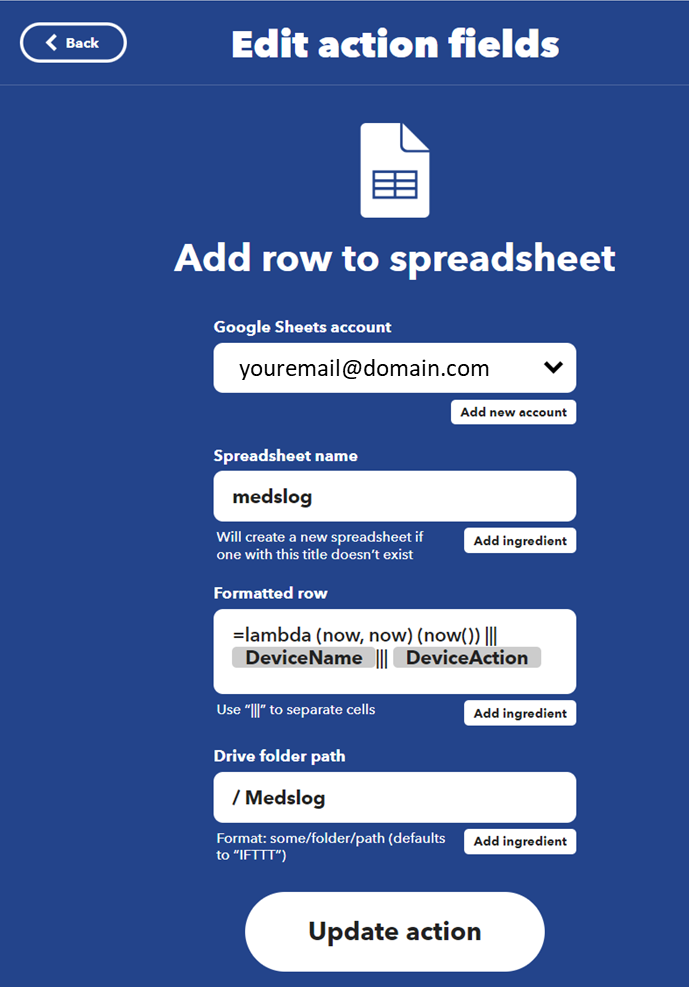
- Then enter the following information
![]()
- For the "Formatted row" you can add the DeviceName and DeviceAction via the "Add ingredient" button. You will need to carefully type the lambda function (and in case you are wondering why this is necessary - there is no Time function variable I can use in IFTTT without paying for a higher tier, and if I use the NOW() or TODAY() Sheet functions they will keep automatically updating to the current time in Sheets, so this was my solution)
- Click Update action
- Note: You need to ensure you have copied the medslog file within this project into the above location - this file has a lot of the logic for the project (instructions above under the Google Account section)
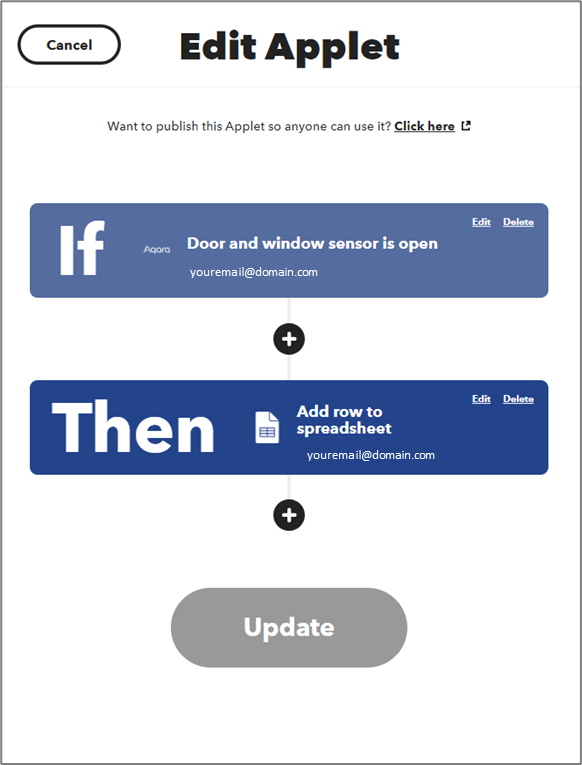
- Your final applet should look like this:
![]()
If you have multiple sensors you will need to perform the above steps for each sensor you own (with 1 sensor you qualify for the free plan, for any more you will need the IFTTT pro plan which is £2.10/month)
Create an applet to notify you if none of the sensors have been triggered today.
- Click on "Create" to create a new applet.
- Click on "Add" (for the "If This")
- Search for "Google Sheets" (click on Google Sheets)
- Now find "Cell updated in spreadsheet" (and click on this)
- Now populate the fields like this
![]()
- Click Update
- Now to setup the Then (this one is easy!)
- Search for "Notification" (click this)
- And choose "Send a notification from the IFTTT app"
- Now click "Add ingredient" and add "Value" like this
![]()
There are other notification types you can use too (if you want to enhance this). For instance, if you use the "Send a rich notification from the IFTTT app" you can add a title and a link to the Google Sheet. So if you receive an alert, you click on the notification on your phone and it takes you to the Google Sheet so you can see what has happened!
- That's it!
Note: If you have any issues with Lamda function in Sheet, try this for the "formatted row" in IFTTT
=DATEVALUE(left("{{Date}}", find(",", "{{Date}}")-1)) + TIMEVALUE(mid("{{Date}}",find(" at ", "{{Date}}")+4,10)) ||| {{DeviceName}}||| {{DeviceAction}} -
4Install the IFTTT mobile app
Go to your app store and search for "IFTTT". It is a black icon with text that simply states "IFTTT".
Install this.
Login with your credentials.
You can setup the IFTTT component of this project within the mobile app however, I find it easier via a laptop/desktop where its easier to follow the instructions.
The solution will send notifications to your mobile (but you need to mobile app installed for this to happen)
-
5Testing - does it work.
The moment of truth has come - does it work!
If you separate the door sensors you should see a new entry appear in the Google Sheet!
Also, you can manually change some of the data in the Google Sheet to trigger the notification. Ensure all dates are in the past, and change some of the sensor names. You want to see a string appearing in cell I8. Also, change the "Hour to send alert" to earlier hour than now (e.g to 0)
The IFTTT applet polls every 5 minutes, you can go into your applet and click "check now" to speed up this process. Within IFTTT you can also click "View activity" which gives you a helpful list of the activities it has automatically performed.
-
6Setup medication box and door sensors
Now you have tested your solution and everything is working (well done) - now attach the sensors to your medication box(es).
The door sensors are two small devices (one slightly larger than the other). One part has a magnet, the other has a reed switch and some electronics that transmits a state change (e.g. magnet is close and reed switch closed or magnet is far away and reed switch open). The below image shows you the two white sensors, I placed a USB drive next to them to give you a sense of scale.
With the Aqara door sensors you also need a hub, this is a little more expensive but means the sensors are a lot more reliable and the battery lasts far longer (as they need less power to talk to the hub than they would to talk to your home WiFi).
![]()
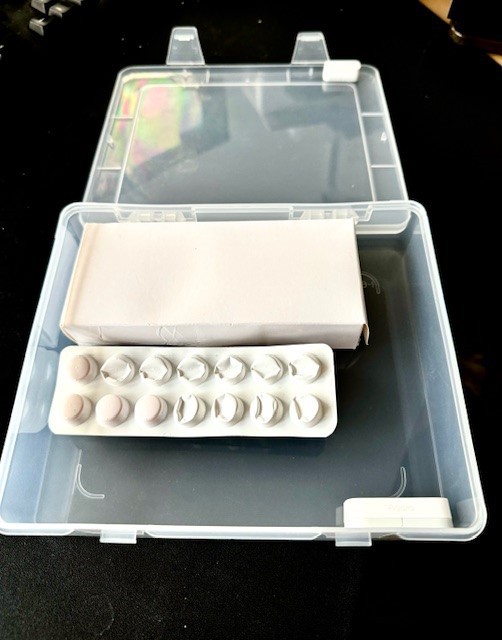
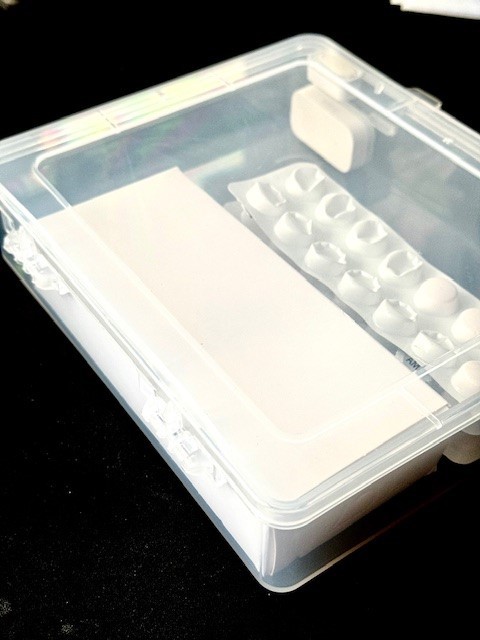
So you need to decide where is the best location to place these sensors on the medication box.
Ideally one on the lid, and the other attached to the main box. What is important is by opening the box the two sensors are moved apart (at least 3 inches).
![]()
![]()
I find it best to place the sensors inside the box in a corner, with the smaller one on the lid, and the main one stuck in the corner so they are next to each other when the lid is closed. The sensor I used remains in the closed state until the unit is at least an inch away so I placed the sensors in the location they would be the furthest apart when the box is open. (see in above image).
Remember that these are door/window sensors, so they are designed that the two units sit next to each other (when a door is closed). So try and ensure the way you arrange them in the box is similar.
I would suggest using some blue-tac or another temporary way of sticking the units so you can ensure the positioning is correct and you are detecting events. (simply open up your Google Sheet, then open the box, after a few seconds you should see a new entry).
Most door sensors come with their own 3M sticky pads which you can use when you are happy with their positioning.
Last point, although the batteries last 2-years, ensure the way you stick the larger unit (which contains the battery) its orientated so you can open it. In the case of these Aqara units, there is a small grove you use to open the unit so ensure it's pointing into the box. Most of the door sensors only work along one edge so this may mean placing the sensor in the right or left corner.
-
7More advanced - archiving sheet data (optional)
Google sheet has a maximum number of rows. So IFTTT will automatically create a new sheet once it exceeds 2000 rows.
To resolve this I've written a simple Apps Script (you can access this within Sheets under the Extensions menu item).
This will delete a row from the start of the dataset when it exceeds 1000 rows (I choose 1000 because apparently the 2000 is based on cell contents and may change so I'd play it safe and delete rows after 1000). This should still provide months of data.
function onChange() {
// This function automatically deletes rows since a Google Sheet has a maximum of 2000 rows (but this is not exact depending on cell contents)
// Make sure to link this function to the "On Change" trigger for the current spreadsheet - choose triggers from the menu on the left.

const doc = SpreadsheetApp.getActiveSpreadsheet();
const sheet=doc.getActiveSheet();

// sheet.getMaxRows()

if(sheet.getLastRow()>1000) {
  sheet.deleteRows(12, 1);
}

}
Paste the above code into the editor
Click Save
I called my script "Delete Old Data"
You may now need to authorize your code
Now click Triggers (menu on left) and Add new Trigger. Setup as below - this now links the action of changing the spreadsheet with running your script.
-
8Controlling LED Lights (optional)
Within the spreadsheet I've added two cells to control LED lights.
IFTTT triggers activities on cell change. So I needed to create two cells, when an alert occurs IFTTT turns the light on, and when the OFF cell changes, IFTTT turns the light off. So you will notice that these cells only increase in value based on the action that needs to be applied to the light.
This allows me to place a light in my mums house which lights (or turns red) if her pills have not been taken today.
To use these cells you need to turn on Iterative calculations in Sheets under File / Settings / Calculations
Track daily medicine tablet for elderly
My mother has dementia and can be quite forgetful. I don't live close so this helps me see whether she has taken her medication.


Discussions
Become a Hackaday.io Member
Create an account to leave a comment. Already have an account? Log In.