All of the designs, STL files, wiring diagrams, code, etc... are in the linked GitHub repo
Overview of the code
Uses a 1.5" waveshare OLED, 7-button interface and an IMU
To make the experience fit your profile, pick a username and tell us what interests you.
We found and based on your interests.
All of the designs, STL files, wiring diagrams, code, etc... are in the linked GitHub repo
Overview of the code
I should have generated this with software so the images are crisp but I just did it manually (took photos of the camera)
This is the full functionality of this camera currently this menu map (going through menu states)
Yeah I guess I bought the wrong IR filter (wanted to block IR and allow visible light) but what I bought it s backwards (block everything except IR).
I'm disappointed in the photos from this camera... I'm not sure if it is just raw resolution eg. I'm used to Sony Alpha 24 or 42 MP compared to the 12... it also is probably made worse by the lens.
At some point I do want to try one of those full-size lens adapters... to see if that is much better.
There's kind of no point in screwing around with a camera if the footage is not really usable.
Anyway... when it's spring/summer I'll do more with this project and also want to build other cameras... hopefully I have a new job by then (more hobby funding).
There is still more work to be done... the current software I wrote for this camera is dog s--- but yeah. I gotta use it more too.
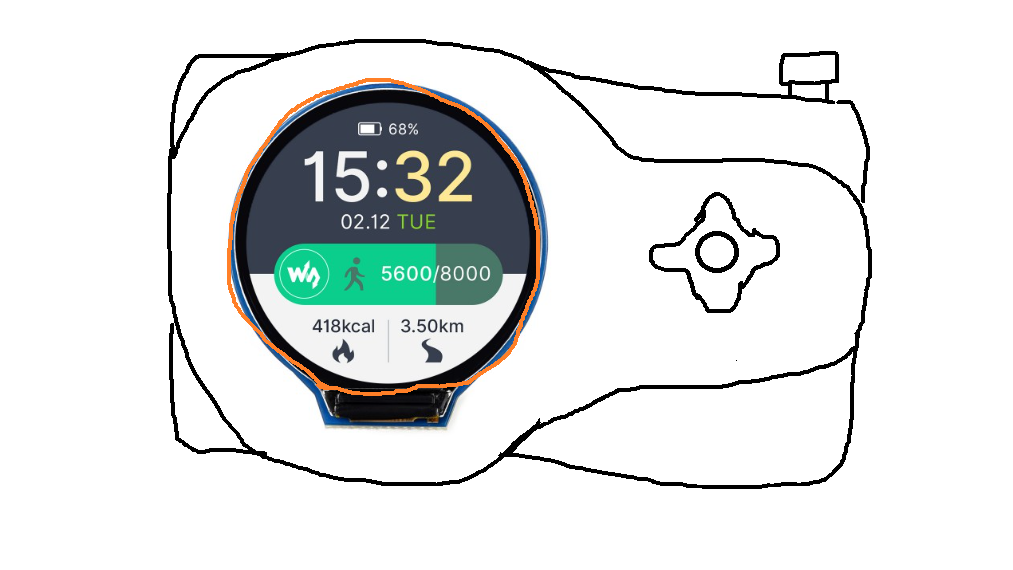
Sorry this is cheap on my part, not done but these displays are neat.
I did check the 64MP camera won't work on a pi zero 2 at full res (not enough ram).
This design would use a d-pad with center click type joy stick that I saw on another camera project.
I mostly want to see how bright these displays are outside.
It's still small at 1.28 inch even smaller than what I have now.
It could work for an 8MP camera without worrying about lens swapping.
Will also print it with color filament too.
This won't happen for a bit, gotta save money and have the time, working on two projects for clients right now.
I also want to look into a lens adapter thing to use full sized/real lenses with the RPi HQ cam.
Edit:
I did got outside breifly, had to run errands but after enduring -9F temperatures today was 30F and sunny.
Unfortunately the 8-50mm camera seems to have an IR problem (need to get an IR filter and test it) but every footage I shoot with it has this purplish tint. Anyway I stopped by the lake and there were so many Geese and some type of swan in another part of the lake.
A few photos failed to write again... ugh. They were good ones too.
Camera is buggy too like after you zoom in, take a photo, it's in a broken state, have to restart.
The purple tint
Black and white looks neat
Compared to non-purple
I ordered an IR filter and ND filter to try out. I wear photo grays and it's amazing outside usually but the camera doesn't match what I see (probably polarization is involved too).
I will have to design some sharable mounts to hold the filters in front.
I really like this shot, it's landscape though, can't use in main thumbnails
Tried my hand at "birding" ha, need higher lens numbers
Best shot I got with Arducam 8-50mm
I need to work on color profile stuff/actual manual camera settings
Software is buggy too, had to turn it on/off few times
Aberration I think is what's bad here
The battery profiler I'll wrap up tomorrow.
There is still a major refactor that needs to be done with regard to how menus are grouped/composable
The battery thing I also have to test the charge question/do the actual profiling for my setup (Panasonic 18650B 3400mAh 4.9A protected)
Hopefully will get my RODE mic in tomorrow and use that for the brief code overview for battery
This code is bad, but shows what direction it can go. I also added a cursed winking intro animation. Supposed to be a chibi smirk face inspired by the Railgun series.
Anyway I have posted version 1.0.0 of the software in the repo.
Video below demoing the current software capability and a tour on the code to help anyone using it to navigate/get a sense of how the code flows.
Also will do a video of my closet garden later to show the Pi Zero HQ's footage. It's pretty good example below.
I would have gone outside but it's snowing here and grey, sad.
This is an avocado I've grown for over a year. Using auto picamera2 settings in indoor bulb light (natural light).
This is the 35mm arducam lens
Here is the video of random images I took in my apartment
Ahh man... it pains me to take apart the ML Hat Cam project for parts... it was a sloppy build/did its part.
With the 5.5 crop factor this is apparently the equivalent of a 40-275mm lens (full frame).
I have made great progress with the menu system, I have a navigable thing now.
But I'm still building out the subpages and the zoom-crop-panning piece that is crucial to taking good photos. I'm also still looking into taking fast photos while enabling preview/dynamic settings eg. the shutter/exposure settings above.
The difference between this menu image and the previous project log is the previous image is a single/static image. This one here was made with individual sprites pasted onto a PIL image. So it's dynamic like that, while not shown here. When you activate a menu... actually I'll just take a quick picture of it. It knows what icon is active/shows the larger text as seen below.
Then you go into subpages/do something.
Actually a gif is better ha.
Will just make a video.
The lens collection grows haha
I will figure out how to film this so it looks better.
Tried camera/phone both look bad the OLED
Just doing basic state/navigation testing with drawing boxes
Eventually it will be more advanced eg. scrolling
Alright I'm done with 3D printing stuff... I was lazier on the 12mm and have had to make either physical changes or reprints. For example the lens cap had a smaller inner diameter than the barrel's outer diameter so it wouldn't fit... dumb. Reprint at least that is under an hour.
The 12mm is shorter so it looks more "camera-ish".
I am working solely on the menu/camera software now. I look forward to 3 days from now when I'm off again.
I may have been wrong claiming this as a macro camera, it's just super cropped. I think macro has magnification.
Some shots, a China doll plant leaf and a dragon fruit (I grew from seeds)
This is still using the non-zoom-crop-pan method, just a scaled down 128x128 preview of the 4000x3000 image.
Pi Zero 1 shedding its former self to become a 2
I think the refresh rate is faster, there is still a visible "update wave" (horizontal line moving down the screen) as it repaints but it seems much faster.
Which I want to attribute to the multiple cores. No SPI is literally faster on the RPi Zero 2, it is 20480 vs. 9491 (pi zero 1) for spidev. Nice! I gotta update the max limit in the OLED driver.
Otherwise I'm just printing the other barrel lens wrappers. I just did the 35mm. I had a mistake on mine (too long) updated on repo STL file.
I'm printing the 12mm now (has 3 parts as well: aperture, focus, lens cap)
After this it's just software work/more outings to the park after I program the zoom-crop-pan feature for focusing. Also figure out faster shutter speed/color profiles.
What's that saying... measure twice, 3D print once?
I am not feeling energetic today so I just did the simpler stuff (3D design/printing).
I added lens caps as well since the original lens covers won't work with the front plates.
Each lens has 3 parts to print between 2-3 hrs on avg, so it'll take a while.
I printed 2 for the 35mm today, it was almost bad but I just cut some of it off (too tall).
Lens cap for 5mm Sonew lens
Aperture ring for 35mm Arducam (this is very narrow it turns out like a 100mm full frame equivalent), the 5mm above is more like a 35mm on full frame
Started thinking about the menu
I won't be able to write any serious code again till Christmas working 5x10 shifts damn
The 12mm Arducam lens will be my macro since for some reason it can't focus farther than that. I tried an adapter but that made it worse. Works for me since I like macro/where I live is boring.
Create an account to leave a comment. Already have an account? Log In.
Ooh! Your design is fancy, not only the ergonomic shutter but that flip out display. Interesting design choice with the internal pegs too. I look forward to your progress.
Edit: that camera (ZV-E10 4K 60FPS min) I think is on my list to get for filming, the A7S3 is a tad pricey for me ha
I have a ZV-E10 and IMHO it's a great camera for both stills and video. Eventually I'd like to give my camera a sensor and mounting ring that's compatible with the Sony emount lenses as that's what I have already.
As soon as I have a working prototype of the case that isn't terrible I'll post the FreeCAD and STL files for anyone to remix.
I don't know why I can't reply to your other message, maybe I have to wait.
Anyway the adapter sounds interesting. I have seen other people have a small-to-big adapter for full frame lenses... would be curious on the custom communication stuff for the lenses (SONY wise). Yeah those lenses are pricey too the GMs.
Tagnent but I have to get myself one of those RODEs wireless mics
Become a member to follow this project and never miss any updates
 Jacob David C Cunningham
 James Pilgrim
 Ted Yapo
Hello! I'm happy to find another person building a personalized camera. I'm making a modular "vlogger camera" like the Sony ZV-E10 because it's a nice general shape and I like the flip-around display. https://hackaday.io/project/194160-my-dang-camera
It turns out that making a camera is a fun holiday hack.