Makerfabs
-
Step 4: Firmware about LTE
03/08/2024 at 01:02 • 0 comments- Using HTTP(S) AT Commands, accessing to HTTP server,
SerialUSB.println("Maduino Zero 4G LTE CAT1 Test Start!"); SerialUSB.println("Wait a few minutes for 4G star"); delay(3000); sendData("AT", 1000, DEBUG); delay(5000); sendData("AT+CICCID", 1000, DEBUG); delay(5000); sendData("AT+SIMCOMATI", 1000, DEBUG); delay(5000); sendData("AT+COPS?", 1000, DEBUG); delay(5000); sendData("AT+CPIN?", 3000, DEBUG); delay(5000); sendData("AT+CSQ", 1000, DEBUG); delay(5000); sendData("AT+CREG?", 1000, DEBUG); delay(5000); sendData("AT+CGREG?", 1000, DEBUG); delay(5000); sendData("AT+CPSI?", 1000, DEBUG); delay(5000); sendData("AT+CGDCONT=1,\"IP\",\"CMNET\"", 1000, DEBUG); delay(5000); sendData("AT+CGATT=1", 1000, DEBUG); delay(5000); sendData("AT+HTTPINIT", 1000, DEBUG); delay(5000); sendData("AT+HTTPPARA=\"URL\",\"http://api.thingspeak.com/update?api_key="+Apikey+"\"\r\n", 2000, DEBUG); delay(5000); sendData("AT+HTTPACTION=0\r\n", 3000, DEBUG); delay(5000); sendData("AT+HTTPTERM\r\n", 3000, DEBUG); delay(5000);- Controlling LTE Access to Write Channel URLs Using AT Commands, continuously sends data to the site on wind speed, temperature, humidity, and the presence or absence of bright light.
String http_str = "AT+HTTPPARA=\"URL\",\"http://api.thingspeak.com/update?api_key=" + Apikey + "&field1=" + String(speed_value)+"&field2=" +String(temperature_value) + "&field3="+ String(humidity_value)+"&field4="+light_index +"\"\r\n"; sendData("AT+HTTPINIT\r\n", 2000, DEBUG); delay(5000); sendData(http_str, 2000, DEBUG); delay(5000); sendData("AT+HTTPACTION=0\r\n", 3000, DEBUG); delay(5000); sendData("AT+HTTPTERM\r\n", 3000, DEBUG); delay(5000); -
Step 3: Thingspeak
03/08/2024 at 01:00 • 0 comments![]()
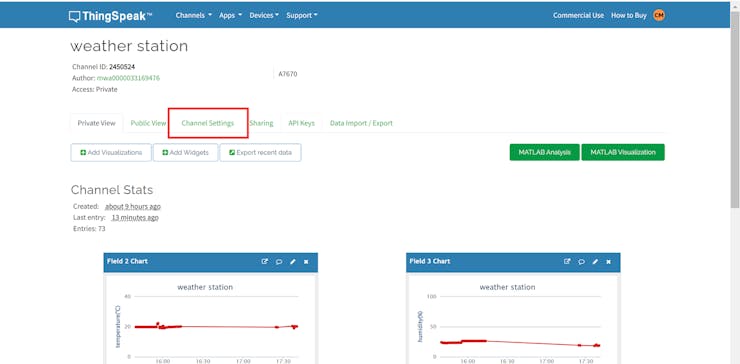
ThingSpeak Is The Open IoT Platform With MATLAB Analytics.
- Register and log in to your account
![]()
![]()
- Define the parameter you want in the Channel page and save it
![]()
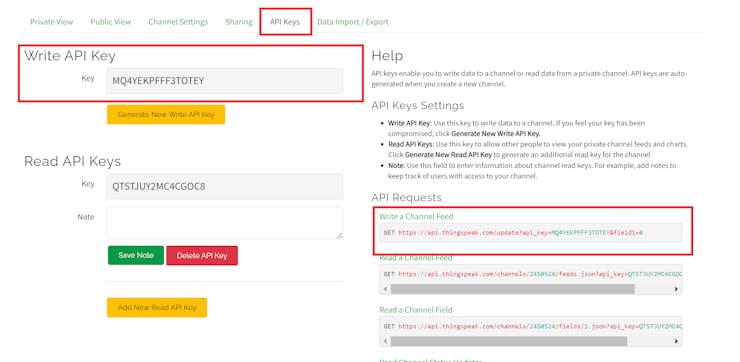
- On the API keys page you can find out the API key used to write the data, and you can see an example of an API request on the right.
![]()
![]()
- By accessing the URL of the write channel, you can modify the parameters
-
Step 2: Firmware about sensor
03/08/2024 at 00:57 • 0 comments- At first, we need to prepare the environment for ESP32 development board programming in arduino, and you can cheak this guide.
- This is a library for our Monochrome OLEDs based on SSD1306 drivers.
#include <Adafruit_SSD1306.h>- This library allows you to communicate with I2C devices (the OLED is connected by I2C)
#include <Wire.h>- The Adafruit_GFX library provides a common syntax and set of graphics functions for all of our LCD and OLED displays and LED matrices.
#include <Adafruit_GFX.h>- An Arduino library for the DHT series.
#include <DHT.h>- Difine your pins, this determines which pin of the board your device should be connected to.
#define DEBUG true #define LTE_RESET_PIN 6 #define LTE_PWRKEY_PIN 5 #define pinInterrupt A0 #define DHTPIN 2 #define LIGHT- Configuring OLEDs.
#define SCREEN_WIDTH 128 // OLED display width, in pixels #define SCREEN_HEIGHT 64 // OLED display height, in pixels #define OLED_RESET -1 // Reset pin # (or -1 if sharing Arduino reset pin) #define SCREEN_ADDRESS 0x3c Adafruit_SSD1306 display(SCREEN_WIDTH, SCREEN_HEIGHT, &Wire, OLED_RESET);- Initialise your devices so that they work properly
erialUSB.begin(115200); Serial1.begin(115200); pinMode(LTE_RESET_PIN, OUTPUT); digitalWrite(LTE_RESET_PIN, LOW); pinMode(LTE_PWRKEY_PIN, OUTPUT); digitalWrite(LTE_RESET_PIN, LOW); delay(100); digitalWrite(LTE_PWRKEY_PIN, HIGH); delay(3000); digitalWrite(LTE_PWRKEY_PIN, LOW); Wire.begin(); if (!display.begin(SSD1306_SWITCHCAPVCC, SCREEN_ADDRESS)) { SerialUSB.println(F("SSD1306 allocation failed")); for (;;); // Don't proceed, loop forever } else{ SerialUSB.println(F("SSD1306 allocation successful")); } display.clearDisplay(); delay(1000); pinMode(pinInterrupt, INPUT_PULLUP); attachInterrupt(digitalPinToInterrupt(pinInterrupt), onChange, FALLING); dht.begin(); pinMode(LIGHT, INPUT);- Detecting wind speed
void wind_speed() { lastDebounceTime = millis(); Count = 0; while(!((millis() - lastDebounceTime) > debounceDelay)); if ((millis() - lastDebounceTime) > debounceDelay) { speed_value = Count * 8.75 * 0.01; SerialUSB.print("Wind speed:"); SerialUSB.print(speed_value); SerialUSB.println("m/s"); Count = 0; } } void onChange() { if (digitalRead(pinInterrupt) == LOW) Count++; }- Detecting light intensity
void light_str() { lastDebounceTime = millis(); count_light = 0; while((millis() - lastDebounceTime) < debounceDelay) { delay(5); if (digitalRead(LIGHT) == 0){ count_light++; } } if(count_light>100) { SerialUSB.println("Strong ultraviolet ray"); light_intensity =light_intensity +"Strong ultraviolet ray"; light_index = light_index + "1"; } else { SerialUSB.println("Weak ultraviolet ray"); light_intensity =light_intensity + "Weak ultraviolet ray"; light_index = light_index + "0"; } count_light = 0; }- Detecting temperature and humidity
float humidity_value = dht.readHumidity(); float temperature_value = dht.readTemperature(); SerialUSB.print("Humidity:"); SerialUSB.print(humidity_value); SerialUSB.println(" %"); SerialUSB.print("Temperature:"); SerialUSB.print(temperature_value); SerialUSB.println(" C");- OLED display information
display.clearDisplay(); display.setCursor(1, 5); display.setTextColor(WHITE); display.setTextSize(1); display.println("Humidity:" + String(humidity_value) + " %" ); display.setCursor(1, 15); display.setTextColor(WHITE); display.setTextSize(1); display.println("Temperature:" + String(temperature_value) + " C" ); display.setCursor(1, 25); display.setTextColor(WHITE); display.setTextSize(1); display.println("Wind speed:" + String(speed_value) + "m/s"); display.setCursor(1, 35); display.setTextColor(WHITE); display.setTextSize(1); display.println(light_l); display.display(); -
Step 1:hardware
03/08/2024 at 00:49 • 0 comments![]()
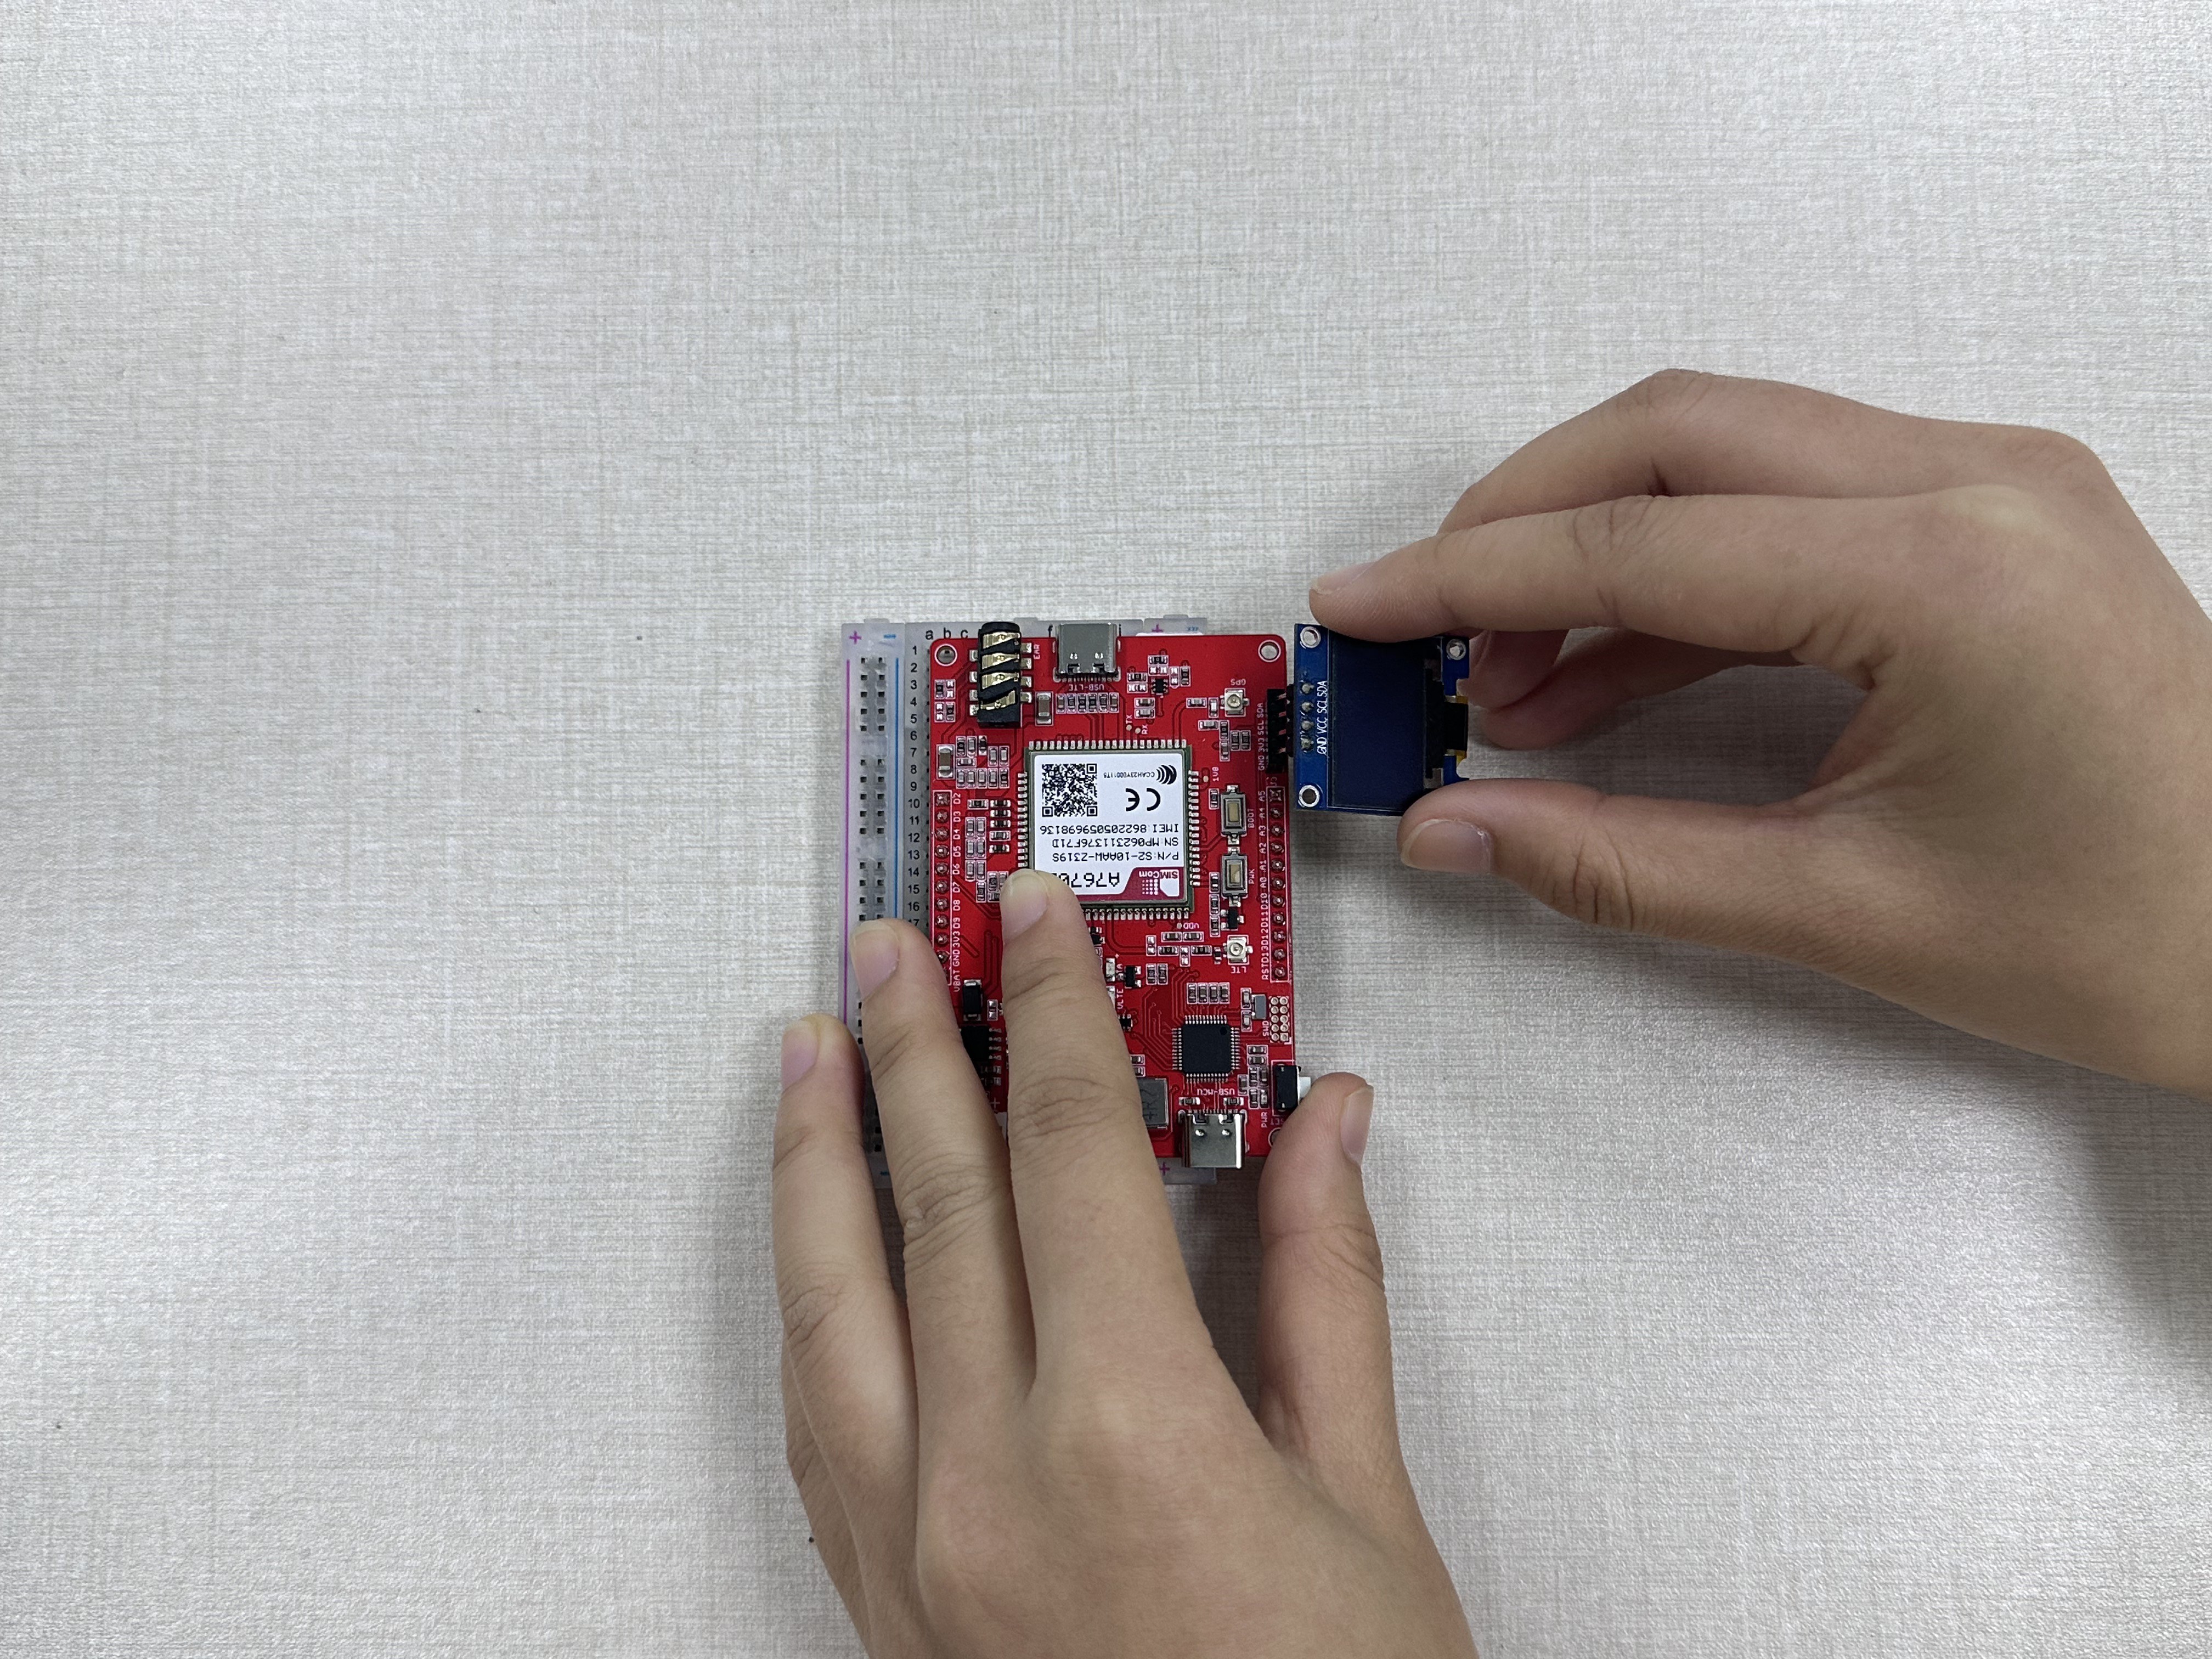
- Insert the SIM card into the slot on the back of the board
![]()
- Connect 0.96 OLED to Maduino Zero 4G LTE(CAT1 A7670) 's SCL and SDA;
![]()
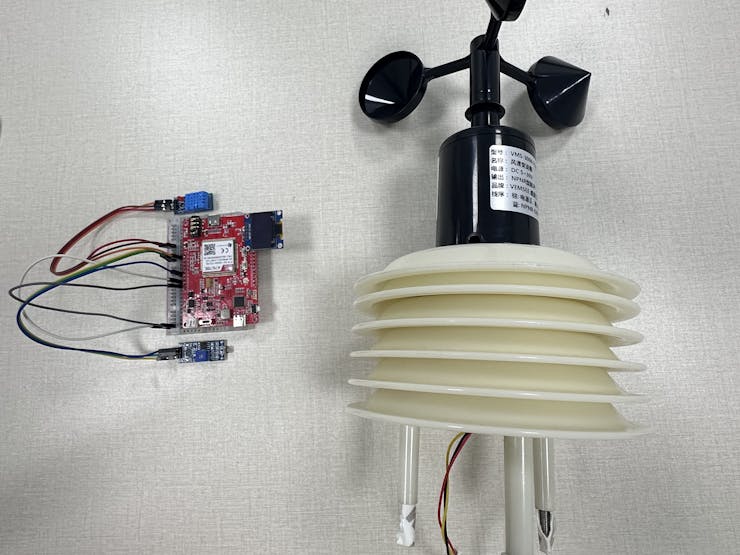
- Connect Temperature and humidity sensor's data pin to Maduino Zero 4G LTE(CAT1 A7670) 's D6;
![]()
- Connect Photosensitive resistance module's data pin to Maduino Zero 4G LTE(CAT1 A7670) 's D8;
![]()
- Connect Wind Speed Transmitter's data pin to Maduino Zero 4G LTE(CAT1 A7670) 's A0;
Weather Station With A7670 -- Remote Monitoring
A weather station with Maduino Zero 4G LTE(CAT1 A7670), which support HTTP, and can transfer