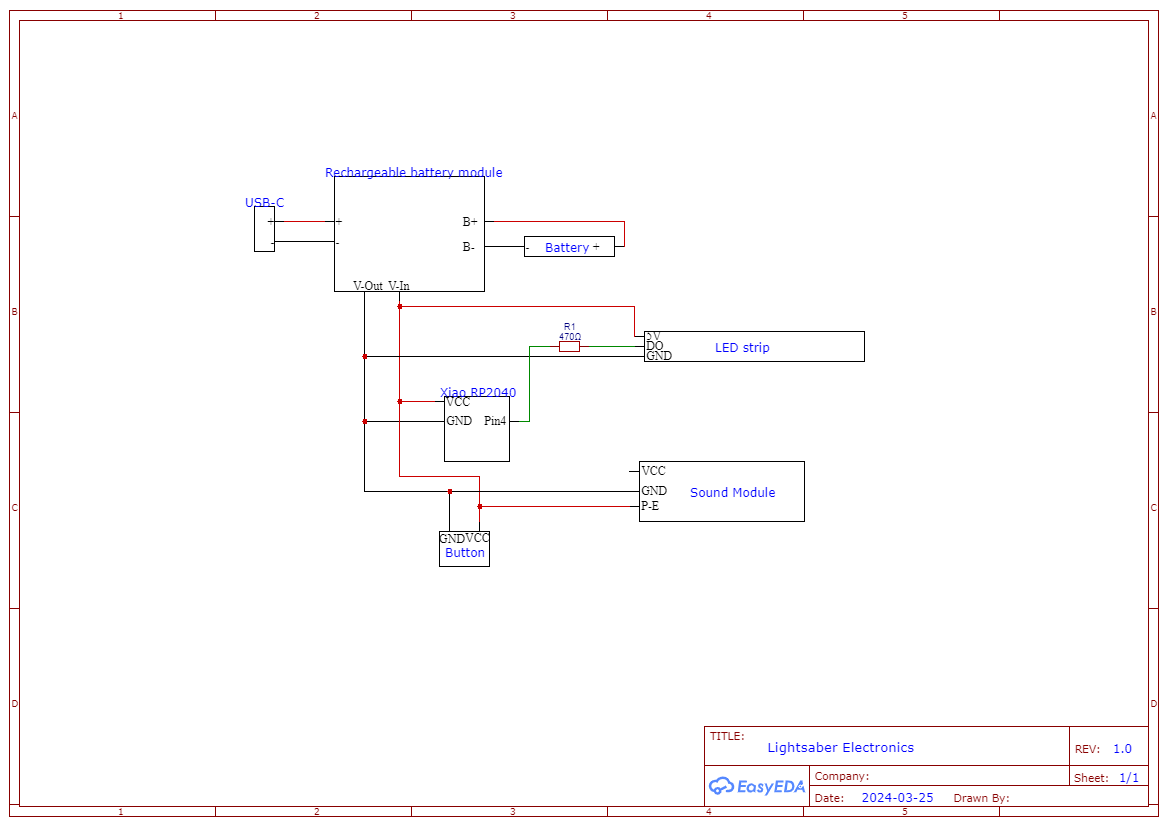
-Connect the USB-C cable and the battery holder to the battery module. Then add wires to the battery module to be able to power the rest of the electronics. Next add power and ground the electronics that its needed and a the button to the loop to make it turn on and off at your free will. See the diagram below for more details.
2
Coding the Neopixel Lights
I used the website Wokwi in order to code my lightsaber and be able to view what the code does using a diagram, and I used the program Thonny in order to upload the code to the Xiao RP2040 microboard. I used a diagram online to determine how to connect the microboard to the other electronics.
I copy and pasted my code from Wokwi to Thonny and I connected the microboard to my computer using a USB-C cable.
In order to upload the code into the microboard, I had to drag the files for the code into the drive of the microboard that appears when you connect it to the computer
To create this lightsaber or one of your very own your will need a 3D printed and 3d modeling software (I recommend Fusion360 but there are other options)
You can break it up into 3 sections: the top or the hilt, the handle, and the bottom
For the top design a unique design we did cookie monster, its important to make sure you have a hole spanning the top to the bottom for your electronics to come from the handle to the light strip above the handle.
For the handle make a cylindric shape that is wide enough to fit your electronics inside. The pi pico and the speaker are the widest components so make sure your diameter is large enough to fit those in. Your cylinder should be hallow and that's where the electronics will go. Put 2 accordingly sized holes in the side of the cylinder for your buttons (you have 2).
For the bottom, design a piece that will cover the bottom hole of the cylinder. It is recommended to make the bottom piece removable by placing threads or using another method, this will make the placing and fixing of the electronics easier.
Alternatively, you can download the STL files to 3D print this lightsaber, or download the F3D files to edit this lightsaber before printing it.
4
Troubleshooting
Electronics
-There were troubles with connections between the wires of the battery pack to the battery module where the solder came off multiple times. Solution was to hot glue to protect the connection
-The button we had was the wrong button which made it a bit more difficult for us to have the project completely working. We added the right button and it works perfectly.
Coding
-Figuring out how to code with the pins since this is our first time coding with electronics
-Making the pixel lights go all the way around on both side without starting at a different point on the LED strip when the lightsaber is turned off.
3D Modeling
-When designing holes, make them 20mm larger than the size needed (except for the threads).
-If one of the holes is several centimeters larger than needed, make a circle with the similar thickness of the lightsaber's body, 20mm smaller than the lightsaber's hole, and with a hole 20mm larger than the size needed.
Discussions
Become a Hackaday.io Member
Create an account to leave a comment. Already have an account? Log In.