To start my journey into this half-day project, I downloaded the Arduino programming tools and headed over to Adafruit to check out their tutorials. I found the infamous "Blink" program in the Example code and flashed it onto the Nano, and what do you know.... it blinked.
Went a little farther, using Adafruit tutorials as a hardware guide and example code included in the Arduino tools to make an 'external' LED fade. (See Fade example in Arduino Examples code)
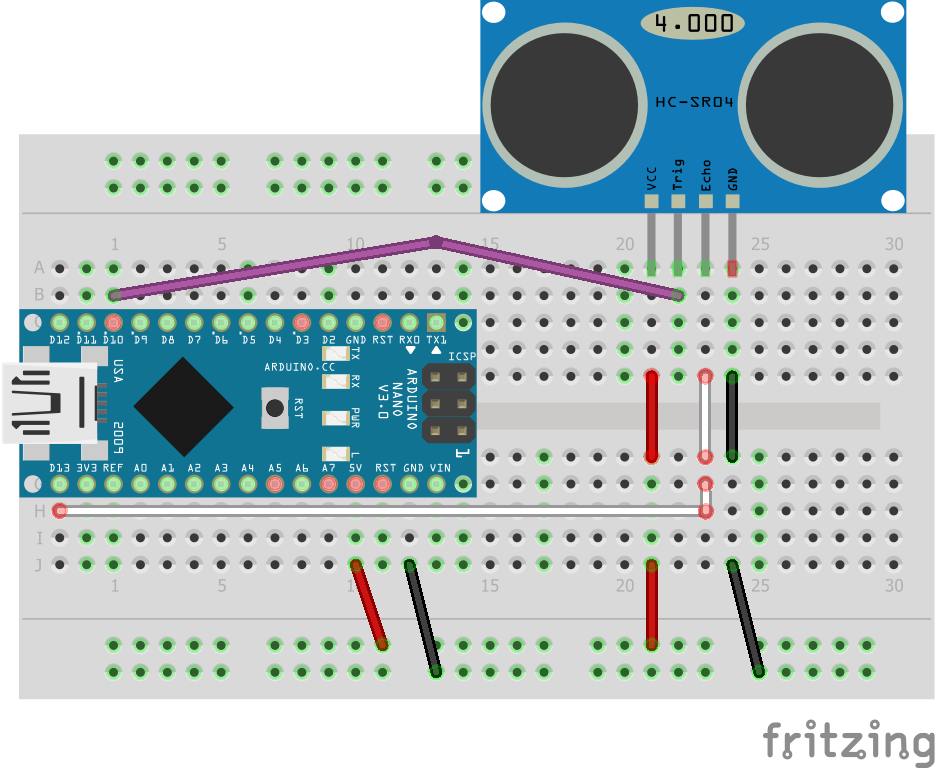
Then I found this Circuit Basics tutorial on setting up the rangefinder. Everything worked great. Almost. One glitch, but it was my bad.
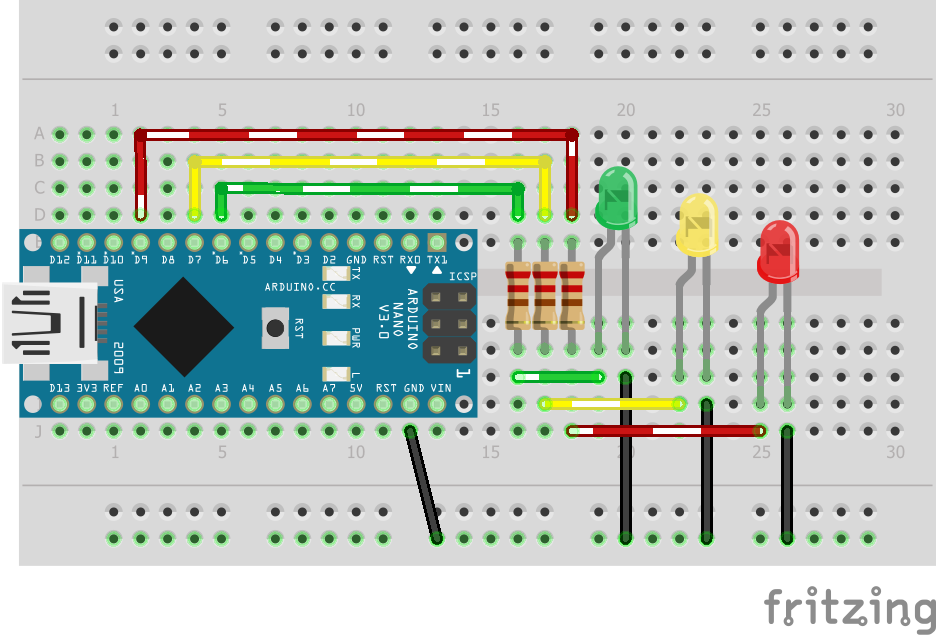
I thought, 'Hmmm... what can I do to make this a little more fun?' So I came up with the idea of indicator LEDs to show how far away something was.
Code:
int ledRed = 9;
int ledGre = 6;
int ledYel = 7;

#define trigPin 10
#define echoPin 13

void setup() {

  pinMode(trigPin, OUTPUT);
  pinMode(echoPin, INPUT);
  pinMode(ledRed, OUTPUT);
  pinMode(ledYel, OUTPUT);
  pinMode(ledGre, OUTPUT);
}

void loop() {
  float duration, distance;
  digitalWrite(trigPin, LOW);
  delayMicroseconds(2);

  digitalWrite(trigPin, HIGH);
  delayMicroseconds(10);
  digitalWrite(trigPin, LOW);

  duration = pulseIn(echoPin, HIGH);
  distance = (duration / 2) * 0.0344;

  if (distance >= 50){
    analogWrite(ledGre, HIGH);
  }
  else {
    analogWrite(ledGre, LOW);
  }

 if (distance > 20 && distance < 50){
    analogWrite(ledYel, HIGH);
  }
    else {
      analogWrite(ledYel, LOW);
 }

  if (distance <= 20){
    analogWrite(ledRed, HIGH);
  }
    else {
    analogWrite(ledRed, LOW);
}

  delay(500);
}
Hardwares:

The LEDs glow a bit weak, but it works...
Here is the hookups for the rangefinder only...

*Please note: These fritzing diagrams are intended to show only the proper connections, not necessarily the proper routing of components and wires... Bear this in mind if you are trying to replicate this build.*
 ken.do
Discussions
Become a Hackaday.io Member
Create an account to leave a comment. Already have an account? Log In.