Alex
Alex-
Playing with code: Part 1
08/29/2024 at 12:44 • 1 commentLet's try making some changes to the code in the main.cpp file. First, let's make the text "Hello, ESP32-S3!" larger. To do this, we'll need to create a new style and customize it by changing the font to one that supports the desired text size.
// Create and display label lv_obj_t *label = lv_label_create(lv_scr_act()); // Create a style for text static lv_style_t style; lv_style_init(&style); // Customize the style by setting the font // Here lv_font_montserrat_42 is an example font lv_style_set_text_font(&style, &lv_font_montserrat_42); // Applying style to label lv_obj_add_style(label, &style, 0); lv_label_set_text(label, "Hello, ESP32-S3!"); lv_obj_align(label, LV_ALIGN_CENTER, 0, 0);![]() ---------- more ----------
---------- more ----------Let's try adding animation.
To set up animation for LVGL interface elements (for example, for a label), you need to perform several steps:
- Create an animation with a start and end state (for example, changing position, size, or opacity).
- Specify the animation duration and other parameters, such as delay or repeat.
- Start the animation.
Example code for creating a simple animation:
// Function for position animation
static void anim_x_cb(void * var, int32_t v) {
    lv_obj_set_x((lv_obj_t *)var, v);
}

void create_animation(lv_obj_t * label) {
    // Create animation
    lv_anim_t a;
    lv_anim_init(&a);

    // Setting animation parameters
    lv_anim_set_var(&a, label);            // Animated object
    lv_anim_set_exec_cb(&a, anim_x_cb);    // Callback for changing a property (e.g. position)
    lv_anim_set_values(&a, 0, 100);        // From initial position x=0 to x=100
    lv_anim_set_time(&a, 1000);            // Animation duration  (1000 ms)
    lv_anim_set_delay(&a, 500);            // Delay before start (500 ms)
    lv_anim_set_repeat_count(&a, LV_ANIM_REPEAT_INFINITE); // Infinite repeat

    // Let's start the animation
    lv_anim_start(&a);
}
This example creates an animation that moves a label along the X axis from 0 to 100 pixels in 1 second, with a 500ms delay and looping infinitely.
Applying an animation to a label:
- Define your animation in a separate function (like the example above).
- Call this function after creating the label.
lv_label_set_text(label, "Hello, ESP32-S3!");
lv_obj_align(label, LV_ALIGN_CENTER, 0, 0);
create_animation(label);
If we want to move the label along the Y axis, we simply change the line
lv_obj_set_x((lv_obj_t *)var, v);as follows
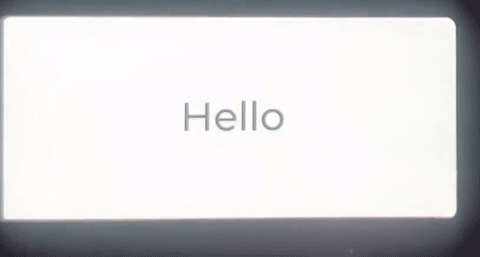
lv_obj_set_y((lv_obj_t *)var, v);Let's change the program so that it cyclically changes the text in the label field.
To do this, we'll create an array of words.
// Array of words to display
static const char *words[] = {
    "Hello",
    "World",
    "This",
    "Is",
    "LVGL",
    "On",
    "ESP32"
};
static const int num_words = sizeof(words) / sizeof(words[0]);
Let's create the 'update_label_text' function. The 'update_label_text' function is responsible for updating the text displayed on a label widget in the LVGL GUI. This function is called periodically by a timer to cycle through a predefined list of words.
static void update_label_text(lv_timer_t * timer) {
    static int word_index = 0;
    lv_obj_t * label = (lv_obj_t *)timer->user_data;

    // Update label text to the next word
    lv_label_set_text(label, words[word_index]);

    // Move to the next word index, wrap around if necessary
    word_index = (word_index + 1) % num_words;
}
Now let's create the 'create_label_with_timer' function. This function creates a label widget on the LVGL screen and sets up a timer to periodically update its text. This provides a dynamic text display that cycles through a list of words.
void create_label_with_timer(lv_obj_t * parent) {
    // Create label
    lv_obj_t * label = lv_label_create(parent);

    // Create style for text
    static lv_style_t style;
    lv_style_init(&style);

    // Set font style
    lv_style_set_text_font(&style, &lv_font_montserrat_48);

    // Apply style to label
    lv_obj_add_style(label, &style, 0);

    // Set initial text
    lv_label_set_text(label, words[0]);
    lv_obj_align(label, LV_ALIGN_CENTER, 0, 0);

    // Create timer to update text every 1 second
    lv_timer_t * timer = lv_timer_create(update_label_text, 1000, label);
}
Let's replace this section of code in the 'app_main' function
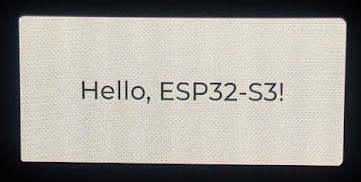
// Create and display label
lv_obj_t *label = lv_label_create(lv_scr_act());
// Create a style for text
static lv_style_t style;
lv_style_init(&style);

// Customize the style by setting the font
// Here lv_font_montserrat_42 is an example font
lv_style_set_text_font(&style, &lv_font_montserrat_42);

// Applying style to label
lv_obj_add_style(label, &style, 0);

lv_label_set_text(label, "Hello, ESP32-S3!");
lv_obj_align(label, LV_ALIGN_CENTER, 0, 0);
with
//lv_obj_t *label = lv_label_create(lv_scr_act());
create_label_with_timer(lv_scr_act());
The result:
![]()
-
Making "Hello World" with ESP-IDF
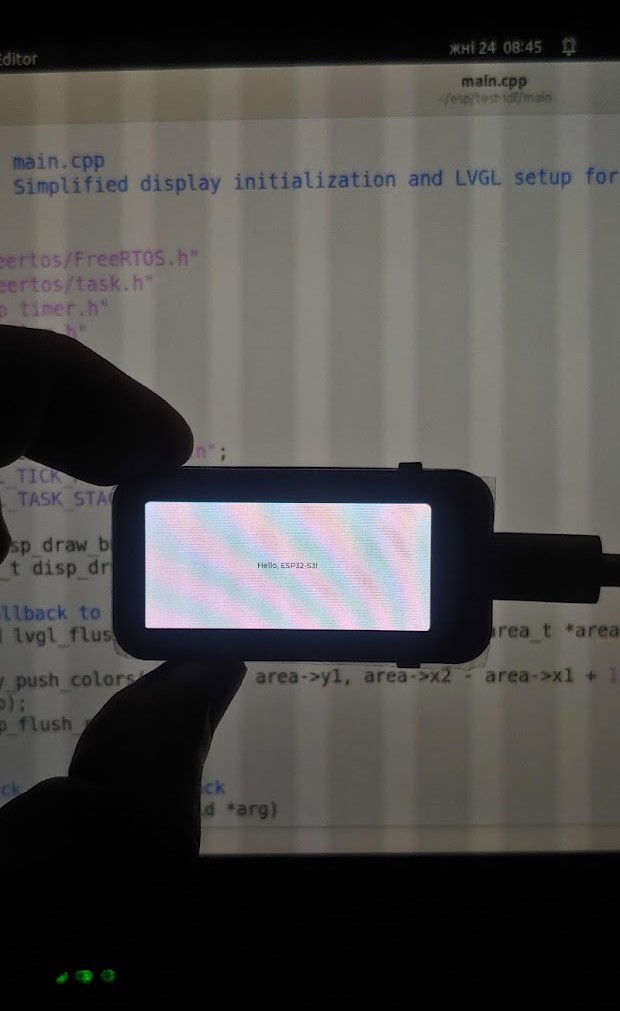
08/28/2024 at 15:17 • 0 commentsI couldn't find any simple examples of working with the ESP-IDF display, so I asked chatGPT to make such an example for me from a LilyGo-Display-IDF demo. All changes affected the main.cpp file.
Here's a simplified version of the main.cpp file:
---------- more ----------/** * @file main.cpp * @brief Simplified display initialization and LVGL setup for ESP32 */ #include "freertos/FreeRTOS.h" #include "freertos/task.h" #include "esp_timer.h" #include "esp_log.h" #include "lvgl.h" #include "tft_driver.h" #include "product_pins.h" static const char *TAG = "main"; #define LVGL_TICK_PERIOD_MS 2 #define LVGL_TASK_STACK_SIZE (4 * 1024) static lv_disp_draw_buf_t disp_buf; lv_disp_drv_t disp_drv; // Flush callback to send buffer to display static void lvgl_flush_cb(lv_disp_drv_t *drv, const lv_area_t *area, lv_color_t *color_map) { display_push_colors(area->x1, area->y1, area->x2 - area->x1 + 1, area->y2 - area->y1 + 1, (uint16_t *)color_map); lv_disp_flush_ready(drv); } // LVGL tick increment callback static void lvgl_tick_inc(void *arg) { lv_tick_inc(LVGL_TICK_PERIOD_MS); } // LVGL task handler static void lvgl_task(void *arg) { while (true) { lv_task_handler(); vTaskDelay(pdMS_TO_TICKS(LVGL_TICK_PERIOD_MS)); } } extern "C" void app_main(void) { ESP_LOGI(TAG, "Initialize DISPLAY and LVGL library."); display_init(); lv_init(); // Allocate display buffers lv_color_t *buf1 = (lv_color_t *)heap_caps_malloc(AMOLED_HEIGHT * 20 * sizeof(lv_color_t), MALLOC_CAP_DMA); lv_color_t *buf2 = (lv_color_t *)heap_caps_malloc(AMOLED_HEIGHT * 20 * sizeof(lv_color_t), MALLOC_CAP_DMA); lv_disp_draw_buf_init(&disp_buf, buf1, buf2, AMOLED_HEIGHT * 20); // Set up and register display driver lv_disp_drv_init(&disp_drv); disp_drv.hor_res = AMOLED_HEIGHT; disp_drv.ver_res = AMOLED_WIDTH; disp_drv.flush_cb = lvgl_flush_cb; disp_drv.draw_buf = &disp_buf; lv_disp_drv_register(&disp_drv); // Install LVGL tick timer esp_timer_handle_t lvgl_tick_timer; const esp_timer_create_args_t tick_timer_args = { .callback = &lvgl_tick_inc, .name = "lvgl_tick" }; esp_timer_create(&tick_timer_args, &lvgl_tick_timer); esp_timer_start_periodic(lvgl_tick_timer, LVGL_TICK_PERIOD_MS * 1000); // Create and display label lv_obj_t *label = lv_label_create(lv_scr_act()); lv_label_set_text(label, "Hello, ESP32-S3!"); lv_obj_align(label, LV_ALIGN_CENTER, 0, 0); // Create LVGL task xTaskCreate(lvgl_task, "LVGL", LVGL_TASK_STACK_SIZE, NULL, tskIDLE_PRIORITY, NULL); }Here’s a line-by-line explanation of the simplified main.cpp file:
Includes:
#include "freertos/FreeRTOS.h"
#include "freertos/task.h"
#include "esp_timer.h"
#include "esp_log.h"
#include "lvgl.h"
#include "tft_driver.h"
#include "product_pins.h"
These are preprocessor directives that include various libraries and headers:
freertos/FreeRTOS.handfreertos/task.h: Required for using FreeRTOS functions and task management. FreeRTOS is a popular real-time operating system (RTOS) for embedded systems that allows for efficient task management and scheduling. FreeRTOS allows this project to run multiple tasks in parallel, such as handling the display (LVGL) and managing timers, without the tasks interfering with each other.esp_timer.h: For handling high-resolution timers in ESP-IDF.esp_log.h: Provides logging capabilities.lvgl.h: The LVGL library for creating graphical user interfaces. The LVGL (Light and Versatile Graphics Library) is an open-source graphics library designed for embedded systems with limited resources.tft_driver.h: Header for display driver functions (specific to the hardware).product_pins.h: Contains pin definitions specific to the product. Also contains definitions of the AMOLED_HEIGHT and AMOLED_WIDTH variables.
TAG Declaration:
static const char *TAG = "main";Defines a static constant string TAG used as a tag for logging purposes, helping to identify the source of log messages.
Macro Definitions:
#define LVGL_TICK_PERIOD_MS 2 #define LVGL_TASK_STACK_SIZE (4 * 1024)LVGL_TICK_PERIOD_MS: Defines the tick period for LVGL in milliseconds, which is 2 ms. This refers to the interval at which the LVGL library's internal clock or "tick" is updated. LVGL uses this tick to manage time-dependent tasks like animations, input handling, and other time-based events within the graphical user interface.LVGL_TASK_STACK_SIZE: Defines the stack size for the LVGL task, which is 4 KB. This is the amount of memory allocated for the stack of a task (thread) that is dedicated to handling LVGL operations in a FreeRTOS environment. In a multitasking operating system like FreeRTOS, each task (or thread) has its own stack, which is a specific region of memory used to store local variables, function calls, and return addresses.
Display Buffer and Driver Declaration:
static lv_disp_draw_buf_t disp_buf; lv_disp_drv_t disp_drv;disp_buf: A structure to hold display buffer information.disp_drv: A structure representing the display driver.
Flush Callback Function:
static void lvgl_flush_cb(lv_disp_drv_t *drv, const lv_area_t *area, lv_color_t *color_map) { display_push_colors(area->x1, area->y1, area->x2 - area->x1 + 1, area->y2 - area->y1 + 1, (uint16_t *)color_map); lv_disp_flush_ready(drv); }lvgl_flush_cb: This function is called by LVGL to send a portion of the display buffer (color_map) to the physical display.display_push_colors: A function that pushes the color data for a specified area on the display.lv_disp_flush_ready: Signals LVGL that the flushing operation is complete.
Tick Increment Function:
static void lvgl_tick_inc(void *arg) { lv_tick_inc(LVGL_TICK_PERIOD_MS); }lvgl_tick_inc: Increments the LVGL internal tick counter, used for timekeeping and animations.lv_tick_inc: LVGL function that advances the tick counter by the defined period (2ms).
LVGL Task Function:
static void lvgl_task(void *arg) { while (true) { lv_task_handler(); vTaskDelay(pdMS_TO_TICKS(LVGL_TICK_PERIOD_MS)); } }lvgl_task: A FreeRTOS task that continuously callslv_task_handler, which processes LVGL tasks like animations and input handling.vTaskDelay: Causes the task to wait for the next tick period (2 ms) before running again, allowing other tasks to execute.
Main Application Function:
extern "C" void app_main(void) {app_main: The main function where the application starts executing. Theextern "C"ensures that the function uses C linkage, which is important for compatibility with the ESP-IDF.
Initialization:
ESP_LOGI(TAG, "Initialize DISPLAY and LVGL library."); display_init(); lv_init();ESP_LOGI: Logs an informational message indicating the start of display and LVGL initialization.display_init: Initializes the display hardware.lv_init: Initializes the LVGL library.
Display Buffer Allocation and Initialization:
lv_color_t *buf1 = (lv_color_t *)heap_caps_malloc(AMOLED_HEIGHT * 20 * sizeof(lv_color_t), MALLOC_CAP_DMA); lv_color_t *buf2 = (lv_color_t *)heap_caps_malloc(AMOLED_HEIGHT * 20 * sizeof(lv_color_t), MALLOC_CAP_DMA); lv_disp_draw_buf_init(&disp_buf, buf1, buf2, AMOLED_HEIGHT * 20);heap_caps_malloc: Allocates memory for two display buffers (buf1 and buf2) with specific capabilities (e.g., DMA). The size is calculated based on the display height and a buffer size factor (20). Using two display buffers (buf1 a and buf2) enables the system to prepare the next frame in the background while the current frame is being displayed, leading to smoother and more efficient screen updates without visual artifacts like flickering or tearing.lv_disp_draw_buf_init: Initializes the display buffer with the allocated memory (buf1, buf2).
Display Driver Setup:
lv_disp_drv_init(&disp_drv); disp_drv.hor_res = AMOLED_HEIGHT; disp_drv.ver_res = AMOLED_WIDTH; disp_drv.flush_cb = lvgl_flush_cb; disp_drv.draw_buf = &disp_buf; lv_disp_drv_register(&disp_drv);lv_disp_drv_init: Initializes the display driver structure (disp_drv).hor_resandver_res: Set the horizontal and vertical resolution of the display.flush_cb: Assigns the flush callback (lvgl_flush_cb) to the driver.draw_buf: Links the display buffer to the driver.lv_disp_drv_register: Registers the display driver with LVGL.
LVGL Tick Timer Setup:
    esp_timer_handle_t lvgl_tick_timer;
    const esp_timer_create_args_t tick_timer_args = { .callback = &lvgl_tick_inc, .name = "lvgl_tick" };
    esp_timer_create(&tick_timer_args, &lvgl_tick_timer);
    esp_timer_start_periodic(lvgl_tick_timer, LVGL_TICK_PERIOD_MS * 1000);
esp_timer_handle_t lvgl_tick_timer: Declares a timer handle.esp_timer_create_args_t tick_timer_args: Defines timer creation arguments, including the callback function (lvgl_tick_inc) and the timer's name (lvgl_tick).esp_timer_create: Creates the timer with the specified arguments.esp_timer_start_periodic: Starts the timer to trigger periodically every 2ms (converted to microseconds).
Label Creation and Alignment:
lv_obj_t *label = lv_label_create(lv_scr_act()); lv_label_set_text(label, "Hello, ESP32-S3!"); lv_obj_align(label, LV_ALIGN_CENTER, 0, 0);lv_label_create: Creates a new label object on the active screen.lv_label_set_text: Sets the text of the label to "Hello, ESP32-S3!".lv_obj_align: Aligns the label to the center of the screen.
LVGL Task Creation:
xTaskCreate(lvgl_task, "LVGL", LVGL_TASK_STACK_SIZE, NULL, tskIDLE_PRIORITY, NULL); }xTaskCreate: Creates and starts a FreeRTOS task that runs thelvgl_taskfunction. The task is named "LVGL", has a stack size of 4 KB, and runs at idle priority.
![]()
-
The Birth of BEAD
07/24/2024 at 08:27 • 0 commentsThe idea for this project came to me after reading an article about creating a miniature eBook reader with a 1.54-inch screen based on the ESP32. There's something incredibly appealing about these tiny devices. However, the device described in the article seemed somewhat impractical. That got me thinking—what would be the smallest practical eBook reader?
![]() ---------- more ----------
---------- more ----------Then I remembered a reading technique that a Boston-based startup called Spritz tried to popularize back in 2014. The core idea of this technique is to display words sequentially on a screen, one at a time, at a rapid pace. This approach minimizes the need for eye movement across the text, saving time. An added benefit of this technique is that it doesn’t require a large screen to display the text—just one that can fit any single word from the text. And that’s exactly what you need for a miniature eBook reader.
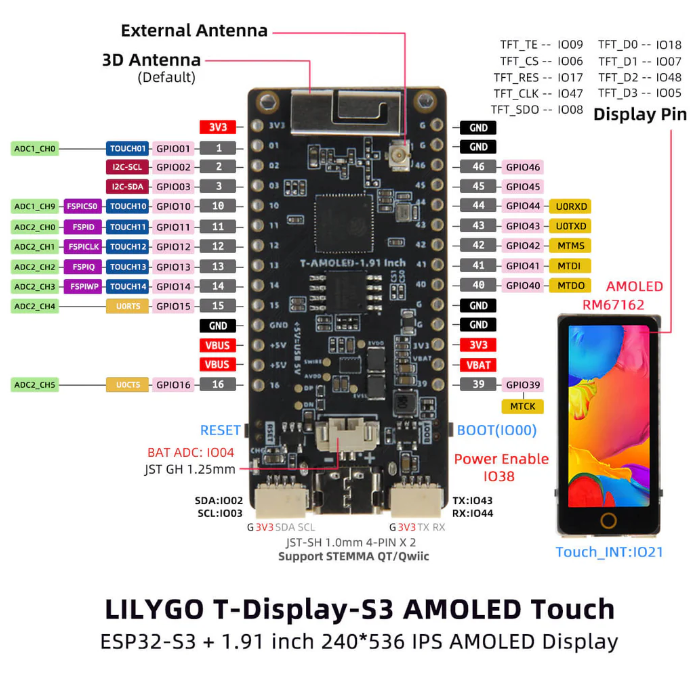
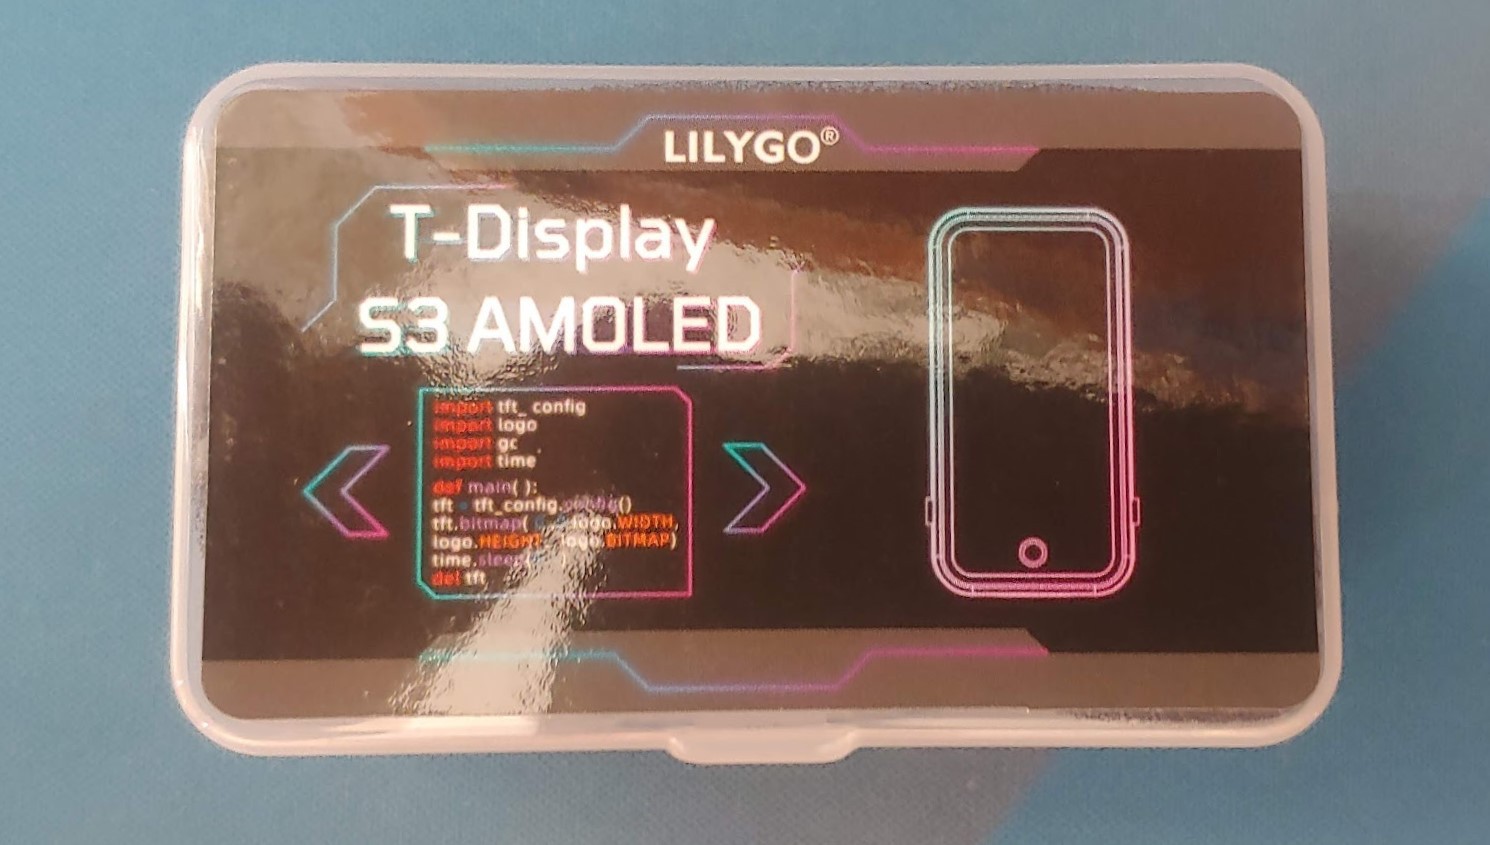
Next, I needed to find a suitable screen for my device. I decided to look for an off-the-shelf electronic module with a small screen, preferably an OLED display to save energy. My search led me to the LILYGO T-Display S3 AMOLED module. It has everything I need to bring this device to life: a 1.91-inch color AMOLED touchscreen with a resolution of 240 x 536 pixels, an ESP32-S3R8 microcontroller, dual GPIO pin headers, battery support, and Wi-Fi and Bluetooth connectivity.
This module covers nearly all the hardware requirements for my project, allowing me to focus on software development. I decided to make this project my entry point into the world of ESP32 development. The only potential hardware modification I might consider is adding physical buttons for device control, which should be easy to implement thanks to the available GPIO pins.
Specifications
MCU ESP32-S3R8 Dual-core LX7 microprocessor Wireless Connectivity 2.4 GHz Wi-Fi & Bluetooth5 (LE) Flash 16MB PSRAM 8MB Screen 1.91 inch RM67162 IPS AMOLED Screen Resolution 240 x 536 Screen Interface QSPI Screen Active Area 19.8 x 44.22mm Screen Driver IC RM67162 ![]()
I reached out to LILYGO and shared my project idea with them. To my delight, they provided me with the T-Display S3 module for free! It was really encouraging to receive such support from the developer of the module. A big thanks to LILYGO for making this project possible!
![]()
BEAD: A Tiny Speed eReader
Compact book reader that can be a bead on your keychain or something more