Close
0%
0%

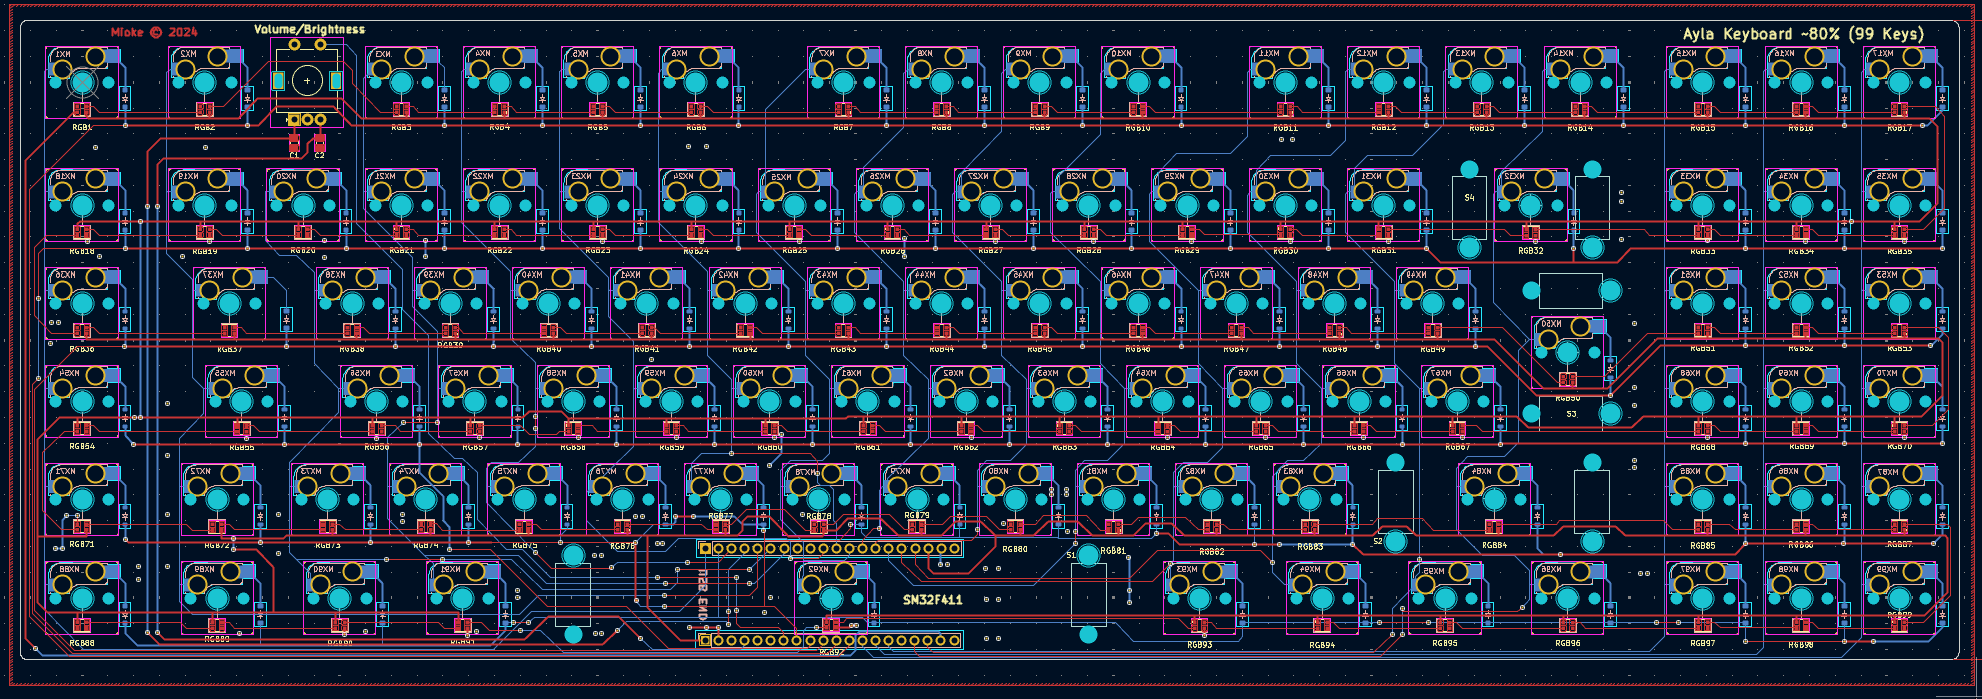
Mioke80 ISO / ANSI 99 Key ~80% Keyboard

Another Open Hardware Keyboard using QMK Firmware

Similar projects worth following
Another QMK based Keyboard (designed from scratch).

- The schematic (kicad) complete...
- QMK code tested and working on BlackPill (STM32411)...
- More work required for RGB...
- Working with usevia app...

Kicad references: KoBuss's and Noah Kiser's youtube tutorials and git pages, both are recommended viewing. Kicad and QMK files are included in my git repo.

The 99 keys include everything except number pad, plus an additional ten macro/media keys.
ISO and ANSI versions...

Please check Project Log for updates...

Hardware: Micro, Keys, etc...

For now, I went with the STM32F072CBT6 as I have a few in stock, might try other chips later.

We could also use other Micros with more GPIO's to remove the need for diodes but I don't know which Micros QMK supports.

For the keys/switches, I went with MX as I also have quite a few. I also went with the hot-swappable option.

Tools:

  • Kicad version 8.0.3+1, release build...
  • Plugins: KLE Placer (saves so much time with layout, a must have).
  • QMK Configurator

Other references:

keyboard-layout-editor.com

Keys: 99 Keys, including 10 Dedicated Macro Keys...

final_ansi_keyboard_layout.json

This is the Keyboard Layout Editor code for V1.0 ANSI Go to http://www.keyboard-layout-editor.com and paste it raw data section... File has change, check repo...

JavaScript Object Notation (JSON) - 1.08 kB - 08/09/2024 at 18:04

Download

final_iso_keyboard_layout.json

This is the Keyboard Layout Editor code for V1.0 ISO Go to http://www.keyboard-layout-editor.com and paste it raw data section... Please see my git repo for up to date file... File has change, check repo...

JavaScript Object Notation (JSON) - 1.09 kB - 08/09/2024 at 17:05

Download

  • 1 × Micro (In Final Version) STM32F072CBT6 LSCS # C94355
  • 1 × Diodes (100) Diode_SOD-123 LSCS # C81598
  • 1 × SK6812-E (99) LCSD PART: C5149201 - MF# SK6812MINI-E - RGB LED with integrated controllerBackMount;
  • 1 × Hot Swappable Connectors (99) CON_HS_MX LSCS # C5184526
  • 1 × 3.3V LDR XC6206PxxxMR-Regulator_Linear LSCS # C5446

View all 9 components

  • Now loading in usevia

    Michael O'Toole11/02/2024 at 08:53 0 comments

    Turns out the code/file required fewer files than I was expecting but that's mainly down to using the Blackpill Module.

    The keyboard now loads in usevia.app and I can record macros...

    Although the keyboard generates the correct key presses, the via app shows the key legends shifted one place to the left after the encoder position. Also issues with RGB and Encoder code as when I try to add any, I get compile errors... but there's some progress :) ...

    Life would be so much simpler with more GPIO's, a 6x17 matrix requires less work in code...

  • Test Board for LQFP64 version

    Michael O'Toole10/03/2024 at 14:16 0 comments

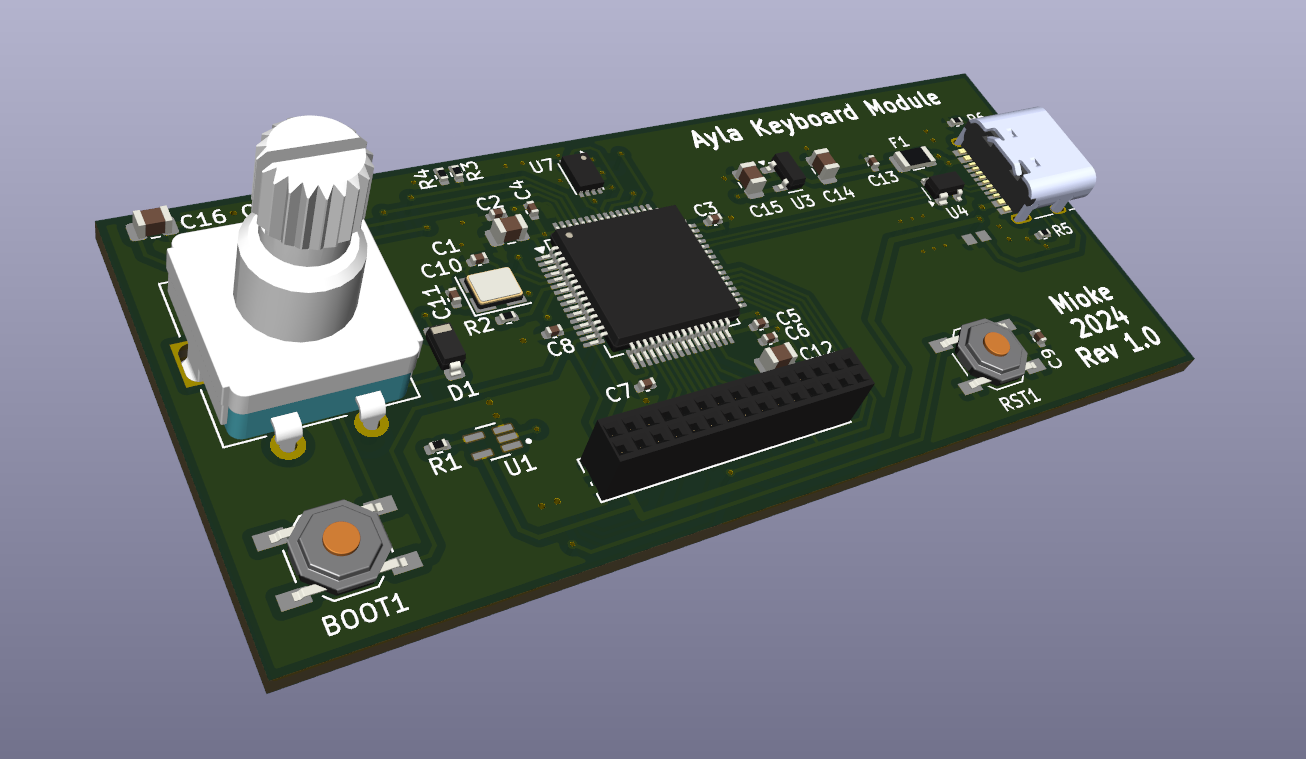
    Getting a fully assembled PCB can be expensive and will almost certainly have some issues, so I designed a small test board to replace the BlackPill version as it had limited GPIO's with an STM32F411 LQFP64 package.

    The board is 72x32mm and contains all the electronics. Connection to the keyboard is via the 30 pin connector (1.27mm pin pitch). I've included level shift for RGB, rotary encoder (Volume etc.)... I'm almost certain I forgot something important...  See for more information on this Test Board.

  • BlackPill Prototype Built

    Michael O'Toole09/10/2024 at 22:19 0 comments

    BlackPill prototype build testing:

    I received the five prototype boards today and set about building a test board (blackpill version), here are the changes required.

    1. Minor edit of code (I had two keys reversed), fixed for the next phase (discrete board build)...
    2. As I used an ISO layout, I had to change one QMK key code (replace KC_TILDE with KC_NUHS)...

    Assembly notes and comments:

    The diodes and hot-swappable sockets were pretty easy so no issues with these, as for the RGB leds, I didn't bother, perhaps another time but will change these out for an easier to solder version (update: I used the right footprint from web but pins are wrong, they are for another RGB device... so, no leds).

    The keyboard functionality works perfectly, next the code for the macro keys, RGB and rotary encoder...

    The version with SK6812-E "the easier to solder RGB led's" is correct, that will be the next prototype using STM32F411RETx (64 version) as I need a few more pins.

    I have two excellent AKKO keyboards, if I can achieve similar results to these I will consider it a success ;)

  • Building with tiny SMD parts

    Michael O'Toole09/08/2024 at 17:44 0 comments

    I've received parts for the BlackPill prototype version and to be completely honest they are tiny, perhaps too tiny. 

    The diodes will be difficult enough being there are 99 of them and no stencil, but I'm not at all confident I can solder the current RGB LEDs even with the stencil supplied, they are simply too small for comfort and my eye sight is not good.

    I will give it a go but may have to update the RDG leds from WS2812B to SK6812-E  as they mount on the back side (allowing one stencil for everything), and they are easier to hand solder.

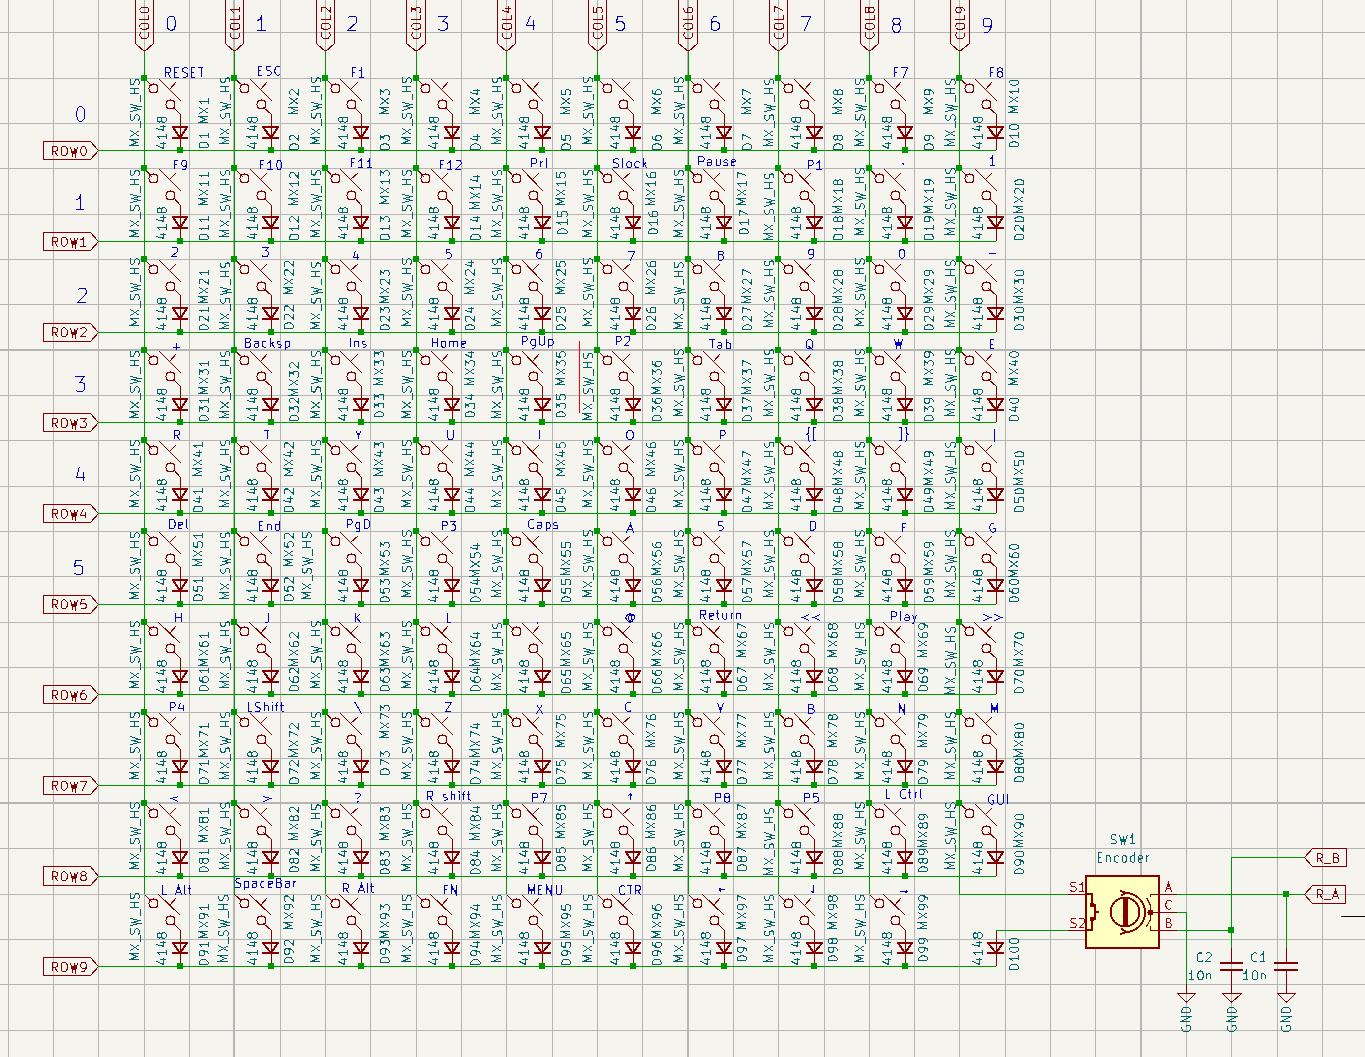
  • Update to 10x10 Matrix

    Michael O'Toole08/22/2024 at 13:39 0 comments

    Switches to 10x10 matrix (20 free pins required for matrix, as opposed to 24 previously). This gives me all the pins I required including the flash option to store macros (plus one spare pin). 

    Smaller keyboards with fewer keys probably wont have this issue. The STM32F4xx (48 pin) should handle a full size keyboard using a 10x11 matrix but that's for another time...

    As I said previously, I'm building with the Blackpill to test everything prior to building with discreet components. Quite a learning experience, especially trying to route a 10x10 matrix, not an easy task on two layers, so I switched to four.

    Of course I had to modify the code and keyboard_layout,json etc., but that bit is easy enough. Some more checking of the Kicad file, then off to PCBWay...

    keyboard_layout.json (from: keyboard_layout_editor.com)

    [{f:3,a:7},"Reset",{x:0.25},{"p":"DCS","a":7,"f":4,"fa":[5]},"Esc",{"x":1},"F1","F2","F3","F4",{"x":0.5},"F5","F6","F7","F8",{"x":0.5},"F9","F10","F11","F12",{"x":0.25,"f":3},"PrtSc","Scroll Lock","Pause"],
    [{y:0.25,"f":6},"M1",{"x":0.25,"a":5,"f":5},"¬\n`","!\n1","\"\n2","£\n3","$\n4","%\n5","^\n6","&\n7","*\n8","(\n9",")\n0","_\n-","+\n=",{"w":2},"Backspace",{"x":0.25,"a":7,"f":4},"Insert","Home","PgUp"],
    [{"f":6}, "M2",{x:0.25},{"f":6,"w":1.5},{"f":6,"w":1.5},"Tab","Q","W","E","R","T","Y","U","I","O","P","{","}",{"x":0.25,"w":1.25,"h":2,"w2":1.5,"h2":1,"x2":-0.25},"Enter",{"x":0.25,"f":4},"Del.","End","PgDn"],
    [{"f":6}, "M3",{x:0.25},{"f":6,"w":1.75},"Caps","A","S","D","F","G","H","J","K","L",":","@","~",{"x":1.5},"V↓"," >","V↑"],
    [{"f":6}, "M4",{x:0.25},{w:2.25},{"w":1.25},"Shift","|","Z","X","C","V","B","N","M","<",">","?",{"w":2.75},"Shift",{"x":0.25},"<<",""," >>"],
    [{"f":6}, "M5",{x:0.25},{w:1.25},{"w":1.25},"Ctrl",{"w":1.25},"Menu",{"w":1.25},"Alt",{"p":"DCSSPACE","w":6.25},"",{"p":"DCS","w":1.25},"Alt",{"w":1.25},"FN",{"w":1.25},"Menu",{"w":1.25},"Ctrl",{"x":0.25},"","",""]
    
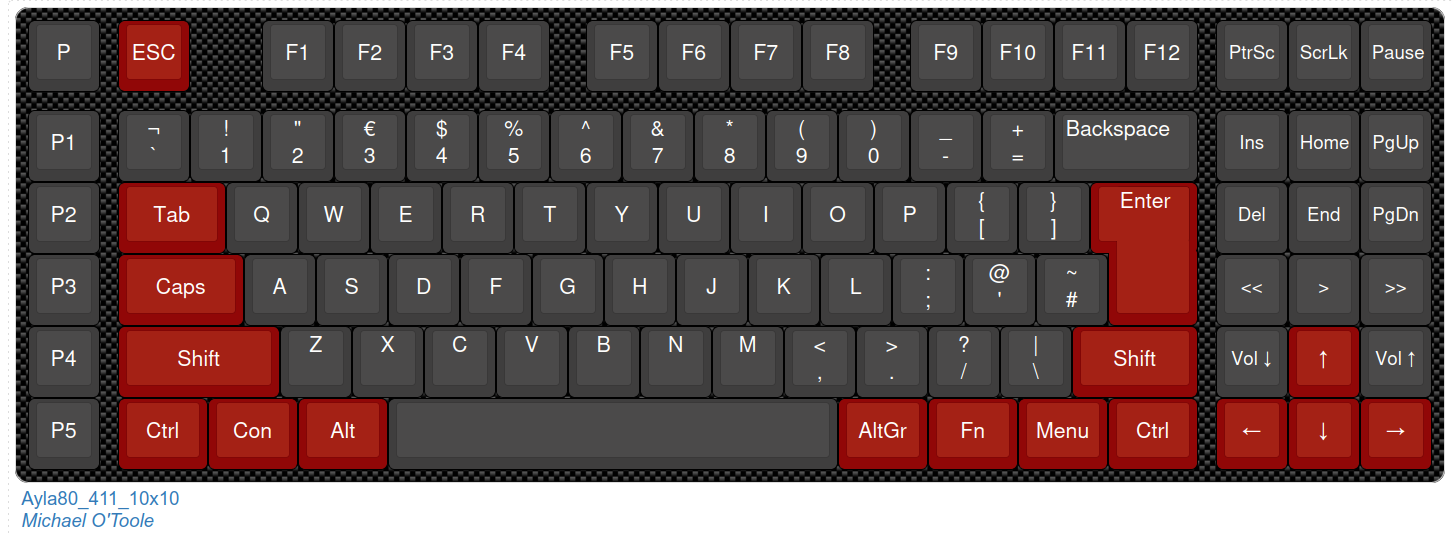
    From keyboard_layout_editor.com my Ayla80 99 key version.

    Note for above image: Might increase left shift from 1.25 to size to 1.75, then move \ to far right (before right shift) and reduce right shift from 2.5 to to 1.5. This might make more sense...

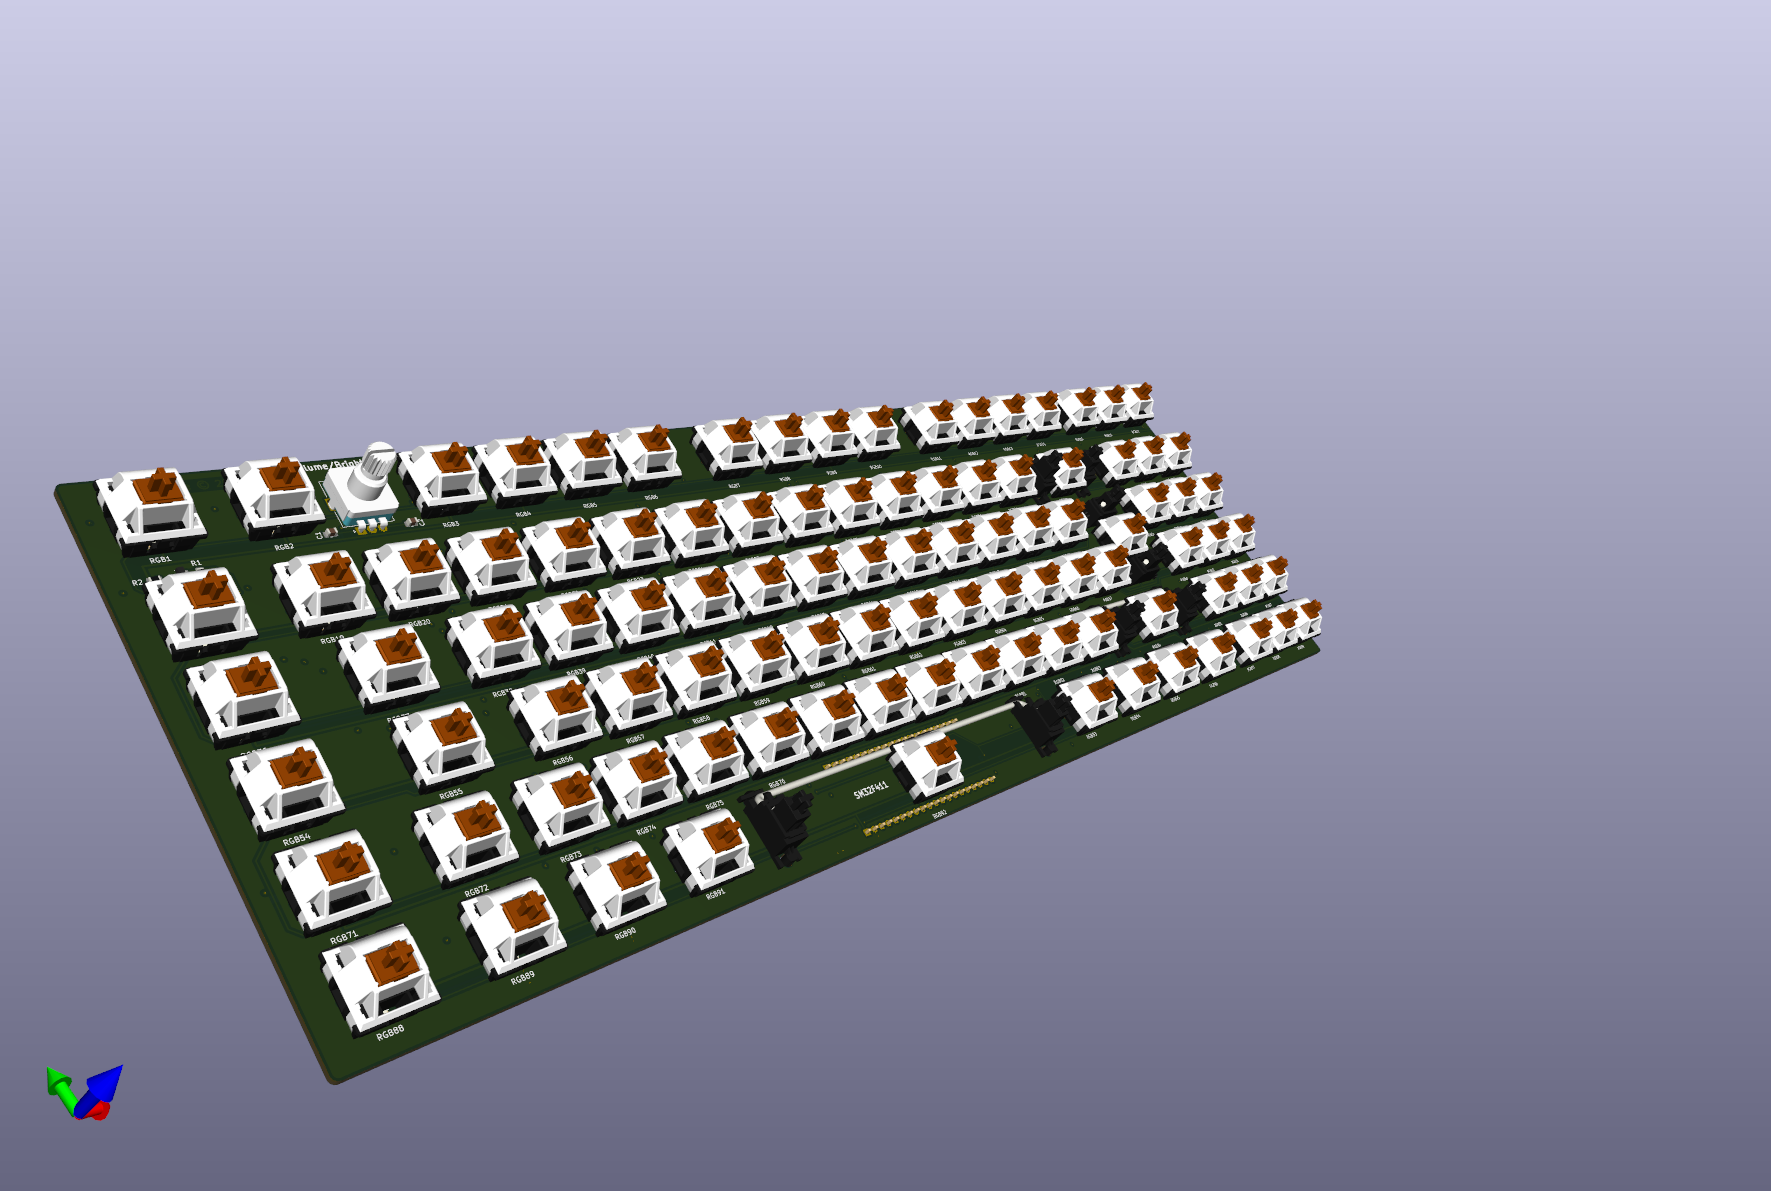
    3D Image

    New 10x10 matrix (20 pins) version

  • STM32F411 Blackpill Version

    Michael O'Toole08/18/2024 at 00:53 0 comments

    Before committing to ordering the boards and associated costs, I though I better test the keyboard circuit design. I removed all of the hard to solder components and replaced them with a BlackPill Dev Board (exactly the same electronics as my board).

    This only leaves the larger components, Diodes, RGB Leds and Hot-swappable connectors which most of us should be able to handle with a good soldering (I use a KSGER which I highly recommend).

    This extra step (proof of concept) before spending money only to find I made a mistake with the layout, code or both, is not essential but realistically it's probably necessary considering the complexity involved.

    So to conclude, the new board is basically the same except we now use a Blackpill for the electronics and it now includes a rotary encode (for volume and RGB dimming). It should be much easier to build and program...

    Once testing is done (not sure if some of GPIO's I used are problematic), I can continue with the embedded version... See project log for update, there are a few...

    Image:

    Mike

  • Updates: Stabilizer & Footprints

    Michael O'Toole08/15/2024 at 15:36 0 comments

    Lest I forget, I added another stabilizer (2U) for the Enter Key, also, edited marbastlib-mx:SW_MX_HS_CPG151101S11_xxx  to include graphics to align the RGB led (had to eyeball the placement as I can't find and official dimensions).

    More...

  • QMK Code Testing

    Michael O'Toole08/12/2024 at 11:18 0 comments

    From the limited experience I have with QMK, it  appears to be a little more Windows / Mac centric, case in point, the QMK Toolbox (recommended GUI), only contains Windows and Mac programs, for Linux it's pretty much CLI (command line interface) all the way...

    There's a lot of quality documentation but I could not find a basic walk through on getting a newly designed keyboard up and running, however, I did find lots on setting up or modifying an existing designs which helped...

    *Will add link to the instructions I used that did not work (left all five test board stuck in DFU mode) as soon as I find it again*

    Test Board used: STM32F401/411  BlackPill

    Process:

    • CD to your qmk_firmware directory
    • qmk new-keyboard ... follow instructions
    • make ayla_411:default
    • ./flash.sh ayla_411_default.bin

    The flash.sh is available on git, not essential but useful...

    See: https://github.com/phpbbireland/mioke80/tree/main/qmk/ayla_411

    Essentials:

    https://docs.qmk.fm/hardware_keyboard_guidelines#naming-your-keyboard-project

    https://docs.qmk.fm/newbs_getting_started

    https://docs.qmk.fm/flashing

  • Media Options

    Michael O'Toole08/09/2024 at 17:01 0 comments

    For this version I will use keys to control audio... Volume Up/Down, Next/Previous Track, Play/Pause.

    In the next version I will use a Rotary Encoder for audio and RGB brightness...

  • Git Repository

    Michael O'Toole07/25/2024 at 19:22 0 comments

    I added the Kicad file to my Git Repository, mind you, some footprints and 3d images are mixed sources, you may have to add your own or re-link them...

View all 11 project logs

Enjoy this project?

Share

Discussions

Michael O'Toole wrote 07/26/2024 at 13:52 point

Will correct it's 8.0.3... simple typo this time, but I can do this on occasion...

  Are you sure? yes | no

Ken Yap wrote 07/26/2024 at 00:12 point

>Kicad version 8.3

You actually mean 8.0.3. 8.3.x is highly unlikely. The next major release next year will be 9.0.0. The numbers are major release, minor release, and patch level. Since 5.1 there have been no minor releases so that number is 0. All patch levels for a given major and minor number are compatible. The current release is 8.0.4 so the patch level is 4.

  Are you sure? yes | no

Similar Projects

Does this project spark your interest?

Become a member to follow this project and never miss any updates