Close
0%
0%

Ocellus Solutions

Discovering IoT/AI solutions to help beekeepers maintain healthy bee colonies (and save the world in doing so!)

Similar projects worth following
335 views
What do you get when someone who knows NOTHING about electronics, coding, IoT, AI, physics or engineering undertakes an IoT project to help save honey bees from collapse?

You get an amazing learning opportunity where a surprising number of very knowledgeable people come together to develop an affordable, easy-to-install, actionable UX bee hive monitoring device that really can ... save the honey bee ... and benefit all of society.

It starts with HONEY BEES

Apis mellifera (the scientific name for the common honey bee) is personally responsible for 70% of the food we eat. Most honey bees are 'managed colonies', meaning that apiarists (beekeepers) raise and care for them. Without human intervention, we could be bee-free.

Total bee populations have declined, with losses of 1 in 3 colonies yearly.  That's because of the FOUR Ps:

  • Pests
  • Pesticides
  • Pathogens (diseases)
  • Poor nutrition

Learn more ... check out this article by Time magazine.

Microphone Board Housing.pdf

Housing and connector for microphones

Adobe Portable Document Format - 993.90 kB - 09/23/2024 at 14:12

Preview

Microphone Board Schematic.pdf

Printed circuit board for microphones

Adobe Portable Document Format - 39.82 kB - 09/23/2024 at 14:12

Preview

Main Board Schematic.pdf

Printed circuit board images

Adobe Portable Document Format - 351.75 kB - 09/23/2024 at 05:00

Preview

Main Board Layout.pdf

Wiring schematic for main PCB

Adobe Portable Document Format - 98.10 kB - 09/23/2024 at 05:00

Preview

Knowles I2S MEMs digital mic.pdf

Knowles microphone datasheet

Adobe Portable Document Format - 1.39 MB - 09/23/2024 at 03:42

Preview

View all 6 files

  • 11 × 0.1 uF resistor Digikey Part No. 478-KGM05AR51A104KHCT-ND
  • 8 × 1.0 uF resistor Digikey Part No.399-C0603C105K4RAC7867CT-ND
  • 2 × 10.0 uF resistor Digikey Part No.478-1655-1-ND
  • 6 × Molex connector RCPT 8POS 0.049 TIN SMD R/A Digitkey Part No.WM4951CT-ND
  • 1 × JAE Electronics USB C Receptacle USB2.0 16P Digikey Part No.670-DX07S016JA3R1500CT-ND

View all 13 components

  • Kevin Jablonski10/04/2024 at 17:44 0 comments

    Mic placements within Langstroth hive box

  • Hive Acoustics

    Kevin Jablonski10/04/2024 at 17:37 0 comments

    Phase II recording involved sound sampling from an empty hive box.

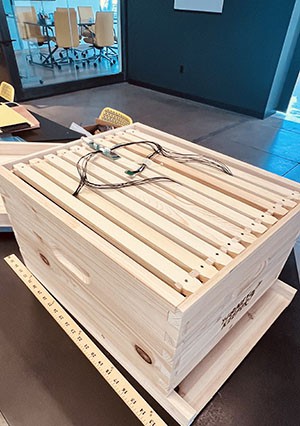
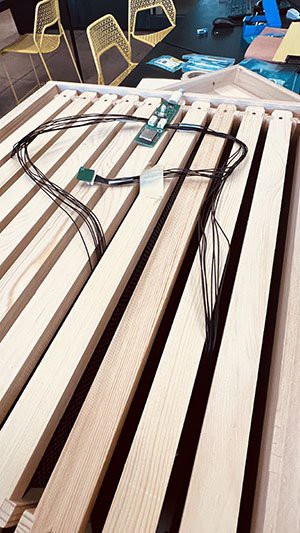
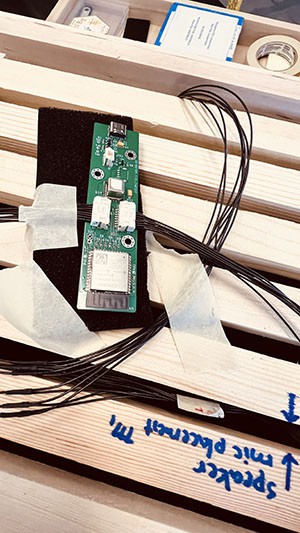
    As part of refining our IoT device, we’ve moved to testing microphone placement within an empty hive box. Using 3D-printed mic holders, we intentionally positioned the mics in four key areas: opposite sides of a frame, the top center of the hive (where most studies recommend placing mics), and deep near the hive’s primary entrance.

    Our sound source, an iPhone 13, was placed on a vibration-reducing pad on the bottom board in two locations. The hive's lid was secured to replicate realistic hive conditions. We then conducted a series of recordings under different sound conditions, including white noise, ambient external sounds, a mix of white noise and external sounds, and even queen piping recordings, both with and without ambient noise.

    The goal was to determine how each mic position captured these different sound profiles and assess the clarity of the recordings from each location. This testing phase was crucial for deciding which mic placements yielded the most accurate and informative data within the hive, setting the stage for the next round of experiments.

    By experimenting with strategic mic placements, we're ensuring that future recordings of real hive conditions—complete with live bees—will provide us with the highest-quality data for monitoring hive health.

  • Resolving the Mic Issue

    Kevin Jablonski10/04/2024 at 17:22 0 comments

    Isolating the sound and vibrations solved our mic problems.

    Our initial microphone test didn’t go as expected. Despite placing the four mics only centimeters apart, the frequency and spectrogram fingerprints from two of them were identical, while the other two mics also matched but differed from the first pair. This raised concerns, as we anticipated all four mics would produce nearly similar results.

    We uncovered multiple issues after brainstorming and discussing with our newest team member—an electronics and acoustic engineer from the University of Pittsburgh. First, mounting the microphones on a wooden platform created unforeseen complications. The wood vibrated during sound tests, transmitting signals between the mics, which resulted in cross-interference. Additionally, the sound source itself, also positioned on the wood, introduced both sound and mechanical vibrations that further distorted the data. The proximity of the microphones compounded the interference, leading to unclear results.

    The solution came after some experimentation. We used small foam pieces under each mic to eliminate vibrations, spaced the mics further apart, and increased the dB level of the sound source, ensuring it was equidistant from each mic. This resolved the issues and set us up for Phase II studies.

  • Sound Check (one of many)!

    Kevin Jablonski10/04/2024 at 15:04 0 comments

    Testing began with white noise and ambient sound recordings.

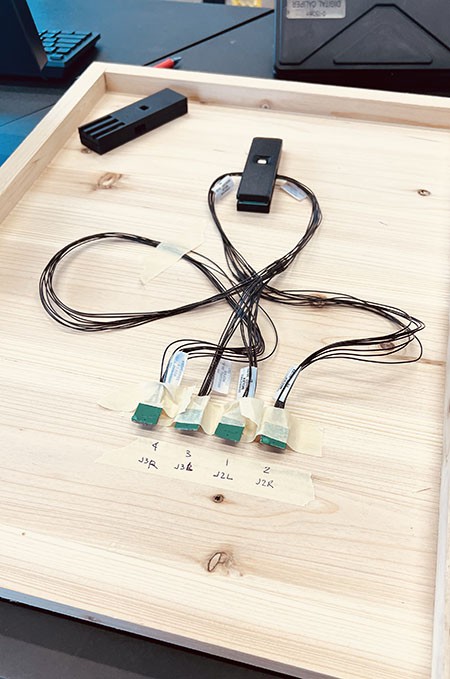
    As we move forward with our IoT sensor and microphone setup, the first step in our testing protocol is to record baseline samples. We began by capturing white noise and ambient room noise from all four microphones. To ensure consistency, we mounted the mics directly onto a hardwood base, placing them side by side. This setup allowed us to compare their performance under controlled conditions.  This proved to be a complete failure and reminded us that the fields of engineering and electronics are highly specialized ... you often need to find an expert in your specific area of interest to achieve your desired goals ;-)

  • Wired for Sound

    Kevin Jablonski10/04/2024 at 14:40 0 comments

    Finally, we wire the hive!

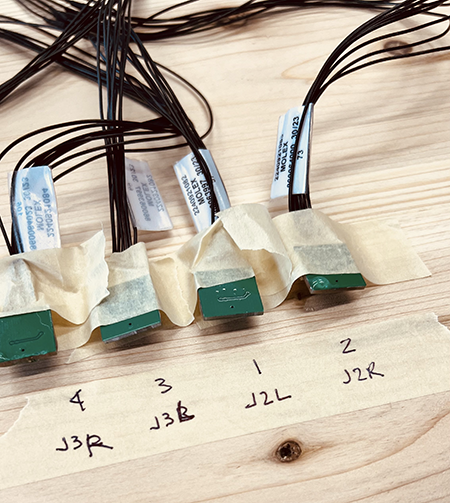
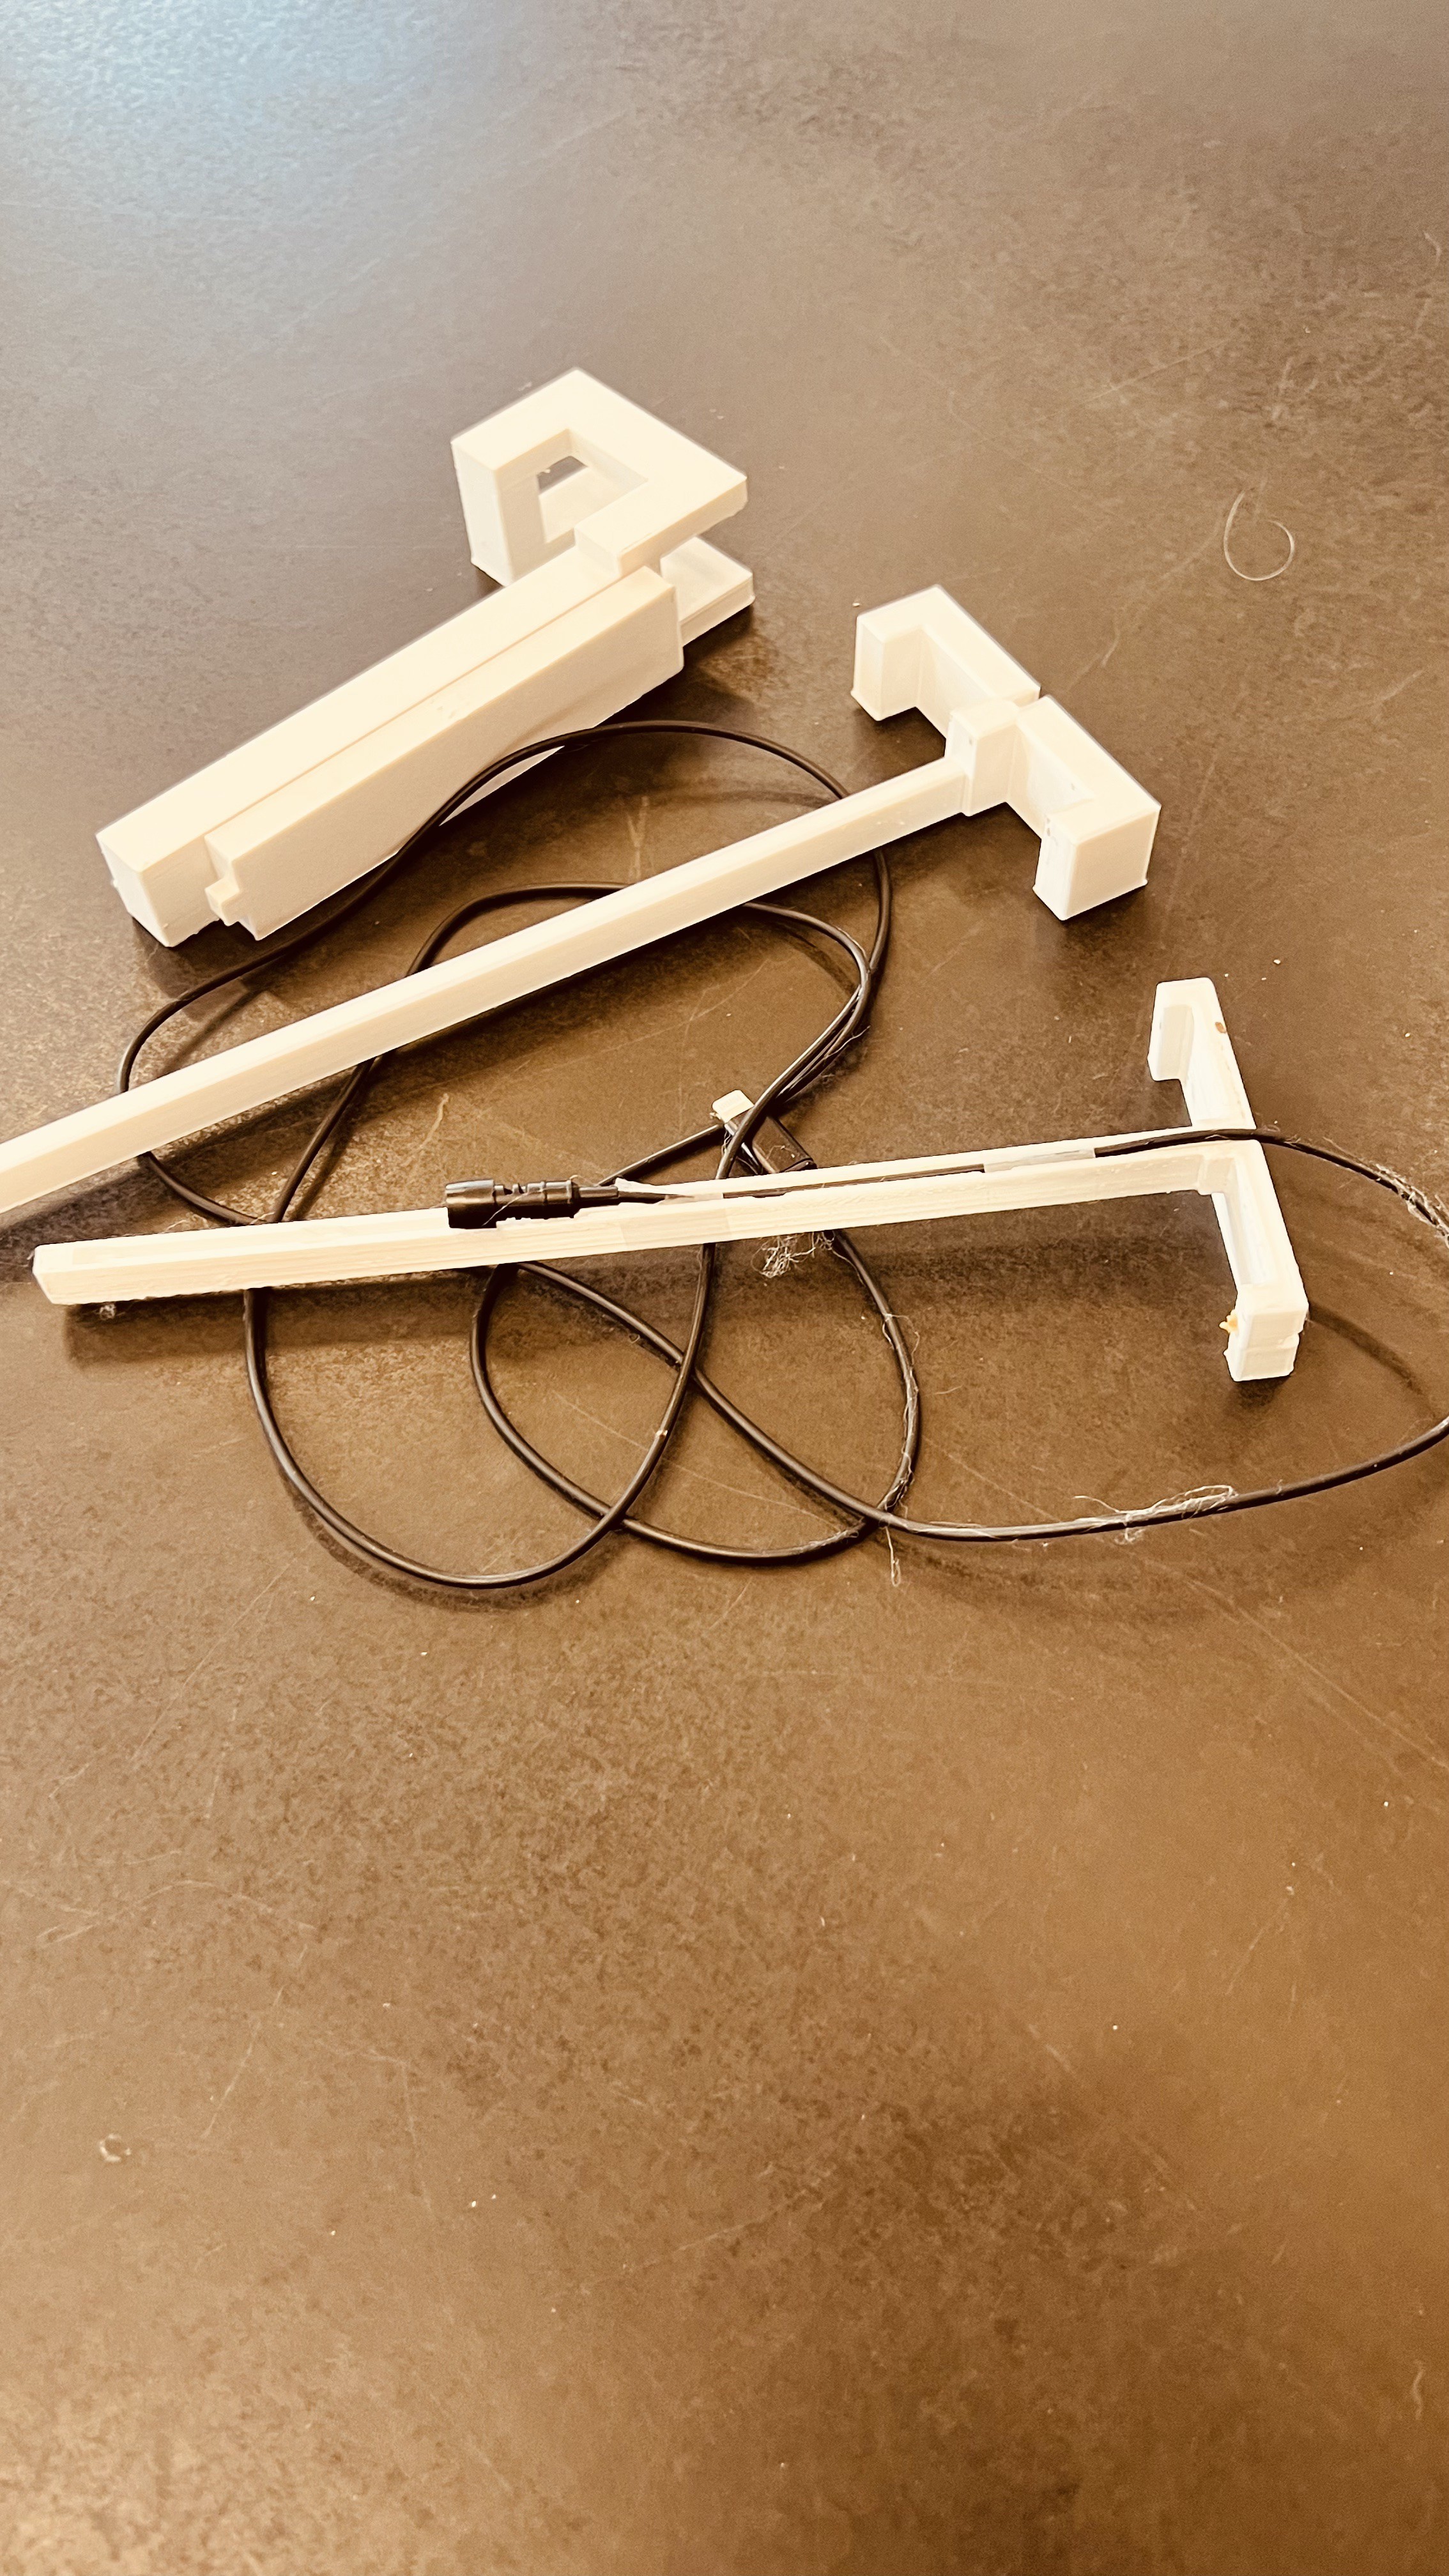
    Once the mic boards were sealed, the next challenge was creating efficient wiring assemblies. Each mic connector on the main PCB could handle up to two microphones, so to minimize clutter, I spliced two wire lengths together, creating custom assemblies that tied the mic boards to the main PCB. Paired with my 3D-printed mic holders, this allowed me to position the mics anywhere within the hive for optimal sound capture.

  • Safe and Sound

    Kevin Jablonski10/04/2024 at 14:38 0 comments

    Configuring the mics posed unique challenges.

    We kept in mind that we were very limited in internal space within the hive, and after completing the mic holders, we created our mic assemblies.  After lengthy research, including multiple phone consultations with four major international mic producers, we used Knowles I2S MEMs omnidirectional microphones.  The most critical consideration is the accuracy and ability to capture honey bee frequencies (100Hz to 3000Hz) with low noise interference (it's already very noisy inside a beehive).

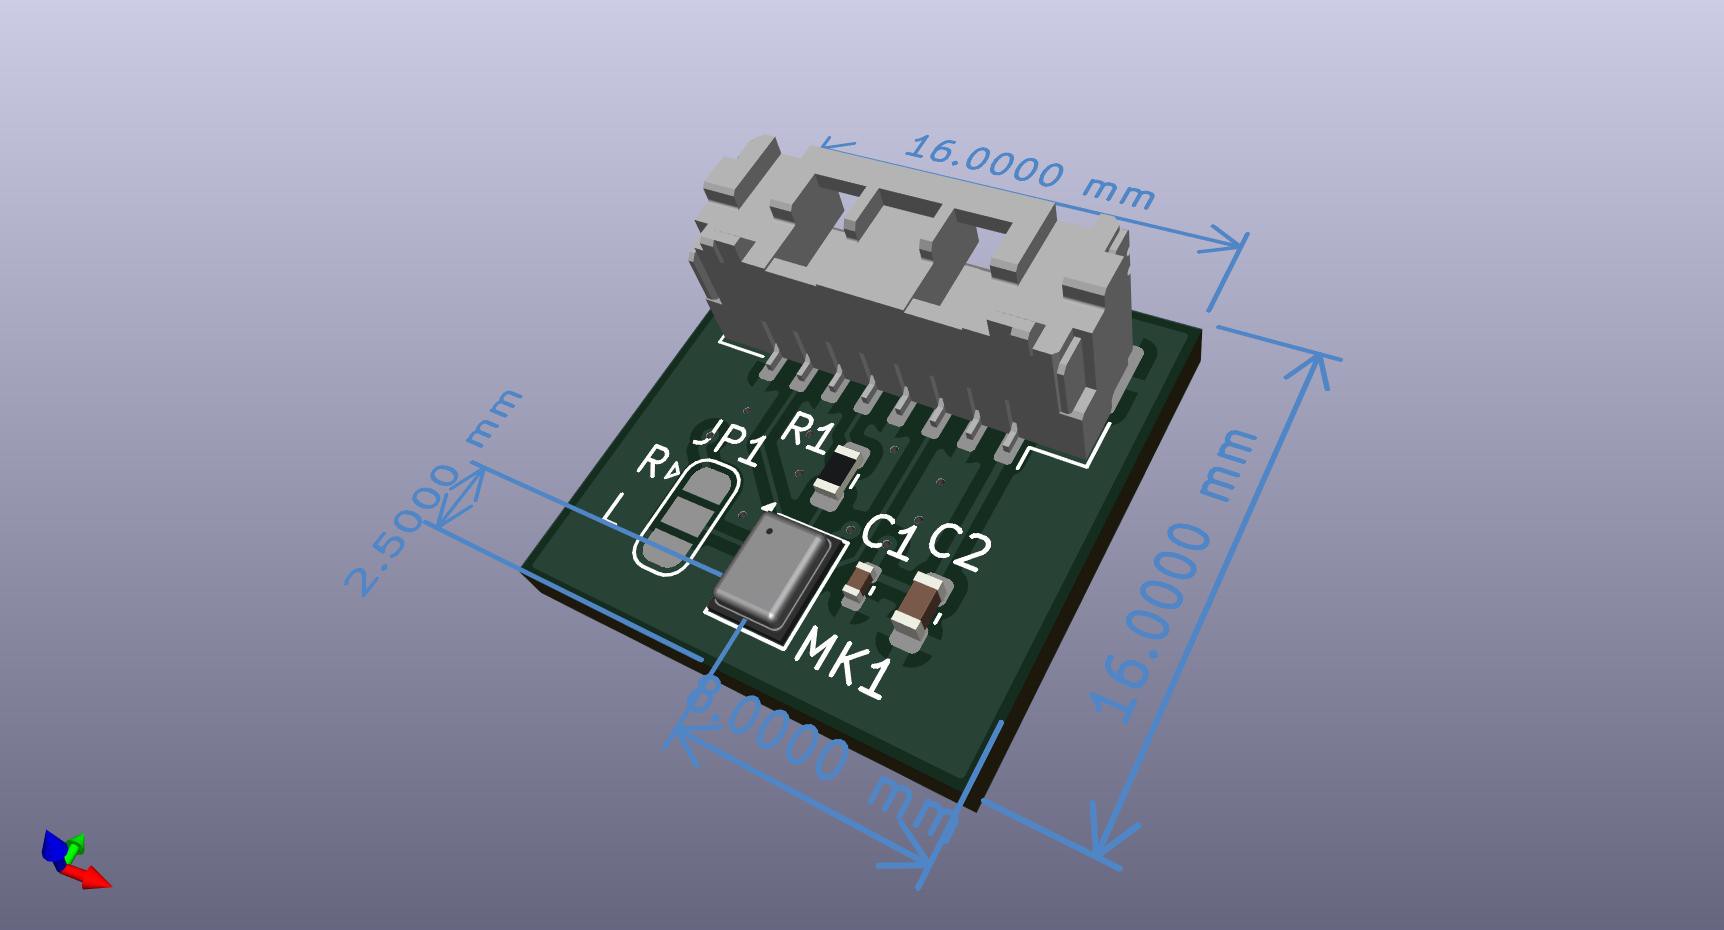
    The mics were individually mounted on small PCBs we designed specifically to hold the mics, a connect and a couple of basic electronic components necessary for mic operation.  I  decided to coat the microphone boards with a food-grade, quick-drying epoxy. This prevents the electronics from shorting or being chewed by curious bees and ensures that the bees are protected from exposure to electrical currents. The epoxy provided a durable, bee-safe barrier critical for maintaining the integrity of both the hive and the sensors.

  • Finaling My Mic Holder (or so I thought)

    Kevin Jablonski09/23/2024 at 14:45 0 comments

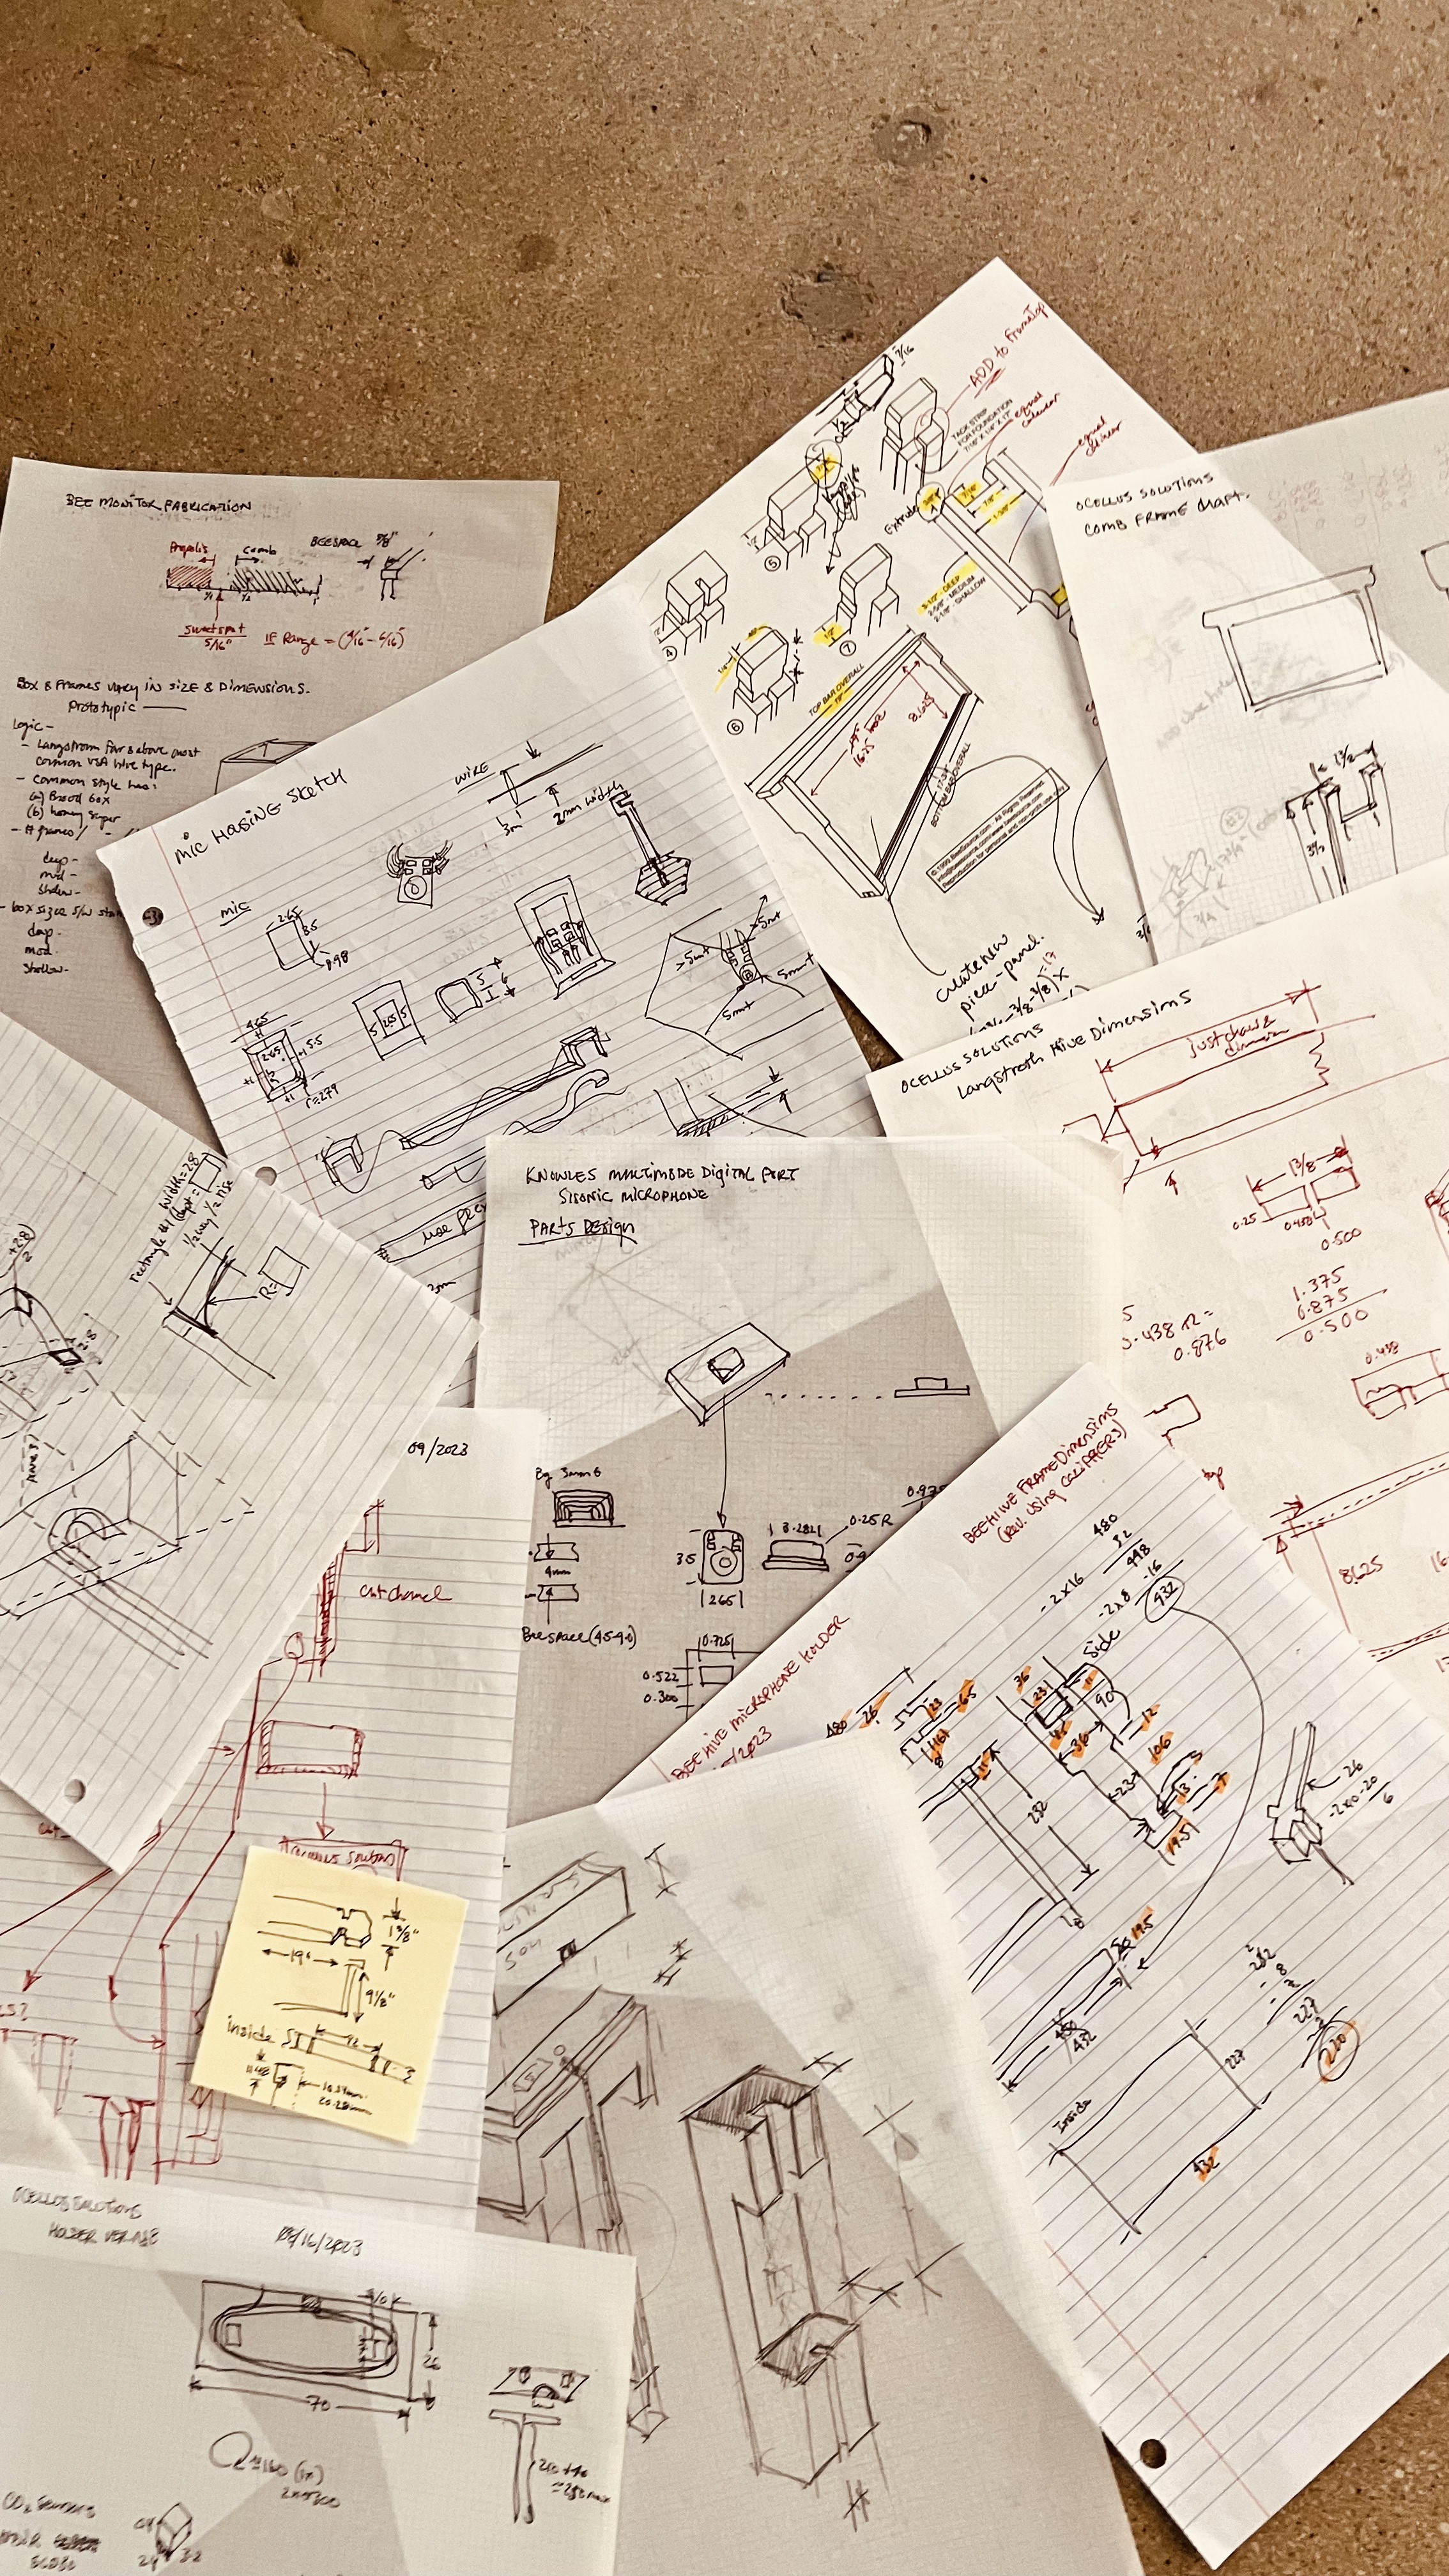
    I was surprised at how much time, and how many sketches, I went through trying to design the perfect mic holder

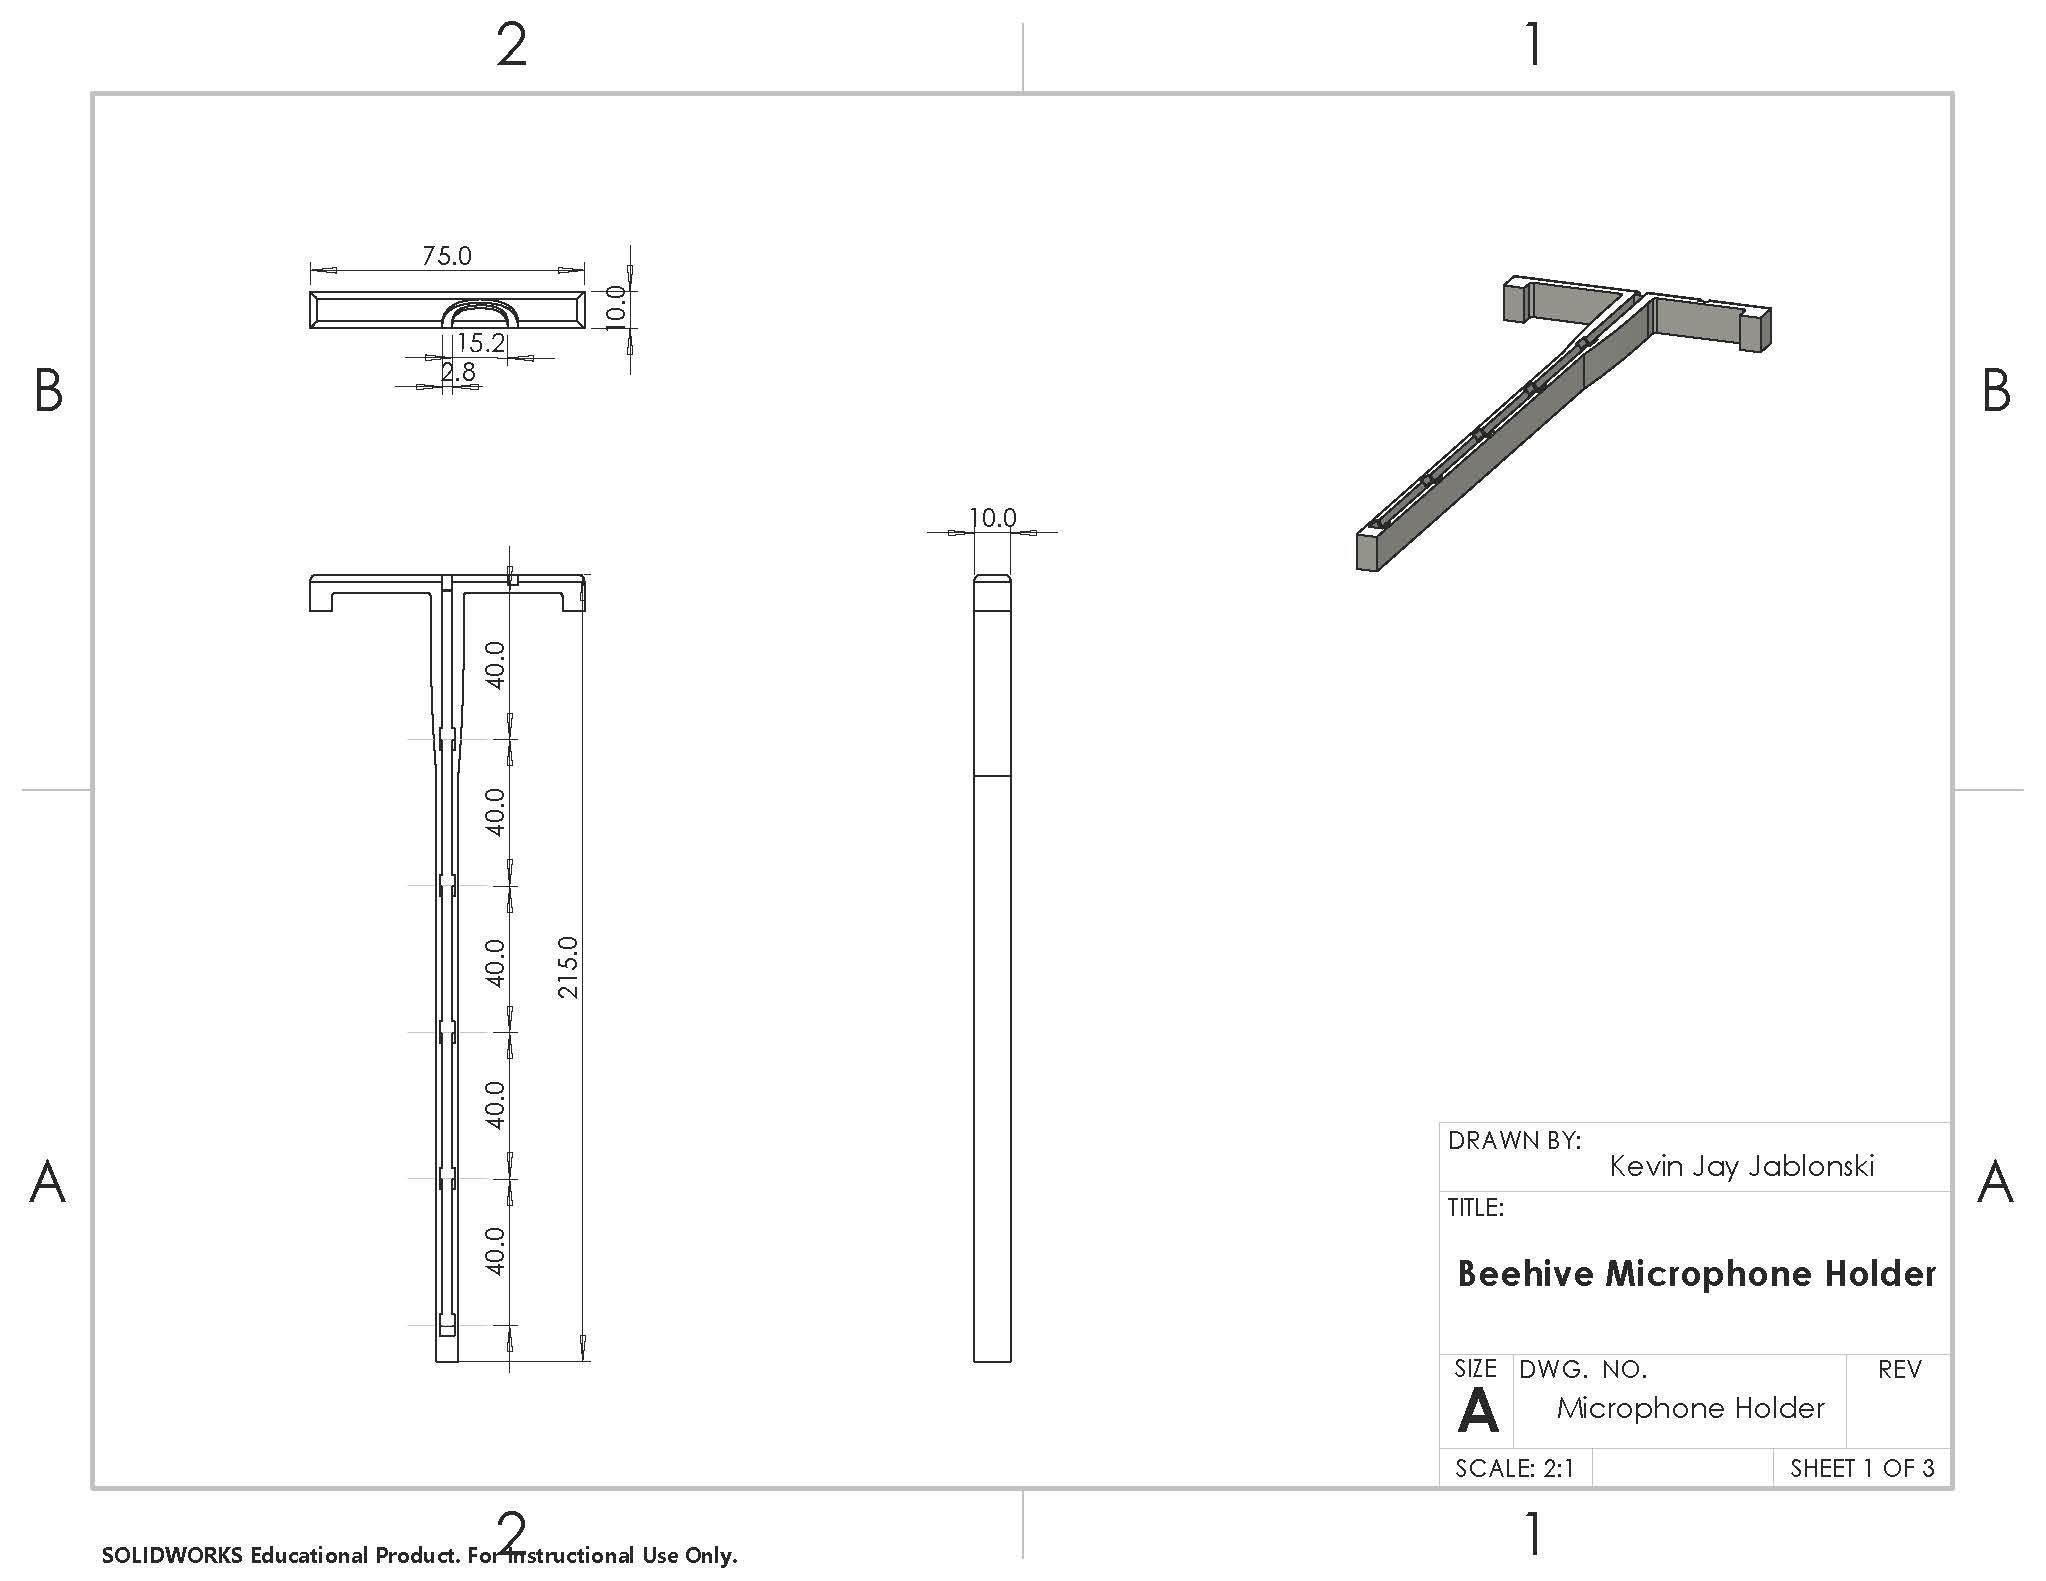
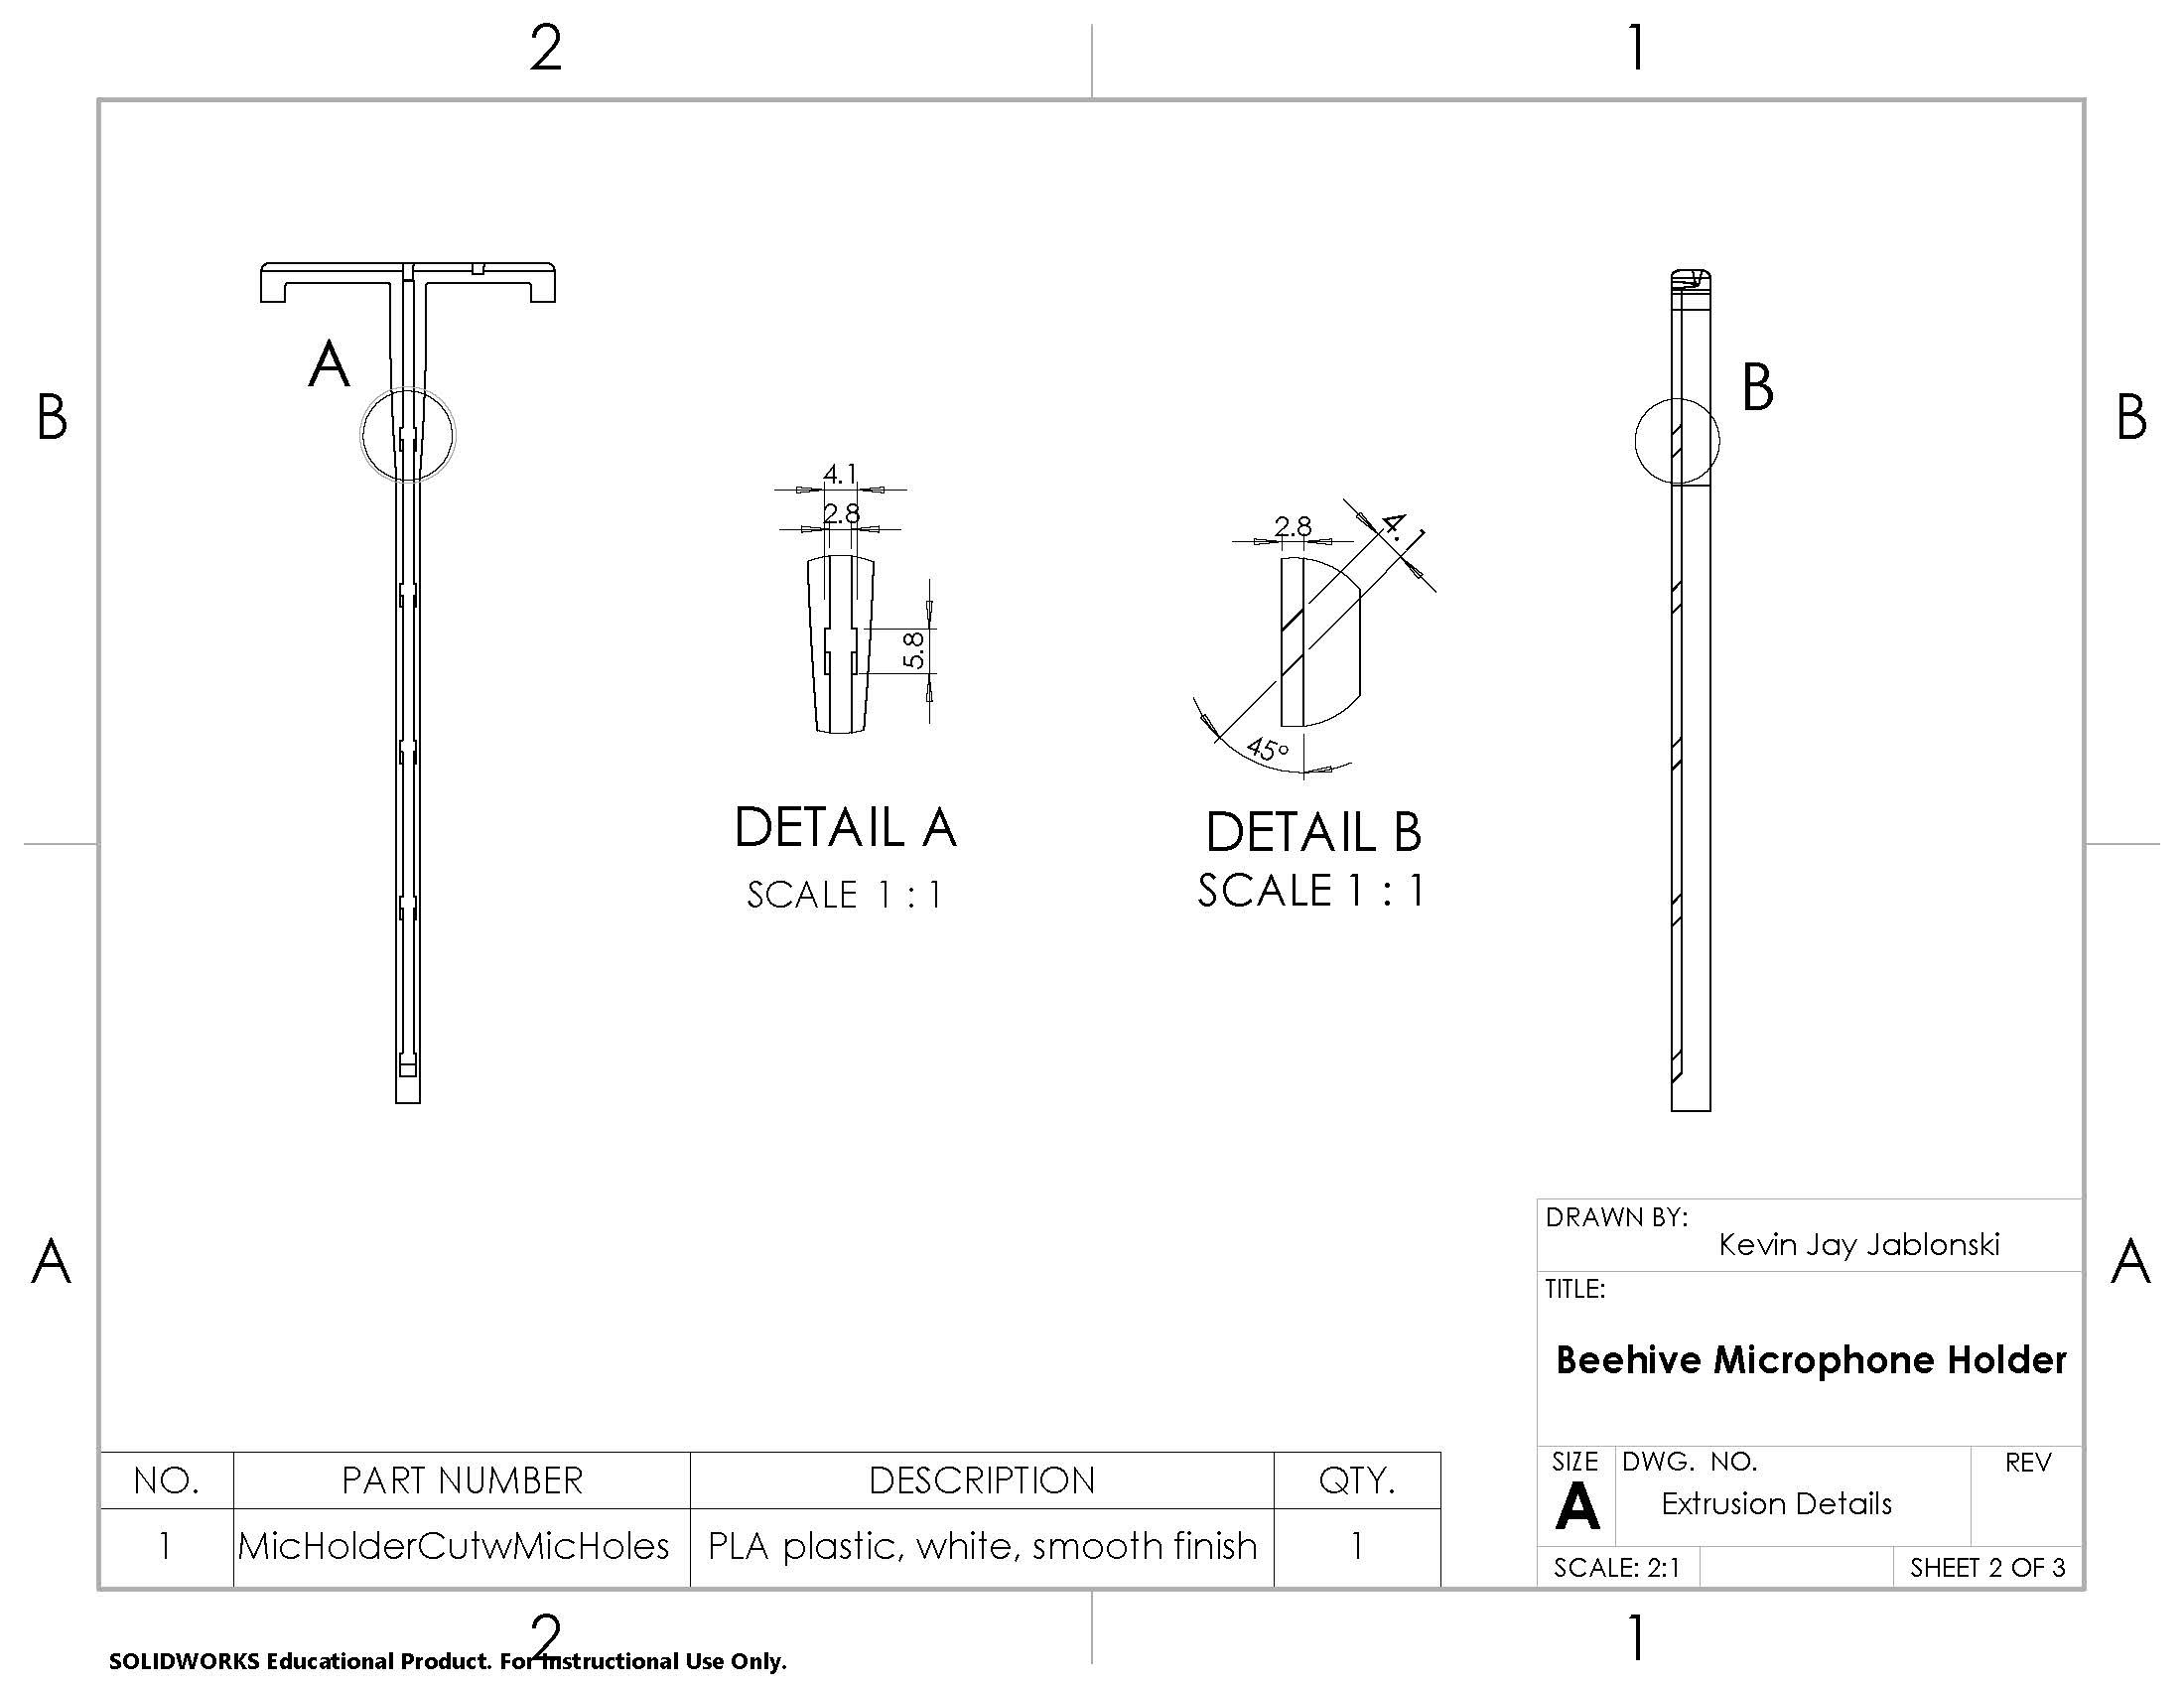
    I finally settled on this design ....

  • Mic Holder Progression

    Kevin Jablonski09/23/2024 at 14:37 0 comments

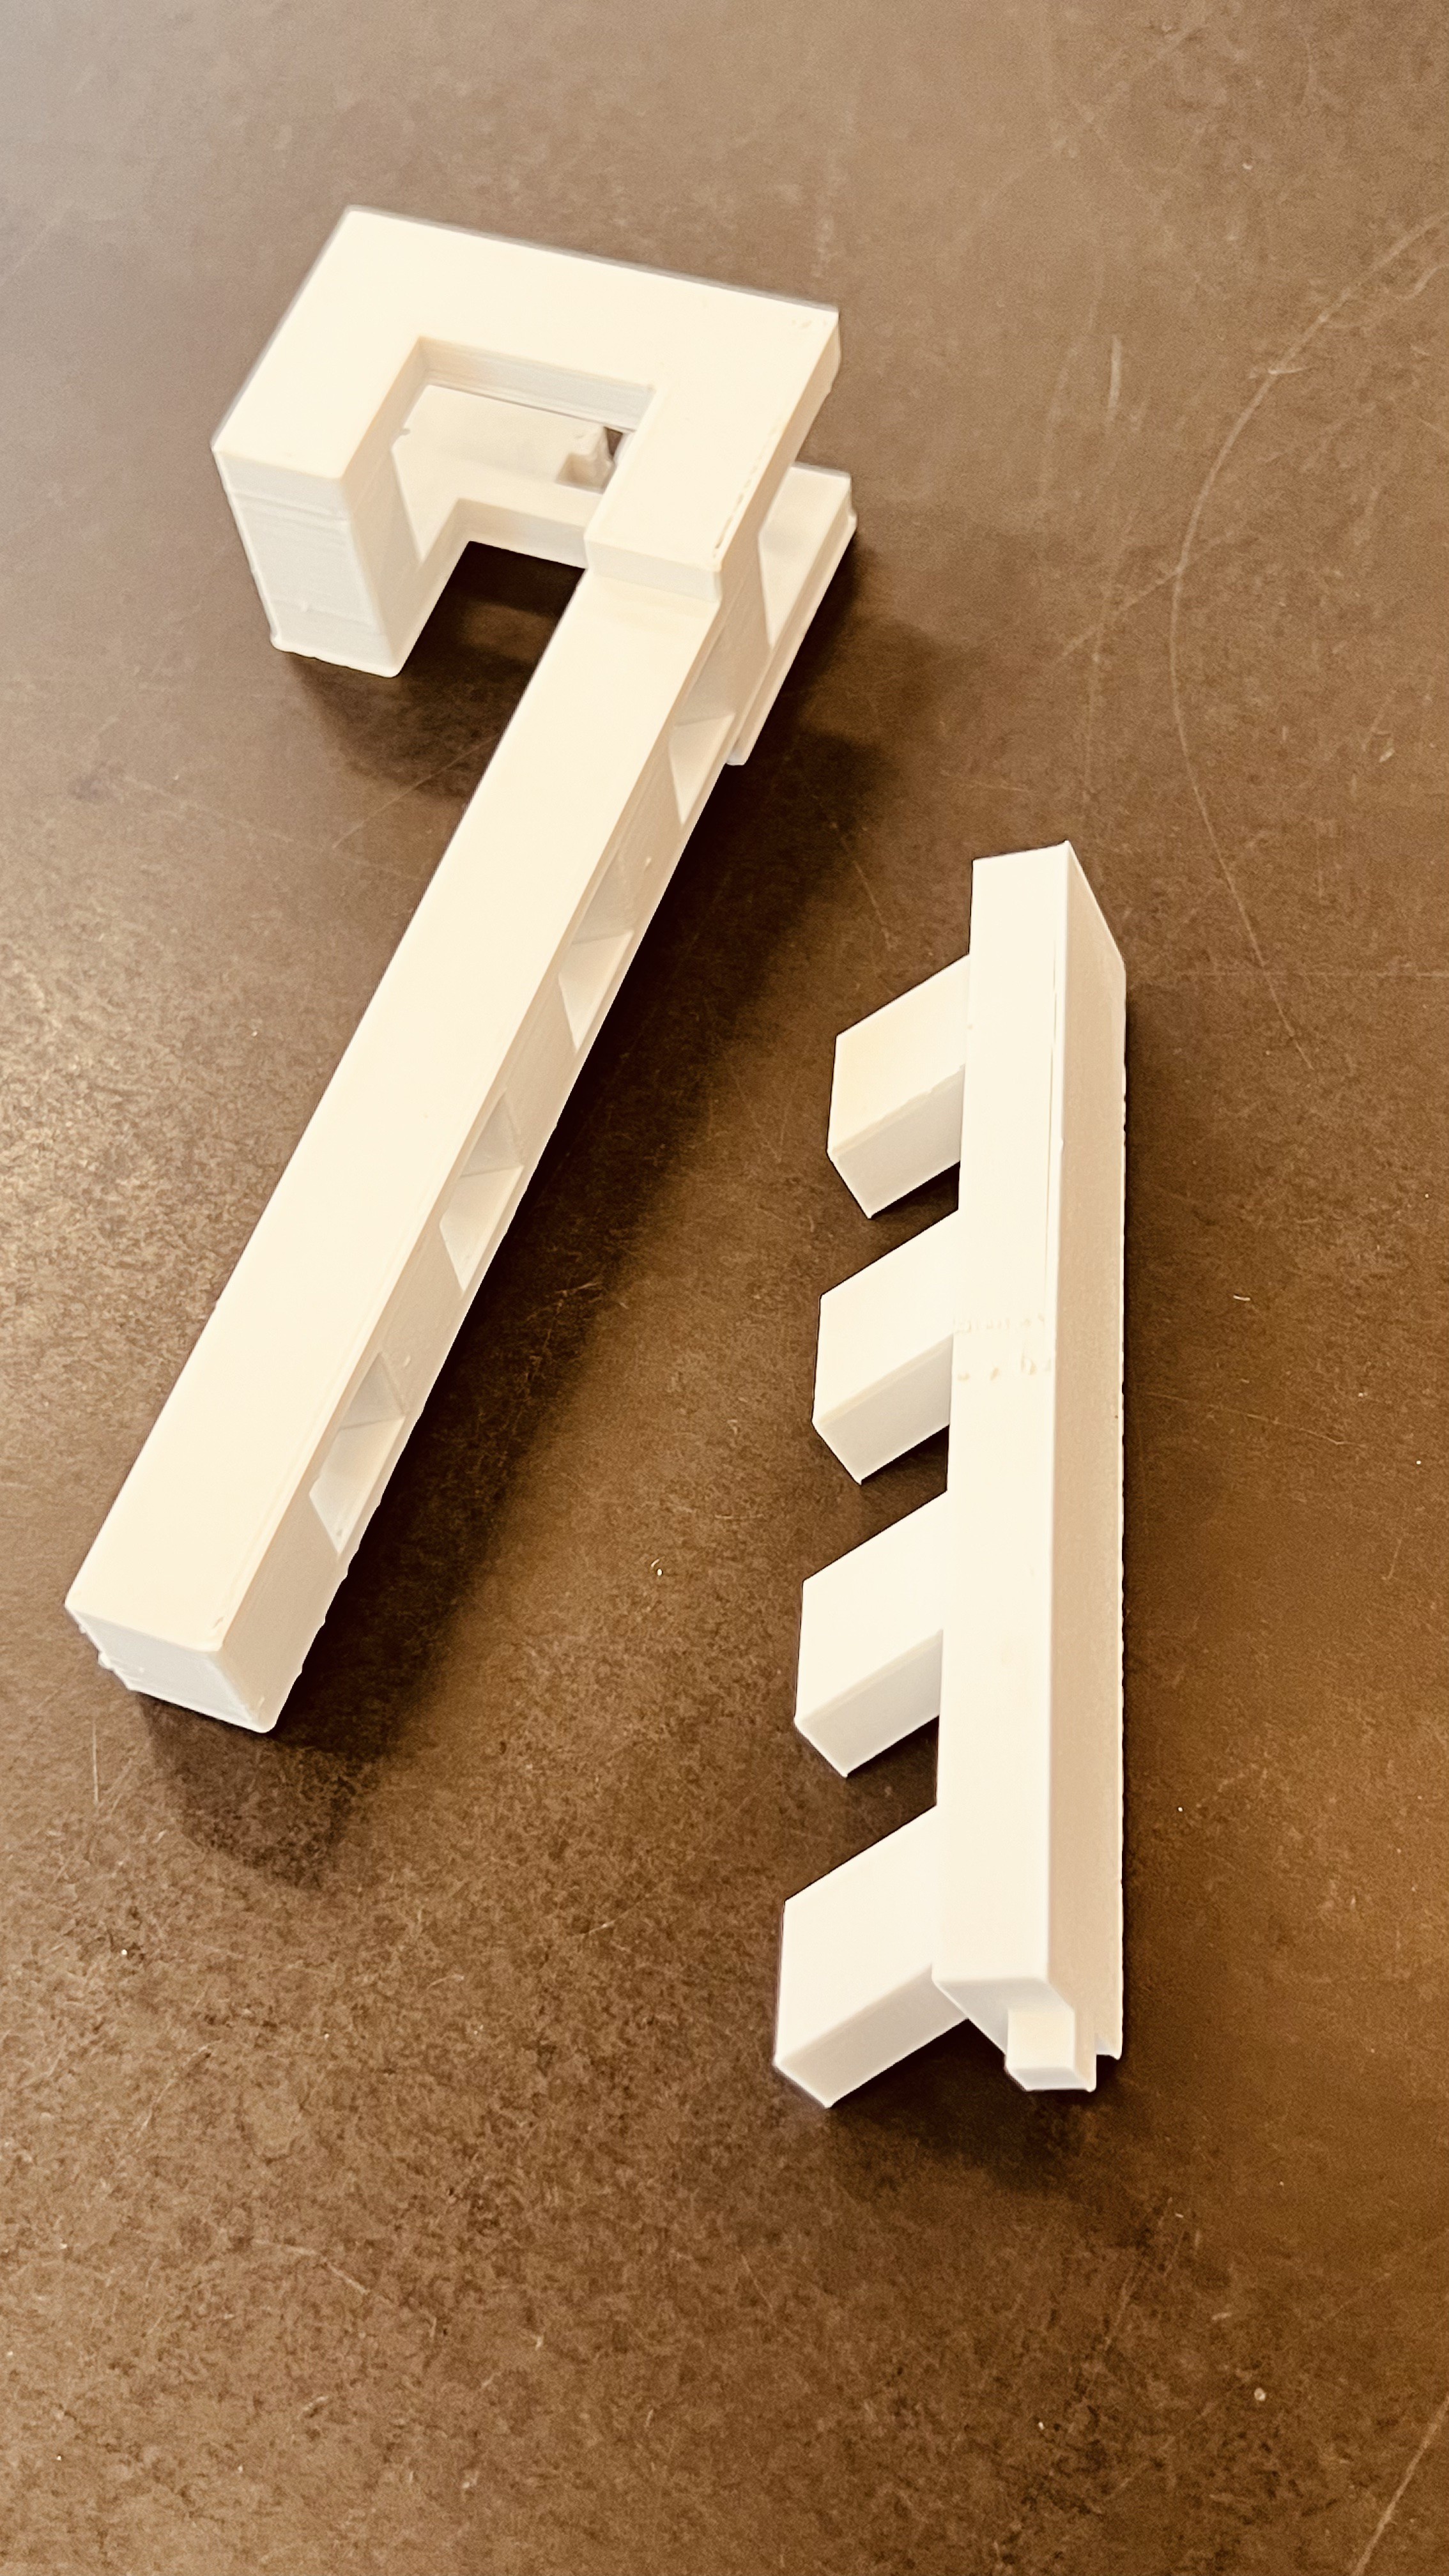
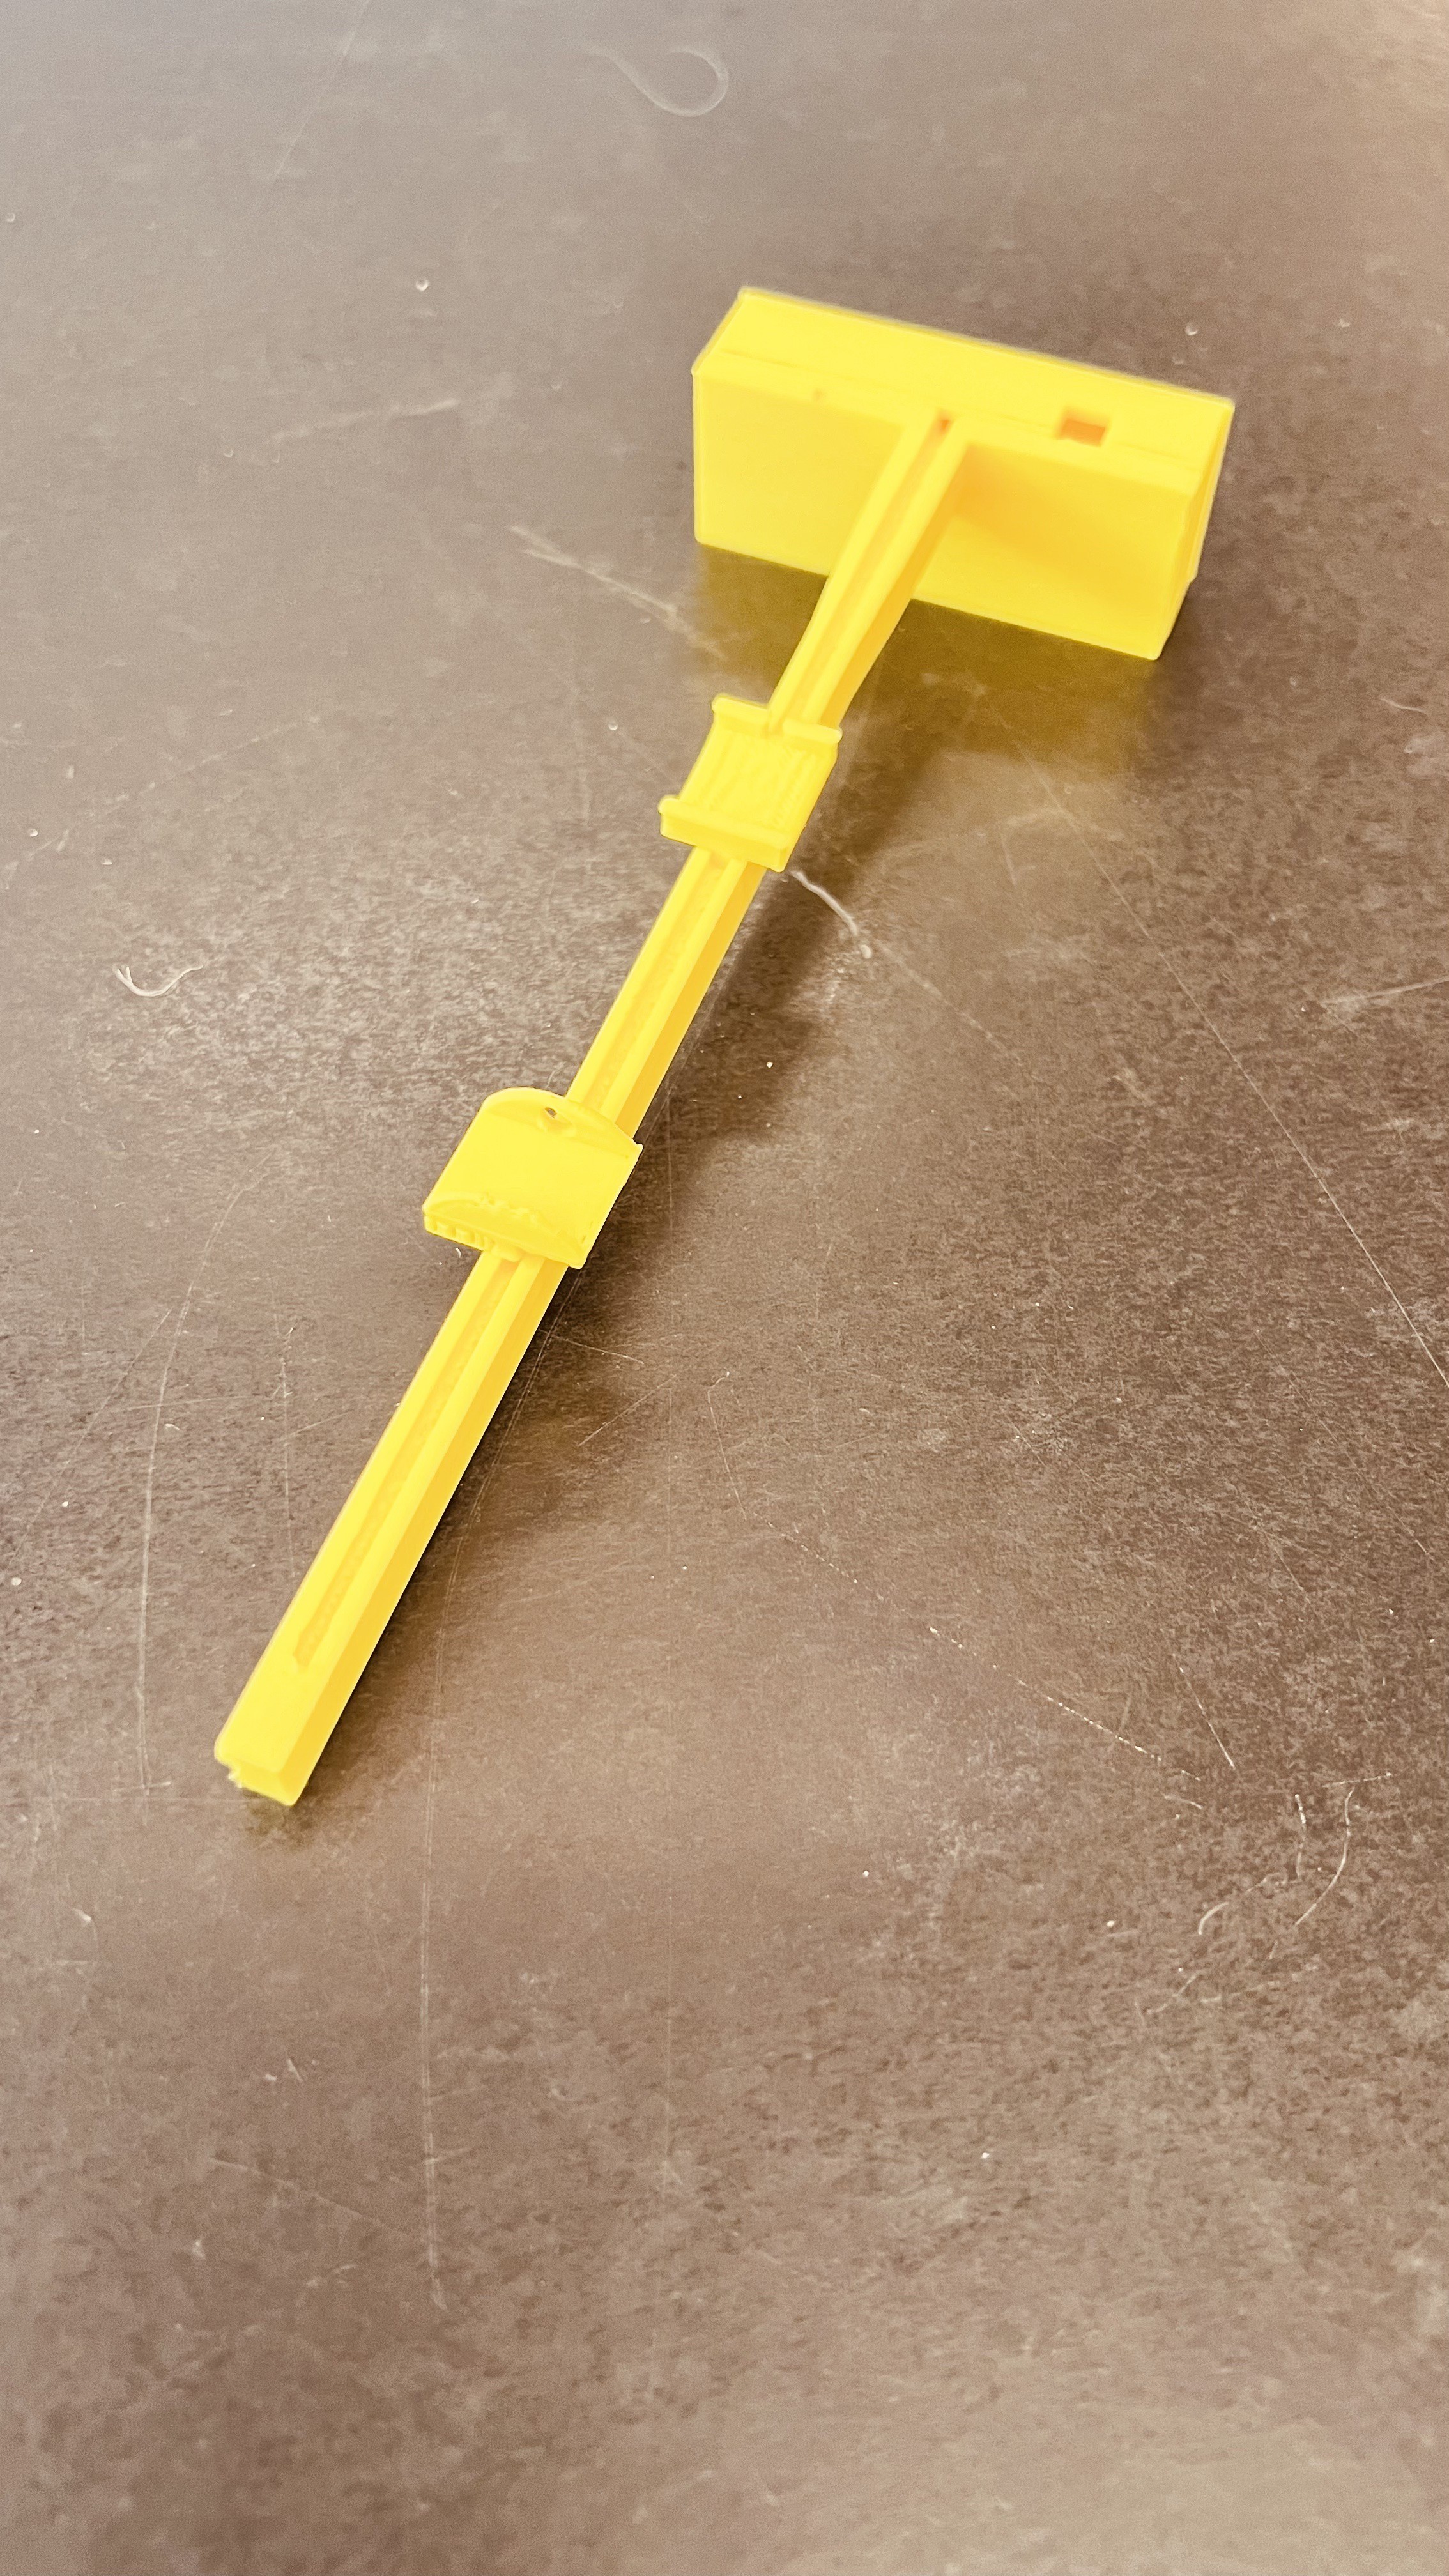
    This very first mic holder iteration was a complete failure.  First, my concept was off - I couldn't keep the mics affixed to the holder.  The holder was much too large and bulky.  There was too much unnecessary structure to it.  The 'adjustable arm' only fit in one position on the main unit as the extruded posts interfered, preventing positioning it anywhere else.

  • Where are You? On Positioning Our Mics

    Kevin Jablonski09/23/2024 at 14:27 0 comments

    Honey bees have a highly organized hive architecture. The sounds that are of interest to me are not located in just one place

    As I worked on integrating microphones into my smart hive, it became clear that simply placing the mics inside the hive wasn't enough. To ensure accurate and consistent sound capture, I needed to create a dedicated microphone holder. This holder allows me to secure the mic at an exact location within the hive, preventing bees from moving or interfering with it. By keeping the microphone in a fixed position, I can maintain the integrity of the sound data, which is crucial for monitoring the hive's health and behavior effectively.

  • Surround Sound (detection) in Hive

    Kevin Jablonski09/23/2024 at 14:09 0 comments

    To effectively monitor and analyze the acoustic environment inside the hive, I realized that the microphone needed to be on its own dedicated board. This design decision allows for maximum flexibility, enabling me to position each microphone precisely where it's needed within the hive. With four microphones, each on its own board and connected to the main PCB, I can simultaneously record sound from multiple locations within the hive. This setup is essential for capturing a comprehensive sound profile, which will be invaluable for understanding hive health and behavior through acoustic analysis.

    By isolating the microphones on separate boards, I ensured that the sound data collected is as accurate as possible, free from interference or noise that might arise from other components on the main PCB. This design also allows for easy repositioning and testing during the prototype phase, allowing me to experiment with different configurations to find the most effective setup for capturing the subtle sounds bees make. The result is a versatile and powerful tool for non-invasively monitoring the hive, providing critical insights without disturbing the bees.

    The schematic and board design along with the connector are found under 'Files.'

View all 22 project logs

Enjoy this project?

Share

Discussions

Similar Projects

Does this project spark your interest?

Become a member to follow this project and never miss any updates