 gokux
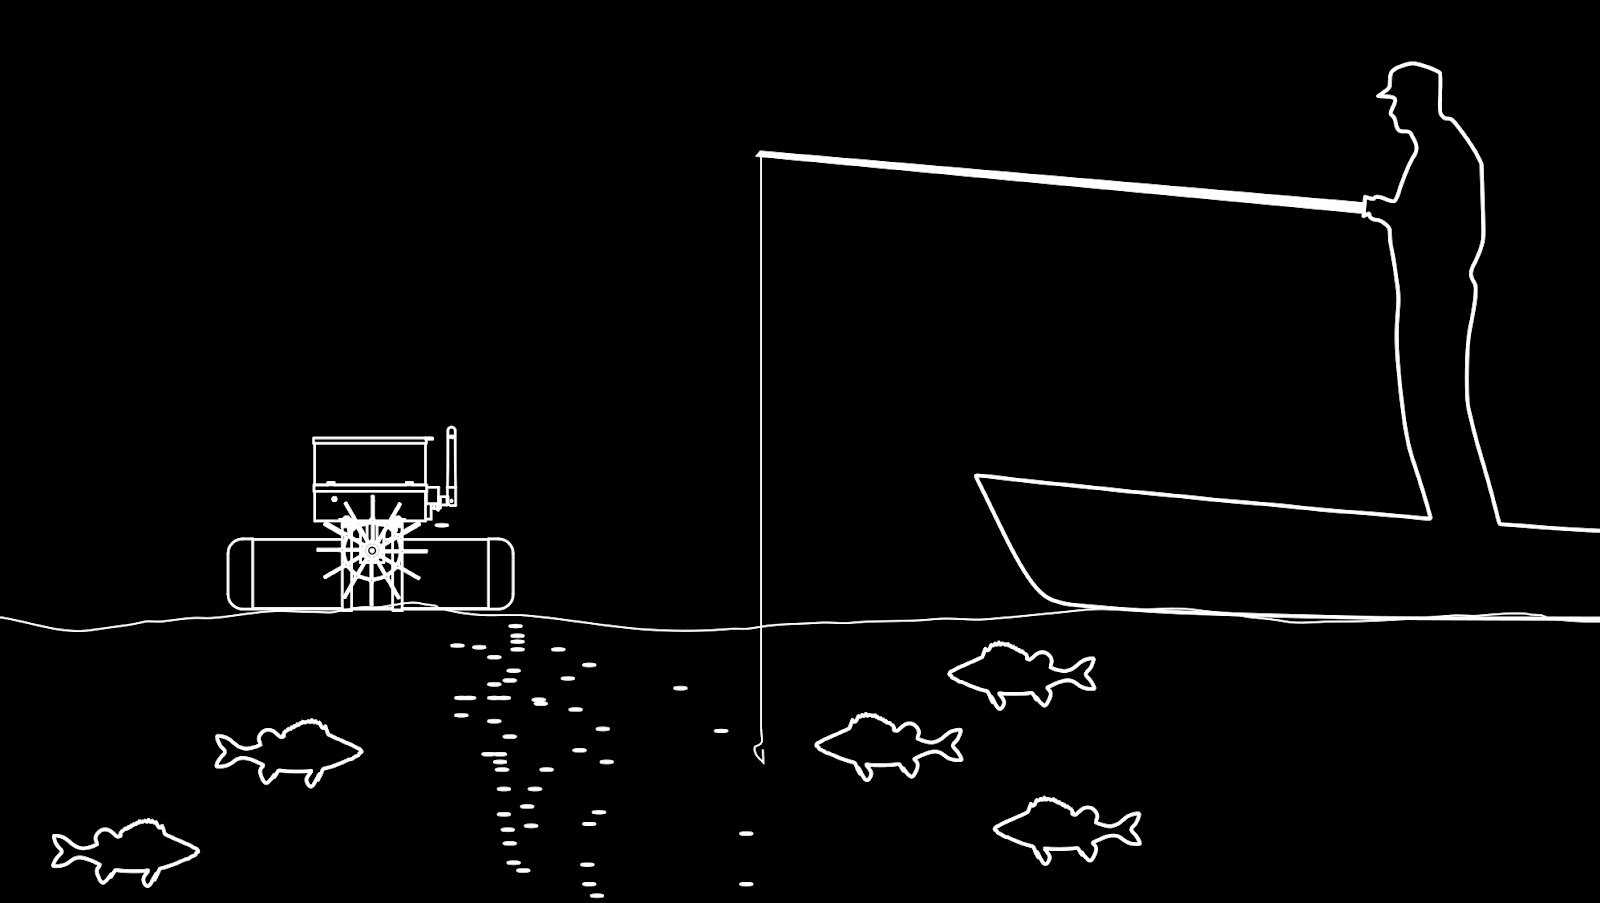
gokuxThe original plan for this project was to create a fun RC Paddle Boat. However, during the project, I came up with the idea of adding a fish feeder. This means that besides enjoying a ride around the lake, the boat can also be used as a bait board for fishing, and can deliver food and medicine in pellet size needed by fish to otherwise inaccessible areas like Mangrove.
The RC controller and the Boat communicate using the ESP-NOW protocol, eliminating the need for a separate radio controller circuit and reducing the complexity and cost of the construction. In my test, I achieved a range of around 200m (line of sight). Additionally, the boat stays afloat with the help of two water bottles.
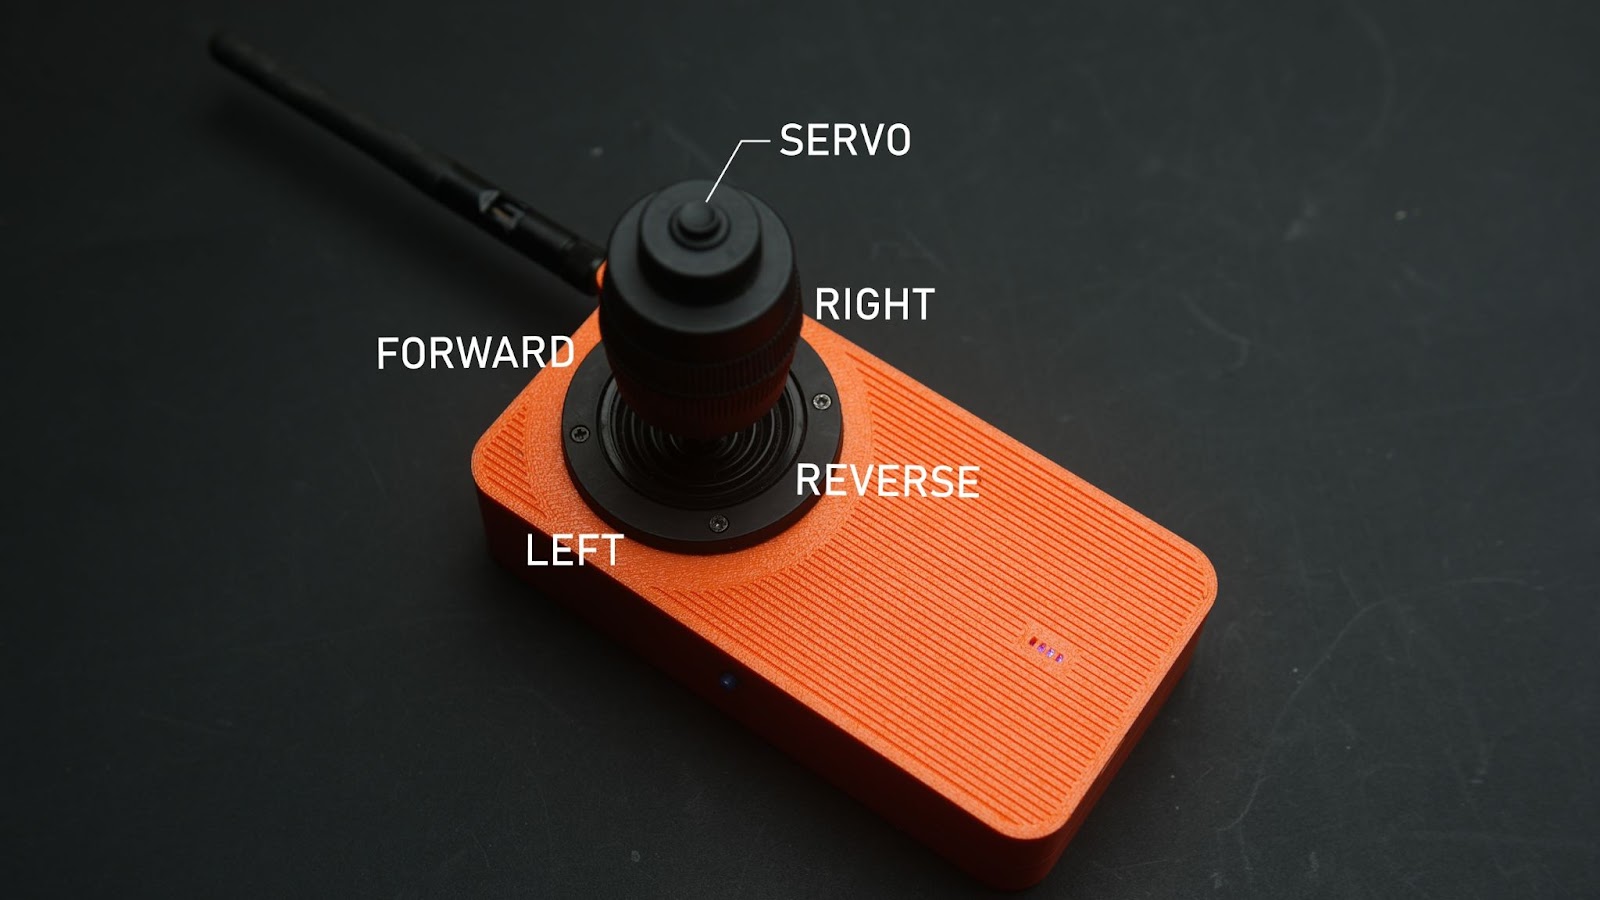
I also build an RC controller for this. you can control the movement of the boat using a single joystick also you can drop the payload by pressing the pushbutton on top of the joystick. you do not need any pairing for RX and TX it will done automatically. you can switch on the TX by pressing the push button on the side. You can also see the battery indicator on the top. TX is rechargeable through USBC
Supplies

Receiver parts
- 8*M3 x 10mm
- 4*m3 x15mm
- 12* M3 nut
- 4*m4 x10mm
- 4*m4 x nut
- 2*18650 Battery 2500mah
- 2*To pin JST XH connectors male and female (2.54MM PITCH)
- MT3608 voltage booster
- BMS 5v booster
- 360-degree servo
- 4*M4 6mm Knurled Threaded Insert
- DRV8833 motor driver
- Seeed Studio XIAO ESP32C3
- 2*300 RPM L-Shape BO Motor (couldn't find international shipping )
- 2.4ghz antenna
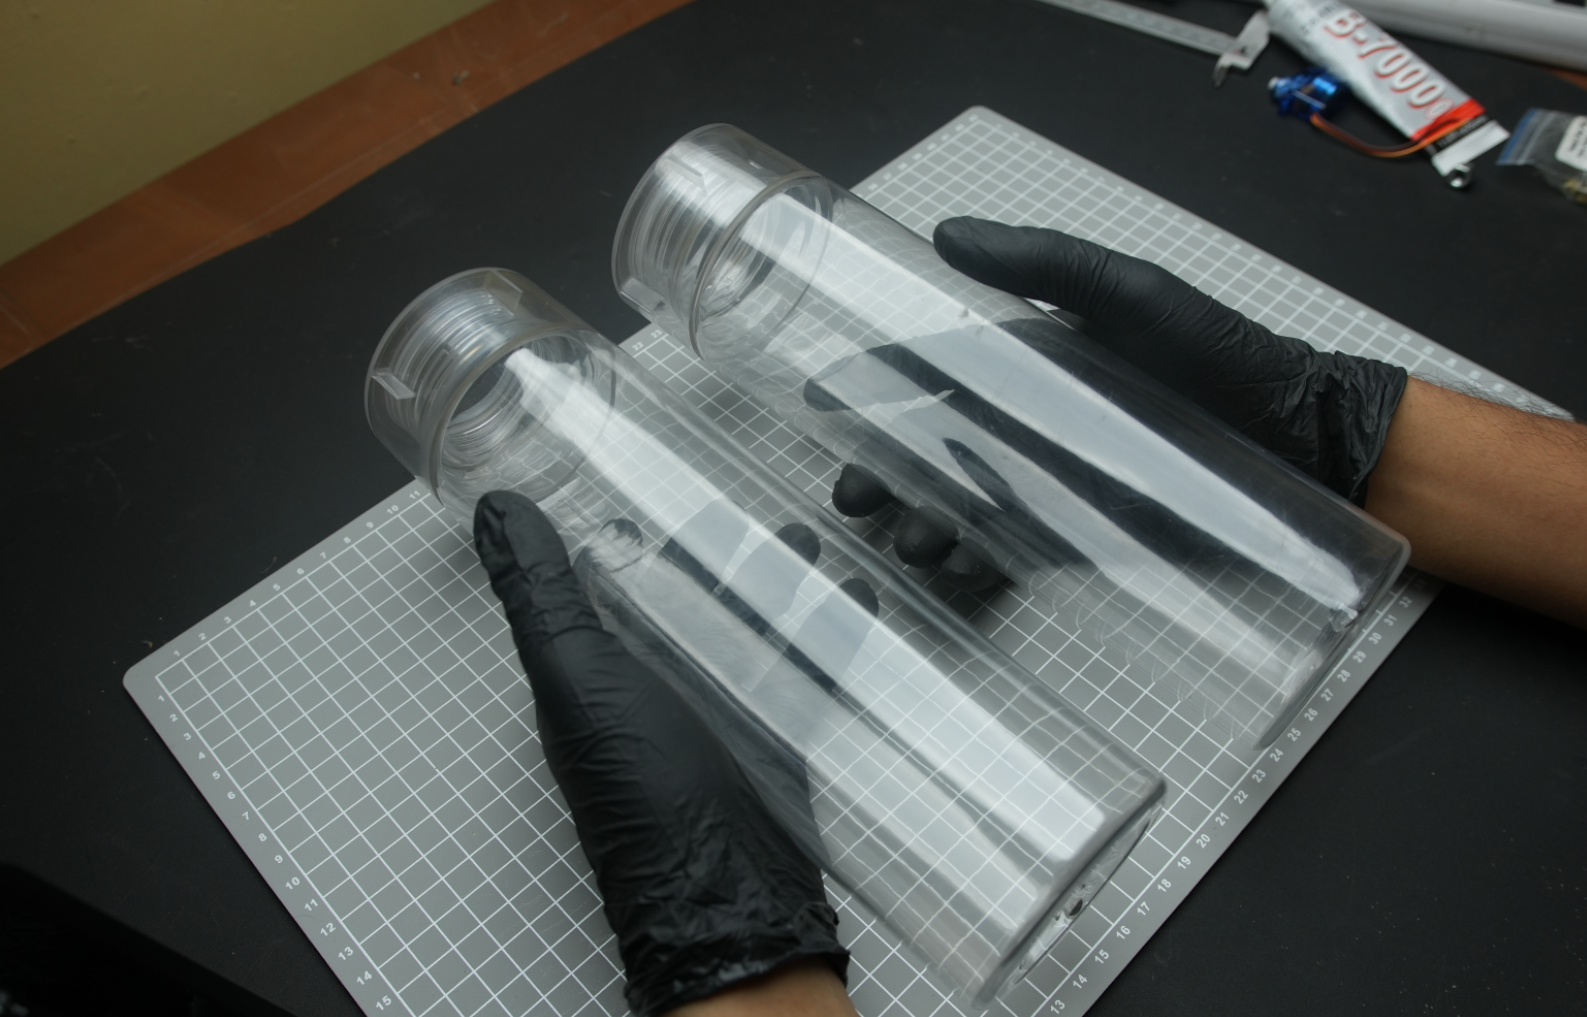
- 2*water bottles
- Heat Shrink Tubing kit
Transmitter parts
- 18650 Battery 2500mah
- Push button
- Seeed Studio XIAO ESP32C3
- BMS 5v booster
- 2.4ghz antenna
- 4 axis joystick
We are not using ordinary servo motors for this project. We need a 360-degree servo for this build. Currently, I'm using a modified 90° servo. This video helped me learn how to mod it. However, there's no need to modify the 360-degree servo; it is available in the market. I have attached a link to it in the part list.

For this project, I used a 1L water bottle with a 3-inch diameter. If you can't find one like this, you can also use a PVC pipe with both ends closed. A simple redesign of the floater holder will enable you to adapt this build to any other size of similar-looking water bottles.
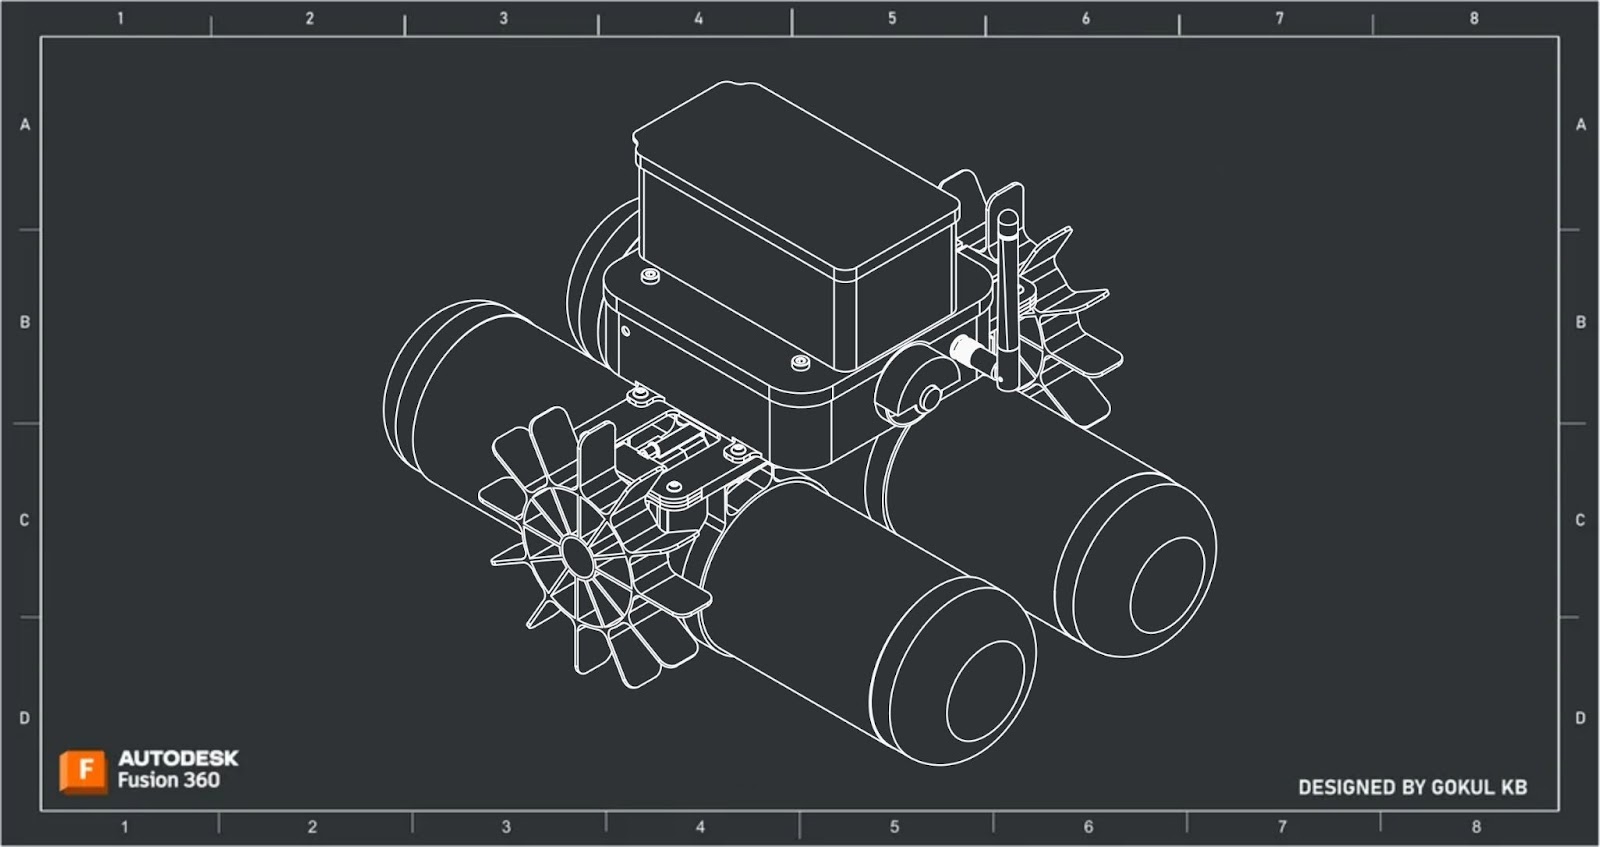
Step 1: Designing in Fusion 360
RX
TX

This project is built around the water bottle. Design is broken down into several levels for easy 3d printing.
Step 2: 3D Printing

I designed the object in parts due to its complex nature, so we will need to assemble it after 3D printing. I used orange PLA and grey PLA. 3D printed all models in my anycubic printer. In 0.2mm layer height and 30% infill
Also please note that you had to print several STL files multiple Times
- Floater clamp X4
- Floater end cap X4
- Motor clamp X2
- Motor holder X2
- Wheel X2
Attachments
![download {{ file.name }}]() battery cap.stlDownloadView in 3D
battery cap.stlDownloadView in 3D
![download {{ file.name }}]() battery holder .stlDownloadView in 3D
battery holder .stlDownloadView in 3D
![download {{ file.name }}]() floater clamp.stlDownloadView in 3D
floater clamp.stlDownloadView in 3D
![download {{ file.name }}]() floater end cap.stlDownloadView in 3D
floater end cap.stlDownloadView in 3D
![download {{ file.name }}]() frame.stlDownloadView in 3D
frame.stlDownloadView in 3D
![download {{ file.name }}]() holder.stlDownloadView in 3D
holder.stlDownloadView in 3D
![download {{ file.name }}]() main boady cap.stlDownloadView in 3D
main boady cap.stlDownloadView in 3D
![download {{ file.name }}]() MAIN BODY.stlDownloadView in 3D
MAIN BODY.stlDownloadView in 3D
![download {{ file.name }}]() motor clamp.stlDownloadView in 3D
motor clamp.stlDownloadView in 3D
![download {{ file.name }}]() motor holder.stlDownloadView in 3D
motor holder.stlDownloadView in 3D
![download {{ file.name }}]() payload cap.stlDownloadView in 3D
payload cap.stlDownloadView in 3D
![download {{ file.name }}]() screw holder.stlDownloadView in 3D
screw holder.stlDownloadView in 3D
![download {{ file.name }}]() screw v2.stlDownloadView in 3D
screw v2.stlDownloadView in 3D
![download {{ file.name }}]() wheel v1.stlDownloadView in 3D
wheel v1.stlDownloadView in 3D
![download {{ file.name }}]() Feeder Boat_.stepDownloadView in 3D
Feeder Boat_.stepDownloadView in 3D
![download {{ file.name }}]() remote ct v6.stepDownloadView in 3D
remote ct v6.stepDownloadView in 3D


Step 3: Finding MAC Address of Your XIAO ESP32C3

We are using the ESP-NOW protocol for communication between the transmitter (TX) and receiver (RX). For this, the transmitter (TX) needs to know the unique MAC address of the RX ESP32. You will need to run the following code on your ESP32C3 receiver (XIAO) to find its MAC address. After running this program, the MAC address will be displayed on the serial monitor.
My MAC address is 64:E8:33:8A:22:54...
Read more »