 linuxguy
Let's deep dive into the core components of this devkit.
This development board is manufactured from MYIR Tech, its price is 55$ and the specs from the website are:
- RENESAS RZ/G2L Processor based on 1.2GHz Dual ARM Cortex-A55 and 200MHz Cortex-M33 Cores
- 1GB DDR4, 8GB eMMC Flash, 32KB EEPROM
- UARTs, 2 x USB 2.0 HOST, 1 x USB 2.0 OTG, 2 x Gigabit Ethernet, WiFi/Bluetooth, Micro SD card Slot
- Camera Interface (MIPI-CSI), LVDS, HDMI, Audio Input/Output
- Optional 7-inch LCD Modules, Camera Module and RPI Module (RS232/RS485/CAN)
- Supports for Linux, Debian and Ubuntu
The interesting part is that has a Coprocessor CM33 for Low power applications. Furthermore, a 3D GPU G31 is enclosed with a H264 encoder/decoder.
Fore more info you can see the Renesas website.
The downsides are the 1GB of RAM and 8GB eMMC flash.
On the other hand, you can see that supports Gigabit Ethernet, WiFi & BLE, HDMI and Ubuntu / Debian for Linux distributions.
For the simplicity of this article let’s focus on how to download, setup and build the firmware for this dev board and see how it looks like.
Build Image with Yocto
(NOTE) You need at least 50GB of HDD storage to build from scratch.
It’s highly recommended to use Ubuntu 20.04 LTS, otherwise you may face errors when building with Yocto. If for any reason you cannot install that specific version, I’ve found a Renesas github repo that helps you install a docker image for Ubuntu 20.04.You can find more here:
renesas-rz/docker_setup: Instructions and scripts for creating docker containers to be used to build RZ BSP images
The githib repository for the Yocto layers of remi PI is located here:
MYiR-Dev/myir-renesas-yocto at develop-remi-yocto3.1.20
(NOTE) Before start building It’s good to make sure you have the following packages or install them.
$ sudo apt-get update
$ sudo apt-get install gawk wget git-core diffstat unzip texinfo gcc-multilib \ build-essential chrpath socat cpio python3 python3-pip python3-pexpect xz-utils \ debianutils iputils-ping libsdl1.2-dev xterm p7zip-full libyaml-dev libssl-dev \ bmap-tools iproute2
Also, in order to run git command you should a username and email address like:
$ git config --global user.email "you@example.com"
$ git config --global user.name "Your Name"
Start by cloning the repo:
$ git checkout origin/develop-remi-yocto3.1.20
and then checkout to the branch we want with:
$ git checkout origin/develop-remi-yocto3.1.20
You will see a directory layers with all the meta-directories inside.
Let’s create the build directory with all the components needed.
$ DISTRO=poky MACHINE=myir-remi-1g source layers/metamyir-remi/scripts/myir-remi-1g-environment.sh build-remi-1g
You should see the output:
### Shell environment set up for builds. ###
You can now run 'bitbake <target>'
Common targets are:
core-image-minimal
core-image-sato
meta-toolchain
meta-ide-support
myir-image-core
myir-image-full
You can also run generated qemu images with a command like 'runqemu qemux8
6'
Other commonly useful commands are:
- 'devtool' and 'recipetool' handle common recipe tasks
- 'bitbake-layers' handles common layer tasks
- 'oe-pkgdata-util' handles common target package tasks
As you can see we can only use
myir-image-core
myir-image-full
To start the building,execute:
bitbake myir-image-full -k
Parsing recipes: 100% |############################################
#############################################################
####################################| Time: 0:00:58
Parsing of 2546 .bb files complete (0 cached, 2546 parsed). 6301 targets, 711 skip
ped, 3 masked, 0 errors.
NOTE: Resolving any missing task queue dependencies
Build Configuration:
BB_VERSION = "1.46.0"
BUILD_SYS = "x86_64-linux"
NATIVELSBSTRING = "universal"
TARGET_SYS = "aarch64-poky-linux"
MACHINE = "myir-remi-1g"
DISTRO = "poky"
DISTRO_VERSION = "3.1.20"
TUNE_FEATURES = "aarch64 cortexa55"
TARGET_FPU = ""
SOC_FAMILY = "rzg2l:r9a07g044l"
meta-gplv2 = "tmp:60b251c25ba87e946a0ca4cdc8d17b1cb09292ac"
meta-poky
meta-yocto-bsp = "dunfell:a1eab45e4afe05fe80a28ceacb0a6f7b14268064"
meta-myir-remi = "<unknown>:<unknown>"
meta-oe
meta-python
meta-multimedia
meta-webserver = "tmp:ec978232732edbdd875ac367b5a9c04b881f2e19"
meta-qt5 = "HEAD:8d5672cc6ca327576a814d35dfb5d59ab24043cb"
meta-filesystems
meta-networking = "tmp:ec978232732edbdd875ac367b5a9c04b881f2e19"
meta-virtualization = "tmp:c5f61e547b90aa8058cf816f00902afed9c96f72"
Initialising tasks: 100% |############################################
#############################################################
#################################| Time: 0:00:16
Sstate summary: Wanted 345 Found 342 Missed 3 Current 2429 (99% match, 99%
complete)
NOTE: Executing Tasks
Currently 1 running tasks (6155 of 6818) 90% |##########################
#############################################################
############################## |
0: myir-image-full-1.0-r0 do_rootfs (pid 4074346) 13% |###############
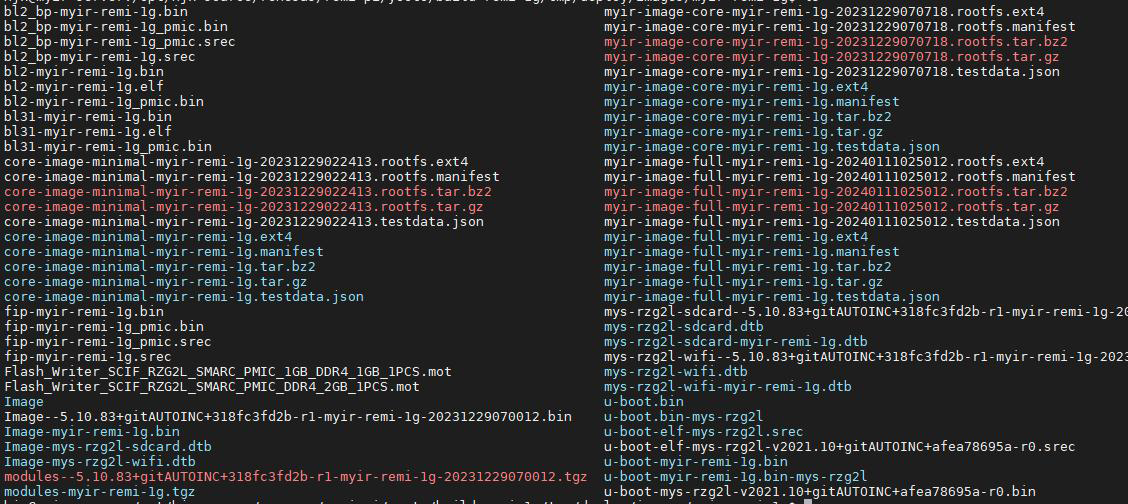
After hours of downloading and building - approximately 2 hours for a mid-range laptop - you will find all the generated system files under tmp/deploy/images/myir-remi-1g/ directory
Now it's time to burn the image into the board.
Burn the Image
First of all, we will use Teraterm as serial console Software and Win32DiskImager to burn the image into an SD card ( at least 8GB size ). Of course, you can use any alternative of your choice.
Here you can find info how to create an img file to burn it directly with burning SW.
rzg2_bsp_scripts/image_creator at master · renesas-rz/rzg2_bsp_scripts
Or you can go with the hard way and create partitions manually.
rzg2_bsp_scripts/usb_sd_partition at master · renesas-rz/rzg2_bsp_scripts
The bootloaders will be written to eMMC using serial console and Flash Writer - tool to burn eMMC/qSPI.. BL2 and BL31/u-boot are first written to eMMC. Then from uboot, we will load the Linux kernel and rootfs from SD card..
In addition, the boot mode needs to be adjusted during burning. You can configure DIP switches based on the following table.
Startup mode SW2(1/2/3/4)
SCFI Download OFF/OFF/ON/OFF
EMMC startup OFF/OFF/OFF/OFF
Switch the dip switches to the USB Download mode (OFF/OFF/ON/OFF), connect the devkit using the USB-TTL cable to J15 interface of the development board to the USB of you PC.
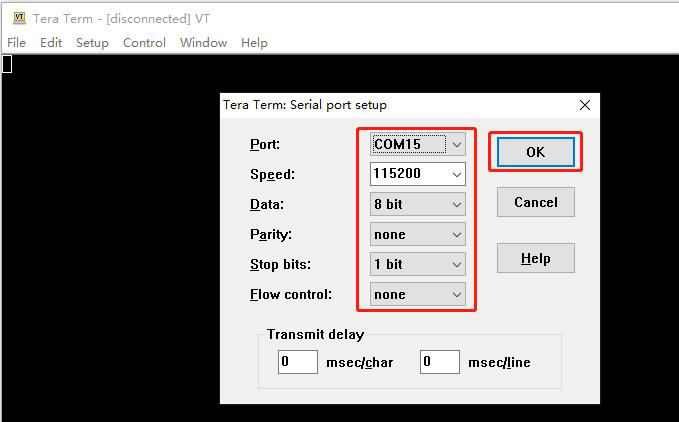
Setup Teraterm like that:
And a message like that will be shown:
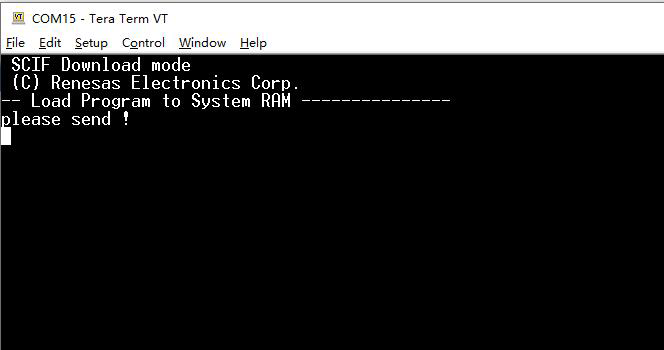
We need to send this file from build directory : Flash_Writer_SCIF1_RZG2L_SMARC_PMIC_1GB_DDR4_1GB_1PCS.mot
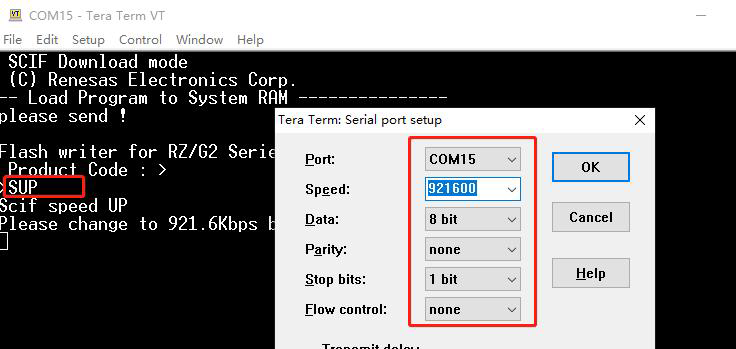
When it's done you will see a prompt waiting for command.
Type SUP to speed up the serial's baud rate and set the speed accordingly.
Now, it's time to configure some registers for eMMC in order to set it as the default boot device.
Type the following commands and values when asked:
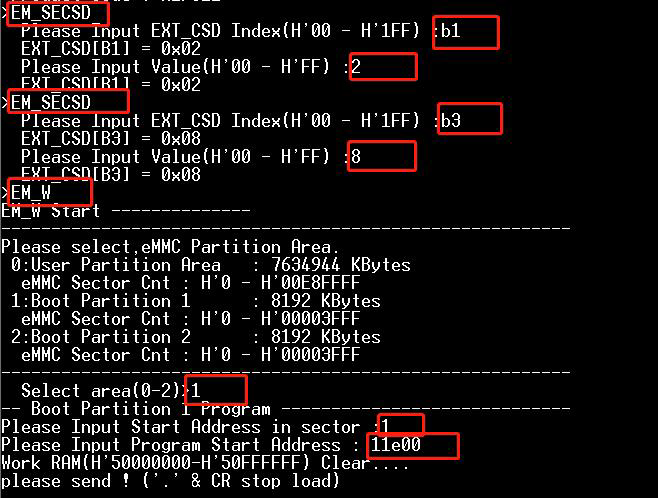
With command EM_W we will start the write process on eMMC, Type the above values and when asked send the file bl2_bp-myir-remi-1g_pmic.srec
Next, we should do the same for fip image/u-boot/BL31.

Send the fip-myir-remi-1g_pmic.srec when asked.
After wiping the bootloader to the qspi, power OFF, reset the dip switch to start eMMC(OFF/OFF/OFF/OFF), set the baud rate back to 115200, power on and start to the uboot.
When u-boot is up and running you will see:
U-Boot 2021.10-g85c70d60 (Jan 13 2024 - 10:48:52 +0800)
CPU: Renesas Electronics CPU rev 1.0
Model: smarc-rzg2l
DRAM: 896 MiB
MMC: sd@11c00000: 0, sd@11c10000: 1
Loading Environment from MMC... OK
In: serial@1004b800
Out: serial@1004b800
Err: serial@1004b800
Net:
Error: ethernet@11c20000 address not set.
No ethernet found.
Hit any key to stop autoboot: 0
Type these commands
=> setenv fdt_file mys-rzg2l-sdcard.dtb
=> setenv sdhi_sw "if test $board_name = MYS-RZG2L ; then switch_sdhi1 sdcard;fi"
=> saveenv
Now, you need to reset the board and the rest of the process will be done automatically.
switch to sdcard
switch to partitions #0, OK
mmc1 is current device
248 bytes read in 9 ms (26.4 KiB/s)
## Executing script at 48080000
switch to partitions #0, OK
mmc1 is current device
The board will boot on Linux and will run a flash script which writes the files of SD card to eMMC.
myir-remi-1g login: root (automatic login)
Last login: Fri Jan 1 00:00:06 UTC 2066
Changing ext_csd[BOOT_BUS_CONDITIONS] from 0x02 to 0x02
Boot bu[ 10.437171] mmcblk0: p1 p2
s Conditions [BOOT_BUS_CONDITIONS: 0x02]
Boot configuration bytes [PARTITION_CONFIG: 0x08]
[ 10.472262] mmcblk0: p1 p2
umount: /dev/mmcblk1p1: not mounted.
---------------------------start erasing_emmc---------------------------
== Destroying Master Boot Record (sector 0) ==
dd if=/dev/zero of=/dev/mmcblk0 bs=512 count=1
1+0 records in
1+0 records out
512 bytes copied, 0.00486404 s, 105 kB/s
---------------------------end erasing_emmc---------------------------
---------------------------start fidsk_emmc---------------------------
Checking that no-one is using this disk right now ... OK
Disk /dev/mmcblk0: 7.29 GiB, 7818182656 bytes, 15269888 sectors
Units: sectors of 1 * 512 = 512 bytes
Sector size (logical/physical): 512 bytes / 512 bytes
I/O size (minimum/optimal): 512 bytes / 512 bytes
>>> Created a new DOS disklabel with disk identifier 0x44c2a010.
/dev/mmcblk0p1: Created a new partition 1 of type 'W95 FAT32 (LBA)' and of size
50 MiB.
Partition #1 contains a vfat signature.
/dev/mmcblk0p2: Created a new partition 2 of type 'Linux' and of size 7.2 GiB.
Partition #2 contains a ext4 signature.
/dev/mmcblk0p3: Done.
New situation:
Disklabel type: dos
Disk identifier: 0x44c2a010
Device Boot Start End Sectors Size Id Type
/dev/mmcblk0p1 20480 122879 102400 50M c W95 FAT32 (LBA)
/dev/mmcblk0p2 122880 15269887 15147008 7.2G 83 Linux
The partition table has been altered.
Calling ioctl() to re-read parti[ 28.848087] mmcblk0: p1 p2
tion table.
Syncing disks.
umount: /dev/mmcblk0p1: not mounted.
umount: /dev/mmcblk0p2: not mounted.
---------------------------end fidsk_emmc---------------------------
---------------------------start burn_boot---------------------------
77+1 records in
77+1 records out
39553 bytes (40 kB, 39 KiB) copied, 0.026087 s, 1.5 MB/s
1405+1 records in
1405+1 records out
719856 bytes (720 kB, 703 KiB) copied, 0.298685 s, 2.4 MB/s
---------------------------end burn_boot---------------------------
>>>[147]{"step":"firmware","PN":"xxx","SN":"xxx","CN":"xxx","result":{"module":"u
boot","progress":"20", "state":"0","message":"write bootloader succuess"}}
---------------------------start burn_image---------------------------
---------------------------end burn_image---------------------------
>>>[147]{"step":"firmware","PN":"xxx","SN":"xxx","CN":"xxx","result":{"module":"i
mage","progress":"20", "state":"0","message":"write bootloader succuess"}}
---------------------------start burn_rootfs---------------------------
1877+1 records in
1877+1 records out
1968319488 bytes (2.0 GB, 1.8 GiB) copied, 97.3578 s, 20.2 MB/s
---------------------------end burn_rootfs---------------------------
>>>[148]{"step":"firmware","PN":"xxx","SN":"xxx","CN":"xxx","result":{"module":"ro
otfs","progress":"20", "state":"0","message":"write bootloader succuess"}}
e2fsck 1.45.7 (28-Jan-2021)
Pass 1: Checking inodes, blocks, and sizes
Pass 2: Checking directory structure
Pass 3: Checking directory connectivity
Pass 4: Checking reference counts
Pass 5: Checking group summary information
/dev/mmcblk0p2: 28453/480720 files (0.2% non-contiguous), 387728/480546 bloc
ks
resize2fs 1.45.7 (28-Jan-2021)
Resizing the filesystem on /dev/mmcblk0p2 to 1893376 (4k) blocks.
The filesystem on /dev/mmcblk0p2 is now 1893376 (4k) blocks long.
---------------------------success---------------------------
---------------------------success---------------------------
---------------------------success---------------------------
After the update is successful, power OFF, remove sd, dip EMMC(OFF/OFF/OFF/OFF) again, power on and start.
That's all you have successfully built and burnt the Remi PI and you can play with it.
You can find plenty of useful info (datasheets ,HW User Manual, Development Guides, pre-built images,tools) here:
Happy Hacking!