Close
0%
0%

JacDac Exploration Tutorial - Coding Projects

The JacDac Smart Exploration Kit turns electronics into a fun, hands-on adventure perfect for beginners and makers alike!

Similar projects worth following
0 followers
Exploring electronics becomes easy and exciting with the JacDac Smart Exploration Kit. Designed for the micro:bit V2, this all-in-one kit combines plug-and-play simplicity with interactive learning, making it perfect for beginners and experienced makers. With a variety of sensors and fun projects, it’s the ideal tool to build skills in coding, electronics, and automation—while keeping learning fun, engaging, and hassle-free.

Exploring the world of electronics can be exciting, whether you are just beginning your journey or already experienced with hands-on projects. Finding the right tools that make learning both simple and engaging is essential for building confidence and skills. The JacDac Smart Exploration Kit from Elecfreaks, designed specifically for the micro:bit V2, is an excellent example of such a tool.

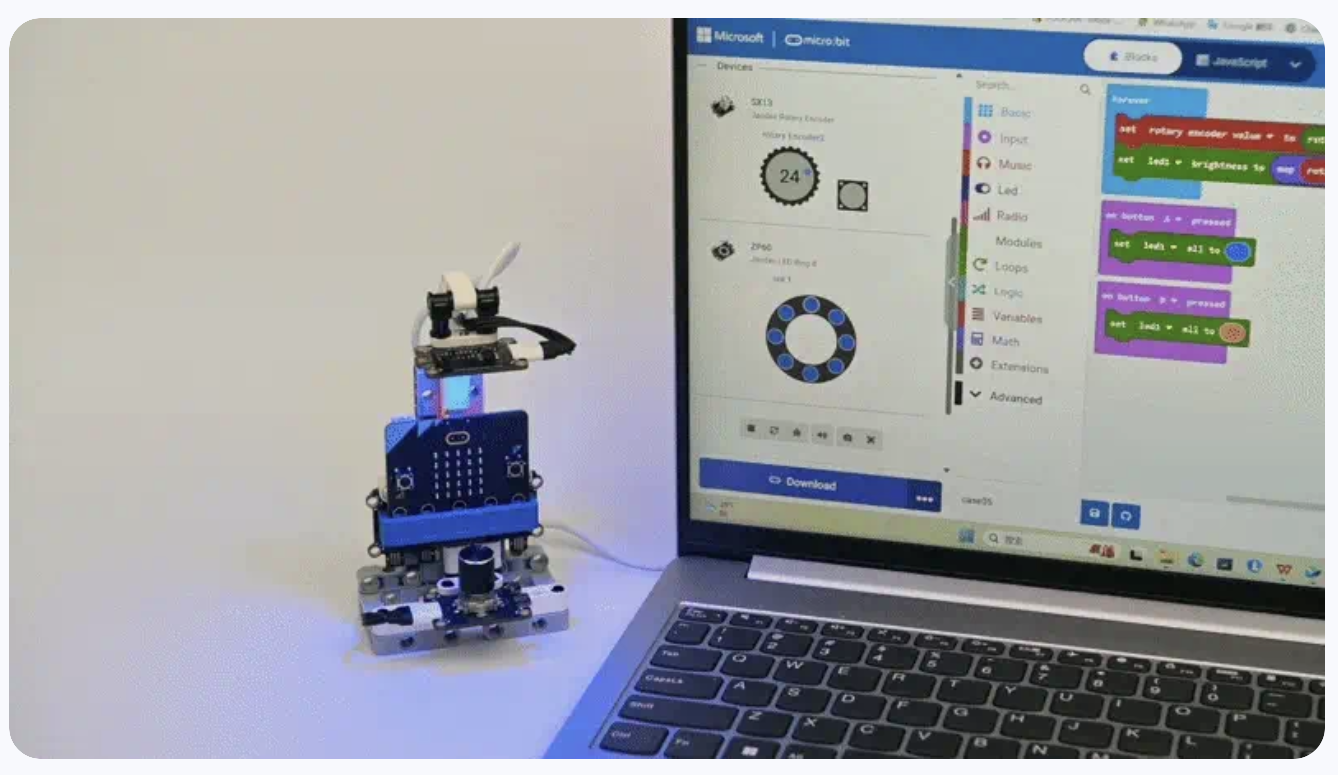
Far more than a basic collection of sensors, this kit is a thoughtfully designed educational resource that encourages curiosity and helps learners develop a solid understanding of electronics, coding, and automation.

Here, we will explore why this kit is a perfect addition to any maker’s workbench and how it makes learning accessible and enjoyable for all levels. I’m always searching for tools that make learning electronics simple, fun, and hassle-free. The JacDac Smart Exploration Kit from Elecfreaks, designed for micro:bit V2, ticks all those boxes and more.

What Makes This Kit Special?

At the heart of this kit is JacDac technology—Joint Asynchronous Communications Device Access, developed by Microsoft. What does this mean for you? Simple: plug-and-play simplicity with real-time data simulation.

  • No complex setup: connect a module and it instantly shows up in Microsoft MakeCode.
  • No wrong connections: reversible connectors eliminate wiring mistakes.
  • No tedious coding just to get started: the system detects your sensors automatically.

This is exactly what every beginner needs—less time debugging, more time learning and building fun projects!

Why It’s Beginner-Friendly!

Unlike traditional electronics kits that require breadboarding, soldering, and hours of setup, JacDac is completely plug-and-play. Within minutes, you can go from unboxing to building real-world projects.

  • No soldering, no jumper wires
  • Fast setup: great for workshops, classrooms, or weekend tinkering
  • LEGO-compatible & supports 3D printing and wood-based projects
For seasoned makers, it means faster prototyping and quick validation of ideas.

  • 1 × Micro:bit V2 (optional)
  • 1 × Jacdac:Bit
  • 2 × Jacdac Button
  • 1 × Jacdac Rotary Encoder
  • 1 × Jacdac Motion Sensor

View all 11 components

  • 1
    Setting Up Jacdac

    Setting Up – From Box to Project in Minutes

    1. Plug your micro:bit into the JacDac Expansion Board.
    2. Connect any sensor using JacDac cables.
    3. Open Microsoft MakeCode, go to Extensions > Search ‘JacDac’ > Add.
    4. Plug in your module and it appears instantly on your screen!

    No drivers, no complicated setups—just fun electronics learning.

    Sample Projects You Can Build

    Here are a few exciting beginner projects to try right away:

    Project 1 – Button Game

    Create a simple yet fun “compare your luck” game using the button sensor. First, plug the micro:bit into the Jacdac Expansion Board and connect the button module via a 10 cm Jacdac cable. In MakeCode, add the “Jacdac” extension and drag in the “on button pressed” block for your specific button sensor. Inside it, use the “pick random” block (1–6) and display the result on the LED screen. Once downloaded to the micro:bit, pressing the button will show a random number — perfect for number-guessing games or making quick decisions with friends wiki.elecfreaks.com+3wiki.elecfreaks.com+3wiki.elecfreaks.com+3.

    Next, enhance the experience—add a sound effect, fade effect, or animation when the number appears to make it more engaging. You can also compare numbers: after two presses, show “>”, “<”, or “=” to indicate which player got the higher roll. Encourage viewers to challenge their siblings or classmates and celebrate the outcome.

    Finally, prompt your audience to experiment further—“What happens if we change the range to 1–20?” or “Could we combine it with a buzzer or LED ring?” This shows how easy it is to extend basic logic to more complex interactions, reinforcing both coding skills and creativity.

    Project 2 – Magnetic Agent

    Use the magnetic sensor to detect nearby magnets and trigger visual and audio feedback. Start with the standard setup: micro:bit on the expansion board and magnetic sensor attached with a Jacdac cable. In MakeCode, add “on magnetic changes” or “on magnetic detected” block, and inside it display a checkmark icon and play a tone. Also include an “else” path for when no magnetic field is present—display an “X” icon instead wiki.elecfreaks.com.

    Run the program and bring a magnet close to the sensor — a big green “✔️” appears and a beep sounds, indicating detection. Remove the magnet and the display flips to an “❌”. Perfect for a hidden object detector or a door proximity sensor—demonstrate how closing a hidden door could trigger an alert.

    Encourage customization: change the tone, create longer detection intervals, or add color feedback using the RGB LED ring. You can even challenge viewers—“Can you distinguish north vs south pole with the sensor?”—to promote experimentation and discovery.

    Project 3 – Motion Alarm

    Build a motion-activated alert system using the PIR human infrared sensor and the LED ring. Begin by wiring the micro:bit to the PIR sensor and the RGB LED ring on two separate Jacdac ports. In MakeCode, include the “on human motion detected” block; inside, set all LEDs on the ring to red, play a warning tone, pause for a moment, then clear the lights. Add a loop timer or reset to allow for repeated detection wiki.elecfreaks.comwiki.elecfreaks.com+4wiki.elecfreaks.com+4wiki.elecfreaks.com+4.

    Demonstrate the alarm in action: walk in front of the sensor and watch the entire ring glow red and hear the alert tone. Explain how this could be the basis for a kid-friendly security system or a fun “intruder alert” for secret rooms.

    To extend the project, consider adding a countdown, flashing patterns, or Bluetooth notifications. Challenge your audience: “Could you make the ring flash blue if someone left the room?” This exercise strengthens understanding of loops, sensors, and event-driven programming. Each project comes with step-by-step tutorials on the Elecfreaks Wiki, making it ideal for both self-learners and classroom environments.

View all instructions

Enjoy this project?

Share

Discussions

Similar Projects

Does this project spark your interest?

Become a member to follow this project and never miss any updates