 Alec Probst
Hi all,
In this log I'll go over the specific component selection for the USB PD Controller.
USB PD Controller Sink Selection
A USB PD Controller Sink is an IC that communicates with the USB PD standard to set a voltage and current from a USB PD source for downstream devices. The selected USB PD Controller for StampPD is the AP33772S. This IC comes in two variants , the AP33771C and the AP33772S. The C variant is a version which uses resistors to select the desired current and voltage while the S variant uses I2C to communicate with a microcontroller to select the voltage and current. In StampPD, we will use the S variant for its ability to change and request different voltages and currents. The controller selection was inspired by controller in the PicoPD which used an older version called the AP33772. This controller is Not Recommended for New Design (NRND) by the manufacturer, Diodes, and is only compatible with the USD PD3.0 standard. The AP33772S is compatible with the newer USB PD3.1 standard. I compared a couple differences between these two controllers in the Design Objectives log if you wish to see why this version was chosen. I attempted to research USB PD3.2 controllers that were similar to the AP33772S but was not able to find any, likely due to the standard being more recently released. Some reasons I've selected the AP33772S were:
- Evaluation Board (EVB) User Guide
- Direct reference on how to implement the AP33772S on a PCB
- Known components and component values to start from
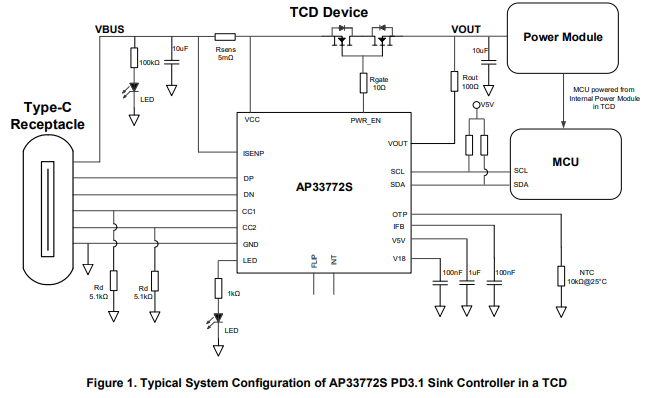
- Detailed Reference Circuit Diagram ( image below )
- Decent Datasheet Documentation
- Explains all pins and their functions
- Functional Descriptions of all features
- Missing PWR_EN pin voltage / current abilities ( more details below )
- Small Package Size
- While the side pins are likely hand solderable, it's unclear how one would solder the bottom exposed pad for thermal dissipation
- Lots of built in safety features
- Support for many types of PD (EPR, AVS, SPR, PPS)
- Wide Voltage and Current Control up to 140W (28V, 5A)
- No 240W support :(
- Easy I2C control
Recommended Components
Below, an example circuit, called Figure 1, shows what an implementation of the AP33772S should look like with some specified component values. A table called Pin Descriptions describe the functions and voltage / current for pins of the AP333772S. Since the circuit diagram + table gives us a good idea of what to implement for this IC, I'll describe the more important/complicated components and only put component values in a list for the others.

Input Current Sense Resistor
This resistor sits between ISENP (Current Sense Pin) and VCC. It is used by the AP33772S to determine the amount of IR drop through VBUS for overcurrent protection. Since VBUS supports 5A and the recommended resistance is 5mOhm, this resistor needs to support at least 5A^2 * 5mOhm = 0.125W ( P = I^2 * R ). We'll want to give around a 50% power margin here so our target resistor power rating is 0.125W * 1.5 = 0.1875W. We should also limit the resistance tolerance to within 1% to reduce variability and power loss.
IC LED
This pin is described as outputting up to 5.33V, 2mA. If we use the suggested 1000Ohm resistance value, we should look for a LED with a Forward Voltage (Vf ) = Voltage Source - Resistor * Forward Current. Vf = 5.33V - 1000Ohms * 2mA = 3.33V. This means if we keep the suggested 1000Ohm resistor and assume 2mA of Forward Current, we should look for a LED with a Forward Voltage of 3.33V. This will likely be a blue or white colored LED.
Over Temperature Protection (OTP)
This resistor is used to detect the temperature around the IC. When NTC resistors heat up, their resistance decreases. This can be detected to determine overheating conditions. For this IC, it's calibrated for a NTC resistor that has a resistance of 10KOhm when the temperature is 25C.
VBUS LED and Resistors
For the VBUS LED and Resistors, I'm ignoring the values suggested in the circuit diagram. Instead, I am reusing the LED from the IC LED. This means this LED will have a Forward Voltage of 3.33V and a Forward Current of 2mA. Since the max VBUS voltage possible here should be 28V, we can calculate the resistor values as R = ( Voltage Source - Forward Voltage ) / Forward Current or R = ( 28V - 3.33V ) / 2mA = 12,335Ohms. Since I am trying to reuse components here, We can put two 5.1KOhm resistors in series and get 10,200Ohms which is close enough to our 12,335Ohms needed. Note that the LED will be fairly dim when our voltage is lower, such as at 5V. I'm ok with this since we have the IC LED as well so there is some redundancy.
Power Enable Switch
The Power Enable Switch components are some of the most important for the AP33772S. This is because the PWR_EN pin turns on and off the power, including automatic shut off of the safety features. One issue with the AP33772S is that the PWR_EN pin not well defined. The best definition is in the Absolute Maximum Ratings table ( see below ) where it specifies that there can be a range of -30V to 4V between VCC and PWR_EN pins. I think that this is implying that PWR_EN should have a voltage ~4V more than VCC when turning the MOSFET on, no matter what voltage VCC is at, but it is not defined directly as such. I've sent a message to the company that makes the AP33772S, Diodes, to clarify this functionality but haven't heard back from them. Assuming a PWR_EN voltage of 4V as compared to VCC, we need back-to-back NMOS MOSFETS that support Gate-to-Source Voltage ( Vgs ) of 4V, Drain-to-Source Voltage ( Vdss ) of at least 28V, Continuous Current ( Id ) of at least 5A, and ideally less than 10mOhm Resistance across Drain-to-Source ( Rds ) due to power loss ( 10mOhm * 5A^2 = 0.25W max power lost across the MOSFET ). Taking into account a 50% voltage margin and a 30% current margin, Vdss is recommended at 28V*1.5 = 42V and Id is recommended at 5A*1.3 = 6.5A.

Diode for ESD
In past posts I had mentioned using the TPD4E05U06DQAR for ESD protection. I've decided to not use this component due to cost, it being hard to hand solder, and limited board space. This means StampPD will be more susceptible to ESD but the AP33772S does have an ESD rating of up to 750V as show in the Absolute Maximum Ratings table above, so I'm not too worried
Component Summary
Input Current Sense Resistor
- 1x 5mOhm Resistor
- At least >= 0.125W, recommended >= 0.1875W
- Resistance Tolerance <= 1%
SDA and SCL Pull Up Resistors
- 2x 5.1kOhm Resistors
IC LED
- 1x 1kOhm Resistor
- 1x LED
- Around 3.33V Forward Voltage
- Around 2mA Forward Current
Power Supply 1.8V
- 1x 100nF Capacitor
Over Temperature Protection (OTP)
- 1x NTC Resistor
- 10kOhm@25C
Current Feedback (IFB)
- 1x 100nF Capacitor
CC1 and CC2 Pull Down Resistors
- 2x 5.1kOhm Resistors
Power Supply 5.0V
- 1x 1uF Capacitor
VBUS Input Capacitor
- 1x 10uF Capacitor
VBUS LED and Resistors
- 2x 5.1kOhm Resistors
- 1x LED (Duplicated from IC LED)
- Around 3.33V Forward Voltage
- Around 2mA Forward Current
VOUT Output Capacitor
- 1x 10uF Capacitor
- 1x 100Ohm Resistor
Power Enable Switch
- 1x 100Ohm Resistor
- 1x NMOS Array (BUK7K6R8-40E)
- Vgs at least <= 4V
- Vdss at least >= 28V, recommended >= 42V
- Id at least >= 5A, recommended >= 6.5A
- Rds <= 10mOhm
Discussions
Become a Hackaday.io Member
Create an account to leave a comment. Already have an account? Log In.