 ElectroScope Archive
So, you know those little receipt printers you see at coffee shops? Turns out, you can totally hijack that tech for your own ESP32 projects. No ink, no cartridges, just a roll of thermal paper and a print head that burns your text (literally with heat) onto it. Cheap, fast, and surprisingly fun to play with.
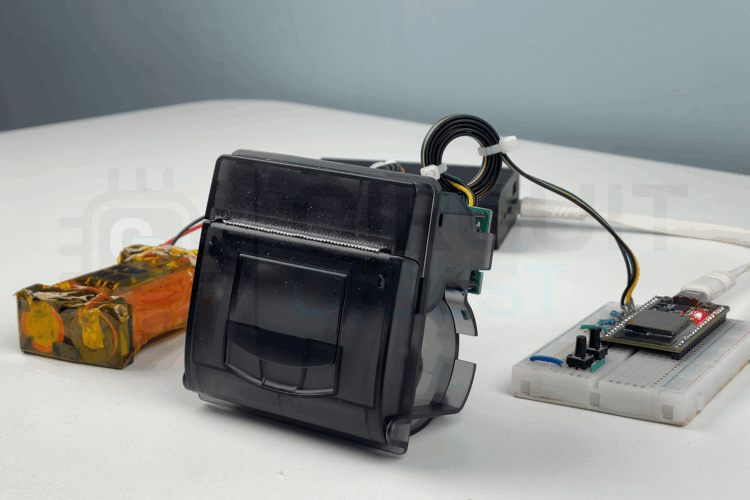
I grabbed a PNP-500 thermal printer module and hooked it up with an ESP32 to see how far I could push it. Spoiler: you can spit out receipts, QR codes, barcodes, or even goofy bitmap graphics straight from your microcontroller.
Why Thermal Printers Are Cool
- No ink. Ever. The paper is heat-sensitive and does all the magic.
- Pretty quiet compared to dot-matrix printers. (Remember those? Yikes.)
- Fast enough that you don’t need to sit around waiting for a line of text to crawl out.
- Simple UART/TTL interface. Your ESP32 talks to it just like a serial monitor.
Downsides? Sure:
- Prints can fade if left in the sun or under heat (so maybe don’t print your birth certificate).
- Most of these guys only do black-and-white.
- You’ll need special thermal paper rolls.
But for receipts, logs, or quirky IoT projects, they’re perfect.
Direct vs Thermal Transfer
There are two flavors:
- Direct thermal: uses only heat-sensitive paper. Super low-maintenance, but the prints won’t last forever. Great for receipts, tickets, or temporary labels.
- Thermal transfer: adds an ink ribbon so the print lasts way longer. Used for product labels, tags, or stuff that lives outdoors.
For hobby stuff? Direct thermal is more than enough.
Meet the PNP-500 Printer
This little panel-mount printer is basically plug-and-play. It’s compact, reliable, and built to live inside control panels or diagnostic gear. Perfect size for projects.
Specs in a nutshell:
- Paper width: 57mm (standard receipt size)
- Print speed: 50–80mm/sec
- Resolution: 8 dots/mm (384 dots/line)
- Interfaces: TTL serial, RS232, USB
- Voltage: 5–9V (12V max, but honestly it prints darker above 6V)
- Print head life: around 50km of paper
Yep, kilometers. That’s a lot of bad dad jokes you can print.
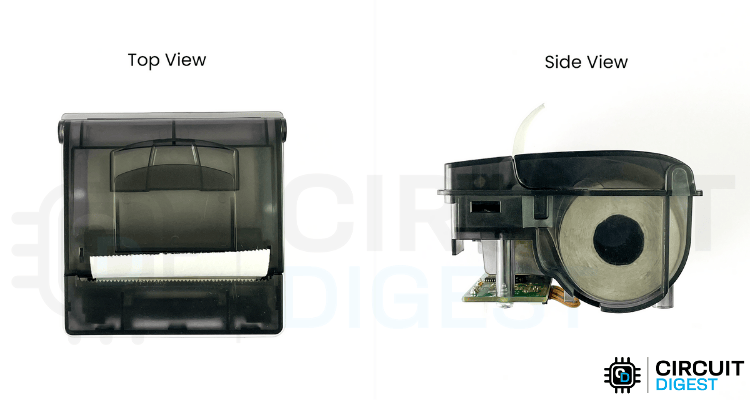
Inside the Printer (Teardown Time)
Couldn’t resist...I popped mine open. Here’s the anatomy:
- Main control PCB - This single board handles everything. You get pins for RS232 and TTL, plus a power input. I powered mine with a 2S Li-ion pack because 5V made the prints too light. There’s also: Status LED (blinks in patterns when things go wrong, like “no paper” or “overheating”).
A handy test-print button that spits out a demo page showing fonts, settings, and even a QR code. On the back: NOR flash, motor driver IC, RS232 transceiver, and a 32-bit ARM MCU doing all the heavy lifting. - Print head - The real hero. It’s a strip with 384 heating dots in a row. Heat them in the right pattern, and text magically appears. Also has a thermistor to prevent overheating and sensors for paper detection.
- Spring suspension - Two springs push the print head against the paper, making sure the dots burn evenly.
- Paper feed mechanism - A bunch of gears and a stepper motor precisely pull the paper through. The ratios are tuned so every line prints cleanly.
- IR-based paper sensor - Uses an IR LED + photodiode to check if there’s paper. Simple but effective.
- Paper storage - Holds up to a 40mm roll (around 16–20 meters). That’s plenty for a test project.
Word of warning: if you take yours apart, be gentle with the ribbon cable. It’s flexible but fragile.
Programming the Printer
Good news: you don’t need to reinvent the wheel here. The printer already understands a bunch of standard ESC/POS commands (same family used in receipt printers everywhere). Just send the right bytes over serial.
A few handy ones:
- ESC d n – feed paper by n lines
- ESC a n – set alignment (0=left, 1=center, 2=right)
- ESC { n – upside-down text (because why not)
- ESC - n – underline text
- GS B n – inverse print (white on black)
- ESC 3 n – set line spacing
You can also tweak print density and heat for darker prints, or even...
Read more »
 Miroslav Zuzelka
 Malte Schrader
 Toby Jackson
 Christoph