 Mario Ninic
The main component of this project is a USB audio codec made by Burr-Brown (TI). I selected this device primarily because I already had one available and because it operates without requiring additional drivers. The datasheet for this device can be found on the TI website:
https://www.ti.com/lit/ug/sleu024a/sleu024a.pdf
When using a sound card as an audio analyzer—at least this particular model—several major issues arise. My workarounds for each are described below:
Low input impedance:
The sound card’s input impedance is typically too low for accurate audio measurements. Standard audio analyzers, such as the System One by Audio Precision, use input impedances around 100 kΩ. The PCM2900 board has approximately 12 kΩ at the line input jacks. To address this, I added an external preamplifier configured with an input impedance of about 100 kΩ at 0 dB attenuation.
Limited input voltage range:
The input range is restricted to about 2 Vpp, which is too low for testing higher signal levels. I added an attenuator network with –20 dB and –40 dB settings to extend the measurement range.
Low output voltage level:
The output is limited to approximately 2 Vpp, which is insufficient for amplifier testing. To increase this, I added an output amplifier capable of boosting the signal to around 4 Vrms.
Single-ended I/O configuration:
Both inputs and outputs are single-ended. I decided to retain this configuration without modification.
Limited frequency bandwidth:
The frequency range is limited to the audio spectrum (20 Hz–20 kHz), as defined by the codec’s fundamental specifications.
No galvanic isolation:
The inputs and outputs are not galvanically isolated from the computer ground. No change at this point.
Dependence on Windows audio settings:
Audio levels depend on the Windows audio system configuration. Ideally, these settings will remain fixed once configured. Some controls, such as volume, are accessible through the Windows API.
Lack of input protection:
The board includes little to no input protection. I added protection diodes and implemented an auto-ranging software function.
No input preamplifier or selectable attenuation:
The original design lacks both features, which I addressed with the external circuitry mentioned above.
To enable power amplifier testing I added a set of dummy load resistors 4 Ohms and 8 Ohms selectable through software interface.

Amazon parts:
7 Inch Small Monitor, 1024×600 IPS Mini Monitor with Built-in Speakers/HDMI/VGA/AV Input for Raspberry Pi, PC, TV, DVD, CCTV. $38.99.

2PCS 4 Channel 5V Relay Module with Optocoupler High or Low Level Trigger Expansion Board for Raspberry Pi Arduino. $9.99.

Ximimark 1Pcs NE5532 PCB Sound Magnifier Board Preamplifier Audio Amplifier Module 4558 LM833 LT1057 AD827 OPA2604. $7.99

HiLetgo 3pcs AD828 Stereo Preamplifier Board Preamp Power Amplifier Board AMP Module DC5V-15V 12V. $8.79

Module Plug,10A Fuse Switch Male Power Socket,Adapter Power Connector,3 Pins Inlet Power Socket,Black,Red Button,AC 250V 10A IEC 320 C14 3 Pieces. $6.29.

Arduino MEGA 2560 R3 ATMEGA2560 ATMEGA16U2 Compatible with Arduino IDE MEGA 2560 REV3 Without USB Cable. $18.98.

Mini Computer- Donated by fellow engineer.
Enclosure - Donated by fellow engineer. Thank you Leroy.
Block diagram

Input Attenuator and Load Schematic one channel

Board Modifications:
Work in progress

 Stephen G
 Chris Hamilton
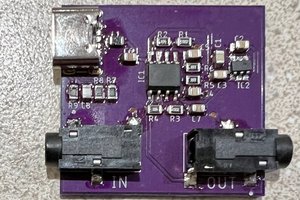
 Nick Sayer