Close
0%
0%

Lumie Bodyclock Starter LED Retrofit

Replacing the halogen bulb with a modern LED type

Similar projects worth following
60 views
0 followers
This is a really simple modification to the old style Lumie Bodyclock Starter with a halogen bulb so it can be used with a modern smart LED bulb.

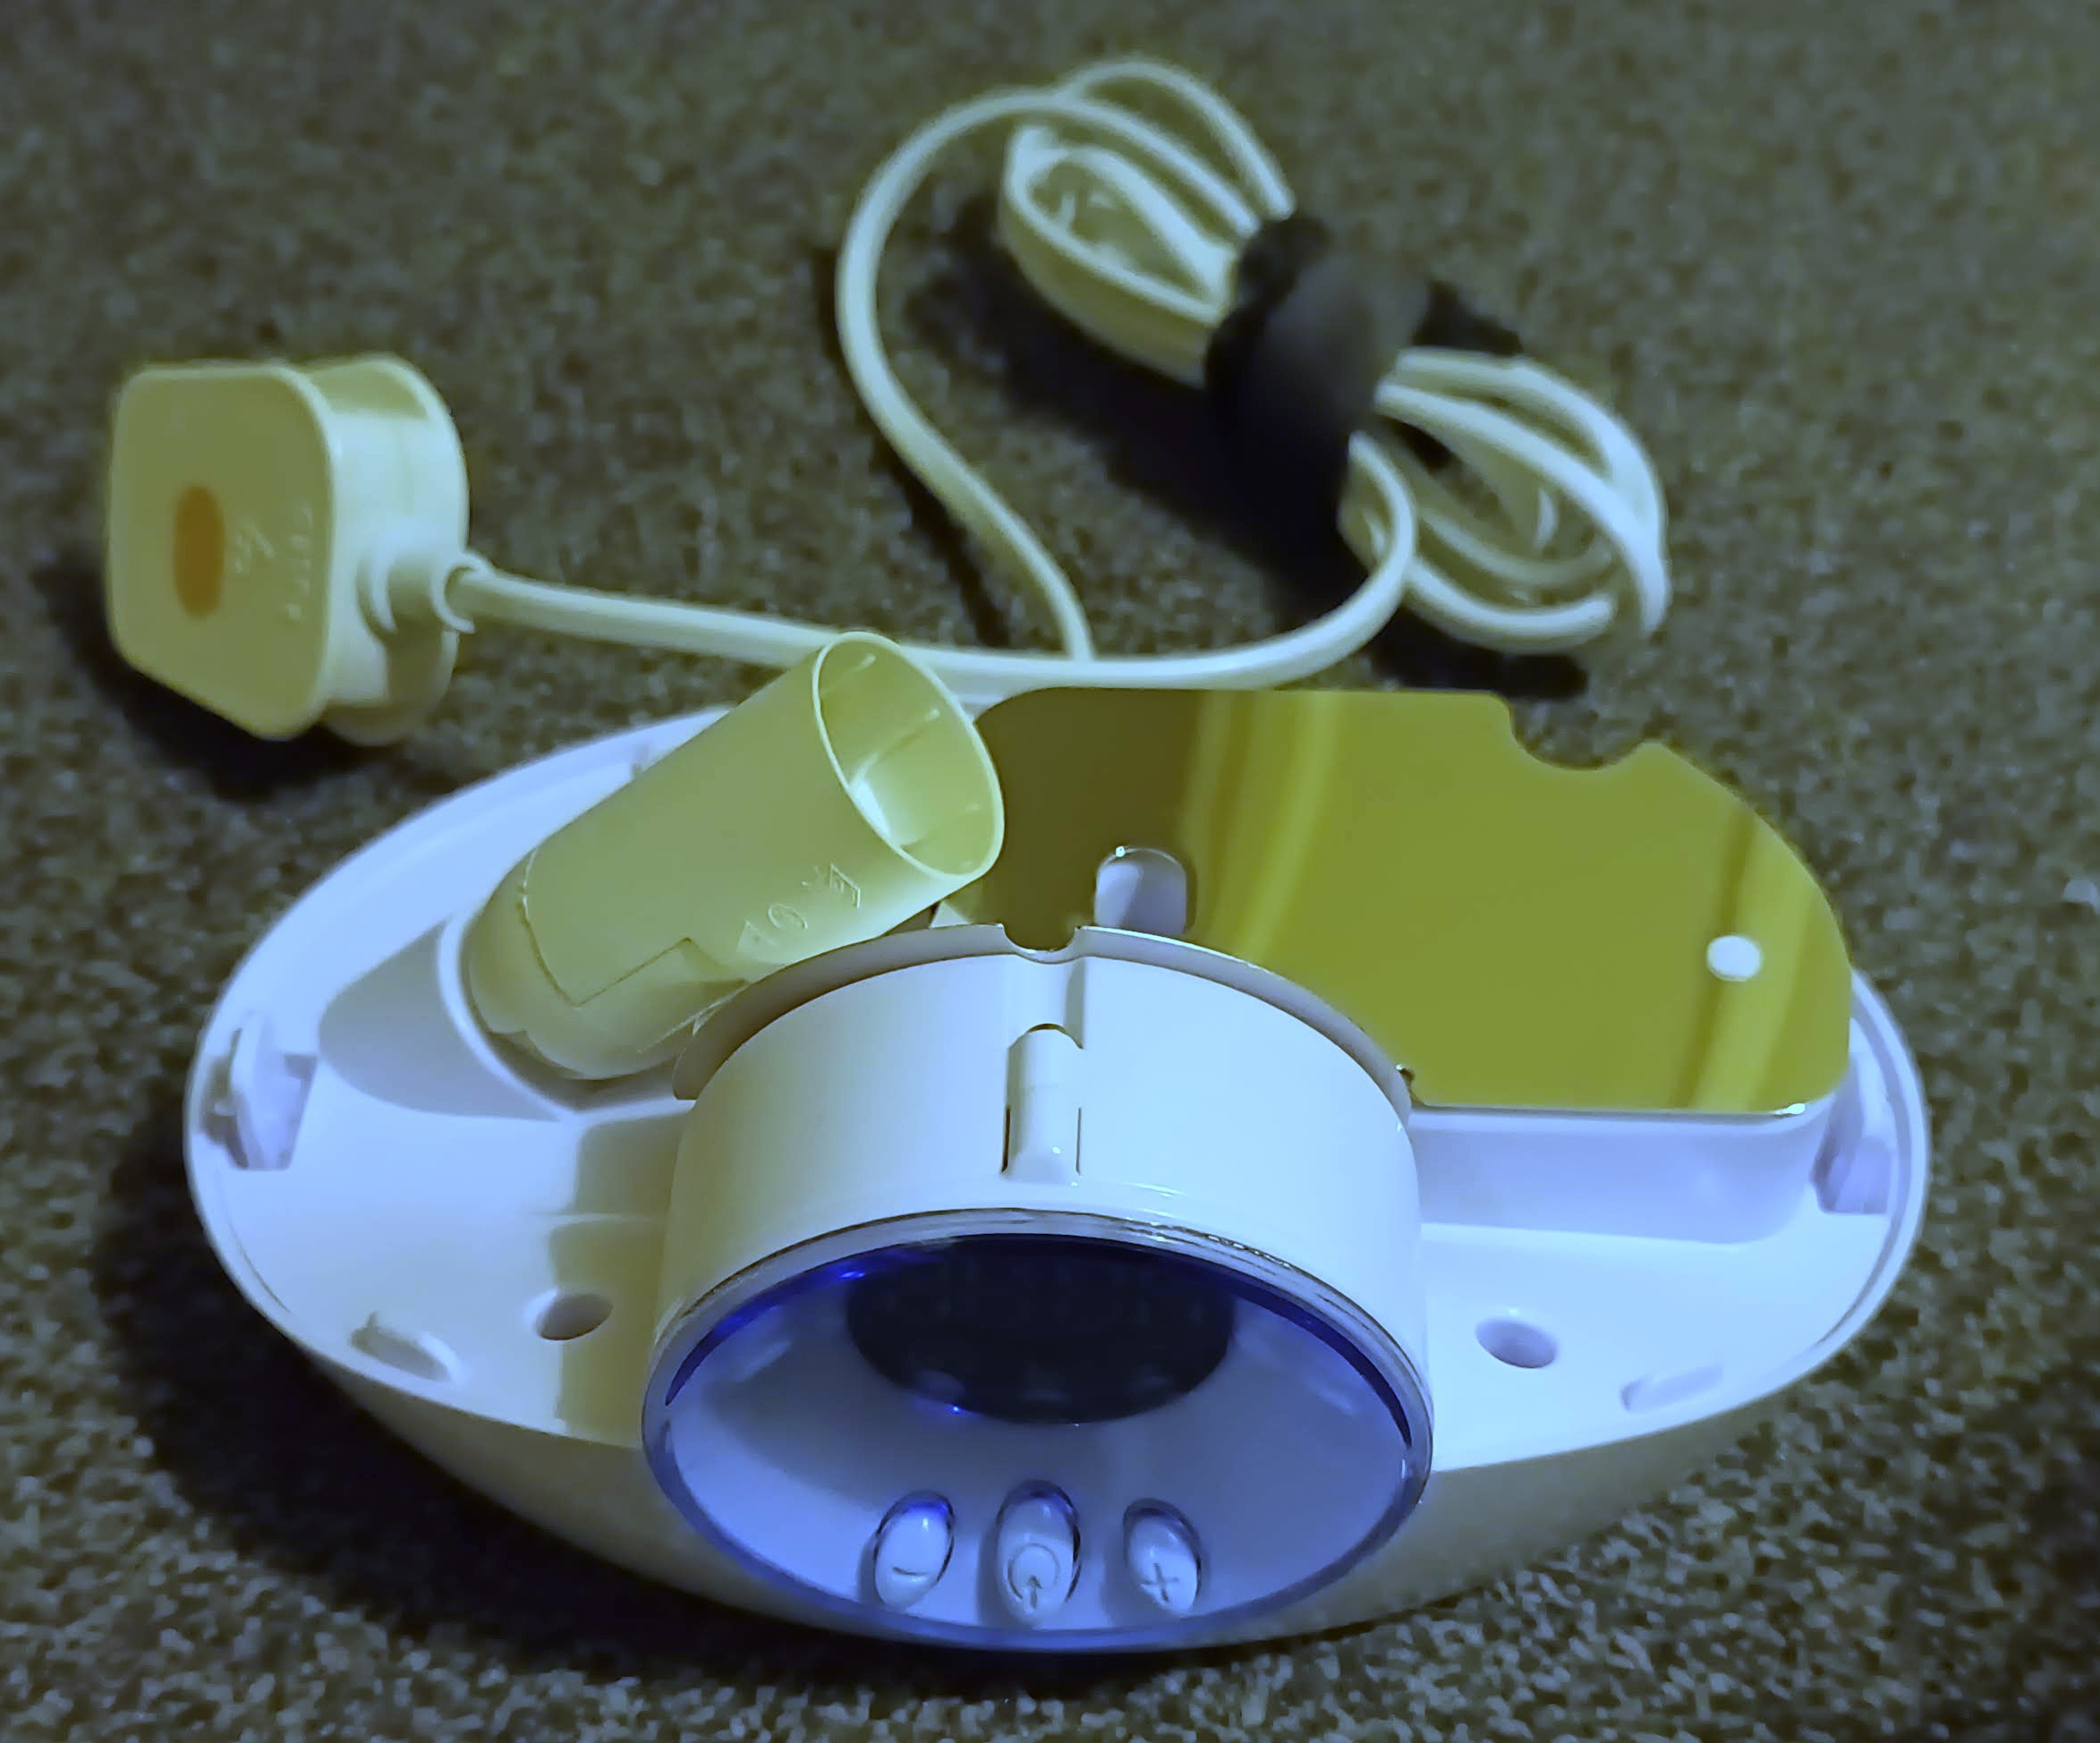
The old style Lumie Bodyclock Starter was supplied fitted with a 42W E14 halogen bulb.

It's a bulb within a bulb as you can see:

There are obvious downsides to that:

  1. It's very inefficient by modern standards. This device would get scary hot in operation.
  2. Bulbs like this die eventually - the filament just breaks eventually. Mine is broken in the image above.
  3. These old glass bulbs are so fragile that people would complain that the product's bulb was broken before they even opened the box.
  4. You can't actually get replacements - halogen bulbs are banned in the UK now. You can still find old stock for sale from small indepedent shops, but they're not meant to be sold as far as I know.
  5. The whitest light you can get from one of these is still pretty yellow. And a light to get you woken up should be a very white, bluish light I believe.

It seems obvious to replace this with an LED bulb, but I doubt that would work as you'd hope. The point of these devices is to slowly brighten the bulb in the morning and to dim the bulb in the evening. I expect it's using a triac. My guess is that it would probably kind of work if you found an LED bulb compatible with old style dimmer switches but I thought this would be a good opportunity to solve all of the problems above in one go.

Plus I wanted to address another annoying weakness: this Lumie requires you to manually set it every night so it comes on the following morning. I want it to be automatic and to have a different time for the weekend.

To replace the halogen bulb, I chose a Philips WiZ LED C37 Colour Smart Light Bulb E14 4.9W smart bulb. I got mine for £12.74 from Toolstation. These don't need a special hub device - they just connect to Wi-Fi.

This bulb has an app that runs on your phone and lets you schedule a wake-up effect that actually turns a blu-ish white by the end, and you can set a different schedule for the weekend. That isn't compatible with dimmer switches - but it can dim itself.

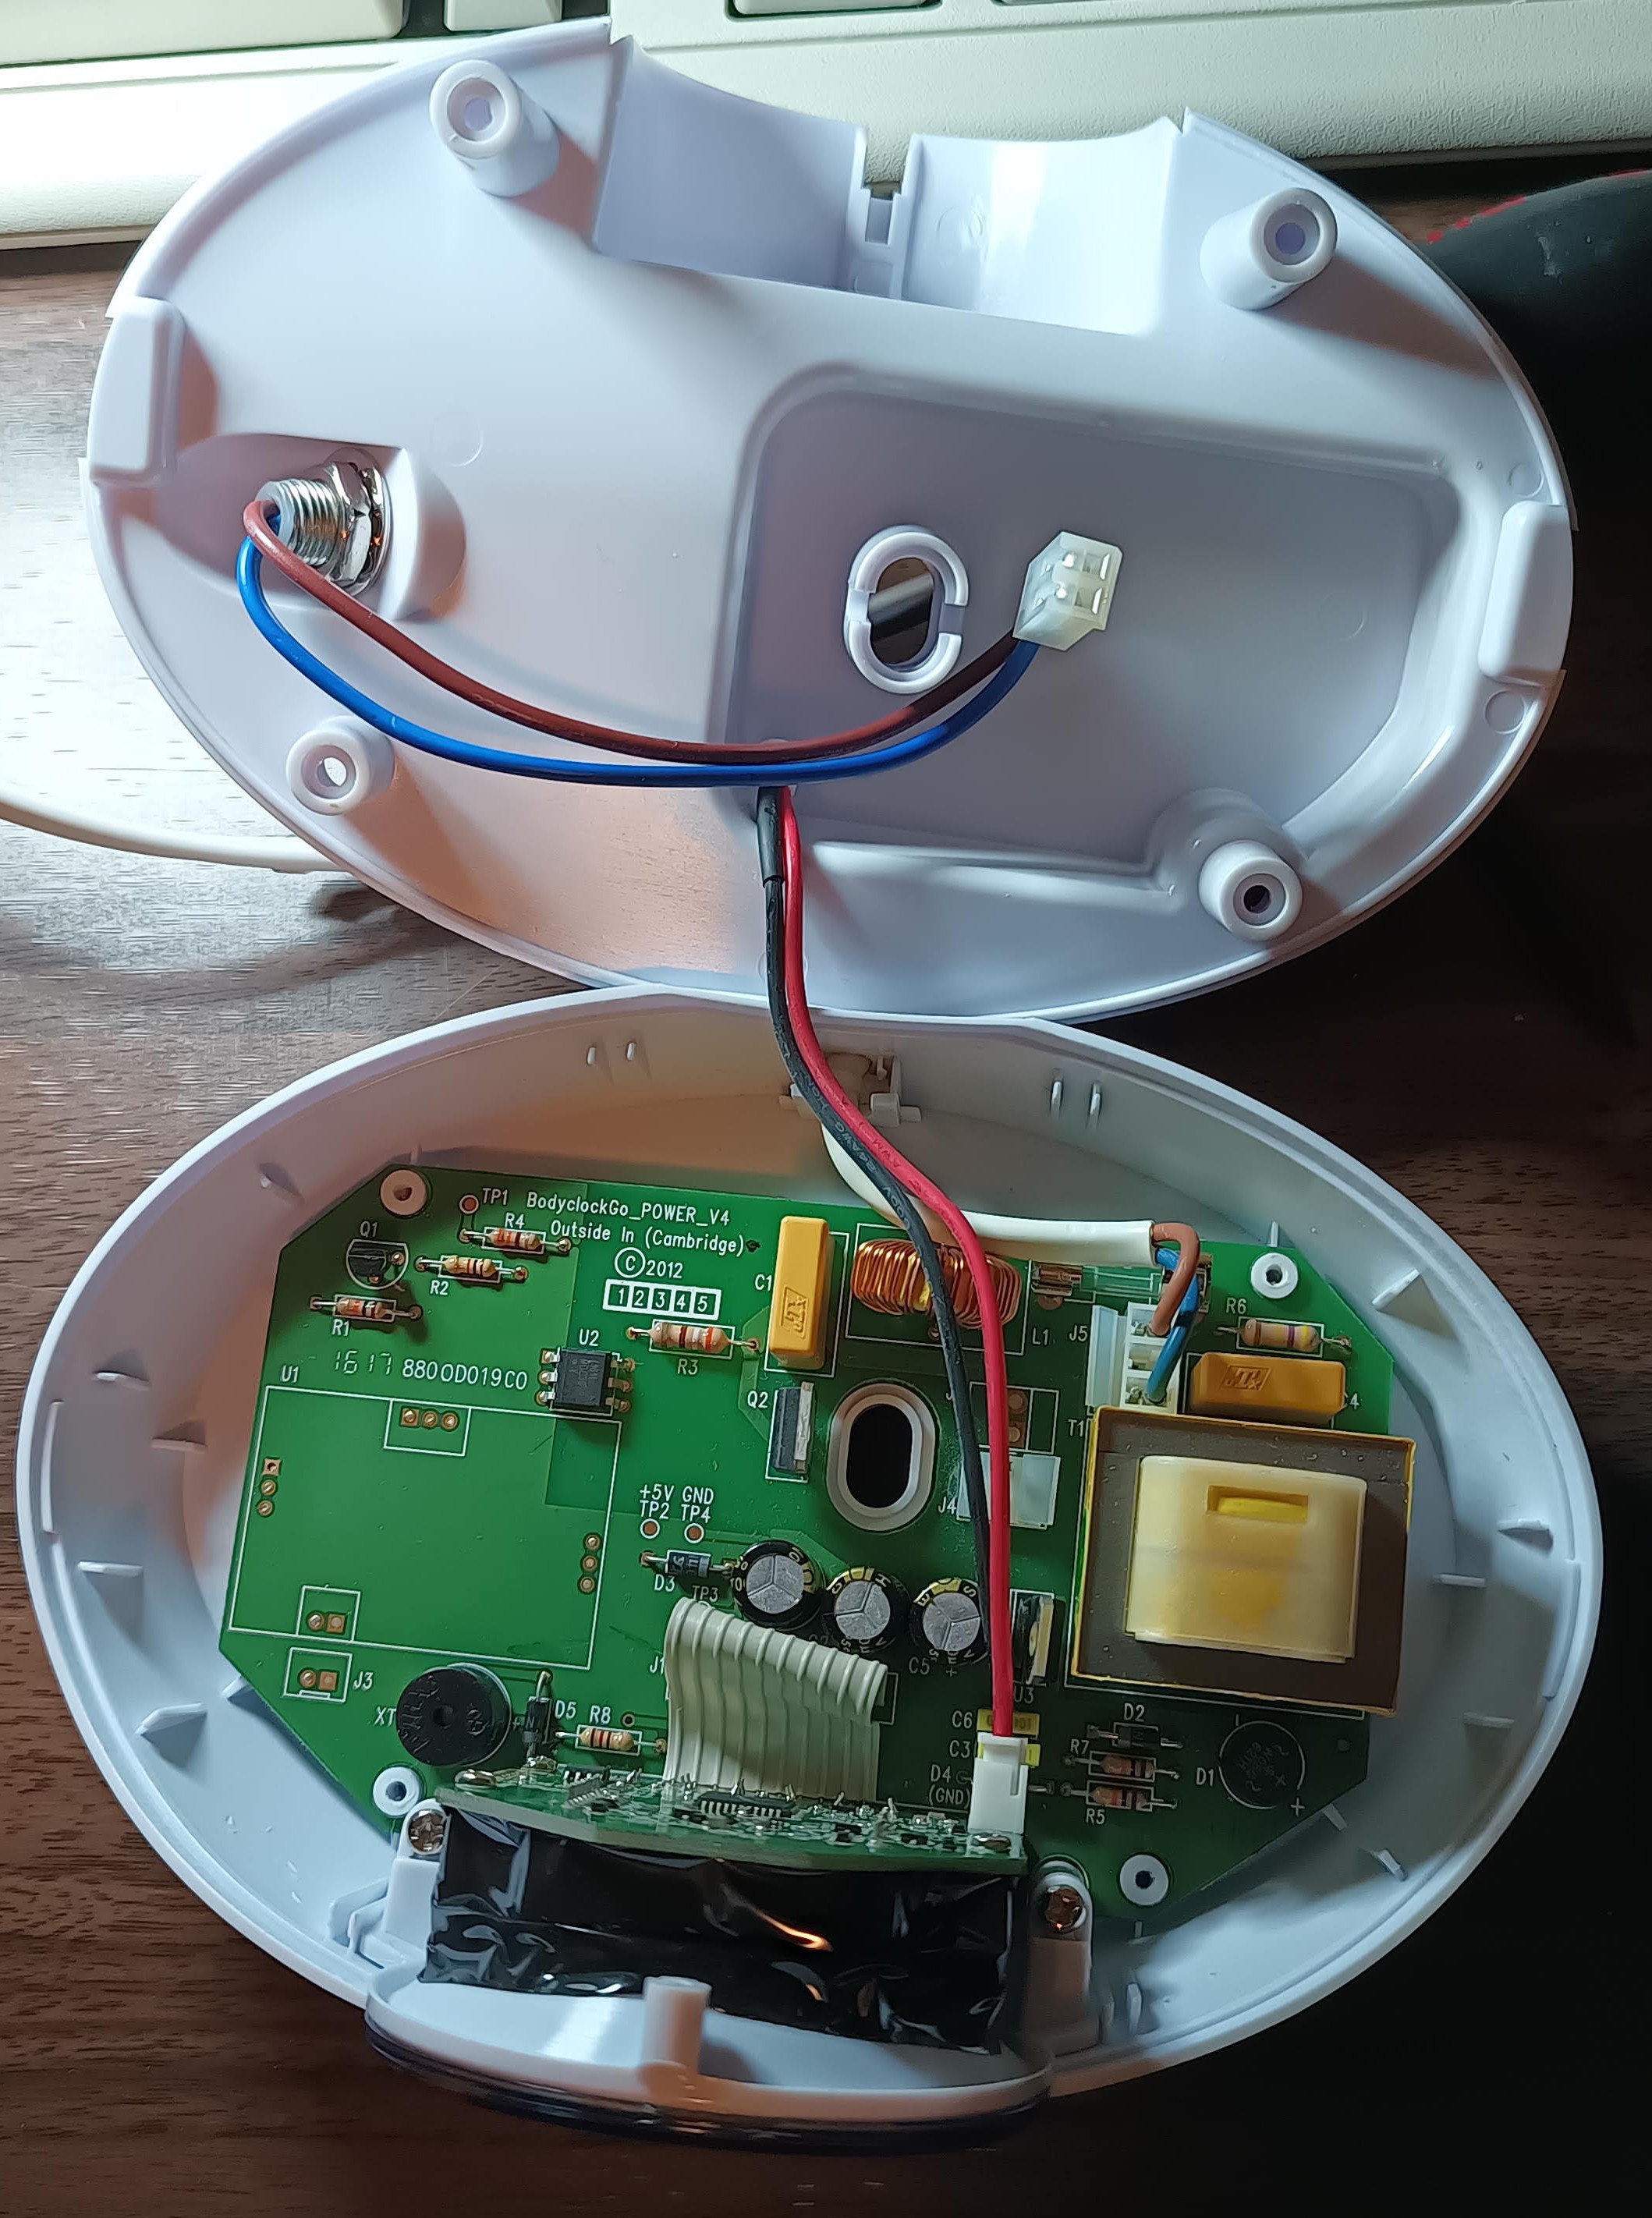
To power it, I simply bypassed the original dimmer circuit in the lamp, allowing the new bulb to be powered directly from the mains. The keys on the front of the device can no longer control the bulb but it doesn't matter because your phone can do it if you ever want to control it manualy. The clock still works because it's just a clock, and if you really want to, I guess you can still use the device's horrific buzzer alarm.

So yes this "hack" is to change a light bulb and power it normally, I'm sorry if you expected something clever.

There is a perceivable hot spot in the diffuser now where the bulb is closer to it, but it doesn't bother me. The device works better than ever, I didn't have to throw it out and it was a quick and cheap fix. I've posted this project so if anyone else has one of these, they too can save it from landfill.

  • 1 × Smart LED Bulb I used "Philips WiZ LED C37 Colour Smart Light Bulb E14 4.9W"
  • 2 × Wago 222-413 Alternatives might fit better, this is what I had on hand
  • 1 × Small zip tie

  • 1
    Remove the old bulb

    Make sure you have unplugged the device from the power socket and don't plug it back in by mistake!

    The translucent top which acts as a diffuser just pulls off by hand. Remove the old halogen bulb carefully and dispose of it properly.

  • 2
    Remove the mezzanine with the bulb holder and reflector on it

    Remove the screws holding down the plastic mezzanine. Note that there's one small screw attaching it to the clock part at the front.

    Then you need to get it out and this was really tedious for me as it was mostly an exercise in brute force. It feels like there must be hidden screws e.g. under the rubber feet, but there are none. Let me know if you worked out an easy way to do it!

    In this picture you can see I already unplugged the bulb holder's cable from the main PCB.

  • 3
    Splice the power supply cable using Wago terminals

    This modification is very simple really. At the moment the power supply cord supplies mains AC voltage to the main PCB. That PCB then controls the brightness of the bulb, presumably using something like a triac. You're going to bypass that part of the PCB so that the mains AC supply from the plug goes to both the main PCB (so the clock still works) and the new LED bulb.

    Remove the zip tie which acts as a strain relief on the 2-core power supply cord (from the mains plug) and pull some extra cord through. I found the cord was so long that I had plenty of cable to spare for this.

    Cut that cable, but make sure you give yourself a good long tail for the connector to the main PCB. It will help to remove the outer jacket from that so you just have one brown and one blue wire.

    Cut off the plug for the wires to the bulb holder - make them as long as you can because you'll need that length to get to the Wago connectors you're adding at the back of the device.

    You need one 3-position Wago terminal for the live, and one for the neutral. This device isn't earthed.

    Simply connect the incoming live to your live terminal, along with the supply to the main PCB and to the bulb holder. Then do the same with the neutral.

    Position the terminal blocks at the back of the device, either side of the cord inlet. I found there was space for them here without disturbing anything else.

    Don't forget to put a new zip tie on as strain relief!

View all 7 instructions

Enjoy this project?

Share

Discussions

Does this project spark your interest?

Become a member to follow this project and never miss any updates