 Arnov Sharma
-
1BREADBOARD SETUP
![]()
![]()
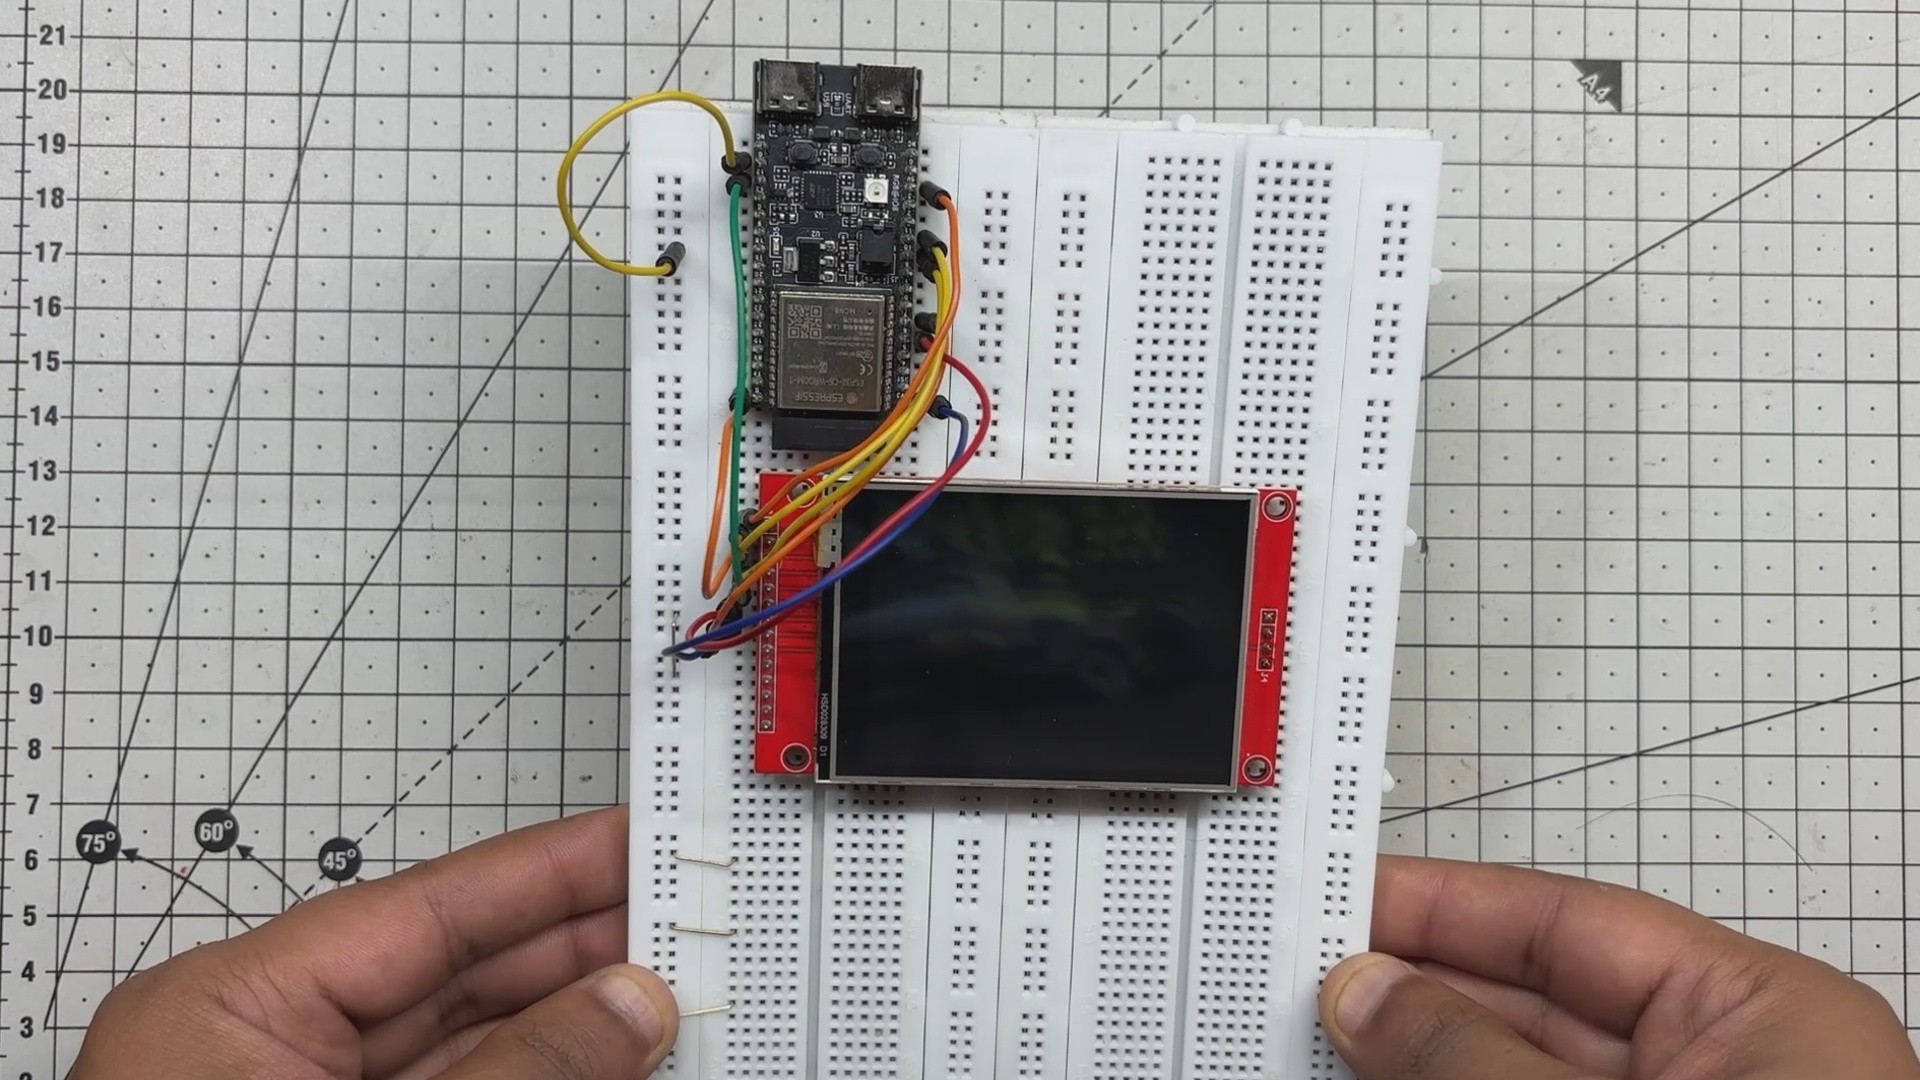
We get started with the project by setting up a simple breadboard setup using the ESP32-C6 DevKit connected to a 320×240 ILI9341 display.
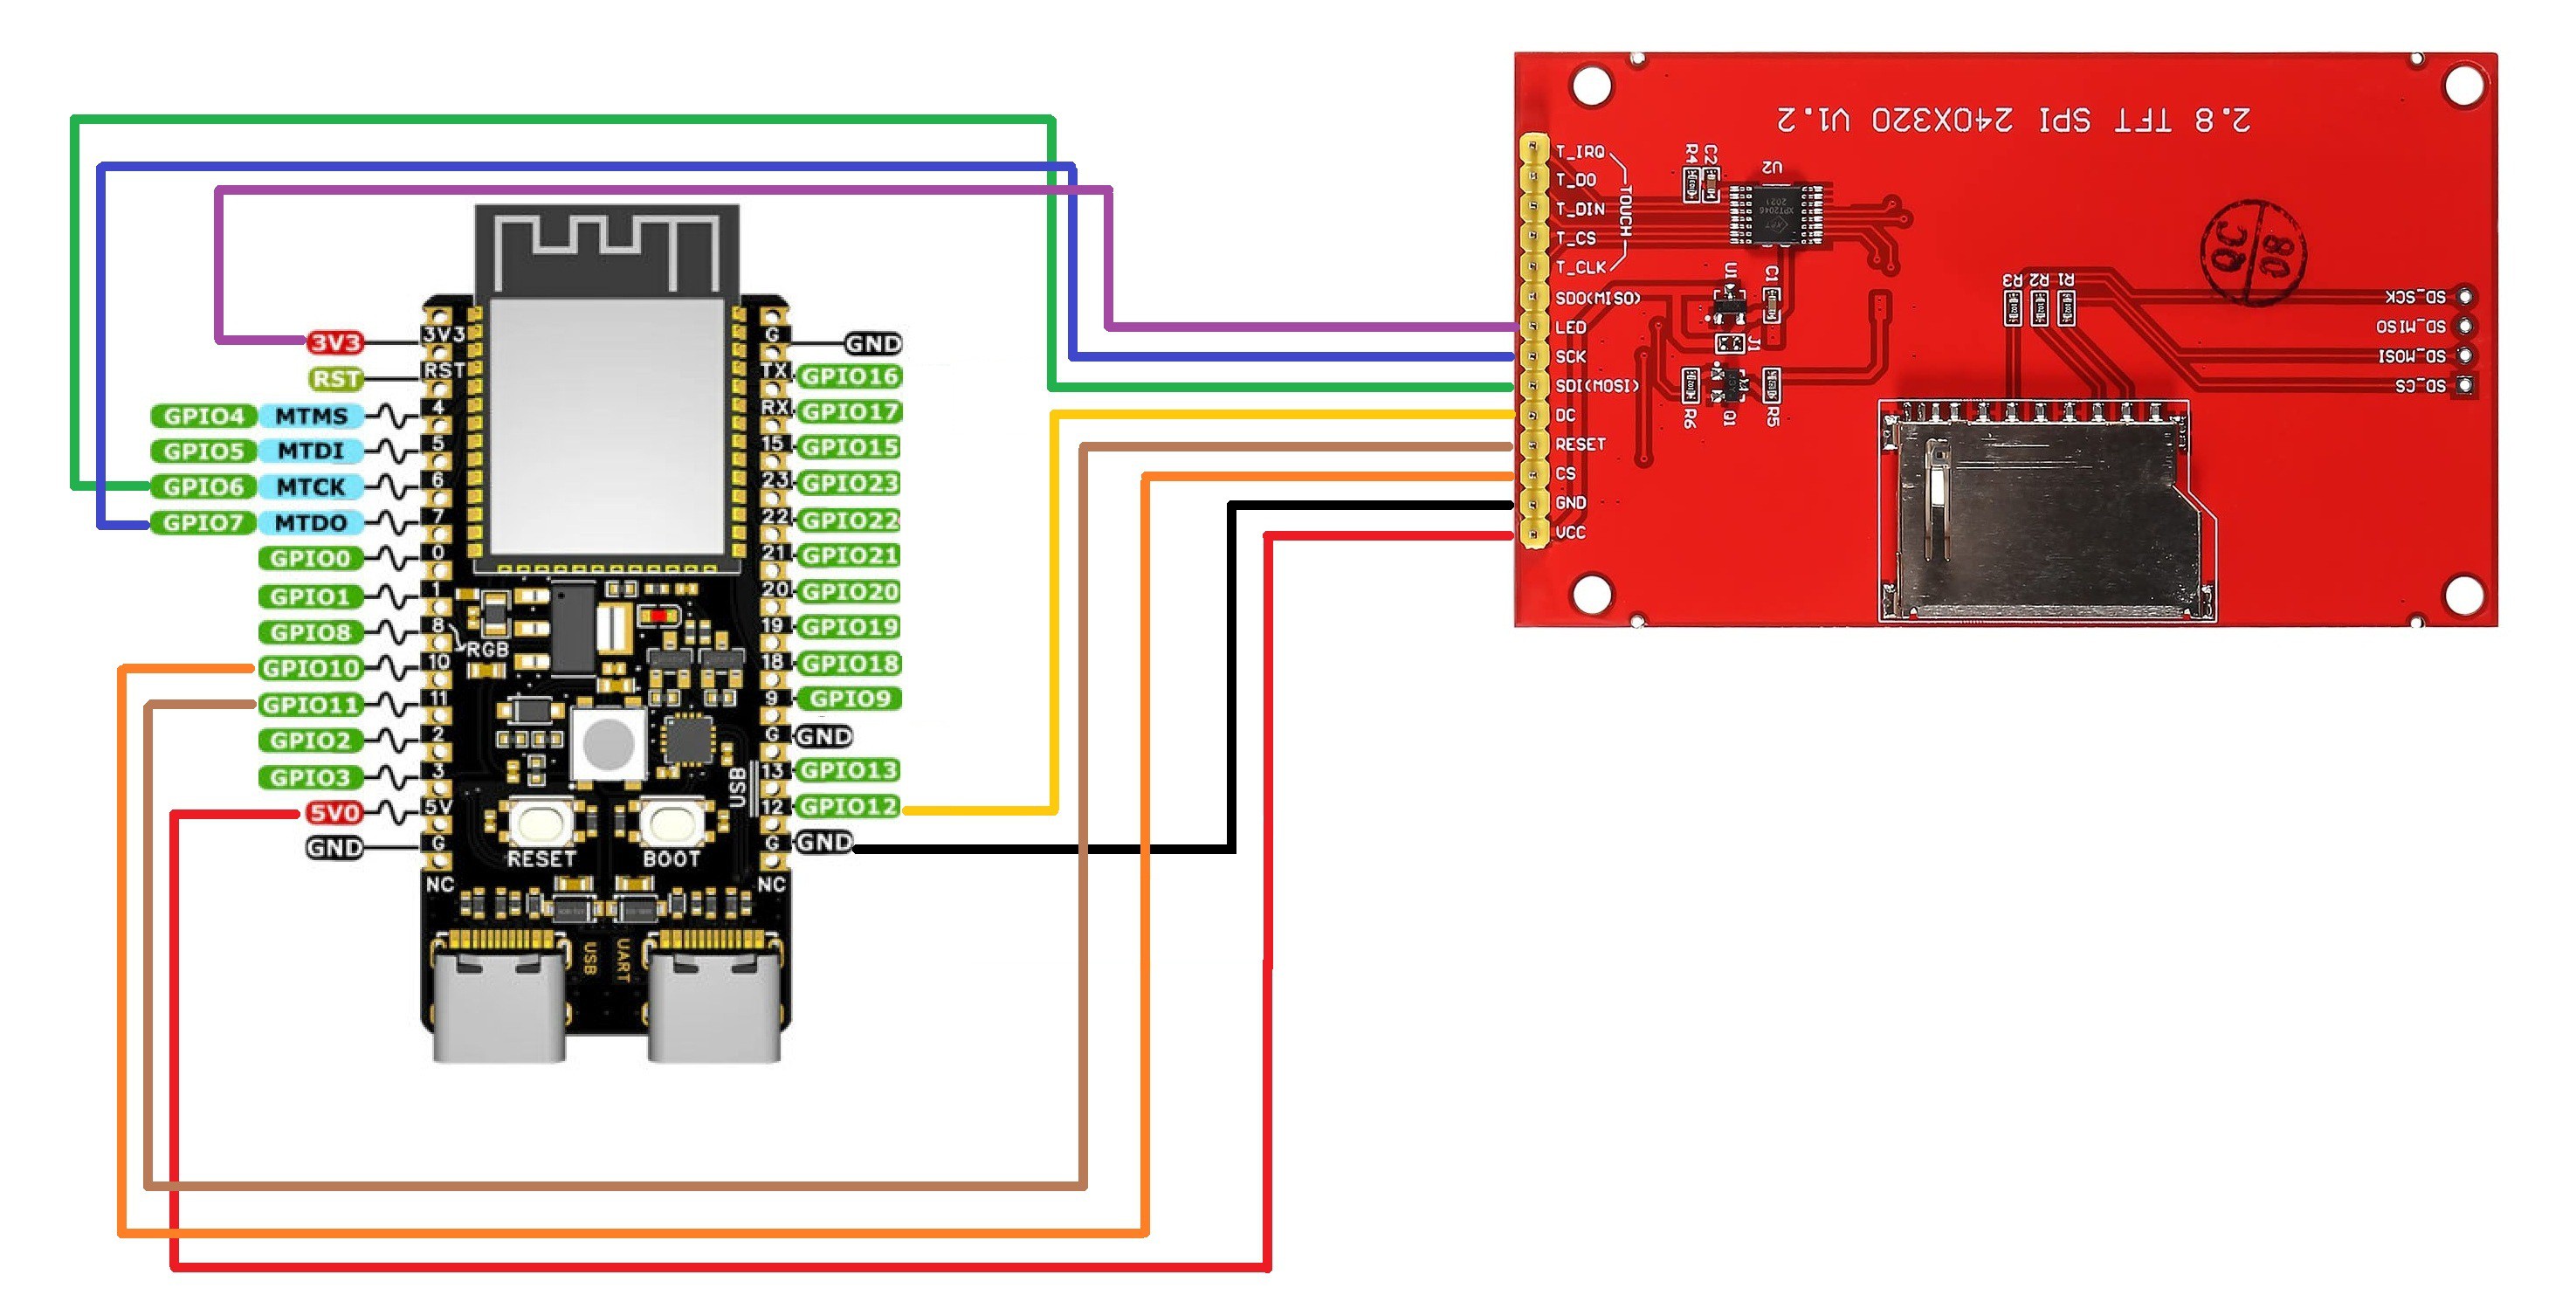
Using Jumper wires, we use the following wiring order for connecting ESP32 with our display.
- DISPLAY's MOSI to GPIO6
- SCK to GPIO7
- Chip Select to GPIO10
- Reset to GPIO11
- DC to GPIO12
- The LED Pin of Display goes to 3.3V of the DevKit.
- VCC goes to 5V
- GND to GND
-
2CODE
This was the code we used in this project and it's a simple one.
#include <Arduino.h>
#include <BLEGamepadClient.h>
#include <Adafruit_GFX.h>
#include <Adafruit_ILI9341.h>
#include <SPI.h>
// Display pin mapping
#define TFT_CS 10
#define TFT_DC 12
#define TFT_RST 11
#define TFT_MOSI 6
#define TFT_SCLK 7
Adafruit_ILI9341 tft = Adafruit_ILI9341(TFT_CS, TFT_DC, TFT_RST);
XboxController controller;
bool wasConnected = false;
void setup() {
Serial.begin(115200);
SPI.begin(TFT_SCLK, -1, TFT_MOSI);
tft.begin();
tft.setRotation(3);  // Landscape, flipped
tft.fillScreen(ILI9341_BLACK);
tft.setTextSize(2);
tft.setTextColor(ILI9341_WHITE);
// Static labels
tft.setCursor(10, 10);  tft.print("LX / LY:");
tft.setCursor(10, 30);  tft.print("RX / RY:");
tft.setCursor(10, 50);  tft.print("LT / RT:");
tft.setCursor(10, 70);  tft.print("Buttons:");
tft.setCursor(10, 90);  tft.print("Bumpers:");
tft.setCursor(10, 110); tft.print("D-pad:");
tft.setCursor(10, 130); tft.print("Center:");
tft.setCursor(10, 160); tft.print("Status:");
controller.begin();
}
void loop() {
if (controller.isConnected()) {
XboxControlsEvent e;
controller.read(e);
// Update connection status only if changed
if (!wasConnected) {
tft.fillRect(120, 160, 180, 20, ILI9341_BLACK);
tft.setCursor(120, 160);
tft.setTextColor(ILI9341_GREEN);
tft.print("Connected");
wasConnected = true;
}
// Update analog stick values
tft.fillRect(120, 10, 180, 20, ILI9341_BLACK);
tft.setCursor(120, 10);
tft.setTextColor(ILI9341_WHITE);
tft.printf("%.2f / %.2f", e.leftStickX, e.leftStickY);
tft.fillRect(120, 30, 180, 20, ILI9341_BLACK);
tft.setCursor(120, 30);
tft.printf("%.2f / %.2f", e.rightStickX, e.rightStickY);
// Triggers
tft.fillRect(120, 50, 180, 20, ILI9341_BLACK);
tft.setCursor(120, 50);
tft.printf("%.2f / %.2f", e.leftTrigger, e.rightTrigger);
// Face buttons
tft.fillRect(120, 70, 180, 20, ILI9341_BLACK);
tft.setCursor(120, 70);
if (e.buttonA) tft.print("A ");
if (e.buttonB) tft.print("B ");
if (e.buttonX) tft.print("X ");
if (e.buttonY) tft.print("Y ");
// Bumpers and stick buttons
tft.fillRect(120, 90, 180, 20, ILI9341_BLACK);
tft.setCursor(120, 90);
if (e.leftBumper)      tft.print("LB ");
if (e.rightBumper)     tft.print("RB ");
if (e.leftStickButton) tft.print("LSB ");
if (e.rightStickButton)tft.print("RSB ");
// D-pad
tft.fillRect(120, 110, 180, 20, ILI9341_BLACK);
tft.setCursor(120, 110);
if (e.dpadUp)    tft.print("Up ");
if (e.dpadDown)  tft.print("Down ");
if (e.dpadLeft)  tft.print("Left ");
if (e.dpadRight) tft.print("Right ");
// Center buttons
tft.fillRect(120, 130, 180, 20, ILI9341_BLACK);
tft.setCursor(120, 130);
if (e.shareButton) tft.print("Share ");
if (e.menuButton)  tft.print("Menu ");
if (e.viewButton)  tft.print("View ");
if (e.xboxButton)  tft.print("Xbox ");
} else {
if (wasConnected) {
tft.fillRect(120, 160, 180, 20, ILI9341_BLACK);
tft.setCursor(120, 160);
tft.setTextColor(ILI9341_RED);
tft.print("Controller not connected");
wasConnected = false;
}
}
delay(100);
}
To begin, we include the essential libraries that handle the core functionality of the project. This includes the BLEGamepadClient library, which is the heart of the setup. it enables the ESP32-C6 to connect with and interpret input from an Xbox controller over BLE.
For Driving our display, we used the Adafruit_GFX Library along with the Adafruit_ILI9341 Library that handles graphic rendering.
#include <Arduino.h>#include <BLEGamepadClient.h>#include <Adafruit_GFX.h>#include <Adafruit_ILI9341.h>#include <SPI.h>
Next comes the display’s pin mapping, where we define which GPIO pins on the ESP32-C6 are used to drive the ILI9341 screen. These definitions ensure that the SPI communication between the microcontroller and the display is correctly routed.
#define TFT_CS 10 // Chip Select#define TFT_DC 12 // Data/Command#define TFT_RST 11 // Reset#define TFT_MOSI 6 // SPI MOSI (data out)#define TFT_SCLK 7 // SPI Clock
The below section handles object initialization. Here, we create the ILI9341 display object, initialize the BLE gamepad client, and set up a connection status flag to avoid unnecessary redraws:
Adafruit_ILI9341 tft = Adafruit_ILI9341(TFT_CS, TFT_DC, TFT_RST);XboxController controller;bool wasConnected = false;
The Setup function initializes the serial monitor for debugging, starts the SPI bus with custom pin mapping, and prepares the ILI9341 display by setting its rotation to landscape, clearing the screen, and configuring text size and color. This ensures the display is ready for smooth, real-time updates.
Serial.begin(115200);SPI.begin(TFT_SCLK, -1, TFT_MOSI);tft.begin();tft.setRotation(3);tft.fillScreen(ILI9341_BLACK);tft.setTextSize(2);tft.setTextColor(ILI9341_WHITE);
In the setup, we added Static Labels that are drawn once and remain static. They define the layout for displaying controller input
tft.setCursor(10, 10); tft.print("LX / LY:");tft.setCursor(10, 30); tft.print("RX / RY:");tft.setCursor(10, 50); tft.print("LT / RT:");tft.setCursor(10, 70); tft.print("Buttons:");tft.setCursor(10, 90); tft.print("Bumpers:");tft.setCursor(10, 110); tft.print("D-pad:");tft.setCursor(10, 130); tft.print("Center:");tft.setCursor(10, 160); tft.print("Status:");Atlast, we start BLE scanning and prepare to connect to the Xbox controller.controller.begin();
The loop starts by checking if the Xbox controller is connected. If it is, it reads the latest input values into the e object using controller. read(e), giving access to all real-time button, stick, and trigger data.
if (controller.isConnected()) { XboxControlsEvent e; controller.read(e);Next is the Connection Status Update Section that checks if the connector is connected; if connected, the status line shows "Connected" in Green.
if (!wasConnected) { tft.fillRect(120, 160, 180, 20, ILI9341_BLACK); tft.setCursor(120, 160); tft.setTextColor(ILI9341_GREEN); tft.print("Connected"); wasConnected = true;}Now comes the Input Section that clears and redraws the values from XBOX Controller on our ILI9341 Display in front of the static labels. Each section uses fillRect() to clear the previous value and setCursor() to position the new one.
This Section is for Analog Sticks.
tft.printf("%.2f / %.2f", e.leftStickX, e.leftStickY);tft.printf("%.2f / %.2f", e.rightStickX, e.rightStickY);This is for Triggers.
tft.printf("%.2f / %.2f", e.leftTrigger, e.rightTrigger);This is for Face Buttons
if (e.buttonA) tft.print("A ");if (e.buttonB) tft.print("B ");if (e.buttonX) tft.print("X ");if (e.buttonY) tft.print("Y ");This section is for Bumpers & Stick Buttons.
if (e.leftBumper) tft.print("LB ");if (e.rightBumper) tft.print("RB ");if (e.leftStickButton) tft.print("LSB ");if (e.rightStickButton)tft.print("RSB ");Then we have the D-pad.
if (e.dpadUp) tft.print("Up ");if (e.dpadDown) tft.print("Down ");if (e.dpadLeft) tft.print("Left ");if (e.dpadRight) tft.print("Right ");At last we have Center Buttons.
if (e.shareButton) tft.print("Share ");if (e.menuButton) tft.print("Menu ");if (e.viewButton) tft.print("View ");if (e.xboxButton) tft.print("Xbox ");Byusing the below section, we get a status line that says "Controller not connected" in red.} else { if (wasConnected) { tft.fillRect(120, 160, 180, 20, ILI9341_BLACK); tft.setCursor(120, 160); tft.setTextColor(ILI9341_RED); tft.print("Controller not connected"); wasConnected = false; }} -
3RESULTS
![]()
![]()
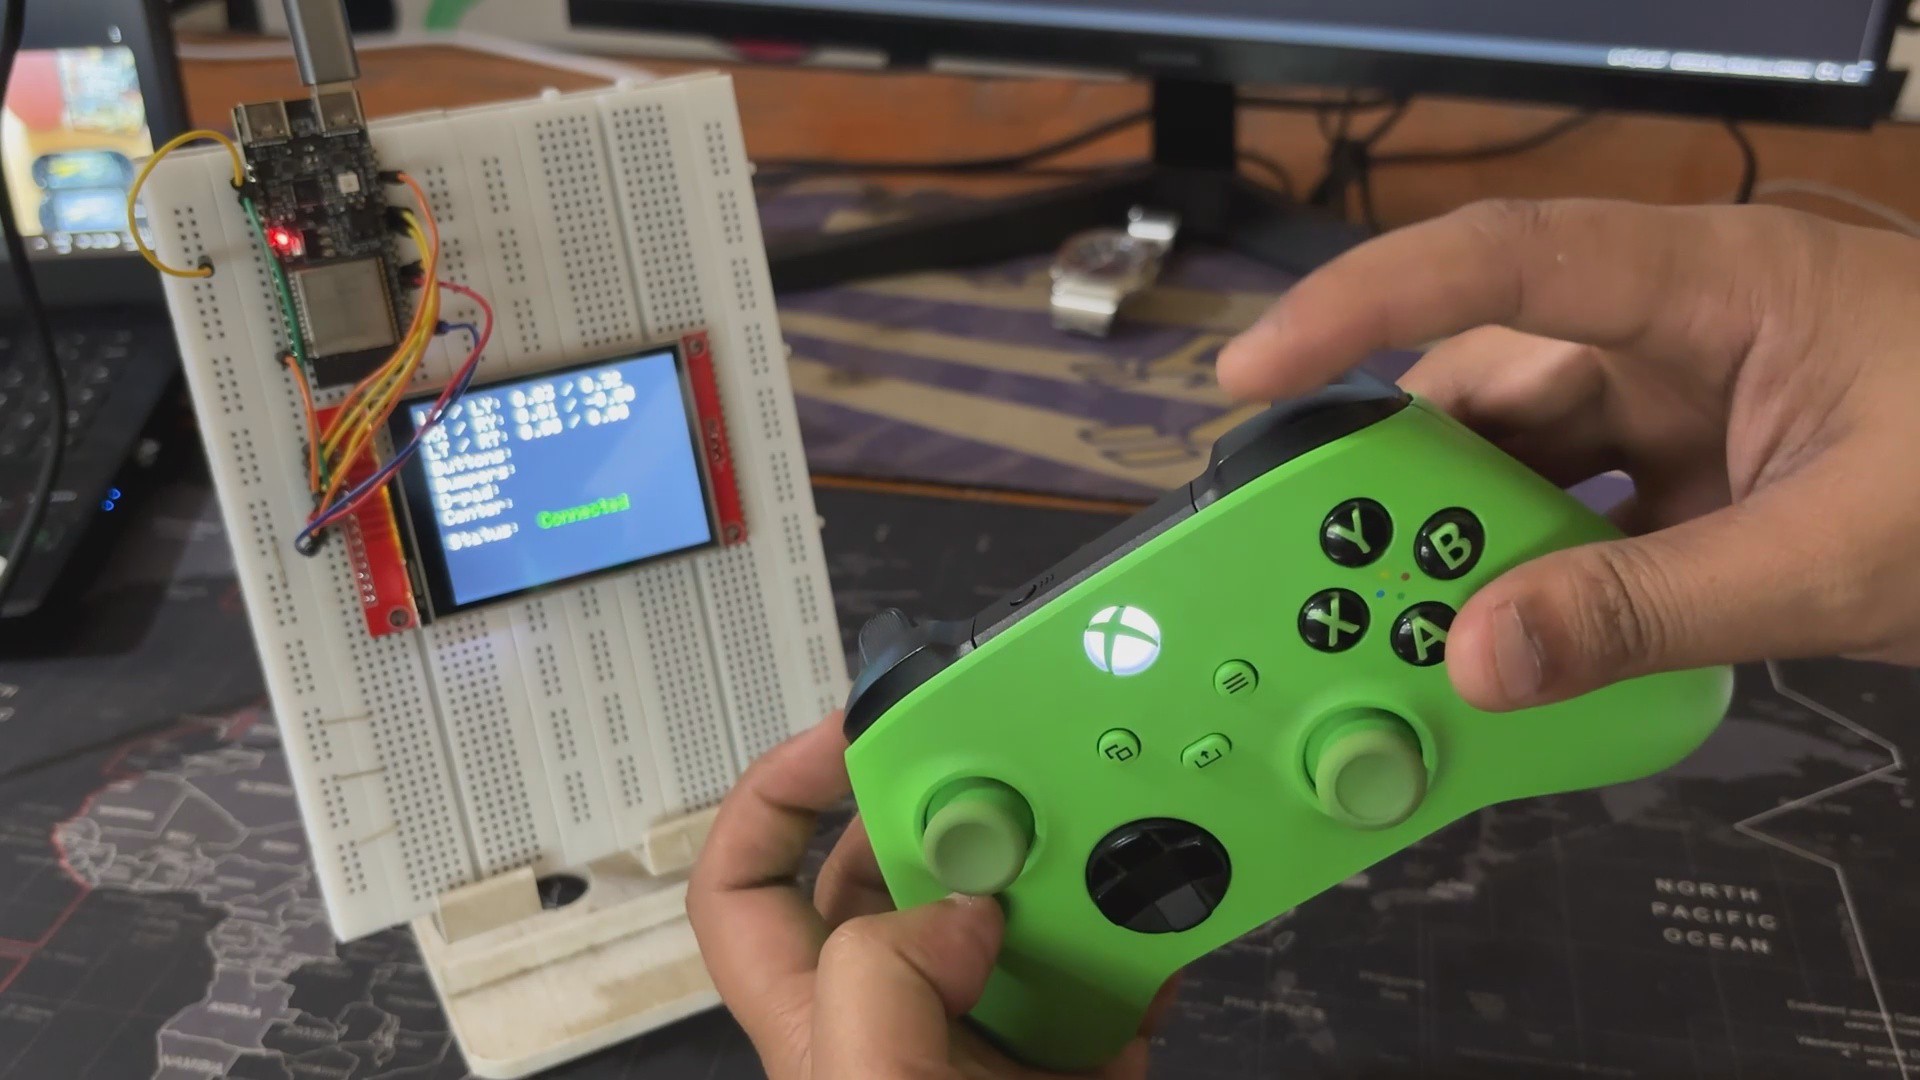
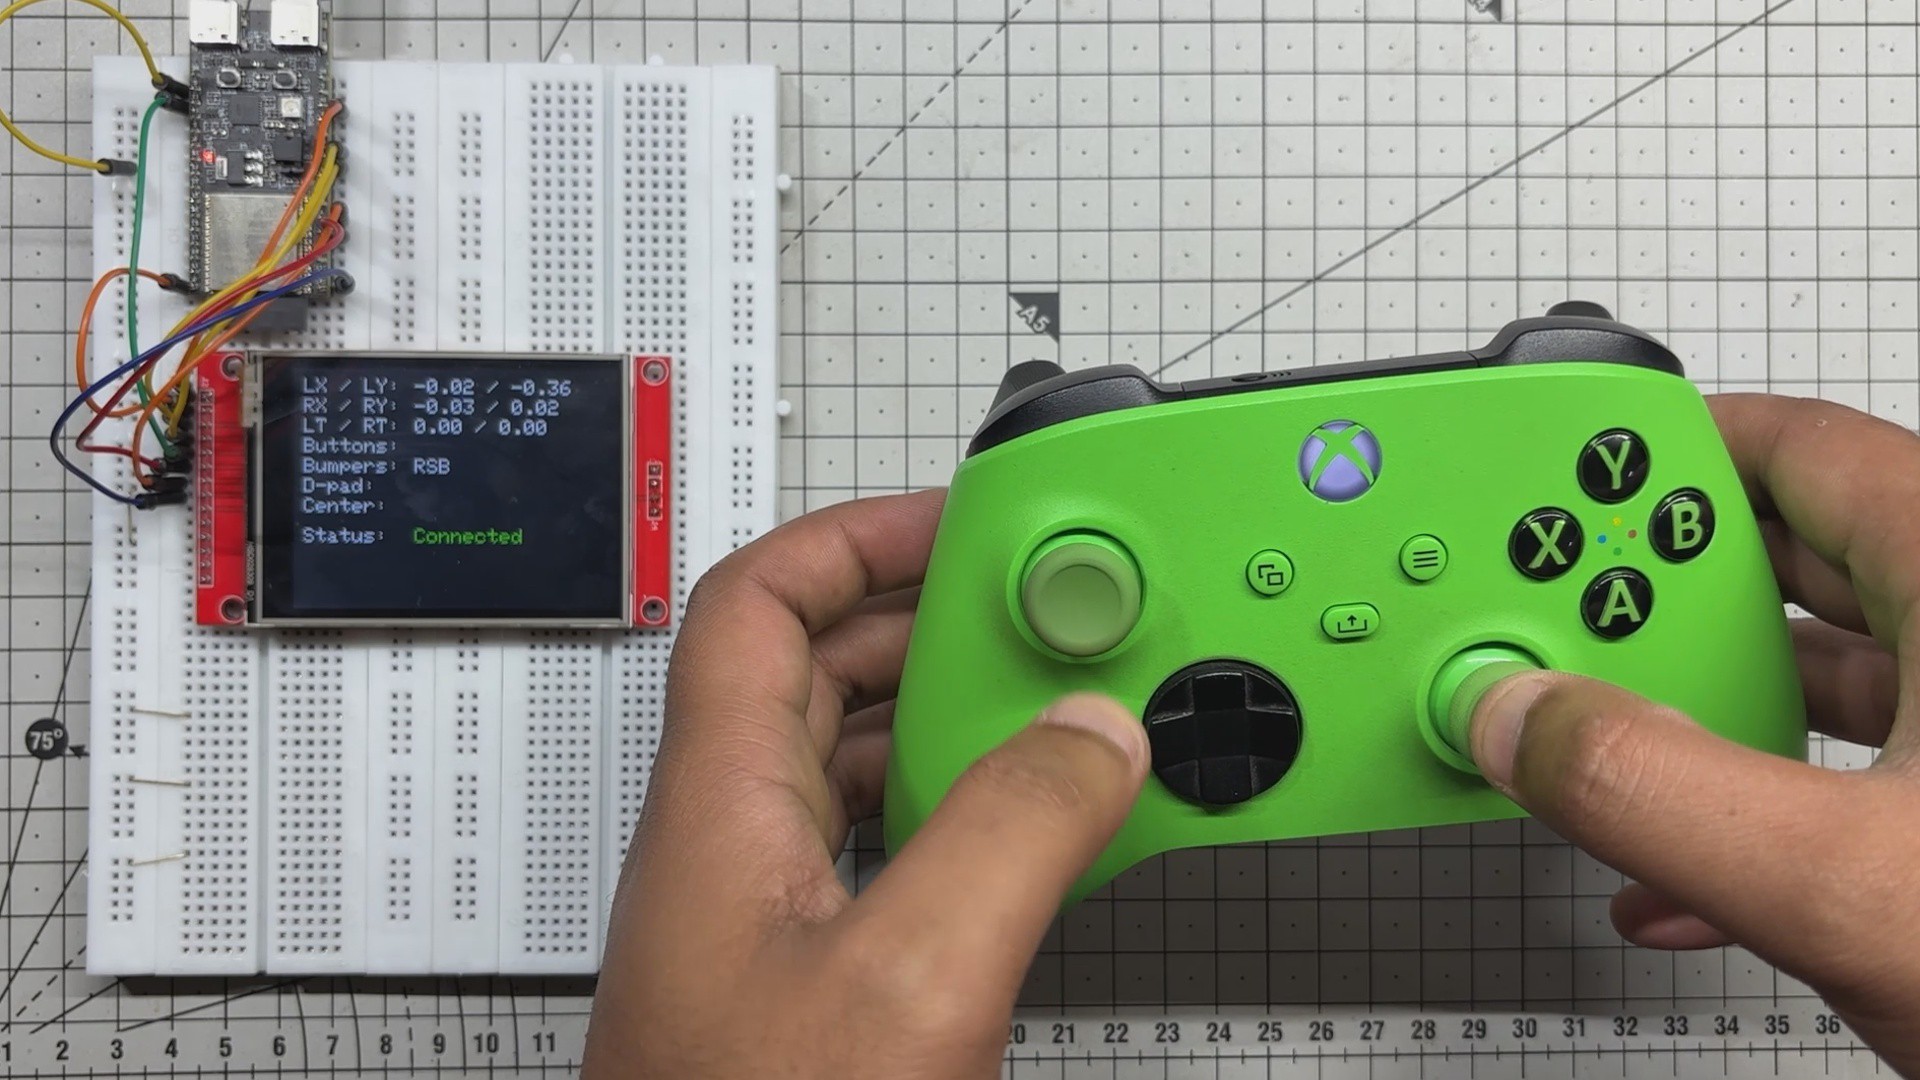
And here’s the final result of this surprisingly simple yet powerful build:
We’ve successfully paired our Xbox controller with the ESP32-C6 DevKit and connected it to an ILI9341 SPI display. Thanks to the BLEGamepadClient library, we’re able to capture and decode all controller input. Every button press is registered instantly, and every trigger value is tracked in real time, which opens up a whole range of possibilities beyond just display.
To connect the Xbox controller to the ESP32-C6 setup, simply hold down the Pair button on the controller until it enters pairing mode. The ESP32, running the BLEGamepadClient library, will automatically detect and establish a Bluetooth Low Energy connection
This setup can be used to build a gamepad visualizer, an input logger, or even a custom UI for embedded games, all running directly on the ESP32-C6 with live feedback on the ILI9341 display.
But here’s where it gets even more exciting: you can use this exact controller input to control a robot wirelessly.
By mapping the analog stick values to motor speed and direction and assigning button presses to trigger actions like arm movement, gripper control, or mode switching, you can build a fully responsive robot interface with no wires, no latency, and no external receiver modules.
The ESP32-C6 handles BLE input, display rendering, and control logic all in one compact board, making it ideal for DIY robotics and RC vehicles, from analog stick positions to button presses—and display them live on screen with zero lag.
Every button press is captured instantly, and trigger values are tracked in real time, giving this setup far more potential than just visualizing inputs. It’s a flexible foundation for building a gamepad visualizer, an input logger, or even a custom UI for embedded games.
That’s exactly why I built it: to control my Snake Game Console using an Xbox controller. With the ESP32-C6 handling BLE input and the ILI9341 display rendering live feedback, I now have a responsive, wireless interface that’s ready for gameplay, debugging, or even robotics.
I will be posting a follow-up project about the snake game console paired with XBOX controller in the future, so stay tuned for that.
For now this project has been completed.
Thanks for reaching this far, and I will be back with a new project pretty soon.
Peace.
Xbox Controller with ESP32
A Tutorial on how to use an Xbox controller with ESP32 to control all sorts of stuff.
Discussions
Become a Hackaday.io Member
Create an account to leave a comment. Already have an account? Log In.