 ElectroScope Archive
Why GSM Instead of Wi-Fi?
-
Wi-Fi trackers only work when connected to a network.
-
The SIM800L connects to the 2G GSM network, so it works even in remote areas.
-
Perfect for tracking vehicles, delivery packages, or outdoor assets.
What You’ll Need
-
ESP32 development board
-
SIM800L GSM module
-
NEO-6M GPS module
-
2 LEDs (5 mm)
-
2 × 470Ω resistors
-
Breadboard and jumper wires
Optional: a Li-ion or LiPo battery for powering the GSM module.
Component Notes
-
ESP32 – Main controller
-
SIM800L – Provides GSM/GPRS cellular connectivity (3.7–4.2V)
-
NEO-6M – Receives GPS coordinates from satellites (3.3–5V)
-
LEDs – Show GPS fix and data send status
Setting Up GeoLinker Cloud
GeoLinker is CircuitDigest’s free cloud platform for IoT visualization.
Steps to get your API key:
-
Go to CircuitDigest Cloud.
-
Click Login and create a free account if you don’t have one.
-
Once logged in, go to My Account → Generate API Key.
-
Copy the API key and use it in your Arduino code.
Each key can handle around 10,000 GPS data points before renewal.
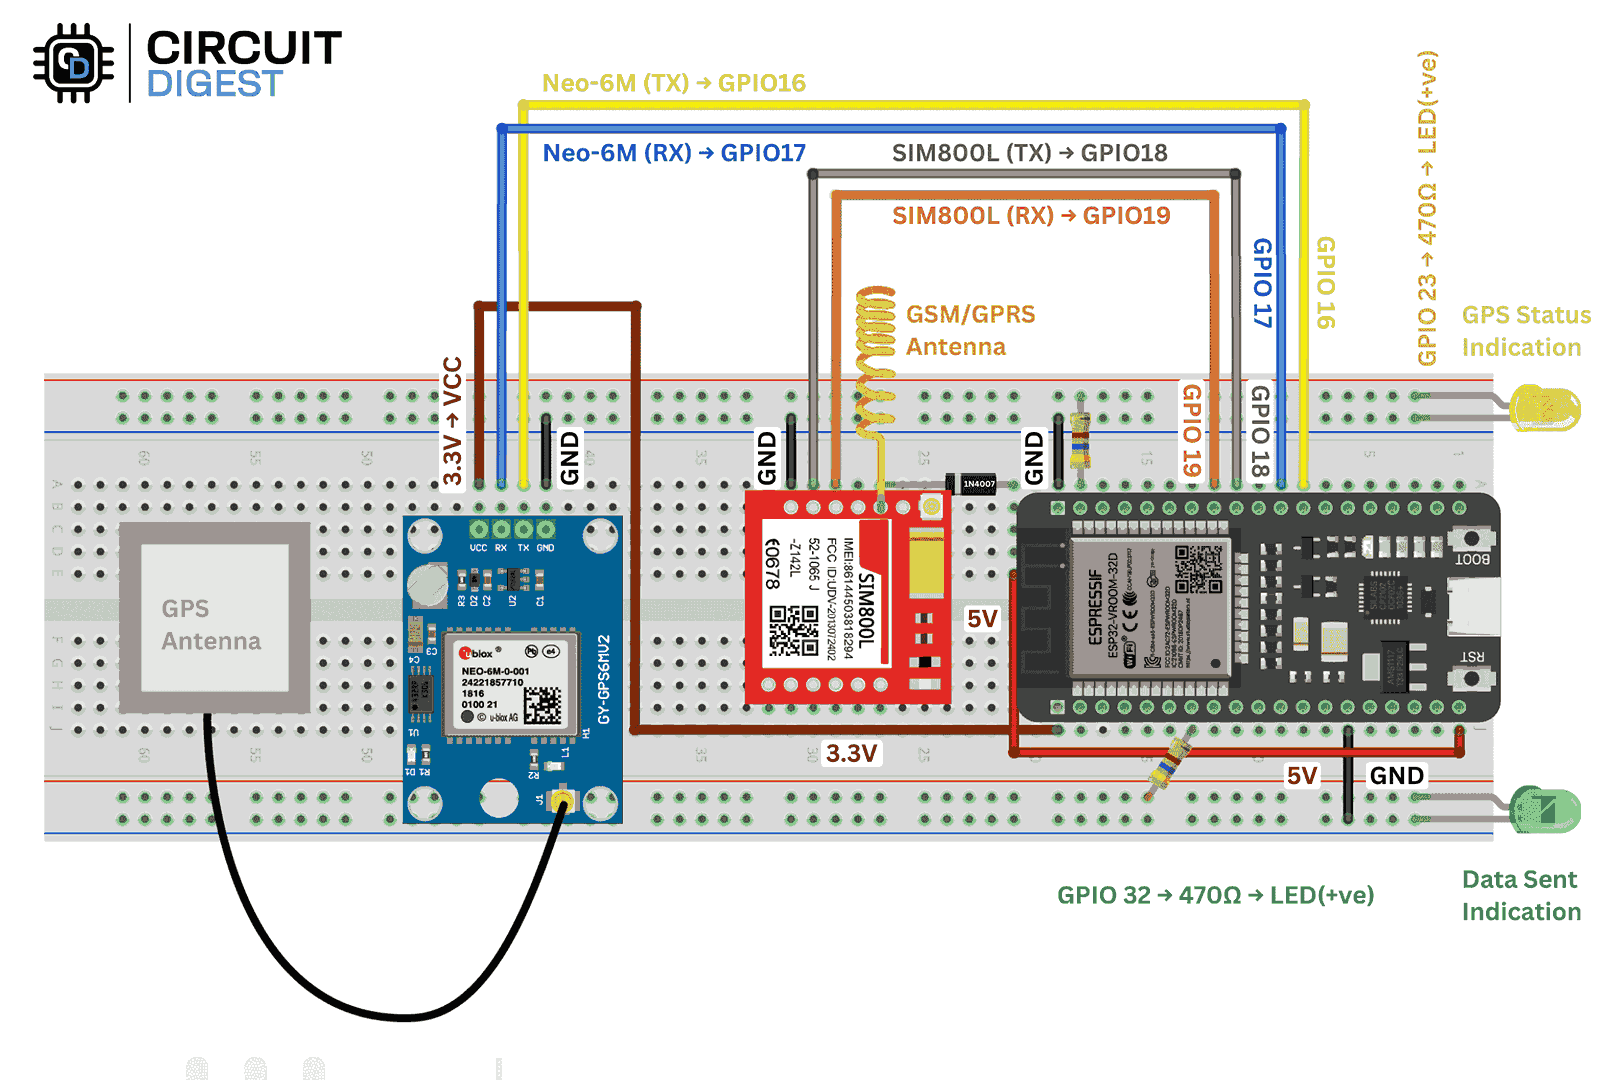
Circuit Connections
-
SIM800L TX → ESP32 GPIO18
-
SIM800L RX → ESP32 GPIO19
-
NEO-6M TX → ESP32 GPIO16
-
NEO-6M RX → ESP32 GPIO17
-
GPSFix LED → ESP32 GPIO23
-
DataSent LED → ESP32 GPIO32
The SIM800L should be powered at 3.7–4.2V. Use a separate Li-ion cell, a LiPo, or a buck converter from 5V.
Arduino Code Overview
We’ll use the GeoLinker Arduino Library to handle GPS parsing, GSM communication, and cloud upload.
Include the library:
#include <GeoLinker.h>
GPS Configuration:
HardwareSerial gpsSerial(1);
#define GPS_RX 16
#define GPS_TX 17
#define GPS_BAUD 9600
GSM Configuration:
HardwareSerial gsmSerial(2);
#define GSM_RX 18
#define GSM_TX 19
#define GSM_BAUD 9600
Network and Cloud Setup:
const char* apn = "yourAPN";
const char* apiKey = "yourAPIkey";
const char* deviceID = "ESP32_Sim800L";
LEDs:
const int DataSent_LED = 32;
const int GPSFix_LED = 23;
GeoLinker Initialization:
GeoLinker geo;

void setup() {  Serial.begin(115200);  gpsSerial.begin(GPS_BAUD, SERIAL_8N1, GPS_RX, GPS_TX);  gsmSerial.begin(GSM_BAUD, SERIAL_8N1, GSM_RX, GSM_TX);
  pinMode(DataSent_LED, OUTPUT);  pinMode(GPSFix_LED, OUTPUT);
  geo.begin(gpsSerial);  geo.setApiKey(apiKey);  geo.setDeviceID(deviceID);  geo.setNetworkMode(GEOLINKER_CELLULAR);  geo.setModemCredentials(apn, nullptr, nullptr);  geo.beginModem(gsmSerial, -1, -1, true);  geo.setUpdateInterval_seconds(30);
}
Main Loop:
void loop() {  uint8_t status = geo.loop();
  if ((status != STATUS_GPS_ERROR) && (status != STATUS_PARSE_ERROR))    digitalWrite(GPSFix_LED, HIGH);  else    digitalWrite(GPSFix_LED, LOW);
  if (status == STATUS_SENT) {    digitalWrite(DataSent_LED, HIGH);    delay(1000);    digitalWrite(DataSent_LED, LOW);  }
}
That’s all you need. The library manages all the background work automatically.
Testing and Debugging
When you power it up:
-
SIM800L LED (1s blink): Not connected to network
-
SIM800L LED (3s blink): Connected and ready
-
SIM800L LED (fast blink): Data transmission active
-
NEO-6M LED: Starts blinking when GPS lock is achieved
Once both modules are active, open the GeoLinker dashboard to see your live location updates in real time.
Pro tip: test outdoors for a faster GPS fix.

Common Issues
No GPS Lock?
-
Move outdoors or near a window
-
Wait 2–10 minutes for a cold start
-
Check antenna and power supply
-
Verify UART baud rate (9600)
SIM800L not connecting?
-
Ensure 3.7–4.2V power supply
-
Check SIM card is active with a 2G data plan
-
Try Airtel, Vi, or BSNL in India (avoid Jio or 4G-only SIMs)
Data not uploading?
-
Double-check API key and APN
-
Verify GSM signal strength
-
Check serial monitor for error messages
Power Optimization Tips
-
Use ESP32 deep sleep between updates
-
Lower GPS update rate
-
Turn off GSM module when idle
-
Use efficient DC-DC converters
-
Log data locally when offline
Final Notes
This ESP32 GPS Tracker...
Read more »
 Ron O'Sullivan
 TomTobback
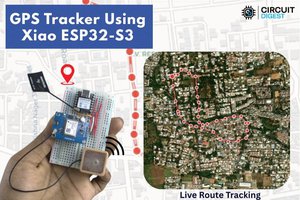
 Pedro Minatel