Neil K. Sheridan
-
RF Network
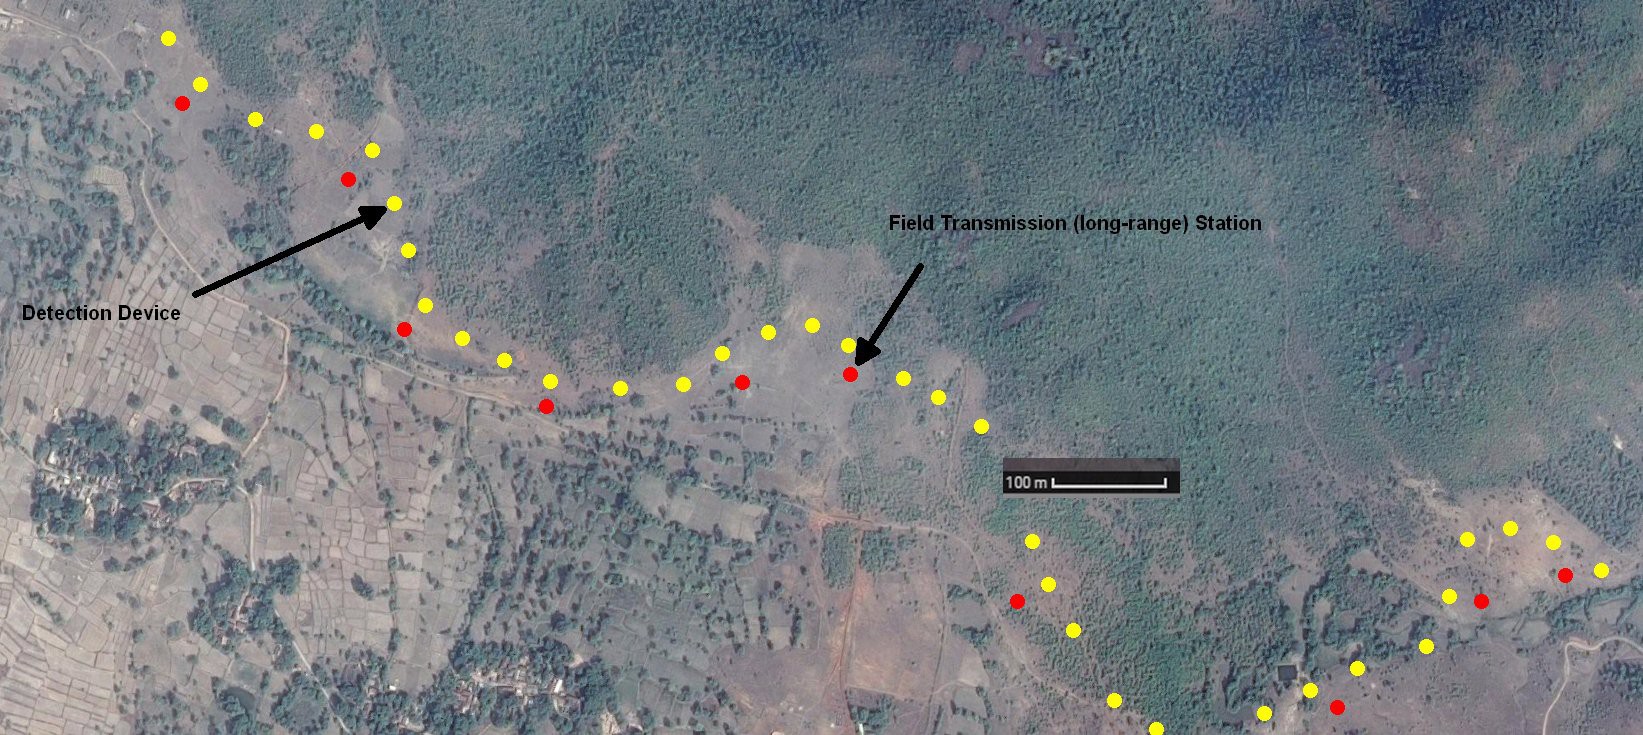
11/04/2017 at 21:56 • 0 commentsSo if you recall from Automated Elephant Identification project, we had the concept of setting up RF comms between the elephant detection devices and field transmission stations. The elephant detection devices using XBee 2mW Wire Antenna - Series 2 (ZigBee Mesh) to communicate with the field transmission station. The field transmission station would use a long-range RF modem to communicate with the village base station.
![]()
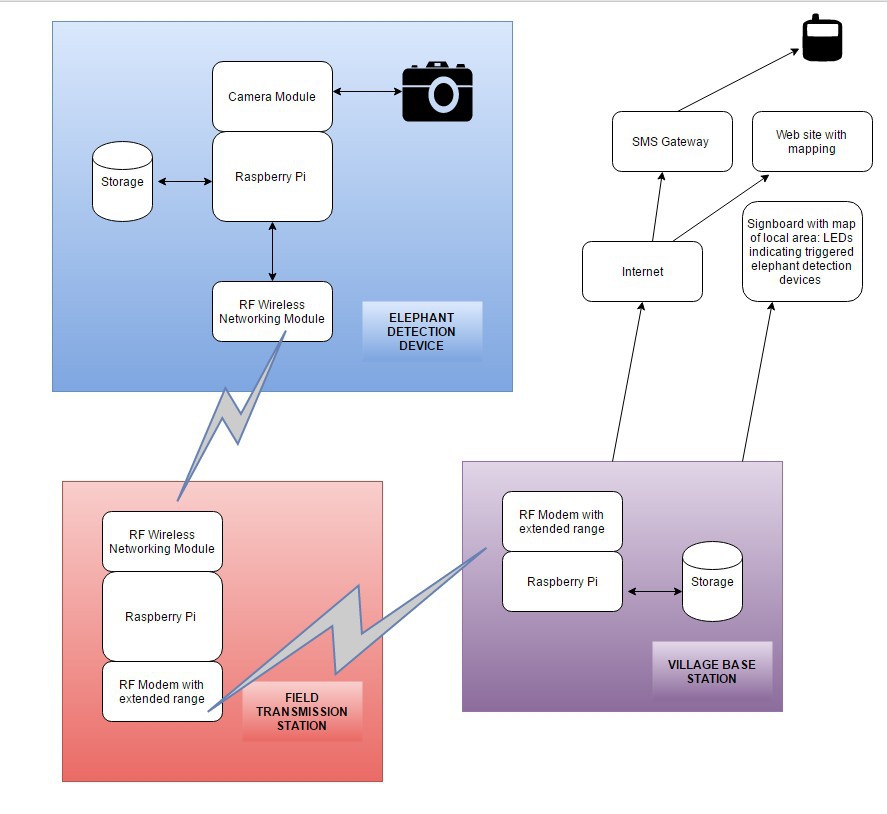
The setup being very basically outlined here:
![]()
So we develop that idea a bit more now, and go to testing it.
We are setting up a network. It's arranged in a mesh topology. Although kinda tree topology if not for the deter devices.
There are three device types in the network:
- End device
- Router
- Coordinator
Anyway, so far as I can see, we can go ahead with using the ZB SERIES S2C - 2MW WITH WIRE ANTENNA (range 120m line-of-sight / $23) and setting these as either end device, router, or coordinator.
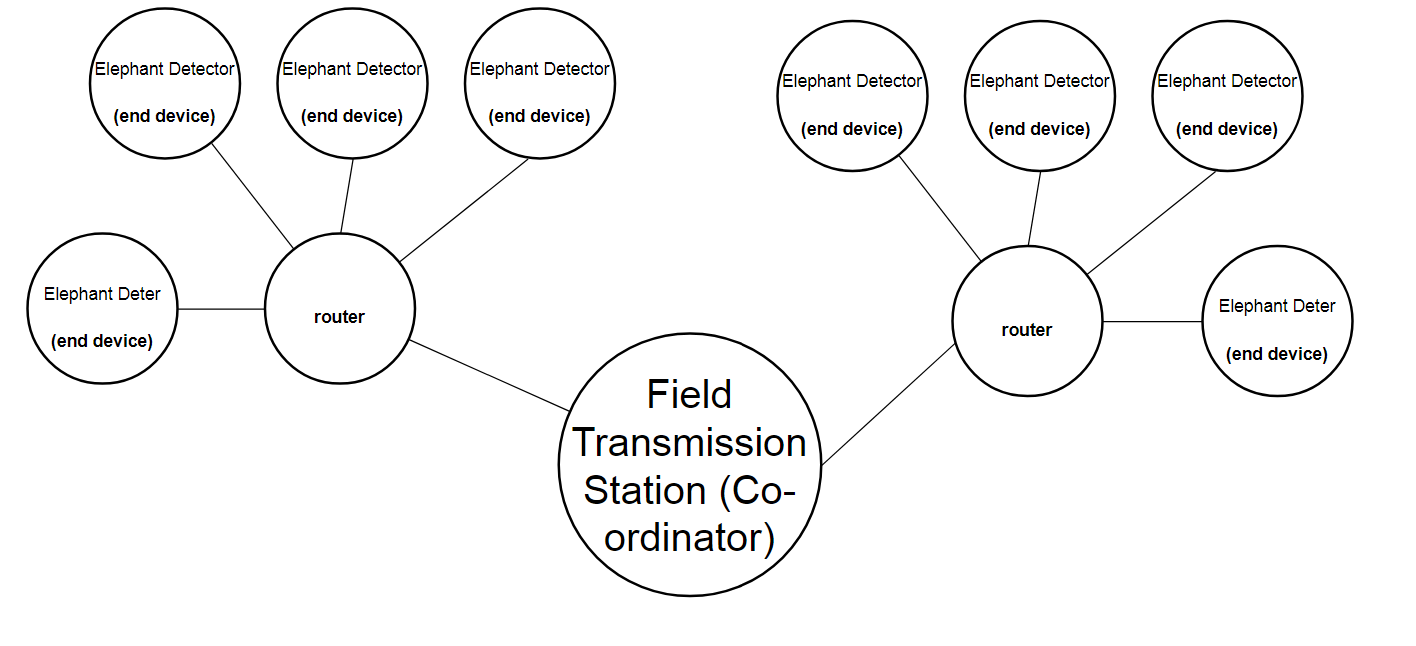
Example starting point for network topology:
![]()
So that's quite good, because we can have each elephant detector 120m from the router, and then the shared coordinator can be 120m from each router. That gives us quite a wide area! And we don't need Bluetooth anymore for the deter devices, so we are more flexible with their locations relative to the elephant detection devices!
Field Transmission Station:
This is the coordinator for our ZigBee network. This is at the root of the tree, and starts the network. It also contains the security keys. So most importantly, as the name Field Transmission Station implies, it will bridge to another network. It was thinking of using the TX6000 LONG RANGE 20KM TRANSMITTER & RECEIVER to do this at up to 500mW RF power output. (£196).
So we can transmit 10-20km line-of-sight from this. Hopefully that is far enough to reach somewhere with wired internet access, or somewhere with 2G/3G coverage! If not, we can use a repeater, giving up to 40km transmission range.
Initial testing:
- First I'll set up a network of 1x elephant detection device, 1x deter device, 1x router, and 1x coordinator. Instead of using the costly long-range TX/RX device, I'll test it by adding 3G connectivity to the coordinator.
- Next, I'll try with making each of the trees: so that's 1x detection device and 1x deter and 1x router for first tree, and 1x detection device and 1x deter and 1x router for the second tree. And the coordinator again with 3G connectivity for testing.
Protocol stack:
It builds on top of IEEE 802.15.4 with some additional layers, including for security. See wikipedia: https://en.wikipedia.org/wiki/Zigbee // I'll do a diagram when I actually get going!
Conclusion:
There are some alternatives to ZigBee, with different protocol stacks, perhaps easier to work with[?] but these ZigBee modules seem a lot cheaper!
I envisage that these RF networks might be fairly useful for camera traps too! So researchers can set up a topology to get the images back to their base of operations easily, and without having to physically visit the traps. Hence, the camera traps remain free of the off-putting human smells!
Resources:
http://www.science.smith.edu/~jcardell/Courses/EGR328/Readings/Zigbee%20ACaseStudy.pdf
-
Building a daytime cat-detector: part 2
10/29/2017 at 20:21 • 0 comments( u n d e r c o n s t r u c t i o n )
So, the cat-detector was tested in better lighting conditions! Remember, we are building a cat-detector to test out image classification using TensorFlow on the Pi, and to investigate some of our future directions for elephant detection too. For instance, we can test out tweeting our labelled cat images, and asking twitter users to add their own labels (i.e. the names of the cats). I.e. supervised learning. Much of this post will cover that.
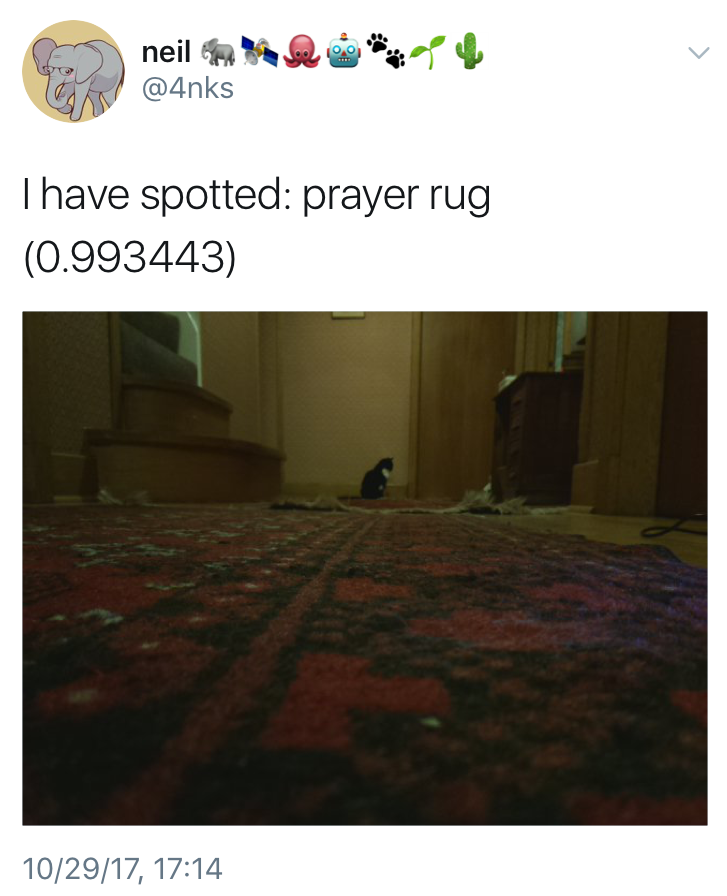
1. Let's see what happened with the cat-detector in better lighting conditions!
![]()
Oh no! Well the largest component of the image is actually very similar to a prayer rug however!
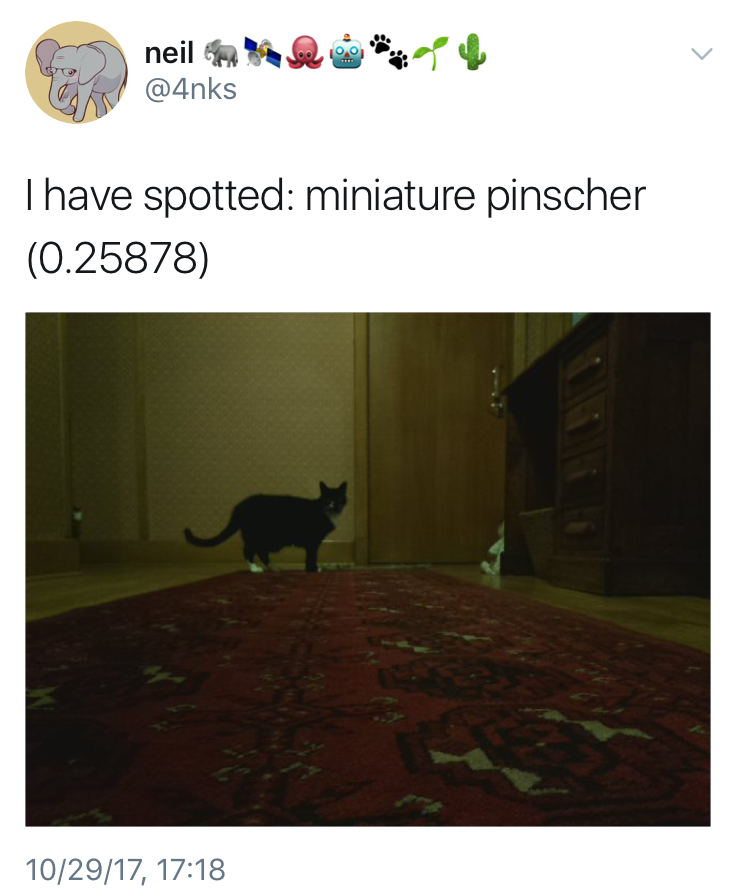
![]()
Prayer rug again!
![]()
Here the cat-detector camera is elevated about 10cm off the floor. At least it got an animal this time. And LaLa's ears do resemble the shape of mini pincher's ears, to be fair!
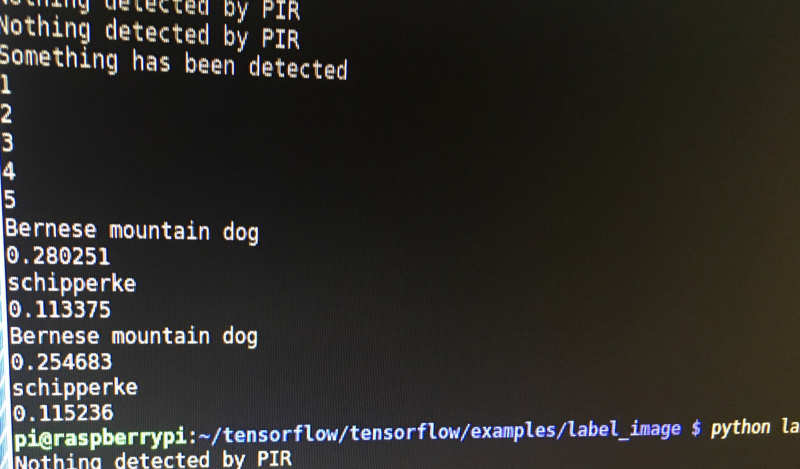
Here are some more results. Not very good really! The top guess being a Bernese mountain dog!
![]()
![]()
![]()
2. What can we do to improve the accuracy of our cat-detector?
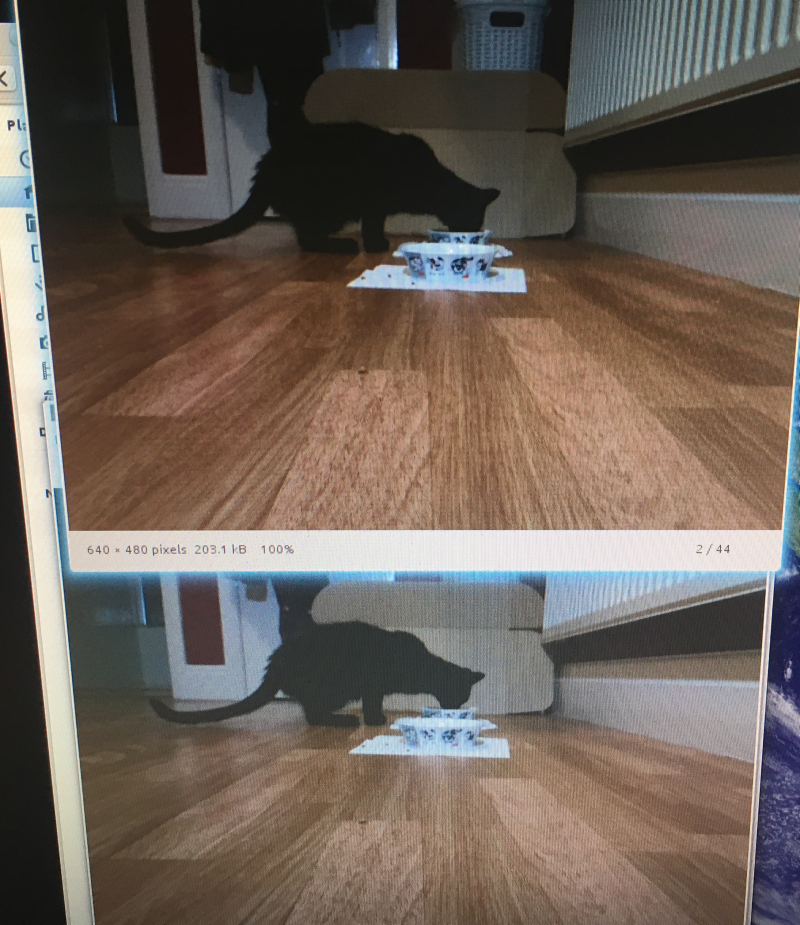
Honestly, I don't think we can get much better images acquired for cats than these at their feeding station! They are not going to come and pose for the camera! So what can we do then?
As I was saying earlier, we can start working on our own cat-detector to detect individual cats (e.g. LaLa and Po). You can see how hard it would be based on the images above (Po is first, then LaLa). They look really similar! Maybe we could look at fixing a camera so it gets their faces when they are eating out the bowl? That would be useful if we wanted to apply the cat-detector to entry control (i.e. cat doors) too!
So:
-- Fix camera so it can acquire images of cat faces when they are eating
-- Acquire up to 1000 cat face images for each cat. Well, let's get 200 each and go with that first. So just have a Pi taking images when the PIR gets triggered and label them LaLa or Po manually.
-- Then we can go about training a CN using some of the kernels from the Kaggle Dogs Vs. Cats Redux for inspiration -> https://www.kaggle.com/c/dogs-vs-cats-redux-kernels-edition/kernels
I know some of them use Keras e.g. https://blog.keras.io/building-powerful-image-classification-models-using-very-little-data.html
-- Then we can try out our new cat-detector!
3. Anyway, let's add code to tweet out the results from the cat-detector now!
Here's the general code we need to add:
from twython import Twython

C_KEY = ''
C_SECRET = ''
A_TOKEN = ''
A_SECRET = ''

twitter = Twython(C_KEY, C_SECRET, A_TOKEN, A_SECRET)
photo = open('image1.jpg', 'rb')
response = twitter.upload_media(media=photo)
twitter.update_status(status=message, media_ids=[response['media_id']])
You can obtain your C_KEY, C_SECRET, A_TOKEN, and A_SECRET from twitter. Here's how to do that: https://twython.readthedocs.io/en/latest/usage/starting_out.html
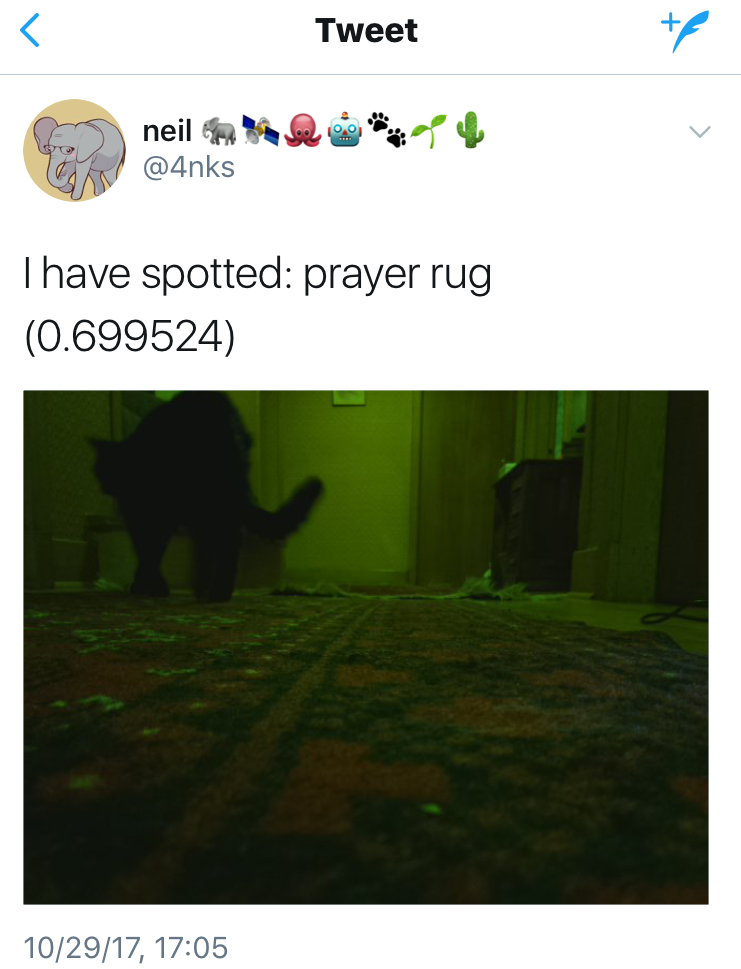
So next we put our detector results in the message string variable (status=message)
message=("I have spotted: " + top_label + " (" + top_result + ")")Ok, so we are good to go with twitter now! Now we could try the idea of asking twitter users to add their own labels to the images. We could ask them to reply with #catdetector #lala if the image was of LaLa (large black and white cat), and ask them to reply with #catdetctor #po if the image was of Po (small black cat) !
** so I will hang back on this next bit, and just try labelling them myself first, since I don't have a VPS ready/code ready.
The entire idea of this is to test the approach to supervised learning I envisaged for elephants. So in this case, I off-load the work of labelling images to twitter users. They reply to cat images with the hashtags above. Then I associate these replies with given cat images, store them in a database. Then when I have enough, I will go ahead and retrain InceptionV3 with two new classes: PoCat and LaLaCat! I'll do some it manually to start, then we can automate the entire process.
3. Getting the replies to our cat images!
So, I only have found how to do this first with Tweepy. But I'm sure we can do the same with Twython later. So what we are doing is streaming realtime tweets, and filtering them for the hashtags we mentioned. Note that we don't do our data analysis on raspberry pi, we do it on another machine, probably a virtual server! The steps are:
-- Create a stream listener
import tweepy
#override tweepy.StreamListener to add logic to on_status
class MyStreamListener(tweepy.StreamListener):

    def on_status(self, status):
        print(status.text)
-- Create stream
myStreamListener = MyStreamListener()
myStream = tweepy.Stream(auth = api.auth, listener=myStreamListener)
-- Start the stream with filters
myStream.filter(track=['#catdetector'])
See the Tweepy docs here: https://github.com/tweepy/tweepy/blob/master/docs/streaming_how_to.rst
4. Analysis of the tweets we get back
Ok, so we should be getting all the tweets coming in with the #catdetector hashtag on them! So the data we get for each tweet is as follows: https://developer.twitter.com/en/docs/tweets/data-dictionary/overview/tweet-object
So we need to analyse the tweets based on what we find in there:
in_reply_to_status_id (Int64) "in_reply_to_status_id":114749583439036416
So that will give us which cat image the tweet is replying to!
text (String) "text":" it was a cat and it was #Po #catdetector "
The actual UTF-8 text of the status update. So we can parse this string for hashtag specifying the cat that was in the image!
So we go ahead and link each tweet to a specific cat image, then parse the string of the tweet status update to see if it contained #LaLa or #Po
5. Storing the data
Now we can put the data into a relational database like SQLite. Well, we will be doing all this in realtime as we get the tweets from stream and analyse them.
import dataset
db = dataset.connect("sqlite:///cat_id.db")
So what's going into the database?
We want:
- a link to the cat image that was in the tweet that twitter user replied to (from in_reply_to_status_id)
- how the twitter user labelled our cat (parsed from text i.e. the status update)
----
Anyway, I am a long way from completing this bit! I got a lot of useful info from https://www.dataquest.io/blog/streaming-data-python/
-
Building a daytime cat-detector: part 1
10/28/2017 at 17:13 • 0 commentsHere's my first software/hardware build guide for the cat detector (as I promised a while back) to help develop and test the hardware and code required for the entire elephant detection system! First we do the daytime cat-detector, then we do a night-time cat-detector with the IR LED illumination and NoIR camera. Then we can connect them together, and add a light sensor to switch!
Here's the entire series of build instructions I'm going to post:
- -- Building a daytime cat-detector: part 1
- -- Building a daytime cat-detector: part 2 (lessons learned)
- -- Building a night-time cat-detector
- -- Building a day and night cat-detector with light-sensor switching
Ok, so first off, let's start building the daytime cat-detector!
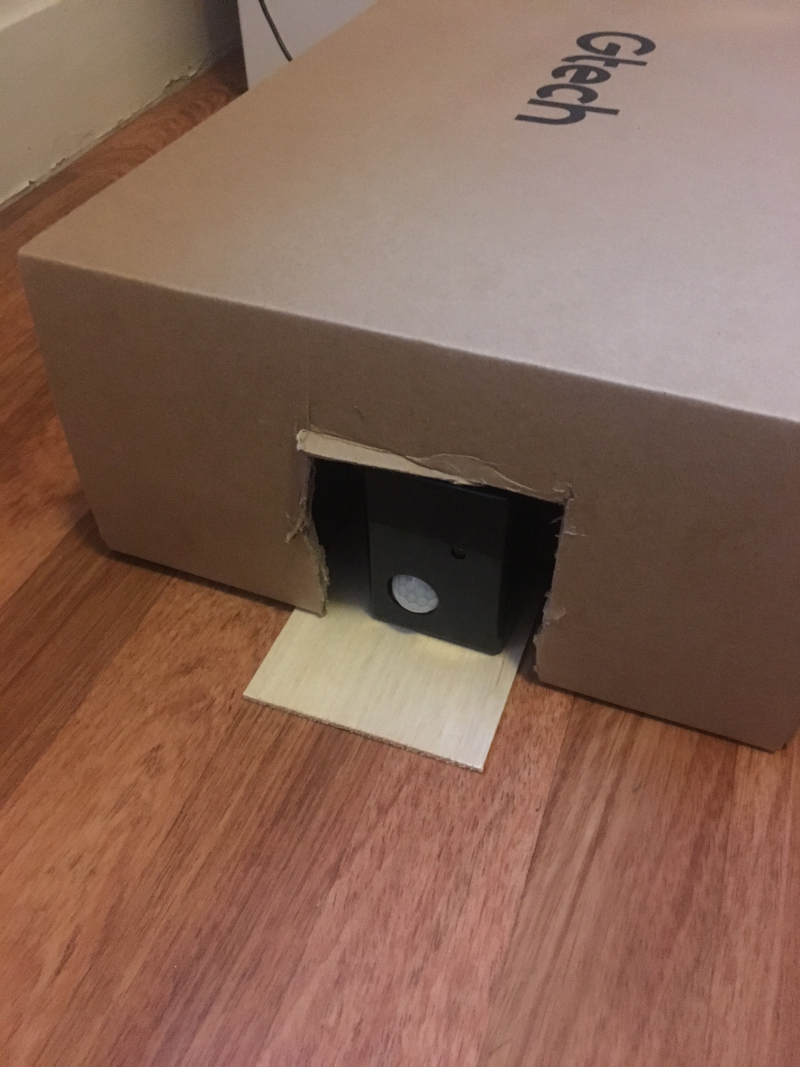
1. First of all let's build the hardware components! So we need the Pi Camera, and we need a PIR. Luckily we covered that earlier https://hackaday.io/project/20448-elephant-ai/log/67655-buildinstructions-for-hardware-pir-and-camera , so you should be familiar with setting those things up! Next, I put them in a small box with holes for PIR and camera. Then I covered it with a cardboard box so that cat's didn't knock it over. Although they still did!
![]()
2. Now, let's add our code we need! First we will add some code to test the PIR, and take photos when it detects something. We'll use this code for that:
import time
import picamera
import datetime
import RPi.GPIO as GPIO

def CheckPIR():
    # dependencies are RPi.GPIO and time
    # returns PIR_IS with either 0 or 1 depending if high or low
    time.sleep(1)
    #don't rush the PIR!
    GPIO.setmode(GPIO.BOARD)
    # set numbering system for GPIO PINs are BOARD
    GPIO.setup(7, GPIO.IN)
    # set up number 7 PIN for input from the PIR
    # need to adjust if you connected PIR to another GPIO PIN
    try:
        val = GPIO.input(7)
        if (val == True):
            PIR_IS = 1
            #PIR returned HIGH to GPIO PIN, so something here!
        if (val == False):
            PIR_IS = 0
            #PIR returned LOW to GPIO PIN, so something here!
            GPIO.cleanup()

    except:
        GPIO.cleanup()

    return PIR_IS


PIR = 1
count = 0


while True:
    PIR = 0
    #Now to check the PIR and send what it returns to PIR
    PIR = CheckPIR()
    if PIR == 0:
        print("Nothing has been detected by PIR")
    elif PIR == 1:
        print("Something has been seen! Time to photograph it!")
        i = 0
        with picamera.PiCamera() as camera:
            while i < 5:
                i = i+1
                print(i)
                camera.start_preview()
                time.sleep(1)
                utc_datetime = datetime.datetime.utcnow()
                utc_datetime.strftime("%Y-%m-%d-%H%MZ")
                #get date and time so we can append it to the image filename
                camera.capture('image_'+str(utc_datetime)+'.jpg')
                camera.stop_preview()
                time.sleep(1)
                if i == 5:
                    break
GitHub: https://github.com/nksheridan/elephantAI/blob/master/demo_Take_Photo_when_PIR_high.py
TENSORFLOW: So we went through installing TensorFlow already, and you should have it at this stage on your Pi. But if not, you can follow this guide https://github.com/samjabrahams/tensorflow-on-raspberry-pi to install the pre-built binaries.
Next, you should clone the TensorFlow repository: git clone https://github.com/tensorflow/tensorflow.git .. And then you should download the graph file for InceptionV3 https://storage.googleapis.com/download.tensorflow.org/models/inception_v3_2016_08_28_frozen.pb.tar.gz . This should be unzipped, and placed in the directory: ~/tensorflow/tensorflow/examples/label_image/ along with the labels file that was in the archive.
Subsequently, it would be good to try just using label_image.py (that should be in this directory), to label/classify an image. I did a video of this here https://hackaday.io/project/20448-elephant-ai/log/69744-video-demo-of-elephant-detection-using-a-raspberry-pi .. And next you could label an image acquired from the Pi Camera. I went through this here -> https://hackaday.io/project/20448-elephant-ai/log/69772-simple-demo-code-for-taking-a-photo-with-raspberry-pi-and-classifying-it-using-inceptionv3-graph
3. Now, before we disconnect our Pi and move it to the cat feeding station, to watch for cats, we may as well add our first cat detector code. That's going to take one image when PIR is triggered, and classify/label it using TensorFlow with the InceptionV3 model graph file and labels file, that you have in the ~/tensorflow/tensorflow/examples/label_image/ directory (see above section re TensorFlow).
So the cat detector code, is a bit different in that I've just printed the top result we get back and the label for it. So I've modified label_image.py like this:
 with tf.Session(graph=graph) as sess:
        results = sess.run(output_operation.outputs[0],{input_operation.outputs[0]: t})
        results = np.squeeze(results)

    top_k = results.argsort()[-5:][::-1]
    labels = load_labels(label_file)
    # we are just taking the top result and its label
    first = top_k[0]
    top_label = str(labels[first])
    top_result = str(results[first])
    print(top_label)
    print(top_result)
Then it's easy to work with the top_label and top_result variables. So later on we could do if top_label == cat then tweet image of cat with "This is an image of a: ", top_label" etc. You can go ahead and do second = top_k[1] too if you want top 2 results .. and so on ..
Anyway, so I put it all together like this. I used some of the functions from the TensorFlow team code label_image.py. Note that their code is licensed under http://www.apache.org/licenses/LICENSE-2.0
Here we go. Here's the daytime cat detector code to put on your Pi. Again, it should be put in the ~/tensorflow/tensorflow/examples/label_image/ directory so we can access the dependencies easily.
# Parts of this code have the following license, since they are written
# by TensorFlow authors. Explicitly, load_graph, read_tensor_from_image_file, load_labels
# which I have taken from label_image.py
#
# Copyright 2017 The TensorFlow Authors. All Rights Reserved.
#
# Licensed under the Apache License, Version 2.0 (the "License");
# you may not use this file except in compliance with the License.
# You may obtain a copy of the License at
#
#     http://www.apache.org/licenses/LICENSE-2.0
#
# Unless required by applicable law or agreed to in writing, software
# distributed under the License is distributed on an "AS IS" BASIS,
# WITHOUT WARRANTIES OR CONDITIONS OF ANY KIND, either express or implied.
# See the License for the specific language governing permissions and
# limitations under the License.
# ==============================================================================

from __future__ import absolute_import
from __future__ import division
from __future__ import print_function

import argparse
import sys
import time
import picamera
import RPi.GPIO as GPIO

import numpy as np
import tensorflow as tf

def CheckPIR():
    # dependencies are RPi.GPIO and time
    # returns PIR_IS with either 0 or 1 depending if high or low
    time.sleep(1)
    #don't rush the PIR!
    GPIO.setmode(GPIO.BOARD)
    # set numbering system for GPIO PINs are BOARD
    GPIO.setup(7, GPIO.IN)
    # set up number 7 PIN for input from the PIR
    # need to adjust if you connected PIR to another GPIO PIN
    try:
        val = GPIO.input(7)
        if (val == True):
            PIR_IS = 1
            #PIR returned HIGH to GPIO PIN, so something here!
        if (val == False):
            PIR_IS = 0
            #PIR returned LOW to GPIO PIN, so something here!
            GPIO.cleanup()

    except:
        GPIO.cleanup()

    return PIR_IS


def load_graph(model_file):
  graph = tf.Graph()
  graph_def = tf.GraphDef()

  with open(model_file, "rb") as f:
    graph_def.ParseFromString(f.read())
  with graph.as_default():
    tf.import_graph_def(graph_def)

  return graph

def read_tensor_from_image_file(file_name, input_height=299, input_width=299,
                input_mean=0, input_std=255):
  input_name = "file_reader"
  output_name = "normalized"
  file_reader = tf.read_file(file_name, input_name)
  if file_name.endswith(".png"):
    image_reader = tf.image.decode_png(file_reader, channels = 3,
                                       name='png_reader')
  elif file_name.endswith(".gif"):
    image_reader = tf.squeeze(tf.image.decode_gif(file_reader,
                                                  name='gif_reader'))
  elif file_name.endswith(".bmp"):
    image_reader = tf.image.decode_bmp(file_reader, name='bmp_reader')
  else:
    image_reader = tf.image.decode_jpeg(file_reader, channels = 3,
                                        name='jpeg_reader')
  float_caster = tf.cast(image_reader, tf.float32)
  dims_expander = tf.expand_dims(float_caster, 0);
  resized = tf.image.resize_bilinear(dims_expander, [input_height, input_width])
  normalized = tf.divide(tf.subtract(resized, [input_mean]), [input_std])
  sess = tf.Session()
  result = sess.run(normalized)

  return result

def load_labels(label_file):
  label = []
  proto_as_ascii_lines = tf.gfile.GFile(label_file).readlines()
  for l in proto_as_ascii_lines:
    label.append(l.rstrip())
  return label

if __name__ == "__main__":

    #here we will check PIR first
    while True:
        PIR = CheckPIR()
        if PIR == 0:
            print("Nothing detected by PIR")
        elif PIR == 1:
            print("Something has been detected")
            camera = picamera.PiCamera()
            print("Capture an image")
            camera.start_preview()
            time.sleep(1)
            # ok capture image to image1.jpg
            camera.capture('image1.jpg')
            camera.stop_preview()
            time.sleep(1)
            break
    file_name = "image1.jpg"
    # set the image for classification to image1.jpg as we just captured from pi camera!
    model_file = "inception_v3_2016_08_28_frozen.pb"
    label_file = "labels_incep.txt"
    input_height = 299
    input_width = 299
    input_mean = 0
    input_std = 255
    input_layer = "input"
    output_layer = "InceptionV3/Predictions/Reshape_1"
    graph = load_graph(model_file)
    t = read_tensor_from_image_file(file_name,
                                  input_height=input_height,
                                  input_width=input_width,
                                  input_mean=input_mean,
                                  input_std=input_std)
    input_name = "import/" + input_layer
    output_name = "import/" + output_layer
    input_operation = graph.get_operation_by_name(input_name);
    output_operation = graph.get_operation_by_name(output_name);

    with tf.Session(graph=graph) as sess:
        results = sess.run(output_operation.outputs[0],{input_operation.outputs[0]: t})
        results = np.squeeze(results)

    top_k = results.argsort()[-5:][::-1]
    labels = load_labels(label_file)
    # we are just taking the top result and its label
    first = top_k[0]
    top_label = str(labels[first])
    top_result = str(results[first])
    print(top_label)
    print(top_result)
GitHub: https://github.com/nksheridan/elephantAI/blob/master/take_image_on_PIR_and_classify.py
[to do: work on read_tensor_from_image_file and remove code not required]
4. Great, so let's move the hardware to the cat feeding station! I've set the Pi to boot to command line, since we will now be accessing it via SSH. Power up the Pi, and then go to another computer, and SSH to it. Remember, you needed to activate SSH using sudo raspi-config. Oops if you didn't!
You can just do
ssh pi@<IP>in linux. Or in windows, you can use https://mremoteng.org/ which I like, and is open-source.
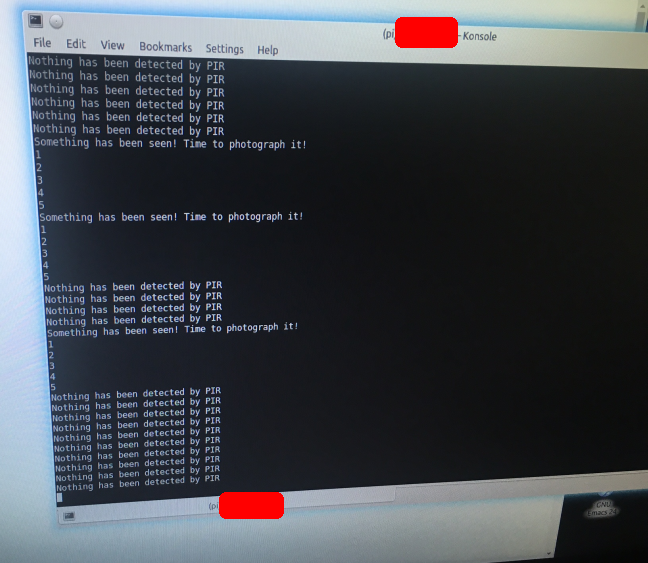
5. So you should have accessed your Pi now via SSH! First let's run the
demo_Take_Photo_when_PIR_high.py code and hopefully the cats will come and eat! Yes, here it is running, and they did come to eat!
![]()
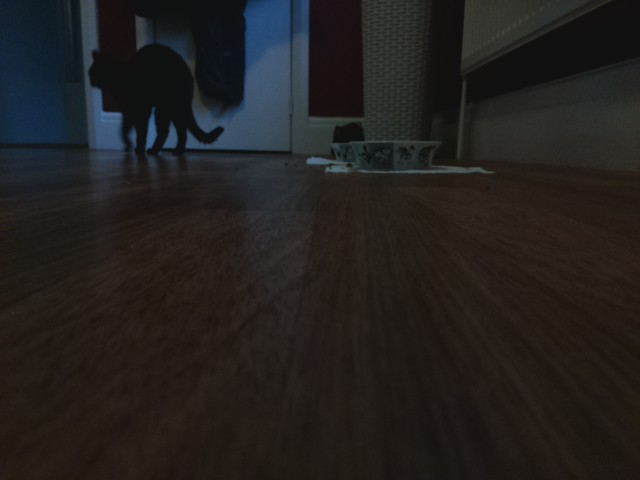
Here they are! Well, that's Po anyway.
![]()
![]()
It's a bit dark, because I did it in the evening! Remember, you can SCP the images from the Pi to you computer you're SSHing the Pi with:
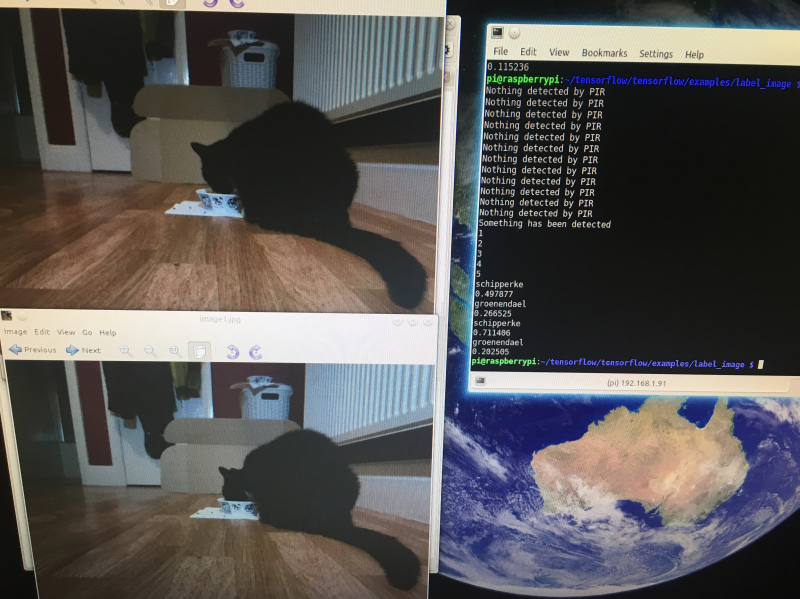
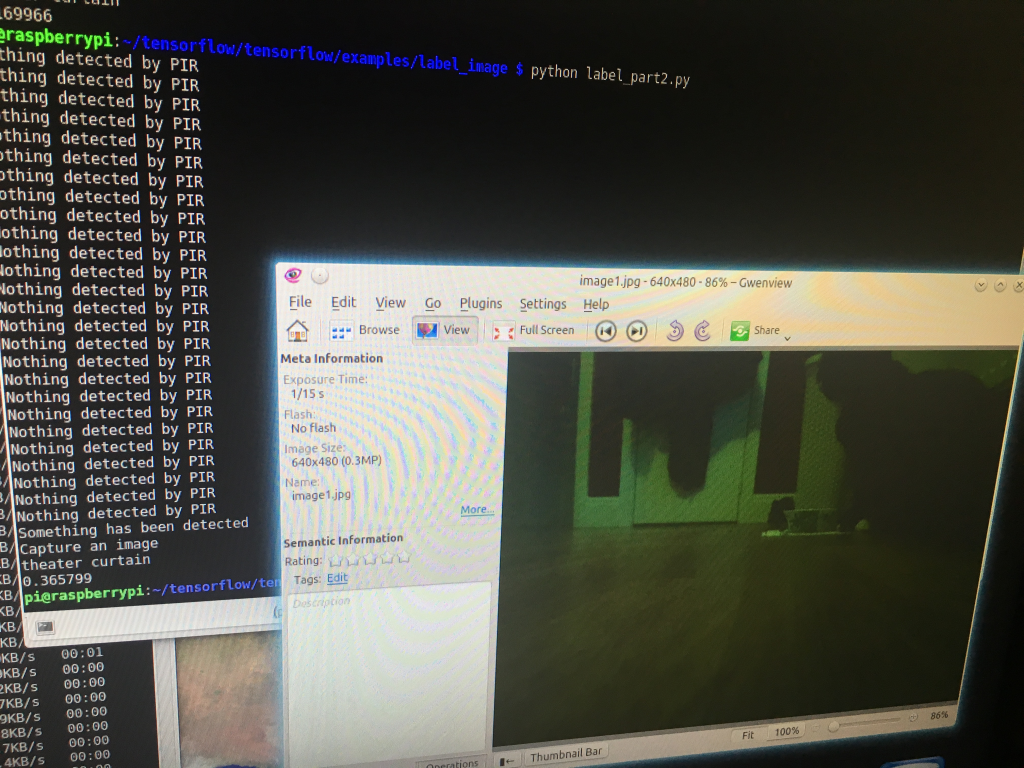
scp pi@192.168.1.3:image1.jpg *6. Great! So we know the PIR and camera are working! Let's now run our cat detector code! So we navigate to the ~/tensorflow/tensorflow/examples/label_image/ directory on the Pi, and we run take_image_on_PIR_and_classify.py code! Hope some cats will arrive to feed again. Here's what we got back:
![]()
So urgh! That's not very good! It labelled LaLa as a theater curtain (0.365799)!! Actually it did this several times. If you observe the background, it does look a bit like a curtain! Because of the things hanging off door.
7. Let's move forward by trying again in better lighting conditions, and controlling the background. We can control the background for cats by placing a piece of cardboard as the background. And we'll take several images, instead of just one, next time!
-
Simple demo code for taking a photo with Raspberry Pi and classifying it using InceptionV3 graph
10/28/2017 at 12:16 • 0 commentsHere we can take an image with the Pi camera, and send it to label_image.py. We went over using label_image.py in this log https://hackaday.io/project/20448-elephant-ai/log/69744-video-demo-of-elephant-detection-using-a-raspberry-pi . This will classify the image using InceptionV3 model graph and labels files. You can download a graph file for InceptionV3 here -> https://storage.googleapis.com/download.tensorflow.org/models/inception_v3_2016_08_28_frozen.pb.tar.gz
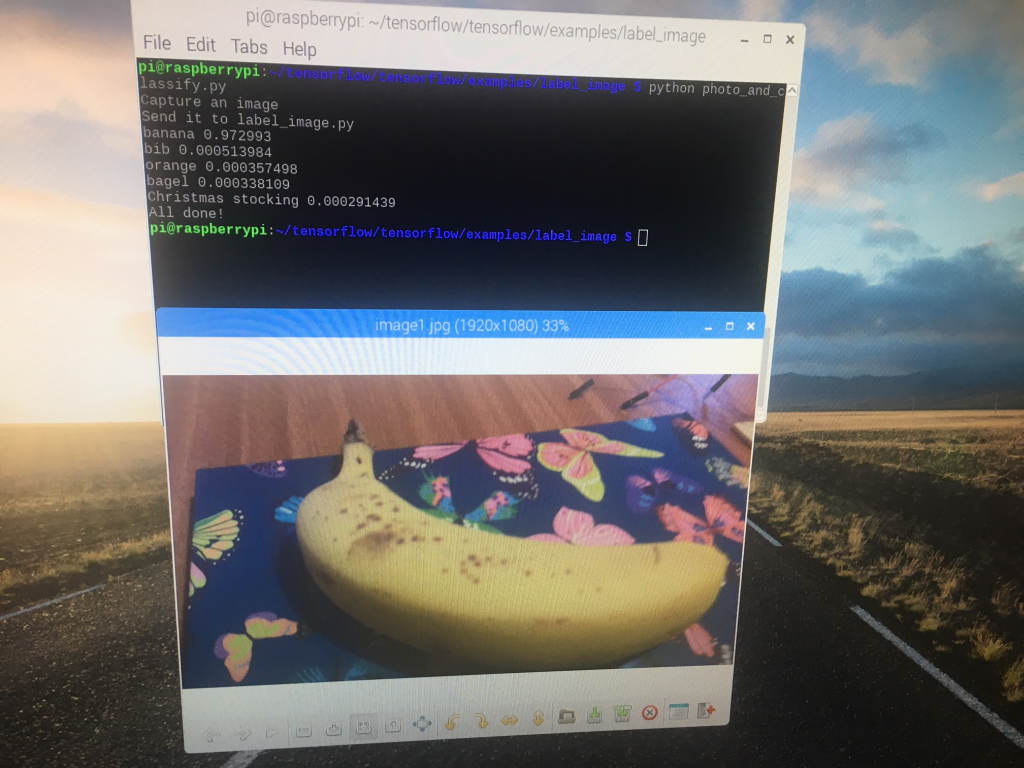
import time
import picamera
import os

camera = picamera.PiCamera()


print("Capture an image")
camera.start_preview()
time.sleep(1)
camera.capture('image1.jpg')
camera.stop_preview()
time.sleep(1)
print("Send it to label_image.py")
os.system('python label_image.py --image=image1.jpg --graph=inception_v3_2016_08_28_frozen.pb --labels=labels_incep.txt')
print("All done!")
Here I ran it whilst pointing the Pi camera at a a banana! And yes, as you can see, it was classified as a banana!
![]()
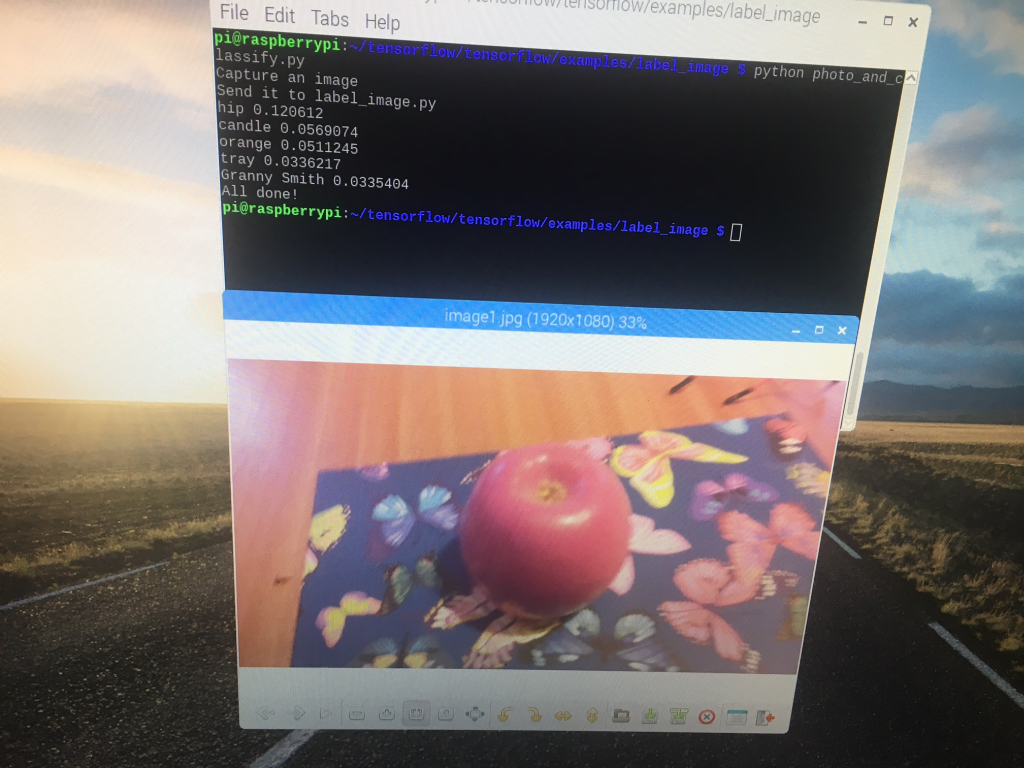
Our apple, however, resulted in some confusion!
![]()
-
Things to do remaining
10/27/2017 at 20:12 • 0 comments- Fix build of TensorFlow on raspberry pi. It seems like permissions issue re NSYNC? So should be easy to fix. [this is a real mess tbh]
- Write a guide for using pip to install pre-built TensorFlow binaries. Some of probs with this can be addressed by building protobuf on the pi. From what I recall it was NSYNC again for most of issues?
- Modify label_image.py to return variables we want and remove argparse etc. I.e. just write it again [completed]
- Code for detection devices needs to classify image using InceptionV3 graph first, then if we got >.70 elephant, go to use the graph from InceptionV3 retrained to classify specific class (e.g. lone, herd)
- Finish up with mounting in boxes [these waterproof boxes are proving difficult. I'm not very good at 3d printing
- Test as a wildlife detection camera trap. Upload everything we get on PIR==HIGH to twitter with labels and results. So should place it in woods []
- Test with horses [yes we can do this now, but we need waterproof boxes!]
- Test with cat-detector https://hackaday.io/project/20448-elephant-ai/log/69784-building-a-daytime-cat-detector-part-1 -- we are using this to test our supervised learning via twitter idea! [it's really bad for cats off-shelf w InceptionV3 so I am freezing this]
- Test with elephant images taken from Pi camera
- Go ahead with https://hackaday.io/project/20448-elephant-ai/log/68940-future-directions-and-improvements-to-elephantai so we need to a proof of concept with something local like birds in the garden for the supervised learning via twitter and virtual private machine. [underway]
- Try RF comms: give a detection device RF comms, and add a Pi with 2/3G + RF comm rx as base station. Try a repeater station too. So that would get RF comms from detection device and send it another few km to the base station! [ok, I am working on this per https://hackaday.io/project/20448-elephant-ai/log/70068-rf-network ]
- Make a Raspberry Pi HAT for the detection devices. So we don't want breadboards and jumper wires all over the place! So I'm going to try and make a HAT instead. This should be fun!
Well, I will update as I complete these!
-
Video demo of elephant detection using a Raspberry Pi
10/27/2017 at 19:38 • 0 commentsHi, so this Pi has TensorFlow and protobuf built and installed. First I will show it using label_image.py from https://github.com/tensorflow/tensorflow/tree/master/tensorflow/examples/label_image to classify a panda. Yes, I know. In this case, we use a graph file from InceptionV3 off-shelf.
Next, I will use the label_image.py code from https://github.com/tensorflow/tensorflow/blob/master/tensorflow/examples/image_retraining/label_image.py and I'll pass the my graph file from retraining InceptionV3 to this, along with the labels file. See here for the retraining instructions: https://hackaday.io/project/20448-elephant-ai/log/68436-software-elephant-detector-transfer-learning-off-shelf-model-with-tensorflow
My retraining on InceptionV3 was to add two new classes: herd elephants, and lone elephants. So we can see what kind of results we get for classification of images containing herds of elephants, and lone elephants!
It takes around 10-15 seconds for the Raspberry Pi to classify the images. That's with 16MB to GPU, and running a GUI. It should be faster if you don't use a GUI. I'll try and get some comparisons later.
Here's the video!
I've uploaded the graph file here <add it>
And the labels.txt here <add it>
So you can try! However, this is just from a test retraining run, and I only used 50-100 images per class.
-
Guide to installing TensorFlow on Raspberry Pi
10/21/2017 at 18:46 • 0 comments[ u n d e r c o n s t r u c t i on ]
This causes a lot of problems, evidenced if you search for issues related to it on the web! And it caused me a lot of problems certainly! So I'm writing this guide to illustrate approaches and things that can go wrong + fixing them.
Please check you have Raspian "Jessie" as the OS on the Pi first! And that you don't have a small or nearly full SD card.
I'm going to add screen-recordings of the installations to help!
USING MAKEFILE TO BUILD TENSORFLOW
This is from the install guide here: https://github.com/tensorflow/tensorflow/tree/master/tensorflow/contrib/makefile
This is an alternative to using bazel to build TensorFlow. You compile the TensorFlow and Protobuf libraries. Here's what protobuf is if you hadn't heard of it: https://github.com/google/protobuf
1. Clone the TensorFlow repository to the Pi. git clone https://github.com/tensorflow/tensorflow.git
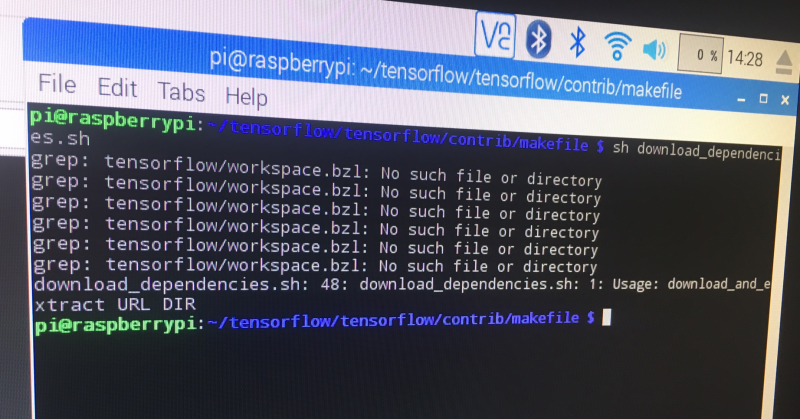
2. Run the download_dependencies.sh script that TensorFlow team have written. You can see it here https://github.com/tensorflow/tensorflow/blob/master/tensorflow/contrib/makefile/download_dependencies.sh and you'll have it on your Pi at tensorflow/contrib/makefile/download_dependencies.sh . This will download all the required dependencies. This is one of the ways I got in a mess because I tried to get them all individually, and got in a muddle.
(e r r o r) So this was the point of the first error! Here is it below! tensorflow/workspace.bzl didn't exist! And if you look at the download_dependencies.sh script, you'll see it wants to use that directory! Ah well this was because the TensorFlow repository has been written to tensorflow/tensorflow instead
of just tensorflow!
![]()
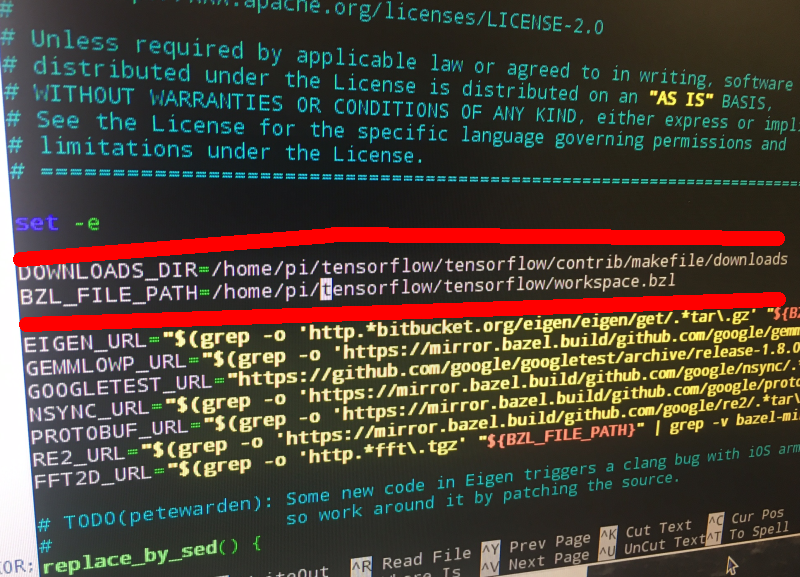
So to fix this error, we have to edit download_dependenices.sh! Let's go and do it with the sudo nano command. It's in the directory tensorflow/tensorflow/contrib/makefile/ . So we change the lines
DONWLOAD_DIR= and BZL_FILES_PATH= to the correct directories. See below image, I have changed them to
/home/pi/tensorflow/tensorflow/ . Now we can run the download dependencies script without an error!
![]()
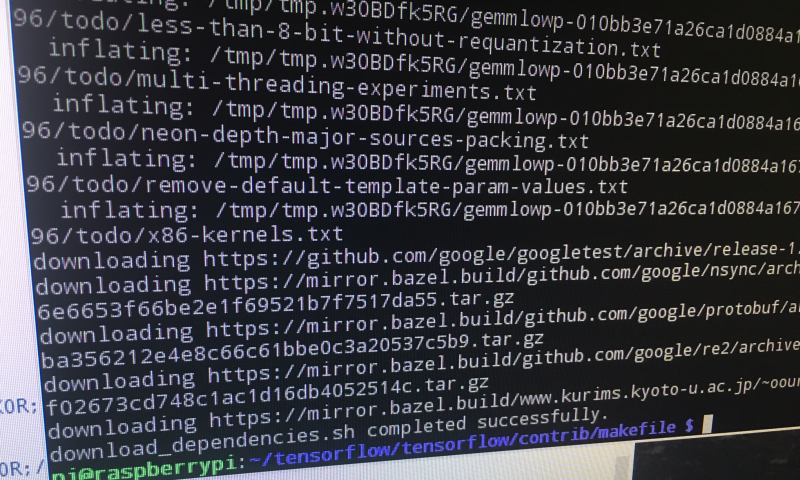
Here's what you should see when you run the script!
![]()
![]()
Great! So that bit is done!
3. Download the example graph for testing . Here it is: https://storage.googleapis.com/download.tensorflow.org/models/inception5h.zip
4. Now with
sudo apt-get install -y autoconf automake libtool gcc-4.8 g++-4.8we will get our packages for installation. So the packages are:
autoconf https://www.gnu.org/software/autoconf/autoconf.html for auto configuration
automake https://www.gnu.org/software/automake/ to auto generate makefile.in
libtool https://www.gnu.org/software/libtool/ support for working with shared libraries
gcc-4.8 gcc 4.8 compiler https://gcc.gnu.org/onlinedocs/4.8.1/ this is used instead
** note that gcc 4.8 is used instead of gcc 4.9 which is installed on the Pi OS, because 4.9 is known to encounter an error involving __atomic_compare_exchange.
g++ 4.8 compiler
I didn't have any problems with that bit! But it did take quite a while i.e. 30 mins+
5. Building protobuf:
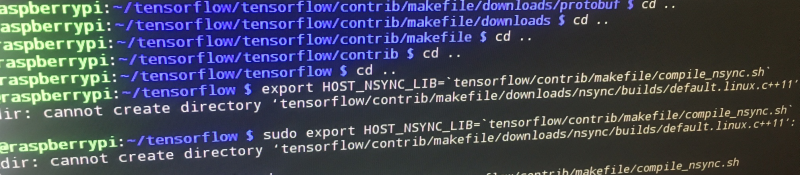
cd tensorflow/contrib/makefile/downloads/protobuf/
./autogen.sh
./configure
make
sudo make install
sudo ldconfig  # refresh shared library cache
cd ../../../../.. (so back to tensorflow directory)
export HOST_NSYNC_LIB=`tensorflow/contrib/makefile/compile_nsync.sh`
export TARGET_NSYNC_LIB="$HOST_NSYNC_LIB"
(e r r o r) Now we encountered the second error! This occurs when you attempt the first export command! Permission was denied to mkdir! Specifically "cannot create directory tensorflow/contrib/makefile/downloads/nsync/builds/default.linux.c++11 Permission Denied"
![]()
So that's because of the permissions. I went ahead and used chmod so change them!
![]()
You can see above I used sudo chmod -R 777 tensorflow to set permission for all subdirectories and files to 777. So that's as loose as it gets for permissions! You can calculate the permission numbers with this tool: https://chmod-calculator.com/ Anyway, as you can see, that worked out fine. You can change them back to something more secure afterwards.
6. Now compile the TensorFlow library using Makefile:
make -f tensorflow/contrib/makefile/Makefile HOST_OS=PI TARGET=PI \
 OPTFLAGS="-Os -mfpu=neon-vfpv4 -funsafe-math-optimizations -ftree-vectorize" CXX=g++-4.8
Ok, so this takes a long time! The first time I did it, it actually crashed the Raspberry Pi. Maybe because I'd allocated extra memory to the GPU for a camera project?
Here's a Tensorflow GitHub issue regarding the crashing when compiling training_ops:
https://github.com/tensorflow/tensorflow/issues/13176
You can see what MakeFile does here: https://github.com/tensorflow/tensorflow/blob/master/tensorflow/contrib/makefile/Makefile
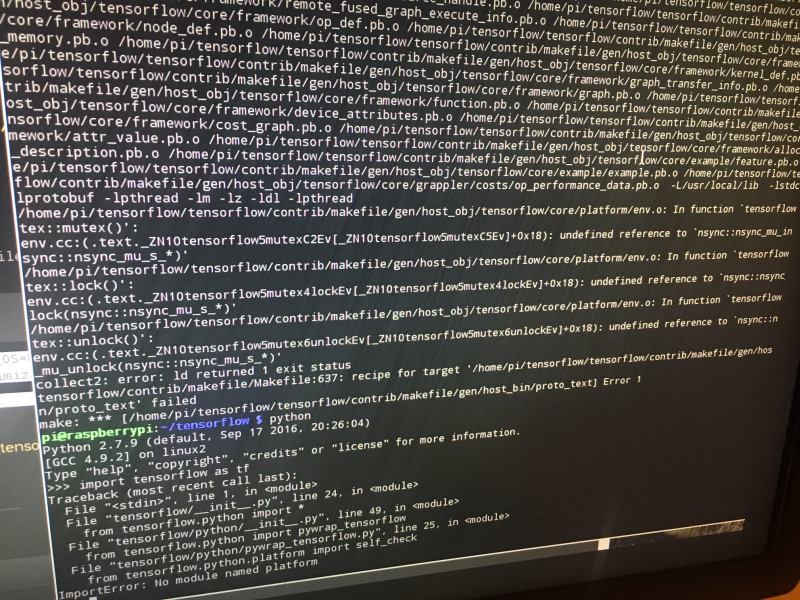
7. Testing your build!
You can go ahead and run python then try importing TensorFlow with "import tensorflow as tf" or as anything you'd like to be a bit different!
Here's a screengrab of me trying this after a failed build. This failed because of the error with "export HOST_NSYNC_LIB=`tensorflow/contrib/makefile/compile_nsync.sh`" mentioned above.
![]()
Testing according to TensorFlow GitHub guide
Ok, so on the makefile section of the TensorFlow GitHub they have this testing method for Raspberry Pi:
curl https://storage.googleapis.com/download.tensorflow.org/models/inception_dec_2015_stripped.zip \
-o /tmp/inception_dec_2015_stripped.zipSo that's use curl to download the Inception model, and write it to local file -o /tmp/inception_dec_2015_stripped.zip
Then it is:
unzip /tmp/inception_dec_2015_stripped.zip \
to unzip the file, and then it is:
-d tensorflow/contrib/pi_examples/label_image/data/
to post the extracted data from that zip to the above directory (tensorflow/contrib/pi_examples/label_image/data
Then they have:
make -f tensorflow/contrib/pi_examples/label_image/Makefile
And afterward, you can use tensorflow/contrib/pi_examples/label_image/gen/bin/label_image with the grace hopper image you got in that zip. The reason you use Makefile is because the https://github.com/tensorflow/tensorflow/blob/master/tensorflow/contrib/pi_examples/label_image/label_image.cc is written in C++ so it needs compiling with gcc! Since we are using Makefile we use that to compile it. Usually it is done using bazel e.g. https://github.com/tensorflow/tensorflow/tree/master/tensorflow/examples/label_image
It's all detailed in their guide here: https://github.com/tensorflow/tensorflow/tree/master/tensorflow/contrib/pi_examples
Testing with Python
Ok, so there is a label_image.py too! Here it is: https://github.com/tensorflow/tensorflow/blob/master/tensorflow/examples/label_image/label_image.py with argparse
You will need to pass it the following arguments
1. --image to label
2. --graph (e.g. tensorflow/examples/label_image/data/inception_v3_2016_08_28_frozen.pb)
3. --labels (e.g. tensorflow/examples/label_image/data/imagenet_slim_labels.txt)
===========
Additional instructions to prevent screen blanking:
https://www.raspberrypi.org/forums/viewtopic.php?f=91&t=57552
You can free resources by disabling the GUI on Raspberry Pi:
Use sudo raspi-config and select boot options. Set boot option to console text console
You can also run the Pi headless to free resources:
Find you Pi's IP. Then use SSH from another computer with
ssh pi@<IP>Pi is the username, and you'll need to enter your password. The default is raspberry. But it would be best to change this if you are exposed to internet!
-
#buildinstructions: light-sensor
10/20/2017 at 20:33 • 0 commentsLet's get started with adding a light-sensor, so we can tell if it is daytime or night-time! We need a light-sensor with a digital output. Or we can build a circuit using a photo-resistor and a transistor instead!
PARTS REQUIRED
digital light sensor. Have used "kwmobile light sensor with digital output, photodetector, brightness sensor, light sensor for Arduino, Genuino and Raspberry Pi " which was £5.40
jumper wires (you can test with female to female, but will need female to male when we share the light sensor between dayPi and nightPi)
1.
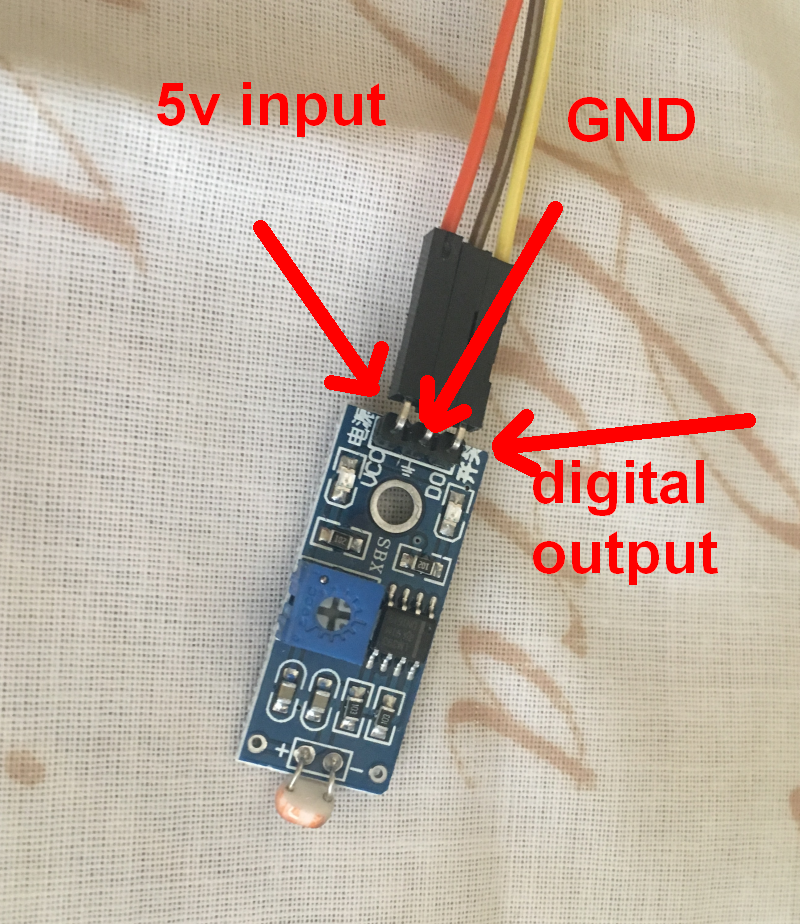
Connect the jumper wires to the light-sensor:
![]()
2. Now we connect the jumper wires to the raspberry pi:
Connect digital output (DO/yellow) to GPIO PIN 7 [board numbering system]
Connect GND to GND
Connect 5v input to a 5v output PIN on Pi
3. Now that's all done! We can go ahead and test it using the following code:
import RPi.GPIO as GPIO
import time
GPIO.setmode(GPIO.BOARD)
GPIO.setup(7, GPIO.IN)
try:
    while True:
           val = GPIO.input(7)
           if (val == True):
                print("IT IS DARK CONDITION")
           else:
                print("IT IS LIGHT CONDITION")
           time.sleep(3)
           GPIO.cleanup()
except KeyboardInterrupt:
     GPIO.cleanup()
Here it is in action! You can see it has it's own LED that turns on/off depending on light condition.
4. Ok, we are all set for using the light-sensor now! I'll add the homemade circuit later!
-
#buildinstructions: allowing dayPi and nightPi to share PIR and light-sensor
10/20/2017 at 19:26 • 0 commentsHere we show how to allow the dayPi and nightPi to share the PIR and light-sensor!
PARTS REQUIRED:
- half-length breadboard
- PIR
- light-sensor with digital output
- numerous jumper cables!
- dayPi
- nightPi
- * I used the Adafruit cobbler for testing
Let's get started!
1. Let's do the light-sensor first. This has a 5v input, a GND, and digital output (giving HIGH or LOW depending on lighting conditions). We need to connect all of these to independent terminal strips on the breadboard. So for example:
5v goes to terminal strip 1. So we connect a jumper wire from this terminal strip to the 5v output on nightPi
GND goes to terminal strip 2. So we connect two other jumper wires to this terminal strip. One will go to GND on nightPi and one will go to GND on dayPi
Digital output goes to terminal strip 3. So we connect two other jumper wires to this terminal strip. One will go to GPIO 11 on nightPi, and one will go to GPIO 11 on dayPi. [note this is BOARD numbering for the GPIOs]
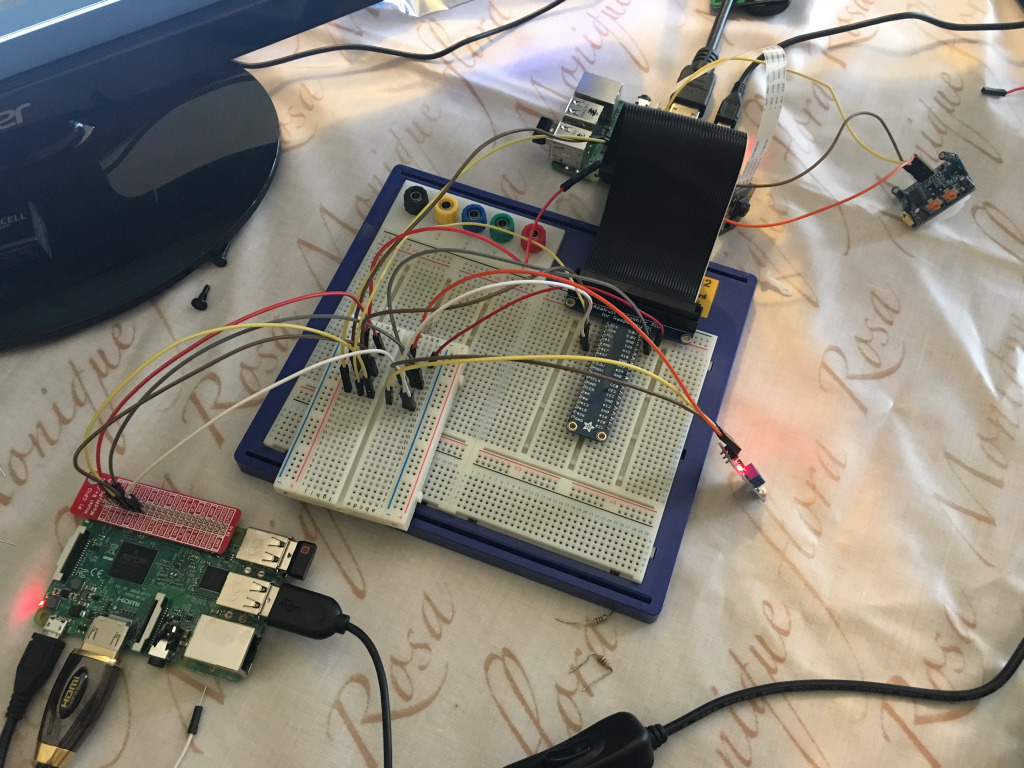
Let's see what this looks like with a photo! This includes the wiring for the PIR, which is the same kind of thing but to GPIO 7 on each Pi for the digital output!
![]()
2. Now let's to it for the PIR. In the photo you can see the light-sensor is wired to the terminal strips on right of divider, and the PIR is wired to terminal strips on the left of the divider (the middle groove of the breadboard).
5v goes to terminal strip 1. So we connect a jumper wire from this terminal strip to the 5v output on dayPi
GND goes to terminal strip 2. So we connect two other jumper wires to this terminal strip. One will go to GND on nightPi and one will go to GND on dayPi
Digital output goes to terminal strip 3. So we connect two other jumper wires to this terminal strip. One will go to GPIO 7 on nightPi, and one will go to GPIO 7 on dayPi. [note this is BOARD numbering for the GPIOs]
If you zoom into the photo, you should be able to follow the paths of the wires!
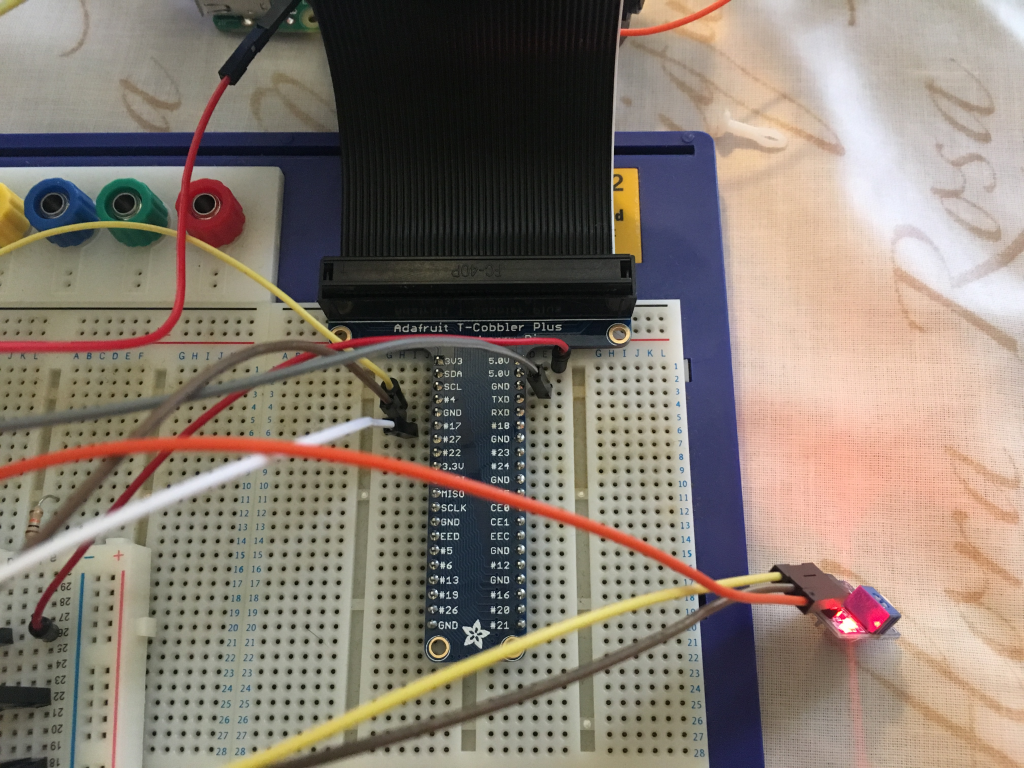
Here's a close-up of the breadboard. You can see how 5v input to the light-sensor and PIR is sent to the first terminal strip, and then it meets the 5v output from the Pi there. Thus we supply power to the light-sensor and PIR. And GND from the light-sensor and PIR goes to the next terminal strip, and from there is sent to GND on both dayPi and nightPi. And digital outputs from light-sensor and PIR go to the next terminal strip down, and they meet wires which take them to the GPIO PINs on dayPi and nightPi.
![]()
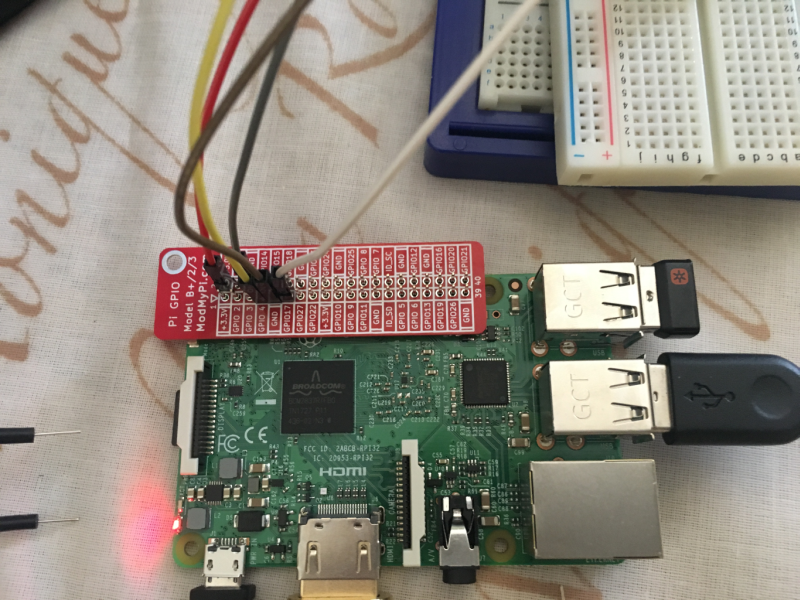
And in the below photos you can see the wires connecting with the dayPi and nightPi:
![]()
![]()
3. Great! We are all ready to share the PIR and light-sensor now!
Elephant AI
a system to prevent human-elephant conflict by detecting elephants using machine vision, and warning humans and/or repelling elephants