 Profe Tolocka
Introduction
This project is an example of how to apply the concepts we covered in the previous parts of this tutorial. You can check them at the following links:
To build a clock that shows both the time and date, you need a Real Time Clock (RTC)—that’s the hardware in charge of keeping track of seconds, minutes, hours, days, months, and even leap years.
RTCs can come as external modules or be built right into your microcontroller. For example, the ESP32 features an internal RTC that keeps running even when the CPU is in deep sleep mode.

Some Common RTC Modules
No matter if it’s built-in or an external chip, all RTCs have one thing in common: they need a backup power source—usually a small coin cell battery—to keep counting time when the main system power is off. And of course, you’ll need a way to set the correct time.
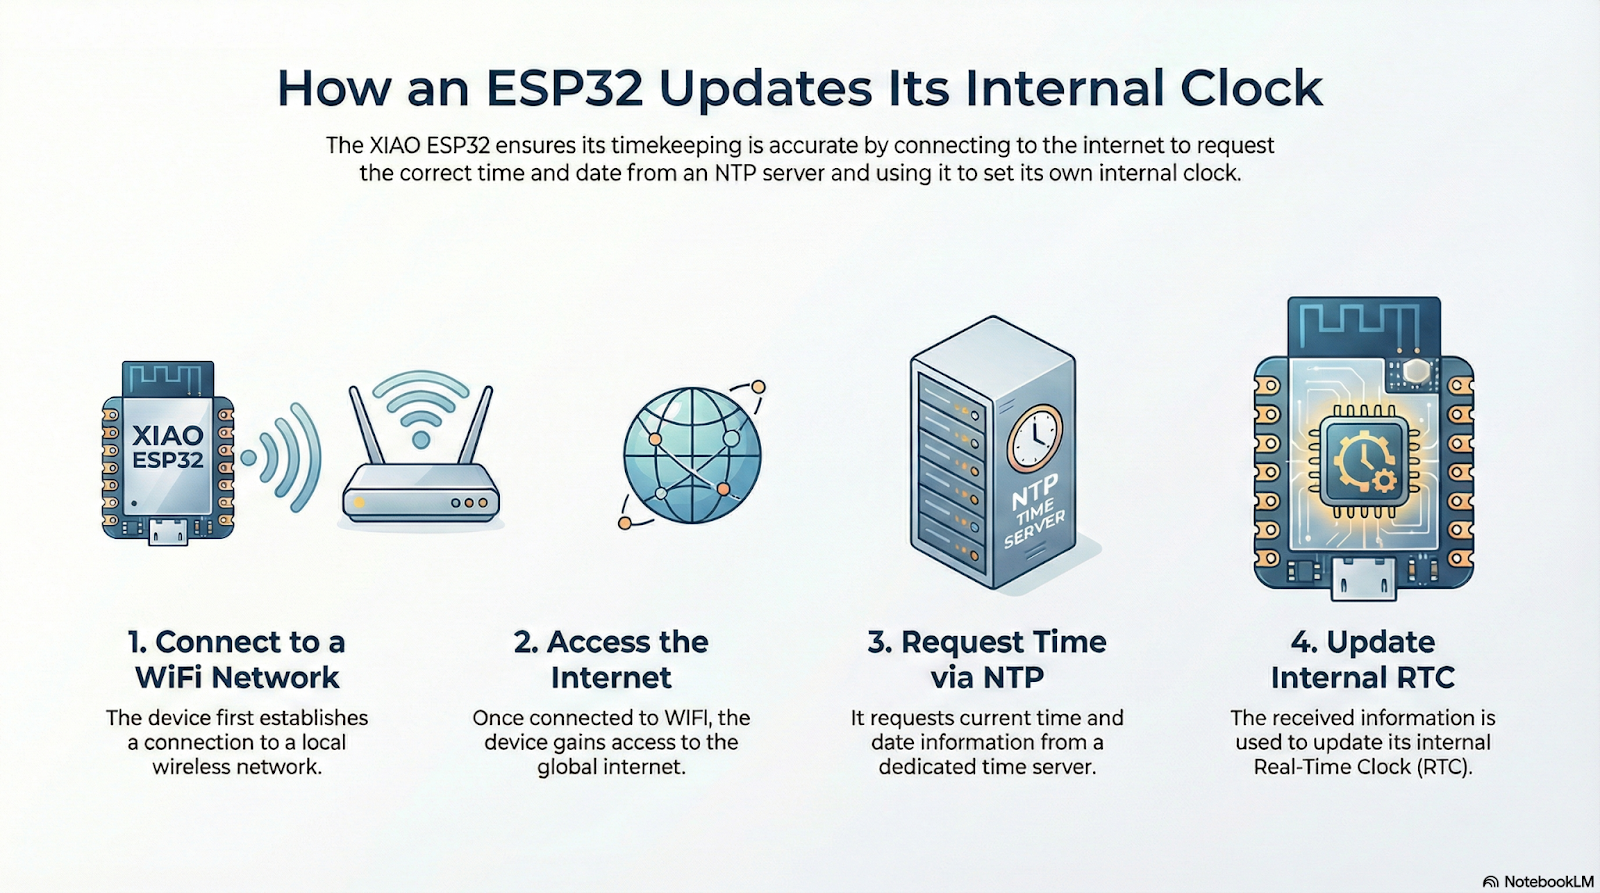
But for this project, let’s take a different approach. Instead of relying on a backup battery to keep the clock running, we’ll use an Internet connection to sync with an NTP server.
That way, even if the device loses track of time when it’s powered off, every time it turns on it will automatically fetch the correct date and time, update the ESP32’s internal RTC, and display the information on the EPD screen.

NTP
What makes it possible for a device like the ESP32 to get the exact current date and time is the Network Time Protocol (NTP).
NTP is a communication protocol that lets you access NTP servers—machines distributed all around the world that can provide the exact time with millisecond precision.
To get the time from an NTP server, the ESP32 first needs to connect to the Internet, typically over Wi-Fi.
Once it’s online, the ESP32 communicates with the server using the NTP protocol, which defines how to exchange date and time information accurately and reliably.
After receiving the data, the ESP32 updates its internal RTC, so it can keep track of time locally without needing to reconnect to the server each time.
NTP servers use what’s called UTC (Coordinated Universal Time), which is the worldwide reference for timekeeping. However, each country—and even different regions within a country—can have their own local time. That’s because the world is divided into multiple time zones, each defined as an offset from UTC.
For example, in my country we use the UTC-3 time zone, which means our local time is three hours behind UTC. So if it’s 11:00 AM UTC, it’s 8:00 AM here.
You can check out the different time zones on this page: https://www.timeanddate.com/time/map/
Syncing the Clock
Now that you know what an NTP server is and why it’s useful, let’s take a closer look at how to access one and sync the ESP32’s internal RTC.
WiFi Connection
First, we need to connect the ESP32 to a Wi-Fi network. For this, you’ll use a few functions from the WiFi library, plus your network credentials (the SSID and password).
Here’s a sample code snippet for connecting:
#include <WiFi.h> // Functions for WiFi connection

// Wi-Fi network configuration
const char* ssid = "yourSSID"; // Use your network name
const char* password = "yourPassword"; // Use your password

void setup() {

  Serial.begin(115200);

  // Attempt to connect to WiFi
  Serial.println("Connecting to WiFi...");
  WiFi.begin(ssid, password);

  // Wait until connected
  while (WiFi.status() != WL_CONNECTED) {
    delay(500);
    Serial.print(".");
  }

  // Successful connection
  Serial.println("");
  Serial.print("Connected to: ");
  Serial.println(WiFi.SSID());
}
In this example, WiFi.begin starts the connection process using your credentials.
This runs in the background and tries to connect. To check if it was successful, use WiFi.status(). If it returns WL_CONNECTED, you’re in! (For a more robust implementation, you should add a timeout in case it can’t connect after a while)
When the...
Read more »
 Roni Bandini
 Darian Johnson
 David Truong