Moritz Walter
-
Hoverlay @ C31C3
12/20/2014 at 17:29 • 0 commentsThe Hoverlay will be part of the Chaos Communication Congress 2014 (C31C3) from December 27th to 30th, 2014 at the CCH Congress Center Hamburg, Germany, Earth, Milky Way. So if you're in Germany, Hamburg these days, come by for a visit. We'll be glad to see you! And to everybody who cannot come: Merry Christmas and Happy new year!!
Also, besides that there'll be many other cool projects and an assembly by the Attraktor Makerspace. Don't miss it :)
-
THP Semifinals Video Released
09/27/2014 at 00:03 • 0 commentsFind out more about the internals and future of the Hoverlay in the THP semifinals video:
-
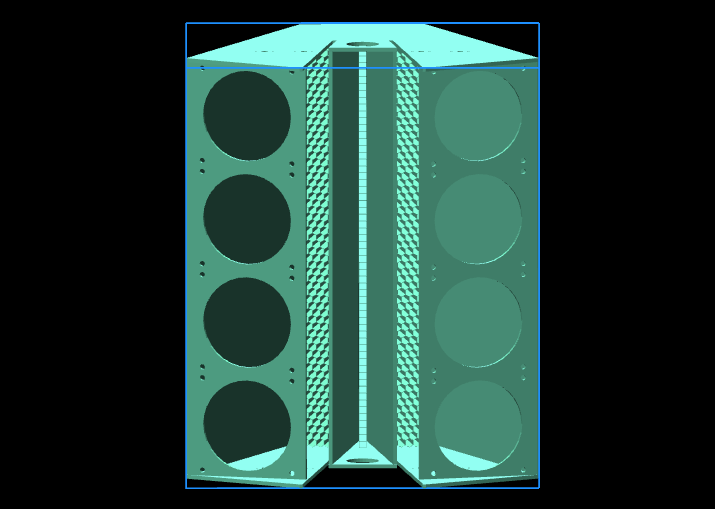
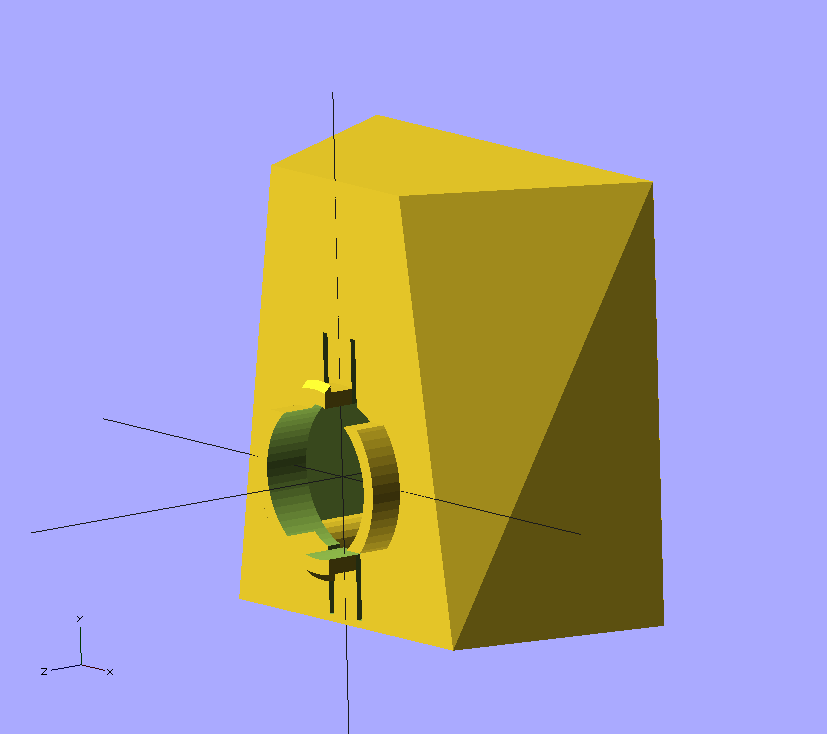
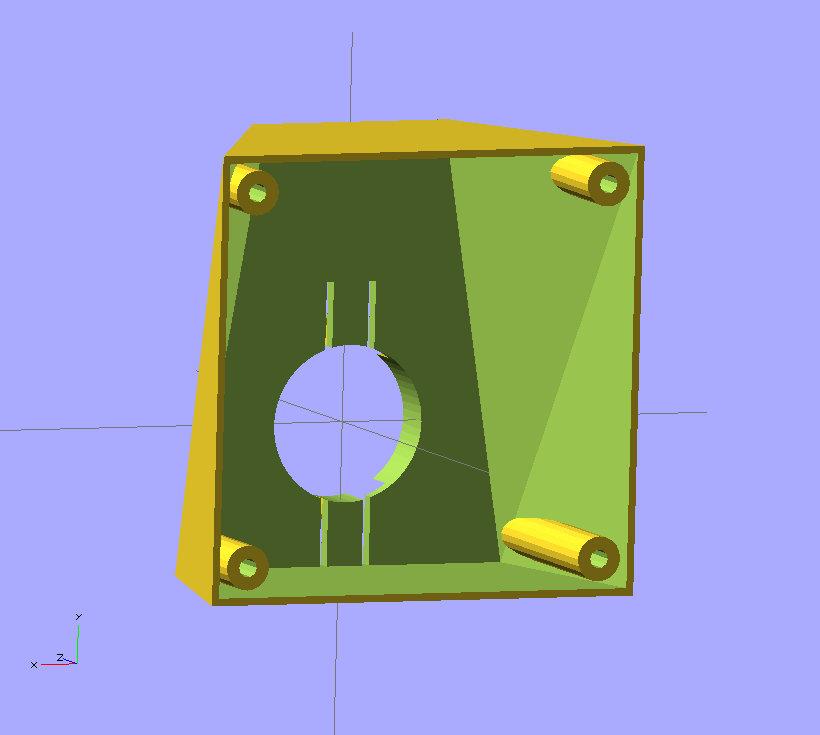
Full CAD model released
09/25/2014 at 15:53 • 0 commentsBoth Hoverlay I and II were completely layouted in Adobe Illustrator, a surprisingly flat 2D drawing tool I just happen to work with a lot. This is how it looks like, basically:
![]()
Making all the parts fit without using 3D CAD required some imagination and a few trigonometric vitamins. Now, since I am getting more and more into OpenSCAD, it's possibilities (like "programming things", yay), and limitations (like no programatical generation of polyhedrons, ouch), I can finally release a full model of the Hoverlay II.
![]()
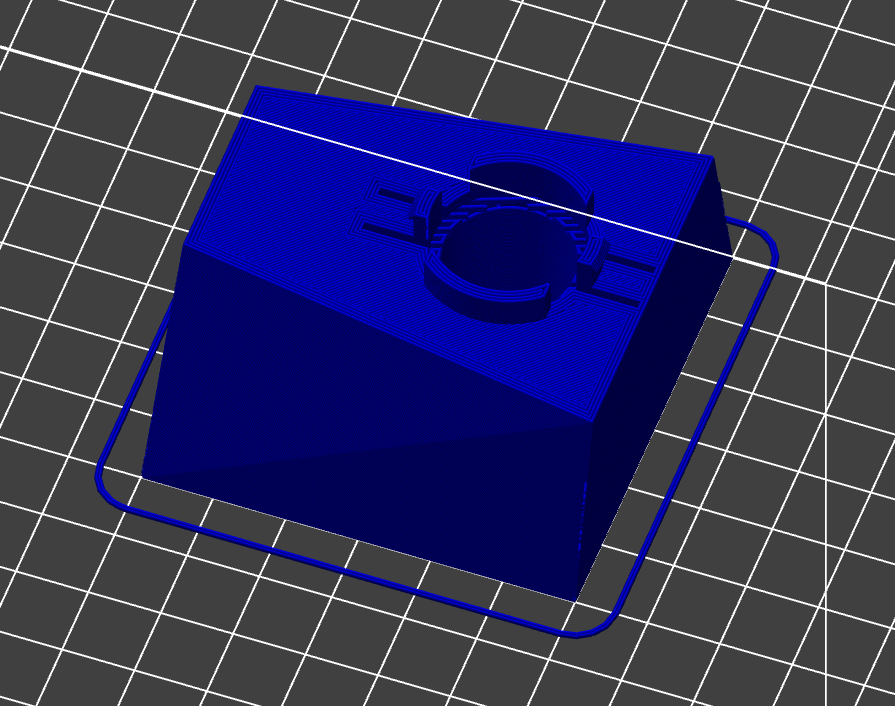
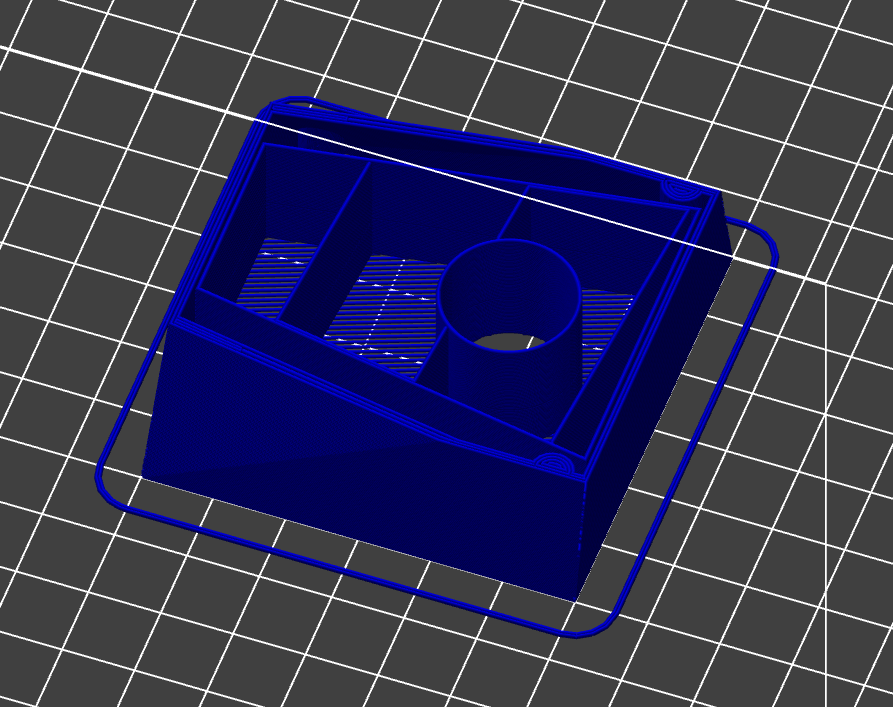
Mind that this is not meant as a 3D printable version of the Hoverlay II, but it's an important step to get there with a potential Hoverlay III. In order to really get this out there on the printers of the makers, splitting up the Hoverlay module in even smaller segments might be as ineviteable as shinking down the module as a whole.
However, in theory, and if you're crazy enough, this is completely 3D-printable. In the screenshot above from Repetier Host you can see that my build platform is completely covered by the object, which means my Prusa i3 is just too small for that. If you plan to threw this onto your FDM machine, make sure your support material spool is full and your printer has the massive build envelope of at least 326 x 271 x 240 mm. Also make sure you print the housing and the vat separately.
![]()
All the updated files are commited and synced to the GitHub repository by now.
-
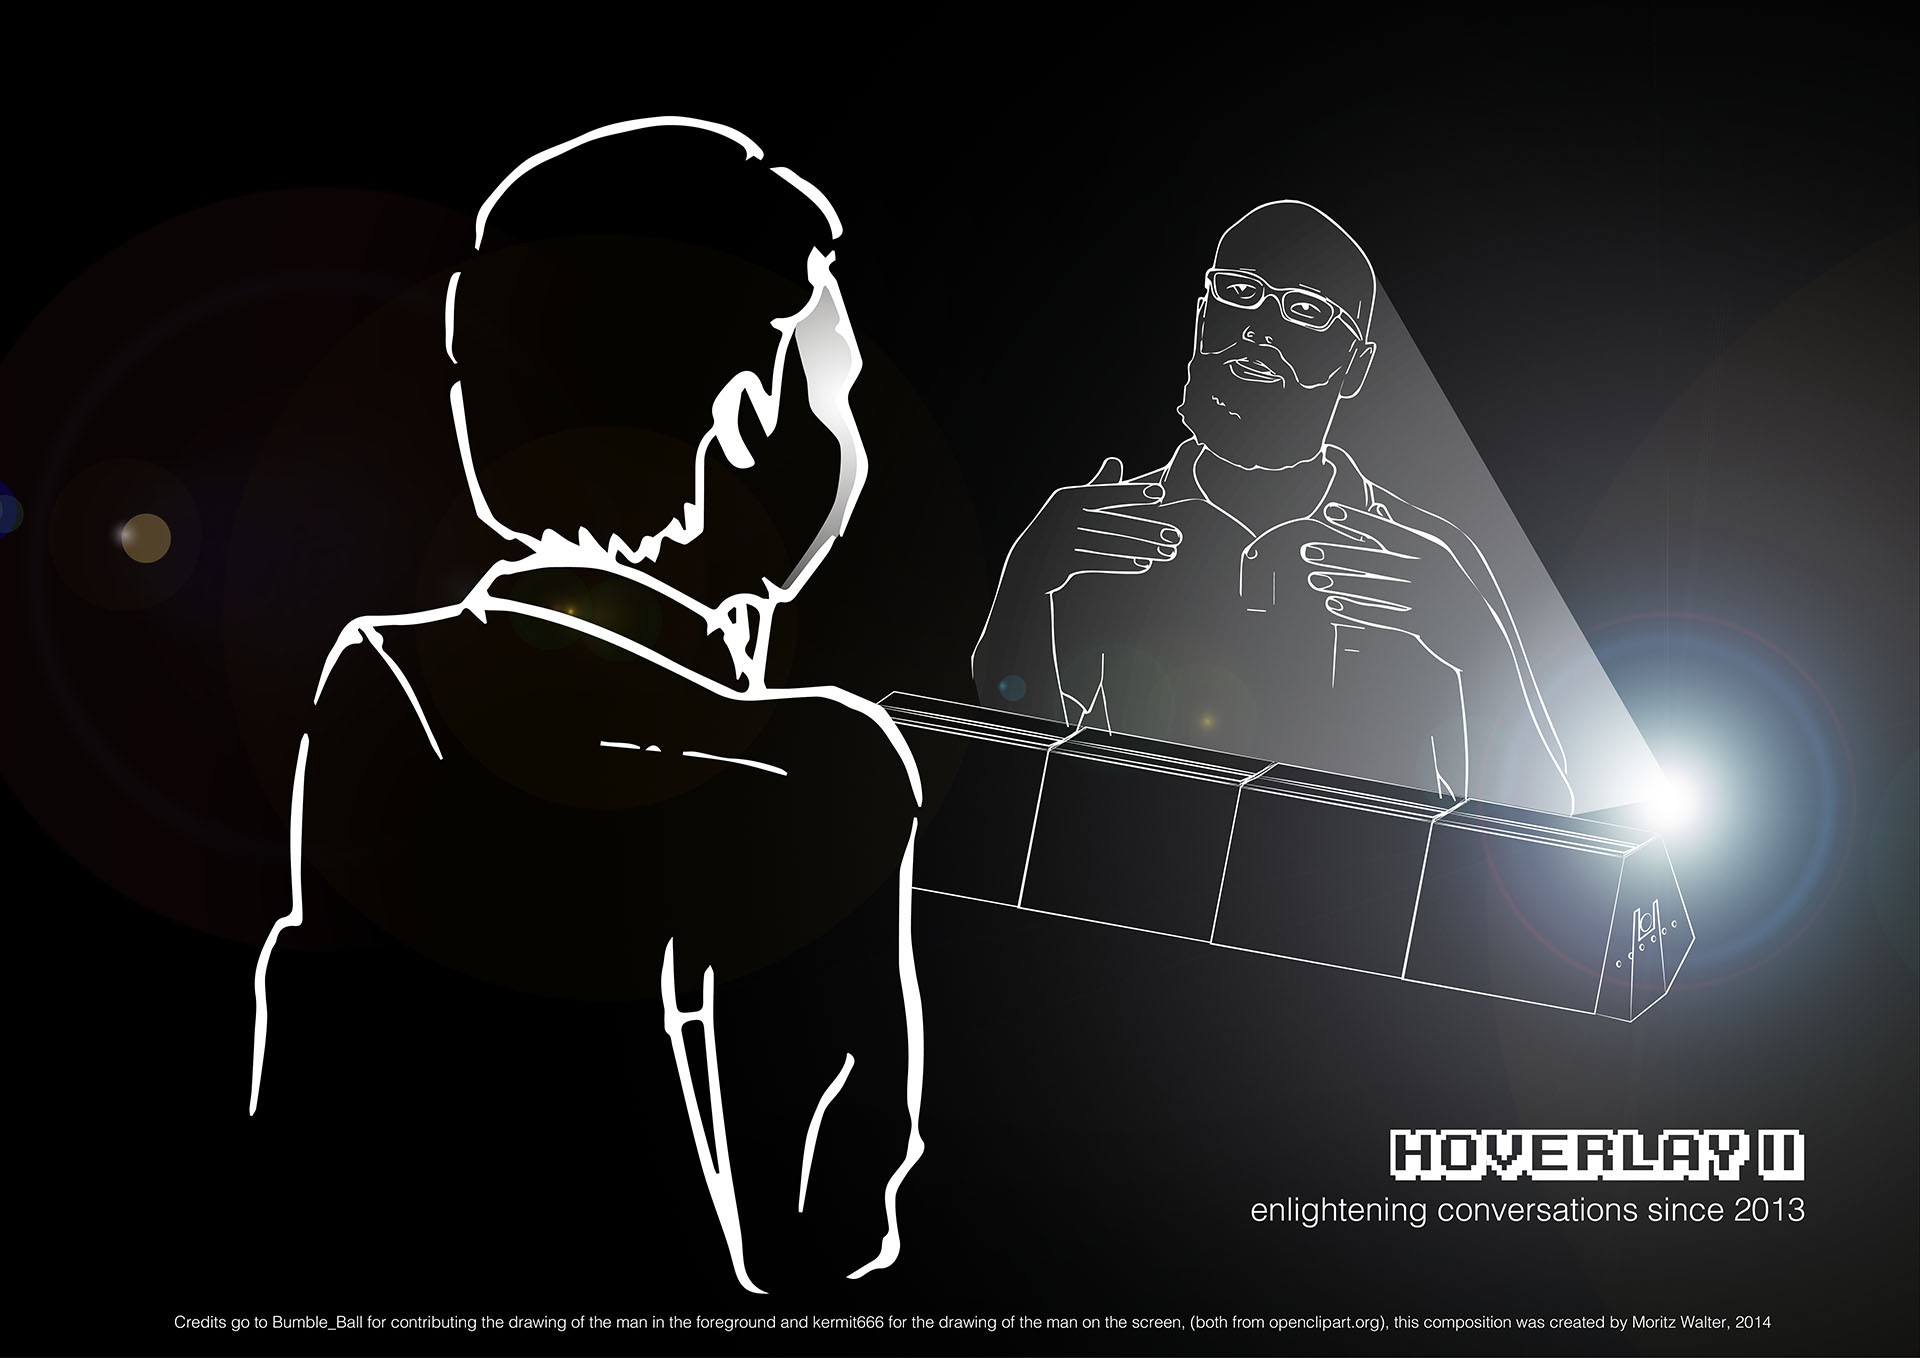
Artistic Masterpiece Created
09/25/2014 at 00:34 • 0 commentsLast night I felt like showing you guys some of my artistic skills together with some serious photoshopping and really create a true masterpiece. Look at the strokes and the use of color, perfection is a understatement, I am taking your bids now.
![]()
Honestly, of all skills I have "drawing" and "painting" have not yet made it to the top ten. I once built this robot to paint pictures from oil, but that also went weird somehow.. Credits go to Bumble_Ball for helping me out and contributing the drawing of the man in the foreground and kermit666 for the drawing of the man on the screen, this composition as well as the drawing of the Hoverlay itself was created by myself and therefore hopefully complies the requirements of the Hackaday Prize rules.
More updates will follow tomorrow. The Hoverlay II prototype as well as the CAD data in the repository have gotten some major upgrade that I hopefully can document in detail tomorrow.
-
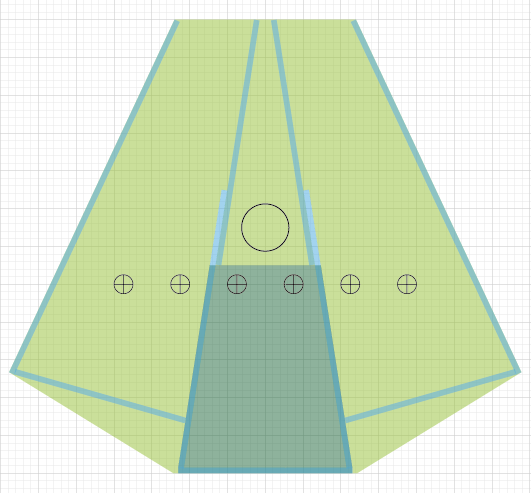
Preliminary Assembly Instructions released
08/27/2014 at 15:49 • 0 commentsBuilding your own Hoverlay II has never been so easy. Just download and follow the brand new Preliminary Assembly Instructions.
![]()
The manual contains everything from the glueing the housing together, assembling the connectors up to a start in wiring it up. You'll still need some basic technical understanding but besides that, its cake!
![]()
-
3D printable brightness booster
08/27/2014 at 09:53 • 0 commentsSince an improvised cardboard-version of this "brightness booster" showed promising results in this project log (with video), I went into setting up a 3D printable version of the brighntess booster in OpenSCAD. This add-on adresses some homogeneity and brighntess issues I experienced on large installations of 3+ Hoverlay II modules. For smaller installations, it will probably not be necessary at all. It's basically a fan duct that snaps onto the inlets of the pressure compensation tube. The pressure compensation tubes are not necessary when using the brightness booster.
![]()
You'll need two of them for the left and right end of the installation. Each one requires a standard 60 mm fan and two more of the power connectors (male) plus some cables. The OpenSCAD file is configureable and will adapt to 40, 60 and 80 mm fans just by changing the fan_size variable.
![]()
Just add a fan, snap it on and you'll have the brightest Hoverlay you've ever seen.
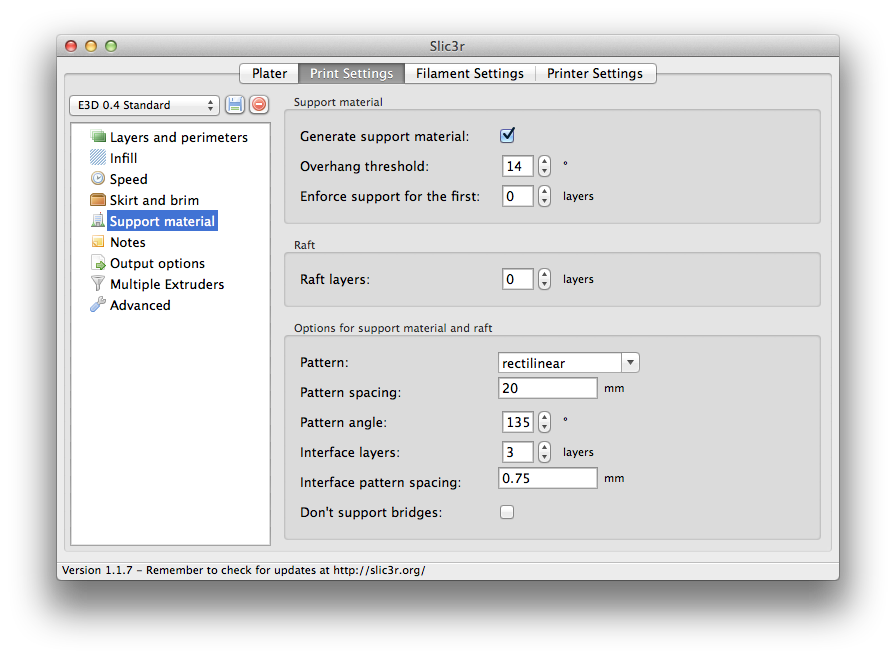
It's designed for 3D printing on a FFF machine with a minimum of support structures. The base plate, where the long bridges occur, is a bit thicker to even out the sagging in the bridge. You could also use Slic3r's cut plane option and print the base plate seperately.
![]()
![]()
I've been successfully printing this using a low density support structure with interface layers. You might be also lucky ticking "don't support bridges" in Slic3r. If you run into trouble printing this see my support settings:
![]()
I'll add some photos of the printed installed boosters soon.
-
"Feuertanz" & "Streiflicht"
08/19/2014 at 10:15 • 0 commentsI've had the luck to get the two truly amazing animation artists and fellow students of mine, David-Kim Hermsdorf and Philipp Kessling, to create this wonderful animation double "Feuertanz" and "Streiflicht" for the Hoverlay II.
Thank you guys, you did a fantastic job there. I (and probably everybody else close by the live installation) immediately got goose pimples experiencing a deep visual stimulation accompanied by deep frequency quakes.
To you, who are watching this on your regular, flat, non-hovering screen with laptop speakers, the experience might not be the same, but I hope it gives you an impression of what's happening there ;)
Short fragments of the footage have also been showed in the Brightness Booster Demo video, I just wanted to get the official permittance to show off the whole thing on Youtube directly from the artists befor upping it completely. I hope you enjoy watching it!
-
Photos & Brightness Booster Enabled
08/17/2014 at 14:58 • 0 commentsLots of cool stuff happened recently at the makerspace. For the first, one of our members volunteered to take professional photographs of the Hoverlay II and its internals. After one afternoon of incredibly focussed work on illumination and setup he gave me an USB stick packed with high resolution, high aesthetic quality shots, so I can take that material now and put it into the construction manual, make a nice web page from it and tease you with pictures like the ones below. Thanks, C.!
Here's an impression of that incredible quality of pictures. Mind that these are photographs, not CGI renders.
![]()
![]()
Also, one of the members of our local makerspace, Dirk, added some modifications to the Hoverlay which resulted in a much higher brighness of the Hoverlay screen. Check it out in the video:
Basically, the modification makes use of the inlets formerly used for the pressure compensation tubes, feeding more air through them into the fog channel with two additional fans. This video shows the first result of this brighntess booster with the same 3000 ANSI lumen projector from the last videos.
-
System Design Document, Credits and Licensing
08/16/2014 at 09:04 • 0 commentsIn order to get a proper System Design Document out I also had to sum up all the used libraries including their license information, open source software and what-so-open-ever else to pay appropriate appreciation to all those great projects out there. Reading this makes me feel like I actually did totally nothing in this project.
----------
Credits and Licensing
The Hoverlay II hardware, CAD, and all application code is licensed under GPL V3 http://www.gnu.org/licenses/gpl.html
This project would not have been possible without open source hard- and software. Special thanks the following open source projects, that have been used in making and/or are part of Hoverlay II:
Hardware Design:
- OpenScad http://www.openscad.org (GPL V2)
- Processing http://www.processing.org (GPL V2, LGPL, GPL)
Manufacturing:
- RepRap Project http://www.reprap.org (GPL)
- Repetier http://www.repetier.com (Apache License V2)
- Slic3r http://www.slic3r.org (Perl Artistic License & AGPLv3)
- LinuxCNC http://linuxcnc.org (GNU GPL)
Application Development:
- Processing http://processing.org (GPL V2, LGPL, GPL)
- KinectA http://kinecta.mihoo.de (GPL V3)
- OpenNI https://github.com/OpenNI/OpenNI (Apache License V2)
- MSAFluid Processing library https://github.com/memo/p5-MSAFluid (MIT License)
- oscP5 Processing library http://www.sojamo.de/libraries/oscP5/ (GNU LGPL V2.1)
- Minim Processing library http://code.compartmental.net/tools/minim/ (GNU LGPL)
- saitoobjloader Processing library https://code.google.com/p/saitoobjloader/ (MIT License)
- Arduino http://arduino.cc (Creative Commons ShareAlike)
Also thanks to Christian Knüll for his efforts in making an affordable CAM tool
available. Check it out at http://estlcam.de (not open source!)
All layouts have been made with Adobe Illustrator (also not open source!).
Of course the used Microsoft Kinect is not open hardware. If you want to learn more about how the Microsoft Kinect is licensed, read the manual from page 14 here: http://download.microsoft.com/download/f/6/6/f6636beb-a352-48ee-86a3-abd9c0d4492a/kinectmanual.pdf
![]()
And last but not least, without the support of my local makerspace "Attraktor", not a single prototype would have been realized. If you live in or nearby Hamburg, Germany, you should definitely give us a visit sometime!
-
New Video
08/13/2014 at 23:17 • 0 commentsLadies and gentlemen, may I present to you, the Hoverlay II:
Yesterday night we set up the Hoverlay in our makerspace Attraktor in Hamburg, Germany and explored a bit more of the possibilities of the interactive midair projection.
All we got was a 3000 ANSI lumen home cinema grade projector, which is visibly less then the 5000 lumens from the projector I had in my university lab. Still, you get a good impression and it was lot's of fun. We tried everything from a skype call, particle effects, 3D viz painting and of course the hackaday skull. I hope you enjoy watching it!