 BLANCHARD Jordan
To start, a little demo video:
ESP32 CYD Retro Weather Terminal in a 3D-Printed CRT Case
I wanted to build a small standalone weather terminal that looks like a tiny 1990s desktop monitor, but runs on modern ESP32 hardware and pulls live data from the internet.
The result is this project: an ESP32 Cheap Yellow Display (ESP32-2432S028 / CYD) mounted inside a custom 3D-printed CRT-style enclosure, running a Windows 95 inspired user interface that displays:
- current weather conditions
- short-term forecast graphs
- daily forecast
- wind and gust data
- a live webcam image
- a satellite/radar image
To make it feel more like a real miniature computer, I also designed a mechanical front-button linkage so the rear buttons on the CYD can be pressed from the front of the case using lever arms. The finished unit is powered by an internal Li-ion battery, with a charging module and a 5V buck converter, so it can run completely wire-free.
This project mixes several things I enjoy: retro design, programming, weather data and 3D printing.
Concept
The idea was not just to make another weather display, but to create something with personality.
A lot of modern electronic projects are technically impressive, but visually generic. I wanted this one to feel like a tiny desktop computer from the Windows 95 era: chunky plastic shapes, beveled “window” elements, simple icons, and dedicated screens for different information.
The ESP32 CYD board is perfect for this kind of project because it already includes:
- an ESP32
- a 320x240 color TFT display
- touch hardware
- a compact form factor
- low cost and easy availability
Instead of leaving it bare, I designed a small CRT monitor shell around it. The enclosure gives it a completely different presence on a desk: it looks more like a miniature appliance than a dev board.
Main Features
Windows 95 style interface
The whole UI is styled with classic retro desktop elements:
- title bars
- beveled panels
- status bars
- simple desktop-like windows
- page indicators
The interface cycles automatically through multiple pages, but it can also be changed manually.
Multiple weather pages
The software currently includes six pages:
-
Current conditions
Displays current weather with icon, temperature, apparent temperature, humidity, pressure, rain, wind, gusts, direction, and observation time. -
Hourly forecast graphs
Shows the next hours using simple graphs for temperature and rain probability. -
Daily forecast
Displays several days of forecast with compact weather icons and min/max values. -
Wind page
Includes wind speed, gusts, direction, a compass-like indicator, and a 12-hour wind graph. -
Satellite / radar image viewer
Downloads and displays a remote satellite/radar composite image. -
Webcam viewer
Downloads and displays a remote webcam image.
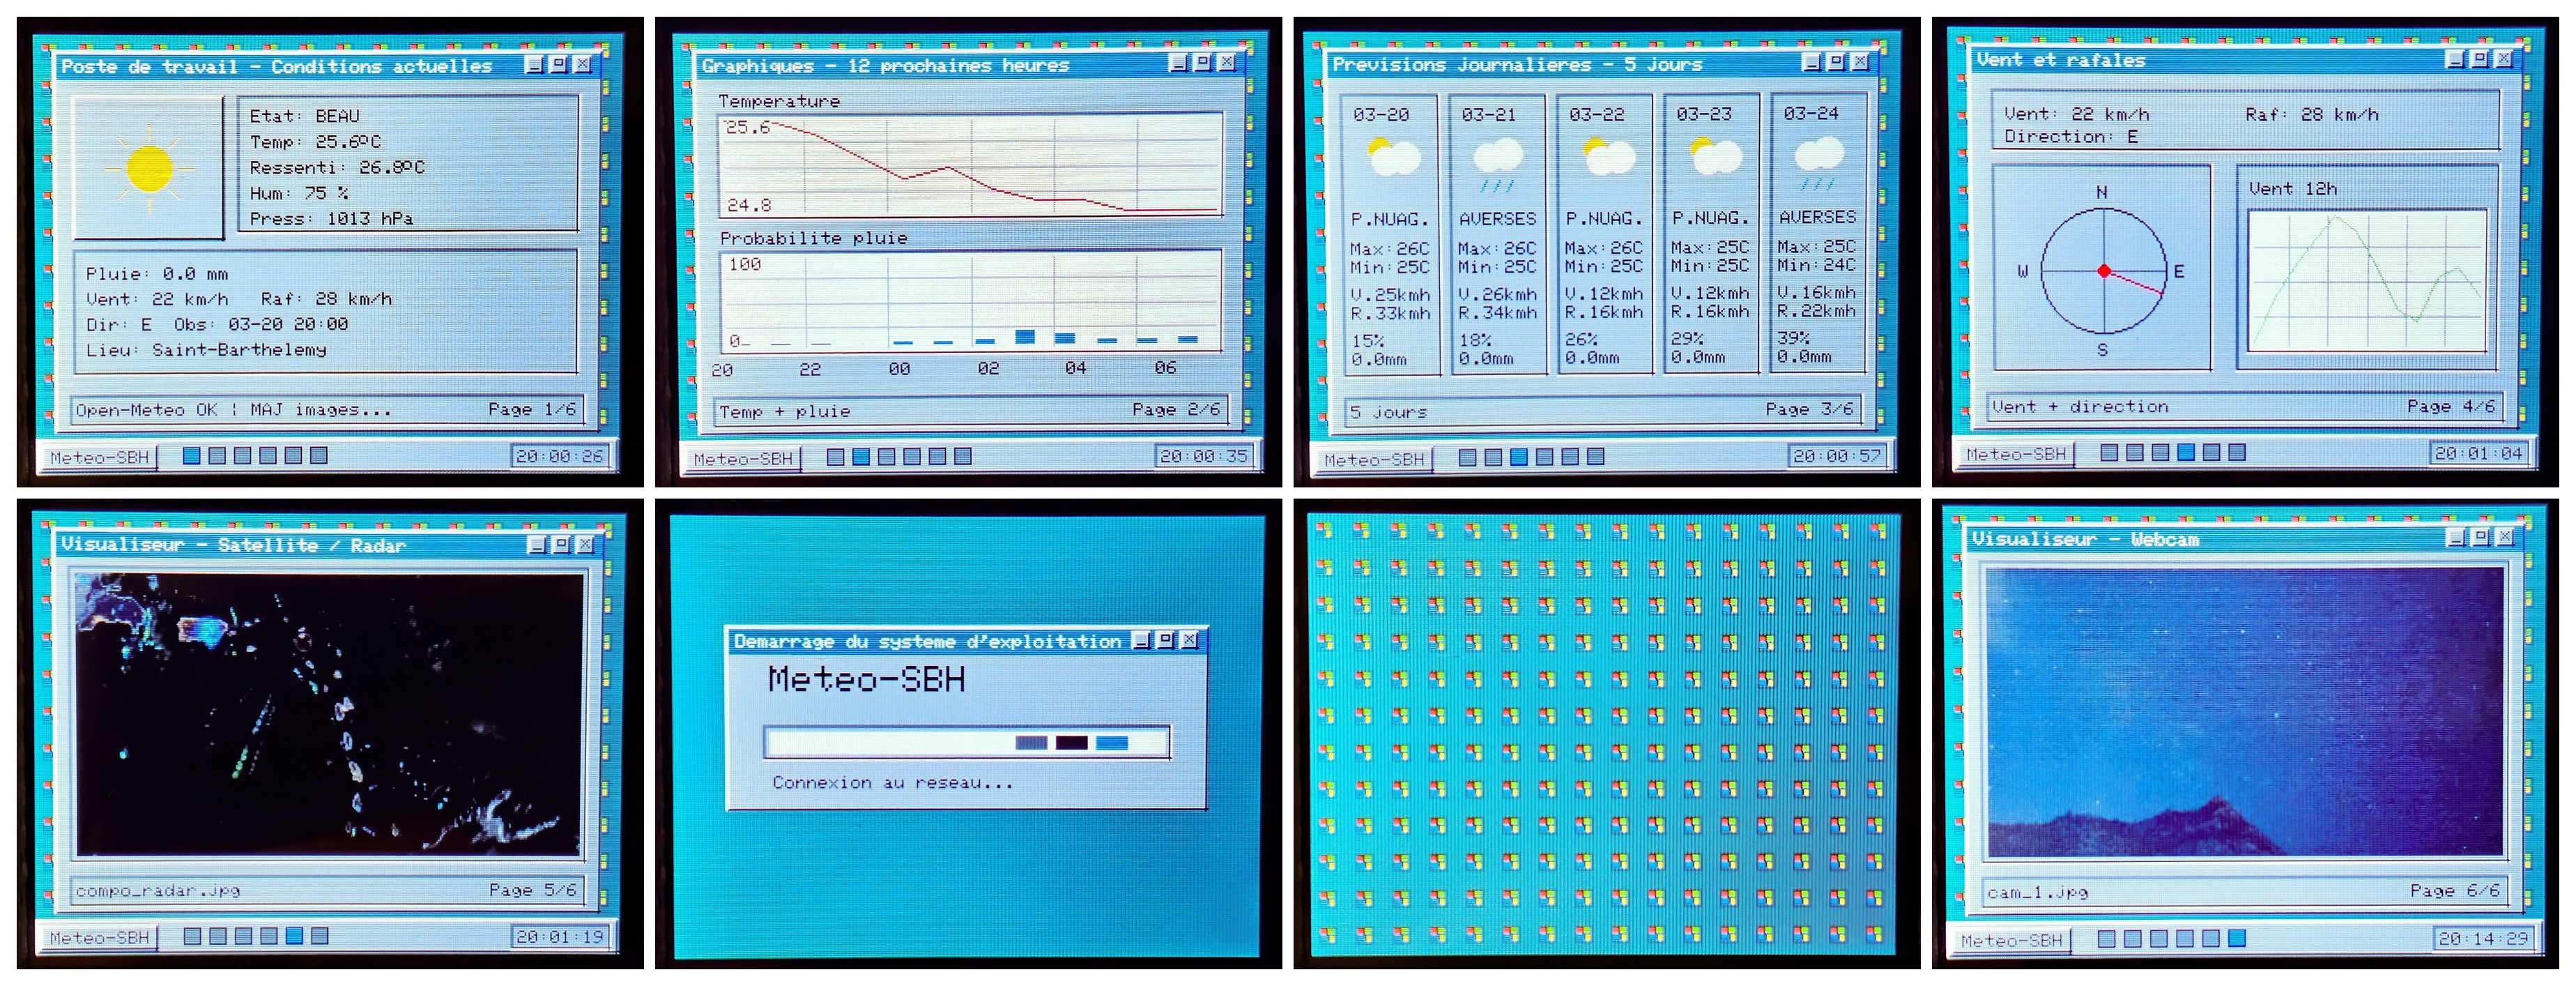
Image caching
Satellite and webcam images are stored in SPIFFS, so the device can keep showing the latest downloaded content even if the network is temporarily unavailable.
Local weather data caching
Weather JSON is also cached locally, which makes the interface more resilient and improves startup behavior.
Wi-Fi + NTP time sync
The ESP32 connects to Wi-Fi, syncs time via NTP, and uses that for the on-screen clock and timestamps.
Asynchronous networking
Network operations are handled in a separate task so the UI remains responsive while data and images are being downloaded.
I must admit that a lot of this interface was created using vibe coding with the help of Chat GPT, but the appearance of the interface he gave me really pleased me.
Battery-powered standalone operation
The final build includes:
- a lithium battery
- a charger module
- a 5V buck converter
That means the unit can be used without any external cable, which makes the object much nicer to place on a desk or shelf.
Hardware Used
The main hardware is:
- ESP32 Cheap Yellow Display (ESP32-2432S028 / CYD)
- lithium battery
- lithium charging module with 5V buck converter
- custom 3D-printed enclosure
- mechanical button linkage parts
- screws, threaded rod, nuts, and spacers for the internal mounting system
The internal mounting method uses a rigid bracket and a threaded rod assembly to hold the board firmly in place and align it with the front bezel.
The 3D-Printed CRT Enclosure
The case is one of the most important parts of this project.
I wanted the device to instantly be like a tiny retro monitor, so the enclosure includes:
- a slanted CRT-style front face
- a thick front bezel around the screen (to kee the screen centered with the circuit board offset)
- side ventilation slots
- a rear housing volume large enough for battery and power electronics
- a simple base
- internal guides and supports
The overall shape is intentionally exaggerated a little compared to a real monitor.
From the front, it looks like a miniature desktop terminal. From the side, the sloped profile really sells the CRT illusion.
Mechanical Front Buttons
One fun challenge was that the CYD’s physical buttons are not located where I wanted to be accessible.
To solve that, I designed a small lever-based mechanism so that the buttons can be pressed from the front of the enclosure. This gives the finished object a much cleaner and more natural interaction.
It is a simple solution, but it adds a lot to the final usability and makes the whole project feel more “finished.”
Software Overview
The code is written with the Arduino IDE for ESP32 (Downloadable from the files list)
It uses these library:
- WiFi.h
- WiFiClientSecure.h
- HTTPClient.h ArduinoJson.h
- SPIFFS.h
- Adafruit_GFX.h
- Adafruit_ILI9341.h
- JPEGDecoder.h
Weather source
The project uses Open-Meteo for forecast and current weather data.
Remote image sources
The device also fetches:
-
a webcam JPEG
-
a satellite/radar JPEG
These are downloaded over HTTP/HTTPS from my personal weather website and stored locally before being rendered on screen.
UI logic
The software rotates through six pages automatically on a timer, and also supports manual page switching through the button input.
Reliability choices
A few design choices were made to make the user experience nicer:
-
render a local page immediately at startup
-
do not wait for slow network operations before showing something
-
cache weather and images locally
-
retry Wi-Fi connection if disconnected
-
update clock separately
-
keep network work out of the main display flow
That makes the device feel much more like a real appliance and less like a demo sketch.
Why I Built It
I run weather-related projects and I like having environmental data visible at a glance, but I also like objects that have some charm and it's fun to do.
A plain screen showing numbers works, but a tiny retro “computer” showing weather, forecasts, webcam images, and satellite views is much more fun. It becomes both a useful desk display and a conversation piece.
The thing I like most is that it does not just look like an electronics prototype. It feels like a tiny product.
The CRT shape gives it character, the Windows 95-inspired interface is nice, and the live weather / webcam / satellite data gives it a real purpose.
It sits somewhere between:
-
a retro computer prop
-
a modern IoT weather station
-
a desktop information terminal
Possible Future Improvements
There are still a lot of directions this project could go:
-
battery gauge on screen
-
touch-based navigation
-
more weather graph pages
-
local sensor integration
-
sound effects for retro UI events, startup, etc...
-
Home Assistant integration
Conclusion
This project started as a weather display, but turned into a miniature retro weather terminal with its own personality.
Using an ESP32 CYD, a custom 3D-printed CRT enclosure, live weather data, webcam and satellite images, internal battery power, and a mechanical front-button system, I ended up with a small standalone desktop gadget that feels much more special than a simple screen in a box.
It is practical, fun, and weird in exactly the right way.
If you like retro-inspired embedded projects, weather gadgets, or over-engineered little desk devices, this might be your kind of build.