Close
0%
0%

Build a Cloud-Based RFID Logger Using ESP32-S3-BOX

Log RFID card UIDs to Google Sheets in real time using the ESP32-S3-BOX-3, MFRC522, Wi-Fi, and Google Apps Script.

Similar projects worth following
0 followers

Introduction

The Internet of Things (IoT) has transformed the way embedded devices communicate with cloud platforms. Today, even a simple microcontroller can collect information from sensors, communicate over Wi-Fi, and store data online in real time.

One technology that is widely used in IoT applications is RFID (Radio Frequency Identification). RFID provides a simple and contactless way to identify people, products, access cards, inventory items, and many other physical objects.

If you've ever used an employee ID card, a student ID card, a metro card, or an access badge to unlock a door, you've already interacted with RFID technology.

Although reading RFID cards is relatively straightforward, beginners often struggle with one common question:

"How can I save the scanned RFID data online without setting up a complicated database?"

"How can I save the scanned RFID data online without setting up a complicated database?"

Many tutorials immediately introduce cloud databases such as Firebase, MQTT brokers, SQL servers, or custom APIs. While these are excellent solutions for large projects, they also introduce additional complexity that can overwhelm beginners.

Instead of taking that route, this project demonstrates a much simpler approach.

We'll use Google Sheets as our cloud database.

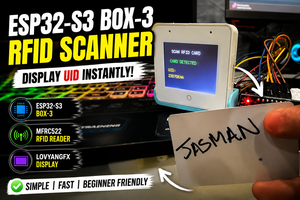
Every time an RFID card is scanned, the ESP32-S3-BOX-3 automatically sends the card's UID over Wi-Fi to Google Apps Script, which instantly stores the information inside a Google Sheet.

The result is a lightweight, cloud-connected RFID logger that anyone can build without purchasing cloud services or configuring a dedicated server.

Because Google Sheets is already familiar to most users, all logged data can immediately be viewed, searched, filtered, exported, or shared without installing additional software.

The entire project relies only on free Google services and can be completed in less than an hour.

Why ESP32-S3-BOX-3?

For this project, I chose the ESP32-S3-BOX-3, which combines powerful processing capabilities with built-in peripherals, making it an excellent development platform for IoT projects.

Some of the reasons for selecting this board include:

  • Dual-core ESP32-S3 processor
  • Built-in Wi-Fi and Bluetooth connectivity
  • Integrated capacitive touch display
  • USB Type-C programming interface
  • Excellent Arduino IDE support
  • High processing performance
  • Large Flash and PSRAM
  • Perfect for Human Machine Interface (HMI) applications

Instead of connecting an external OLED or TFT display, the built-in display allows us to instantly show the scan status, making the project cleaner and much easier to debug.

Why Use Google Sheets?

Whenever cloud storage is mentioned, most people immediately think of Firebase, AWS, Azure, or SQL databases.

While these platforms are extremely powerful, they usually require authentication, database configuration, security rules, APIs, and additional setup before a single piece of data can be stored.

For beginners, this can become frustrating.

Google Sheets provides an incredibly simple alternative.

Using Google Apps Script, the ESP32 can communicate directly with a spreadsheet using nothing more than a standard HTTP request.

This provides several advantages:

  • Completely free
  • Accessible from anywhere
  • No database installation
  • No server maintenance
  • Easy to share with teammates
  • Automatic cloud backup
  • Export to Excel or CSV
  • Perfect for IoT prototypes

For projects involving data logging, RFID testing, inventory tracking, or classroom demonstrations, Google Sheets offers more than enough functionality while remaining incredibly simple to set up.

What We Are Building

In this tutorial, we will build a simple RFID logging system.

The workflow is shown below.

RFID Card      │      ▼MFRC522 RFID Reader      │      ▼ESP32-S3-BOX-3      │      ▼Wi-Fi Network      │      ▼Google Apps Script      │      ▼Google Sheets

Whenever an RFID card is brought close to the reader:

  • The MFRC522 reads the RFID card's UID.
  • The...
Read more »

  • 1 × ESP32 S3 Box 3
  • 1 × Jumper Wires
  • 1 × MFRC522 RFID Module

  • 1
    Understanding How the RFID Logger Works

    Before connecting any wires or uploading code, it's important to understand how the entire system operates. Once you understand the data flow, the rest of the project becomes much easier to follow.

    Unlike traditional RFID examples where the card information is only displayed on the Serial Monitor, this project sends every scanned RFID card directly to Google Sheets over Wi-Fi. This means every scan is automatically stored in the cloud and can be viewed from anywhere.

    The entire communication process is shown below.

    RFID Card               │               ▼      MFRC522 RFID Reader               │         (SPI Communication)               │               ▼        ESP32-S3-BOX-3               │         Wi-Fi Connection               │               ▼     Google Apps Script               │               ▼        Google Sheets

    Whenever an RFID card is brought close to the reader, the MFRC522 detects the card and extracts its Unique Identifier (UID). This UID is a hexadecimal number that uniquely identifies the RFID card.

    For example, a scanned UID may look like this:

    827ED600

    Once the ESP32 receives this UID, it immediately performs two actions:

    • Displays a confirmation message on the ESP32-S3-BOX-3 display.
    • Sends the UID to Google Apps Script using an HTTP request.

    Google Apps Script receives this request and automatically appends a new row to a Google Sheet along with the current date and time.

    Since Google Sheets stores all the records online, you don't need to worry about creating or maintaining a database.

  • 2
    Understanding the Hardware

    Let's briefly understand the purpose of each component used in this project.

    ESP32-S3-BOX-3

    The ESP32-S3-BOX-3 acts as the brain of the project.

    It performs several important tasks simultaneously:

    • Reads RFID data from the MFRC522 module.
    • Connects to the Wi-Fi network.
    • Sends HTTP requests to Google Apps Script.
    • Displays the project status on the built-in screen.

    Because the ESP32-S3 includes built-in Wi-Fi, we don't need any additional communication modules.

    MFRC522RFID Reader

    The MFRC522 is one of the most popular low-cost RFID readers available for Arduino and ESP32 projects.

    It operates at 13.56 MHz and communicates with the ESP32 using the SPI protocol.

    Whenever an RFID card enters its reading range, the module extracts the UID and sends it to the ESP32.

    The typical reading distance is around 2–5 cm, depending on the RFID card and antenna orientation.

    RFIDCard

    Each RFID card contains a small integrated circuit and antenna.

    Every card has its own unique UID, which acts like a digital fingerprint.

    For example:

    Card 1827ED600-------------------Card 22A7E17B1-------------------Card 3D784D500

    Throughout this tutorial, only the UID will be stored in Google Sheets.

    Later, you can modify the software to associate each UID with a person's name, employee ID, student record, or any other information.

  • 3
    Understanding SPI Communication

    The MFRC522 communicates with the ESP32 using the SPI (Serial Peripheral Interface) protocol.

    SPI is one of the fastest communication methods available for embedded systems and is commonly used with displays, SD cards, RFID modules, and other high-speed peripherals.

    The communication uses four primary signals:

    SCK: Clock signal generated by the ESP32

    MOSI: Data sent from ESP32 to RFID module

    MISO: Data sent from RFID module to ESP32

    SDA(SS): Chip Select signal

    The ESP32-S3-Box3 uses the following pin mapping:

    MFRC522 Pin -> ESP32-S3-BOX-3 Pin

    SDA - GPIO 10

    SCK - GPIO 12

    MOSI - GPIO 11

    MISO - GPIO 13

    3.3v - 3.3v

    GND - GND

View all 11 instructions

Enjoy this project?

Share

Discussions

Similar Projects

Does this project spark your interest?

Become a member to follow this project and never miss any updates