 Szybet
The project started in the summer of 2024, after I finished high school. I have been using the v2 watchy for a year by then and while I was happy with it, I was not satisfied with the hardware, the battery life and clock drift were a problem. I also by then repaired it a few times, the buttons broke constantly for me. That's my fault, as I was reading book on it on the bus every day, while switching pages was done using the accelerometer, it was still more than you expect from a watch.
I also looked into adding some hardware features, RGB led, microphone, buzzer, IMU, sensors, solar (Hiiii LightInk!). While some pins were exposed, it wasn't enough for me.
I planned (still do), two (three?) watches, one for the outside (sensors, solar) and one for the inside (microphone, buzzer), maybe some LORA, wireless magic when I get to it?
Designing the hardware
I looked into simply modifying the watchy, I wouldn't be able to pack all of those features into one device, as even the watchy is packed tightly. Creating 3 separate devices would be hard, time consuming and expensive. The soldering of it would also need to be easier, those tiny QFN packages are manageable to solder, but ordering spares if I messed something in the process would be expensive.
I decided on a module system, a separate PCB soldered into the main one. I looked long for a connector, so it would be easier to attach, but nothing comes close to just solder bridge the 2 things together. It takes some effort, but can be done just fine. On both sides the pads are small THT, so you can't break them off. After that it's sturdy and if needed, can be desoldered and swapped.
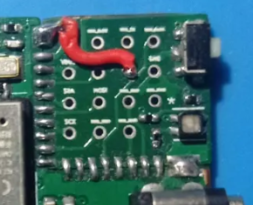
Please ignore the red cable, that has been fixed in a newer PCB revision :)
The first module I went with was the one above, some exposed pins and a RGB diode (It's not rotated because I couldn't buy one easily at that time, I use a 3D printed cover with some reflective paint to reflect the light...). In the newest revision it also has a small place for a frontlight diode on the other side.
I designed a second one since then, it has an IMU, buzzer, microphone (the buzzer gets integrated into the case and below the buzzer is the microphone, the 3D model just covers it). Didn't yet test it as my mind wandered to other projects, but it's a beginning:
It's obviously something not all people are interested in, removing the module area & merging the 2 PCB's in kicad is easy. People in the community have already done that successfully.
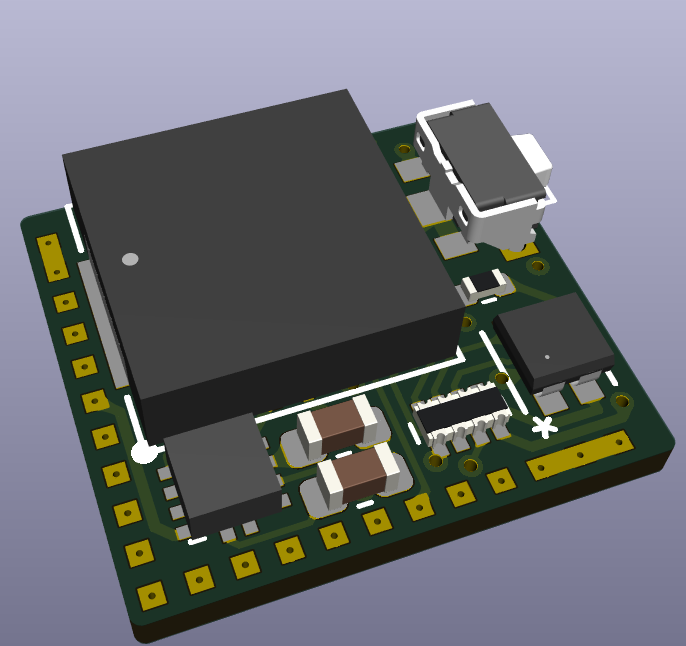
The next thing to think about were the buttons and the usb port. Based on the watchy experience I knew one thing: THT or it will break off. Maybe after a year, maybe after 5, but that was the only solution. I decided for a PCB of height 1mm, so that was also a limitation.
I ended up with Panasonic EVP-AKE31A, small buttons, not so loud as the watchy ones but most importantly, THT and the button body is fully enclosed. After soldering the a few times, overheating them, leaking flux into them and bathing them in acetone (Yes, it's not ABS I guess) they still work, less clicky, but survived everything, even my book reading or aggressive tetris/towerfall playthroughs :D
The USBC was harder (Yes, we need to switch to USBC for this, micro usb is not acceptable in this era), The only one was USB4730-GF-A-KIT with an acceptable height of the THT pins. It's on the bigger size, but that's a problem for the future me designing a case. There were already people switching it for another models, but I can't get myself to that, I only trust THT to survive.
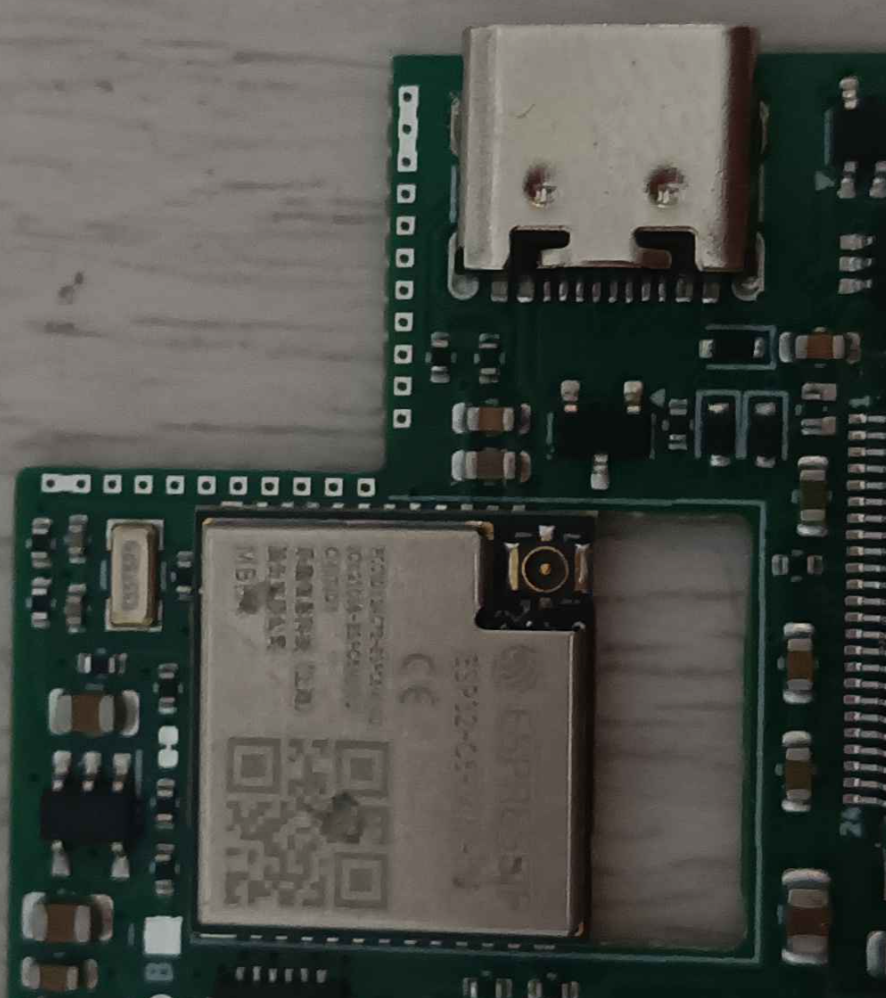
A modified yatchy with another usbc port, that the THT pins needed to be cut off manually. The esp is without an integrated antenna because of the chip shortage. Credits go to Lukas from the DC server
For more IO I choose the MCP23018-E_MJ, pretty power efficient, works well, love it.
To fix the power consumption I went with the esp32c6 (Nordic MCU's are more efficient, but less DIY, more expensive, harder to solder and less flash space for stuff), which has an integrated low power core. It drives the screen most of the time updating only the time. A very paranoid journey can be tracked here (A bit outdated, it improved a bit on the software side since), but the quick answer is around 3 months while using a 200mAh battery. It could be easily improved further:
- The watch now fully wakes up's every 30 minutes for the steps/weather/anything to also update, doing it less often would increase the battery life drastically
- Setting less input/interrupt sources in the MCP23018 would also help, now it's 4 buttons + USB connection, doing only 1 button as a wakeup source would help a lot
- The watch also has a BMA456 accelerometer which tracks steps, in this mode it consumes more than in "full deep sleep", turning it off improves it even further. There is also place on the PCB for the improved BMA530, it's more power efficient, but in a harder to solder package. (There are place for both of them because they are hard to source sometimes).
- Doing what LightInk does, which basically means full power down while waiting for the BUSY pin on the eink screen. While it wouldn't improve it drastically, because I use the lpcore for the screen and the regular update is very short, it would still improve a lot. That project is so smart, so inspiring! It even reminded my that Yatchy doesn't have a hackaday page and that I should finally post it here :D
But 3 months is enough for me, so I don't fight it further ;)
As already mentioned, BMA456 or BMA530 accelerometers were used for step tracking. They are pretty power efficient so that's good.
A vibration motor circuit was also added, but no dedicated place for the motor itself, that's the job for the case.
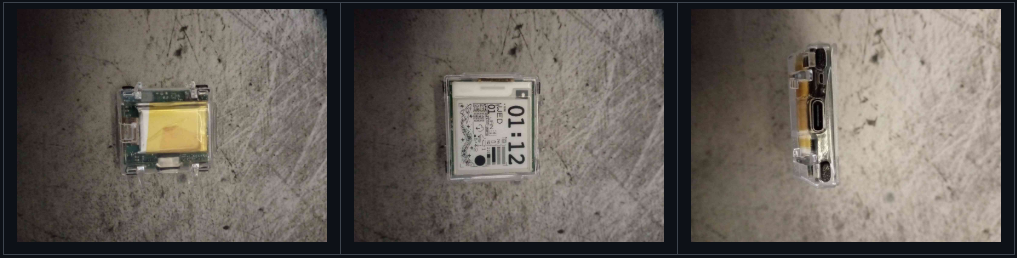
Time precision was another thing to fix, the solution was: money! Simply not using cheap RTC IC's or cheap 32Khz quartz is enough to make it good enough for a wrist watch (looking at you, watchy! which cheaped out on the RTC IC's in the previous versions and on the 32Khz in the v3 version...). I decided to use a bit more expensive, 20ppm quartz and that was enough to fix that issue. Results were okay, then I switched to even more expensive 10ppm, 5ppm ones and they are just perfect. While temperature could still mess with the time in theory, in practice it just works for me (20° C -> 40°C, -5°C -> 20°C never made me notice anything)
The screen, GDEY0154D67/GDEH0154D67 stays the same, it's the perfect eink screen, the size is just enough and it's cheap. Most importantly, it's available for years, not discontinued like other panels. The problem was driving it using the RTCIO pins, the only pins the lp core can use (as the MCP23018 doesn't have push pull, only open drain + pull up, so it would be slow). The solution was to:
- Make the CS pin always low via the mcp23018, it turned out the screen doesn't care about it, doesn't impact battery life
- Merge the interrupt and the ADC pin for measuring battery level. Some software filtration later it works and in theory if the battery goes low enough, the watch will wake up (so stop the lp core), realize the battery is low and go to sleep even harder, a cool side effect :)
I wasn't able to source at that time a small battery connector (those used in kobo ereaders are small and flat) so I needed to go with just soldering pins and that hurts me a lot. Should be definitely improved once there is more space near the usb connector (a few revisions before there wasn't).
To make it easier to solder, there were some decisions made:
- Used the mini wroom of the esp32c6, which maybe wastes a bit of space, helps with the routing and increases the speed of the soldering
- Modified most of the footprints (of the mcp23018, esp32c6, flex pin connector, accelerometer, 32Khz quartz etc) to make them easier to solder/repair manually with an iron. While hot air/plate is still needed for the esp32c6, small problems can be repaired manually as you can access the pads still easily
This could mess with ordering PCB assembly (It's too expensive for me, also some of the components are barely available anyway there...) some people in the community just did it and it worked.
After a few revisions, a few fixes, it works. Looking back at how many people tried, at various skill level, I think it's worth calling a DIY watch.
The firmware
Around 2023 I started writing my own firmware for the watchy, named InkWatchy. Then I ported Yatchy to it. Yatchy supports all of it's features, check them out, it's a long list :)
I won't write down about it a lot here, but some key points:
- It's modular, most features can be disabled, then they aren't compiled into the binary (I love #if). So while it has a lot of features, you can customize it to your needs
- It still supports other watchies, even after I moved fully to Yatchy. I think it's really cool.
- Some of the UI parts are written in rust, slint. Slint is awesome, it's cross platform capabilities are unmatched (and the easy use of them). I regularly use esp-hal to see if rust is ready for the esp32 platform, the answer is, it's closer and closer :D
- As all codebases written by a young person for a few years, sometimes I'm not happy with it. While it works perfectly, I was also learning a long the way.
- You might ask, does Yatchy/InkWatchy support connecting your phone to it? The answer is uhhhh no, but: There is a gadgetbridge branch prototype, people are working on it from time to time. There is also a vibecoded inkwatchy fork named tether with full iphone support? You might have seen that I support: Connecting a bluetooth keyboard to yatchy to type notes, connecting yatchy to the PC as a game controller, the baiky app for biking. A lot of bluetooth, but for me watchy/yatchy is an alternative to a phone, I keep a calendar and weather on it, in the encrypted vault are phone numbers and everything I need to survive/log in. So I refuse to code it myself, I'm waiting for contributors ;). Also the battery life would get destroyed, maybe a nordic mcu as a module for that...
That's the main firmware, but there are other parts of the software for the Yatchy. If you solder by hand, not self assembly/stencil you have an option of first to solder the esp32c6 and upload the test-program which allows you to measure if a pin is connected (by switching it to HIGH and LOW every second). You just measure with a multi-meter to make sure. It also has a self test which detects shorts between pins. It saved me so many times, no more guessing if it's right, or trying to view with with a magnifying glass. InkWatchy also has many debugging flags to test the various subsystems of the device properly.
The lp core also has a separate binary program which gets loaded when needed. This part is written in rust because debugging the lp core is hard and rust didn't crash for me (I'm sorry for my lack of skill in C). Driving the eink screen with limited memory is hard, you basically need to only touch coordinates/sizes dividable by 8, because bytes and magic. Regular drivers just have the whole buffer loaded, modify it, then send what's needed, I only have a small one and need to interact in "parts" to create the proper font. I think my memory problems are caused by rust somehow, I must have messed something up somewhere, I even followed the research paper on rust binary sizes (can be found on the internet), helped only a bit.
That was the hard part with coding the Yatchy, but LightInk showed it can be done even better! When I get the time and ambition, I should improve it. Merging lpcore already being power efficient and the techniques for driving the eink from light ink will make it so much better.
On the github it's written the lp core program is not open source, that's true, in the beginning I didn't want someone just to steal this project. Right now I should just publish it, before that I should clean it up and that's the hard part :/ the codebase is chaotic, the code itself is fine but you need to know where to do what and look for what. Sooner or later will be done, if people ask for it then maybe even faster (Yatchy works without it just fine, just battery life is worse)
On a side note, TinyWatchy, another watchy firmware was ported to yatchy, while it's only used by Michał, I think it's still cool to mention here.
Cases
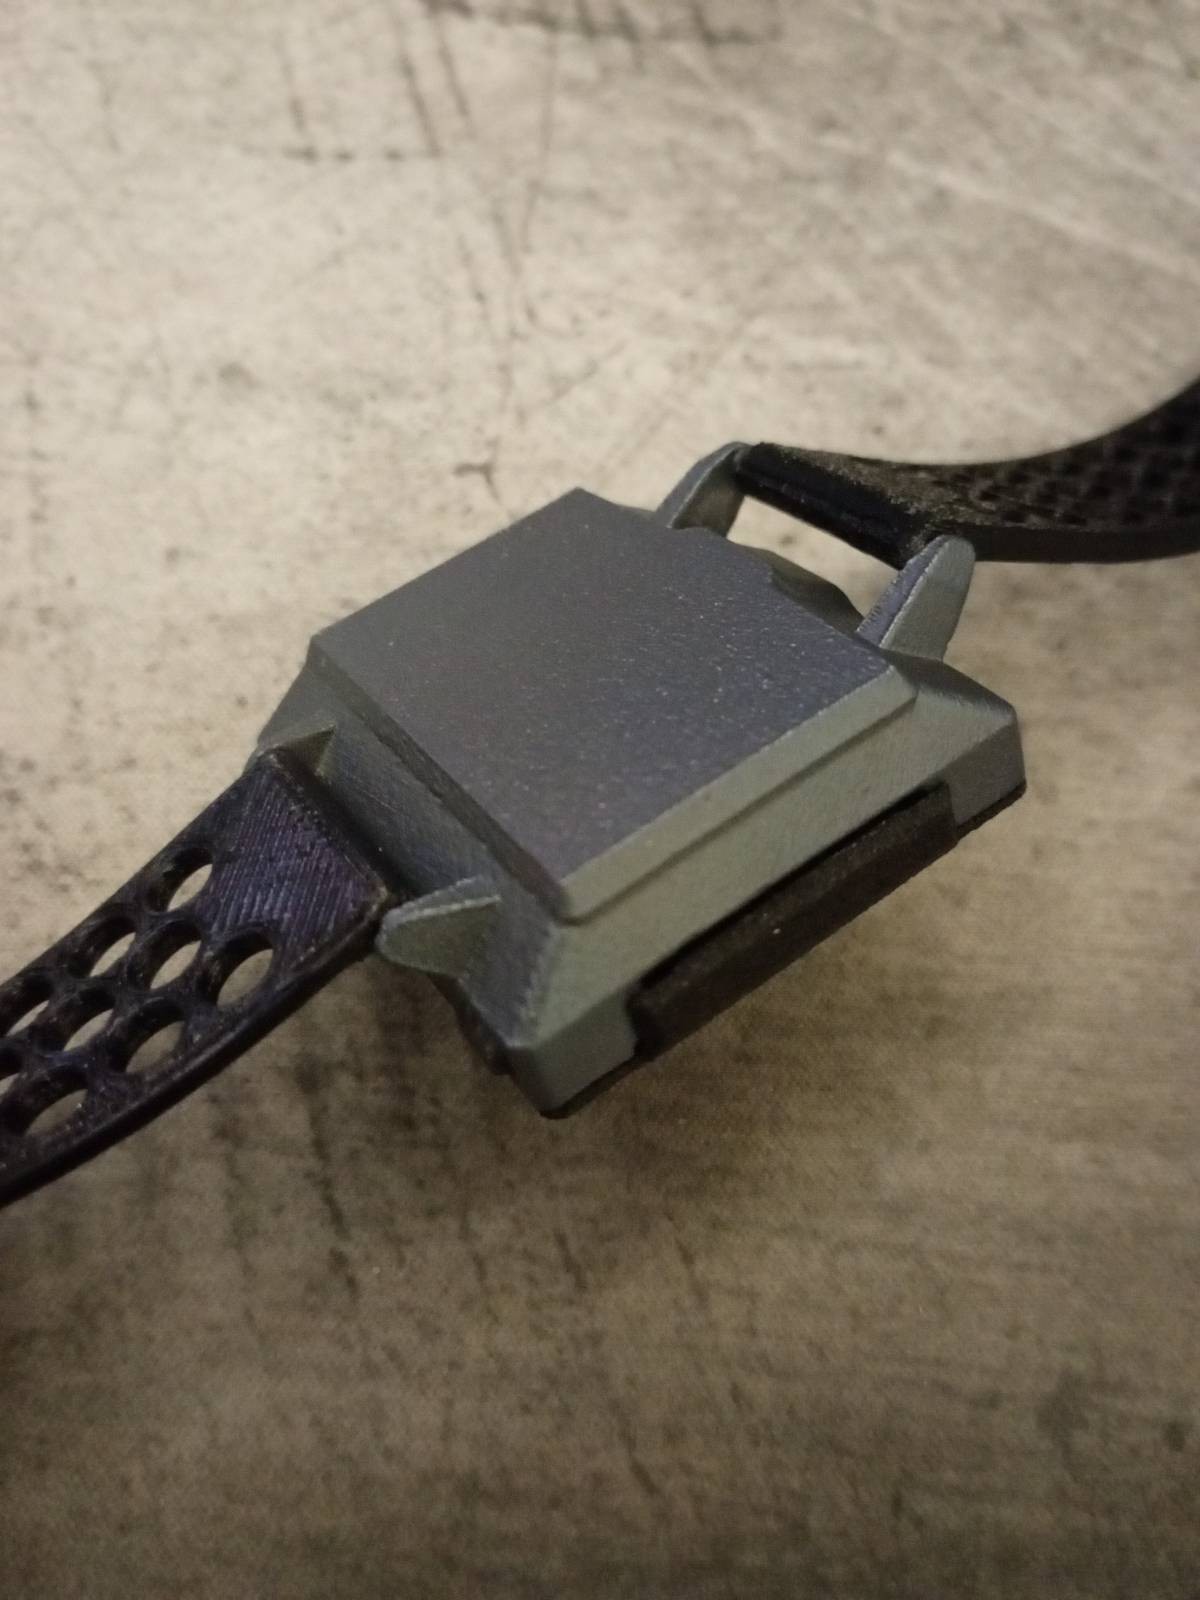
Yatchy is not a commercial product, so obviously 3D printing is the only option for a case. At this point, there are a lot of cases to choose from, they are listed here. Personally I ended up with the rotated case, because it's easier to plug in the cable for reprogramming the watch while it's on my hand.
After a lot of colors, different filaments I ended up ordering some cases online in various technologies. The review is here. I think I finally settled on the anodized titanium case with the nylon front. I also use a TPU 3D printed wrist strap.
Off topic: If you plan to anodize titanium, learn the chemistry safety rules and just do it with try and error, starting with low voltages. The few guides online can be more confusing then they are worth.
The transparent case is also something to look for, sadly it gets yellow after some time
Postscript
I don't know if hackaday shows it properly, so: The whole project, source files, documentation, explanations, more informations are located here: https://github.com/Szybet/Yatchy and there are links to the discord community & the new matrix space
While it's mostly a solo project, there are people I would like to thank for:
- Glowy The Glow bug, for finding bugs and being the first one to create his own yatchy
- Themkoi, for contributing and helping in random places in the whole project (PCB, lpcore, inkwatchy, 3D cases) but refusing to use his own yatchy (he is here for the love of the game I guess)
- Watchy, for inspiring the love in me for eink open source watches
- Some pictures in the gallery are from other yatch owners & from the case repo, thanks!
And all the other people who were interested in this project and got their own yatchies by one way and another, thanks!
(Yatchy stands for Your watchy, or your watch, depending if I can use the name "watchy", I think I can, it's a generic name for a small watch?)
Now I need to finally finish the modules and finish the plan I had from the beginning. The prototype program for the microphone is still waiting for me
With passion from Poland, so if english is lacking somewhere in the write up, let me know!