-
1Simulating Arrhythmia detection functionality
HeartyPatch needs to be connected to a cardiac simulator in order to test the Arrhythmia detection functionality. The following video shows how to connect the HeartyPatch to the simulator and start using it.
The output of the Arrhythmia detection algorithm is sent over the USB port present on the HeartyPatch. Connect it to a computer's USB port and following the instructions in the "Installing the GUI" section.
-
2Install and run the HeartyPatch GUI
For demonstrating how the Arrhythmia detection algorithm works internally on the HeartyPatch, a GUI written in Processing for Java has been developed.
This software can be downloaded from our Github repo at:
![]()
A few points about this software:
- The software works on any platform that supports Java and Processing programs.
- The GUI is only for visualization, all the processing is carried out on the device itself.
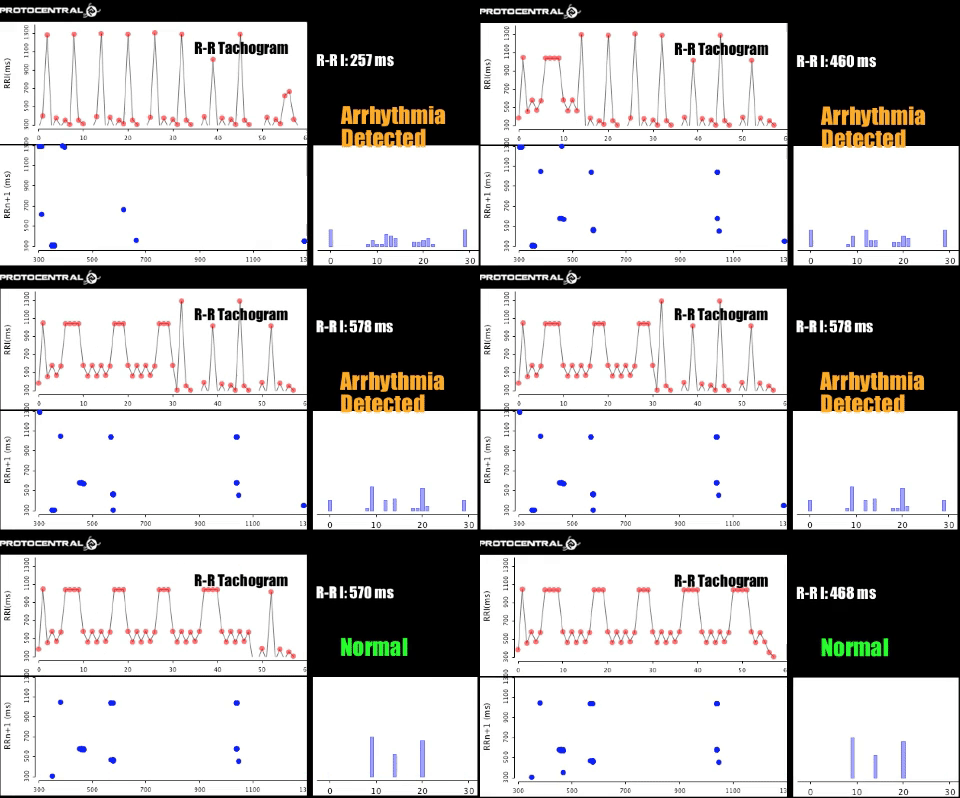
- The GUI shows the tachogram (R-R intervals), a Poincare plot (recurrence plot used to show self-similarity between successive samples) and a histogram that classifies the R-R intervals into buckets and the number of occurrences of each
- Finally, the GUI shows the Arrhythmia detection status which is read from the Arrhythmia status bit set by the device
-
3Developing on and extending the firmware
The firmware for the HeartyPatch is written for the ESP-IDF Framework for the ESP32 from Espressif. All the firmware is available on our Github repo at: https://github.com/Protocentral/protocentral_heartypatch/tree/master/firmware
Espressif hasvery detailed instructions to setup the ESP-IDF toolchain. Once the toolchain installed and configured, Makefiles can be used to build the firmware. The firmware can also be programmed to the device through the USB port with the esptool Python script.
-
4Wearing the HeartyPatch
To wear the HeartyPatch:
- Turn ON the HeartyPatch
- Snap-in two disposable electrodes to the two snap connectors on the back
- Peel off the sticker backing on the electrodes
- stick it on the left upper side of the chest
- In about 5-10 seconds, the device will adjust itself to the signal levels and start picking up beats
The demo firmware which is pre-installed in the device contains the following functionality:
- Flashes the onboard RGB LED in perfect sync with your heart's beats. This is demonstrate heartrate variability.
- Provides a Bluetooth Low Energy (BLE) service compatible with any Heart-rate monitoring or HRV analysis software. Here is a recording of the popular EliteHRV app receiving data from the HeartyPatch. To connect to the device, you can install any BLE-compatible heart-rate monitor app on Android or iOS (just search for BLE heartrate on the Google Play store) or you can install EliteHRV for Android or for Apple iOS devices. In a BLE Scan, the device would appear as "heartyPatchXX" where XX stands for the serial number.
3. Provides a serial data output over the USB port on the board. This data is sent in a format that is understood by our Open Source GUI (described below).
HeartyPatch: A single-lead ECG-HR patch with ESP32
HeartyPatch is a fully open-source, IoT connected, BLE enabled heart-rate variability & ECG patch with great accuracy
 Ashwin K Whitchurch
Discussions
Become a Hackaday.io Member
Create an account to leave a comment. Already have an account? Log In.