Dane Gardner
-
Fixing Bugs
12/08/2018 at 17:28 • 0 comments[] has been working through a similar project to this one. He's clearly more disciplined at using the system logger than I am, and pointed out that in my time setting script printf was interpreting anything with a zero in front as an octal character. This is fine for time components in the range of 00-07, but will fail on 08 and 09. Values ten or greater won't have the preceding zero, so it was interpreted as decimal.
I've updated the original script and build log to include space padded date components instead of the default zero padding.
Thanks []!
-
Setting the Hand Controller Location on Boot
11/26/2018 at 00:16 • 0 commentsAfter using network time protocol (NTP) to set the hand controller's time on start, I was lamenting that I still had to set the location manually. I could easily use the same script as a starting point to set the location using my network's IP address geolocation, so why don't I?
---------- more ----------There are plenty of free services on the web to get an IP address' latitude and longitude. I chose `ipinfo.io` because it allows a few requests per day without a license, and it was easiest to extract the location using a CLI JSON parser called `jq`. At the command line you can get your location like this:
$ curl -s ipinfo.io | jq -r '.loc'
47.6205,-122.3493
According to the Celestron protocol documentation for location setting, we need it in a degrees/minutes/seconds format with an extra byte for hemisphere.
The format of the location commands is: ABCDEFGH, where:
A is the number of degrees of latitude.
B is the number of minutes of latitude.
C is the number of seconds of latitude.
D is 0 for north and 1 for south.
E is the number of degrees of longitude.
F is the number of minutes of longitude.
G is the number of seconds of longitude.
H is 0 for east and 1 for west.
I was disappointed that I couldn't find any easy way of converting floating point degrees to DMS format at the command line in Raspbian. As a rule I don't do math in Bash, so I had to write my own in Python.
def dms(deg):
    m = (abs(deg) - int(abs(deg))) * 60.0
    s = (abs(m) - int(abs(m))) * 60.0
    return (int(deg), int(m), int(s))

def celestron(deg):
    c = dms(deg)
    return "{0:d} {1:d} {2:d} {3:d}".format(abs(c[0]), c[1], c[2], 0 if(c[0] >= 0) else 1)

print "{0} {1}".format(celestron(lat), celestron(lon))
Combining these two concepts with the previous script for setting the time, I came up with a couple scripts, and kicked them off with the `/etc/rc.local` script so it runs at boot. This works surprisingly well from my home network, which is a little scary from a privacy perspective.
-
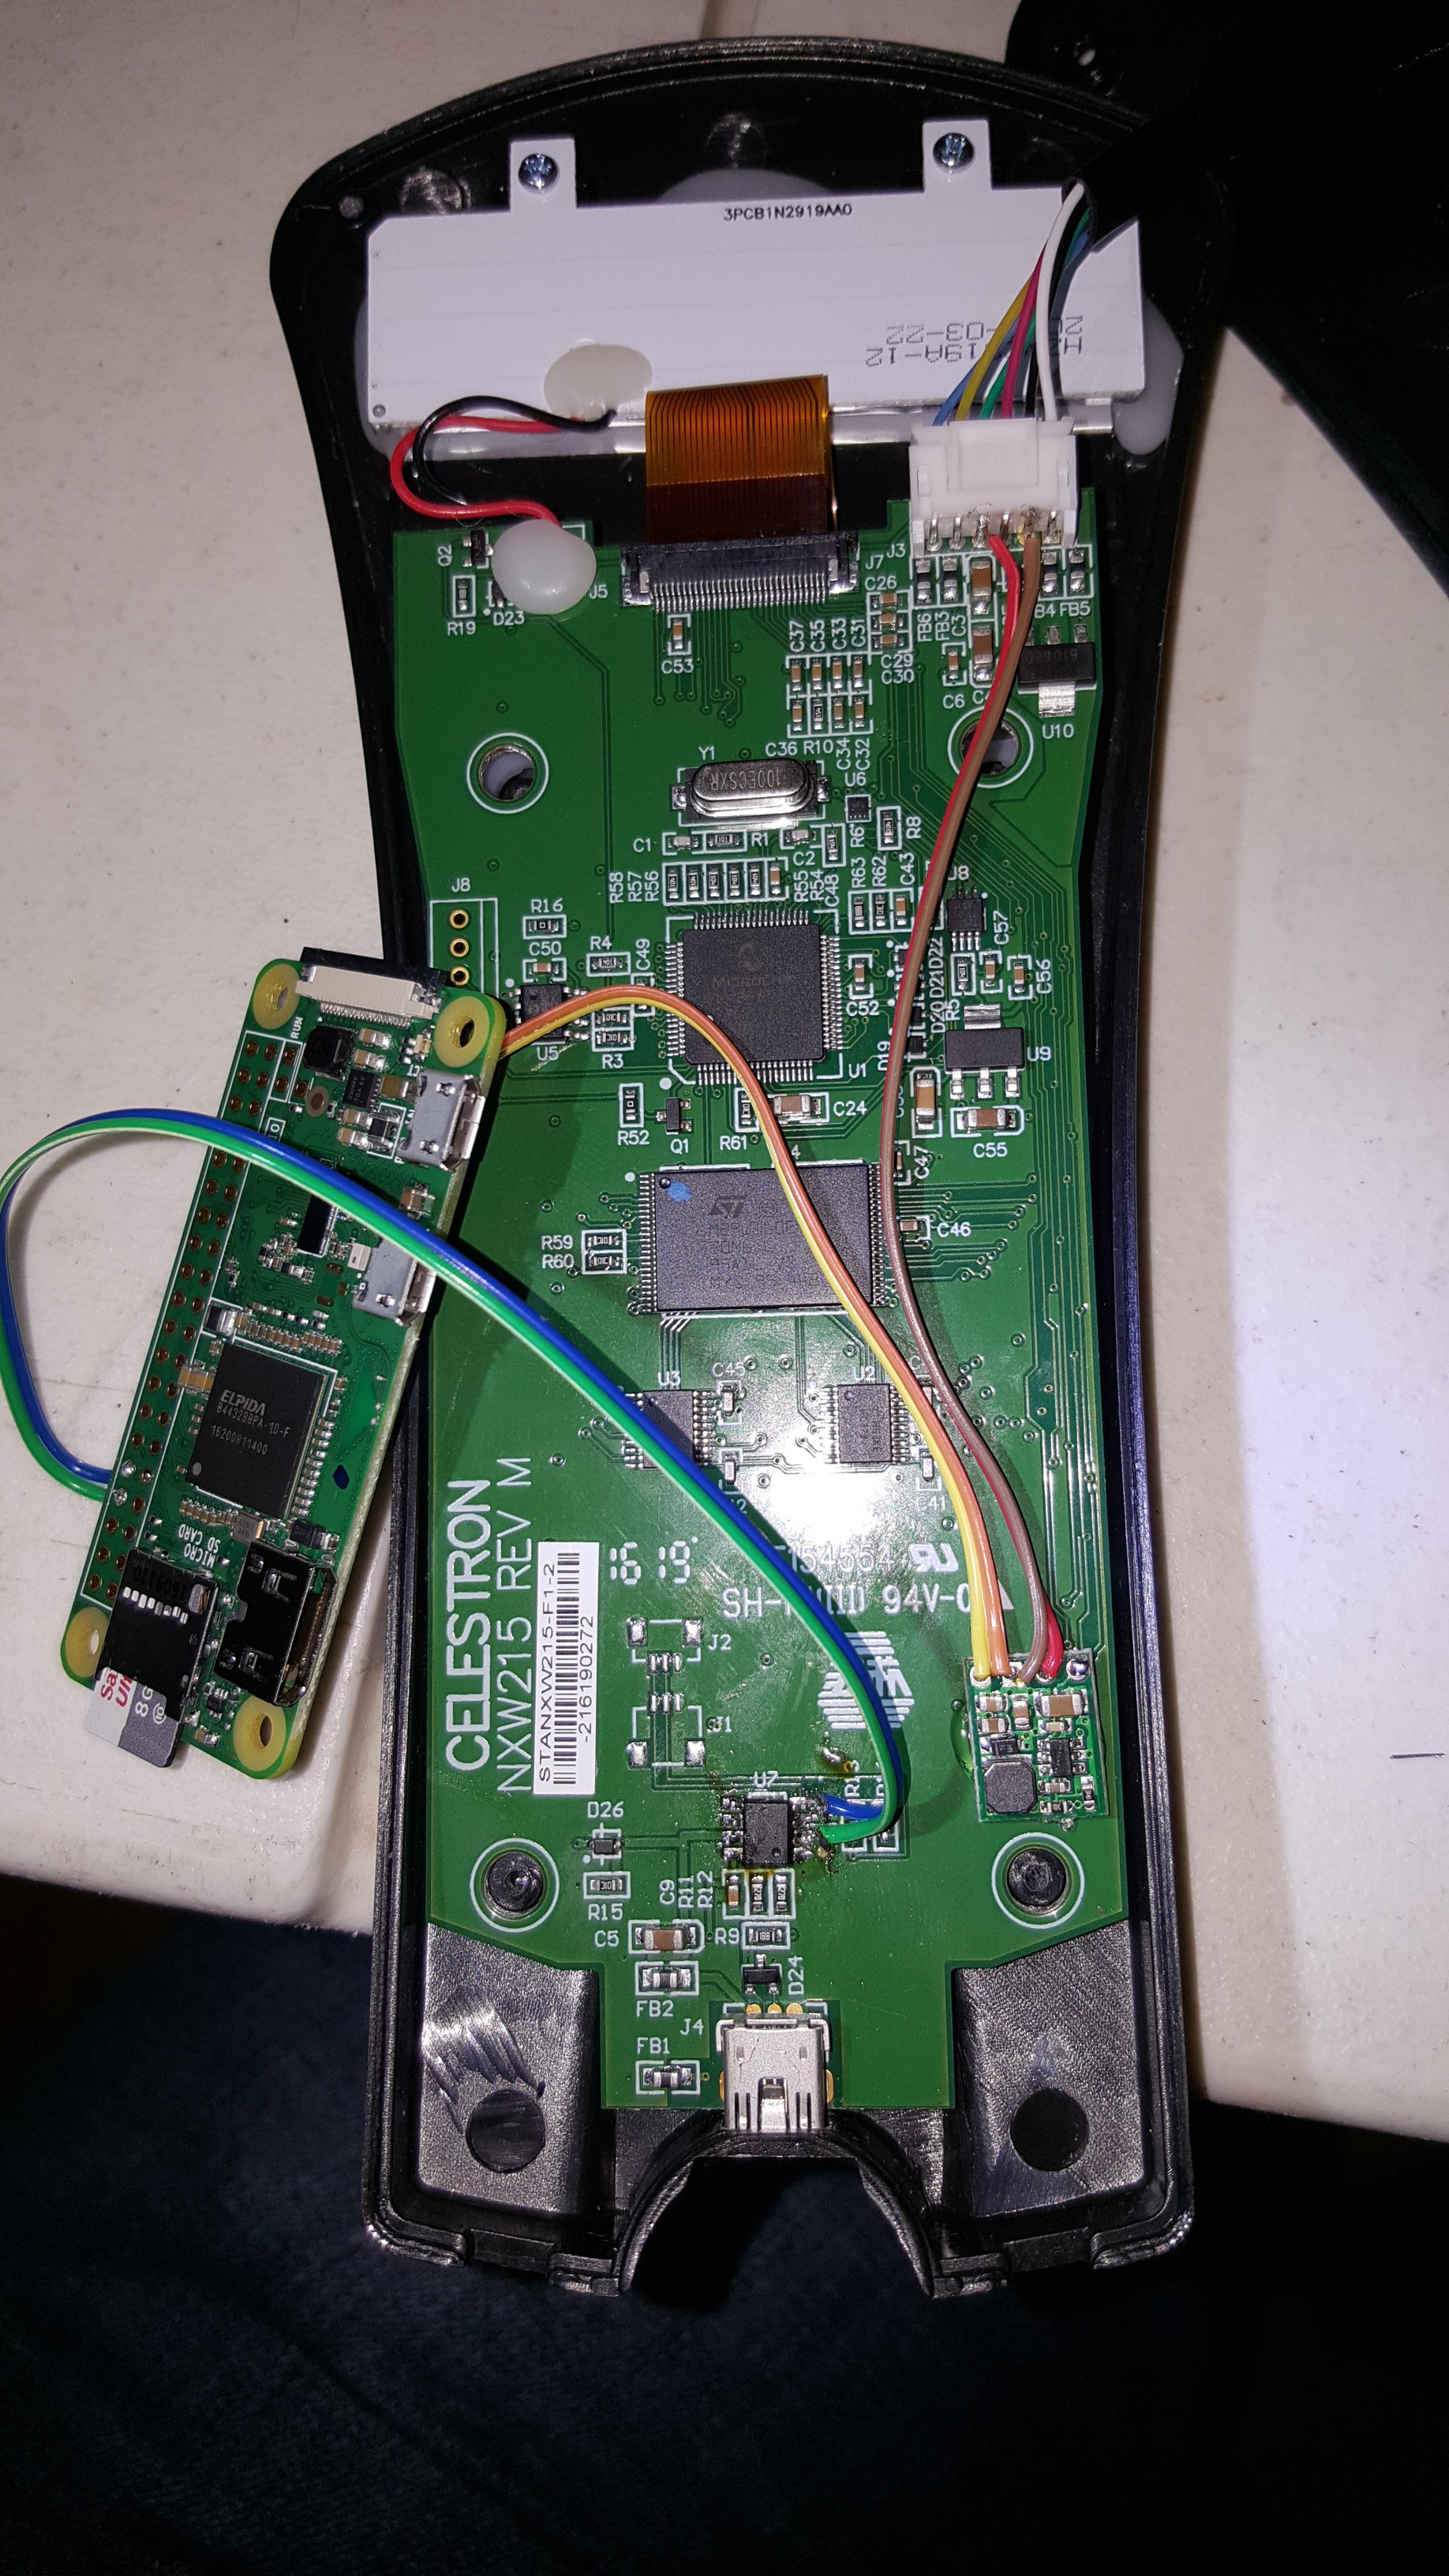
Adding a RTC Module
11/14/2018 at 01:16 • 1 commentI am finding that using NTP for automatically setting my hand controller's time is great, but only when I'm home on my WiFi network. To get accurate time setting done in the field, you have two options. Use a real-time clock (RTC) module that keeps track of time using a small internal battery for power, or use a GPS module that will pull time from satellites signals (and may even have a RTC module built in).
To start, I've settled on using a RTC module (DS3231) from AdaFruit. The DS3231 more accurate than I probably need it to be, but given the wild changes in temperature that my poor telescope experiences throughout a trip, I figured it was worth the extra expense. One could easily go with a less expensive module if price is a concern.
---------- more ----------The module fits inside the hand controller without any problem, and keeps with the "sleeper" look that I like. I really haven't been able to find a GPS unit that can fit inside the controller --if anybody knows of one small enough, let me know in the comments!
Following these directions, I wired up the RTC to my Raspberry Pi Zero W, and secured it in my hand controller. Configuring the Pi took all of ten minutes, and after rebooting I was able to confirm that it worked.
![]()
RTC module wired in, ready for testing In my previous build log, I wrote a script that forces a wait for NTP time to set the system clock before pushing the time to the hand controller over serial. Now that we have an onboard clock, we no longer want to fail before setting the hand controller if the NTP update doesn't succeed. This forces the most accurate method of time setting possible. This can be accomplished by simply commenting out one line:
[...] # if we couldn't get the time in 30s, give up # if [ ${code} != 0 ]; then exit; fi [...] -
Setting the Hand Controller Time on Boot
11/03/2018 at 08:43 • 0 commentsAfter upgrading to the latest version of Raspbian, I took a look through my notes on future work, and realized I could immediately do part of a requirement I set out to do with this project. My hand controller for my Nexstar 6se doesn't have a real time clock (RTC) built into it, which means that every time it loses power, I have to manually reset the time. I'm also lazy, and I don't accurately set the time when I have to enter it by hand, so I could easily be off by a minute or two. To remedy this, I would like to set the time automatically when the Raspberry Pi first starts, allowing me to skip this manual process.
Unfortunately, RPis don't have RTCs either! I can however use my WiFi connection to discover the time using the Network Time Protocol (NTP), and in the future I could add a hardware RTC, or use a GPS module, to keep track of time when a network connection isn't readily available.
---------- more ----------Forcing NTP Update
The NTP service can take several minutes after a reboot to synchronize the time with an external server. In this case, however, we want an immediate time sync. To do this, we will momentarily disable the NTP client daemon, force the update via `ntpd`, and then start the client again. I've added this near the top of my `/etc/rc.local` script which runs at startup.
service ntp stop   # stop the client
ntpd -gq           # force the update
service ntp start  # start things again
Observation shows that this reduces the typical sync time from over three minutes, to less than 15 seconds after startup. I can now inspect get the time from the OS, and then set it on my hand controller using the serial port.
Setting the HC Time
Celestron has published the HC serial protocol, and reading through that I found the following regarding the format of the time when setting it, such that each value is a binary formatted byte.
The format of the time commands is: QRSTUVWX, where:
Q is the hour (24 hour clock).
R is the minutes.
S is the seconds.
T is the month.
U is the day.
V is the year (century assumed as 20).
W is the offset from GMT for the time zone. Note: if zone is negative, use 256-zone.
X is 1 to enable Daylight Savings and 0 for Standard Time.Easy enough; I can actually knock that out with just Bash!
# set the serial port speed
stty -F ${serial} 9600

# get the date in the order the protocol calls for
dtm="$(date -u '+%_H %_M %_S %_m %_d %_y 0 0')"

# H is the command char; the following 8 bytes are the date/time
HEX="\\\\x%02X"
unset FORMAT
for i in {1..8}; do FORMAT="${FORMAT}${HEX}"; done
hex_text="$(printf "H${FORMAT}" ${dtm})"

# send it to the serial port
echo -ne "${hex_text}" > ${serial}
NOTE: I am using the UTC timezone so that I don't have to fuss with daylight savings and whatnot. I don't use my hand controller to look at the local time, so there's no need to go through the extra effort.
Using my Bus Pirate, I was able to confirm that this functioned as expected, so I wrapped everything up into a tidy little script, and I am executing it from the top of my `/etc/rc.local`. I sealed up the HC again, and tested out the timing to ensure that I didn't try to set the time before the HC was ready for serial communications, and haven't seen any problems yet! If I find that I need it in the future, I can probably set up a button on my joystick controller to force an update of the HC time.
EDIT (20181208): I've updated the script to include space padded date components. It was pointed out to me by [] that printf was interpreting anything with a zero in front as an octal character.
-
Upgrading Raspbian Jesse to Stretch
11/03/2018 at 07:31 • 0 commentsIt's been a while since I updated the software on the Raspberry Pi Zero W that I had installed in my telescope hand controllers, mainly because I was afraid that it would turn out to be a huge time sink to get it as stable as it was originally. This turned out to not be the case. The upgrade process going from Jesse to Stretch is quite slow, but very straightforward and I was able to multitask while doing it.
---------- more ----------As root, upgrade the operating system to the latest version:
sed -i 's/jessie/stretch/g' /etc/apt/sources.list
apt-get update
apt-get upgrade -y
apt-get update
apt-get dist-upgrade -y
As root, remove all of the old libindi packages for Jesse:
apt-get remove atikccd fliusb-dkms fliusb-source indi-aagcloudwatcher \
  indi-aagcloudwatcher-dbg indi-apogee indi-apogee-dbg indi-asi indi-asi-dbg indi-bin \
  indi-dbg indi-dsi indi-dsi-dbg indi-duino indi-duino-dbg indi-eqmod indi-eqmod-dbg \
  indi-ffmv indi-ffmv-dbg indi-fishcamp indi-fishcamp-dbg indi-fli indi-fli-dbg \
  indi-gphoto indi-gphoto-dbg indi-gpsd indi-maxdomeii indi-maxdomeii-dbg indi-qhy \
  indi-qhy-dbg indi-qsi indi-qsi-dbg indi-sbig indi-sbig-dbg indi-sx indi-sx-dbg \
  libapogee3 libapogee3-dev libapogee-dbg libfishcamp libfishcamp-dev libfli1 \
  libfli-dev libindi1:armhf libindi-data libindi-dev libqhy libqsi7 libqsi-dbg \
  libqsi-dev shoestring usbfocus
As root, install all of the new ones for Stretch (directions from here):
apt-get install cdbs libcfitsio-dev libnova-dev libusb-1.0-0-dev libjpeg-dev \
  libusb-dev libtiff5-dev libftdi1-dev fxload libkrb5-dev libcurl4-gnutls-dev \
  libraw-dev libgphoto2-dev libgsl-dev dkms libboost-regex-dev libgps-dev \
  libdc1394-22-dev

curl -o libindi_rpi.tgz -L http://indilib.org/download/raspberry-pi/send/6-raspberry-pi/9-indi-library-for-raspberry-pi.html

tar -xzf libindi_rpi.tgz

dpkg -i *.deb 2>&1 | tee install.log
I also had to reconfigure (pair/trust/connect) my Bluetooth controller using my notes from when I initially setting it up.
-
It works really well!
05/30/2017 at 02:10 • 0 commentsI wanted to get some photography of Jupiter's Great Red Spot while it was facing us, but unfortunately it was too early in the evening to do a proper alignment using Polaris. This meant that I'd have to hand align the telescope as my three minute exposure progressed. Normally this would involve using the corded hand controller, which meant I'd have to hold perfectly still to avoid introducing vibration into the telescope through the cord, but with my wireless controller, this was not only easy, but I could comfortably sit several feet away closer to my laptop screen! The result speaks for itself:
![]()
Equipment: C9.25 on AVX + Neximage 10
Parameters: Y800 640x480; 30FPS & 1/30s @ 3.5dB for 03:00
Processing: 3594 frames >> PIPP >> 1200 frames >> Registax 6
-
Automatic connection of Bluetooth controller
05/28/2017 at 00:03 • 0 commentsI was having problems with consistent connections of the Bluetooth controller, and found that despite configuring calibration settings at boot time, they were lost if the device wasn't already connected. I ended up writing a script that could be run periodically using a cron job that would attempt to connect the joystick if it wasn't already, and then calibrate it if it wasn't already.
Here's the complete code: https://gist.github.com/DaneGardner/a3ff6124e1ffaac34a6823b3d5235a26
Save that file to your home directory on the Raspberry Pi, and ensure that it's executable. Then add a cron job that runs every minute using `crontab -e` at the command line:
* * * * * ~/joystick-connect.sh
Now, if your joystick isn't on and ready to connect when you start your telescope, it will take a maximum of one minute before it's discovered, connected, and configured once you do turn it on!
-
Using a Bluetooth joystick for slew control
04/11/2017 at 02:11 • 0 commentsI picked up a cheap Bluetooth SNES controller to allow me to slew my telescope without disturbing the setup with vibrations from a wired hand controller. This should allow things to settle more quickly after a manual change to the scope's position.
To configure the RPi for a Bluetooth joystick, I used `bluetoothctl` at the command line:
bluetoothctl
[bluetooth]# agent on
[bluetooth]# default-agent
[bluetooth]# scan on
...
[bluetooth]# pair XX:XX:XX:XX:XX:XX
[bluetooth]# trust XX:XX:XX:XX:XX:XX
[bluetooth]# connect XX:XX:XX:XX:XX:XX
[bluetooth]# quit
Unfortunately, the joystick driver in libindi forgets any remapping you may perform in the UI, despite saving and reloading the configuration. To work around this, I changed the button mapping at the OS level to match what I wanted, and have it automatically reconfigure each time the RPi reboots.
apt-get install joystick cat > /etc/joystick.cal < EOF jscal -u 8,0,1,2,5,9,10,16,17,16,315,304,305,314,307,308,310,311,316,317,318,319,306,309,312,313 /dev/input/js0 jscal -s 8,1,0,127,127,-4194176,-4227201,1,0,127,127,4227201,4194176,1,0,127,127,2147483647,2147483647,1,0,127,127,2147483647,2147483647,1,0,0,0,2147483647,2147483647,1,0,0,0,2147483647,2147483647,1,0,0,0,2147483647,2147483647,1,0,0,0,2147483647,2147483647 /dev/input/js0 EOF echo "source /etc/joystick.cal" >> /etc/rc.local![]() Be sure to add the 'Joystick' driver to the libindi server configuration in the web manager interface!
Be sure to add the 'Joystick' driver to the libindi server configuration in the web manager interface!That's it. It works great for me now!
-
Modifying a USB Nexstar hand controller
04/11/2017 at 00:20 • 0 commentsThe project instructions detail how to modify the serial version of the hand controller, which is more common on the smaller mounts like that found on my Nexstar 6SE. However, I also have an AVX mount for my other telescope that I'd like modified as well, but its hand controller is USB based.
![]()
Turns out it's even easier to modify than the serial version because the pins on the USB chip are significantly larger! Please note that the USB chip is upside down when compared to the serial adapter chip of the other HC (pin 1 is to the lower-right, instead of the upper-left).
Raspberry Pi Driven Telescope Mount
full telescope control over WiFi using INDI on a RPi Zero W


 Be sure to add the 'Joystick' driver to the libindi server configuration in the web manager interface!