Close
0%
0%

NTSC/PAL Video Display Shield

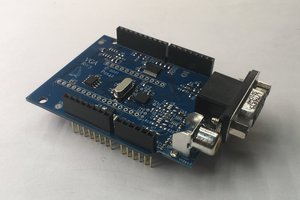
An Arduino NTSC/PAL video display shield with integrated framebuffer and composite video output.

Similar projects worth following
Starting from
$35.00
Wolfi has 197 orders / 12reviews
Ships from Canada
This board is now retired.
A new design with up to 4x composite video out does exist.
https://hackaday.io/project/170499-vga-shield-wing

The Arduino family of compatible boards is lacking a solid hardware support option to display images, animations or video. This board provides an analog composite video display with integrated frame buffer memory accessible through SPI or parallel bus. It will not display 4K video but somebody will hack it to run Doom, Joust or Ultra-Cricket. PAL, NTSC and VGA output formats are supported, resolution is up to 640x480 with reduced color count.
Currently NTSC 320x200 (40x25 characters text mode) and PAL 300x240 (37x30 characters text mode) resolutions are working with an identical color map.
A 2Mbit SPI FLASH memory is available on-board.
Design data is published on my GitHub.

The heart of this design is the VLSI VS23S010D-L chip. It is a 1 Megabit SPI SRAM with Serial and Parallel Interfaces and Integrated Video Display Controller, which outputs a composite video signal.

Possible video resolutions, PAL and NTSC modes might be exclusive depending on the mounted crystal (4.433618MHz or 3.579545MHz):
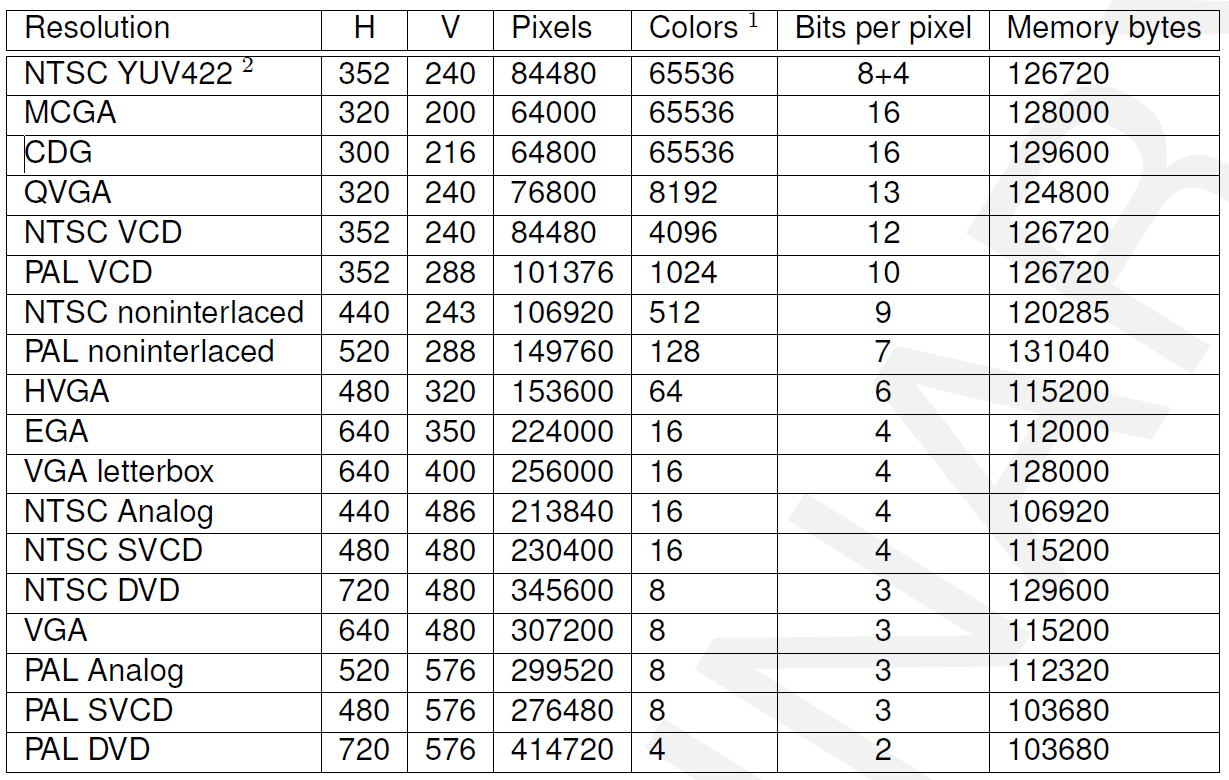
The chip has a 3.3V interface, so a level shifter logic is required, which is done by a 74LVC4245A buffer, which is able to handle SPI Mbps speed better that a simple FET based level shifter. A footprint for a 512Kbit EEPROM for bitmaps and character memory is added, but is probably too slow for effective operation. On a suggestion of [kbdhog] the current version does have a 2Mbit SPI FLASH chip for better speed and memory size. Now I am dreaming of SPI DMA, which just gave me an idea of a small PLD and a parallel flash memory to implement that.

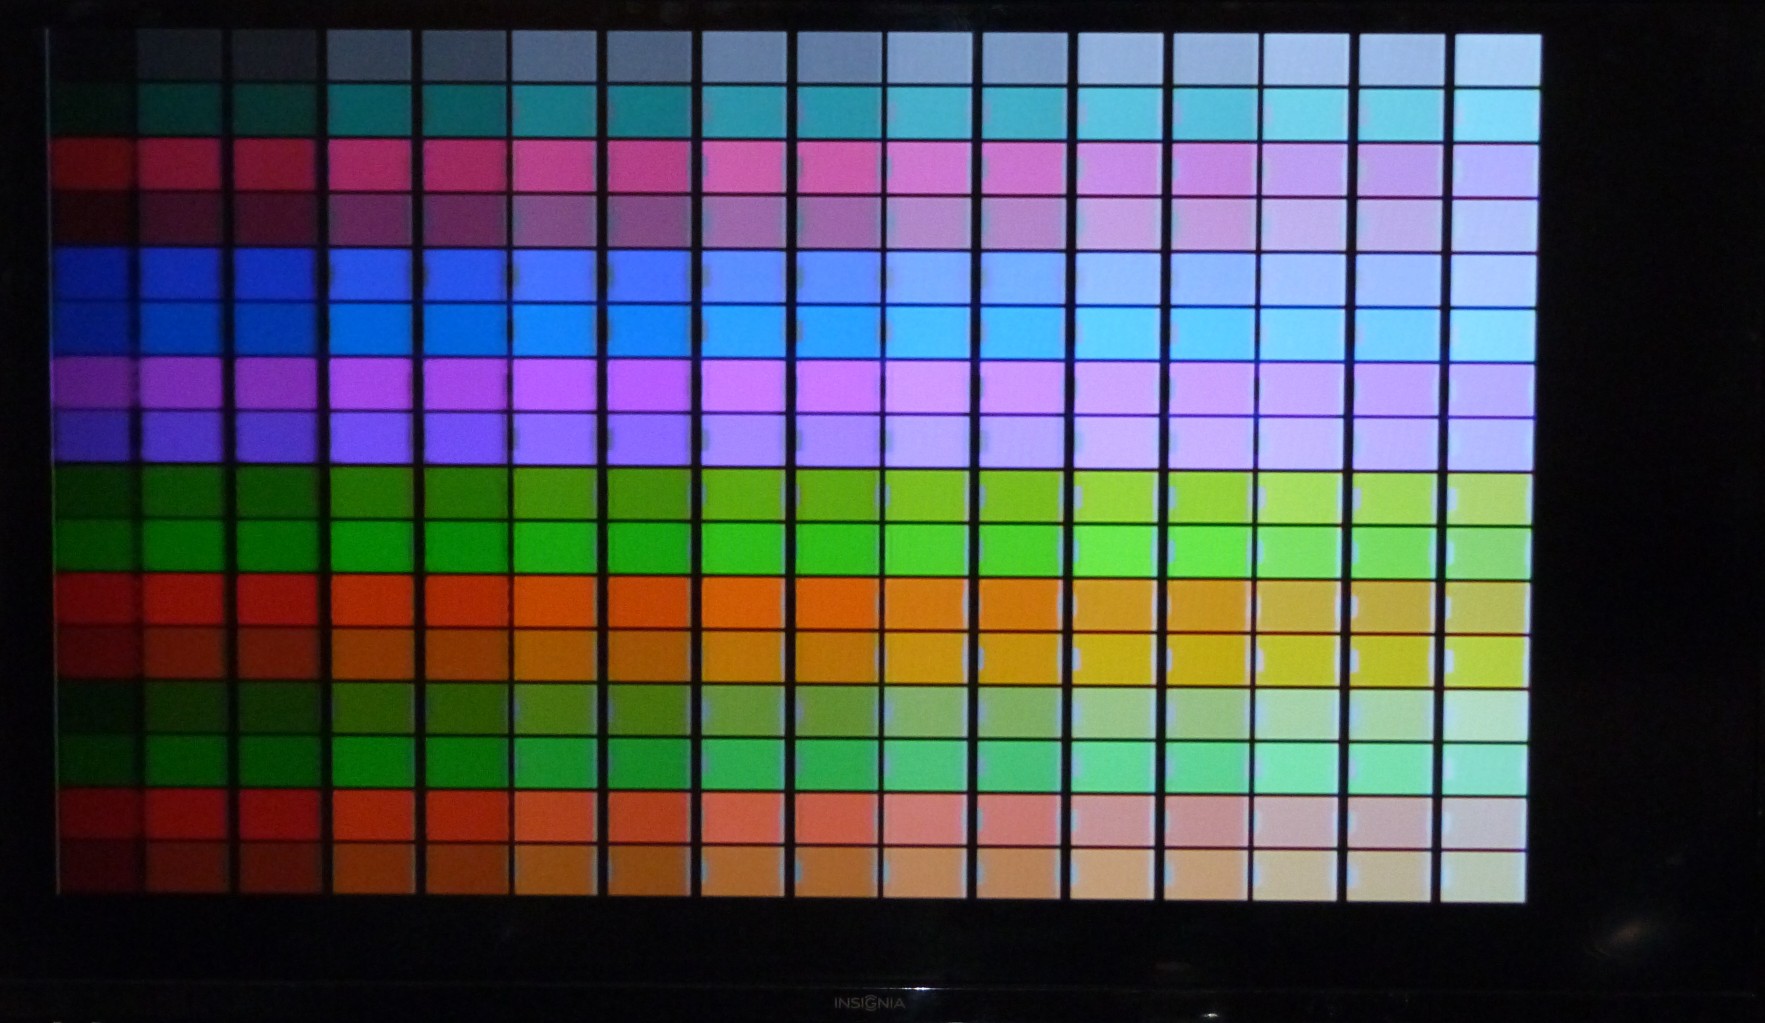
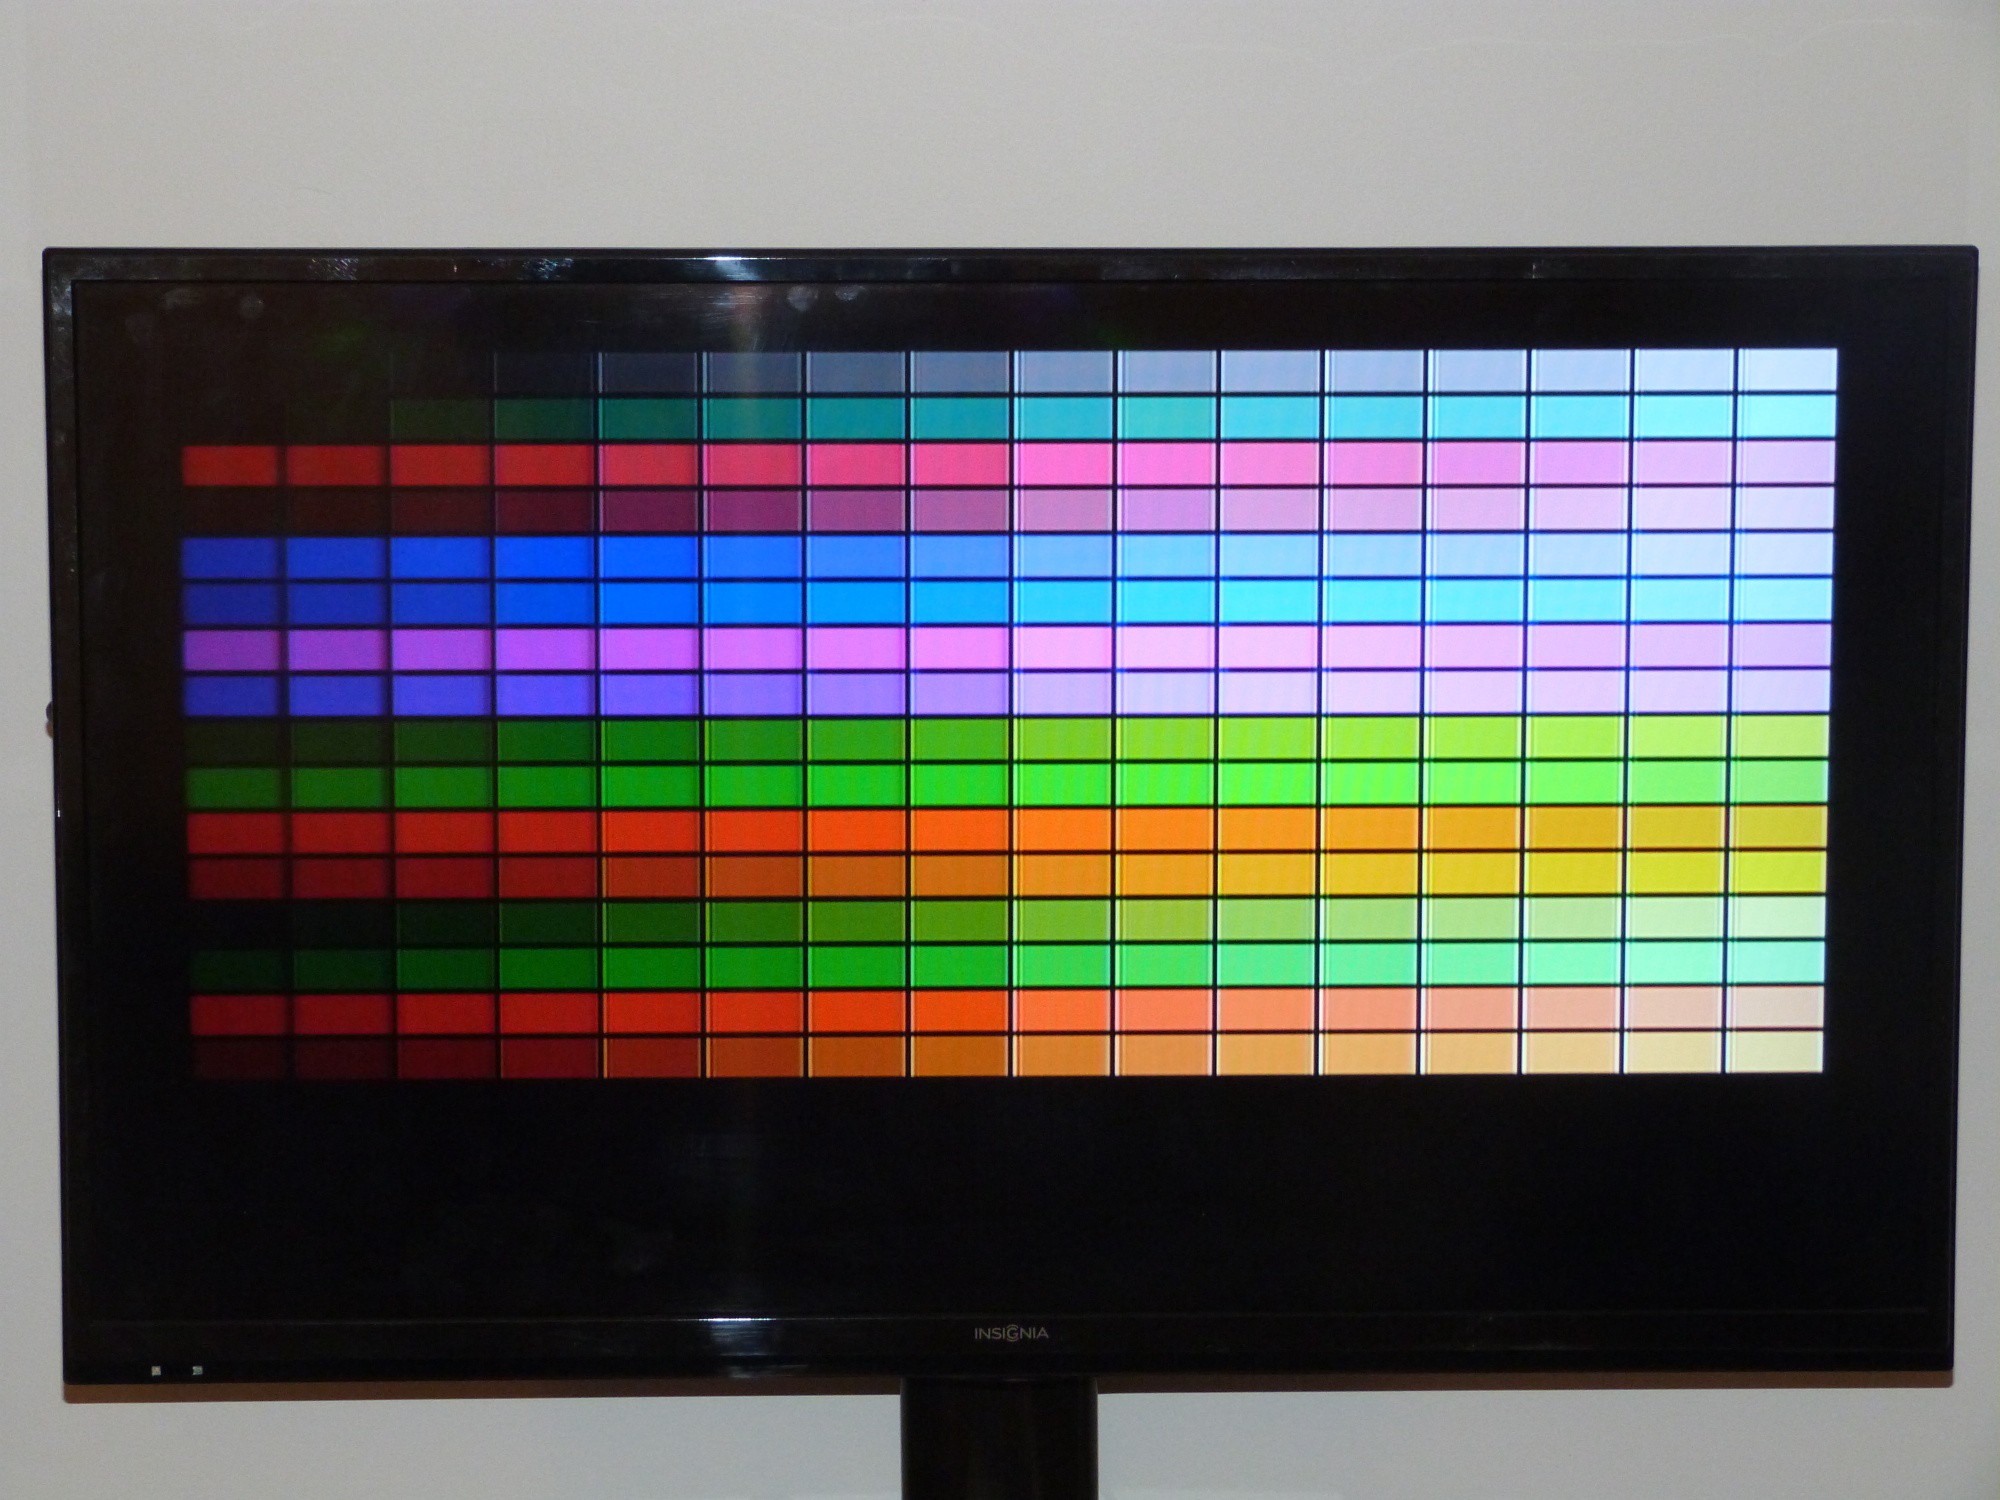
Rev3 of the board (with added SPI FLASH) is being designed, might be the final one if things go well. Writing SW is so hard in comparison. Currently NTSC 320x200 and PAL 300x240 resolutions are working with an identical color bar test image. This is important to have an unified RGB to YUV conversion table. Both resolutions have 8bit color depth. 640x480 resolution is being worked on now.

Arduino Mega and Due are supported in the library, to use a HW SPI an extra cable is needed. Using a soft SPI should be possible but I have not tried this yet.

The circuit on the bottom left of the rev1 schematic is used to fill the 10cm x 10cm PCB space and left to the reader to figure out its functionality. ;-) I will end up with ~780 copies of this circuit which will last a lifetime or they might show up on Tindie.

  • 1 × VLSI VS23S010D-L 1 Mbit SPI/8-Bit Parallel Bus SRAM with Video Display Controller
  • 1 × Winbond W25X20CLSNIG SPI FLASH Memory
  • 3 × Res 75R 1% 0.1W 0603 Resistor
  • 2 × RES, 22R0, 1%, 0.1W, 0603 Resistor
  • 1 × RES, 1MEG, 1%, 0.125W, 0603 Resistor

View all 16 components

  • Images

    MagicWolfi06/21/2019 at 23:49 0 comments

    Working on a function to display images. BMP over UART, we'll see how that goes.

    More to come... soon.

    The protocol changed to UART-2-Flash and display image from Flash. Making progress. Not on Github yet :(

  • PCB hacking

    MagicWolfi02/28/2019 at 01:54 0 comments

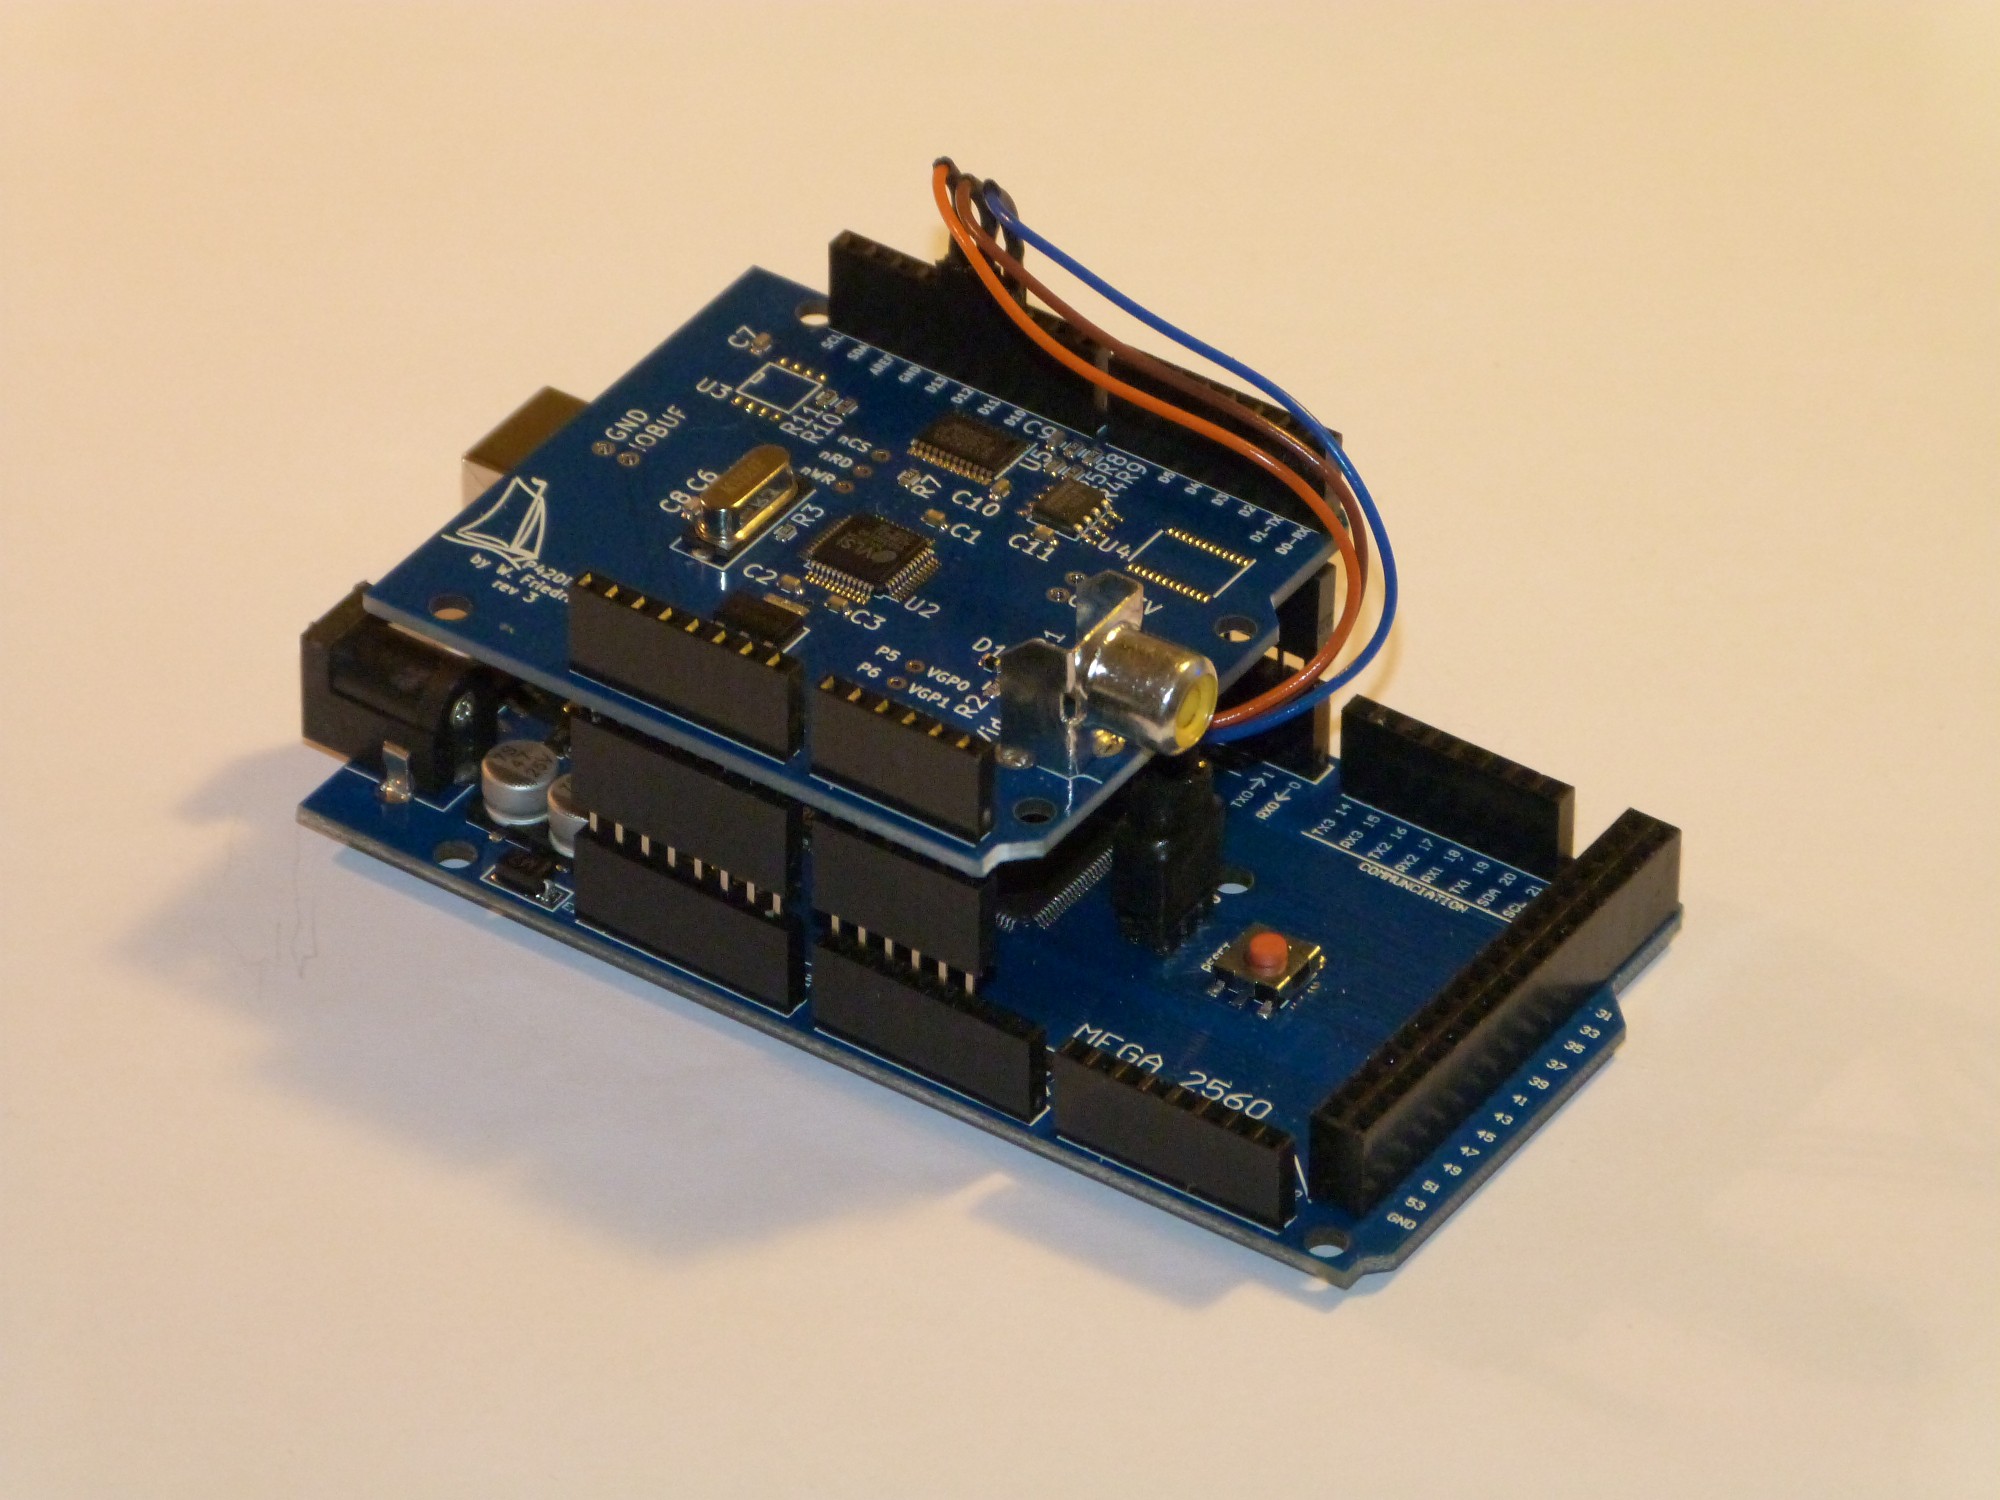
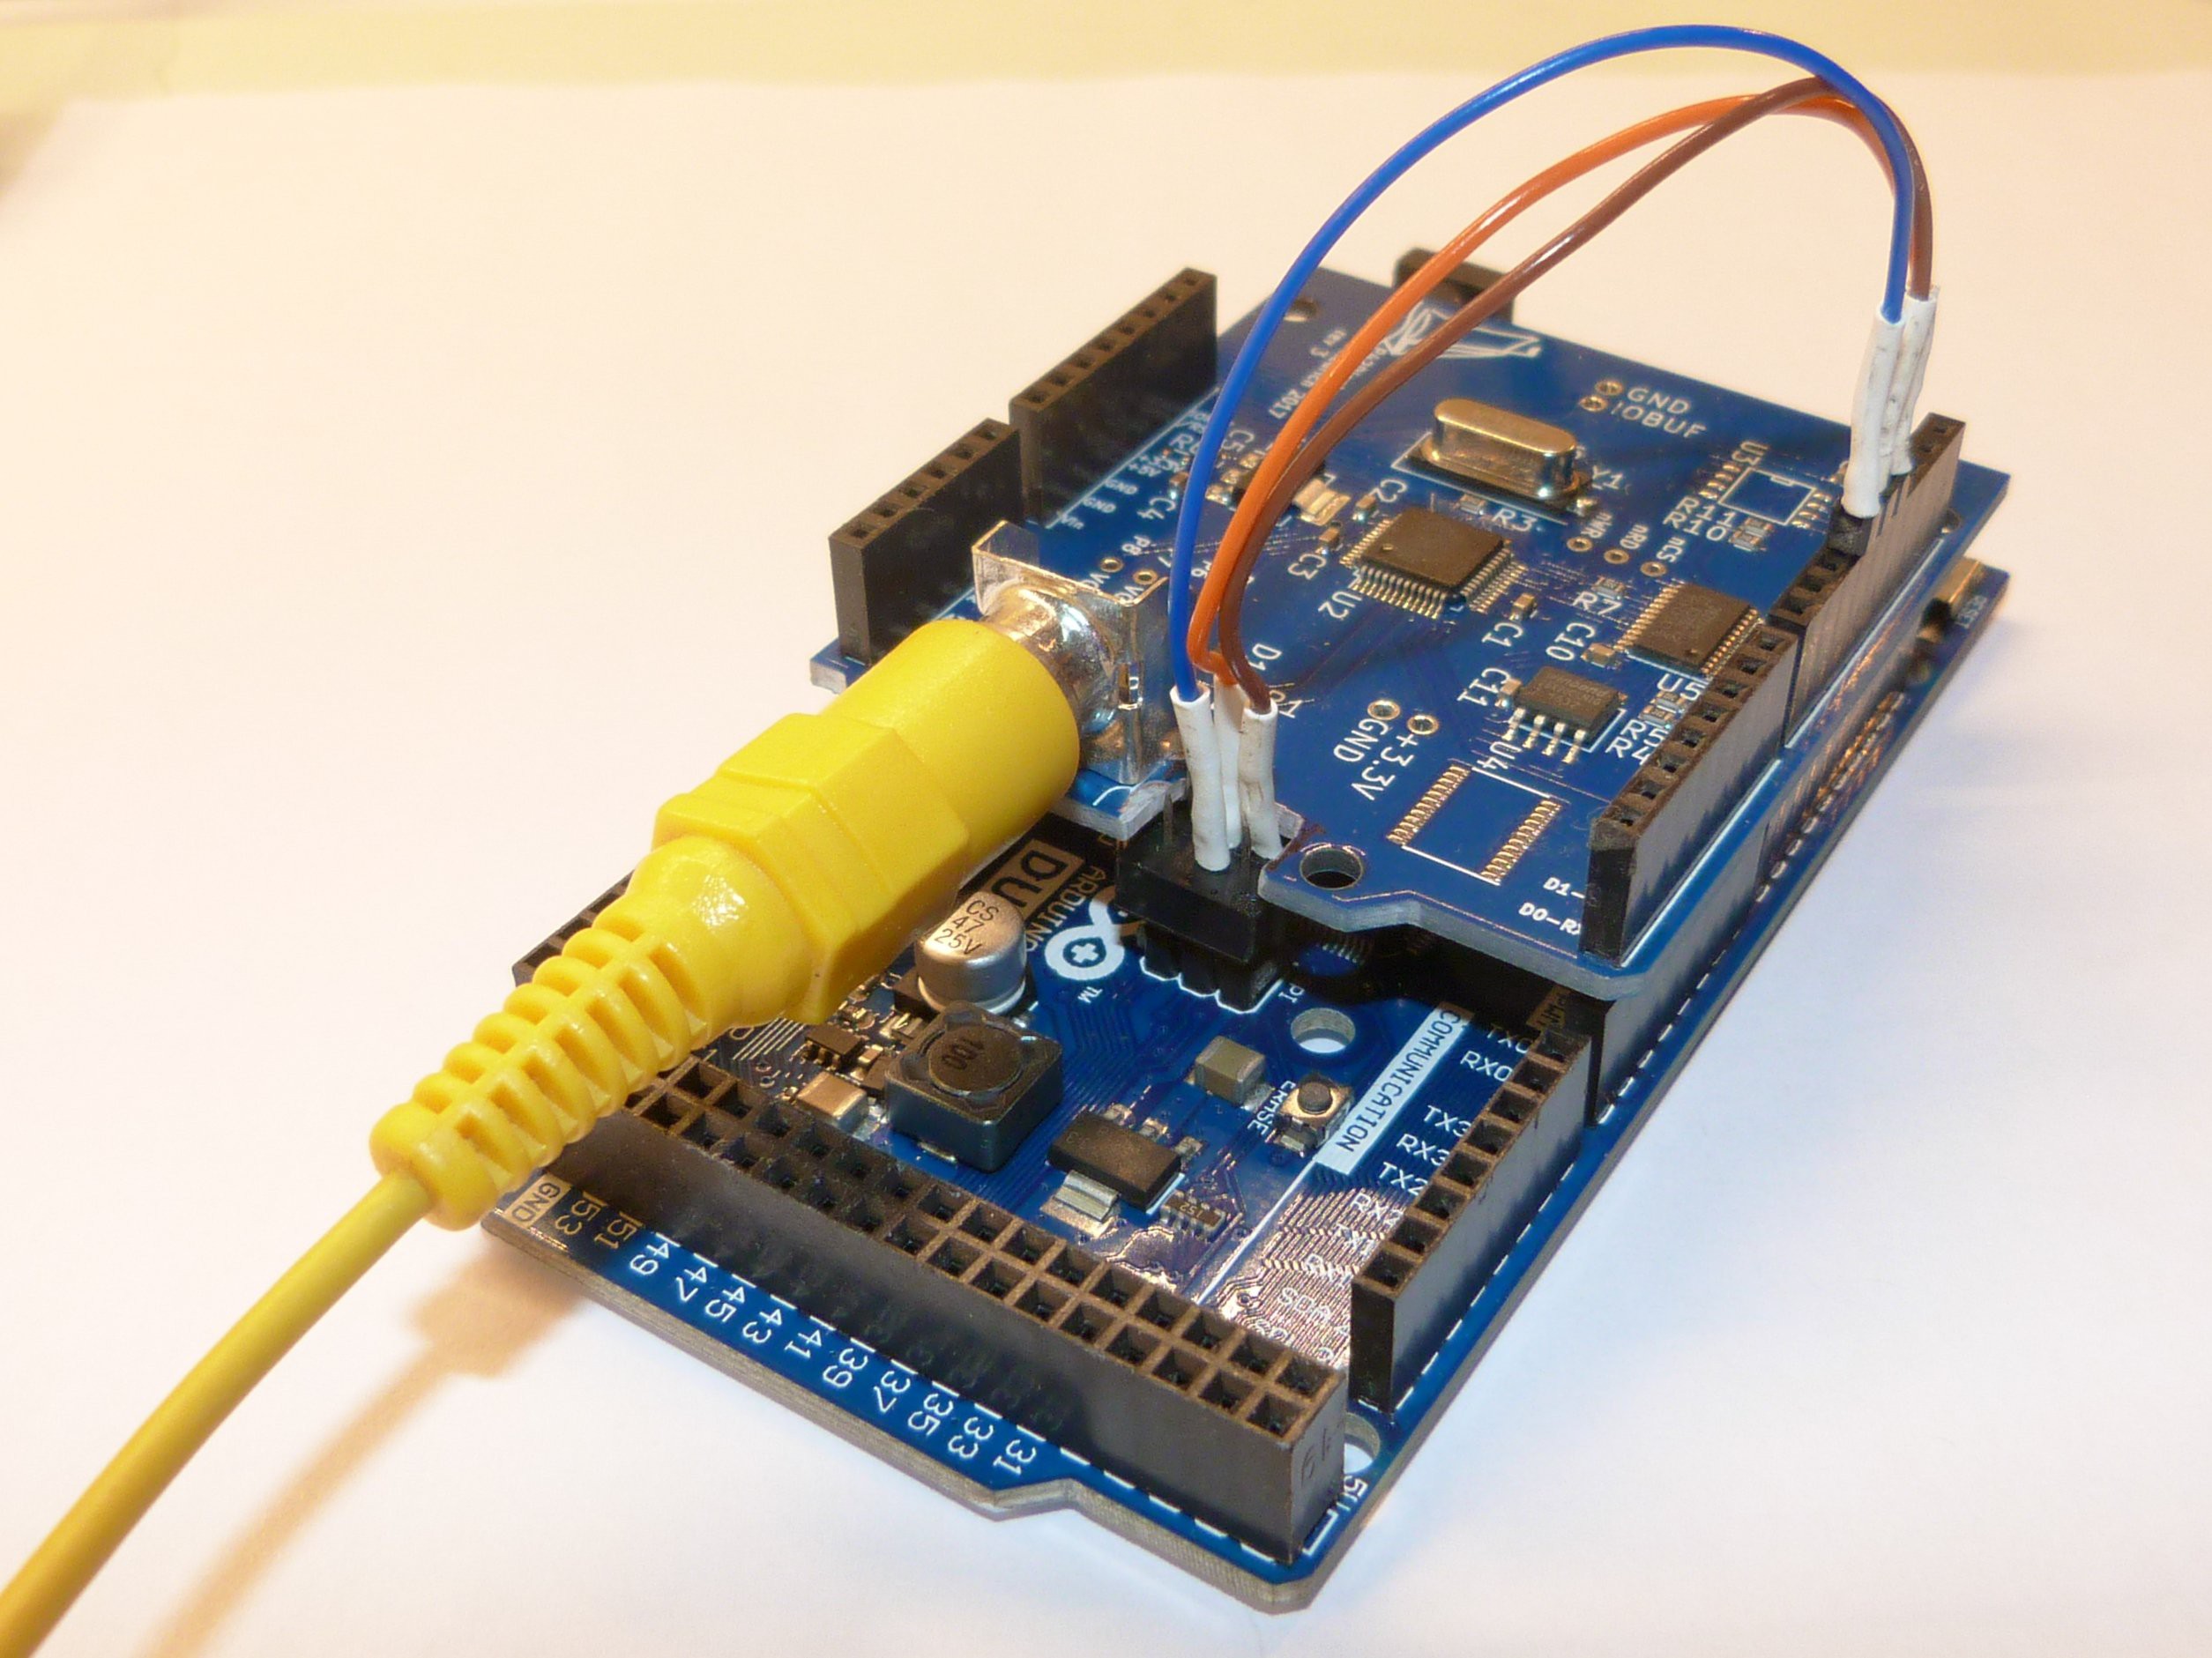
    To use the Video Display Shield with an Arduino Mega or Due, a cable to connect the SPI port to the shield is required. The cable would interfere with the shield, so I had to use an extra set of Arduino headers to raise the shield and open up some room underneath. Here demonstrated with a Mega board.

    To make the system more compact, I literally hacked the shield (with a Dremel) to provide an open slot to feed the cable through without interference. 

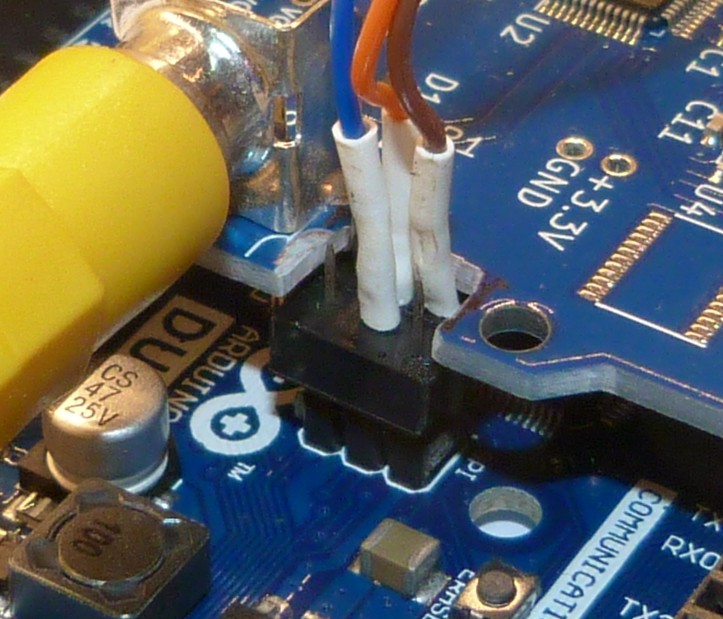
    And a closeup for the details.

    Another option would be to use a soft core (bitbang) SPI and assign the standard Uno SPI pins. This depends on the application.

  • Boing Ball Video

    MagicWolfi04/05/2018 at 00:49 0 comments

    Finally I have got the animation demo with the famous Amiga Boing ball running. The video quality is not stunning, but it shows what is possible with very little program overhead once the memory is set up. Information on how to do this will be soon below in the instructions and the code is on Github.

  • Selling on Tindie and docs

    MagicWolfi03/17/2018 at 01:39 0 comments

    Finally the Arduino library shows enough features and I have built and tested some modules. The boards have been partly assembled (everything SMD) and shipped from @Elecrow. I added the through hole shield connectors and RCA jack and programmed the character bitmaps into FLASH. Now I have opened my brandnew Tindie store and have stock for sale. Code and documentation can be found on my Github.

    BTW, the manufacturing was flawless and communication with Elecrow was delightful.

  • PAL vs. NTSC

    MagicWolfi02/25/2018 at 21:02 0 comments

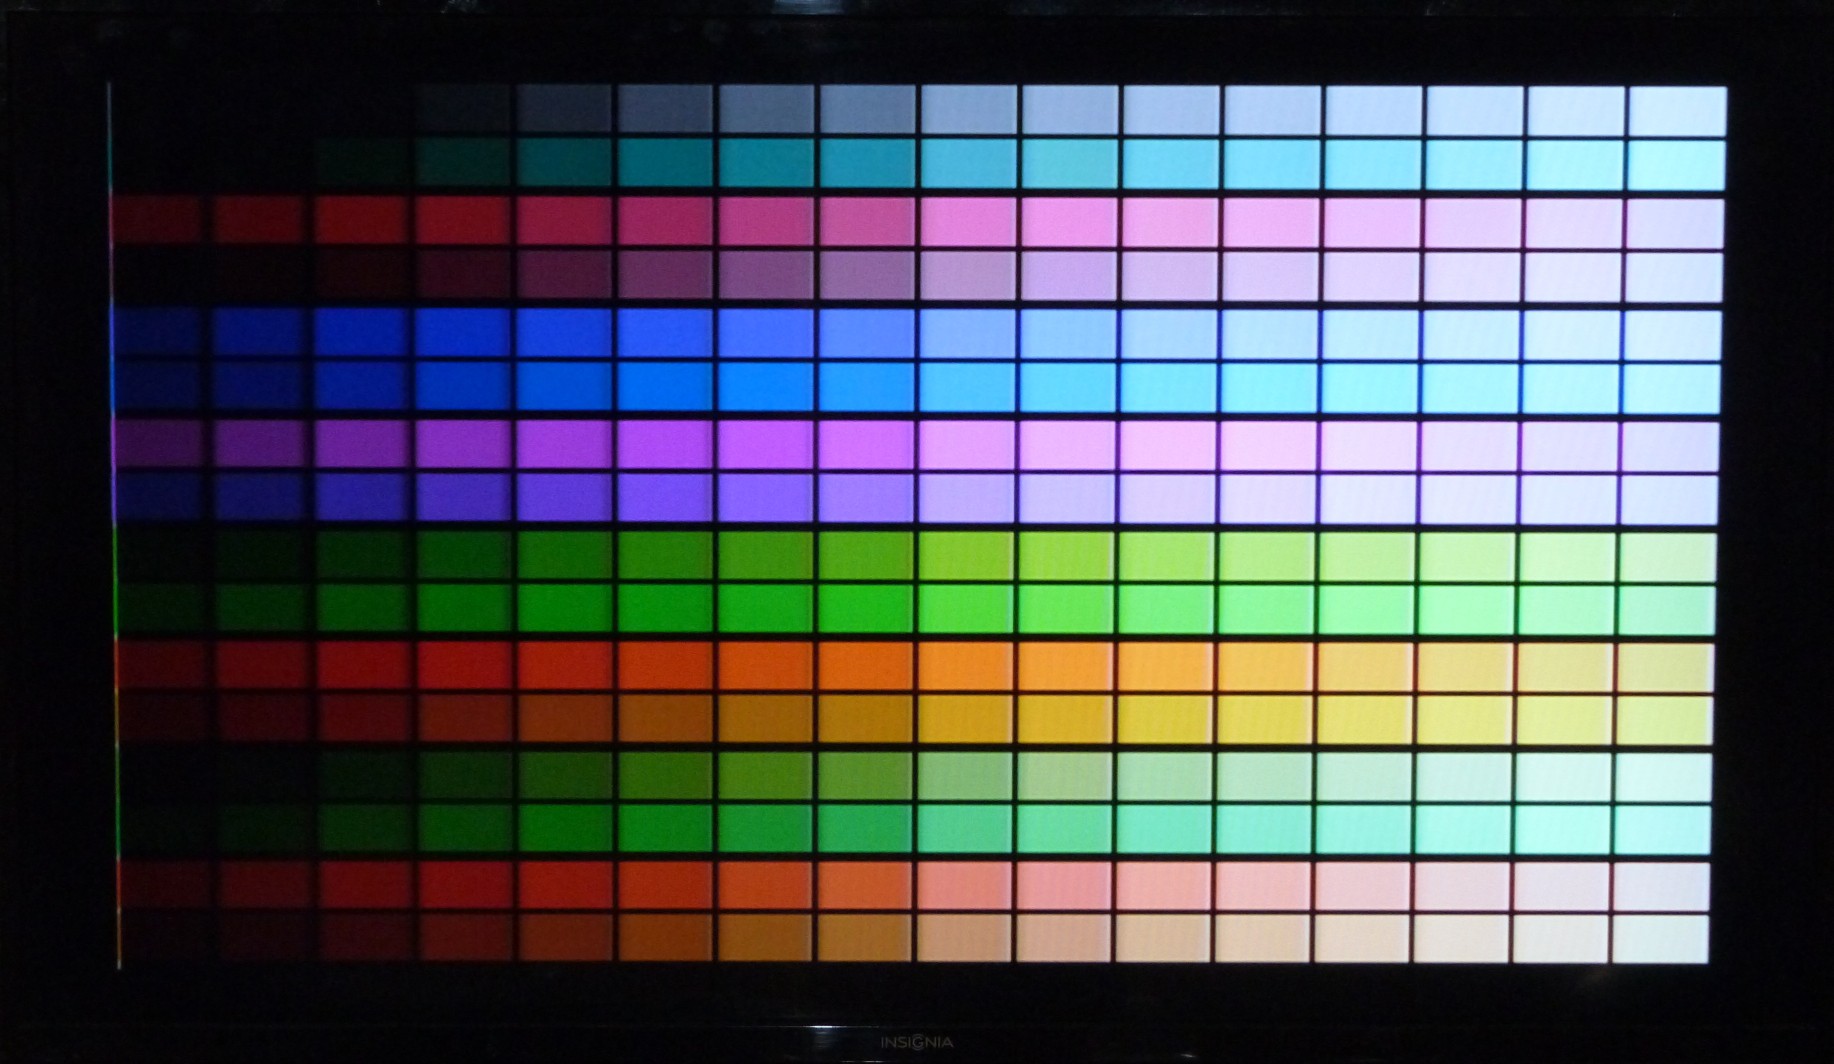
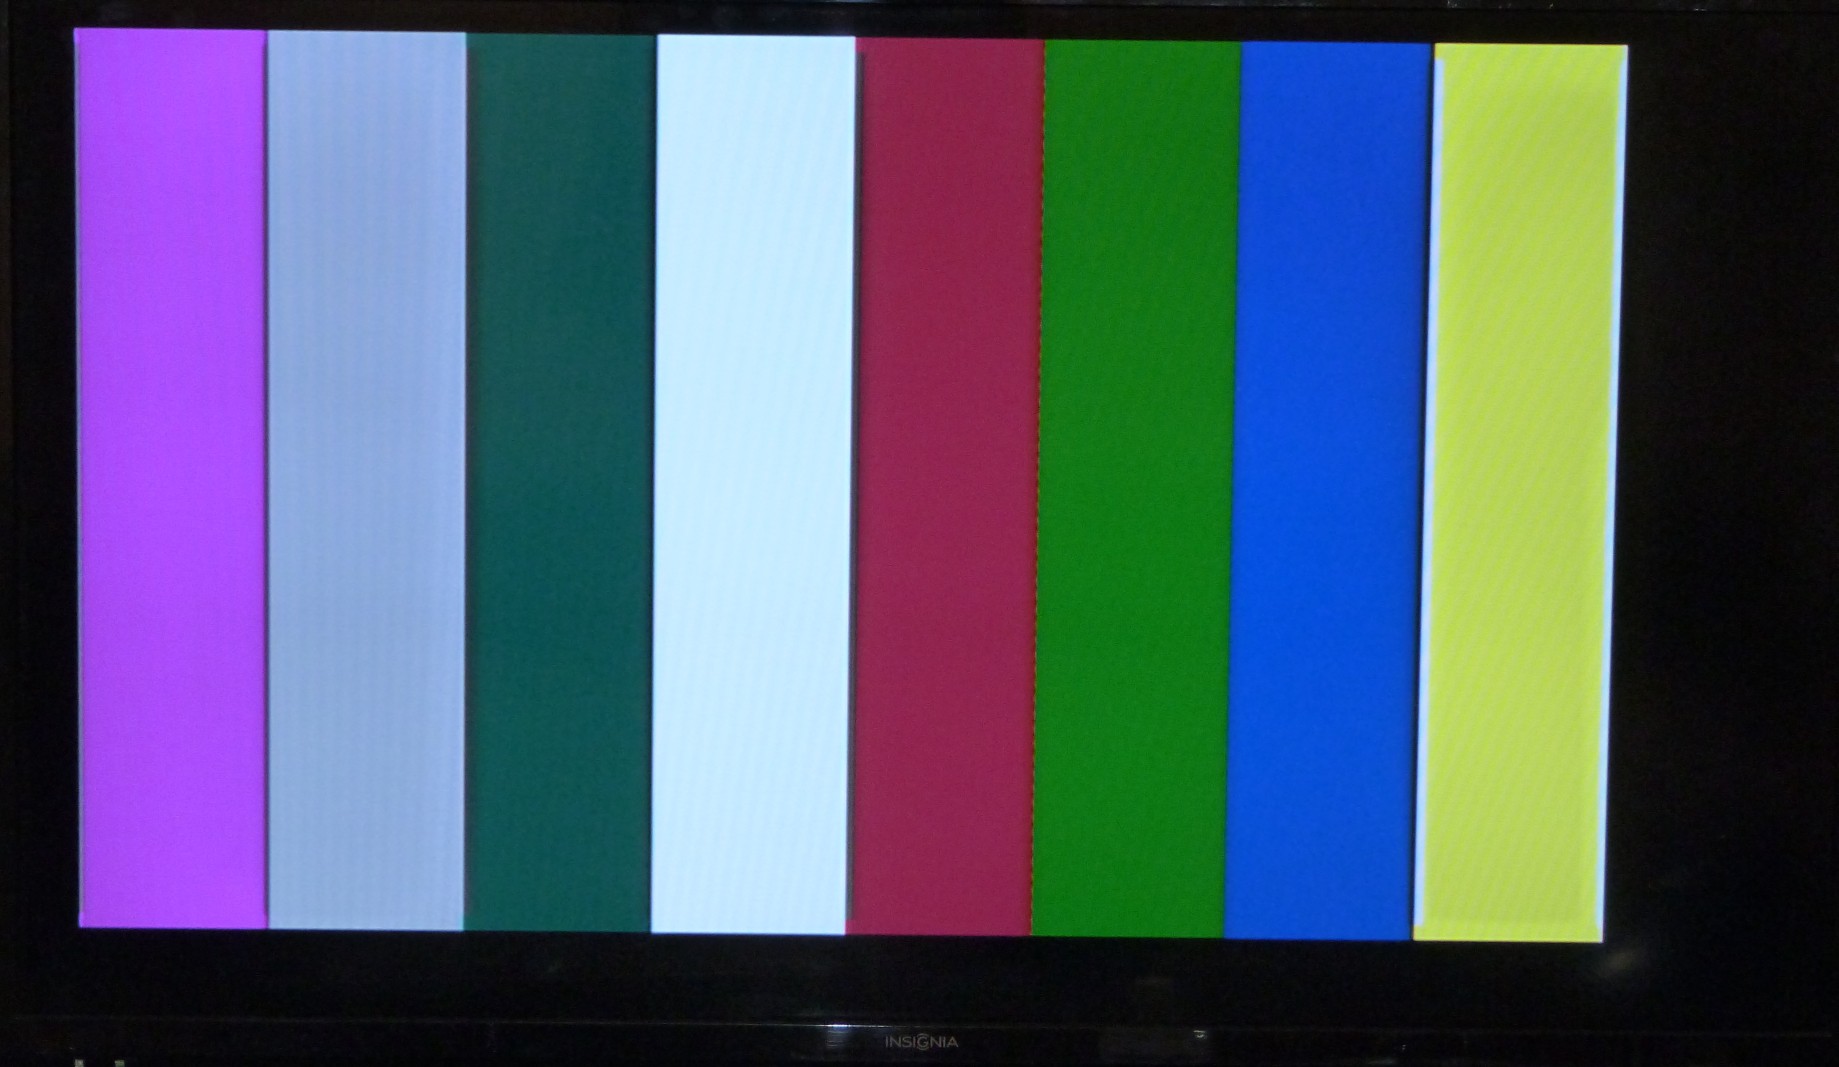
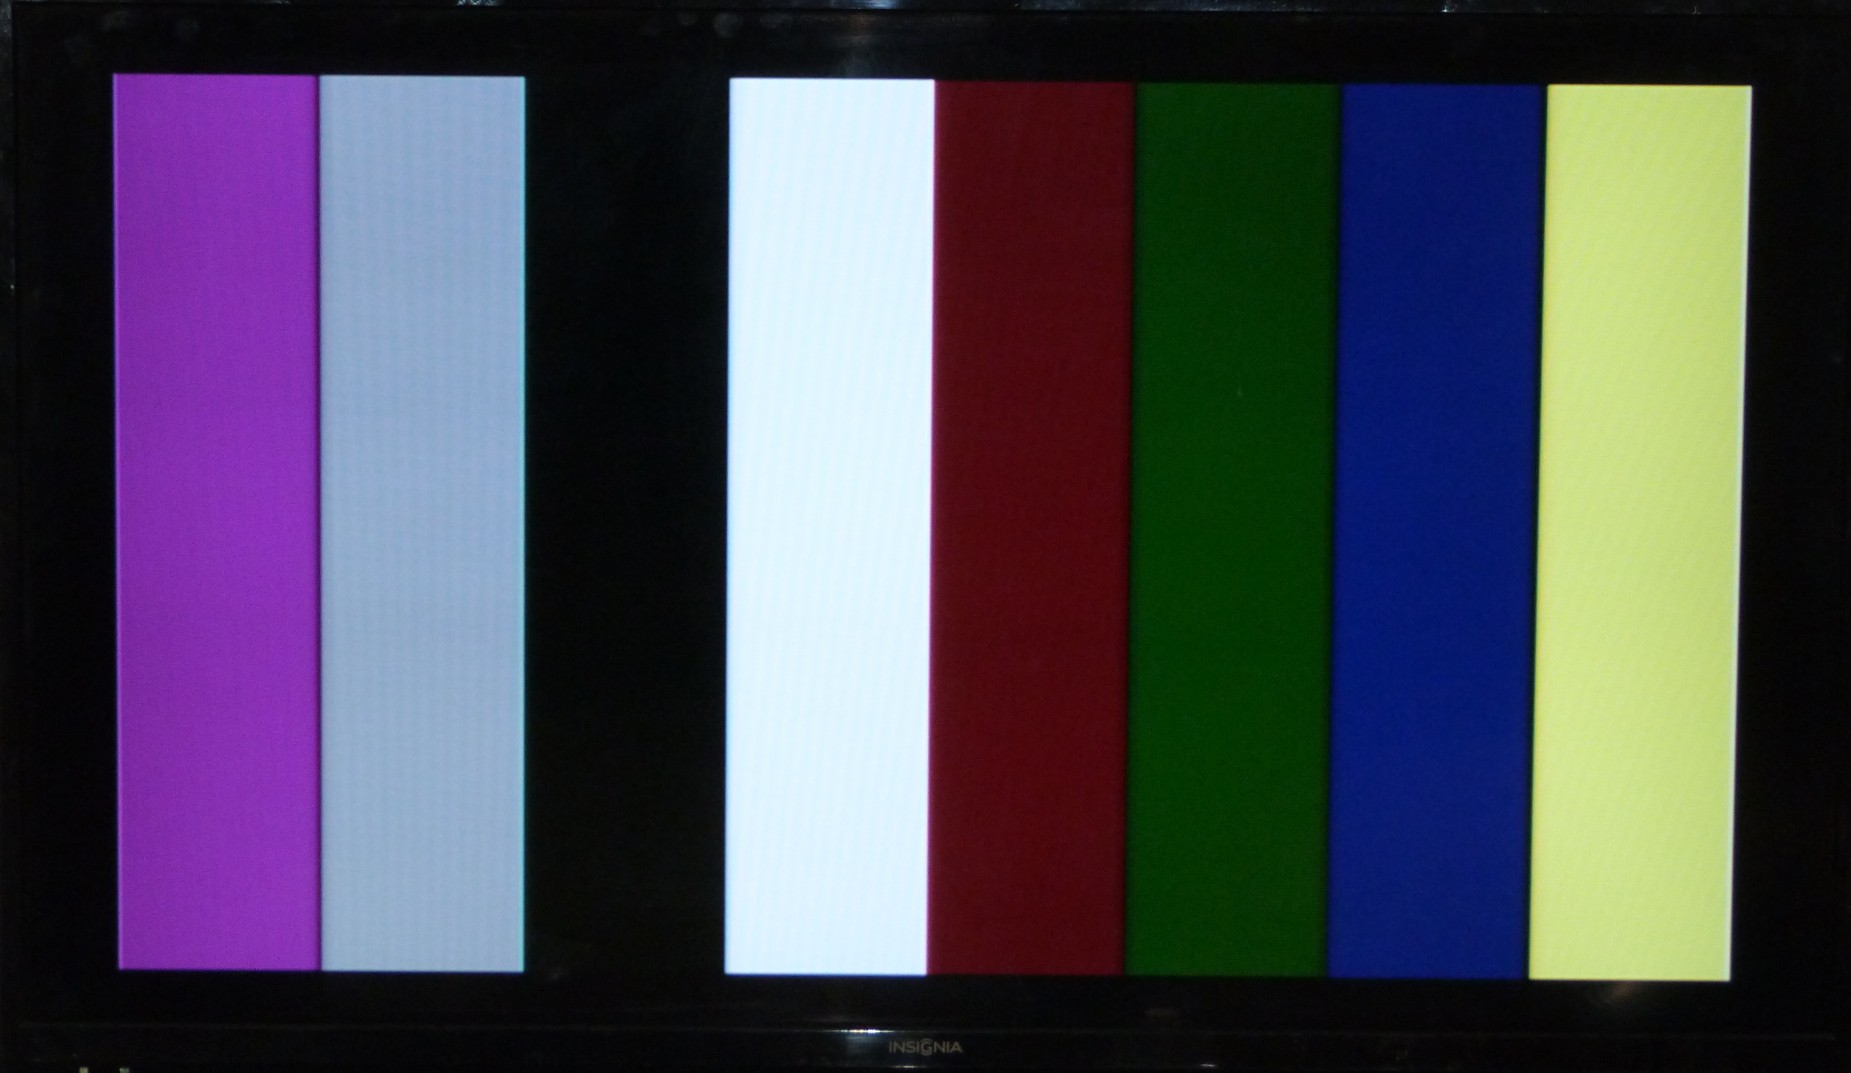
    Now that I have figured out a setting for similar palettes in NTSC and PAL here are some comparison pictures. All pictures are 8 bit color depth, NTSC resolution is 320x200, PAL resolution is 300x240.

    PAL palette

    NTSC palette

    NTSC is a little darker with all settings identical.

    PAL colour stripes

    NTSC colour stripes

  • SPI for Arduino Mega with Uno shield

    MagicWolfi02/12/2018 at 01:07 4 comments

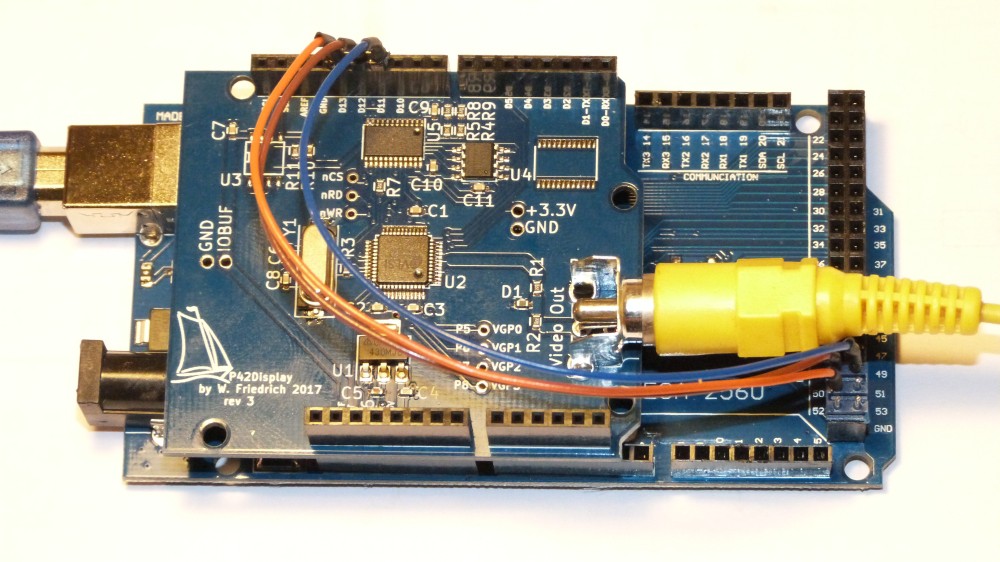
    The issue: The Arduino Mega has its SPI port mapped on pins 50 to 53, which is on the dual row header at the end of the board. Those pins are not accessible through are regular Uno shield.
    To use my Video Display shield (and any other shield that wants to talk SPI), this is what I did:

    Connect the SPI communication signals through jumper wires to the shield.

    • SCK:   Mega pin 52  -> Uno shield pin 13 - orange wire
    • MOSI: Mega pin 50   -> Uno shield pin 12 - brown wire
    • MISO: Mega pin 51  -> Uno shield pin 11  - blue wire

    The slave select pin 53 does not need to be wired, as it is mapped as a normal GPIO in a normal Uno sketch. The picture for the pin numbers 50-51 on the Mega connector is misleading due to the parallax. 

    (The RCA connector is not in a ideal location for the wire jumpers. Here is a reason for another spin).

    Make pins 11 to 13 on the Mega inputs or tri-stated outputs.

    Add the define somewhere in the header file for the shield or at the beginning of the sketch

    #define MEGA 
    

    Add the code to disable the pins that are used by Uno for SPI in the setup() function

    #ifdef MEGA 
    pinMode(11, INPUT); 
    pinMode(12, INPUT); 
    pinMode(13, INPUT); 
    #endif

     This was all I needed to do and the MEGA was happily configuring the Video Display shield and outputting the test patterns.

    And the compile log told me, there is lots of memory available compared to the Uno:

    Sketch uses 7498 bytes (2%) of program storage space. Maximum is 253952 bytes.
    Global variables use 424 bytes (5%) of dynamic memory, leaving 7768 bytes for local variables. Maximum is 8192 bytes.

    That was easy. (Edit: Well, to easy to not mess it up, pin numbers are now correct, see comments)

  • Revisions 2 and 3

    MagicWolfi12/09/2017 at 02:17 0 comments

    The project made some progress in the last few months. I had board revision 2 manufactured by @Elecrow and got it to work with 'only' 2 wire mods. I had changed the voltage level shifter to a 74LVC4245 and added some protection to the video output. The 2Mbit Flash found a home on the board and is responding to SPI commands. And the IO voltage gets used for the level shifter, this makes the shield compatible to circuits that run with less than 3.3V. Also some progress was made on the software side. I have the configuration for NTSC 320x200 running in my own code. Display of the VLSI test image and text output is functioning.

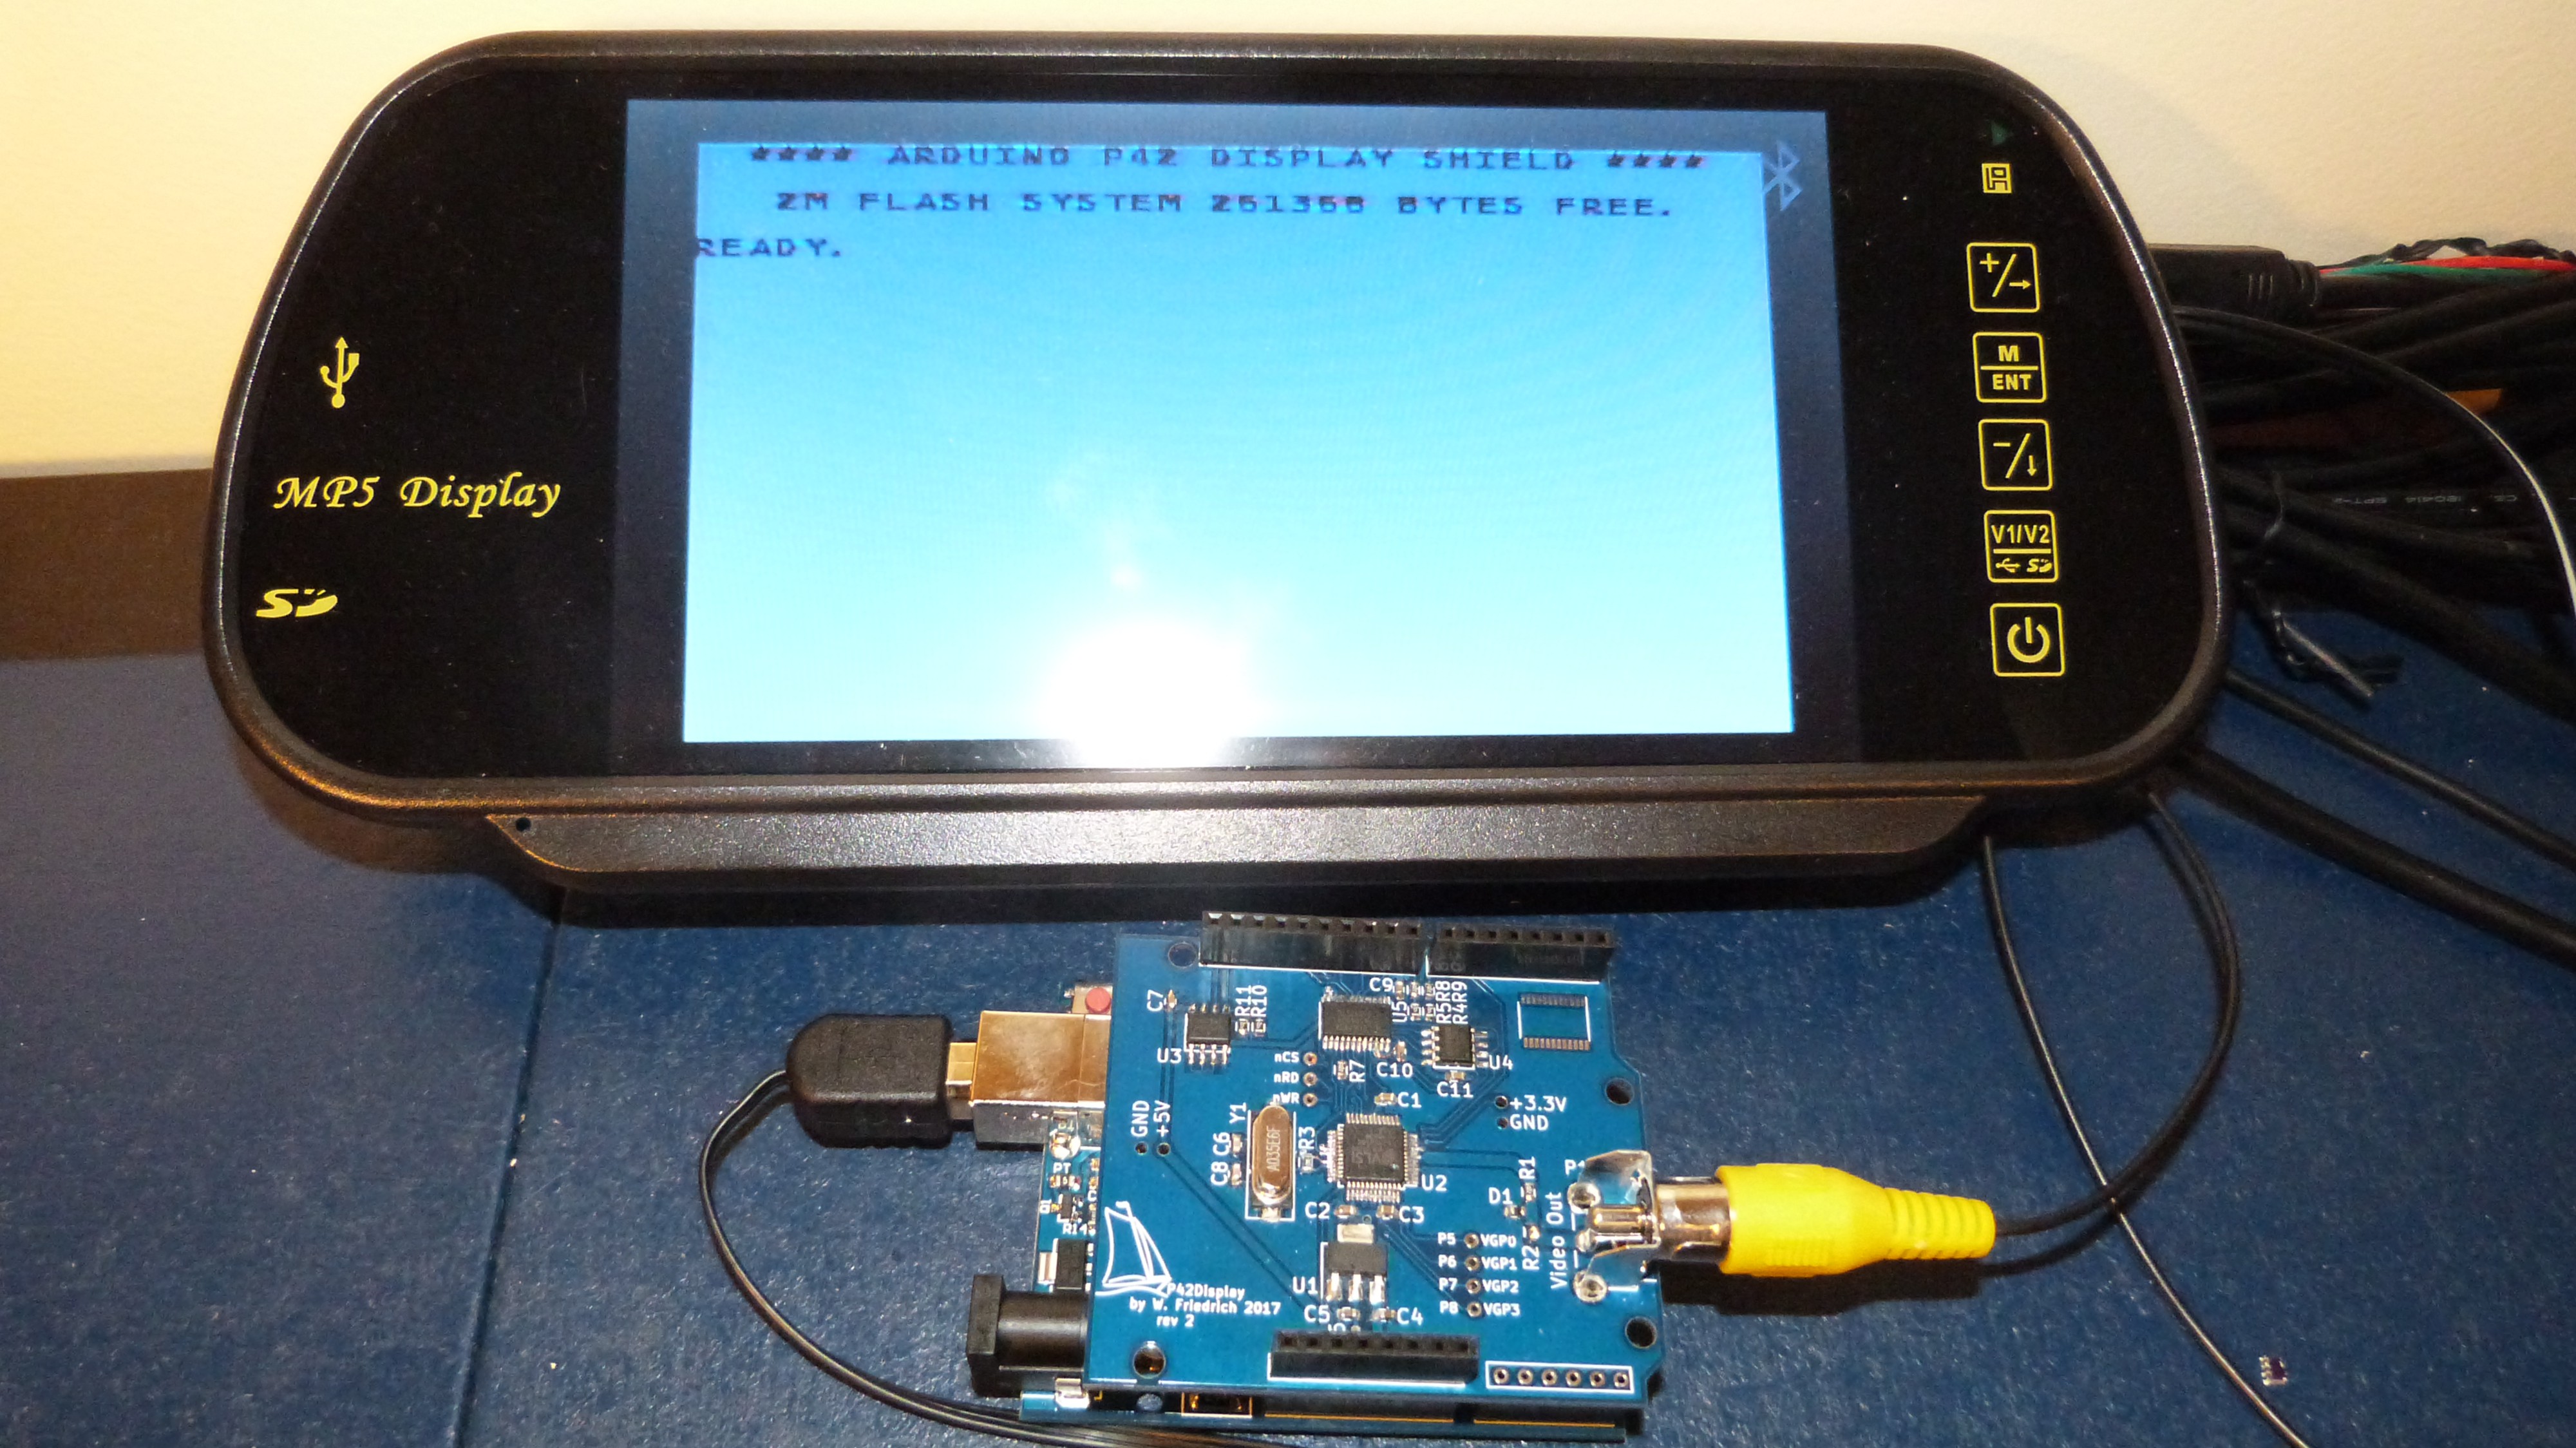
    Text output on my new 7" display. Now I can work on my desk instead in front of the 40" TV.

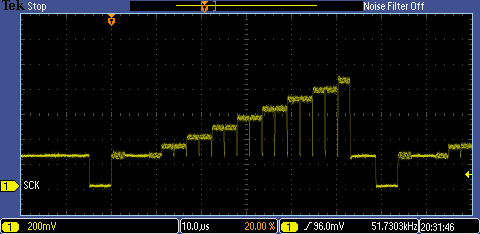
    And a scope plot of a nice NTSC video signal displaying the color test image.

    Todo: Add an instruction on how to generate a bitmap font and upload into Flash. 

    SW todo: Get a PAL configuration and higher resolution set up. Also image display will be a feature.

    Rev 3 is removing the wire mods.

  • Some progress

    MagicWolfi10/01/2017 at 23:20 0 comments

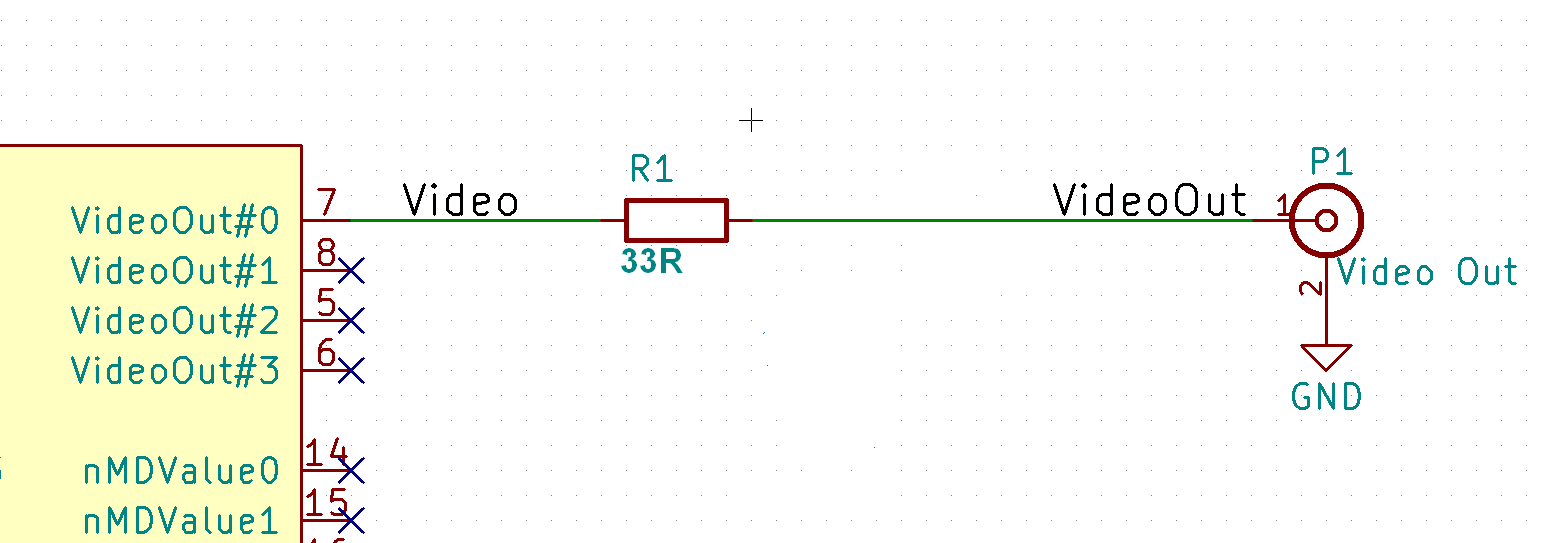
    I am playing with the hardware to determine the perfect setup for rev 2 of the board. Using this circuit as output driver works best and gives the nicest range from dark to bright color.


    And this is the result:


    So it will be probably 2x 22R with a protection device between on the next board. The output video opamp is still not working, difficult to debug with my scope still in the box.

  • VLSI tech support rocks x2

    MagicWolfi08/11/2017 at 02:15 0 comments

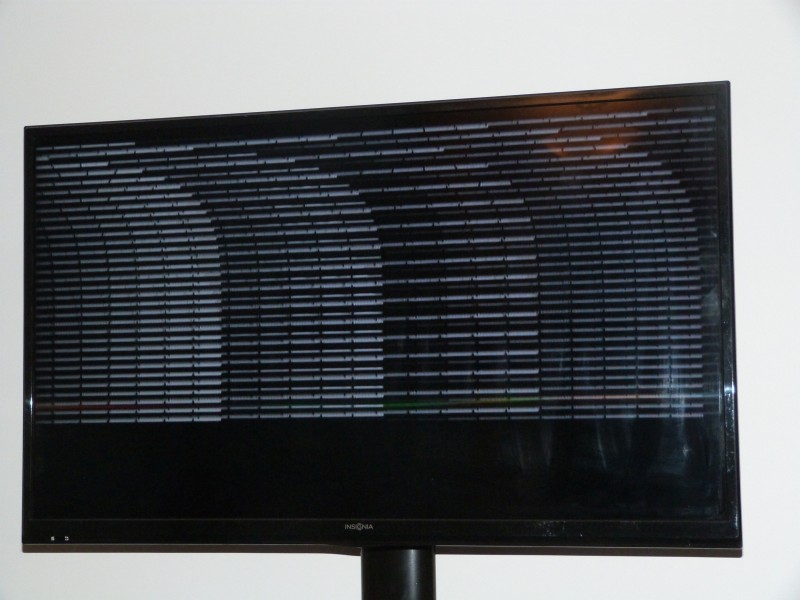
    The folks at VLSI tech support are great. [Panu] and [Kalle] are a big help with HW and SW. They even sent a full Arduino sketch to configure the VS23S010. It does configure the chip corretlyf̶o̶r̶ M̶C̶G̶A̶ 3̶2̶0̶x̶2̶0̶0̶ w̶h̶i̶c̶h̶ u̶n̶f̶o̶r̶t̶u̶n̶a̶t̶e̶l̶y̶ m̶y̶ T̶V̶ s̶e̶t̶ d̶o̶e̶s̶ n̶o̶t̶ f̶u̶l̶l̶y̶ ̶u̶n̶d̶e̶r̶s̶t̶a̶n̶d̶.̶ B̶u̶t̶ i̶t̶ i̶s̶ c̶l̶e̶a̶r̶l̶y̶ v̶i̶s̶i̶b̶l̶e̶ t̶h̶a̶t̶ t̶h̶e̶ v̶i̶d̶e̶o̶ o̶u̶t̶p̶u̶t̶ w̶o̶r̶k̶s̶.̶ N̶o̶w̶ ̶i̶t̶ i̶s̶ j̶u̶s̶t̶ a̶ m̶a̶t̶t̶e̶r̶ o̶f̶ t̶h̶e̶ r̶i̶g̶h̶t̶ c̶o̶n̶f̶i̶g̶u̶r̶a̶t̶i̶o̶n̶ o̶r̶ t̶h̶e̶ r̶i̶g̶h̶t̶ v̶i̶d̶e̶o̶ ̶m̶o̶n̶i̶t̶o̶r̶.

    With the help of VLSI tech support I had my facepalm moment for the week. Just from this picture they could tell me, that I had the crystal for PAL video mounted and not for NTSC (displeasure for some many different standards for everything). Fixing that and getting the video out termination right got me this result. YAY. Now it's only 1s and 0s and a lot of typing to program a graphics engine.

  • 1st response

    MagicWolfi07/26/2017 at 00:43 0 comments

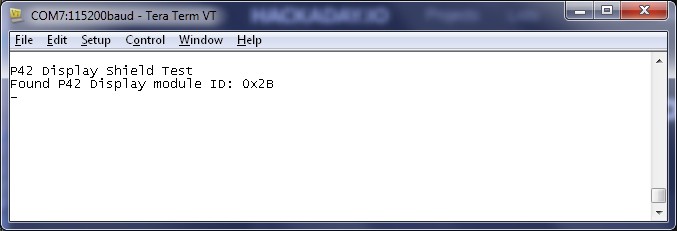
    After some typing, compiling and syntax error fixing, this was the 1st response of the video chip on the shield:

    Initially I was scratching my head about what was going on, because page 24 of the datasheet says, the default value for the ID register is ABh, but page 49 tells the correct value of 2Bh and everything is hunky-dory.

    Now comes the easy part of figuring out how to configure the video display controller. The first image will be amazing as my only device with video input is a 40" TV.

View all 14 project logs

  • 1
    How to generate a character bit map in Flash

    Ingredients:

    1. The Dot Factory: An LCD Font and Image Generator
    2. A True Type font of choice: Hack (which is also a beautiful font for source code editing)
    3. A display that uses pixels.
    4. An Arduino Video Display Shield (Have you understood recursion already? ;-)

     "The Dot Factory is a small open source tool (MIT licensed) intended to generate the required C language information to store many fonts and images, as efficiently as possible, on a microcontroller."

    Hack is an open source typeface ideal for sourcecode as it distinguished nicely between "0O" and "lI1".In Windows, 'Consolas' is designed for the same purpose, but I wasn't sure about license issues. So I used an open source alternative.
    With 'TheDotFactory' software I generated a character bitmap for a subset of the ASCII codes 32 - 126 used for regular text display. The characters came out as up to 8 bit wide and 12 bit high. To optimize text output on low resolution displays, I reduced the height to 8 bit. This was a manual task, but not really tedious. The program also generates a table with character width, which would be usable for proportional width text display. For my demo I am not using this part and opt for a fixed width of 8 pixels.
    A short Arduino program later, I programmed the character bitmap in Flash on my Video Display Shield. With clever memory access I have now text output. Source code for this is on my Github under P42Display_Memtest.
    PS: 'TheDotFactory' is also usable to translate Images into image data bitmaps. This is helpful for all sorts of predefined graphics.
  • 2
    How to generate an animation with the Block Move command (BoingBall)

    I used a 8-frame GIF animation of the famous Amiga BoingBall and separately saved the frames with the help of IrfanView. With the same program the images got scaled that the ball had a size of 30 x 30 pixels with a 1 pixel border on all 4 sides making it a 32x32 image size.

    On the website Image2ASCIIArt (A big thank you to Robert Ecker for this great tool) I converted the 8 single images to text files.

    WWWWWWWWWWWWWWWWWWWWWWWWWWWWWWWW
    WWWWWWWWWWW##....####.WWWWWWWWWW
    WWWWWWWW#...#####.####..WWWWWWWW
    WWWWWWW....#####.........#WWWWWW
    WWWWWW....######......###.#WWWWW
    WWWWW....######.......####.#WWWW
    WWWW.###....###.......#####..WWW
    WWW.####.......#.....######..WWW
    WWW####.......#####..######...WW
    WW.####.......#######..####...WW
    WW####.......########.....#...#W
    W.####.......########......#...W
    W#.###.......########......###.W
    W#...##.....########.......####W
    W....######.########.......####W
    W....#######...#####.......####W
    W....######........#.......####W
    W....######........####....####W
    W....######........#######.####W
    W.#..######........#######....#W
    W.#########.......########....#W
    WW###...###.......#######.....#W
    WW###.....#.......#######....#WW
    WWW##.....####...#######.....#WW
    WWWW#.....#######.######....#WWW
    WWWW.#....######.......#...#WWWW
    WWWWW.#...######.......####WWWWW
    WWWWWW.##.######......###.WWWWWW
    WWWWWWWW##..####.....###.WWWWWWW
    WWWWWWWWW##....#....###WWWWWWWWW
    WWWWWWWWWWWW..####...WWWWWWWWWWW
    WWWWWWWWWWWWWWWWWWWWWWWWWWWWWWWW 

    From here it was 3 simple search and replace operations and some surrounding code for a nice data structure that got used in my code to be programmed into FLASH similar to the character set. The code snipped below would look nice if it could be formatted to 32 entries per line.

    const PROGMEM byte boingball[] = {
    // frame 0
    0x00, 0x00, 0x00, 0x00, 0x00, 0x00, 0x00, 0x00, 0x00, 0x00, 0x00, 0x00, 0x00, 0x00, 0x00, 0x00, 0x00, 0x00, 0x00, 0x00, 0x00, 0x00, 0x00, 0x00, 0x00, 0x00, 0x00, 0x00, 0x00, 0x00, 0x00, 0x00, 0x00, 0x00, 0x00, 0x00, 0x00, 0x00, 0x00, 0x00, 0x00, 0x00, 0x00, 0x24, 0x24, 0x0D, 0x0D, 0x0D, 0x0D, 0x24, 0x24, 0x24, 0x24, 0x0D, 0x00, 0x00, 0x00, 0x00, 0x00, 0x00, 0x00, 0x00, 0x00, 0x00, 0x00, 0x00, 0x00, 0x00, 0x00, 0x00, 0x00, 0x00, 0x24, 0x0D, 0x0D, 0x0D, 0x24, 0x24, 0x24, 0x24, 0x24, 0x0D, 0x24, 0x24, 0x24, 0x24, 0x0D, 0x0D, 0x00, 0x00, 0x00, 0x00, 0x00, 0x00, 0x00, 0x00, 0x00, 0x00, 0x00, 0x00, 0x00, 0x00, 0x00, 0x0D, 0x0D, 0x0D, 0x0D, 0x24, 0x24, 0x24, 0x24, 0x24, 0x0D, 0x0D, 0x0D, 0x0D, 0x0D, 0x0D, 0x0D, 0x0D, 0x0D, 0x24, 0x00, 0x00, 0x00, 0x00, 0x00, 0x00, 0x00, 0x00, 0x00, 0x00, 0x00, 0x00, 0x0D, 0x0D, 0x0D, 0x0D, 0x24, 0x24, 0x24, 0x24, 0x24, 0x24, 0x0D, 0x0D, 0x0D, 0x0D, 0x0D, 0x0D, 0x24, 0x24, 0x24, 0x0D, 0x24, 0x00, 0x00, 0x00, 0x00, 0x00, 0x00, 0x00, 0x00, 0x00, 0x00, 0x0D, 0x0D, 0x0D, 0x0D, 0x24, 0x24, 0x24, 0x24, 0x24, 0x24, 0x0D, 0x0D, 0x0D, 0x0D, 0x0D, 0x0D, 0x0D, 0x24, 0x24, 0x24, 0x24, 0x0D, 0x24, 0x00, 0x00, 0x00, 0x00, 0x00, 0x00, 0x00, 0x00, 0x0D, 0x24, 0x24, 0x24, 0x0D, 0x0D, 0x0D, 0x0D, 0x24, 0x24, 0x24, 0x0D, 0x0D, 0x0D, 0x0D, 0x0D, 0x0D, 0x0D, 0x24, 0x24, 0x24, 0x24, 0x24, 0x0D, 0x0D, 0x00, 0x00, 0x00, 0x00, 0x00, 0x00, 0x0D, 0x24, 0x24, 0x24, 0x24, 0x0D, 0x0D, 0x0D, 0x0D, 0x0D, 0x0D, 0x0D, 0x24, 0x0D, 0x0D, 0x0D, 0x0D, 0x0D, 0x24, 0x24, 0x24, 0x24, 0x24, 0x24, 0x0D, 0x0D, 0x00, 0x00, 0x00, 0x00, 0x00, 0x00, 0x24, 0x24, 0x24, 0x24, 0x0D, 0x0D, 0x0D, 0x0D, 0x0D, 0x0D, 0x0D, 0x24, 0x24, 0x24, 0x24, 0x24, 0x0D, 0x0D, 0x24, 0x24, 0x24, 0x24, 0x24, 0x24, 0x0D, 0x0D, 0x0D, 0x00, 0x00, 0x00, 0x00, 0x0D, 0x24, 0x24, 0x24, 0x24, 0x0D, 0x0D, 0x0D, 0x0D, 0x0D, 0x0D, 0x0D, 0x24, 0x24, 0x24, 0x24, 0x24, 0x24, 0x24, 0x0D, 0x0D, 0x24, 0x24, 0x24, 0x24, 0x0D, 0x0D, 0x0D, 0x00, 0x00, 0x00, 0x00, 0x24, 0x24, 0x24, 0x24, 0x0D, 0x0D, 0x0D, 0x0D, 0x0D, 0x0D, 0x0D, 0x24, 0x24, 0x24, 0x24, 0x24, 0x24, 0x24, 0x24, 0x0D, 0x0D, 0x0D, 0x0D, 0x0D, 0x24, 0x0D, 0x0D, 0x0D, 0x24, 0x00, 0x00, 0x0D, 0x24, 0x24, 0x24, 0x24, 0x0D, 0x0D, 0x0D, 0x0D, 0x0D, 0x0D, 0x0D, 0x24, 0x24, 0x24, 0x24, 0x24, 0x24, 0x24, 0x24, 0x0D, 0x0D, 0x0D, 0x0D, 0x0D, 0x0D, 0x24, 0x0D, 0x0D, 0x0D, 0x00, 0x00, 0x24, 0x0D, 0x24, 0x24, 0x24, 0x0D, 0x0D, 0x0D, 0x0D, 0x0D, 0x0D, 0x0D, 0x24, 0x24, 0x24, 0x24, 0x24, 0x24, 0x24, 0x24, 0x0D, 0x0D, 0x0D, 0x0D, 0x0D, 0x0D, 0x24, 0x24, 0x24, 0x0D, 0x00, 0x00, 0x24, 0x0D, 0x0D, 0x0D, 0x24, 0x24, 0x0D, 0x0D, 0x0D, 0x0D, 0x0D, 0x24, 0x24, 0x24, 0x24, 0x24, 0x24, 0x24, 0x24, 0x0D, 0x0D, 0x0D, 0x0D, 0x0D, 0x0D, 0x0D, 0x24, 0x24, 0x24, 0x24, 0x00, 0x00, 0x0D, 0x0D, 0x0D, 0x0D, 0x24, 0x24, 0x24, 0x24, 0x24, 0x24, 0x0D, 0x24, 0x24, 0x24, 0x24, 0x24, 0x24, 0x24, 0x24, 0x0D, 0x0D, 0x0D, 0x0D, 0x0D, 0x0D, 0x0D, 0x24, 0x24, 0x24, 0x24, 0x00, 0x00, 0x0D, 0x0D, 0x0D, 0x0D, 0x24, 0x24, 0x24, 0x24, 0x24, 0x24, 0x24, 0x0D, 0x0D, 0x0D, 0x24, 0x24, 0x24, 0x24, 0x24, 0x0D, 0x0D, 0x0D, 0x0D, 0x0D, 0x0D, 0x0D, 0x24, 0x24, 0x24, 0x24, 0x00, 0x00, 0x0D, 0x0D, 0x0D, 0x0D, 0x24, 0x24, 0x24, 0x24, 0x24, 0x24, 0x0D, 0x0D, 0x0D, 0x0D, 0x0D, 0x0D, 0x0D, 0x0D, 0x24, 0x0D, 0x0D, 0x0D, 0x0D, 0x0D, 0x0D, 0x0D, 0x24, 0x24, 0x24, 0x24, 0x00, 0x00, 0x0D, 0x0D, 0x0D, 0x0D, 0x24, 0x24, 0x24, 0x24, 0x24, 0x24, 0x0D, 0x0D, 0x0D, 0x0D, 0x0D, 0x0D, 0x0D, 0x0D, 0x24, 0x24, 0x24, 0x24, 0x0D, 0x0D, 0x0D, 0x0D, 0x24, 0x24, 0x24, 0x24, 0x00, 0x00, 0x0D, 0x0D, 0x0D, 0x0D, 0x24, 0x24, 0x24, 0x24, 0x24, 0x24, 0x0D, 0x0D, 0x0D, 0x0D, 0x0D, 0x0D, 0x0D, 0x0D, 0x24, 0x24, 0x24, 0x24, 0x24, 0x24, 0x24, 0x0D, 0x24, 0x24, 0x24, 0x24, 0x00, 0x00, 0x0D, 0x24, 0x0D, 0x0D, 0x24, 0x24, 0x24, 0x24, 0x24, 0x24, 0x0D, 0x0D, 0x0D, 0x0D, 0x0D, 0x0D, 0x0D, 0x0D, 0x24, 0x24, 0x24, 0x24, 0x24, 0x24, 0x24, 0x0D, 0x0D, 0x0D, 0x0D, 0x24, 0x00, 0x00, 0x0D, 0x24, 0x24, 0x24, 0x24, 0x24, 0x24, 0x24, 0x24, 0x24, 0x0D, 0x0D, 0x0D, 0x0D, 0x0D, 0x0D, 0x0D, 0x24, 0x24, 0x24, 0x24, 0x24, 0x24, 0x24, 0x24, 0x0D, 0x0D, 0x0D, 0x0D, 0x24, 0x00, 0x00, 0x00, 0x24, 0x24, 0x24, 0x0D, 0x0D, 0x0D, 0x24, 0x24, 0x24, 0x0D, 0x0D, 0x0D, 0x0D, 0x0D, 0x0D, 0x0D, 0x24, 0x24, 0x24, 0x24, 0x24, 0x24, 0x24, 0x0D, 0x0D, 0x0D, 0x0D, 0x0D, 0x24, 0x00, 0x00, 0x00, 0x24, 0x24, 0x24, 0x0D, 0x0D, 0x0D, 0x0D, 0x0D, 0x24, 0x0D, 0x0D, 0x0D, 0x0D, 0x0D, 0x0D, 0x0D, 0x24, 0x24, 0x24, 0x24, 0x24, 0x24, 0x24, 0x0D, 0x0D, 0x0D, 0x0D, 0x24, 0x00, 0x00, 0x00, 0x00, 0x00, 0x24, 0x24, 0x0D, 0x0D, 0x0D, 0x0D, 0x0D, 0x24, 0x24, 0x24, 0x24, 0x0D, 0x0D, 0x0D, 0x24, 0x24, 0x24, 0x24, 0x24, 0x24, 0x24, 0x0D, 0x0D, 0x0D, 0x0D, 0x0D, 0x24, 0x00, 0x00, 0x00, 0x00, 0x00, 0x00, 0x24, 0x0D, 0x0D, 0x0D, 0x0D, 0x0D, 0x24, 0x24, 0x24, 0x24, 0x24, 0x24, 0x24, 0x0D, 0x24, 0x24, 0x24, 0x24, 0x24, 0x24, 0x0D, 0x0D, 0x0D, 0x0D, 0x24, 0x00, 0x00, 0x00, 0x00, 0x00, 0x00, 0x00, 0x0D, 0x24, 0x0D, 0x0D, 0x0D, 0x0D, 0x24, 0x24, 0x24, 0x24, 0x24, 0x24, 0x0D, 0x0D, 0x0D, 0x0D, 0x0D, 0x0D, 0x0D, 0x24, 0x0D, 0x0D, 0x0D, 0x24, 0x00, 0x00, 0x00, 0x00, 0x00, 0x00, 0x00, 0x00, 0x00, 0x0D, 0x24, 0x0D, 0x0D, 0x0D, 0x24, 0x24, 0x24, 0x24, 0x24, 0x24, 0x0D, 0x0D, 0x0D, 0x0D, 0x0D, 0x0D, 0x0D, 0x24, 0x24, 0x24, 0x24, 0x00, 0x00, 0x00, 0x00, 0x00, 0x00, 0x00, 0x00, 0x00, 0x00, 0x00, 0x0D, 0x24, 0x24, 0x0D, 0x24, 0x24, 0x24, 0x24, 0x24, 0x24, 0x0D, 0x0D, 0x0D, 0x0D, 0x0D, 0x0D, 0x24, 0x24, 0x24, 0x0D, 0x00, 0x00, 0x00, 0x00, 0x00, 0x00, 0x00, 0x00, 0x00, 0x00, 0x00, 0x00, 0x00, 0x00, 0x24, 0x24, 0x0D, 0x0D, 0x24, 0x24, 0x24, 0x24, 0x0D, 0x0D, 0x0D, 0x0D, 0x0D, 0x24, 0x24, 0x24, 0x0D, 0x00, 0x00, 0x00, 0x00, 0x00, 0x00, 0x00, 0x00, 0x00, 0x00, 0x00, 0x00, 0x00, 0x00, 0x00, 0x00, 0x24, 0x24, 0x0D, 0x0D, 0x0D, 0x0D, 0x24, 0x0D, 0x0D, 0x0D, 0x0D, 0x24, 0x24, 0x24, 0x00, 0x00, 0x00, 0x00, 0x00, 0x00, 0x00, 0x00, 0x00, 0x00, 0x00, 0x00, 0x00, 0x00, 0x00, 0x00, 0x00, 0x00, 0x00, 0x00, 0x00, 0x0D, 0x0D, 0x24, 0x24, 0x24, 0x24, 0x0D, 0x0D, 0x0D, 0x00, 0x00, 0x00, 0x00, 0x00, 0x00, 0x00, 0x00, 0x00, 0x00, 0x00, 0x00, 0x00, 0x00, 0x00, 0x00, 0x00, 0x00, 0x00, 0x00, 0x00, 0x00, 0x00, 0x00, 0x00, 0x00, 0x00, 0x00, 0x00, 0x00, 0x00, 0x00, 0x00, 0x00, 0x00, 0x00, 0x00, 0x00, 0x00, 0x00, 0x00, 0x00, 0x00,
    // frame 1......}

     Next: How to do a block animation with the VLSI VS23S010D.

View all instructions

Enjoy this project?

Share

Discussions

T. B. Trzepacz wrote 10/31/2017 at 10:58 point

So, this looks very interesting, but I'm wondering if there is going to be anything in the hardware to speed up building your drawings. Sending bitmaps pixel-by-pixel over SPI is the way we do it with LCD screens now, and is very slow when you are trying to update the whole screen. It looks like you at least have paletted bitmaps with lower bits-per-pixel than those LCD screens, so that might speed stuff up a bit, but it would be nice if the hardware had something like the sprites and character mapped scroll planes of the old video game systems. Some sort of "blitter" style system might also work, although I get the impression performance wouldn't be as good.
I'm sure you've already got your plan and specs set tho, so it's silly for me to suggest anything.
I look forward to seeing the final result.

  Are you sure? yes | no

MagicWolfi wrote 10/31/2017 at 15:38 point

Hello Tim. Thanks for the interest in my project. The controller has hardware support for a simple memory block move operation, which is configured in 3 register write commands. For the interface speed, the VLSI folks managed to display a full video stream through their audio SoC (used as data host) handling all data traffic.

http://www.vsdsp-forum.com/phpbb/viewtopic.php?f=15&t=2176

Of course this will not happen with an Arduino as the host. For a full graphics engine as you are suggesting, a FPGA or dedicated uC would need to interface to the parallel memory bus for maximum speed and handle all the higher level functions. I would love to do that, but then I would use a different display solution and go DVI or HDMI. Cheers.

  Are you sure? yes | no

KD9KCK wrote 10/30/2017 at 20:13 point

This is cool! Might make my recent project using basically an Arduino Due easier. (Less low on the main chip)

  Are you sure? yes | no

MagicWolfi wrote 10/31/2017 at 01:38 point

Currently the IO voltage is 5V so it would not work together with a 3.3V Due. But your comment triggered an idea to use the IOREF pin to make it compatible to 3.3V boards. I will add this to the next revision. Thanks for that.

  Are you sure? yes | no

KD9KCK wrote 10/31/2017 at 15:56 point

Mostly I was talking about applying your work as part on my full board. (Making a PCB with the SAMX3E (due's chip) with a different set of IO broken out. Like the Ethernet MAC and Can bus.) Adding this sort of chip and is supporting hardware would give it a way for displaying information on a screen. )

  Are you sure? yes | no

Nard Janssens wrote 10/24/2017 at 17:59 point

Have been searching for this a long time. Can't wait

  Are you sure? yes | no

MagicWolfi wrote 10/31/2017 at 15:39 point

Stay tuned. Boards will be available on Tindie soon.

  Are you sure? yes | no

Nard Janssens wrote 10/31/2017 at 17:43 point

Do you have any indication of the costs of the shield? (Another possibility for me as a video display shield would be the Arduino Due with the DueVGA library by Stimmer. So I am wondering which would be cheaper.)

  Are you sure? yes | no

MagicWolfi wrote 03/23/2018 at 00:53 point

Hello again. It took a little longer but now it is available for sale here:

https://www.tindie.com/products/Wolfi/ntscpal-video-display-shield-for-arduino/

  Are you sure? yes | no

Ed Caceres wrote 10/02/2017 at 01:35 point

I can't be only one thinking "awesome progress!!!", and also can't wait to try one out!

  Are you sure? yes | no

MagicWolfi wrote 10/03/2017 at 00:48 point

Thanks. As I said in one of the logs, the SW is the hard part. I would like to release this not only as a piece of hardware, but at least want to show some basic functionality. And the list of functions is long: different resolutions, draw pixels and boxes in RGB, display images that get downloaded to the board, character generator and maybe a demo that is somewhat useful (i.g. displaying a thermometer and having a sensor hooked up to show live updates of temp changes.

  Are you sure? yes | no

Starhawk wrote 08/09/2017 at 21:40 point

That extra board looks a lot, from the schematic, like a simple constant current setup for driving LEDs...

  Are you sure? yes | no

MagicWolfi wrote 08/09/2017 at 23:57 point

Bingo! It is almost constant current, as it slightly increases with higher voltage. The nice part is, that is only has 2 connections so it can be easily wired inline into any  LED on wires, that do not need variable brightness control.

  Are you sure? yes | no

Starhawk wrote 08/10/2017 at 00:01 point

Haha, I thought that might be it. It's not an uncommon design. I saw it on Google over a year ago...

By the way, I absolutely love the idea of this Shield (the video part, not the LED driver) and that you're actually making them...

  Are you sure? yes | no

Ed Caceres wrote 04/11/2017 at 14:03 point

If I may offer a little idea: Since you already have SPI driving this board, perhaps add a nice sized SPI-flash chip (2mbits?). This can be used to store character fonts, icons, even entire bit-maps. Thereby removing that storage burden from the Arduino's memory space. The SPI-flash would be loaded once (via RS232 serial commands?) and then maybe you can have a write-protect jumper as well... making the contents somewhat "permanent".

  Are you sure? yes | no

MagicWolfi wrote 04/12/2017 at 21:17 point

Thanks, kdbhog. The I2C EEPROM on the board was planned to be for this purpose, I just used a small 24c 64 as placeholder, the biggest I can use is a 512Kbit. You are absolutely right, an SPI flash chip would give much larger storage and higher performance. I will add this for the next rev. Boards should arrive in 2-6 weeks, stay tuned, there will be updates. Cheers

  Are you sure? yes | no

Ed Caceres wrote 04/11/2017 at 02:38 point

Very often, 640x480, or NTSC/PAL, are *just enough*. Especially for diagnostic screen output, or simple control systems. I like it! I look forward to seeing this work.

  Are you sure? yes | no

Similar Projects

Does this project spark your interest?

Become a member to follow this project and never miss any updates