 Capt. Flatus O'Flaherty ☠
-
1Step 1
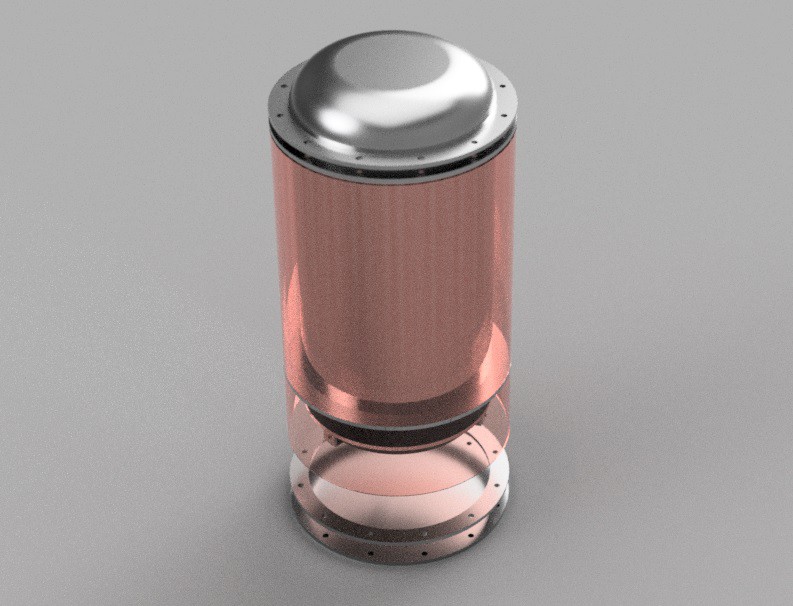
![]() A great deal of the work involved was in making the boiler. The 3D image above hopefully should show how it is put together.
A great deal of the work involved was in making the boiler. The 3D image above hopefully should show how it is put together.Boiler Parts:
![]()
![]()
![]() The boiler is made from a stainless steel beer keg, some custom laser cut stainless rings and plates and the electric heating element from a standalone electric hob.
The boiler is made from a stainless steel beer keg, some custom laser cut stainless rings and plates and the electric heating element from a standalone electric hob.I did consider making my own heating element or even using an inductor coil, but the desire for a simpler life got the better of me. The same is true of using the smart looking stainless keg. The boiler needs to have an access lid large enough to get your hand in for cleaning the inside and the heating elements must not protrude into the keg so need to be underneath or around the sides or both. Protruding elements would be far easier but they are dangerous as if they are not fully submerged in liquid they can glow red hot and ignite the alcohol fumes - AVOID!
-
2Step 2
Boiler Fabrication - Keg and Outer Skin
![]()
![]()
![]()
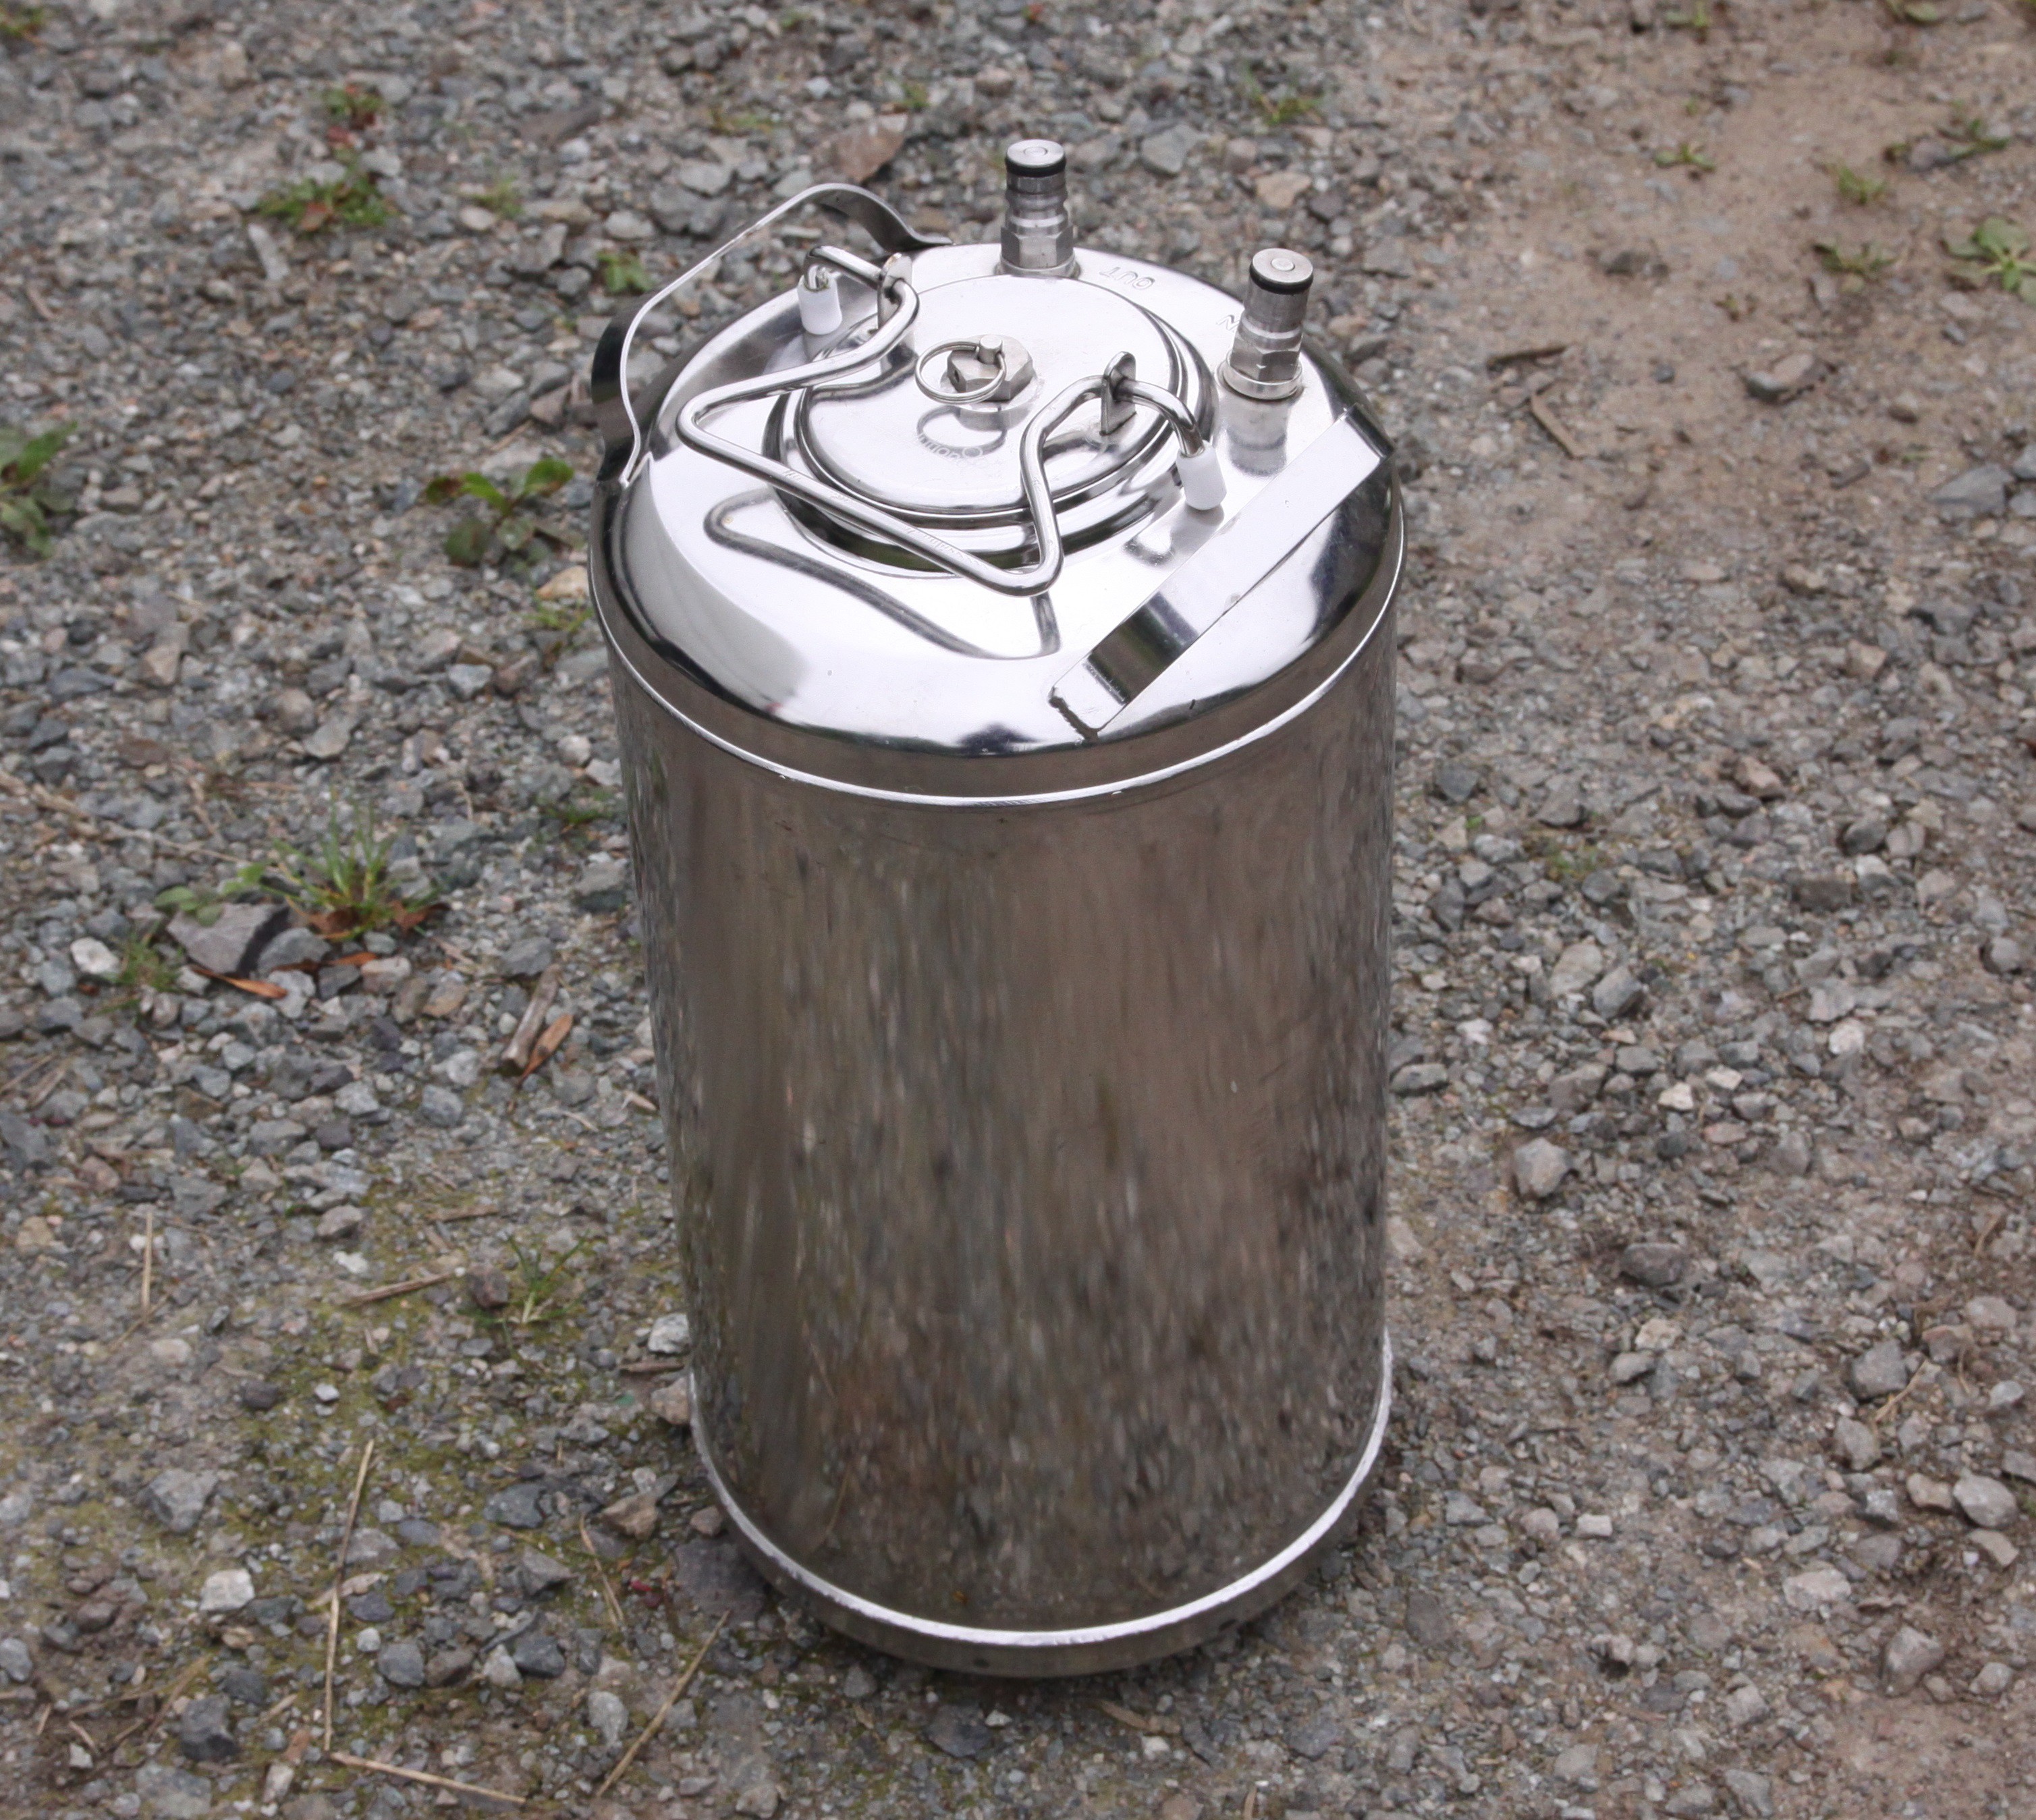
The boiler is double skinned to provide some degree of insulation. The bottom of the keg is removed, the outer cylinder has a flange welded onto it to connect to the top of the keg and the keg has a hole cut in it at 45 degrees to accept the 2" socket.
The 10 litre keg, though of very high quality manufacture, is made of very thin stainless steel which makes it very difficult to weld without over heating it and forming a large hole. I used a combination of MIG and TIG techniques and it probably took me about 2 days until I got it leak proof.
The boiler was tested for leaks after the reflux pipe was finished and attached. This made it easy to attach a compressed air supply and pressurise the whole thing to about 30 psi. A bit of soapy water sprayed on the outside revealed the leaks when it formed bubbles.
-
3Step 3
Boiler Fabrication - Weld in the 2" Socket
![]()
![]() The brass connector is screwed into the 2" socket to prevent distortion and splatter on the threads during welding.
The brass connector is screwed into the 2" socket to prevent distortion and splatter on the threads during welding. -
4Step 4
Boiler Fabrication - Heating Element
![]()
![]()
![]()
The thick stainless disc (see attached dwg files) is welded onto the bottom of the keg and the 1500 watt heating element assembly is bolted onto it with some thermal grease in between. It is then slotted into the keg and wired up for 240 volts. The heating element was extracted from an electric hotplate found on ebay.
Fortunately, the heating element worked really well and the thick stainless disc helped even out the heat when the electricity supply was pulsed on and off at 10 second intervals to reduce the overall power.
-
5Step 5
Reflux Pipe
![]()
![]()
![]()
Parts:
- 6620 3/8" x 1/4" BSP HEX REDUCING BUSH, BRASS
- 6620 3/8" x 1/4" BSP HEX REDUCING BUSH, BRASS 4 £0.20 £0.80
- 6621 1/2" x 1/4" BSP HEX REDUCING BUSH, BRASS 4 £0.49 £1.96
- 6675 6 mm COMP x 1/4" BSP TM, ADAPTOR, UK 4 £1.36 £5.44
- 6705 15 mm COMP COUPLER, UK 2 £0.90 £1.80 6768 15 mm COUPLING, EF 4 £0.08 £0.32
- 6787 15 mm x 10 mm FITTING REDUCER, EF 2 £0.25 £0.50
- 6798 15 mm EF, 90° ELBOW 4 £0.13 £0.52
- 6809 15 mm EQUAL TEE, EF 4 £0.26 £1.04
- 7160 54 mm EF x 2" BSP TM STRAIGHT ADAPTOR 1 £13.81 £13.81
- 7958 35 mm x 15 mm FITTING REDUCER, EF 1 £1.30 £1.30
- 7984 15 mm OBTUSE BEND 45°, EF 4 £0.35 £1.40
- 8280 2" BSP PLAIN HOLLOW PLUG, BLACK 1 £2.12 £2.12
- 9175 42 mm x 35 mm FITTING REDUCER, EF 1 £2.15 £2.15
- 9177 54 mm x 42 mm FITTING REDUCER, EF 1 £4.07 £4.07
- 14360 1/4" BSP HALF SOCKET, 316 S/S 3 £0.48 £1.44
- 14367 2" BSP HALF SOCKET, 316 S/S 1 £4.33 £4.33
- 14479 2" BSP TM, WELDING NIPPLE, 316, S/S 1 £4.16 £4.16
The reflux pipe is made of a series of brass and copper reducers which go from 2" to 15mm in size. The parts are soldered up using lead free solder to help prevent heavy metal poisoning. Paradoxically, copper is thought to be beneficial as the copper will react with the acid sulphurous fumes and remove sulphur by falling back into the boiler. Unfortunately, some of it will carry on into the condenser which will contaminate the product with copper ions. These can be detected by using a conductivity meter and removed with ion exchange resins at a later stage if necessary.
During the heating process, the fluid vapours will react with the copper in the reflux tube and also the fluid itself will react with pieces of copper tube cut up and dropped into the boiler.
-
6Step 6
The Condensor
![]()
![]()
![]()
![]()
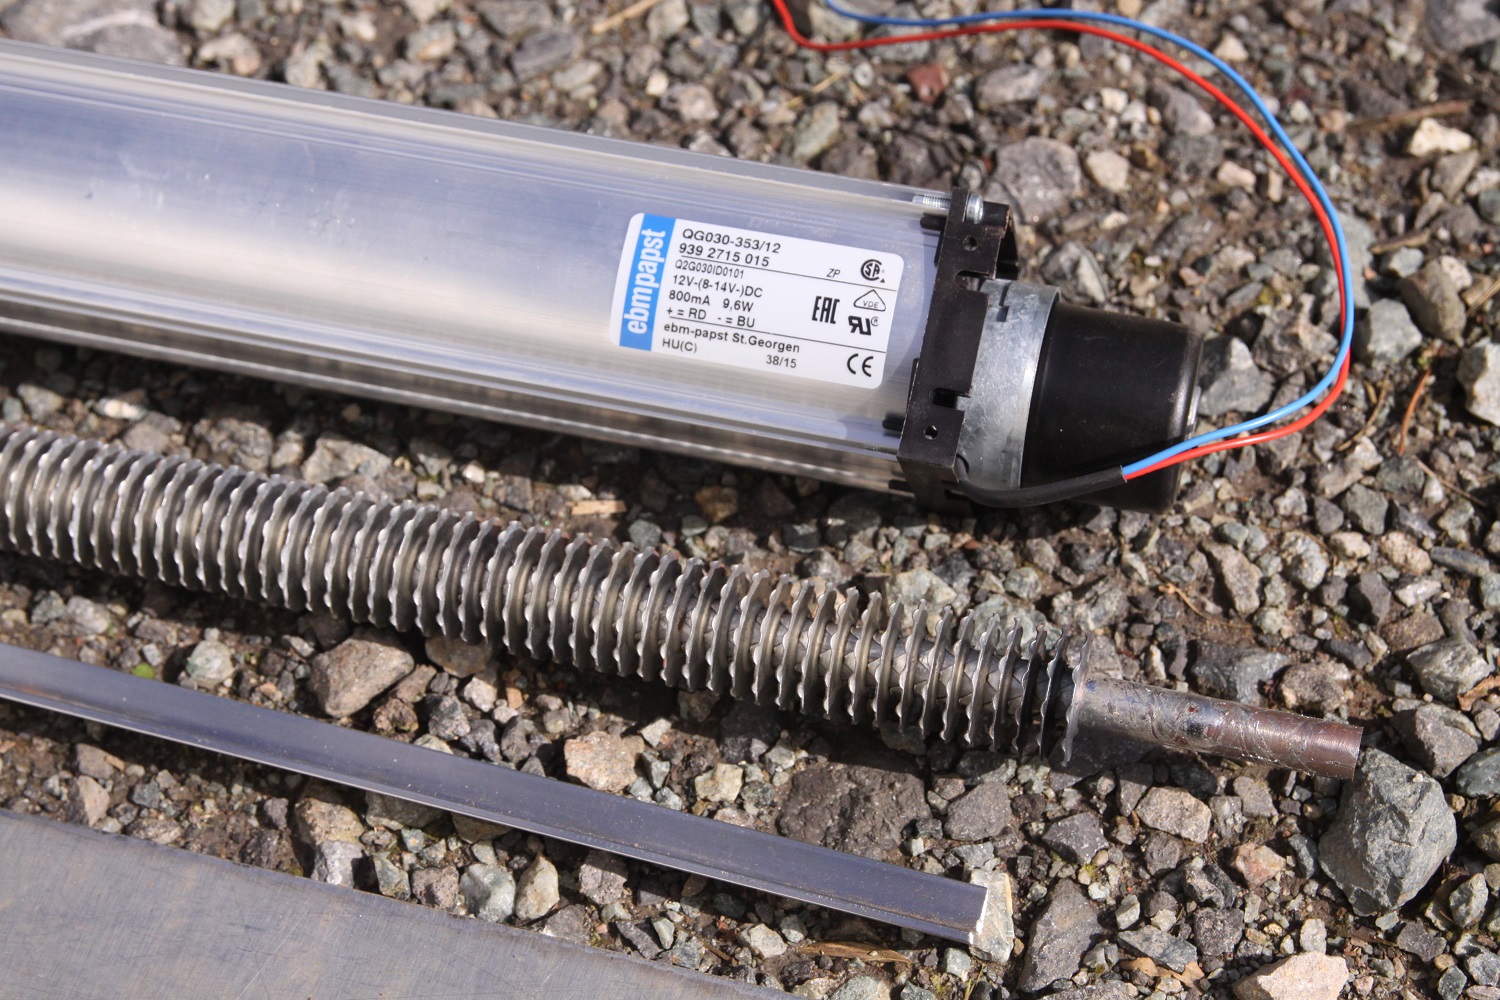
Parts:
- 5912-QG030-353/12, MFG Part No:QG030-353/12, ebm-papst Blowers, TARIC:8414592090 ECCN:EAR99 COO:HU
- 3/8 radiator tube with 15/16" discs.
Normally, the condenser would be made with water cooling, but I did not want the hassle of having running water in this system so I opted for air cooled instead.
A 3/8" pipe was fitted with special cooling discs (Anybody know what they're called?) and a condenser assembly was fabricated. The actual power of the system is estimated to be about 500 watts.
During operation, the boiler is programmed to reduce it's effective power after it passes the 85 degrees C mark. Looking at the graph on the features step, the heating curve shows where the power was reduced and how the increase in temperature slopes off to an almost flat line. At this point, the temperature increases very slowly as the boiler itself is 'cooled' by the vapours being emitted. It's very important not to 'over cook' the condenser or else vapour will be emitted from the breather pipes.
-
7Step 7
Frame
![]()
![]()
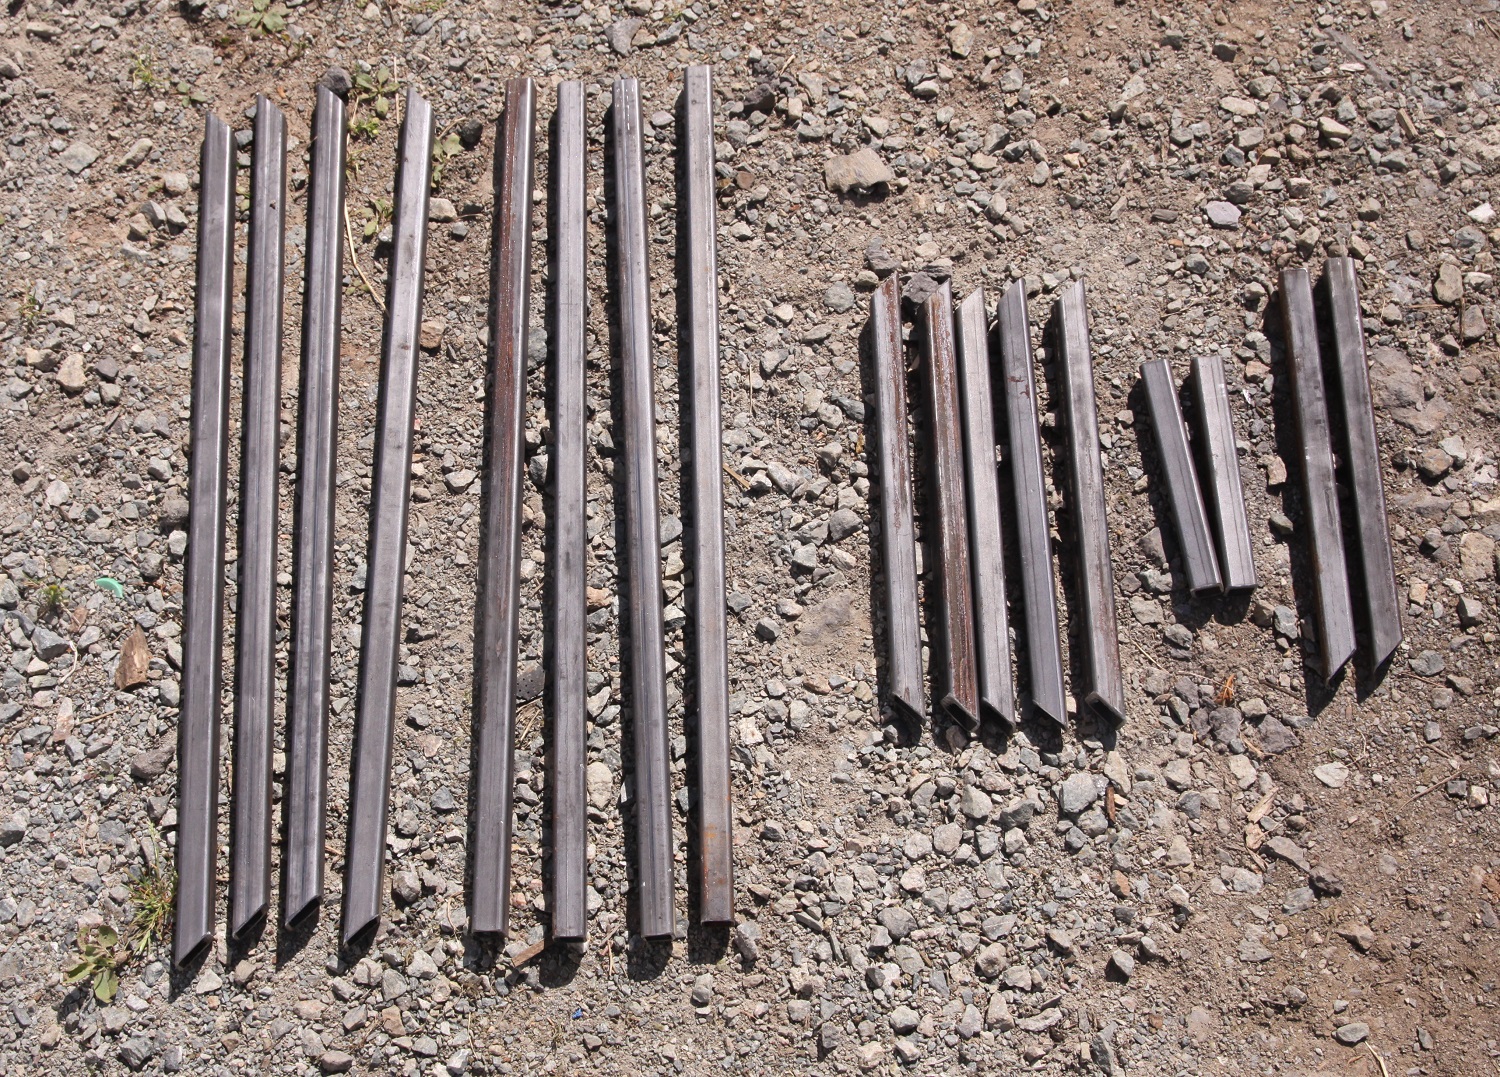
Parts:
- 20 x 20 x 3 mm steel box section x 12m
The frame allows all the components to be mounted securely which is important for reliability and safety. Remember we have potentially explosive vapours and 240 volt electricity.
-
8Step 8
Hydrometer
![]()
![]()
![]()
This elaborate pipe fabrication, sometimes known as a 'Parrot', allows the alcohol product to be split off at different parts of the process and has a very sensitive pressure sensor chip in the control panel that senses the level of fluid in the main tube.
The hydrometer allows the 'foreshots' to be automatically separated from the distillate produced by detecting the level of fluid in it's pipework. After this, during the rest of the process, it can indicate the concentration of alcohol being produced although at present it's not really accurate enough to give very meaningful results. I might upgrade this to a capacitance probe if I can bench test one successfully.
-
9Step 9
Breather Pipes
![]()
![]()
![]()
Many parts of the system require a breather pipe to the outside eg the receiver tank for the product and the cold end of the condenser. The exception is the boiler itself as it vents directly through the condenser.
All the breather pipes are yellow and are quite small as during normal operation they only vent a very small amount of vapour/air. If there is a major malfunction in the machine, which would necessitate multiple safety failures, then the tubes will vent excess pressure.
-
10Step 10
Alcohol Vapour Detector Probe
![]()
![]()
![]()
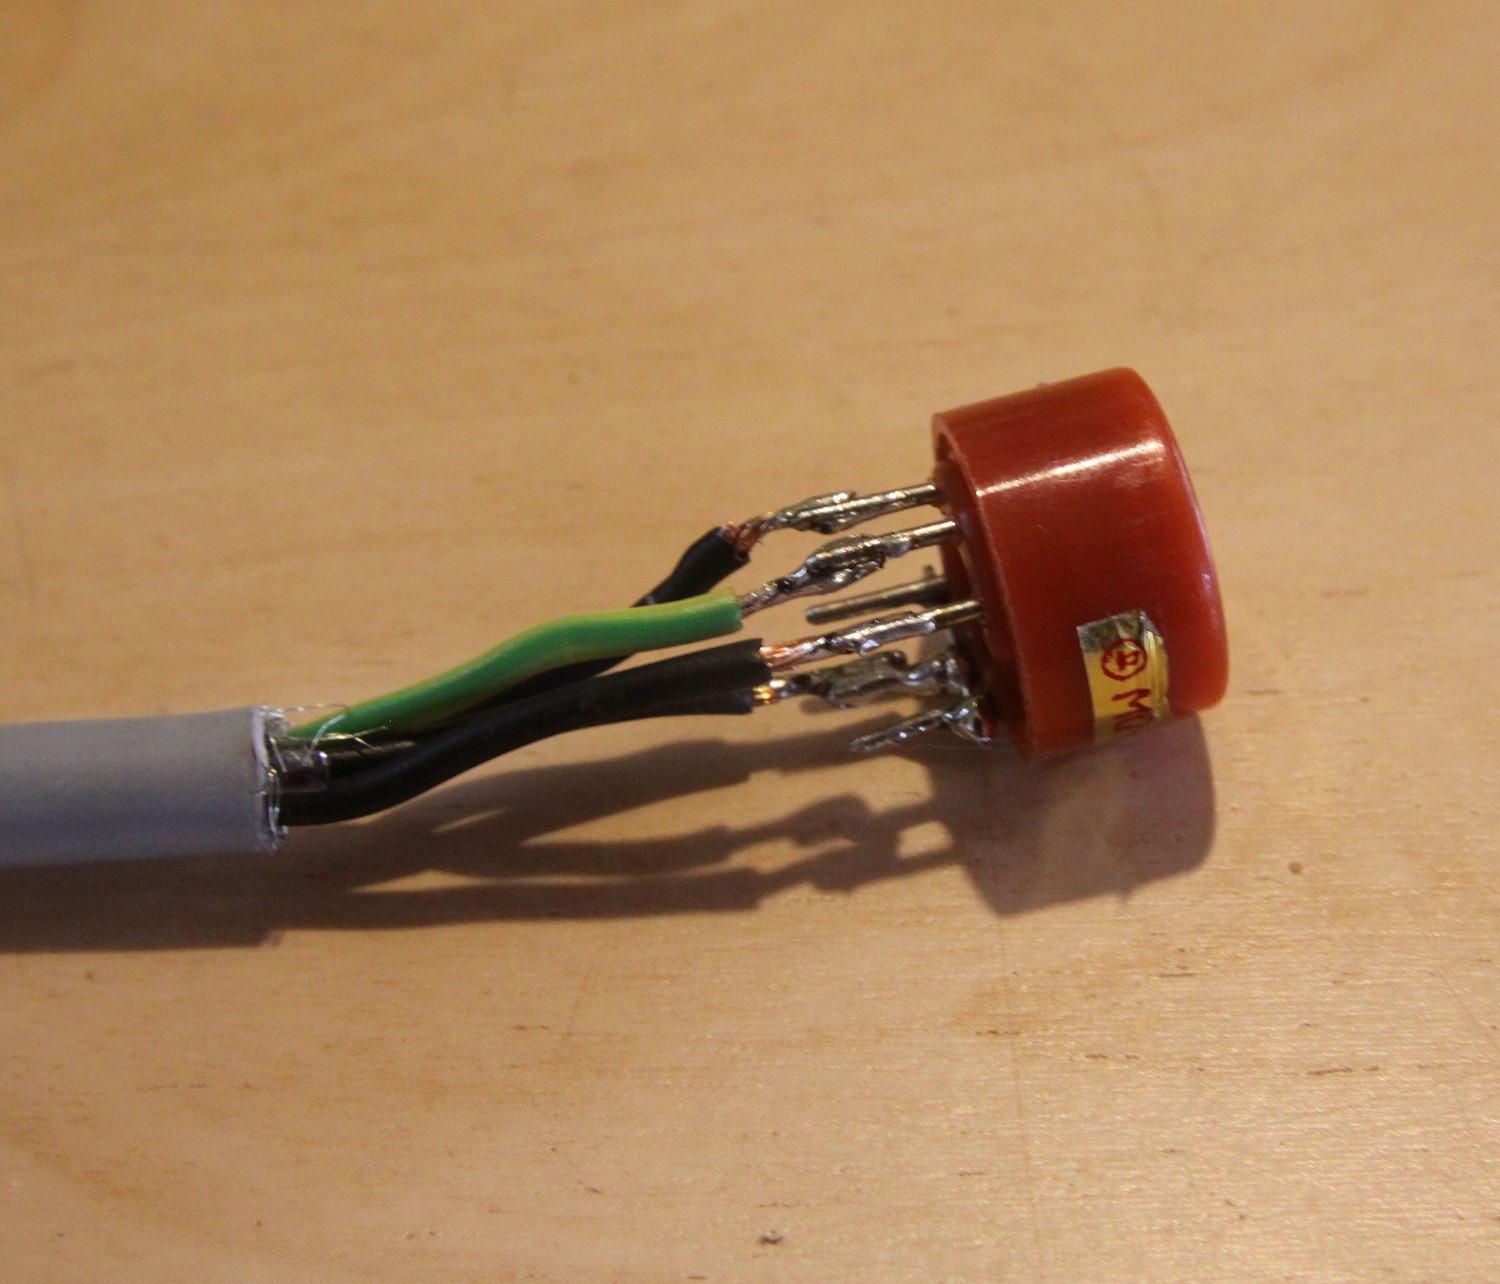
Parts:
- Epoxy resin and hardener
- MQ3 alcohol detector
The orange MQ-3 module is wired up, tested, and slotted into a 20mm tube and permanently embedded in epoxy resin. This is the best way of protecting the connections against shorting and giving strain relief for the cable itself.
The sensor is easy to use but does use quite a lot of power - it has a very small heating element inside it. For this reason, the machine must never be powered from the USB cable going to the Arduino Mega or the Mega's onboard power supply will be destroyed. The sensor needs to be wired directly to the main power supply and can be isolated with a Schottky diode.
The NanoStillery™ - Whiskey Distillery
The world's smallest fully automatic whiskey still built with safety as the foremost consideration.
 A great deal of the work involved was in making the boiler. The 3D image above hopefully should show how it is put together.
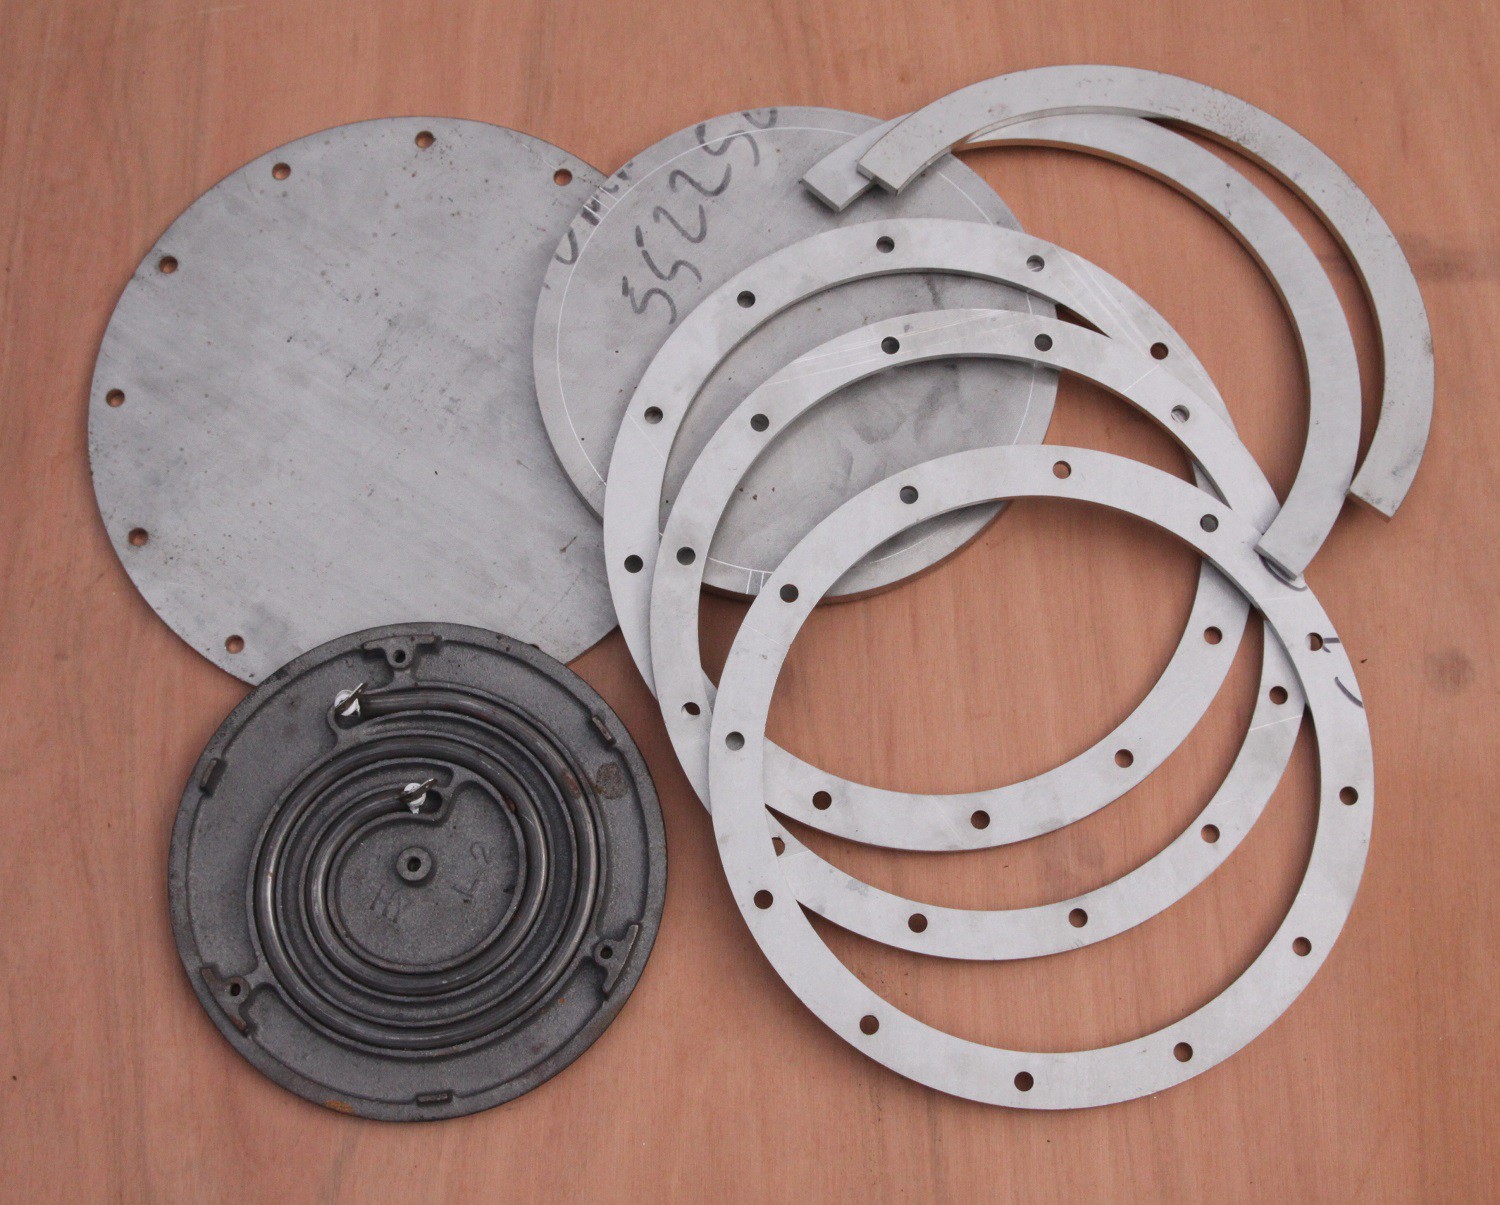
 The boiler is made from a stainless steel beer keg, some custom laser cut stainless rings and plates and the electric heating element from a standalone electric hob.


 The brass connector is screwed into the 2" socket to prevent distortion and splatter on the threads during welding.
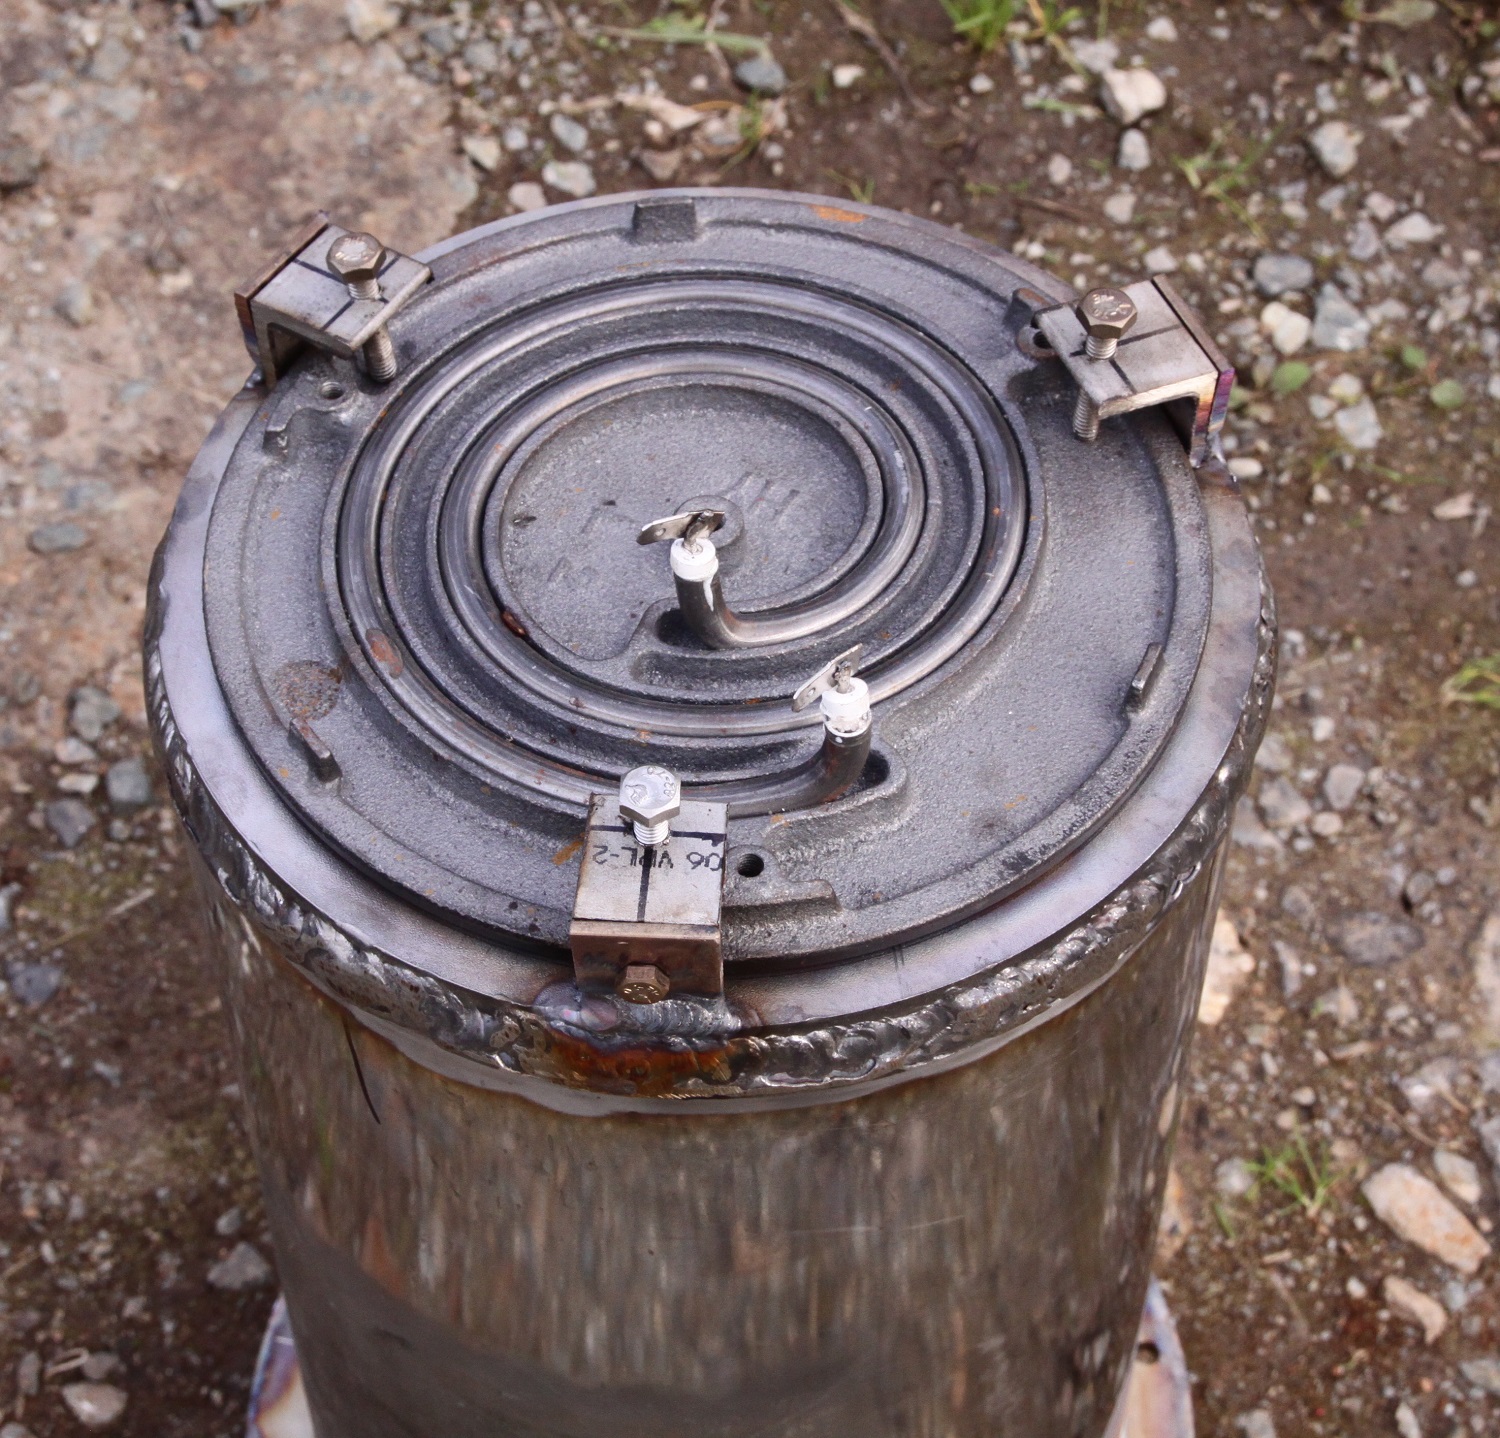


Discussions
Become a Hackaday.io Member
Create an account to leave a comment. Already have an account? Log In.