Close
0%
0%

Arduino Desktop

Building computers on Arduino platform is fun. How far can we take this?

Similar projects worth following
The original iteration of this project used an Arduino Mega and Parallax Propeller, see details.

New version uses a Teensy 4.1 to deliver a lot more horsepower and advanced features. The computer is rather small and easy to program. It is much simpler than RPi or beagle, which has its benefits and weaknesses. It provides all the typical computer peripherals, like USB, Ethernet, storage, video, audio, etc, but to the Arduino platform.

Old description:
Want to have a computer in your pocket other than a RPi, and easily write an OS for it? Here is the answer. An OS + the hardware for a desktop using an arduino. ON AN ARDUINO MEGA.

New Teensy-Based Design & Specifications

Wiki for extended details + documentation: http://wiki.nuclearman.technology/mediawiki//index.php/Teensy_4.1_Computer

Hardware Specs:

  • Teensy 4.1 for the main processor
    • 600Mhz, or more with overclock
    • SDIO for lots of storage
  • 4-port USB host
  • Ethernet
  • Hi-Fi Audio
  • Parallel port for adding a video card or LCD controller (8-bit & 5v-compatible)

Goals:

  • Actually useful computer for common tasks like writing, organizing files, playing music, etc
  • Run games
  • Load and execute ELF files cross-compiled from Linux
  • Run a computationally costly game similar to Minecraft
    • Perhaps load a mesh and textures from an SD card, and render them

The newer version was created so that I'd have a much more powerful platform to work with.  An Arduino Mega just can't do that much, and although what I did was cool, I think I can do a lot more cool stuff now since technology has advanced, and since I've gotten better at making things.

I think all of the goals I mentioned are at least achievable, and much of it is not so hard.  I already have much of an OS already written for the Teensy 4.1, which is probably much better than the code I created back in 2017.  You can see the #NTIOS (Arduino OS) repository on my gitlab server: https://git.nuclaer-servers.com/Nuclaer/teensy-ntios

Old Design & Specifications

Hardware Specs:

  • NGT30 graphics
  • keyboard
  • Ethernet
  • SD card support
  • Extra 32KB parallel SRAM if using an awesome shield

Goals:

  • File System
  • Programs for Files (Editing, executing, displaying...)
  • Shell (Obviously)
  • daemon for displaying RAM usage (right side of screen)
  • Task Manager
  • Compilable & Executable BASIC
  • Terra (Like Terraria)

There are two software versions. One is an emulator and the other is a hard coded OS.  The hard coded one has two repos, for the older and newer versions.

I have compiled a YouTube playlist chronologically of when I created them.  Here it is:

Teensy4.1_Desktop_v1.3.zip

New board design for use with Teensy 4.1 - grants 4 USB ports, audio, ethernet, power, etc.

Zip Archive - 806.75 kB - 08/07/2024 at 16:54

Download

as.py

Assembler for Some-CPU-I-haven't-named-yet (SCIHNY)

plain - 9.56 kB - 05/23/2017 at 04:22

Download

server_boot.py

Distributes bootcode for those of us without SD card support in our computers (like myself)

plain - 940.00 bytes - 05/23/2017 at 04:22

Download

mmc_assemble.py

This seems to work. For MMC CPU architecture. Use Python 3. I no longer am using MMC for this project

plain - 9.15 kB - 04/29/2017 at 03:04

Download

mmc_compile.py

Not sure this works. PYTHON 3!!! No longer used.

plain - 5.91 kB - 04/29/2017 at 03:04

Download

View all 7 files

  • 1 × NGT20 Graphics Shield
  • 1 × Arduino Mega Processor/Control Board
  • 1 × PS/2 Compatible Keyboard you can cut the connector off and plug the wires into the arduino. Or get a connector.
  • 1 × SD Card Shield (Optional) Be Careful! Ensure Mega compatibility!
  • 1 × VGA/NTSC Monitor and Cables

View all 6 components

  • The New Board Works

    Dylan Brophy08/06/2024 at 15:28 0 comments

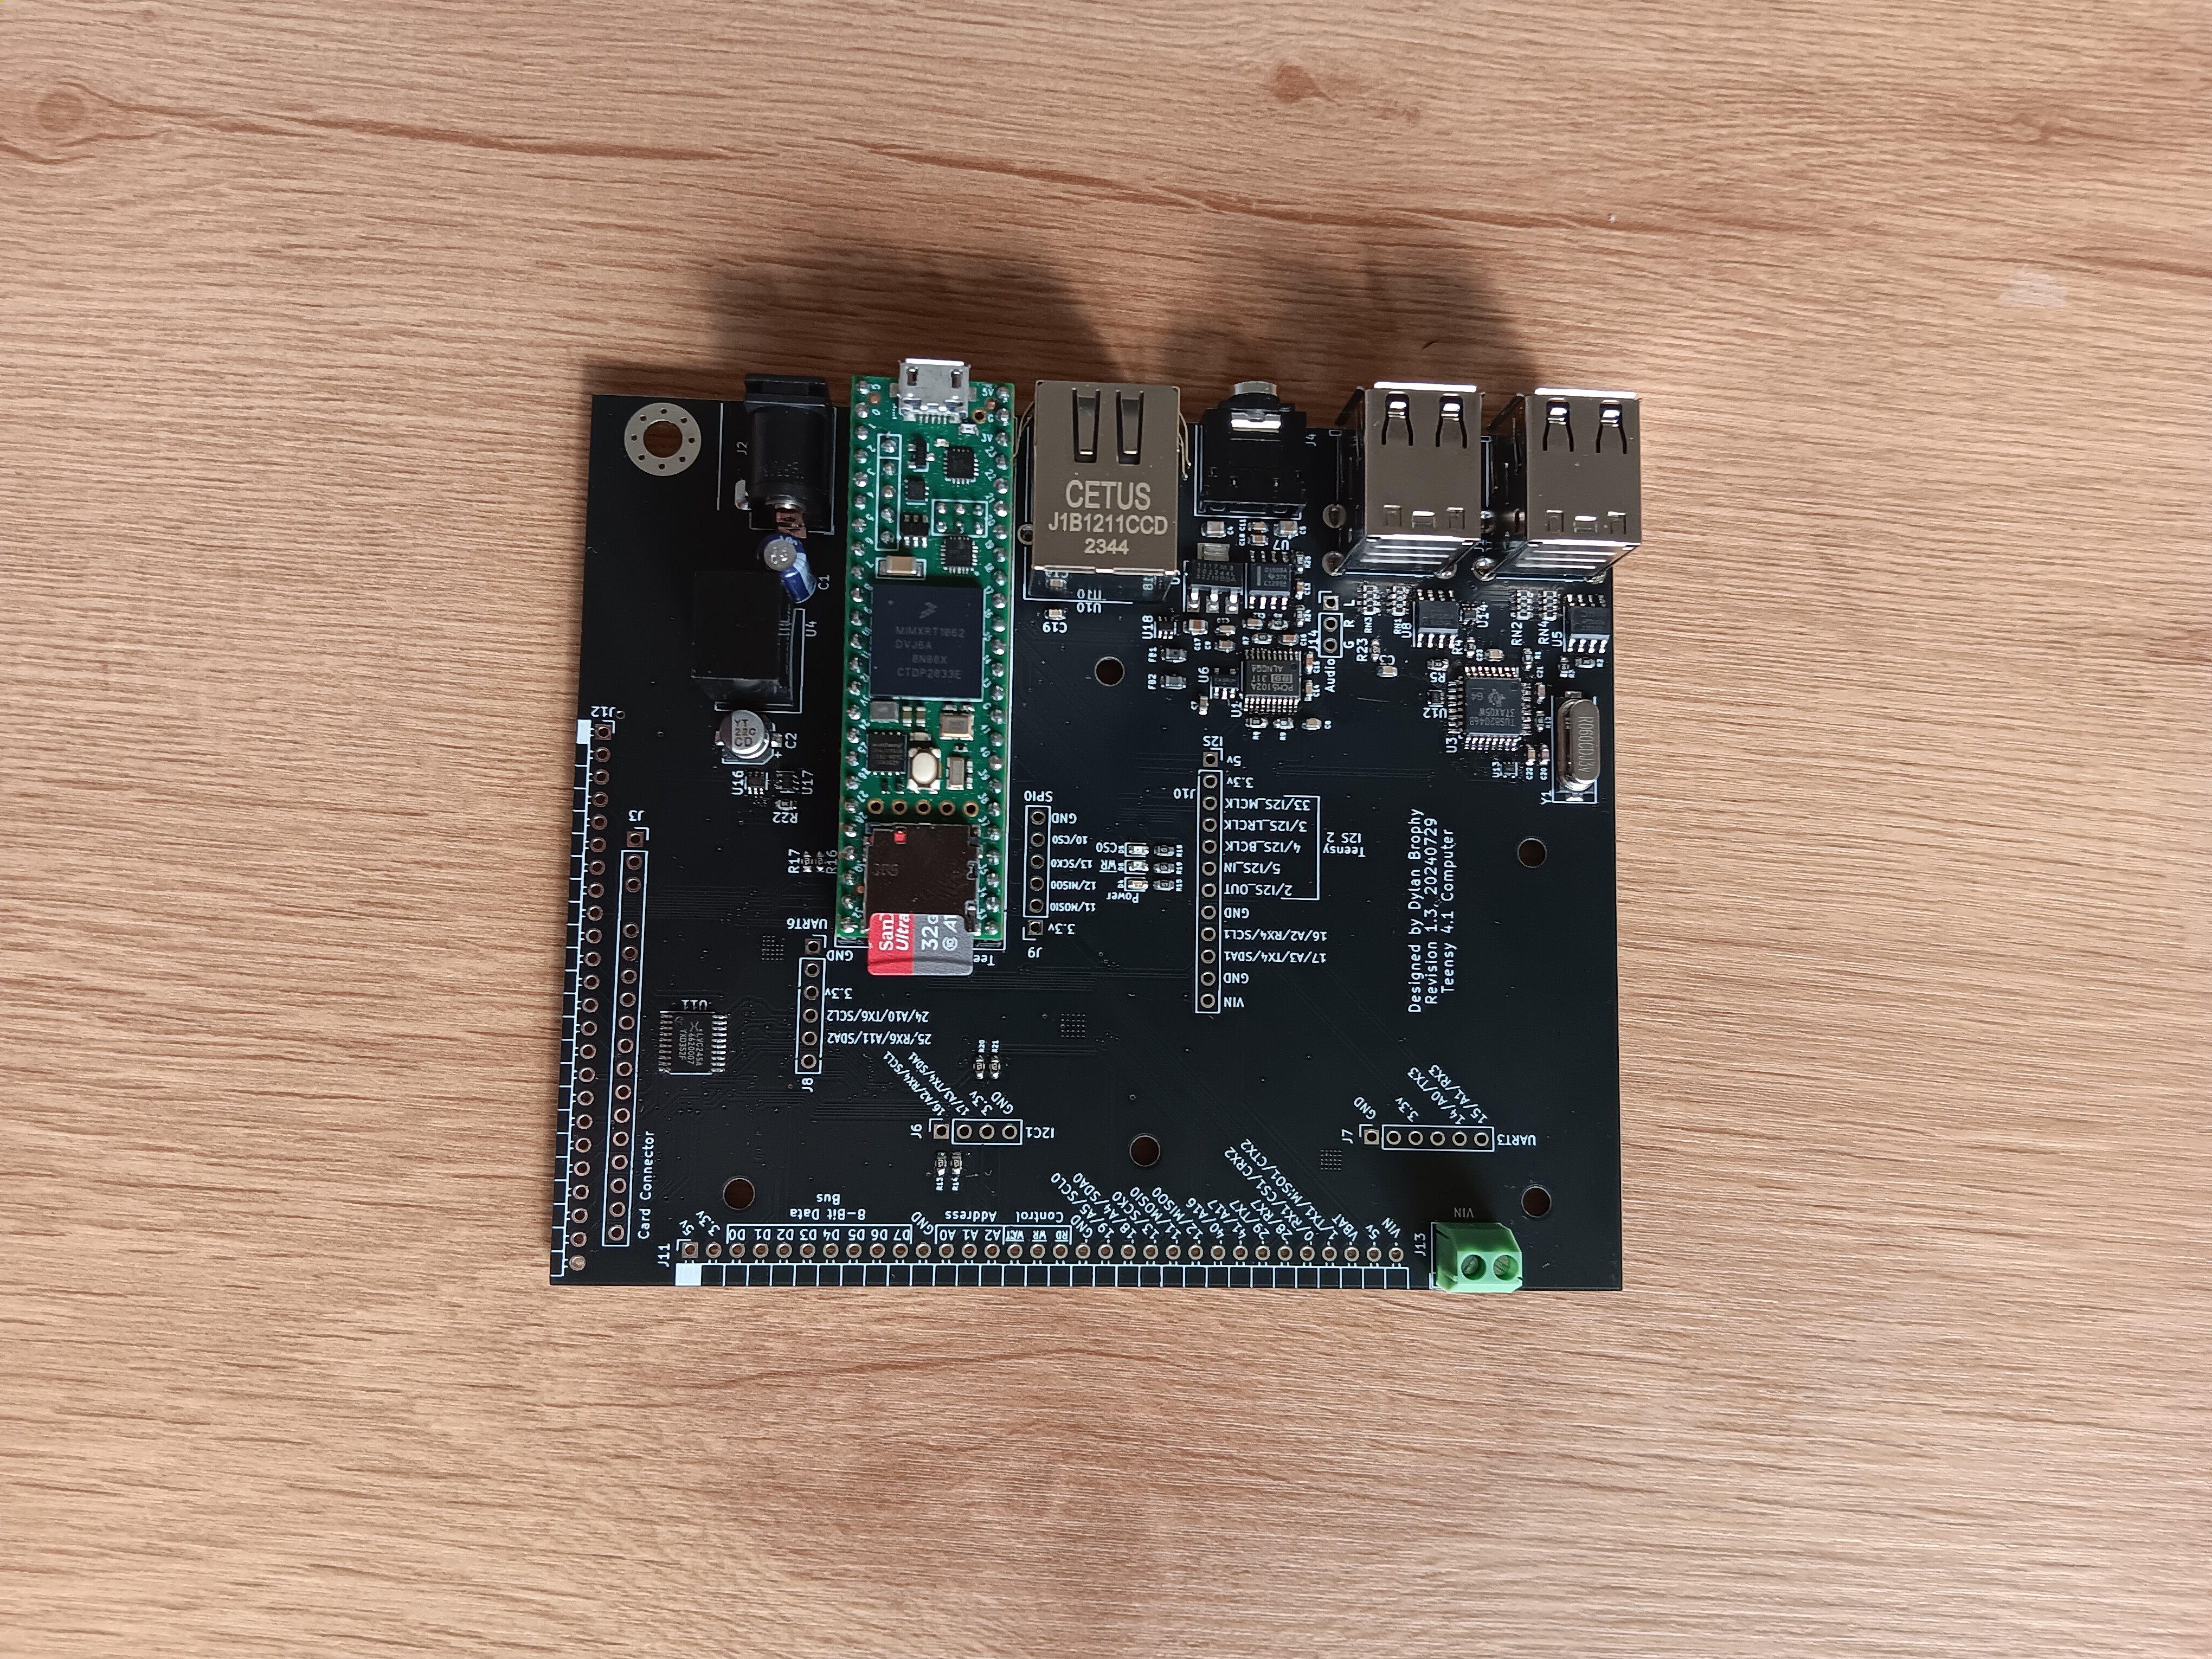
    My new board has working USB, Ethernet, power, and audio!  I did a board revision previously which I did not log, where I made two silly mistakes which prevented that version from working.  Here is the largely working board:

    I say "largely working" because there is an issue with one USB port, but this isn't due to the PCB design, it is due to my assembling an SMD board by hand XD

    So, I can now connect whatever devices I need/want to my Teensy very easily for building another Arduino Desktop.  One USB port is just not enough.  Now the last thing I'll need is a video card of some kind, either my #uPD7220 Retro Graphics Card (and VGA hack) project or the #RA8875 VGA card will do.

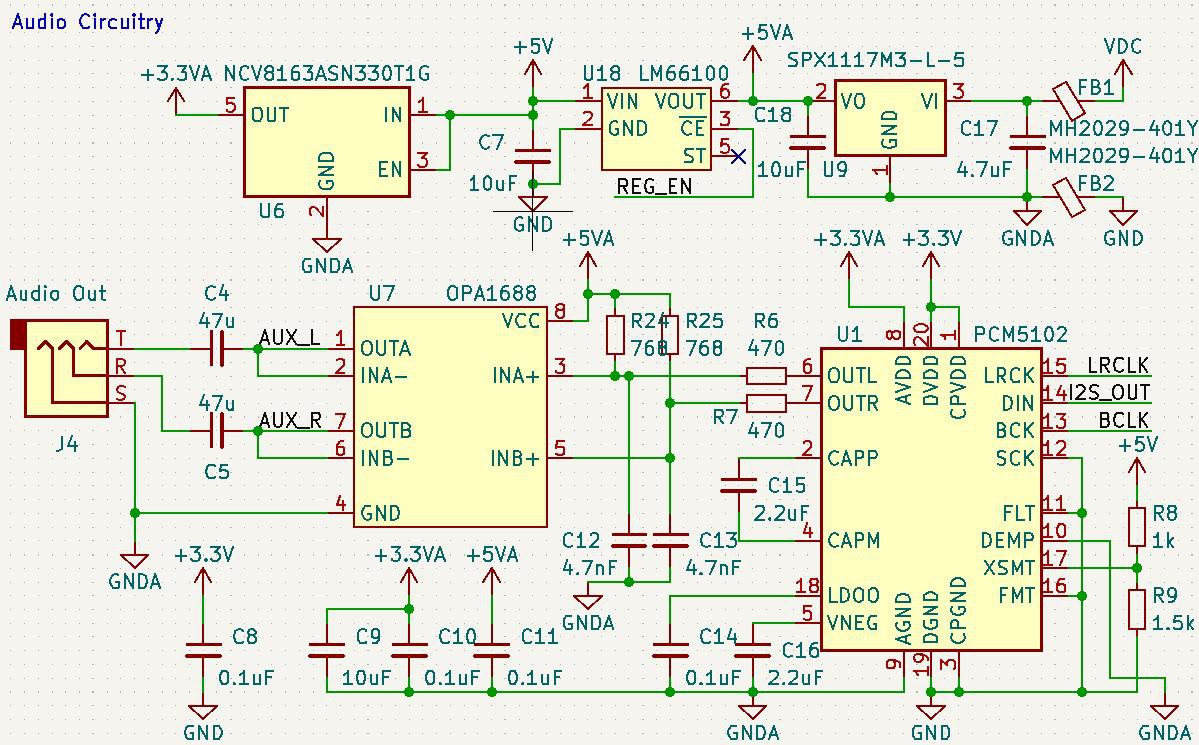
    The only thing I really want to improve at this point is the audio circuit - specifically how it pulls power from the main 5v rail, because it causes some noise (although it does sound pretty cool...).  Here is the audio circuit on this board:

    This circuit is basically just a DAC and an op-amp, with some power circuitry, which is *designed* to clean the noise from the signal.  For the most part, it does do that, but if VDC is 5v or lower then it fails miserably, and the user can hear the noise.  This power circuit basically switches between an LDO and the main 5v rail for providing the 5va rail to the amplifier.  If there is no power available other than USB or a low VIN voltage, then it switches to the main 5v line, which introduces a lot of noise from the rest of the system, and typically also from the device at the other end of the USB cable too.  I also suspect that there is something else at play making this worse, perhaps the LDO being backfed or some instability in the 5VA line when coming through the LM66100.  Likely noise is also coming through the two resistor dividers before the amp, since it is connected to the 5VA line directly.

    The only other thing, is that this circuit is VERY loud.  The design, is that the volume can be controlled digitally by scaling the PCM data going to the DAC.  Well, perhaps controlling volume a different way could improve sound quality, both because it could reduce noise, and because it would avoid compromising the PCM data precision.

    In the next board revision, which I'm not rushing towards as this works well enough, I plan to add more filtering to the system 5v line before feeding into the audio circuit, and to consider adding some feature for analog control of the volume of the audio circuit.  Everything else is working great though!

  • Misadventures in PCB Design

    Dylan Brophy05/28/2024 at 17:15 0 comments

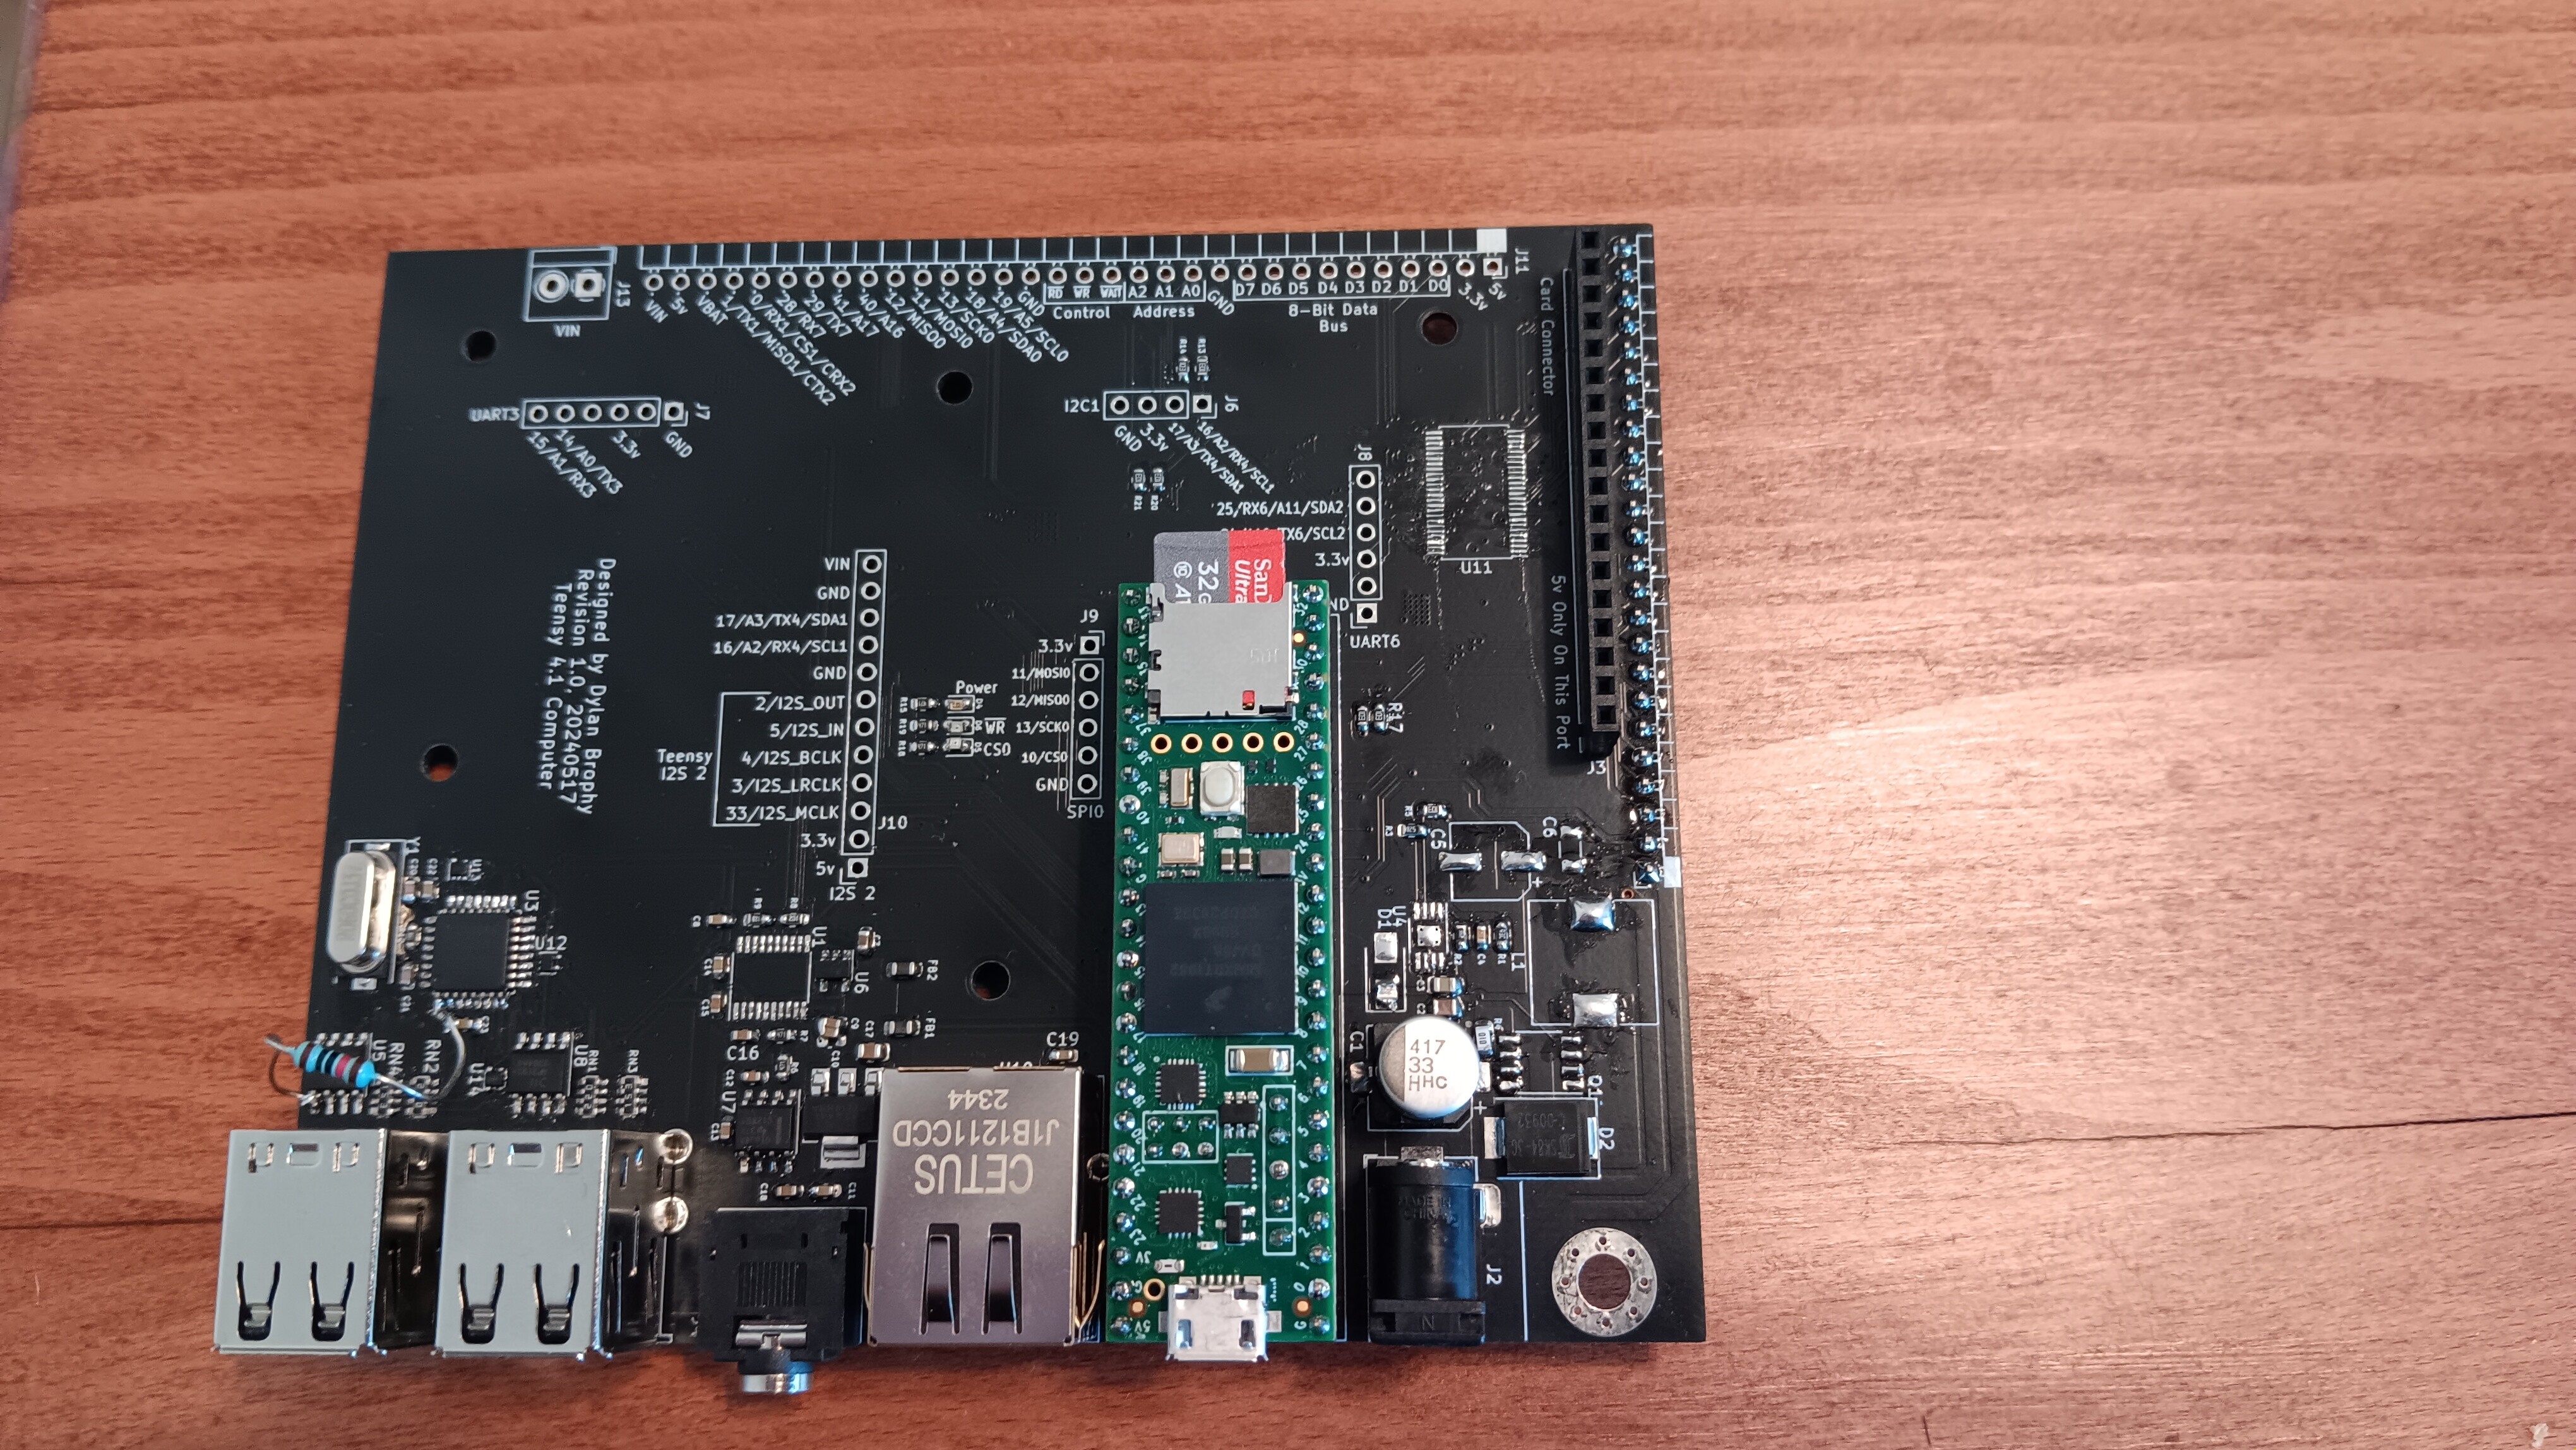
    Last log I designed a board and ordered it; a few days ago I received that board and assembled it.  Here's what it currently looks like, after some alterations:

    The board came out nice if you ignore the modifications.  Unfortunately, after I baked the board for SMD soldering, the board fell while the solder was still liquid and components got thrown off the board.  When I put them back on, I mixed up two of the ICs, and I think this is why the voltage regulator flooded the 5v line with 11v.  Needless to say, numerous components were destroyed, so I don't know if certain components work.  Nonetheless, I was able to find several issues with my design, and so I'll be doing one more board run with a few modifications:

    List of changes:
    • Added ideal diodes to control flow of power, to prevent regulator backfeeding and to control power going to the audio amp
    • Added missing pullup resistors to the USB hub for overcurrent detection and USB connection detect
    • Changed the IC used for 5v level shifting to the 74LVC245
    • Removed the buck regulator I designed and replaced it with a "linear regulator replacement".  The ones like this I've used before worked great.  This one is rated for 2A.

    While I wait for the new board to arrive, I've been working on connecting this to my #uPD7220 Retro Graphics Card (and VGA hack), and at this point I can communicate with that card.  Due to hardware bugs and fried components, I can only do this by means of more modifications:

    The card also has some design bugs, so I had to make some hacks there too.  I'll post a log to that project once I get a valid signal from the card - I think I'm getting close.

    Well, that is all for now.

  • Arduino/Teensy based SBC

    Dylan Brophy05/16/2024 at 15:08 0 comments

    In the previous log I planned to build a new Arduino-Desktop type system, with a more powerful microcontroller like the Teensy 4.1 or ESP32.  I decided to go with the Teensy 4.1, because it has a lot of useful features out of the box for me to work with, and although it doesn't have WiFi, WiFi can be easily added with an ESP8266 or ESP32 attachment.  The Teensy 4.1 on its own provides Ethernet, a blazing fast processor, SDIO, I2S audio, a USB host, and 8 UARTs.

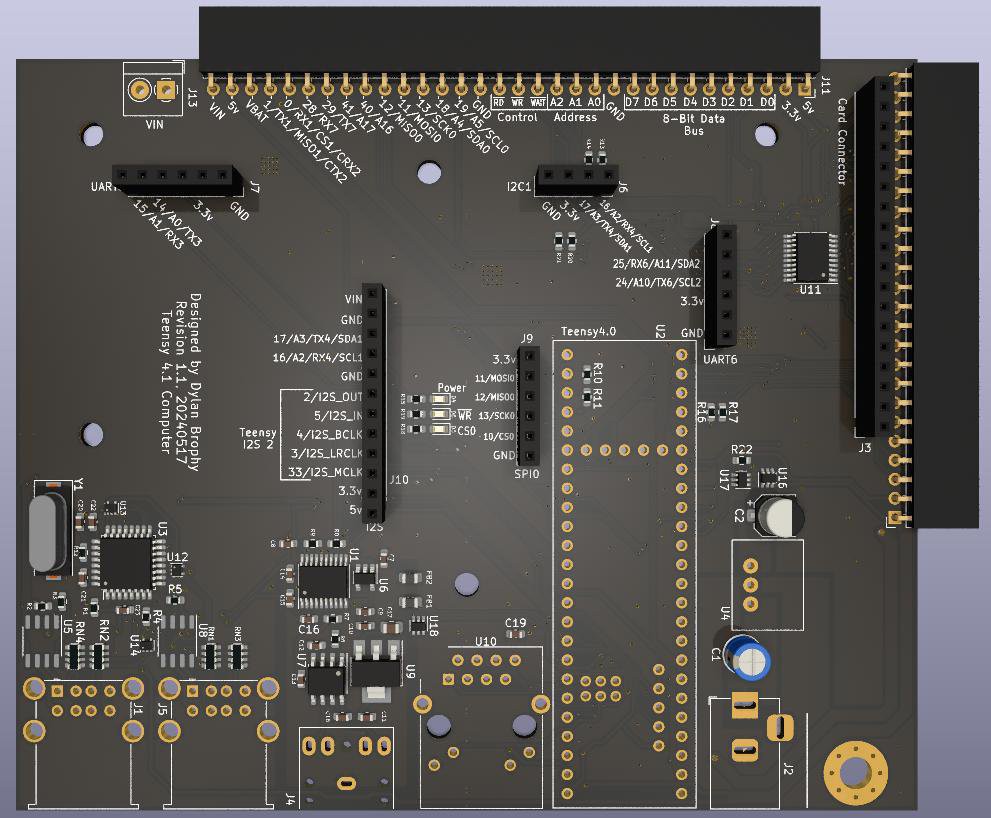
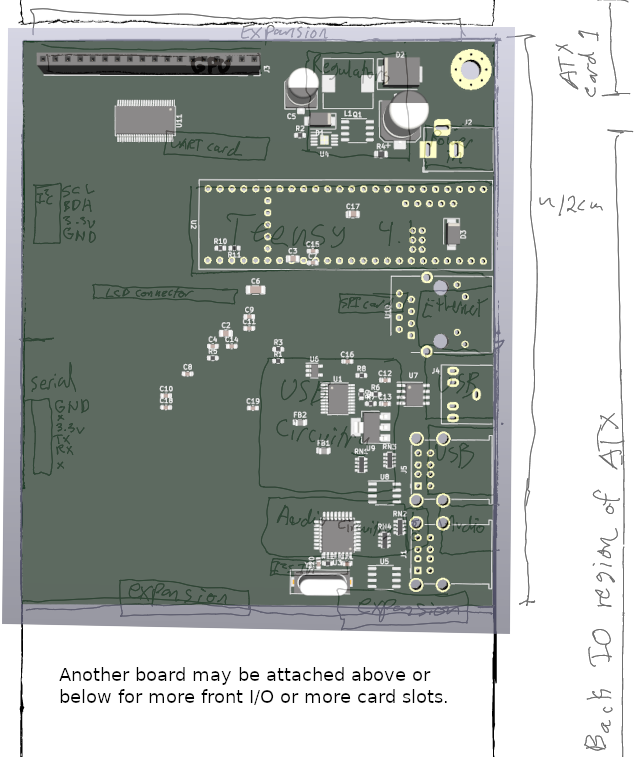
    The board I'm working on makes use of all of it - it provides Ethernet, 4 USB ports, audio, and will provide several headers for connecting more stuff.  I wish the KiCad rendering of my half-baked board had 3D models for the connectors, but it doesn't, so please just imagine that you see them:

    In the picture above the USB / audio ports are in different places than in the overlayed drawing, but other than that, I'm really surprised the PCB lines up so well, considering I completely eyeballed the component placement.  You can see where I plan to put certain headers and such, which I've tailored to certain devices I think I'd want to connect to the system.  The headers on the far left match up to pinouts on certain SparkFun devices, for example their GPS modules and QWIIC breakouts.  Those modules should be drop-in to this system.  I want to put a connector for LCD displays up there too, which would have an 8-bit bus and I2C for a touch screen.  The expansion card slot on the top is an 8-bit bus compatible with my #Z80 overpowered computer project I worked on previously, so the card I designed for it will fit.  Other than those headers, I want to add a few more for LoRa and WiFi devices, and headers for connecting other boards for a larger system.  We'll see if I actually have enough IO pins to do all that though.

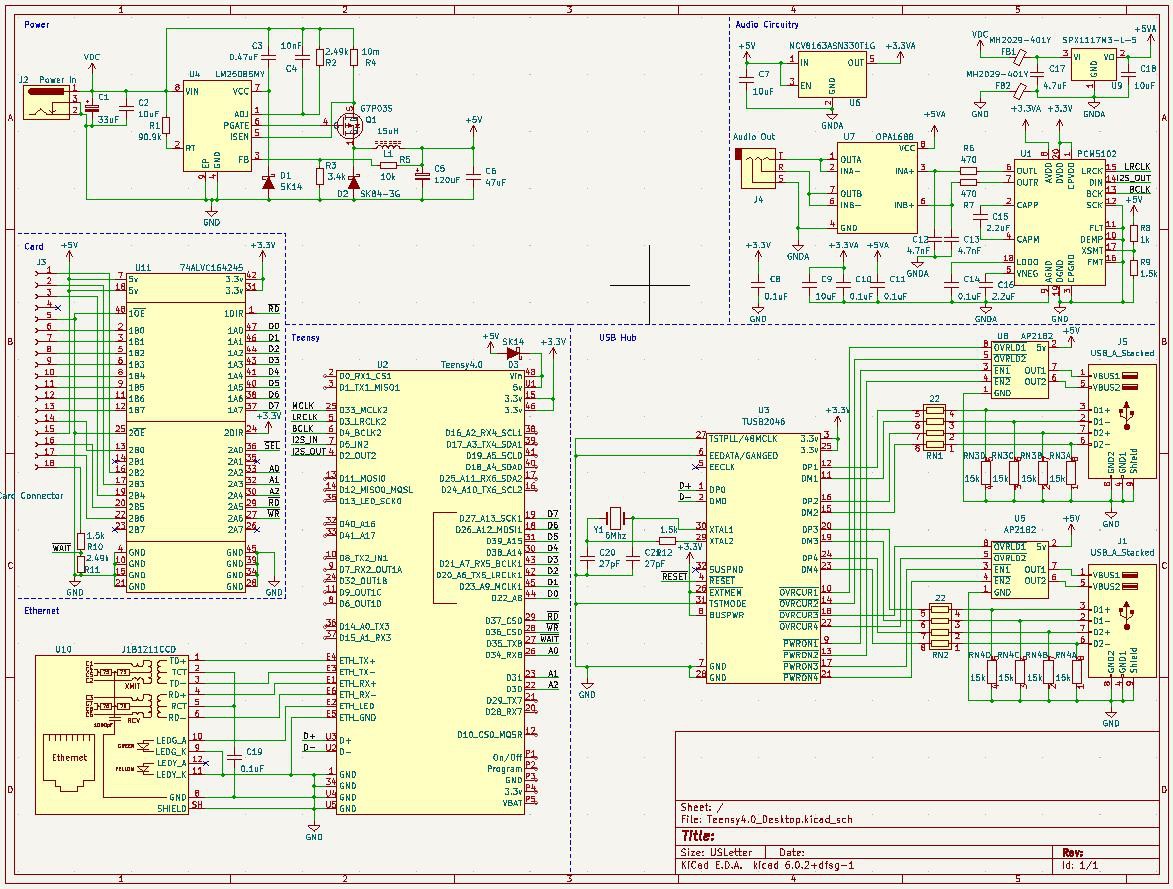
    The schematic so far:The audio circuitry in the top right is pretty complicated, since it provides its own linear regulators and a separated analog ground, with filtering.  Its probably way overkill for what I'm doing, but I like to make things overkill I guess ¯\_(ツ)_/¯.

    The four USB ports are connected to a TUSB2046 hub, to expand the Teensy's number of available ports.  Since each USB port may draw up to an amp or so, I made sure to equip the board with a nice fat buck regulator, shown top-left.  Again, probably way overkill to provide up to 6A 5v to the board, but whatever.

    The rest of it is pretty self-explanatory - there is an Ethernet MagJack and a level shifter to the 5v expansion slot.  I still need to add a bunch of headers to the board.

    I've integrated most of these devices to #NTIOS (Arduino OS) on their own, but I don't think I've integrated quite so many on one board at the same time.  Anyway, this board should give me a lot to play with.  I mean, it's basically a Teensy-based SBC at this point.

  • The need for refined hardware

    Dylan Brophy05/08/2024 at 00:27 0 comments

    I decided to break the new OS into a new project: #NTIOS (Arduino OS).  I think this project here should be more for the hardware and the shell program, and also any programs (or games??) made on the platform.

    I'm going to try to build an interesting machine using a Teensy or ESP32, and I'm thinking of combining it with the #uPD7220 Retro Graphics Card (and VGA hack) project to provide VGA output.  This would be interesting, because then we could have a device using early 1980s graphics technology to output VGA (not invented yet), while simultaneously running software at 800Mhz, and loading linux ELFs into an Arduino environment.  This would be a bizarre but fun combination of hacks.  And, greatest of all, it could run games, probably including DOOM.  It just seems like an absurd yet wonderful conglomeration of technology.

    As far as loading ELF files goes, I think I'm actually pretty close.  I think the main error I made previously was in the compiler options.  Many of the necessary syscalls are already implemented in NTIOS, and would just need the dynamic linking.  Importantly, the Teensy 4.1 only uses the thumb ISA, so one must compile with all the right options.  The code for ELF loading and executing on Teensy can be found on my gitlab server.

    The hardware I had made previously was cool and worked well, but was very limited with system resources, and I feel that it didn't leave much room for expanding on.  Now I have a highly modular OS I can plug into pretty much anything and various more powerful microcontrollers have become widely available.  I've also just become way better at programming and building electronics in the past several years.  I think there's an opportunity to make an actually cool and fun computer running on Arduino, where there wasn't before.

  • Should I return? Updates from past few years

    Dylan Brophy04/10/2023 at 04:09 1 comment

    I haven't been on HaD for a few years now.  But this Arduino computer project has, in some way, continued to advance.  I'm going to write a series of logs outlining the changes and developments that have happened over the past few years, not necessarily in chronological order.

    At some point I took some code I wrote, copied and restructured it into a git submodule, and started building an OS around it.  A bigger, more flushed out OS and fragments of a kernel and HAL.

    The repo is on my personal GitLab instance here if you want to take a peek at the modern source code: https://git.nuclaer-servers.com/Nuclaer/ntios-2020
    In all honesty, I never planned on releasing it, so there's some pieces that were copied from around the internet but probably have attributions in the comments.

    I've created many devices with this software over the past 2-3 years:

    Various devices I built over the last few years


    Writing assembly in a text editor on a hacked-together laptop-like computer
    Closer image of some of the associated electronics

    Terminal output (device pictured lower right in top image)

    All of the devices above run ~95% the same software.  The only differences are in the exact mapping/configuration of the hardware and some drivers to plug it in to the rest of the HAL.

    I kindof just wanted to sneak peek what the project kindof is now, and see what people think.  This is not very much, and doesn't describe what's going on or how any of this works, this is just kindof a preview.  If you want to see/learn more, comment so I know people are interested.

    What does this run on?

    If you pay attention, you'll see I'm quite a fan of the Teensy 4.1 now.  I've used other chips like the ESP32 and Artemis, but T4.1 has been my go-to for a while now.  I haven't used AVR in many of my projects for a long time now, but I think I could run this on an ATmega2560.  The software stack is getting rather large though, and probably ever more memory intensive, so I don't think I could run this well on an ATMega328p or similar chip.

    Relation to the original software

    When I first created this new OS in May 2020, I probably only copied over the existing system() function I had written for this project, but it seems like everything else was written from scratch to be more modular and use more OOP.  It's not clear if I copied some stuff from the NTIOS_2.0 codebase, or if I started from scratch.  In either case, the way the HAL is set up for the new OS project has some strange resemblance to the HAl in NTIOS_2.0.  But in all honesty, at some point I had pretty much completely forgotten about the NTIOS_2.0 code and what I had been working on.  This happens more frequently than I would like to admit...

    Should this even be considered the same project?

    I think this is the logical continuation of this project.  I don't even know where the hardware is for this project anymore, but I want to make it nicer and more modern anyway.  Is it the same?  Well we have a new codebase, new hardware...  But yet it has the same objectives and interestingly, seemingly, some of the same architecture.  I don't know, but this project will die if it stays what it was, because that is in the past.  Grow, or die, is the way of life.

    Where is this project going now?

    My hopes for the new system are a bit more lofty.  My newer code is far more mature and advanced.  I think I can load and execute ELF files from an SD card on ARM if I put some more work into it.  In the meantime we can assemble programs for a built-in emulator and execute them.  Currently this still is compiled and uploaded from Arduino.

    If I come back to HaD, this project is going to change a lot.  The code will be newer and more capable.  The hardware will become more powerful and more portable (like tablets and laptops instead of a static device).

  • GPIO Support

    Dylan Brophy10/12/2019 at 23:28 0 comments

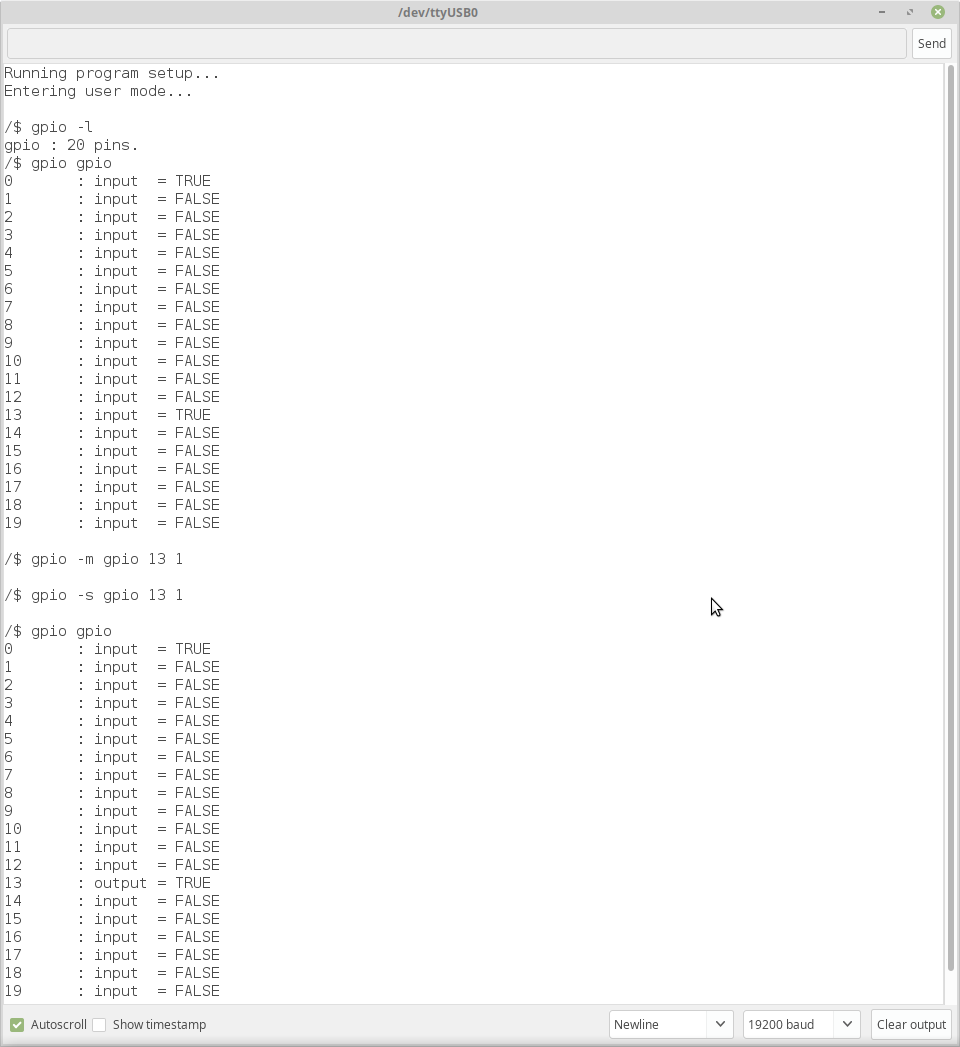
    I added GPIO drivers, and a gpio program to test the drivers.

    Essentially I just set pin 13 to output, then set it HIGH.  And yes, it worked!  Yay!

    What's nice about the way this is programmed is that it is independent of hardware and the Arduino IDE.  the GPIO command I used uses whichever driver(s) for GPIO that it finds, regardless of what hardware this is running on.  I even can run this OS on my linux machine as a cli command.  Great for testing!

  • AVR Support

    Dylan Brophy10/11/2019 at 06:08 0 comments

    Wait - didn't this used to run on Arduino?

    Yea, in the Arduino IDE.  I am no longer using the Arduino IDE, and uploading to AVR via a makefile works great!

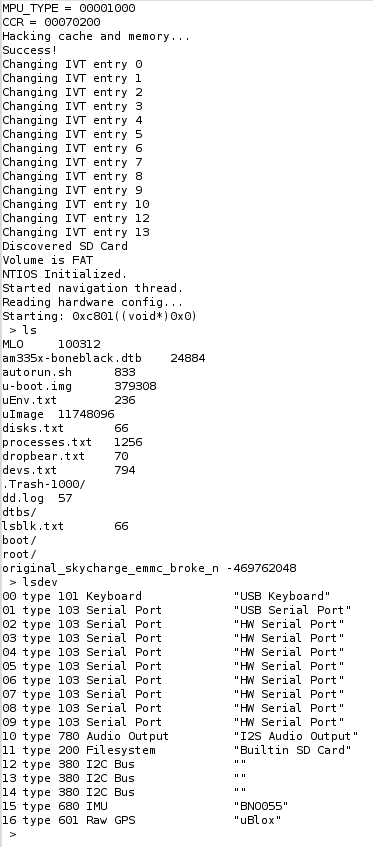
    After overhauling the OS I lost AVR support.  I have regained it!  Here's what the result is:

    I am still using the Arduino IDE for a serial monitor, but everything seems to work.  I still need to add support for lots of stuff now, but I'm running on a microcontroller again, which is nice.

    Anyway, I'm super excited, next I plan to add a GPIO API, so that later I can add software serial (then graphics support via an NGT30 :D)

  • Overhaul of the OS

    Dylan Brophy10/05/2019 at 04:53 0 comments

    It's been a while since I worked on this, and I see things differently now.

    First, I designed this dumb.  It's not scalable.  It was too hard to add drivers and programs and nothing was organized.

    Now I have separate directories for programs/commands and drivers.  Also, I have python scripts to configure the programs and drivers before compilation.  They are configured with JSON files that the python scripts read, and each component can be enabled/disabled.

    So I now have organization and scalability!!!  Yay!

    This is wonderful because I want to make this OS cross-platform.  I want support for more hardware, more processor types, and I want it to be usable in more ways.  For instance, to use it on microcontrollers as a usable OS in projects that need less processing power than a raspberry pi, like small robots, in home automation, and simple portables (like my #OpenPDA project).

    I definitely have a ways to go, but this is a major step.  See PR on Github here: https://github.com/NuclearManD/NTIOS_2.0/pull/1

    Note:

    1. Not as much hardware support - yet.  Only UART, NGT30, and PS2 Keyboard support
    2. No GUI anymore (can be fixed later)
    3. Added a man command
    4. Filesystem is not working, even though it is there.
    5. No multitasking at this time

    Like I said, lots of work to do!

  • basic BASIC and filesystem commands work!

    Dylan Brophy04/24/2018 at 00:58 2 comments

    Now the SD card is actually useful!  Project is now getting even more fun :D

  • SD Card working (finally!)

    Dylan Brophy12/02/2017 at 23:38 0 comments

    My arduino desktop now has a filesystem.  I can't do much with it yet, but it works. I also made some other improvements:

    1. better task manager
    2. CLI improvements
    3. new GUI color scheme

    Here is a video:

    Also, like I said in the video, I am making a board with:

    1. Arduino mega
    2. NGT20
    3. PS/2 Keyboard port
    4. SD card slot

    All in one arduino-mega sized board.

View all 18 project logs

Enjoy this project?

Share

Discussions

ActualDragon wrote 06/07/2018 at 17:38 point

i can see it now, we'll be winning fortnite dubs on our arduinos XD 

  Are you sure? yes | no

Dylan Brophy wrote 07/21/2018 at 05:03 point

Just wait for Arduinos with FPGA softcore accellerated graphics... :P

  Are you sure? yes | no

Mars wrote 05/23/2017 at 05:50 point

Nice!  What do you want to do for the filesystem?  I have a similar project and considered fatfs, but opted to design my own simple system.  If you built the hardware, wrote your own assembler, why not build your own fs?  I'm curious what you come up with.  Mine is based on files just being single linked lists of sectors, and a directory is just a struct of names and sector numbers stored in a 'regular' file.  No index or FAT.

  Are you sure? yes | no

Dylan Brophy wrote 05/24/2017 at 01:04 point

Basically the arduino c code (outside the emulator) replaces a large part of the kernel, including filesystem support.  I do this because I am not sure yet how to directly read/write bytes to/from the SD card in C using the libraries I have and I feel that a filesystem driver that is emulated would be too slow.  It would be more something to do on my #FPGA computer, but I would consider it on this project too.  I have designed filesystems in the past.... Before I knew how drives worked XD.  I would do it again. 

  Are you sure? yes | no

Similar Projects

Does this project spark your interest?

Become a member to follow this project and never miss any updates