 Anshul Sanamvenkata
-
1Configuring the Bluetooth Low Energy Module
The bluetooth module used in this project is a HM-11. A stock module will have a default name of "HMSoft" and a default password of "000000". In addition, it will be configured with a 9600 baud rate, and only 0 dBm.
These are all characteristics we need to modify. There aren't any good tutorials on the net showing how to do this, so I will attempt to do just that here.
First of all, you need an arduino for this process. It offers a stable 3.3 volts to power the module, and has a ft232rl serial chip.Once you've acquired the arduino, remove the ATmega chip in the middle.
![Image result for arduino without atmega]() Next, use the HM-11 pinout diagram below to solder wires to the following pads:
Next, use the HM-11 pinout diagram below to solder wires to the following pads:- UART_TX - Pin 2
- UART_RX - Pin 4
- VCC - Pin 9
- GND - Pin 12
Then plugin the above wires as follows to the arduino:
- HM-11 <-----------------------> Arduino
- UART_TX(pin 2) <---------> RX(pin 0)
- UART_RX(pin 4) <---------> TX(pin 1)
- VCC(pin 9) <-----------------> 3.3V(power rail)
- GND(pin 12) <----------------> GND(any suitable pin on the board)
If you do not have an arduino or one that has a removable atmega chip, you can use a board like this to make the same connections as above.
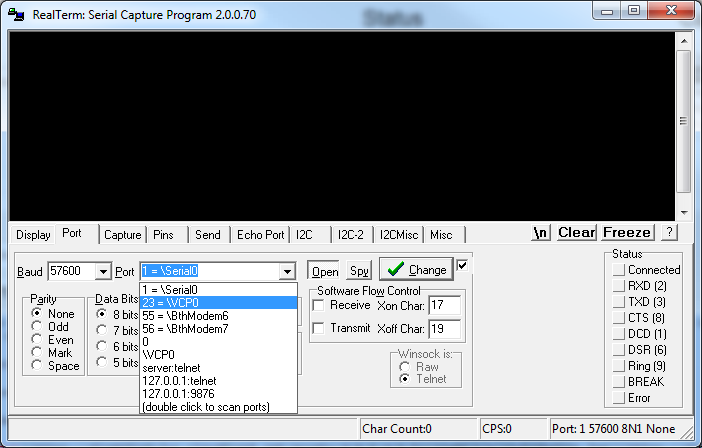
Finally it is time to make configurations. The HM-11 uses a command set called "AT". To properly program the chip, download RealTerm
![Image result for realterm]()
and use the following settings:
Under the "Port" tab
- Baud: 9600
- Parity: None
- Data Bits: 8
- Stop Bits: 1
- Hardware Flow Control: RTS/CTS
- Software Flow Control: Receive--Yes, Transmit--Yes
Under the "Echo Port" tab
- Echo On: Yes
- Monitor: Yes
Then, under the "Send" tab type in AT commands and hit "Send ASCII":
-Send: AT
-Response: OKIf the above happens, you know everything is working.
Do the following to change settings:
- To change name: AT+NAME[name you choose]
- response: OK+SET:[name you chose]
- To change baud rate from 9600 to 115200: AT+BAUD4
- response: OK+SET:4
- To change password: AT+PASS[para1], para1 range is 000000 ~ 999999, the default is 000000.
- response: OK+SET:[para1]
- To change power to dBm: AT+POWE3
- response: OK+SET3
That should be it. All the meaningful settings are customized, but there are many more options including the ability to pair to another bluetooth module. This is something the user could change if they want to experiment with swarm robotics. Full instructions for the other AT commands are in the datasheet starting on page 18.
The UnbreakaBLE Micro Drone
Use any Bluetooth 4.0(BLE) device to control this agile little modular drone.
 Next, use the HM-11 pinout diagram below to solder wires to the following pads:
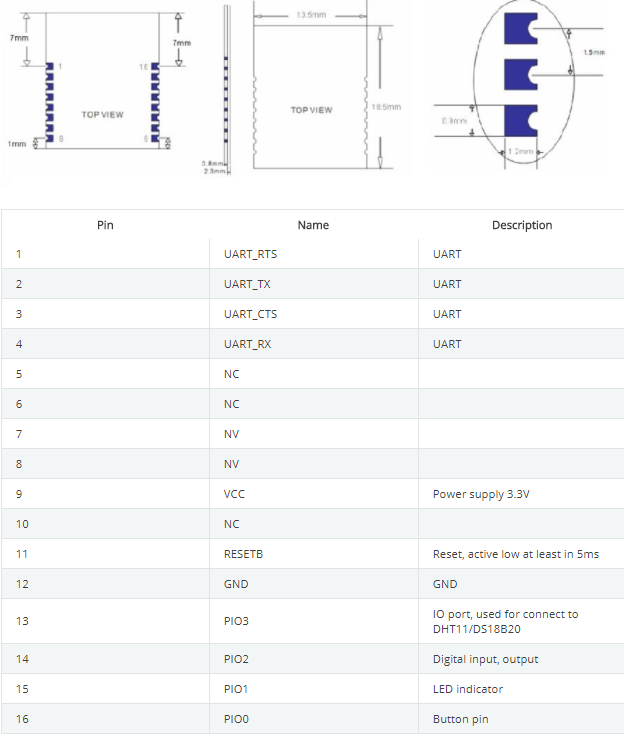
Discussions
Become a Hackaday.io Member
Create an account to leave a comment. Already have an account? Log In.