Joe Menard
-
The Electronic Load – Great Tool for Testing Power Supplies
06/18/2017 at 01:55 • 0 commentsIf you are designing anything with a SMPS (Switch Mode Power Supply), battery circuits, solar panel-based power/battery system design, or even linear power supplies, you need to consider how you are going to test that supply/circuit versus desired specifications. A couple years ago I bought a DC Electronic Load to do this testing, and here is why.
![]()
For “switchMo” (the new name for this Wall Switch project), the supply design that was chosen is capable of suppling 5VDC at 1A. For the Particle Photon, the desired input voltage range is 3.6-5.5V, and the Photon has its own switcher to get down to 3.3VDC. So, the permissible input range is pretty wide.
The major 5VDC power consumers on the PCB, are the Photon, the relay, and the cap touch switch/display. The Photon is spec’d to require 80-100mA, but in worst case peak burst-mode conditions (heavy Wi-Fi), could draw 430mA. The 5VDC coil relay consumes 450mW, and is spec’d at 91mA coil current. The LED in the cap touch display consumes 20mA when on. So, typical current is 80-210mA (80-100mA plus 90 mA plus 20mA) up to worst case of 540mA.
The equivalent resistance for the peak load at 5VDC (540mA) then is a bit more than 9 ohms, at a power rating of about 2.7 Watts. Nominal power draw would be 1.05 Watts, a nominal load resistance of 25 ohms.
How to test this? You could just use a few power resistors, using a 5 Ohm, 10W model to test 1 amp, and a 10 ohm, 5 Watt resistor for the peak current load of 540mA.
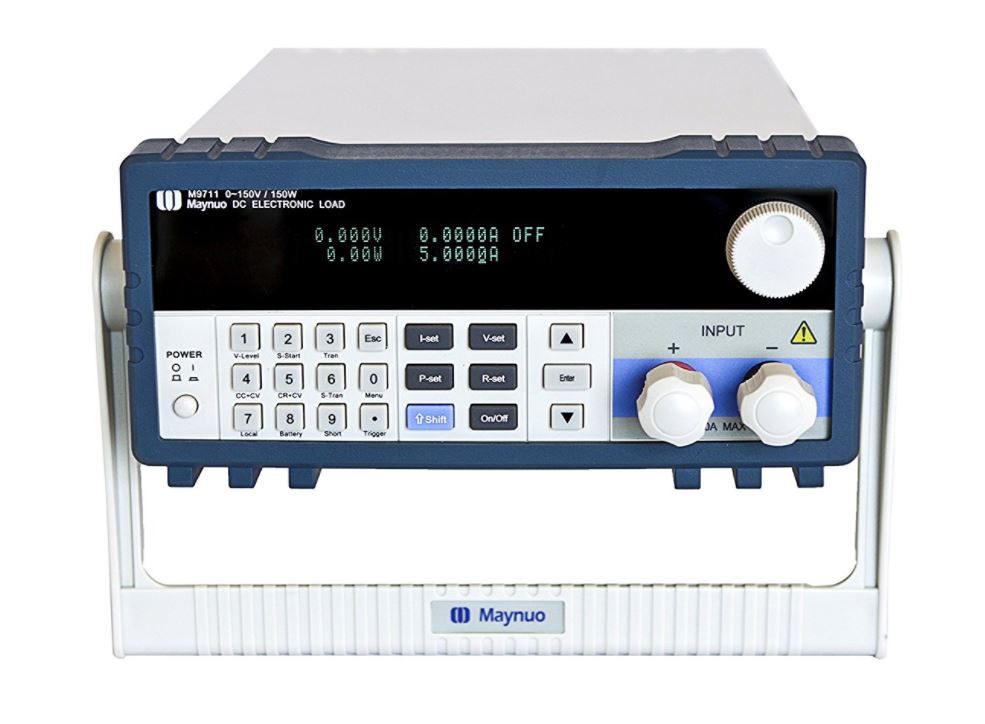
Since I have designed a few SMPS’s, a lithium battery charging circuit, a solar-panel to 5VDC supply and simple linear 78xx supplies, I use a programmable DC electronic load. These can be pricey but the convenience they provide is huge. I bought the Maynuo M9711, on Amazon for $474. It appears to be a clone of a similar B&K instrument ($1195). It works up to 150V, up to 30 amps, at a maximum of 150 watts. It is a static load – you control it manually from the front panel to a specific level.
With this instrument, I could easily and quickly test switchMo’s 5VDC supply. I started at 1000 ohms, dropping down through 500, 100, 50, 25, 15, 10 and finally 5 ohms. The voltage output started at 5.08VDC, and at 5 ohms (almost 1A) had sagged to 4.85VDC. Good enough for the Photon.
Because there is a 560uF electrolytic on switchMo’s 5VDC, it is assumed peak surges from 100mA to 500mA can be met though no calculations were made though. In practice, the Photon worked reliably.
Again, you can cheaply just use power resistors, and this is an instrument I use only a few times a year so is a definitely a bit of a luxury, and a low priority for budget conscious makers (Scope, DMMs and power supplies are way more important). But I found it a great addition to my bench.
-
Native Alexa Skill complete, files on GitHub. Should I have used IFTTT?
06/15/2017 at 22:11 • 0 commentsSince I am using the Particle Photon, one of the freebie possibilities for connections is to use the integration between Alexa, IFTTT and Particle to simply create an IFTTT recipe and be done with it. But I wanted to know how to write a native Alexa Skill so did it that way. All the files (Lambda function, intentsSchema, sample utterances, and slots) are up on GitHub. Below is a short demo of the working Alexa Skill:
So, what did it take to create a native Alexa skill, using JavaScript, to communicate with the Photon on the Wall Switch? Was there a benefit?
To learn enough to do the Skill, it took about 15 hours of noodling around watching YouTube videos, perusing Amazon instructional pages (there are lots), and getting familiar with both the Amazon Developer Alexa Skills creation site and the Amazon Lambda function sites. On the developer site, you create a JSON model of user interaction with Alexa. And on Lambda, running in Amazon’s cloud, you create a function to do the work based on what Alexa asks for. Many of you with more software experience probably would take less time than I. I chose to use JavaScript but you could use Python of Java if so inclined.
I am not an experienced programmer, and know JavaScript at a level between beginner and intermediate from previously developing a web page. In another 15-20 hours or so (again, if you know JavaScript and doing POSTs and GETs in JavaScript, it might take you far less) I got things coded, debugged, and added a minor enhancement (added gate control capability), and most importantly, working.
Was it worth it? Instead of saying “Alexa Trigger blah blah blah …” as you would with IFTTT, I say “Alexa ask Ranch to turn on the garage lights” (Ranch is what we call our house even though it isn’t one). No biggie there. But the native skill has a “help” system making it easy for guests to use. In the future, I will likely have a much easier time customizing it (“Alexa, ask Ranch to turn on all exterior lights now and turn them off at midnight” would just be another function in Lambda). And because a GET can also be used, status can be gathered and potentially recorded. If in the future I choose to switch to a non-IFTTT-integrated device, or even away from a Particle Photon, I already have a great start. So I am glad I did this.
That said … if you are just looking for a wam-bam quick solution, Alexa/IFTTT/Particle may be the way to go.
The code for the working skill, and intents JSON, sample utterances, and slots can be seen on GitHub.
Once last thing … this is my first experience with an Echo. She is great a lot of the time but sometimes seems hard of hearing – the alexa.amazon.com site allows you to see what Alexa heard and either my voice is too raspy, she needs training, or I need to pick very different location names. One can get tired of hearing “I do not know that switch location”.
-
Ramblings on Getting the BOM Cost Down versus Development Hours
06/14/2017 at 23:46 • 0 commentsIf I prove to myself that this device safe, I plan to install 12 of them.
As seen on the BOM (see above in files), excluding assembly and test costs, the Light Switch comes in at a whopping $83, quantity one. The top 5 parts cost items are the Particle Photon ($19), the Formlabs-printed front plastic piece ($15.80), the capacitive touch illuminated display ($7.10), the Wurth Flyback transformer (at my guess of $2.56), and the PCB ($2.15 from Elecrow). Sitting towards the bottom of the BOM sits a sneaky $10.00, my estimate for shipping where it is not already included in the parts cost. If for personal use in California, add $8.10 per unit in sales tax. For 12 units, the only substantial decline is the shipping per unit, so say it would cost $75 for 12.
Going to 100-unit quantity, the price drops to $47.91, as part costs drop and shipping costs/unit drop, and it is assumed the ultimate buyer pays the sales tax.
Where to cut costs? Well, sacrifice quality of the plastic front piece by using a filament 3D printer, and you save $15, dropping to quantity one cost at $68. The Cap Touch switch is kind of the aesthetic design center (though at 100 units, it drops to $4.42). And you are not going to do much about the flyback transformer – I had to order 50.
That obviously leaves the Particle Photon, which in a product as low end as this, represents a dominant 25% of the BOM. The obvious thing is to go to an ESP8266 for a couple dollars, dropping quantity one to $55, and quantity 100 to $36.91 (I assumed buying 100 Photons would be possible for $13 each versus $19, but I have no basis for that).
But when going to the ESP8266 (which I have not yet used), I am guessing I am going to spend more time on software development, as linking a Photon to some remote app is simple stuff. So, what is my time worth to write that software versus the lower costs. If developing just for myself, creating a cloud function on AWS or my own server, to connect, say, a dozen of these wall switches to remote applications, sounds like a lot of work, and the Particle Cloud seems worth the $17 adder (a total of about $200 in additional cost).
Now on the quantity 100 side, the savings would be $1100. So how much do I value my time? How much software maintenance/updates will I have to do over time on my “invented here” solution, and how many hours is that?
For simplicity, let’s say I could earn an engineer’s salary of $100K here in Silicon Valley, or about $50 an hour. That would allow me 22 hours to replace the Particle Cloud, excluding future maintenance. Even if I value my time at $20/hour, that would still only be 55 hours. For some of you, I imagine that would be a no brainer using AWS or some node.js application you can pull together quickly. But my software skills are insufficient to finish such a project in 22 or even 55 hours.
What if it were 1000 units? Well, using back of the envelope calculations, the BOM cost drops to either around $30 with the Photon, or around $20, using the ESP8266. And the total cost delta then becomes $10,000. At $50/hour, that means 200 hours for software development, at $20 hour 500 hours. Starts to look like a possibility. On the other hand, what about provisioning and fleet maintenance software?
Bottom line for me is the Particle Photon is way expensive versus alternatives like the ESP8266. But for my skill levels, and a project that will have Android and iPhone app’s, an Alexa skill, and a web page …. I should stick with what I know and can do in a reasonable amount of time.
How much is your time worth? How do you trade off lowering costs versus investing your time? Would you write your own server and maintain it?
We have not discussed the assembly and test side of this ramble - that will come in a future log entry.
-
User Guide for TI UCC28711 Eval Board, Cap Touch Display Datsheet
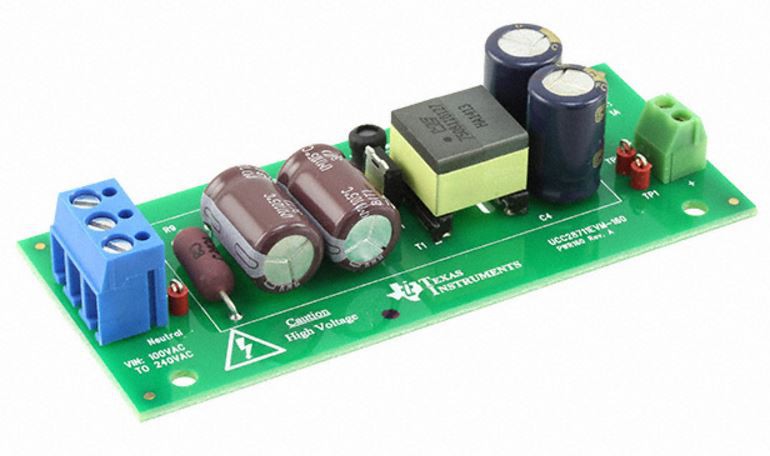
06/13/2017 at 21:22 • 0 commentsThe user guide for TI's switch mode power supply evaluation board, that was the basis of the 120VAC to 5VDC power supply design in this project, was uploaded on the project site.
![]()
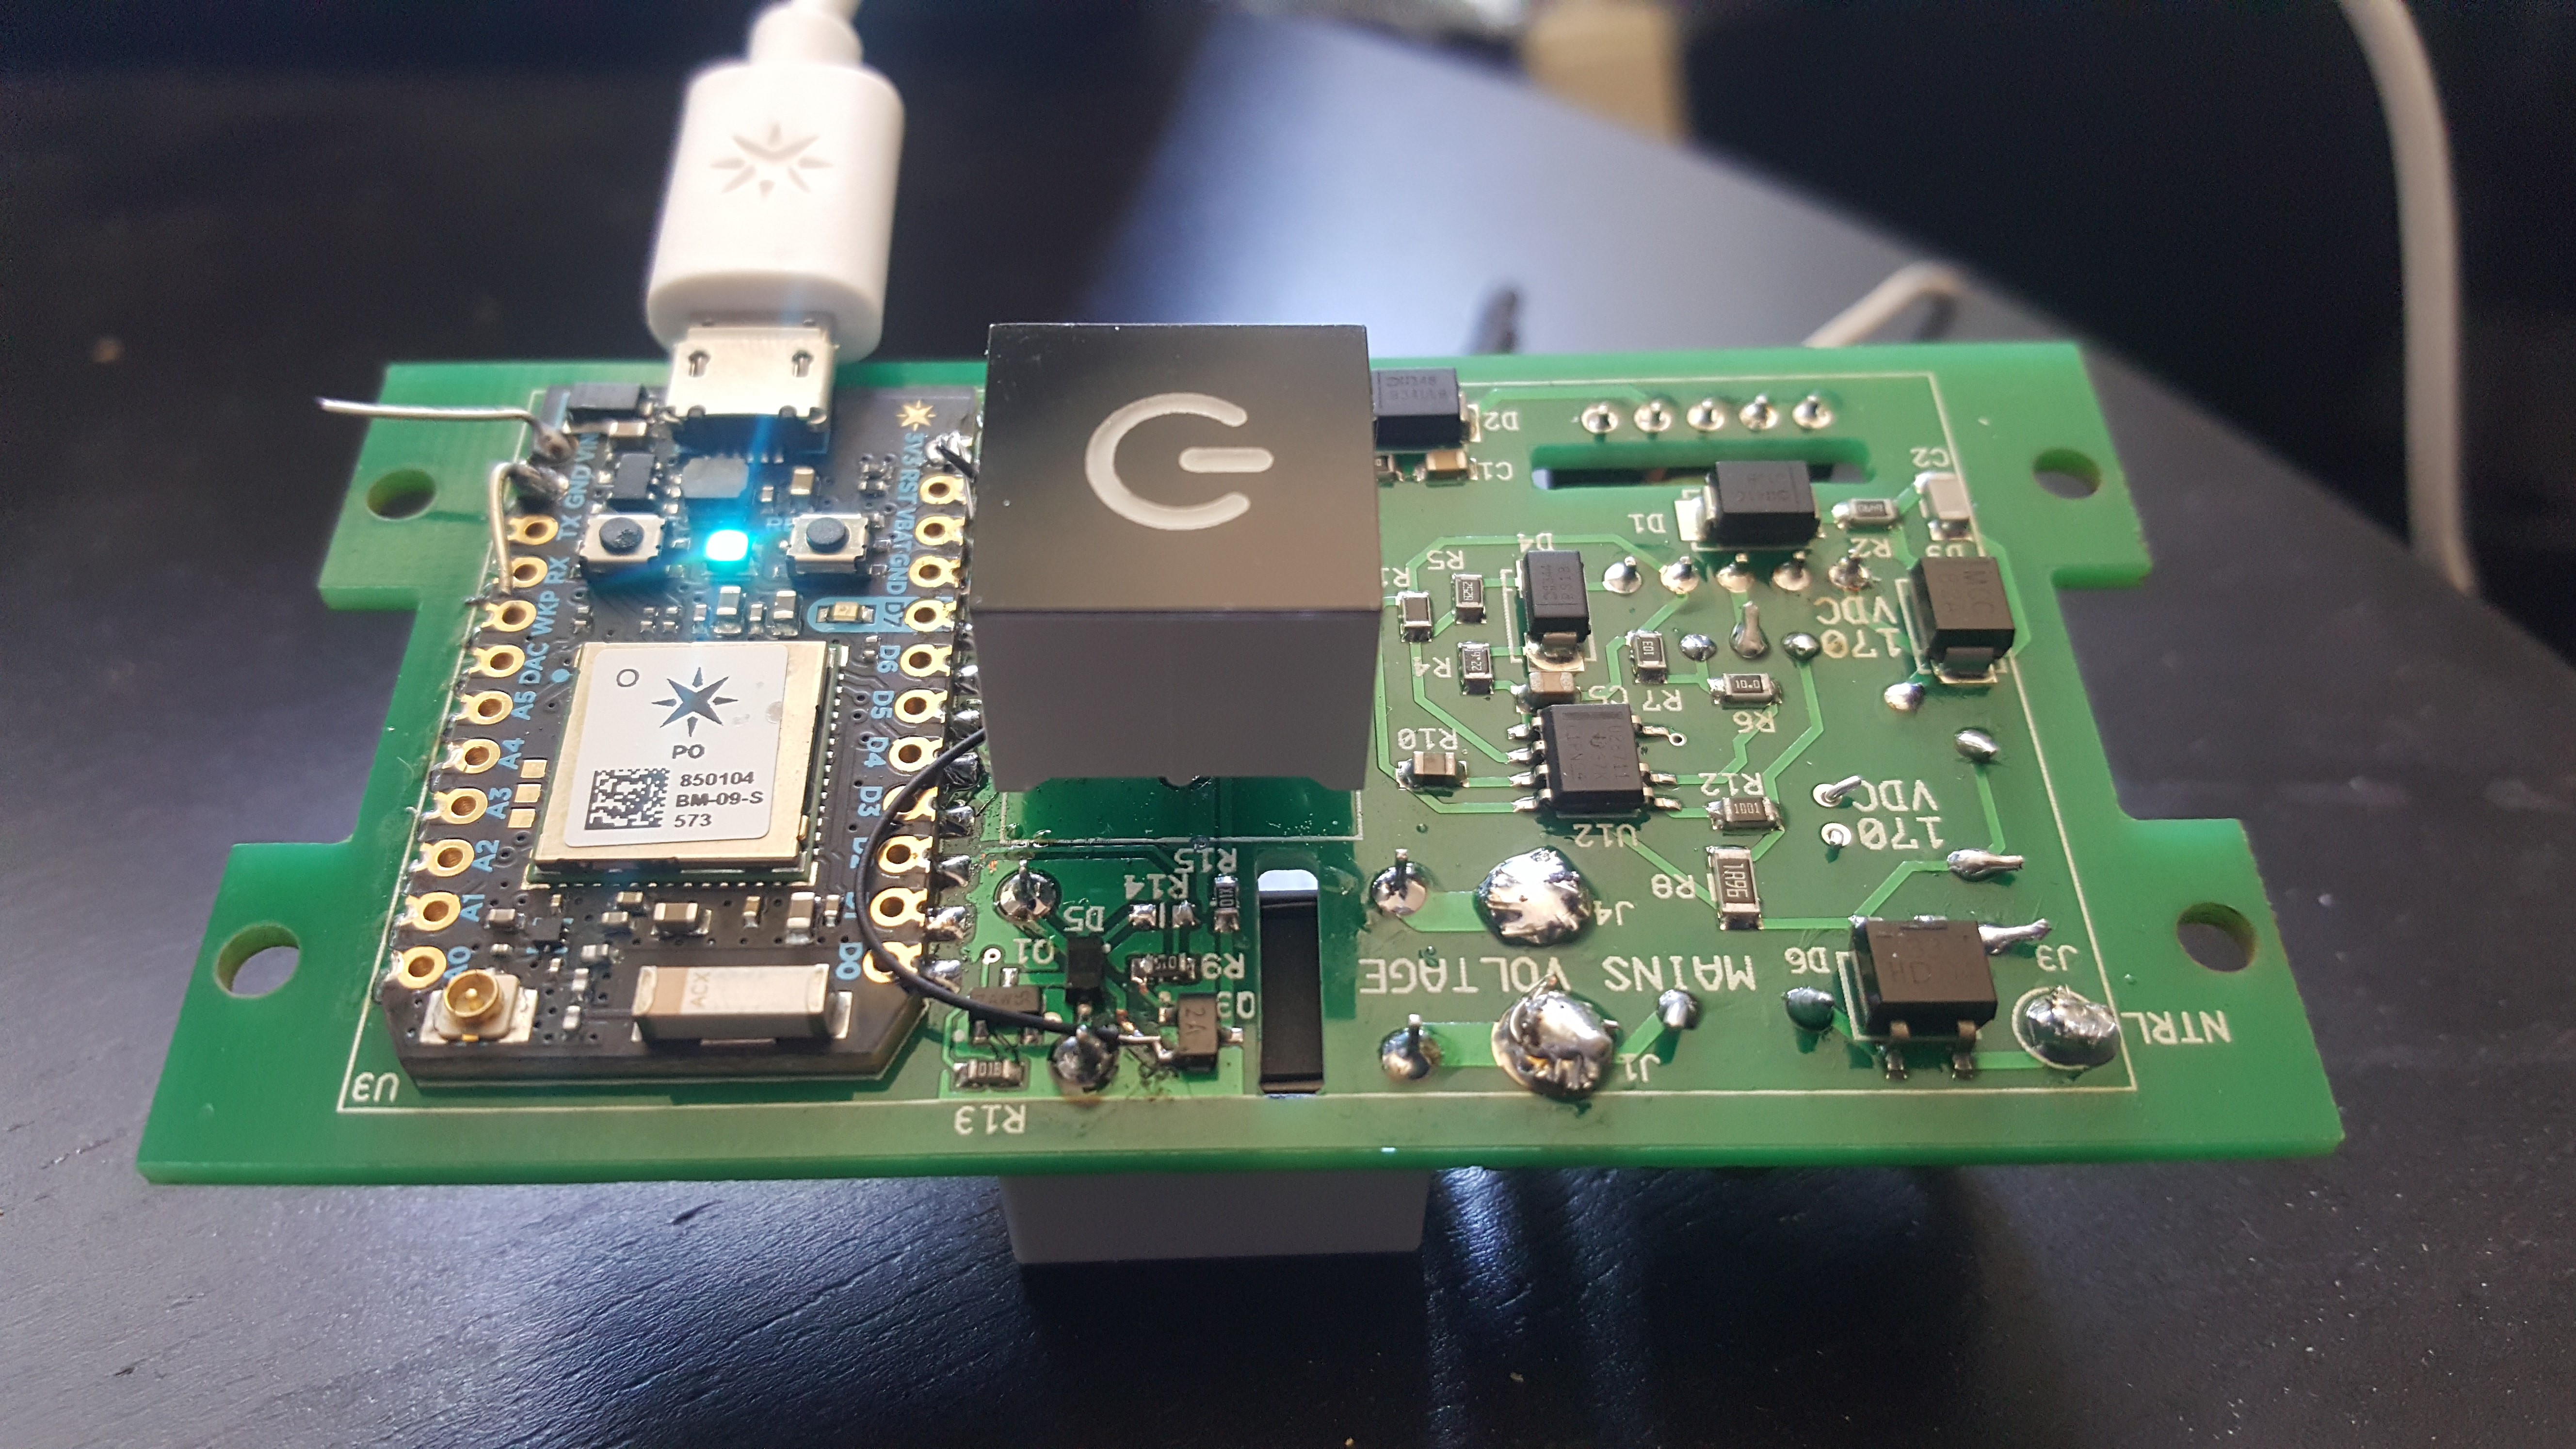
The datasheet for the Capacitive Touch Switch with Illuminated Display (large component in the middle of board below, with the power icon) was also uploaded to the project site.
![]()
-
To Formlabs or Shapeways, That Is the Question
06/12/2017 at 01:18 • 0 commentsSince for this project I need a very fine finish on the room facing enclosure piece – the one that goes into the Decora face plate – using a filament printer did not seem to be an option. So, it came down to Formlabs (or some other SLA printer) versus Shapeways.
The Shapeways path is easy but sort of slow and costly. Using the latest .stl file of the part, the price with shipping is $26.75 including delivery to California in 5-9 days
The Formlabs path at my local TechShop that has Form 2 was $ 15.70 for a 37ml print volume (including supports). Since I am lucky enough to live nearby, I can have the part same day at about half the price, assuming the Form 2 is available.
So, what is the quality difference?
The Shapeways part is very good. I do not know what 3D printer they use but the quality is certainly good enough to look fine inside the Decora switch plate. Compared to the Formlabs, it is a slight touch grainy but looks perfectly fine.
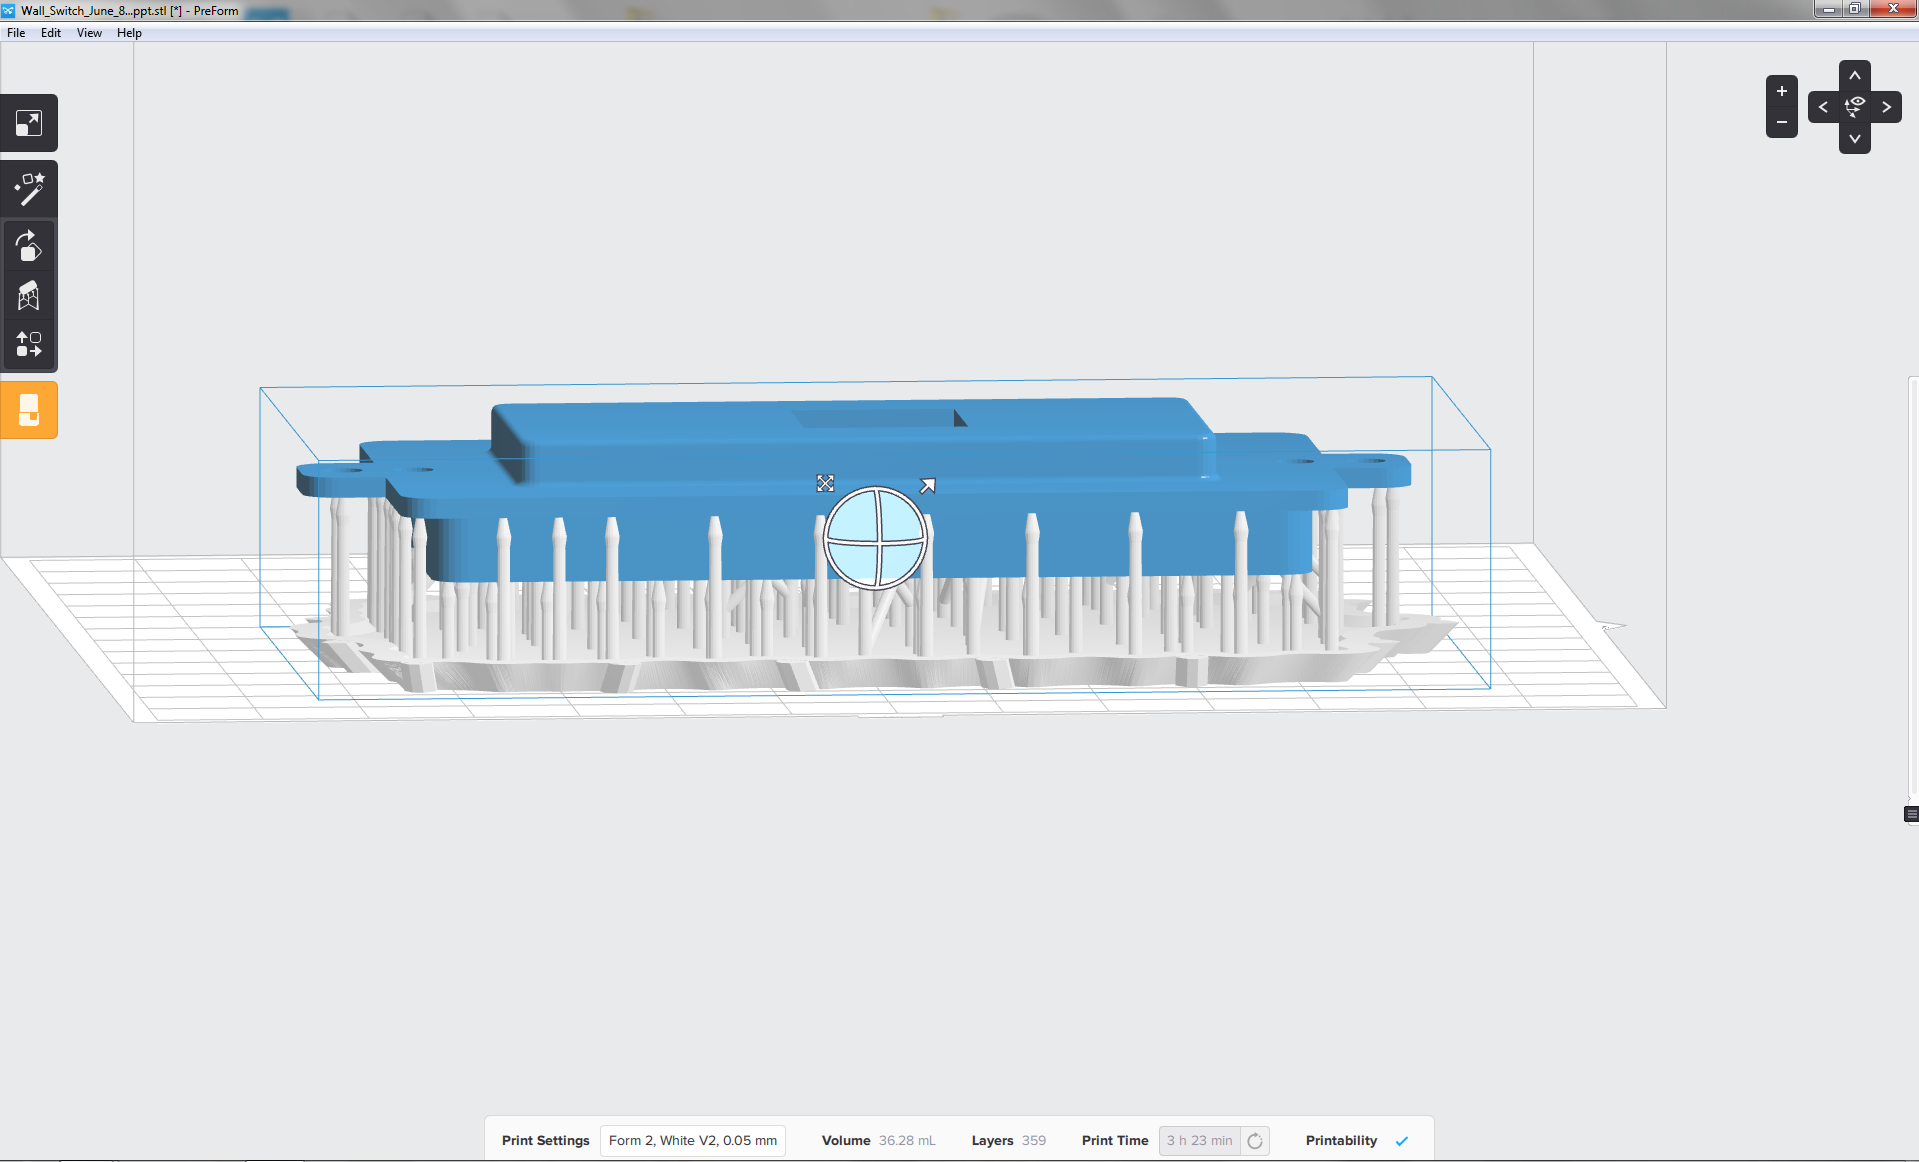
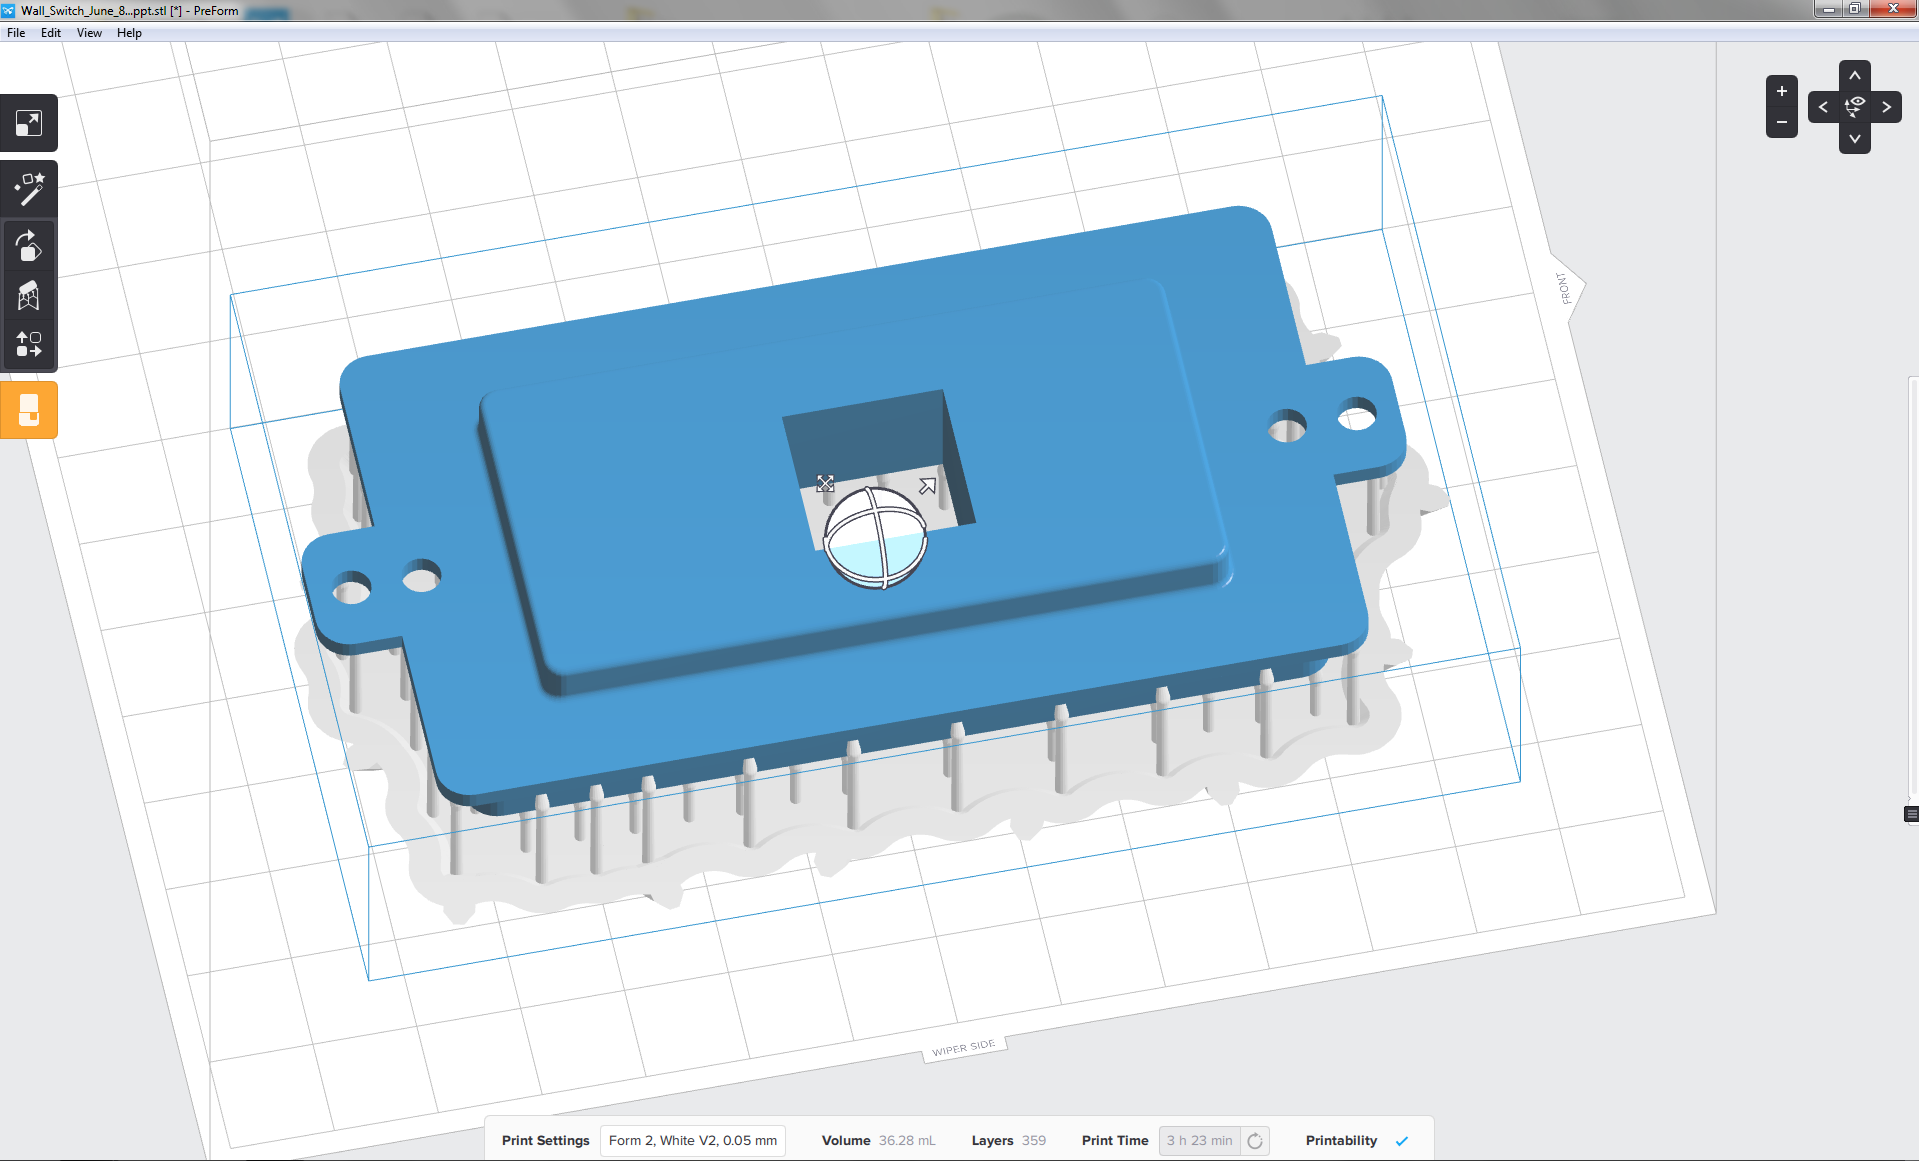
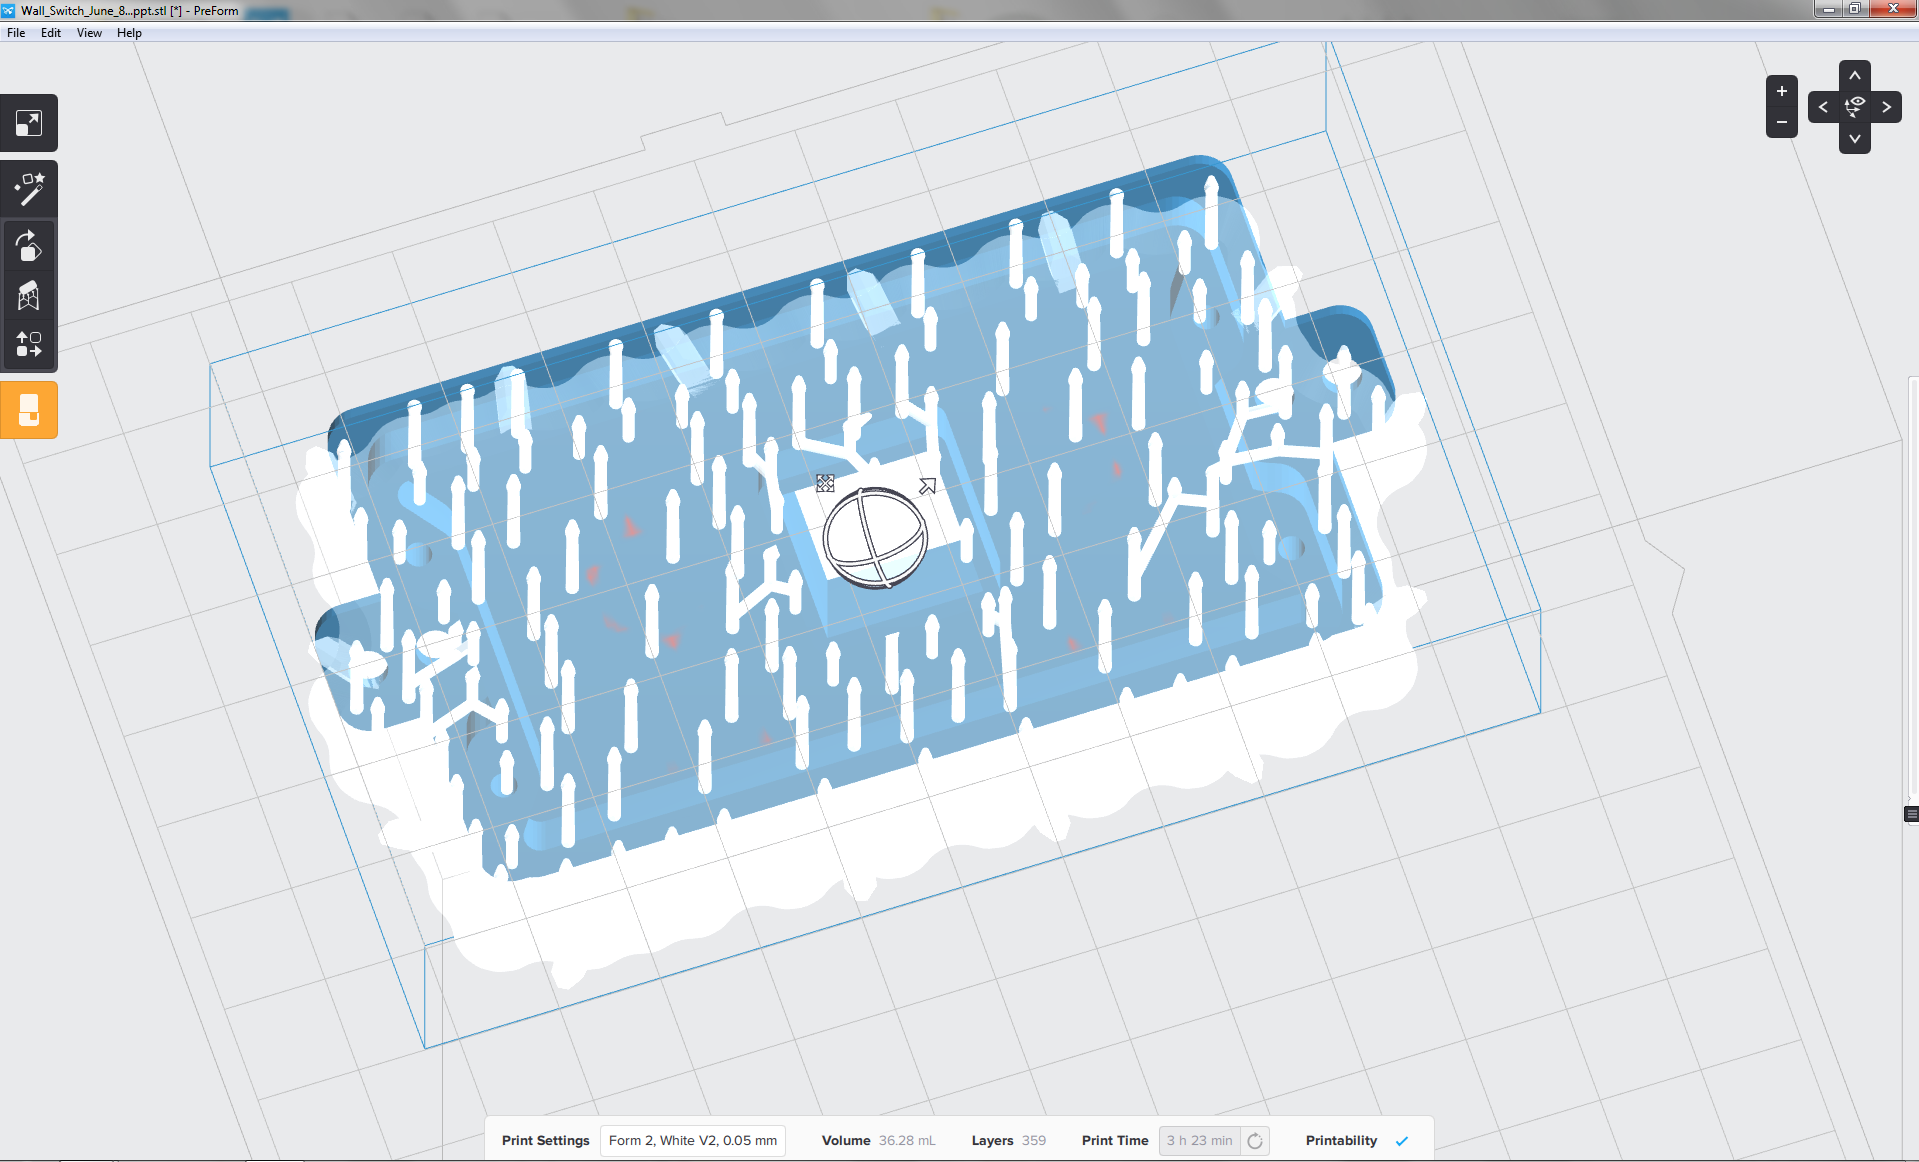
To print the part on the Form 2, the best way to proceed is to have the Form 2 slicer insert supports as seen below:
![]()
![]()
![]()
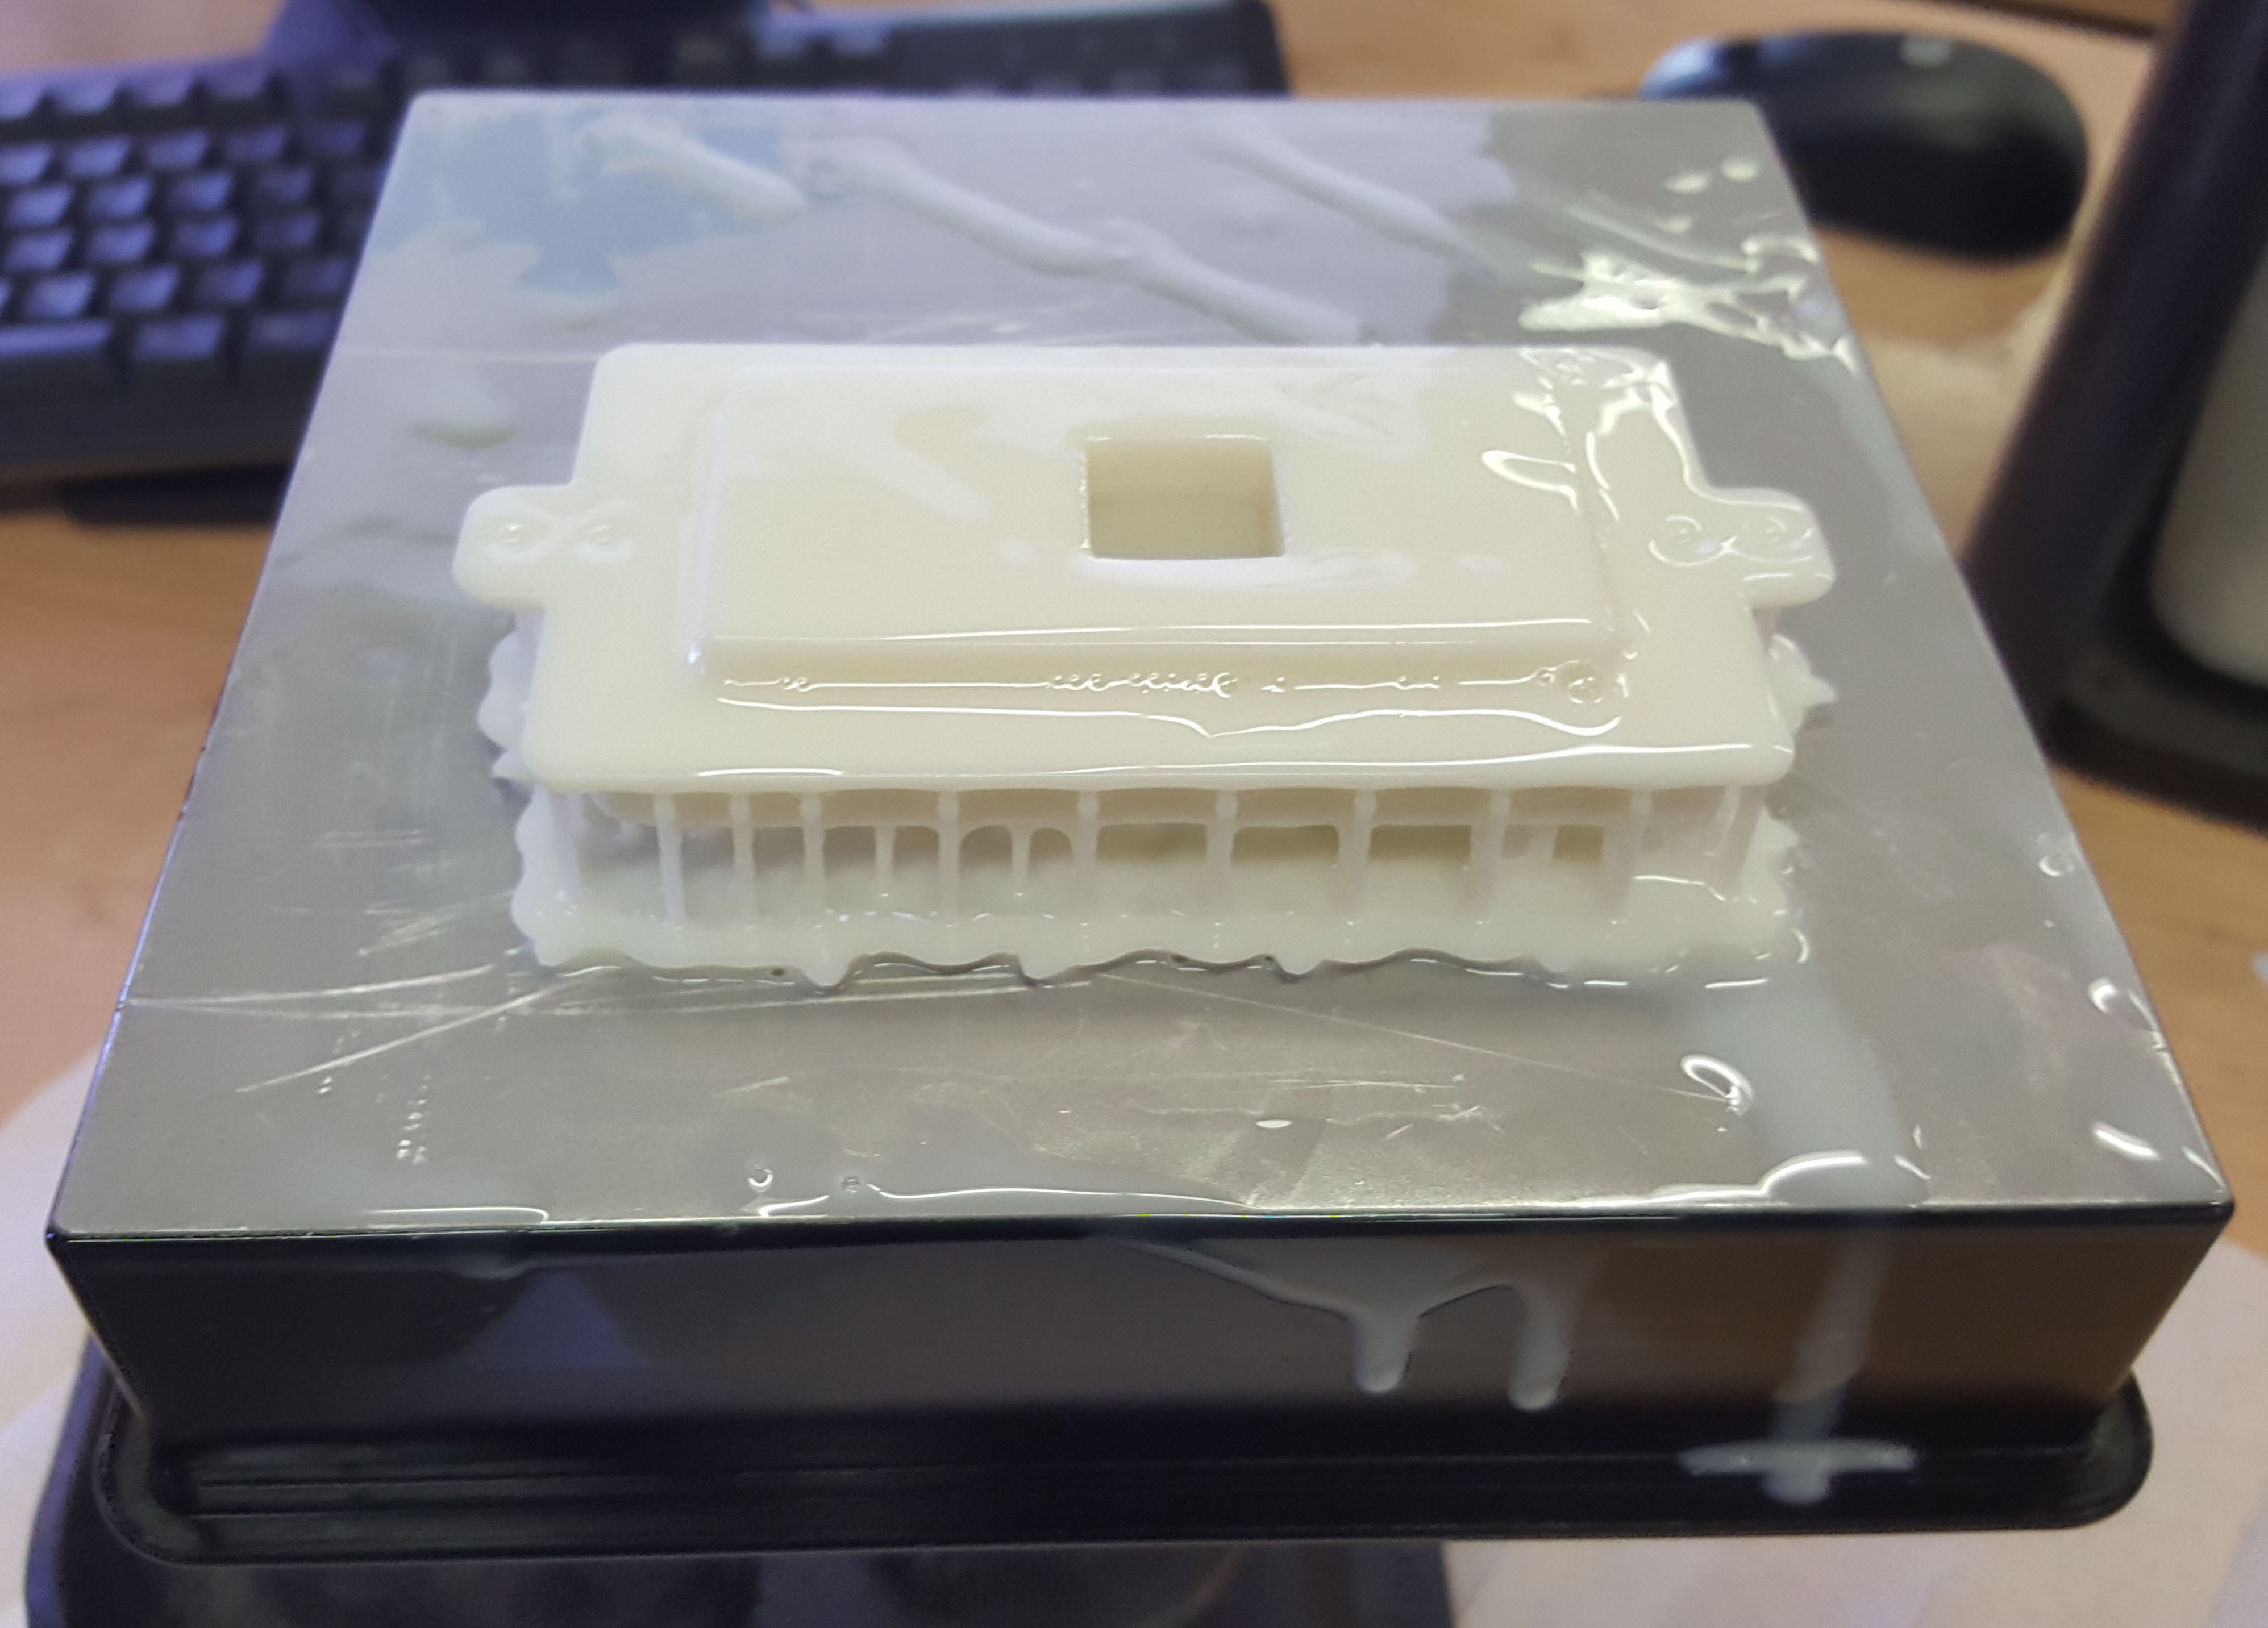
And this is how it comes out of the Form 2:
![]()
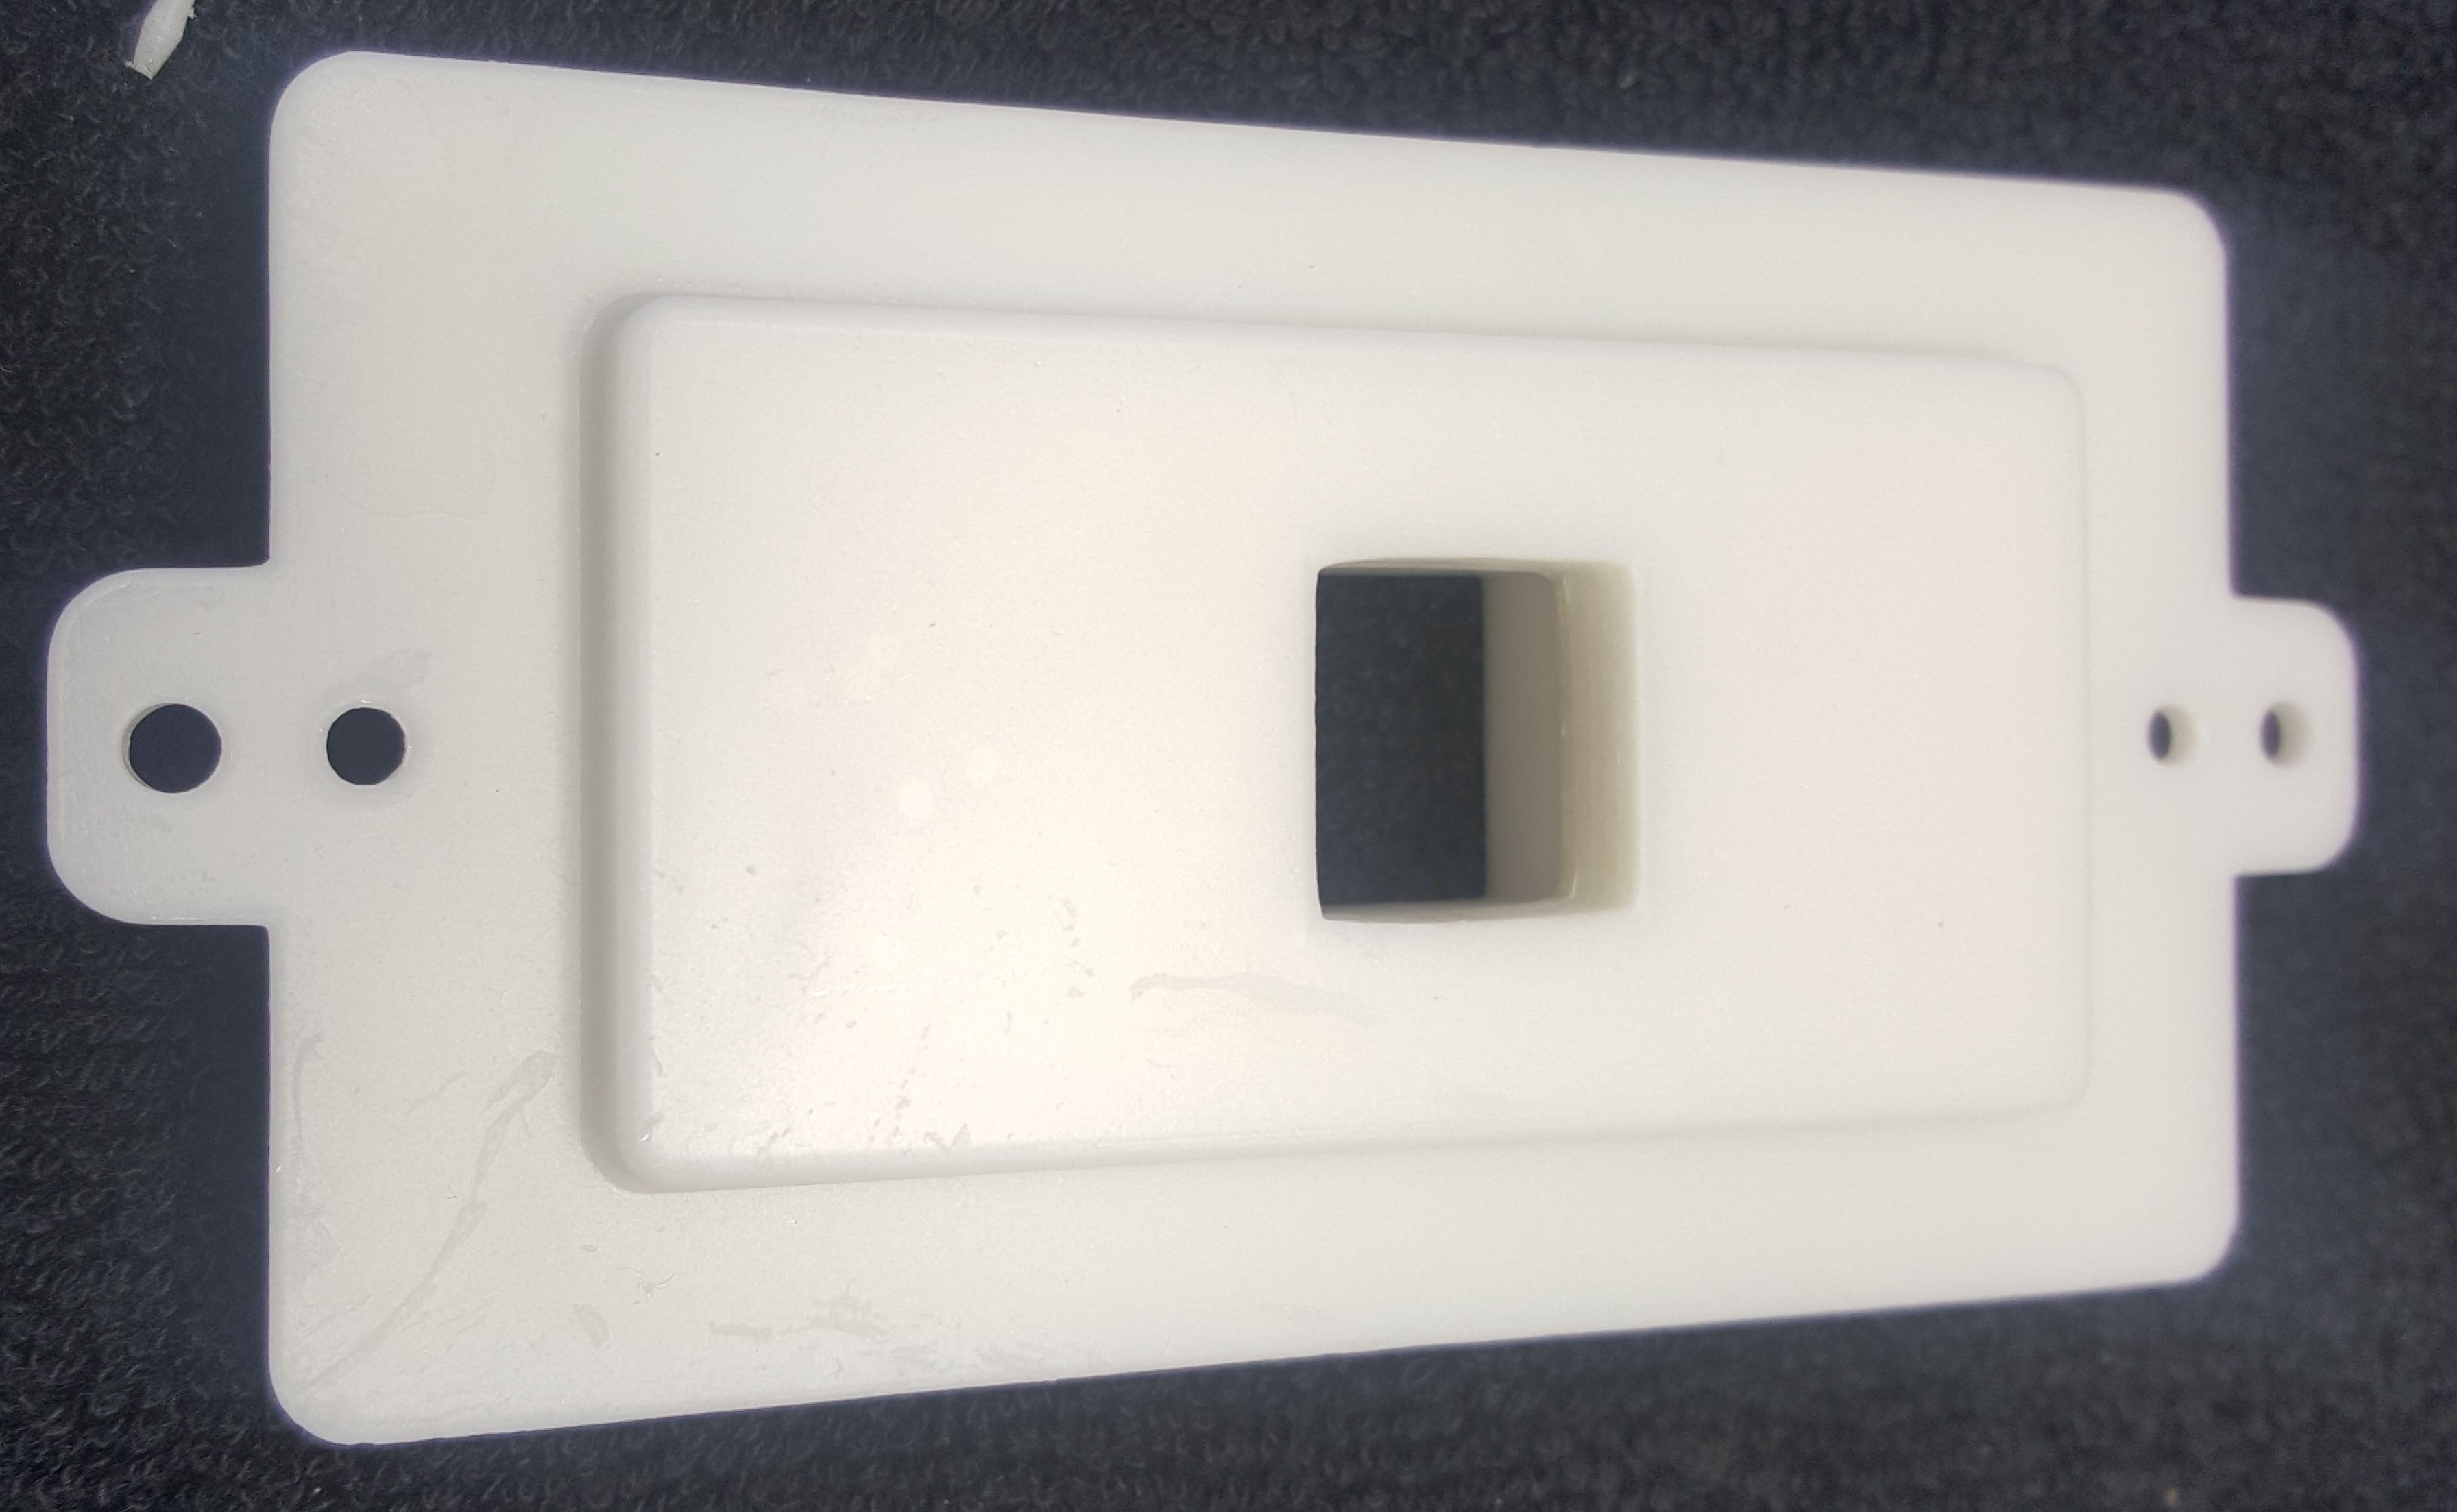
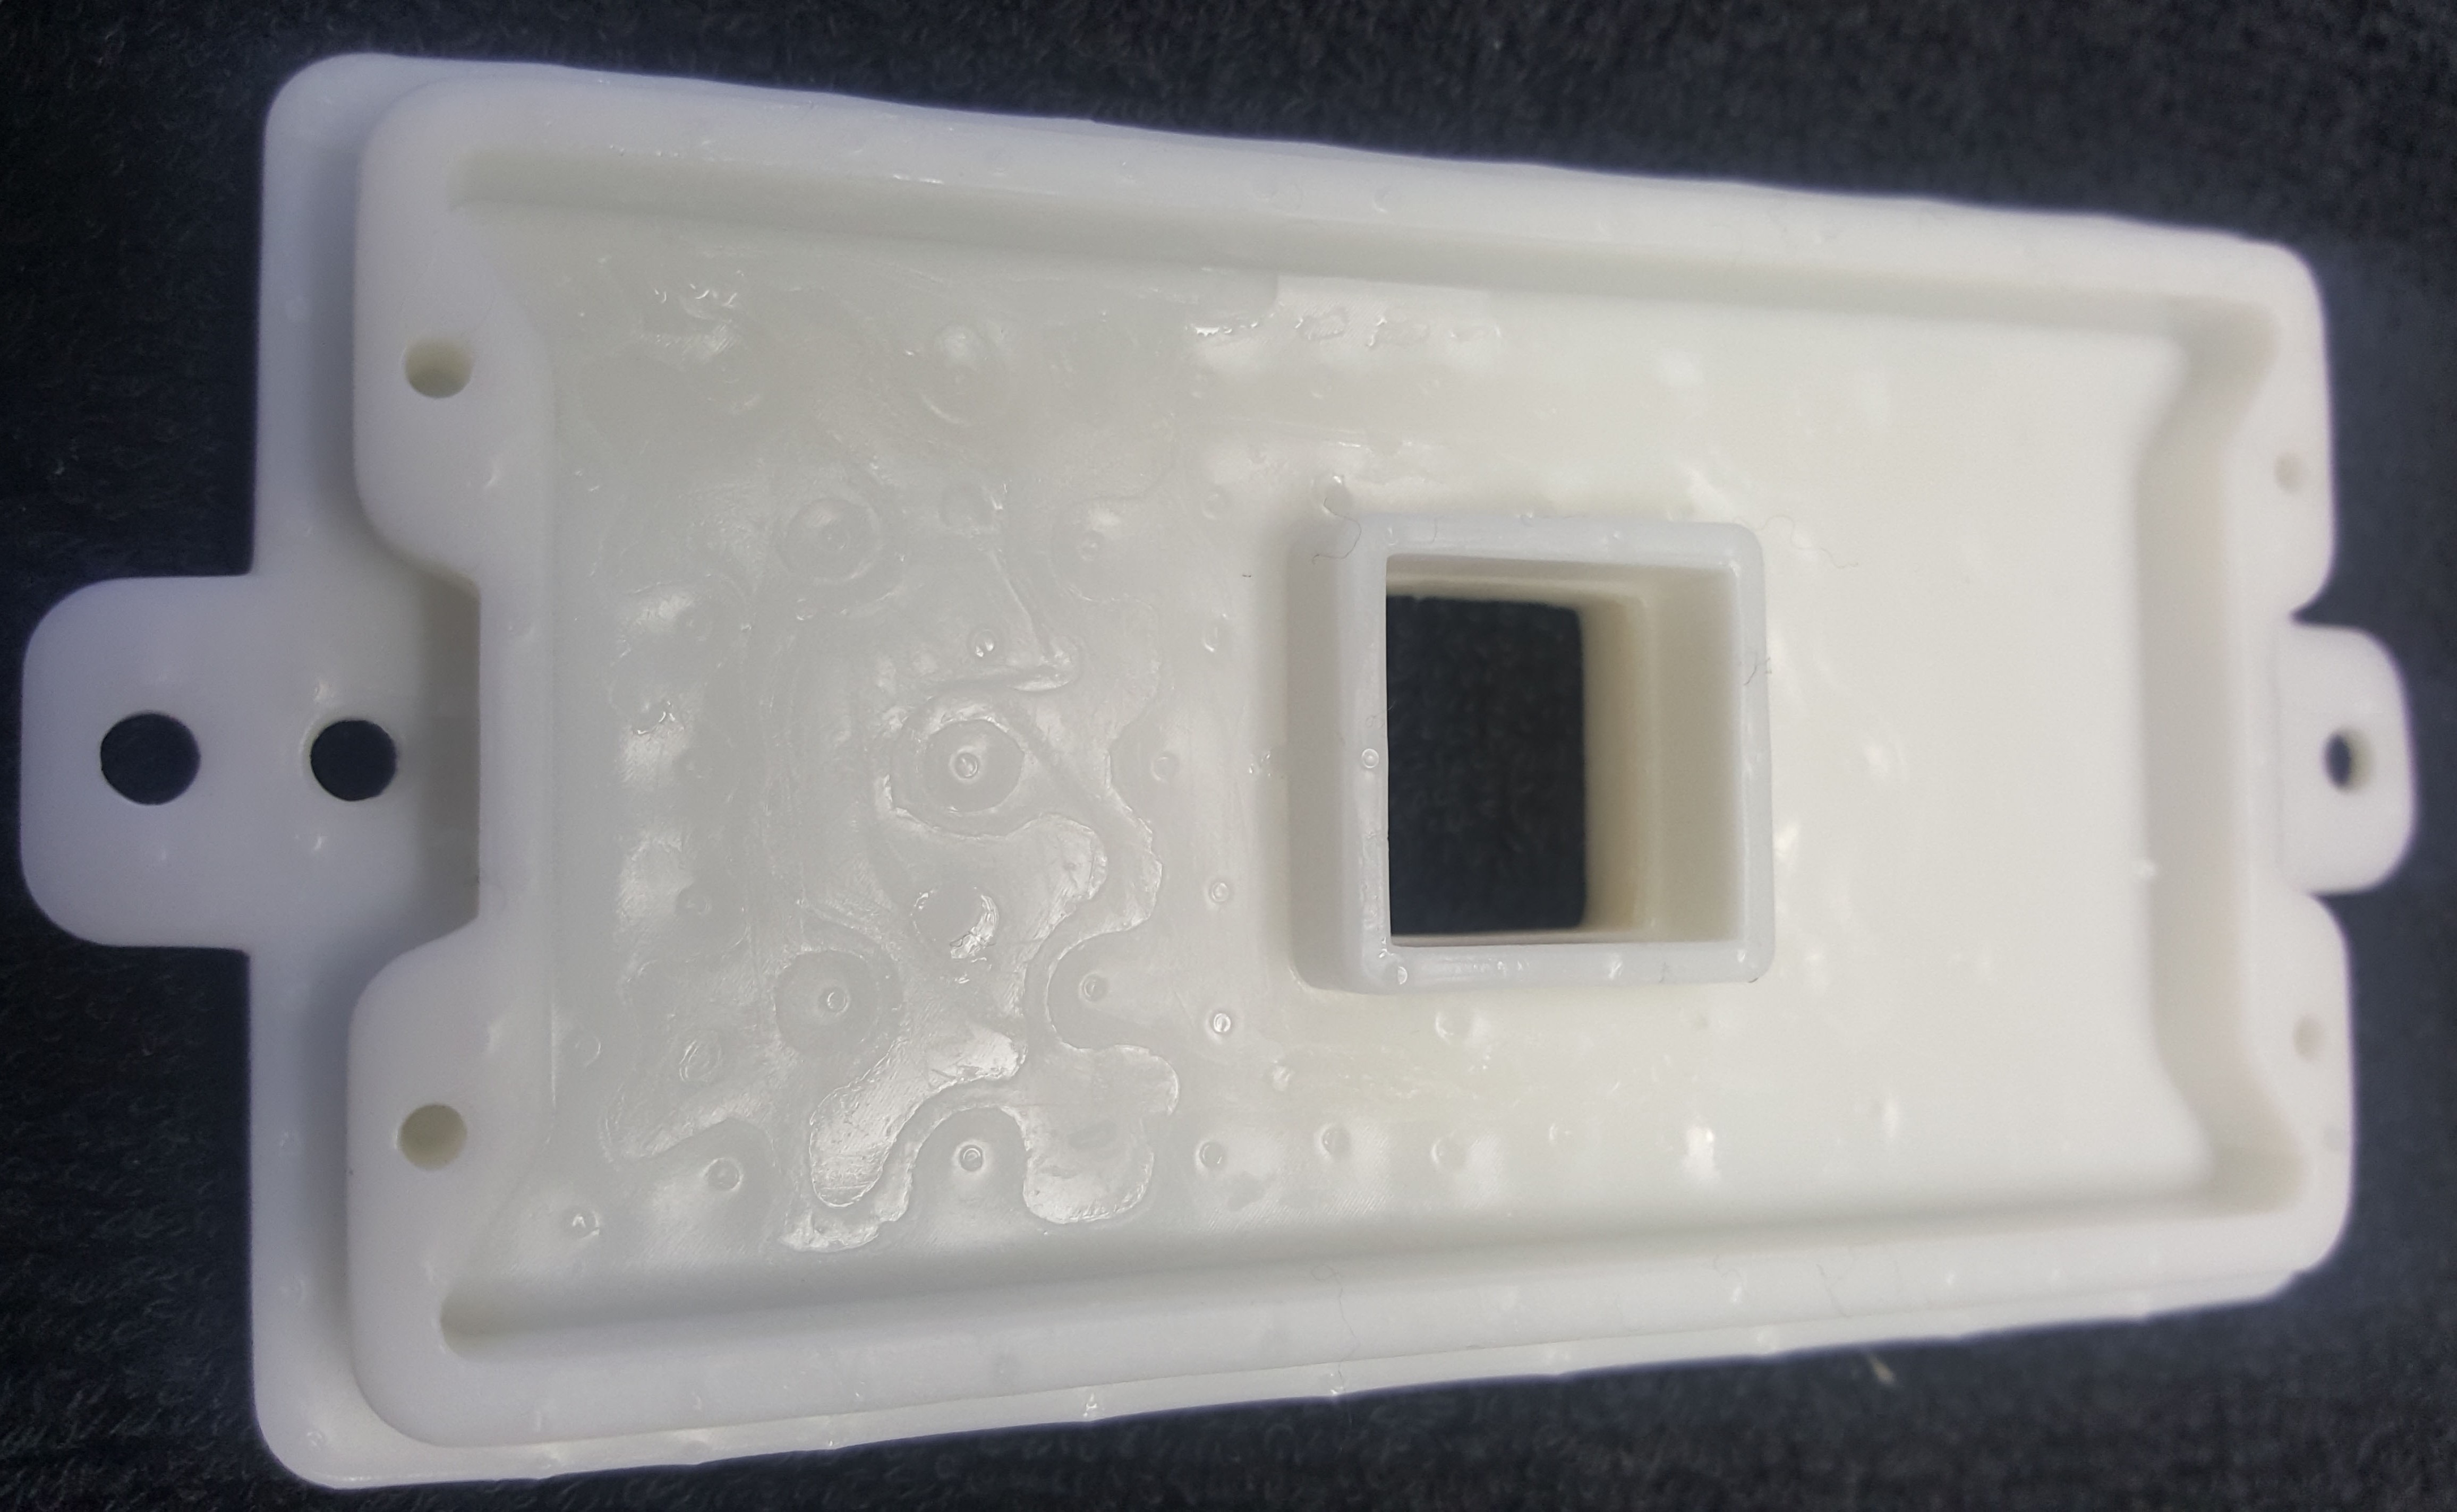
After trimming all the supports away, doing the alcohol bath for a couple hours, and final clean up, the quality of the print surface is outstanding. It looks injection molded.
![]()
On the side where print supports held up the part, there is a bit of dimple roughness from the supports. This is OK everywhere but on the surface of the side-walls where the PCB must mate to closely so there are no gaps in the front piece/PCB/back piece sandwich that makes up the assembly.
![]()
So, this piece will need a little filing to smooth it out. One other thing – it is slightly off white. The Shapeways part is slightly closer to the white of a Decora switch plate.
Note that if you bought yourself a Formlabs Form 2 (at the delivered and California taxed price of $3900), the cost would be 37ml out of 1L of resin. The cost of 1L of resin is $149. The cost of a build tank is $59, and they are good for 2 liters worth of resin, so half that is $29.50. Then there is California tax and shipping of $34.40. All told that comes to .037 x $210.91, or about $7.80 per part, with no fails. All of this assumes you have the prototyping need to use up the rest of the resin and the 2L build plate capacity. Beyond that, you will need to get even more resin if you want to use the remainder of the resin that is left in the resin tank because below a certain level, it is logically unusable. Say that amount is 50ml, that is 1/20th of a liter so you decide if you should factor that into the cost.
Finally, if you amortize the cost of the purchase of the Formlabs machine, and assume you will have a 2-year life of the machine, and in that 2-year period you will print, say, 500 parts, then the capital adder to the cost of each part can be approximated as $3900/500, or coincidentally another $7.80, for a cost-accounting based total of $15.60. TechShop calculates their costs precisely!
So, what do I recommend if you need a fine part? For me, I do not print hundreds of parts. If that is also you, I recommend printing your parts on a cheap filament printer that you own, or one at a nearby Makerspace, and iteratively refining the design across many trials. Once done, if you have TechShop or Makerspace nearby with a Formlabs printer, go there. If not, and you can afford the lag time, send it to Shapeways. If you print lots of fine parts and need them now, the Formlabs Form 2 can print outstanding parts but they come at high cost of acquisition and resin/resin tank supplies.
One last point – a 3D Hubs print on a Formlabs was in the $30-$70 range.
-
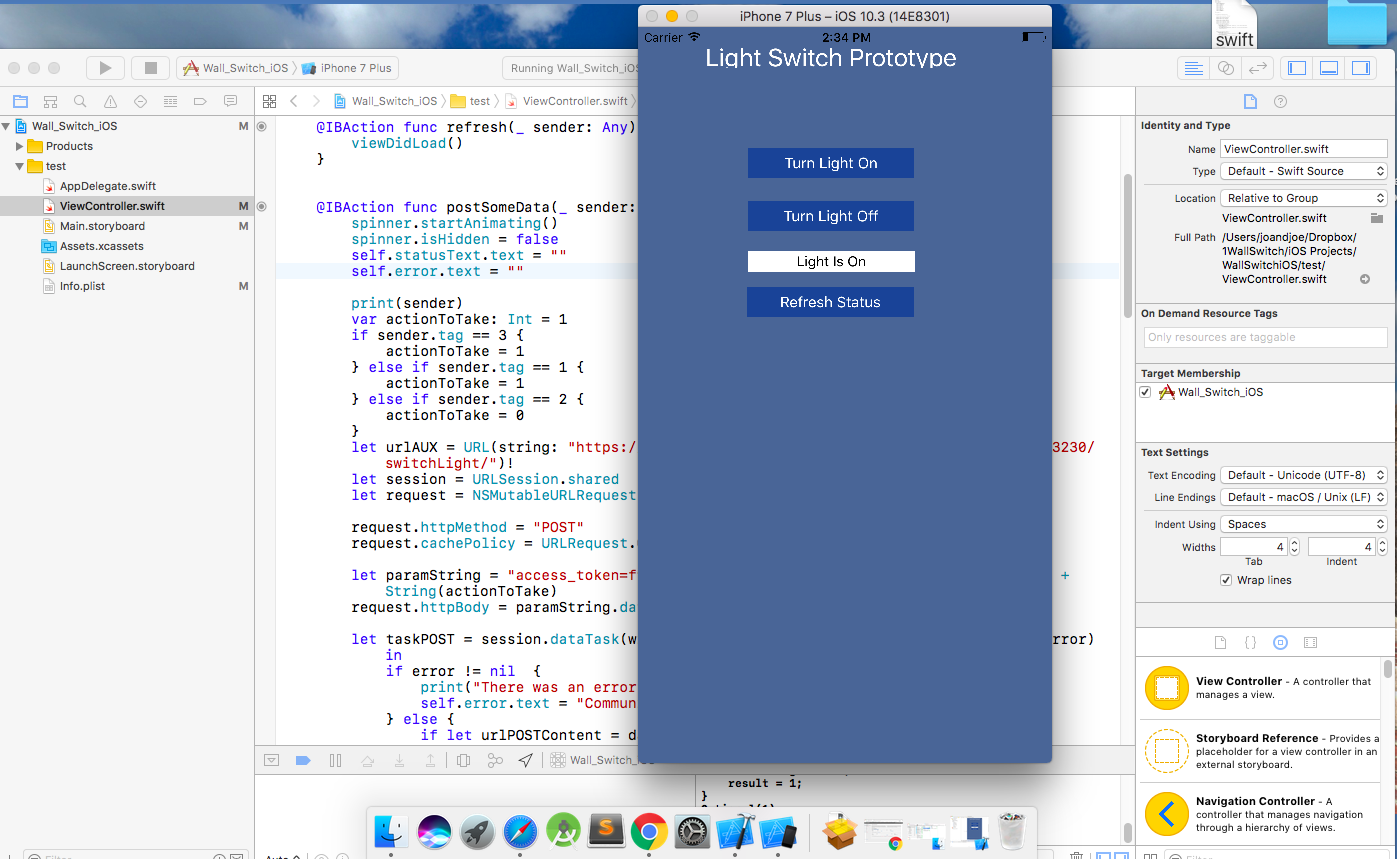
Wall Switch iOS Swift Xcode Project Available
06/11/2017 at 21:58 • 0 commentsA working iOS Swift app project was uploaded to GitHub. Current functionality is same as Android app – just simple, turn on and turn off switch, and get status of switch. Once prototype testing of boards and communications between it and the various remote apps is complete, it will be updated for more sophisticated features.
![]()
-
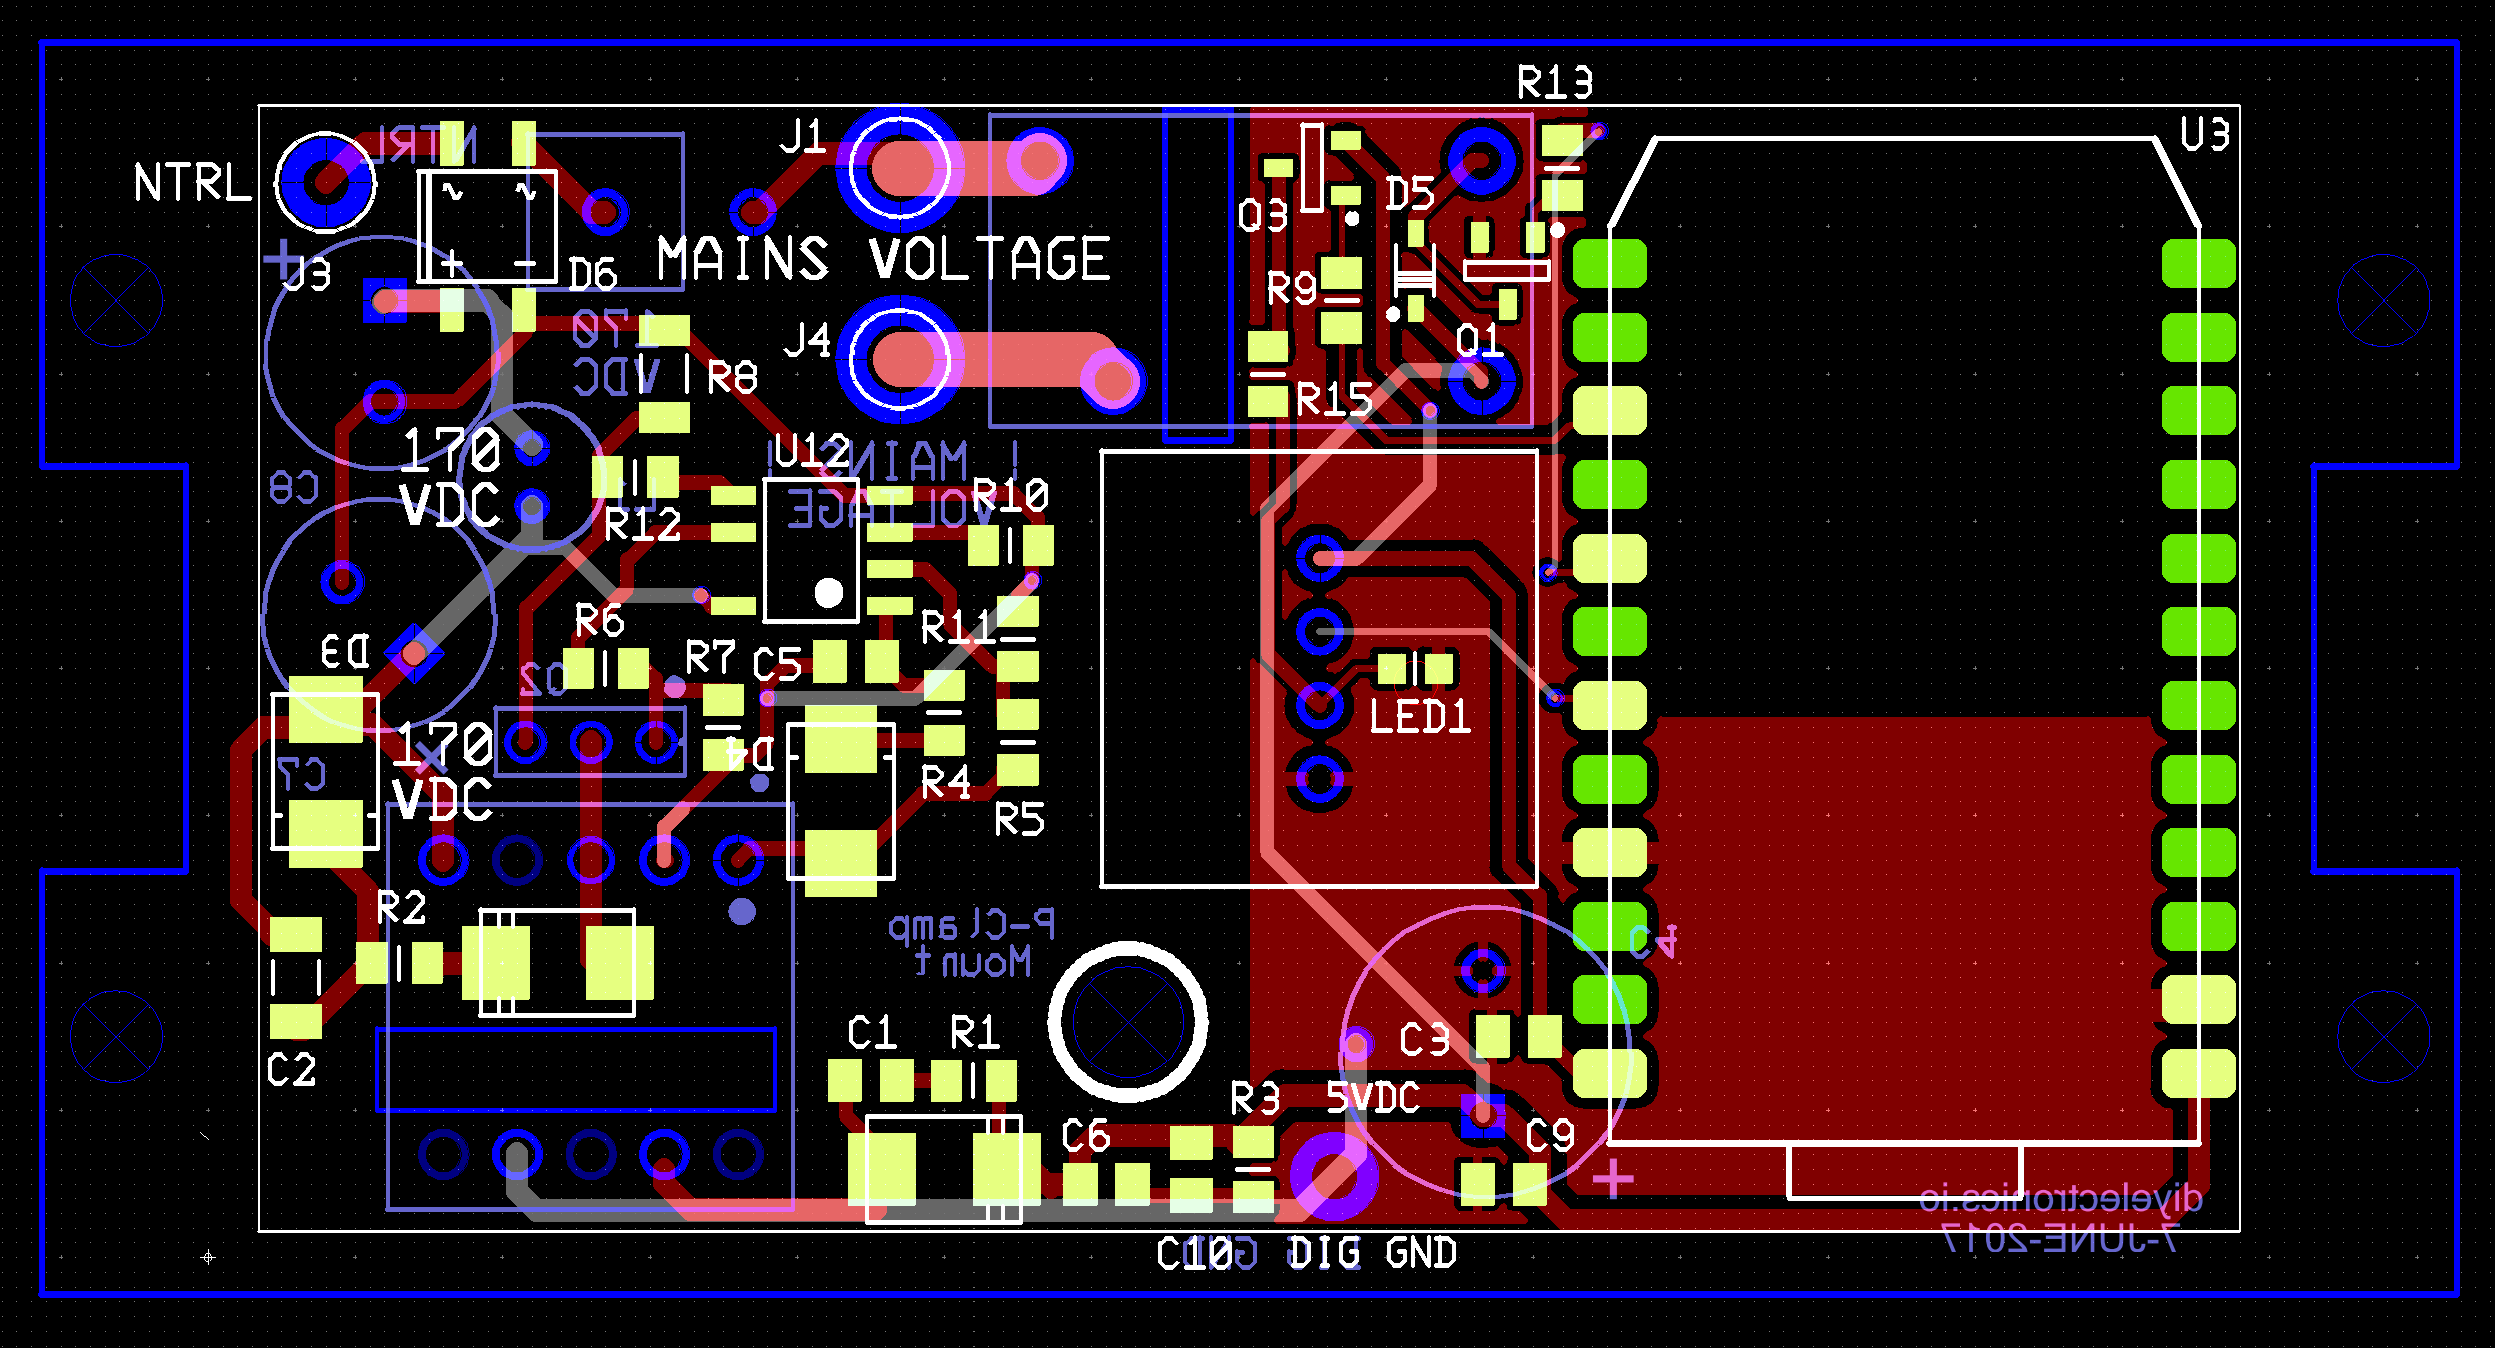
PCB Design Files Uploaded to GitHub
06/10/2017 at 01:48 • 0 commentsThe design files for the PCB were uploaded to GitHub. Included are the Gerber files used to have the board fabricated (I use Elecrow in Shenzhen and get good quality, yet very inexpensive boards and stencils). Also included, but of dubious value to almost all of you, are the schematic and PCB design files – I use National Instruments’ Multisim and Ultiboard packages. Sorry about that but I know them well, and right now I just can’t stomach the learning curve for yet another CAD tool. Maybe KiCAD someday though.
![]()
More detailes and documentation of schematic and PCB design in later posts.
-
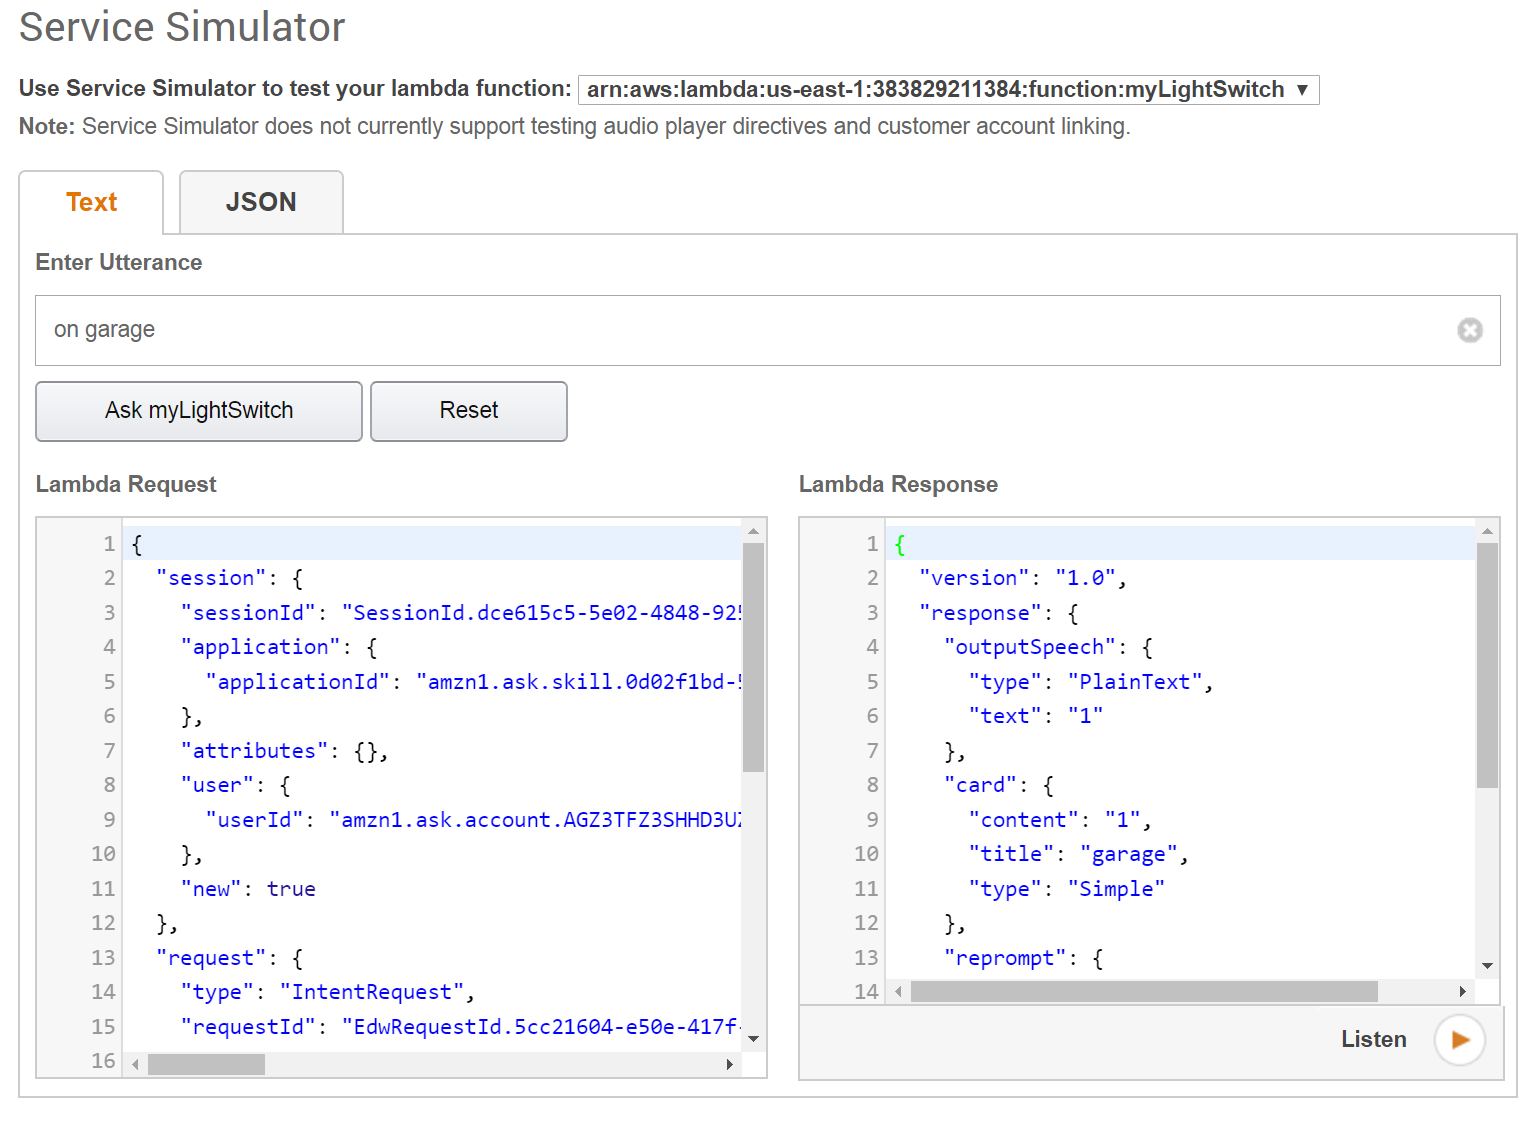
Prototype Wall Switch Alexa Skill Uploaded
06/10/2017 at 01:21 • 0 commentsA working prototype of an Alexa skill was created and uploaded to GitHub. Uploaded files include the current Intents Schema, Sample Utterances, Slots, and the Lambda JavaScript function that makes the HTTPS POST and GET connections to the Particle Photon in the Wall Switch.
As is, it is a good proof of concept. Using the Alexa utterances test section of developer.amazon.com, communication from Alexa to the Lambda function (located at console.aws.amazon.com) to the Photon and back to the Alexa work.
![]()
The JavaScript POST and GET functions embedded within the Lambda function that connect Lambda to a Particle Photon are working. Though it works, I have not quite mastered the intent schema and sample utterances syntax yet though so at least that will need be updated.
Attribution: Based on work by kvarma and a few YouTube videos by blondiebytes and of course many helpful forum notes in stackoverflow.
-
First Pass Particle Firmware Uploaded to GitHub
06/10/2017 at 01:03 • 0 commentsThe Particle Photon firmware to be used for testing (particleLightSwitchFirmware.ino) was uploaded to GitHub. Right now, it is a simple program that can just turn on and off the relay, and report back status via Wi-Fi connection to the Particle Cloud. Future version will have time based and sunset/sunrise based scheduling available.
![]()
-
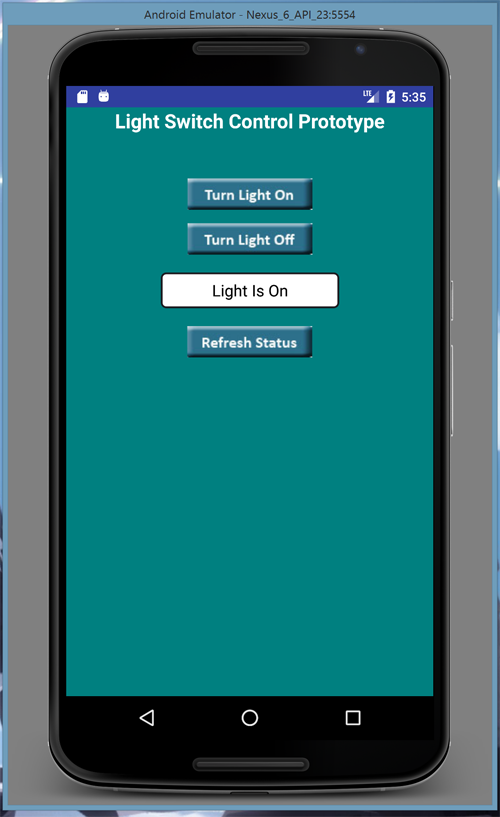
Android Studio Project Uploaded
06/10/2017 at 00:49 • 0 commentsAn Android Studio project was uploaded to GitHub. Current functionality is simple, turn on and turn off switch, and get status of switch. Once prototype testing of boards and communications between it and the various remote apps is complete, it will be updated for more sophisticated features.
![]()
Particle Photon Wi-Fi and Cap-Touch Light Switch
"switchMo" Project will include Schematic, PCB Files, Firmware, 3D Printable Enclosure, Android App, iPhone App, Alexa Skill, Documentation