Close
0%
0%

Reagent Tracker

Track reagent usage and get timely notifications to re-order.

Similar projects worth following
I'm responsible for ordering the resin for our Form 1+ printer, like many lab reagents, the resin is expensive, can take weeks to arrive and only has a 12 month shelf life. Naturally nobody tells me when they use the resin or when it's getting low, but they certainly do when we run out!

Similar issues are faced by labs that require reagents for tests. What if the lab is a clinical in a 3rd world country where it can take weeks or even months to get the new stock? You want to know in good time when the reagent is running low.

Reagent Tracker aims to reduce supply and stock management overheads to allow timely reordering of reagents, simply by placing the bottle on the scales for a few seconds until they beep. No other interaction is required, not even to switch it on!

Reagent Tracker is an internet connected set of scales with built-in NFC tag reading and using an IoT platform can send notifications when the reagent is getting low.

Reagent Tracker is designed so that the end user has as little work to do as possible. There are only three requirements for to use Reagent Tracker.

  • A small identification (NFC) sticker needs to be placed on the bottom of the reagent bottle to be tracked.
  • The reagent/bottle identity needs to be set up on the back-end monitoring / notification system.
  • The bottle needs to be placed on the tracker for a few seconds at appropriate times (i.e. after use).

Usage:

When the a bottle of reagent is placed on the tracker an accelerometer detects the "tap" as the bottle is placed on the scale, this allows the unit to be in a very low power mode, the micro-controller is then woken, the NFC tag is read, the weight of the bottle taken and a double beep emitted to notify the user the bottle should be removed.

Once the bottle has been removed the empty weight is taken (this drifts so you can't use a fixed value) and hence the actual bottle weight is determined, this information is then pushed to the Particle Cloud and onto an appropriate back-end system (for now I'm using Tinamous.com).

Each NFC tag has a unique id and the weight of the bottle is published as a measured field against that id, this allows Tinamous to track individual bottles, once a bottle has been seen by Tinamous it can be given a more friendly label (rather than the NFC tag) and a working range set. This allows a notification to be triggered to re-order the reagent when it falls below this level.

Naturally this all assumes you know the empty weight of the bottle which you probably wont until it's empty which is too late, so an assumption needs to be made about the empty weight or the point at which the restock should occur.

The intention is to build a dedicated tracking web site that can not only track the reagent weight but have meta details assigned to it such as the reagent type, re-order information, location of the scales/reagent, and to perform more predictive analysis such as an estimate of when the reagent will be empty based on usage patterns etc.

Project Composition:

This project is made up of a variety of bits, these include:

  • 3D Printed case made in two halves.
  • Electronics, a main sensing PCB with a Particle Photon as internet connected micro-controller and NFC reader on the top half of the case and battery/power management in the lower half.
  • Firmware, written and deployed to the device using the Particle build platform.
  • Back-end system, for now the project is using Tinamous.com to monitor the scales and reagents, however a more specific website and open source version is planned.

The build logs cover each of these parts individually.

Licenses:

Hardware:

The Hardware is licensed as Creative Commons Share Alike 4.0, schematic and PCB layout are provided in Eagle CAD format (V7.4).

SparkFun Eagle Libraries were used under license:

Firmware:

The firmware uses the following licensed libraries:

HX711:

SparkFunMMA8452Q:

Adafruit_PN532:

NeoPixels:

OneWire:

Given the HX711 Library is GPL I think that means the main BottleBuddy Firmware requires a GPL license as well, hence:

BottleBuddy Firmware License: GNU GENERAL PUBLIC LICENSE Version 2

(BottleBuddy is the original name given to the Reagent Tracker scale/NFC unit).

3D Printed Case:

The .scad and .stl files for the case are released under the Creative Commons Share Alike 4.0 license....

Read more »

Firmware.zip

Version 1.0.34 of the firmware. Note that this version connects to the internet once per minute to publish a empty weight to track drift so needs modification for low power (battery) usage.

x-zip-compressed - 35.56 kB - 06/10/2017 at 02:12

Download

BottleBuddy-V1.1.sch

Eagle schematic file for V1.1 PCB

sch - 703.55 kB - 06/08/2017 at 03:25

Download

BottleBuddy-V1.1.brd

Eagle board file for V1.1 PCB

brd - 127.35 kB - 06/08/2017 at 03:25

Download

PCB-Top.png

PCB V1.1 Top (Everything except bottom copper)

Portable Network Graphics (PNG) - 344.24 kB - 06/08/2017 at 03:24

Preview

PCB-Bottom.png

PCB V1.1 Bottom (Everything except top copper)

Portable Network Graphics (PNG) - 330.34 kB - 06/08/2017 at 03:24

Preview

View all 14 files

  • 1 × Particle Photon
  • 1 × PN532 NFC reader (Red PCB)
  • 1 × Load Cell (5Kg)
  • 1 × HX711 Load Cell Amplifier (Red PCB - SparkFun version should work)
  • 1 × MMQ8452Q (Blue eBay PCB) Capacitors / Ceramic

View all 30 components

  • Video: Reagent Tracker In Use

    Stephen Harrison06/13/2017 at 20:19 0 comments

    Yesterday the second version (V1.1) PCBs arrived so I was able to [almost] fully assemble a proper reagent tracker.

    I made a couple of user interaction tweaks to improve feedback to the user though the LED as a result, but here's a video of the tracker in use.

    When the bottle is placed on the tracker it flashes the LED and plays the wake tune.

    When the bottle is identified it flashes briefly to let the user know it is measuring the weight (it's a little slow to let the scale settle and get a reliable weight).

    Once the bottle is weighted the LED lights solid until the bottle is removed, a reliable zero weight is obtained and the measurement published to the internet.

    This tracker is made from FormLabs clear resin and coated with clear epoxy (and was that messy!)

  • Tracking Reagents and Getting Notifications

    Stephen Harrison06/12/2017 at 02:24 0 comments

    This is the last piece of the puzzle to get our Reagent Tracker to a useful position.

    I've used Tinamous.com as the IoT backend for this project for a few reasons, but mainly (as you can probably guess from my profile name) because I'm the founder of the site!

    You can easily create your own Tinamous.com account (yes, it's free) and then invite other members of your organization to join it (for example purchasing).

    For my own use case (tracking the Form 1+ resin usage in my local hacker space) Tinamous has all the functionality I need, however for a wider audience a dedicated application with predictive analytics, reports and less generic fields would be more useful.

    Tinamous integrates easily with the Particle Cloud via a Particle Bot, Tinamous connects to the API stream and processes the messages received in real-time. Messages published from the Photon with a "status" key will appear on the status timeline and those published with "senml" are taken as measurements. We publish the measured bottle weight as a field measurement where the field name is the NFC tag Id so it will be unique, although initially a little unfriendly!

    Add Particle Bot:

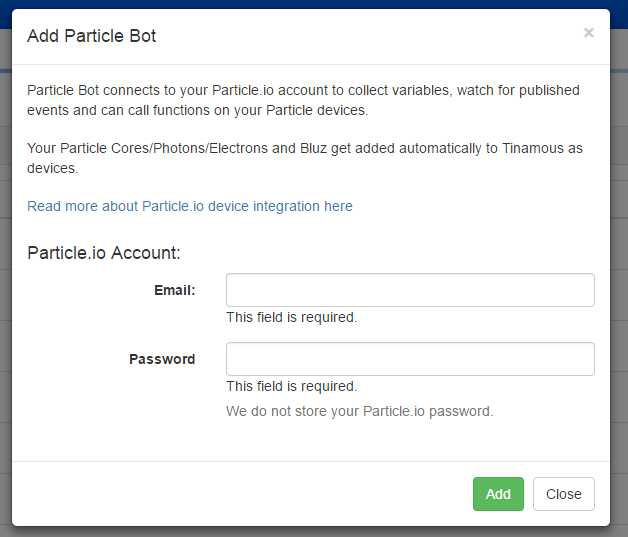
    To get started we need to add a Particle Bot to our Tinamous account, this is as easy as selecting the Add -> Add ParticleBot option from the Bots page and following the instructions:

    Once connected the Particle Bot will import your Particle Photons, Electrons etc. into your Tinamous account. If you already have a Particle Bot up and running then adding a new Reagent Tracker Photon will cause it to be automatically added to your Tinamous account.

    Reagent Tracker Setup:

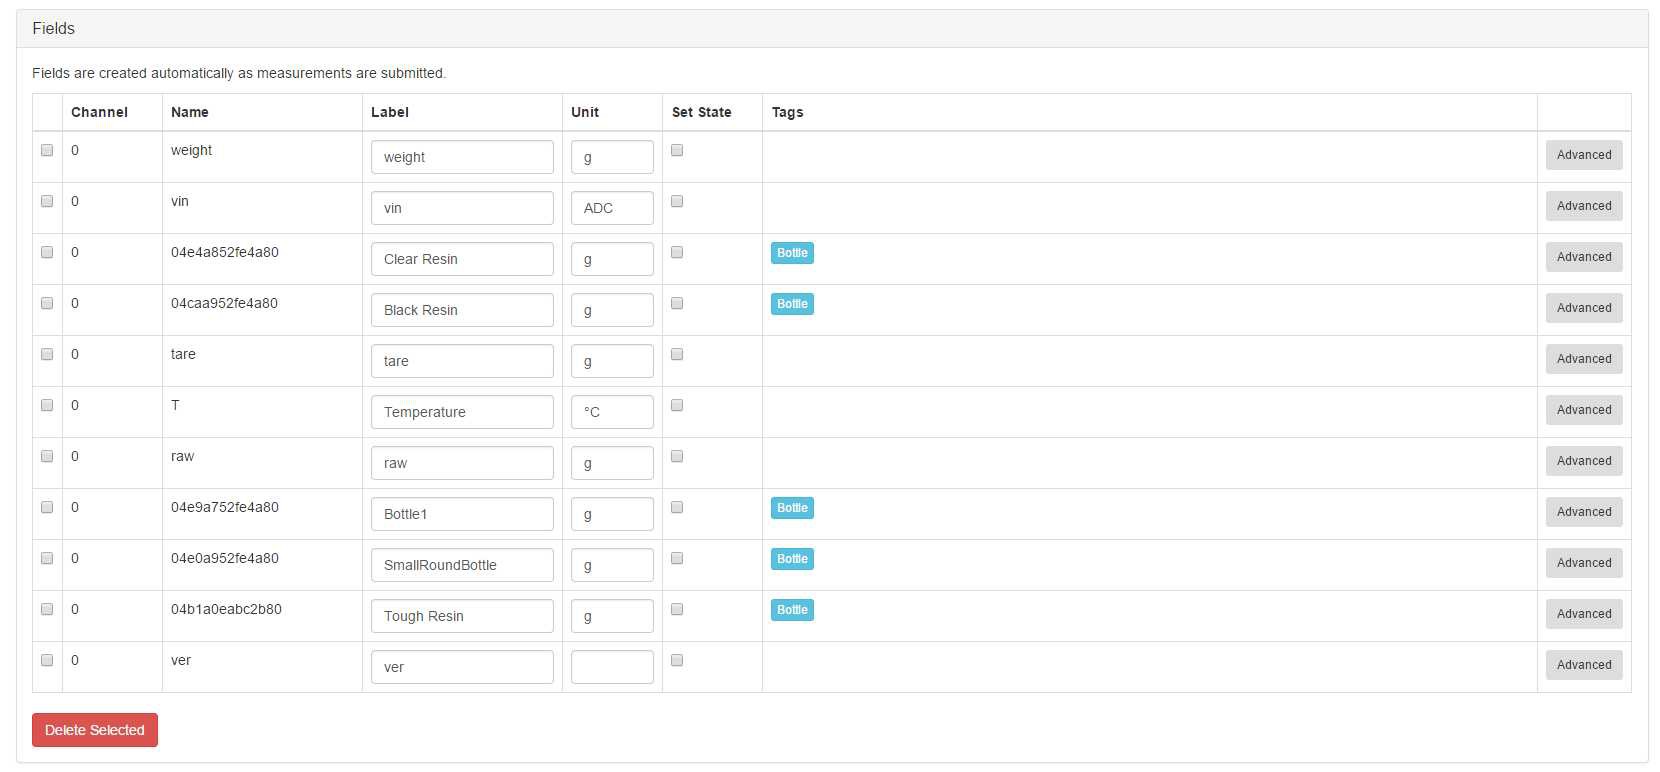
    We don't need to set-up the fields within Tinamous, once the bottle tag is seen and published, Tinamous automatically adds it as a field to the device and tracks the values, however to receive notifications and make tracking a little more human friendly there are a few steps we need to take.

    I changed the tags for the reagent tracker devices to a single "ReagentTracker" tag, this allows us to automatically include additional trackers into the notification group or dashboard charts.

    I also changed the measurement fields that represent bottles (the field name is our tag id) to be tagged "Bottle", again this allows us to create a notification that will automatically include new bottles and help charting.

    I've changed the labels to be more appropriate to the bottle (some of these are just test tags so aren't actually reagent bottles).

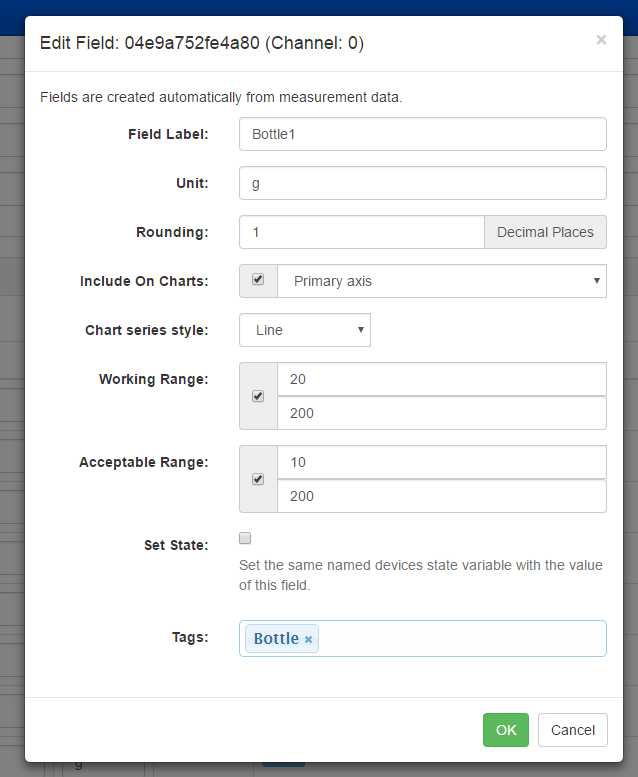
    Tinamous allows us to assign working and acceptable ranges for each field, when a measurement is received that is out of one of these ranges we can trigger a notification, so for our bottles we can set-up the ranges to be the appropriate weights for empty resin bottles.

    For example, below I've set up "Bottle1" to have a working range of 20-200g and an acceptable range of 10-200g. We don't really care about the upper range, but the lower range allows us to trigger notifications when it's time to order new reagent.

    Notification Setup:

    The following screen shots walk us through the notification set-up.

    From the Notifications page, click Add Notification:

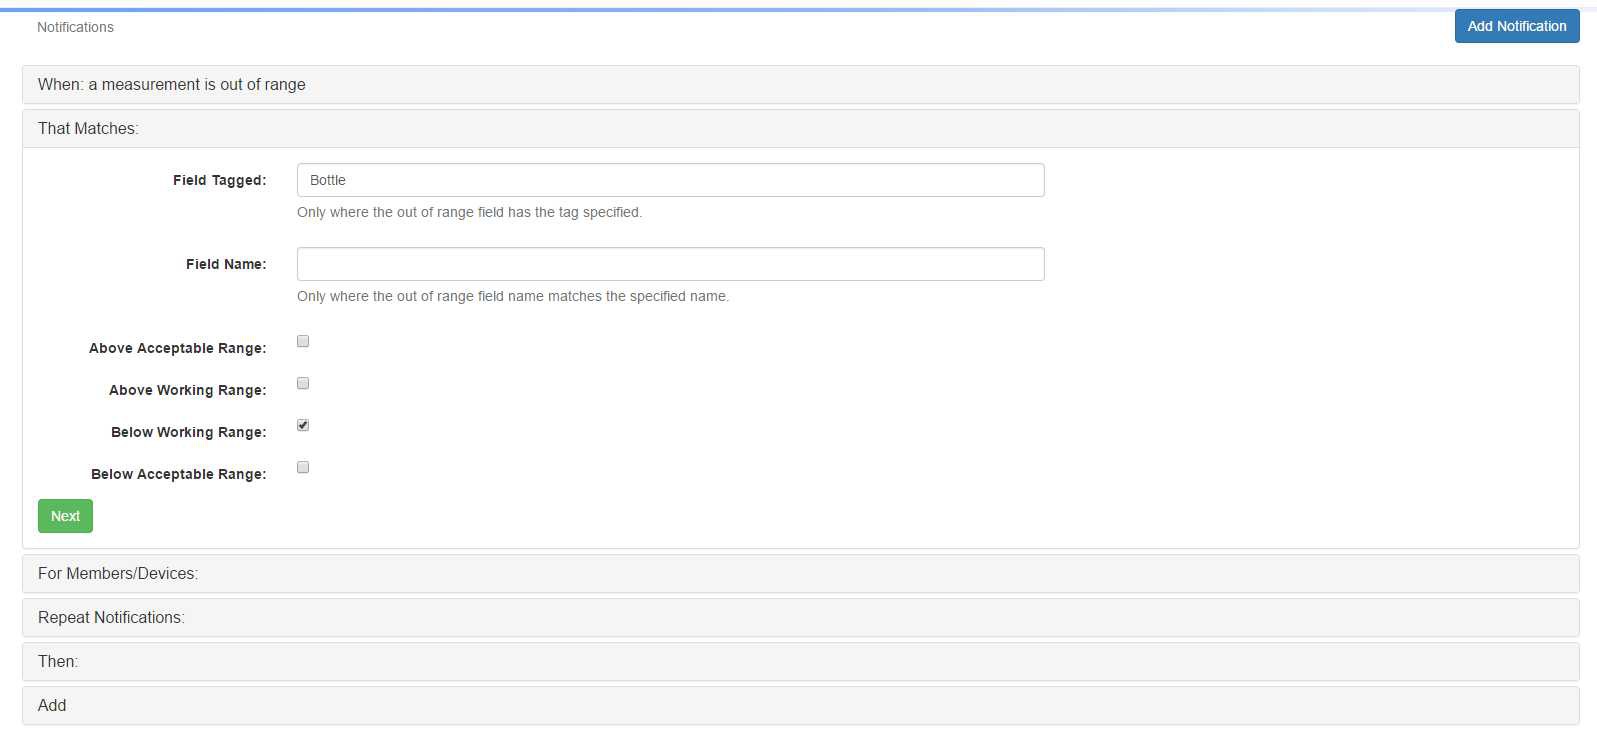
    Select the "A Device posts an out of range measurement" notification type, this is triggered by the working and acceptable ranges we set-up earlier. Each bottle can have it's own unique range based on the type of bottle (glass, plastic, small, large etc.), so we are not constrained to a specific value.

    We are really only interested in the fields that represent a bottle, whilst we could also put ranges on for temperature, humidity, etc. for reagent storage, this notification needs to be triggered only for bottles. Previously we tagged our Bottle identity fields with "Bottle" so we want the notification only to trigger by fields tagged "Bottle" and we are only interested in "Below Working Range" notifications (i.e. in our Bottle1 example when the bottle weight drops below 20g).

    We also want to limit this to our Reagent Tracker devices, whilst it may be unlikely to have...

    Read more »

  • NFC Tags

    Stephen Harrison06/11/2017 at 23:57 0 comments

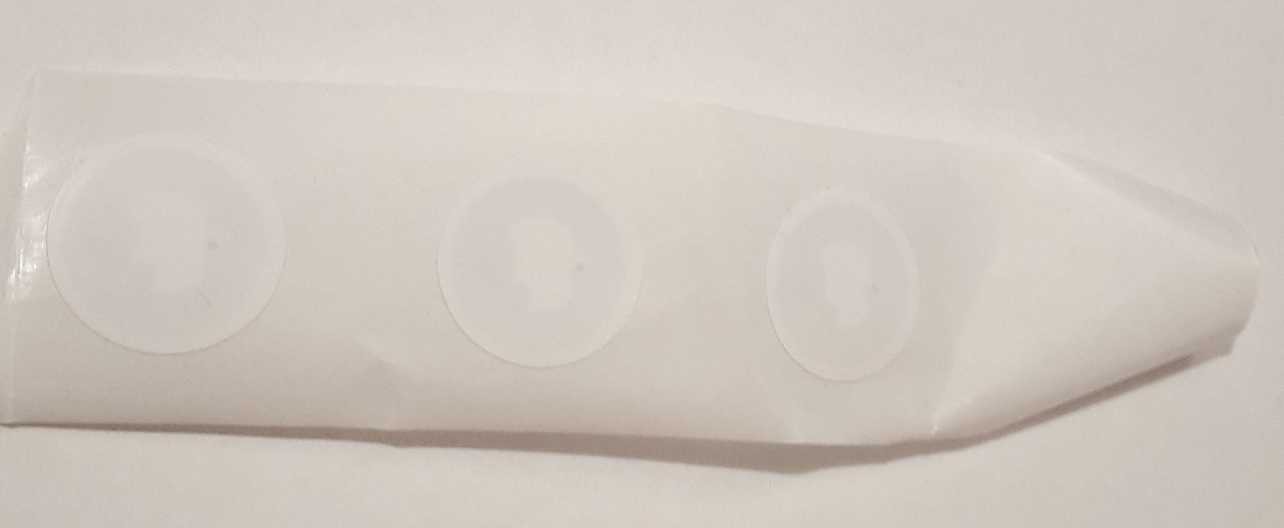
    I figured the NFC tags were worth a quick mention, the ones I've used so far have been NTAG2 format round stickers I got from eBay. These cost about £5 for 10 so not free but not overly expensive either. Given these are intended to go on a bottle of resin that costs over £100 and would last for 6-12 months it's not a great overhead.

    Below are the tags I got from eBay (sorry about the contrast, they are white on a white strip):

    One possible use case of the Reagent Tracker is for refilling of reagent bottles. In a larger lab set-up it is common for solvents and common chemicals to be purchased in bulk and split down to more manageable sized bottles (e.g. a 20L container purchased and split into 500ml bottles as and when needed), or for somebody to make up a bulk lot of reagent (e.g. pH buffer). In this case the NFC tag stays with the bottle but the bottle may end up getting cleaned and re-used.

    During my experimentation with the scale I ended up using my tea mug as a test bottle and hence it got NFC taged. I was surprised to find the tag still attached after forgetfully putting it into the disk washer. The coating was removed but the tag stayed with the mug and still worked, even after a second run through the disk washer!

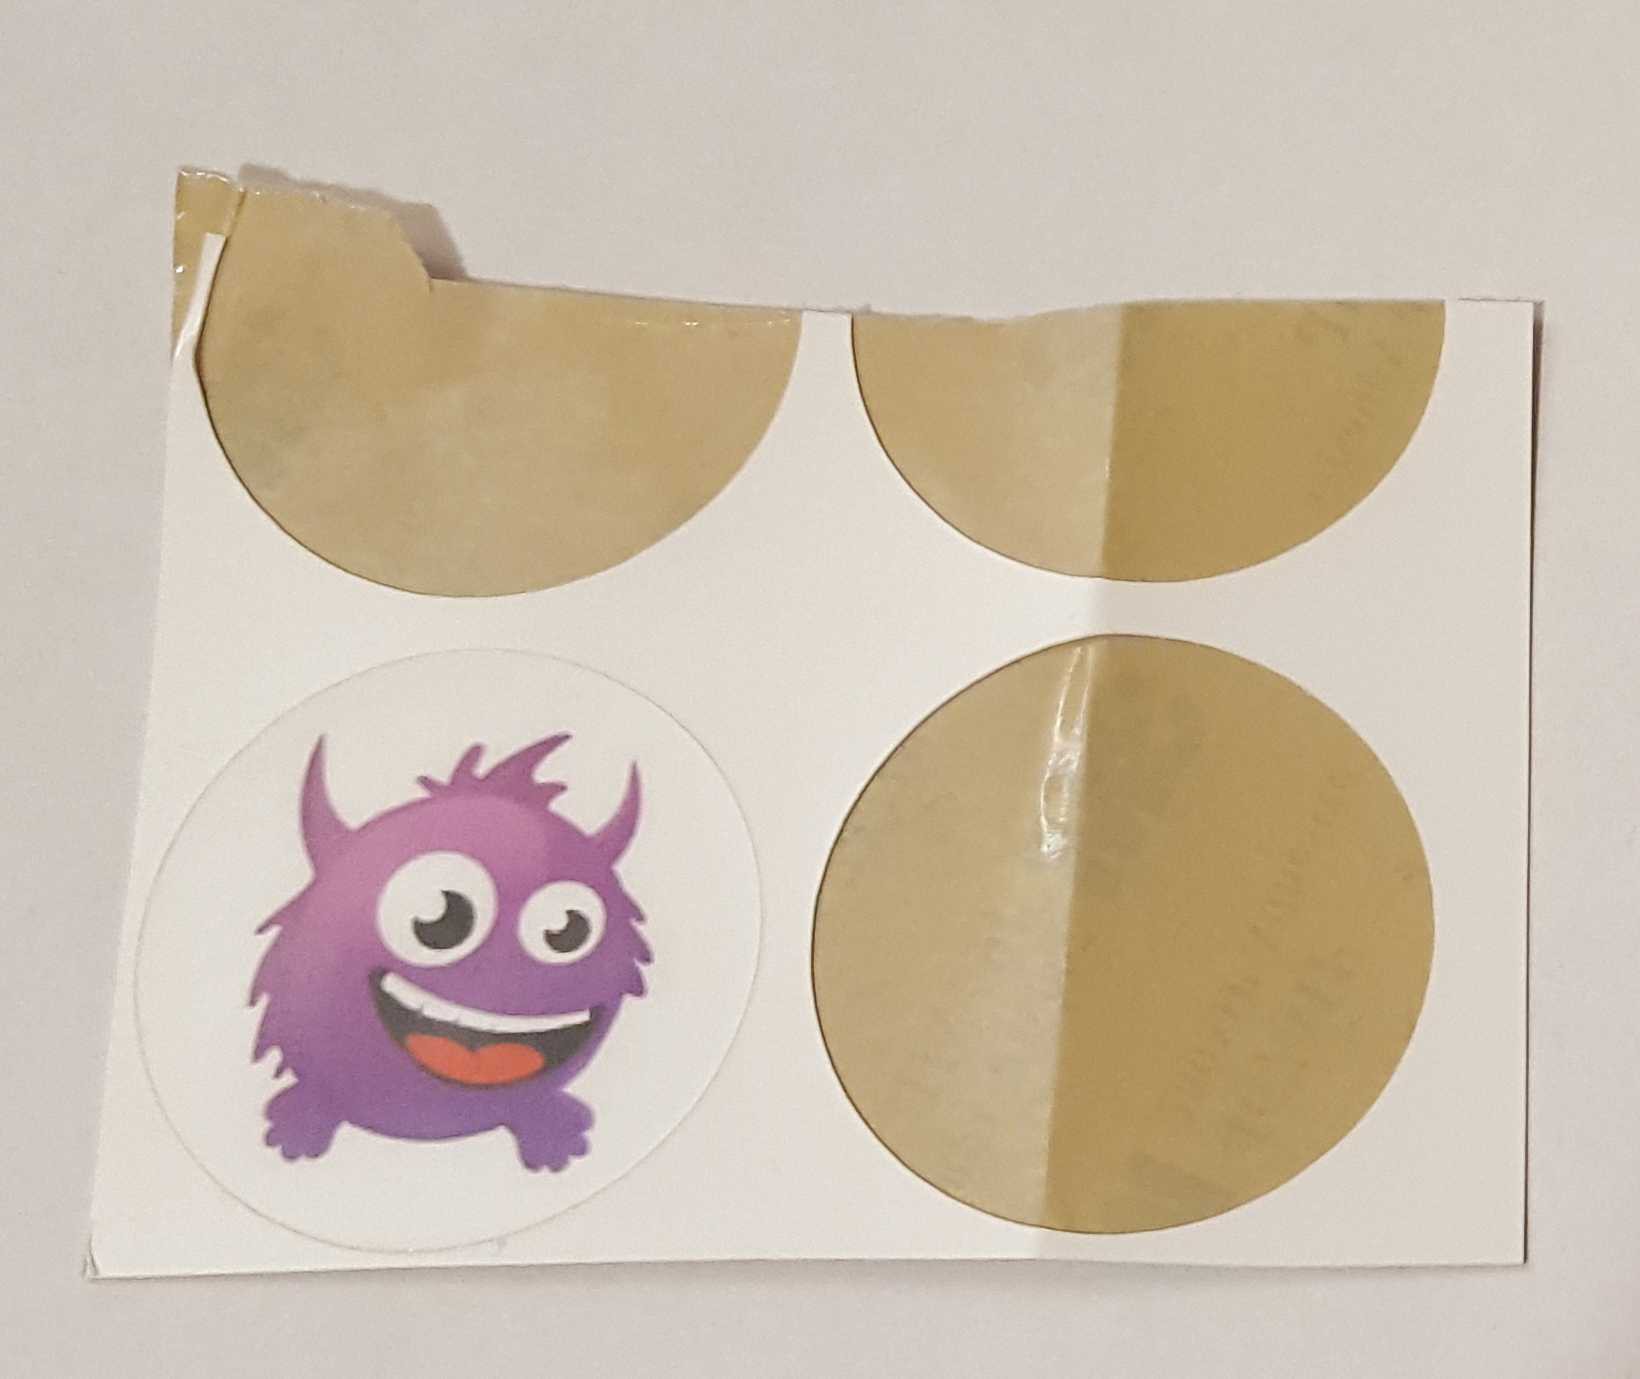
    It is also possible to get custom tags, below is an example of one I've previously had made for Tinamous:

    Sadly the company that made these are no longer going, however I'm sure there are other places that will do this. It can add an extra level of usefulness to the the tagging, or corporate branding, or an indication that the reagent has been though a certain process (goods in, QA etc.)

    It is also possible to get the tags custom programmed, so if for example you regularly have pH 4, 7 and 10 buffers to track, you could have custom tags that include some kind of identifier data to indicate which buffer they were and have a custom colour coded image of 4, 7 or 10 on the sticker to ensure they went on the correct bottle so simplifying the tracking process.

  • Firmware

    Stephen Harrison06/11/2017 at 23:12 0 comments

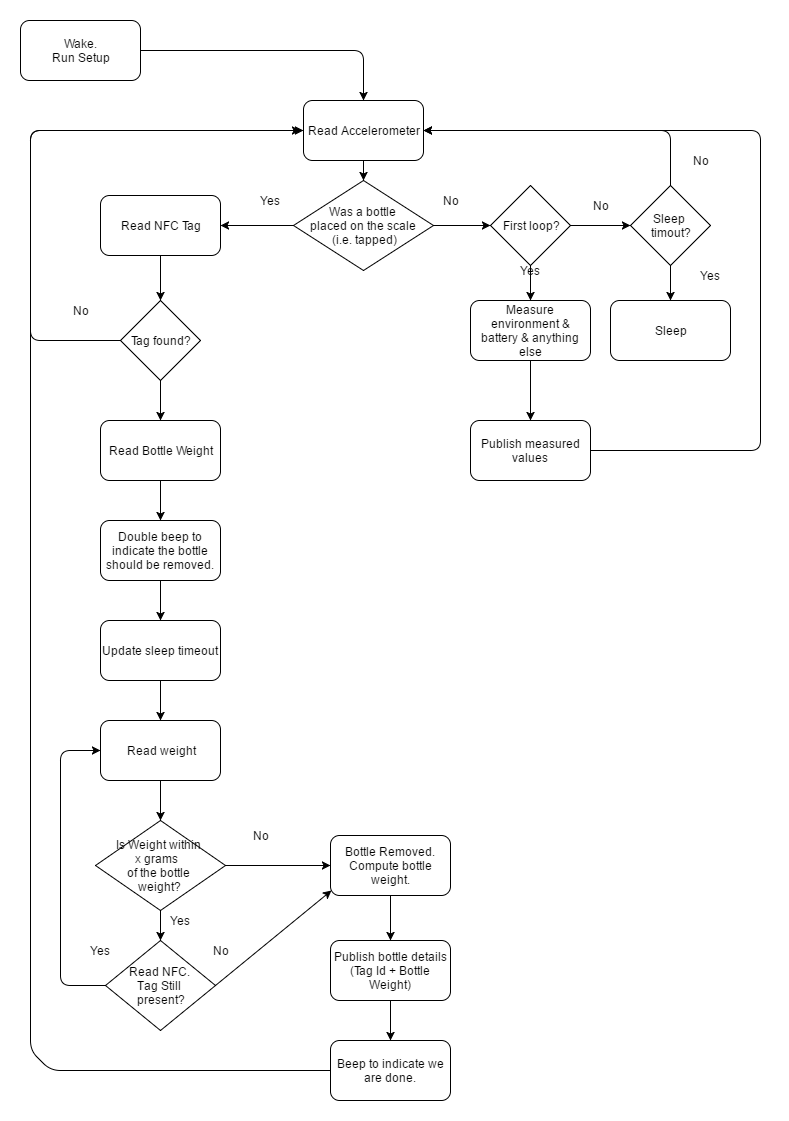
    The flow chart below describes the main functionality of the firmware.


    Most of the time the Photon will be in deep sleep to save battery power, waking only because of a RTC wake or tap interrupt when a bottle is placed on the scales and occasionally due to a system event (power cycle, firmware update, user reset).

    Once the Photon is woken it checks the accelerometer to determine if any taps occurred that would indicate a bottle being placed on the scale, the sensitivity of tap sensing can be adjusted if needed.

    Background (no tap wake) Activity:

    If no taps were observed when the Photon was woken then it is most likely due to the RTC timer timeout. Currently the Photon will take an environment measurement (temperature, empty load cell weight, etc.) and then publish this to the cloud. This may change based on use case but can be used to monitor environmental storage of the reagents should this be required.

    The current version (1.0.34) uses a fairly aggressive read and publish on the RTC clock which will cause high battery drain so this needs to be optimized for the battery version, but gives a nice indication of drift of the load cell baseline.

    Normal Activity:

    If the Photon was woken by a tap the system then goes into measurement mode. The NFC Tag Id is read (no other information is needed from the tag), the weight of the bottle is measured and the user promoted to remove the bottle by a double beep.

    With normal scales you would tare the scale first to get a good zero baseline, however because we are woken by the placement of a bottle on the scale this is not possible, so the system waits for the bottle to be removed (making an annoying beep to prompt the user in the process).

    Once the bottle is removed (indicated either by a weight reduction of more than 10g, or by the absence of the NFC tag) the tare (zero) weight is measured and the overall bottle weight corrected for this. This information is then published to the back-end service.

    Reading the scales requires 1-2mA, reading the NFC requires more power due to the magnetic field needed. Ideally no NFC check would be used to reduce overall power usage, however it is possible that the weight of the bottle is <10g or that the bottle was removed before the weight could be properly measured and so a 10g difference between empty and empty is not possible, hence the use of the NFC check as a backup.

    Once the bottle has been removed the Photon will stay awake for 30s waiting for a possible second, third, forth bottle to be placed on the scales. This is done to try and optimized for connection time as the Photon is required to connect to WiFi and then to the Particle Cloud after a deep sleep. If many bottles are to be measured it is better to connect once and wait for the next bottle.

    Power Management:

    The system is mainly optimized for deep sleep current consumption, no real optimization has been done for wake power usage, for example the NFC reader could be shutdown when not being used even in measuring mode.

    The Deep sleep option is used for the Photon as this gives the lowest power consumption (0.08mA cf. 1mA for normal sleep) which will extend the battery life (or at-least reduce the time between charges). With normal sleep mode the Photon can be woken by a configurable interrupt source (e.g. a change on D1, rising edge on D2 etc.), however when in deep sleep the Photon can only be woken by a rising edge on the WKP pin.

    When sleeping the Photon will only go into deep sleep if certain criteria are met, the Phonon will not sleep if any of the following happen:

    • A measurement is being taken or has occurred in the last 30s
    • The Keep Alive pin (A2) is pulled high.
    • The WKP pin is high (a tap interrupt) if this is not cleared it would result in the Photon never waking.

    Internet Connectivity:

    Publishing to the internet is done via the Particle Cloud functions. Particle.publish() is used to publish either a "status" message or a "senml" message, these are well known message types used at Tinamous.com and will...

    Read more »

  • Programming The Photon

    Stephen Harrison06/10/2017 at 02:33 0 comments

    The code is the same as Arduino code (.ino) with some enhancements for the Particle system and uses a few C++ drivers so should be fairly easy to understand for most. I've attached the fimware to the project as a zip file. This includes the source files and a prebuilt binary file that can be flashed onto a USB connected Photon with the Particle CLI. However this log is about getting the code into the Particle build environment to allow it to be modified and programmed OTA to a Photon.

    If you've not worked with a Photon before check out the Particle.io getting started guide.

    Note that the code is called "BottleBuddy", this is the project name for the hardware side of things, where Reagent Tracker is the overall project / system name.

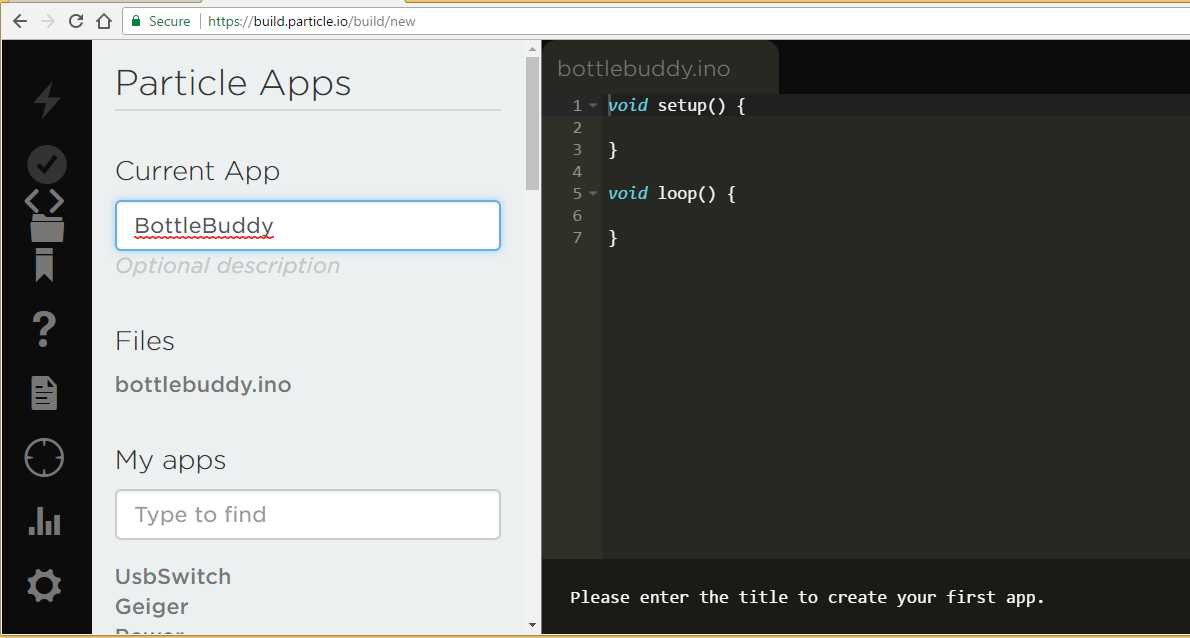
    To use the code open a new code application in the Particle Build environment (https://build.particle.io). Unfortunately at present Particle don't have a nice way to bundle applications for sharing using the build environment so this is a little messy.

    Open the build environment, you will be promoted with a blank application:

    Give it a name.

    Paste in the bottlebuddy.ino code.

    Add the following libraries using the Build library manager:

    • Adafruit_PN532
    • neopixel
    • OneWire

    Add new tabs using the (+) in the top right:

    • HX711
    • SparkFunMMQ8452Q

    You should get a .cpp and .h tab for each of those. Paste in the appropriate files (note theirs a bit of a bug where pasting in the .cpp code will end up in the .h file as well).

    The HX711 library is available through the Particle Library system as HX711ADC however I had some issues with it at the original time of writing so brought it into the project as a C++ file, also the tare function uses an incorrect type (double should be long).

    The MMQ8452Q library didn't support configuration of tap interrupt events so I've modified that slightly from the original SparkFun library to support Tap Interrupts.

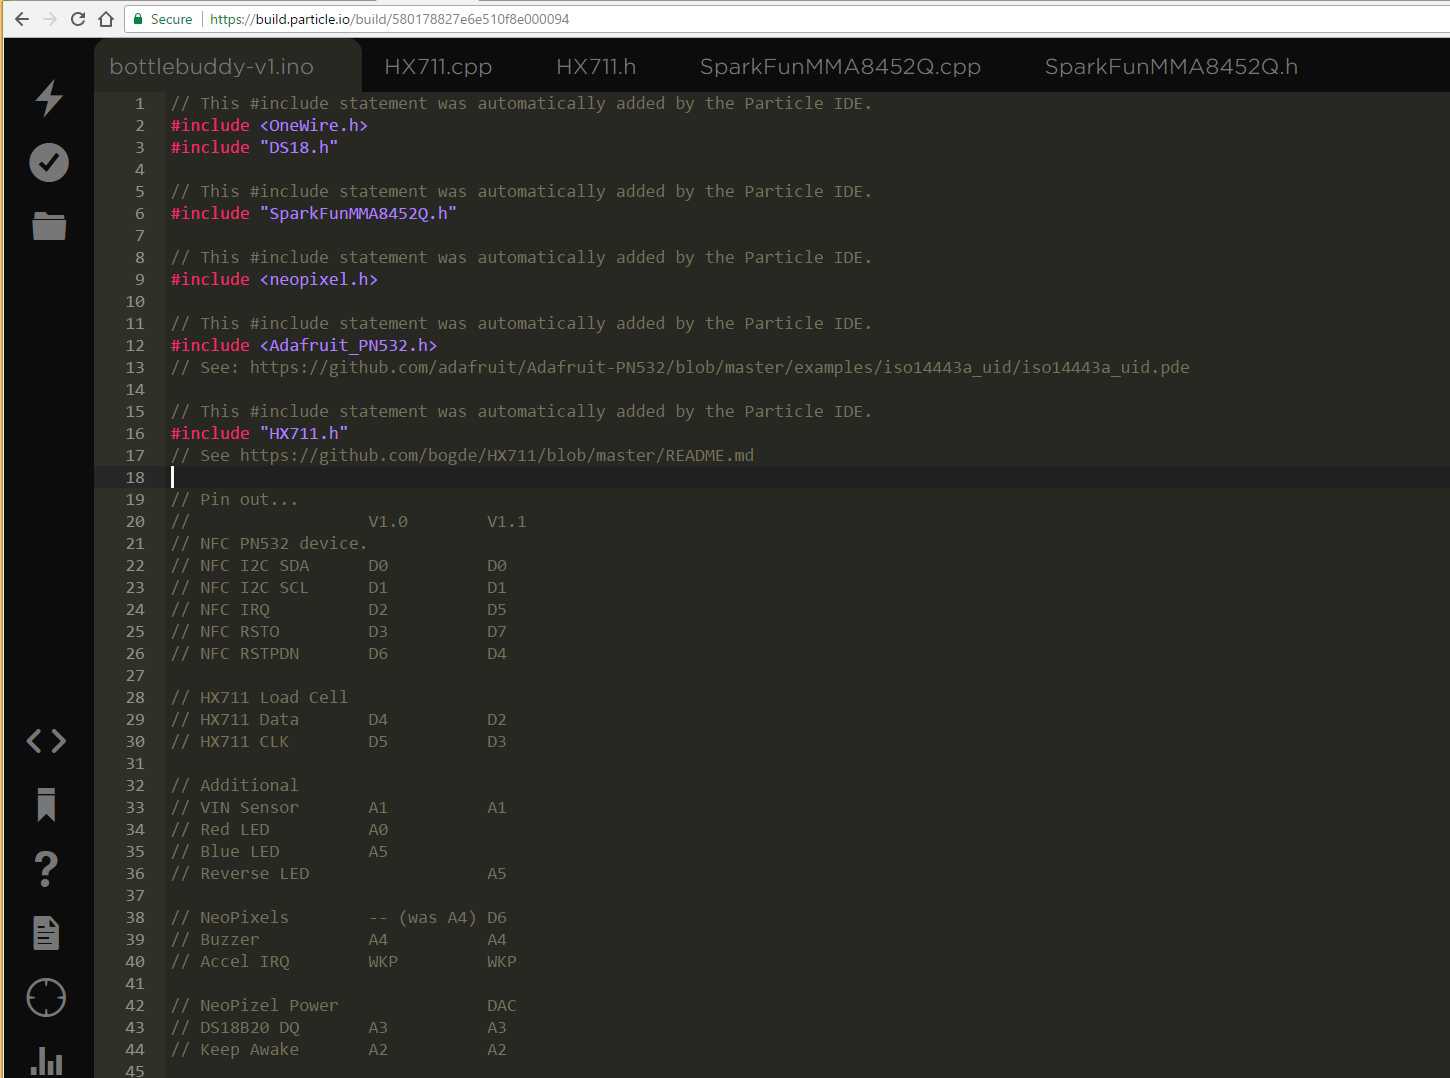
    You will find the build environment has duplicated the #include statements. Remove the duplicates.

    It should look something like this:

    Ensure you have the correct device selected and the firmware version is set to 6.2.

    Ensure that the pin definitions in the .ino file match your build, these have changed between V1.0 and V1.1 of the PCB.

    Click the verify icon and the application should build.

    Now click the Flash icon to program the Photon code. It may take a little time initially to get the Photon's base firmware up-to 6.2, updates after this are lightning fast.

    Once the Photon has been flashed it is going to spend most of its time asleep so we won't be able to re-flash the device without doing something special. At this time the standard build environment doesn't support queued firmware updates so we can't build the code and request it to be flashed on next connect. I think the product deployment functionality on Particle is able to do this, but it's not really suitable for 1 or 2 devices and still requires you test your firmware on a device or two first.

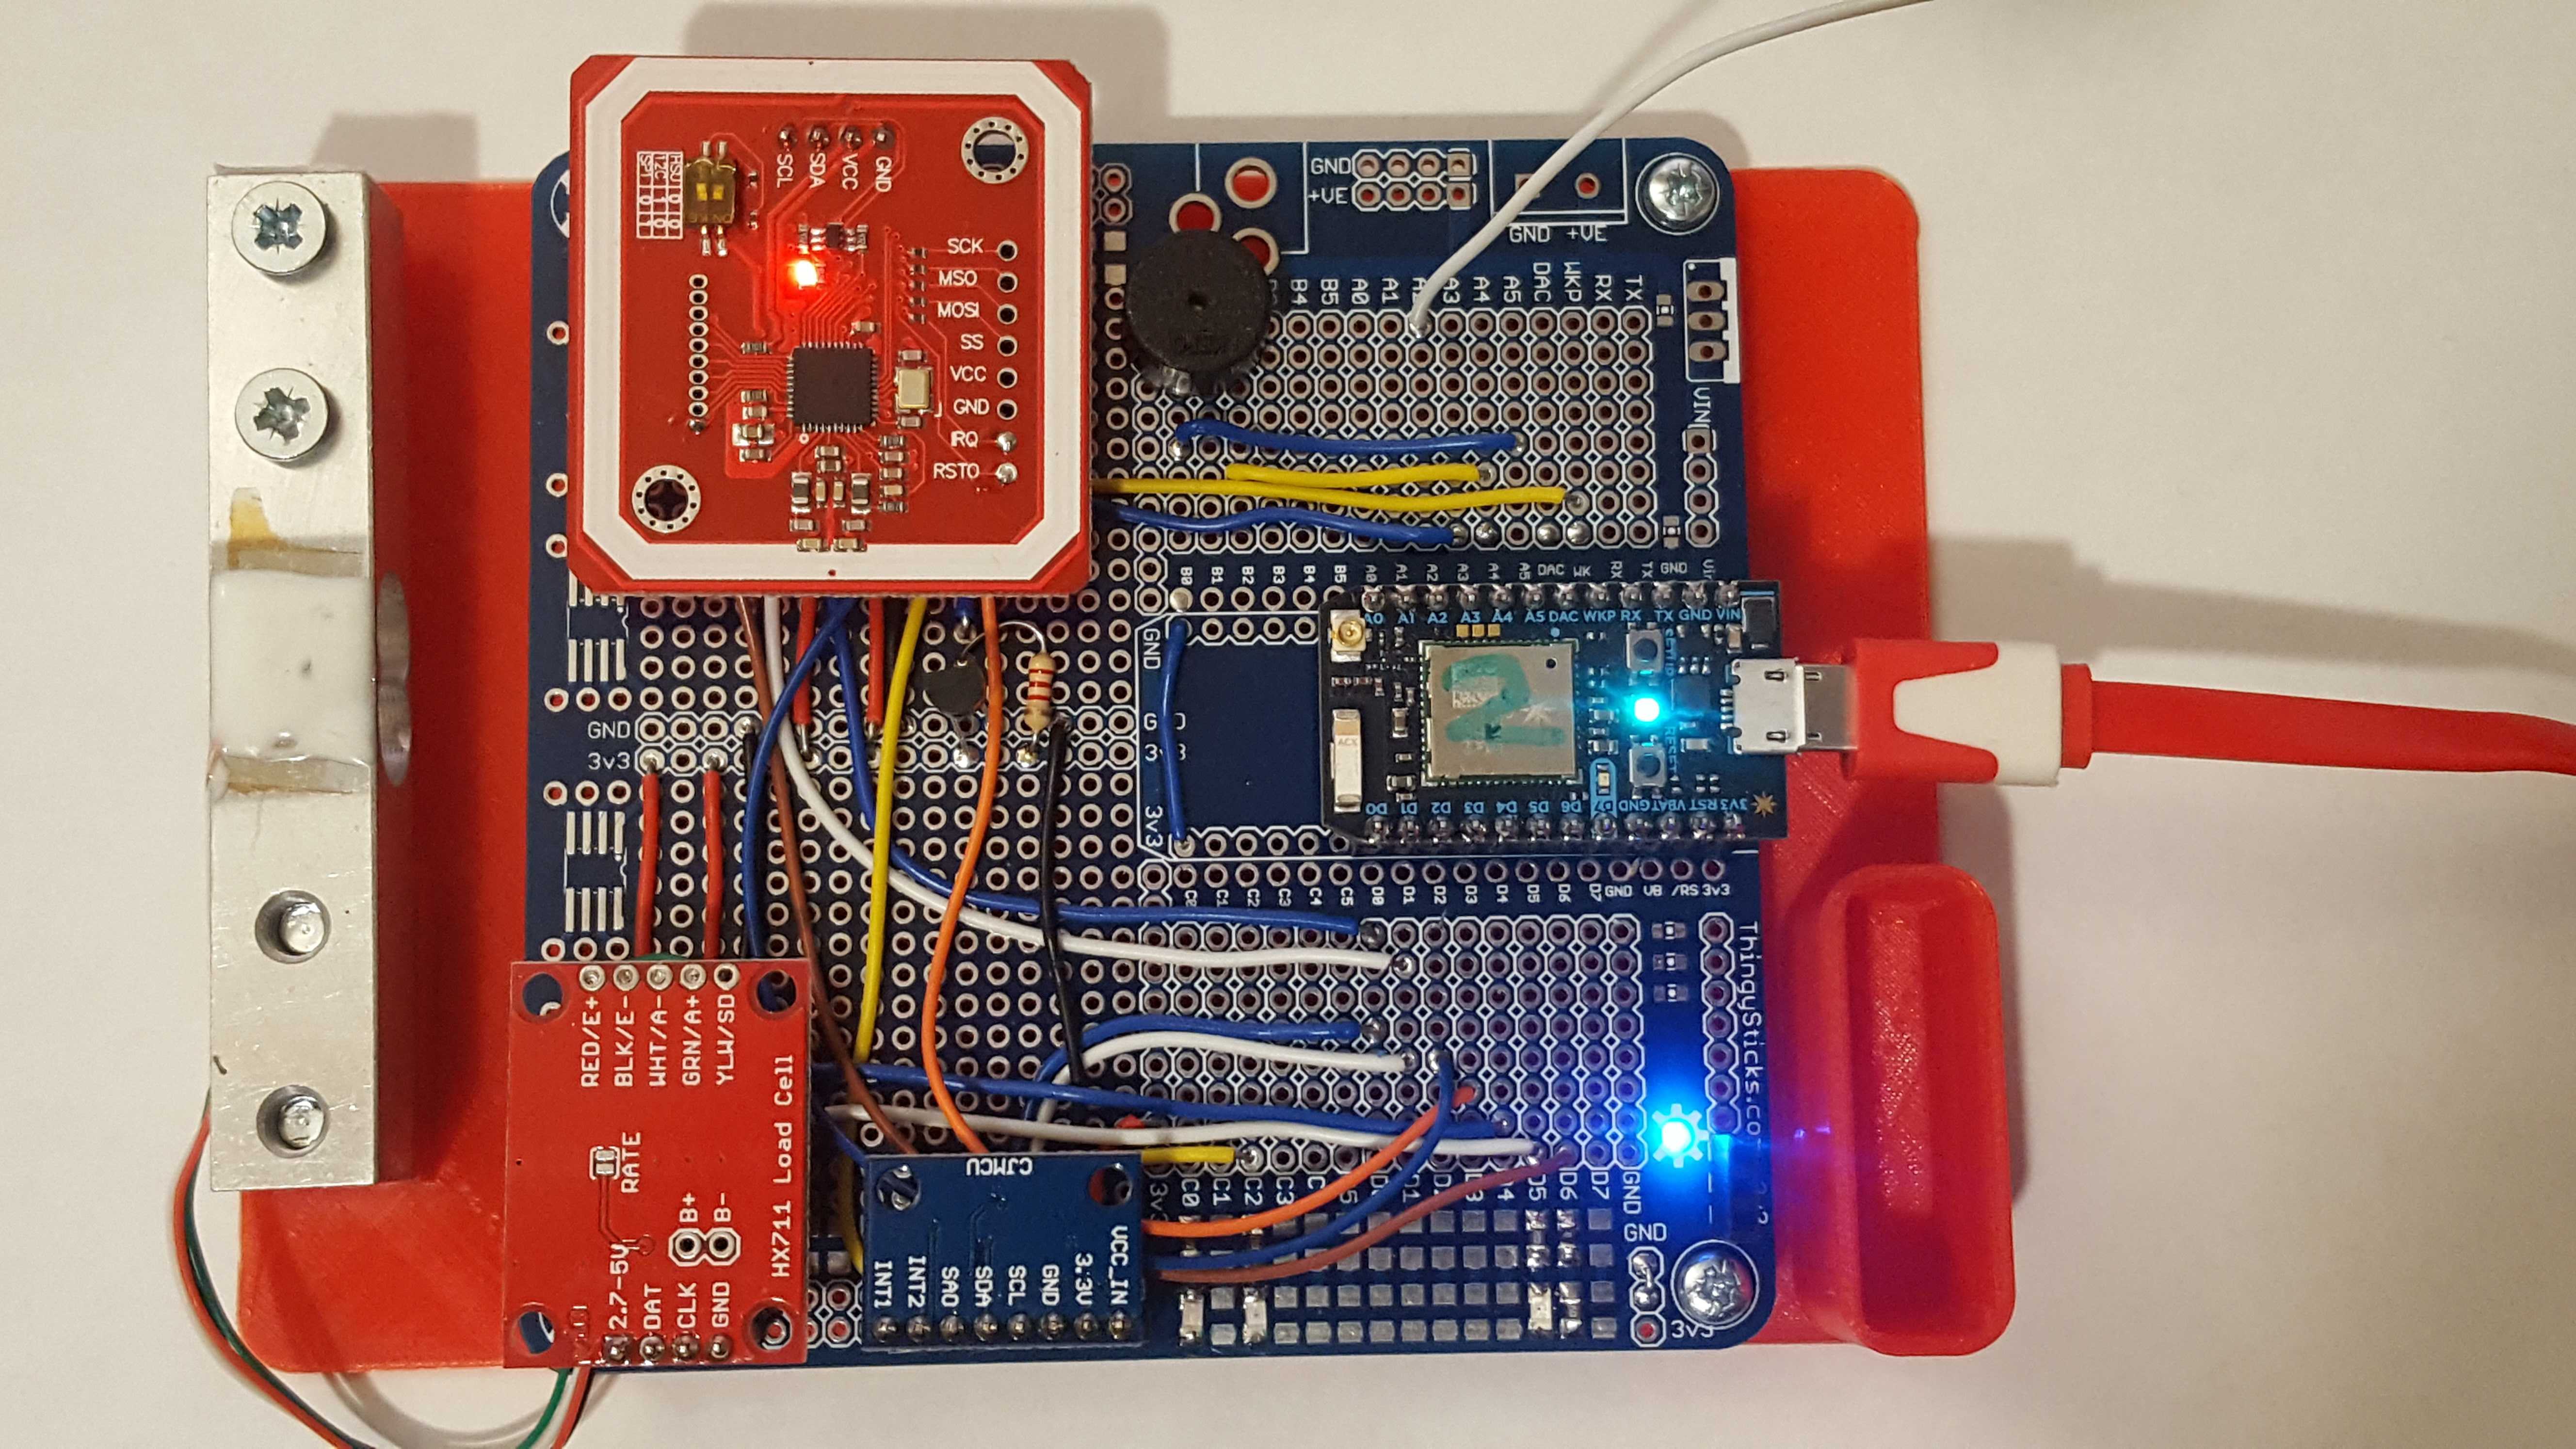
    Their are a few ways to keep the Photon connected to allow firmware updates. The KeepAwake pin (A2) is probably the most useful, particularly on a prototype board set-up, notice the white flying lead below, this connects to 3v3 to keep the application awake. V1.1 of the PCB has a (KeepAwake) test point that can be soldered too if required.

    Alternatively we can place the Photon in Safe Mode, this is handy to know about not only for firmware updates but for when we mess up the firmware and are not able to get the Photon to connect.

    To place the photon in Safe Mode, hold both Set-Up and Reset buttons down, release Reset and wait for the LED to flash Purple (it does this almost immediately), then release the Set-Up button. The Photon will now connect to the Particle Cloud and we can updated it, but it won't run any of our code until it is reset (manual or due to firmware update).

  • ​Electronics

    Stephen Harrison06/08/2017 at 03:08 0 comments

    The electronics side of the scales is made up of the following modules:

    • Micro-Controller
    • RFID Reader
    • Load cell and amplifier
    • Accelerometer
    • Environmental sensors
    • User interaction (LED, Buzzer)
    • Power
    • NeoPixels

    Also covered are:

    • PCB and System Design
    • Prototyping

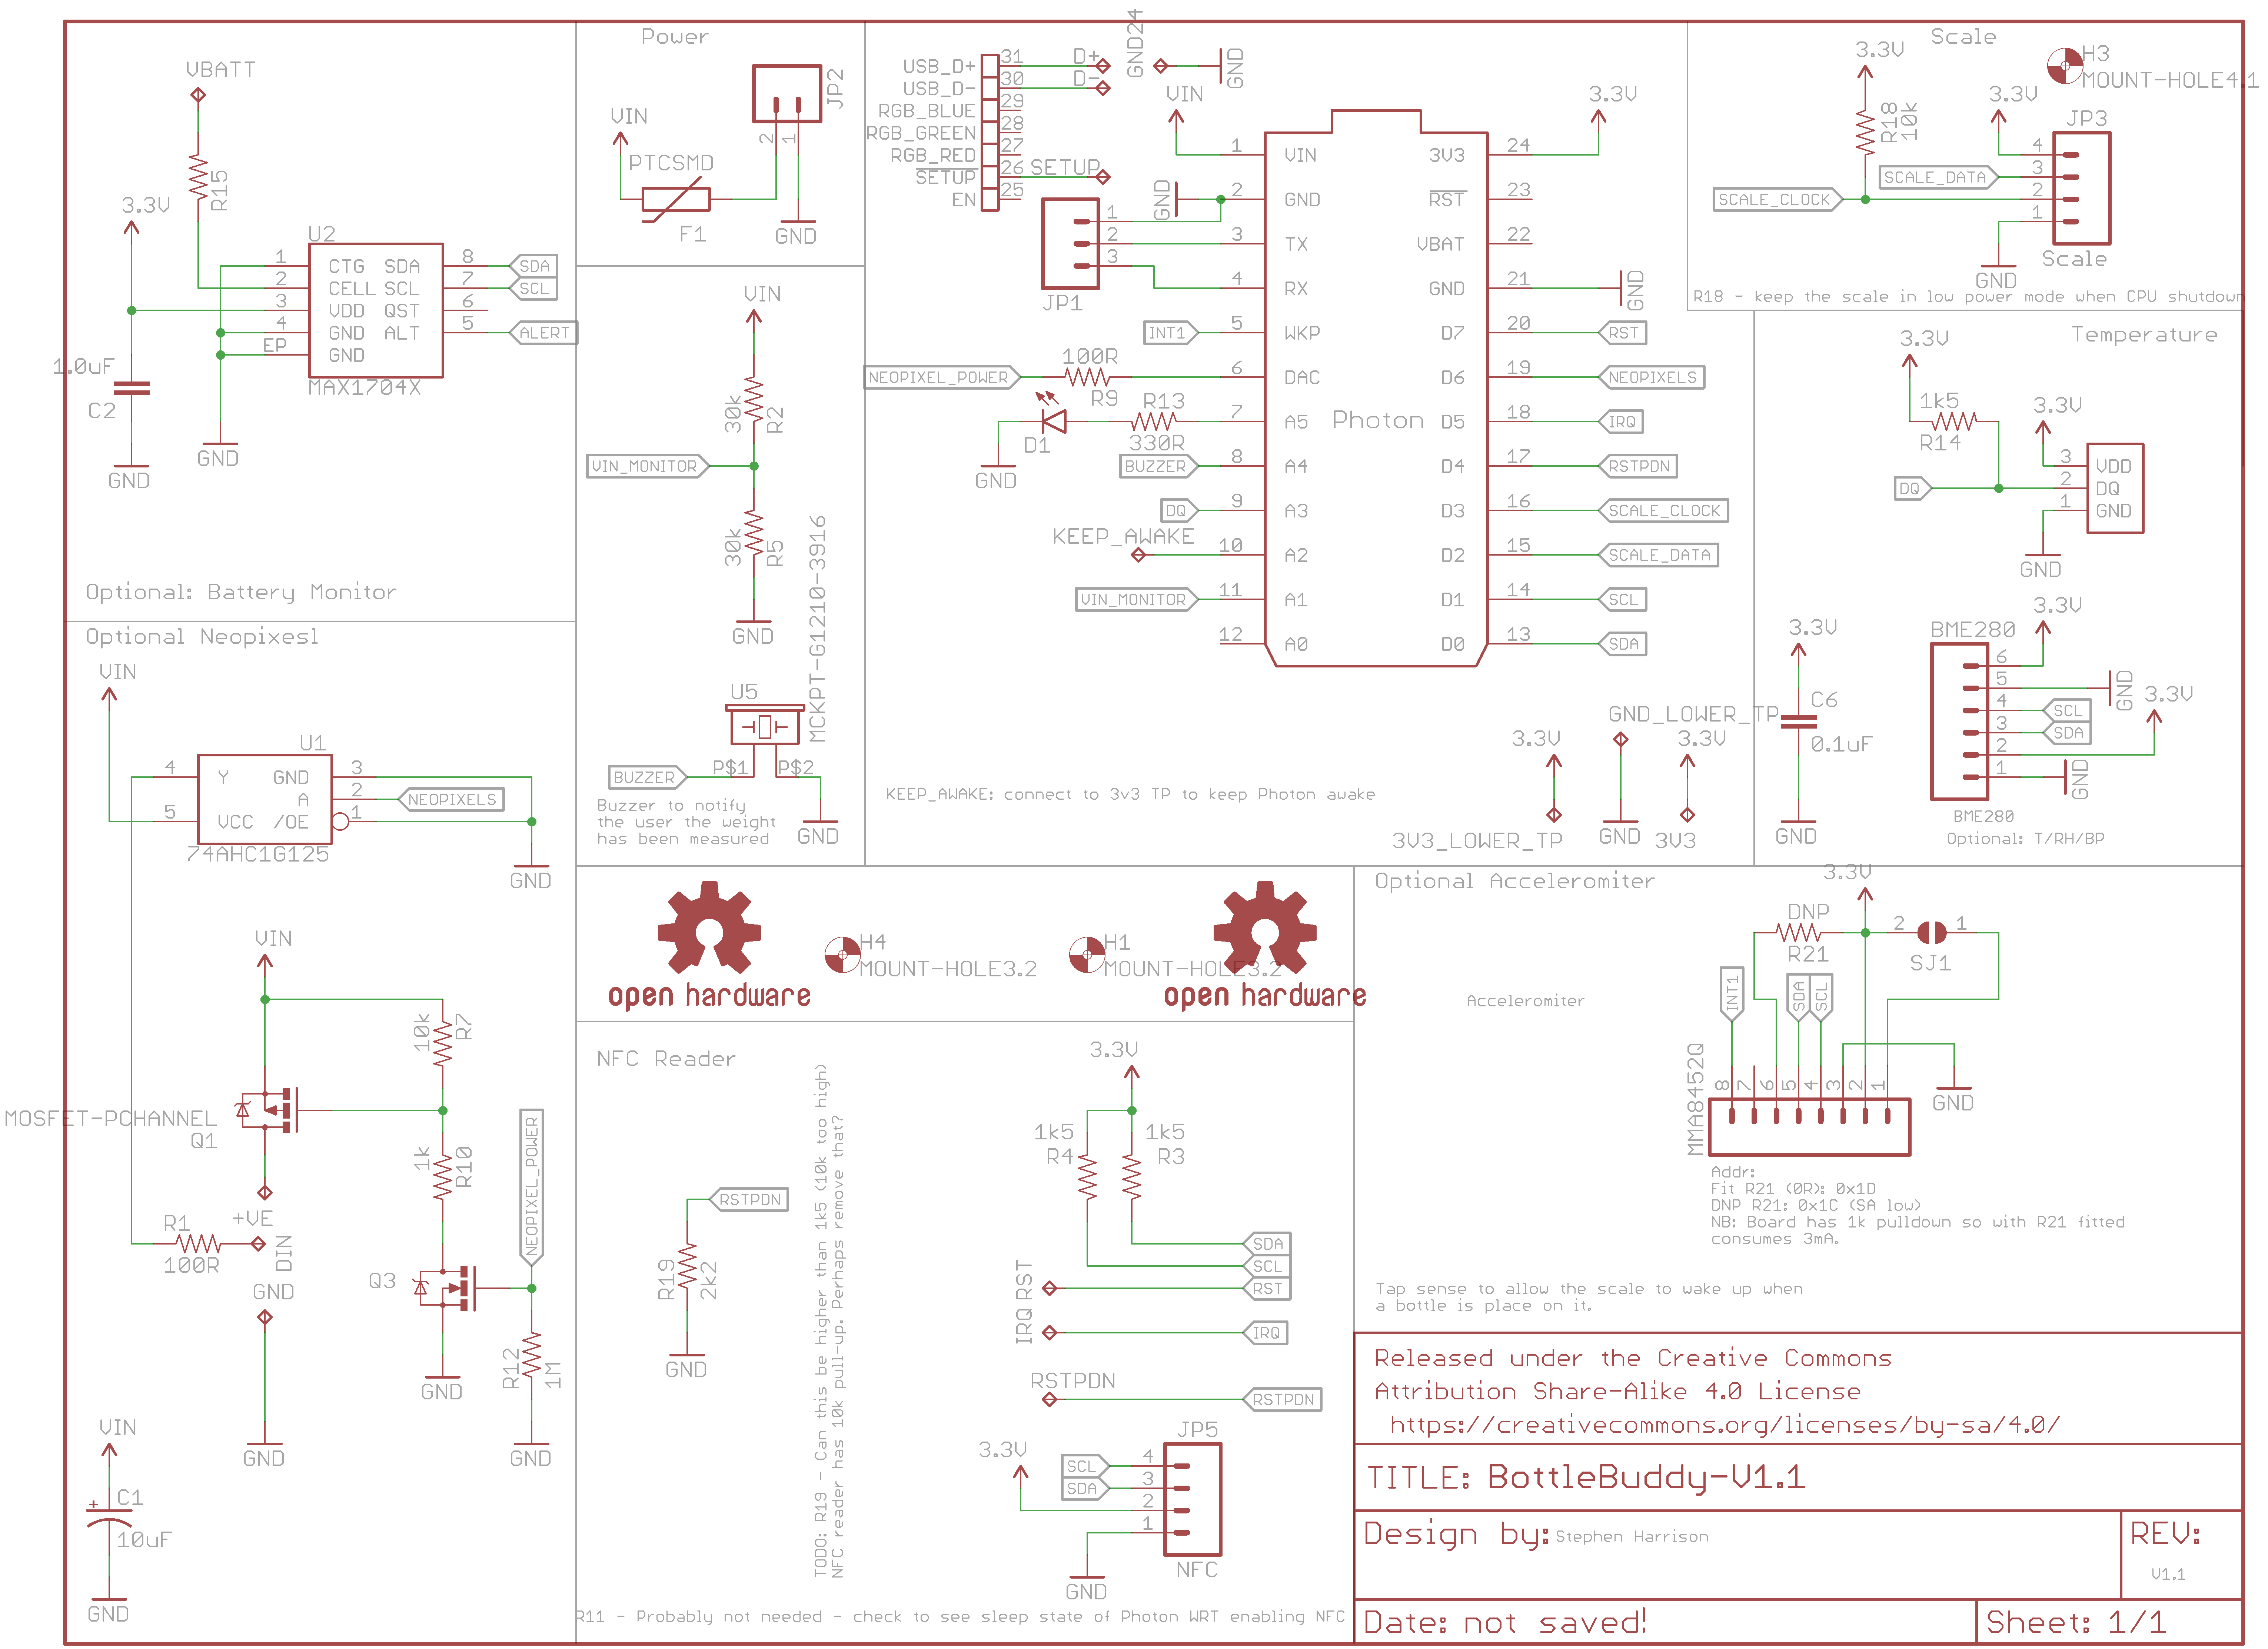
    Schematic:

    Micro-Controller:

    A Photon from Particle.io is used in this project for the micro-controller and internet access. I've used Photons in numerous other projects and they work really well and are very easy to work with.

    The core features of the Photon for this project are:

    • Built-in WiFi
    • Good selection of low power modes (down to 80uA in deep sleep) and wake interrupts
    • Very easy to publish data to the internet (via the Particle Cloud)
    • Good API at the Particle Cloud
    • Good library of drivers and essentially Adruino compatible
    • OTA deployment so no USB connection required
    • Previous experience working with it
    • Integrates easily with Tinamous.com which makes the prototype version quicker to develop

    The Photon can be put into deep sleep which stops all functionality but allows it to be woken by a RTC timer (x seconds after sleeping) or a rising edge on the WKP pin. (Special care needs to be taken when using the WKP pin as the RTC also uses this, if the pin is prevented from going high it will block the RTC wake as well).

    The Photon has various digital GPIO's, 7 Analog (also digital) GPIO's, two serial pins (Tx/Rx) as well as the serial port exposed over USB, possible battery back-up of SRAM variables via a dedicated VBAT input and 2k onboard "EEPROM" flash memory.

    As the Photon is designed to be always powered by the VIN pin from battery or external power we don't need to supply anything to VBAT and any retained variables stored in SRAM will be kept as long as we have power. Long term variables such as load cell calibration values can be stored in the EEPROM to survive power loss.

    Like most micro-controllers, when the Photon is in deep sleep mode we lose control of the GPIO and cannot guarantee the state of the pin so special attention needs to be paid to GPIO pins

    The Photon is intended to be in deep sleep most of the time with only occasional waking when a reagent bottle is to be measured. It may be desirable to have the RTC wake the unit to send a signal to indicate that the unit is still functional and monitor battery charge but this will need to be balanced with battery usage as WiFi connectivity draws a lot of power.

    For the first version of the PCB I used the "header" through hole version of the Photon but switched to the headerless SMD version for V1.1 as this reduced vertical height and saves trimming the legs of the Photon (they are long and protrude a long way though the PCB where space is at a premium).

    RFID Reader

    As mentioned in the 3D case design the RFID reader was one of the more troublesome selections and I finally settled on the PN532 small red board version available through eBay. This supports NTAG2 tags (these appear to be the only format ones I can get that are stick-on type suitable for the bottom of the bottle).

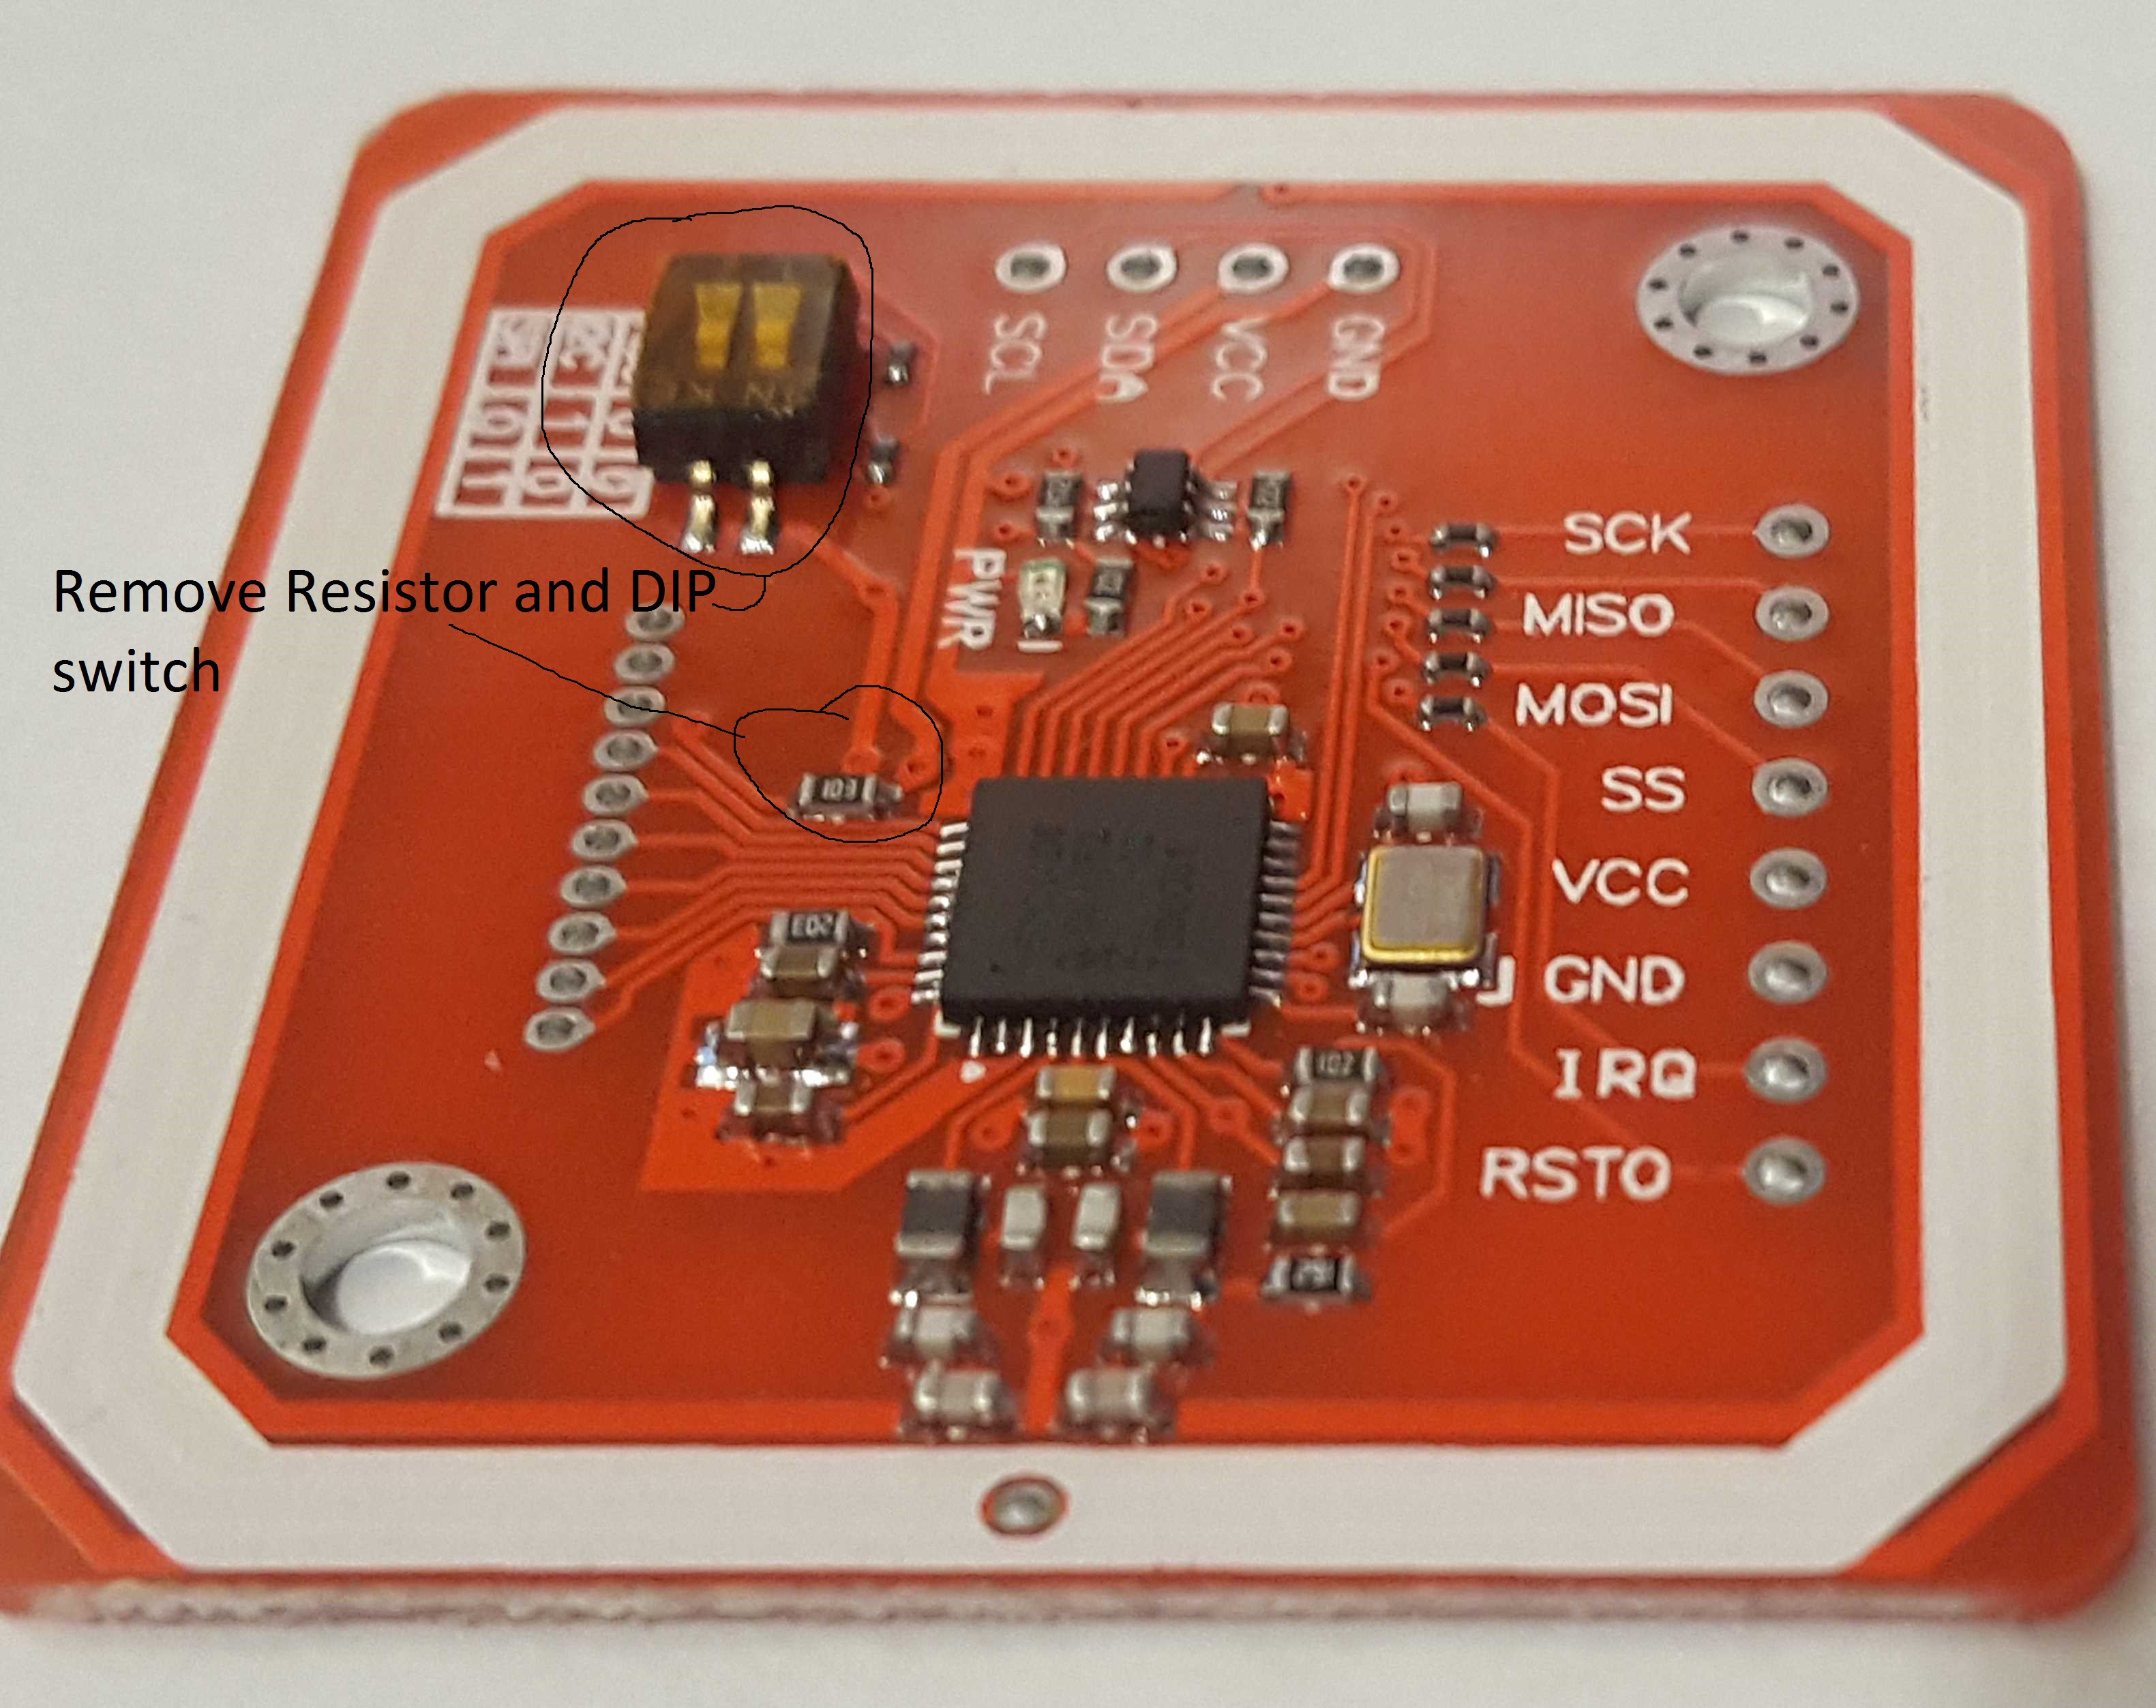
    The PN532 supports I2C, Serial and SPI modes. We're going to use I2C as it simplifies the design needing only 2 wires for the bus and is used for other components. This means that the DIP switch seen upper left in the picture needs to be set to I2C mode (the switch on the right needs to be set towards us). However during final build this will be encapsulated in epoxy so it's going to be better to remove that switch and hard solder the connection to prevent possible vibrations changing the switch which we then can't change, or epoxy getting in and forming an insulation barrier between the switch contacts - it will also reduced the height of the unit by 1.6mm.

    In addition to the I2C and power connections (top centre in the picture) we also need IRQ and RST. These are available bottom right (although this is RSTO and not RSTPDN so further investigation is needed to check which RST the driver actually needs as it is unclear).

    The PN532 has RSTPDN...

    Read more »

  • 3D Printed Case

    Stephen Harrison06/07/2017 at 18:18 0 comments

    Design Considerations:

    The starting point of this project was the case, I wanted something that a bottle of FormLabs resin could sit on (about 100mm diameter), or be dropped into when not in use to act as both storage and measurement system.

    It had to accommodate a load cell and NFC reader to identity of the bottle, ideally be cylindrical to match a bottle. I wanted the bottle to have a NFC label stuck to the underneath, that makes it easy to align the tag with the reader, without having to rotate the bottle to align the tag.

    The case also needs to support either a battery or a power connection of some kind.

    The initial designed idea allowed for a NeoPixel ring to be embedded in the top half to show the user a clock style usage gauge however these are power hungry and blocked when the bottle is on the scales, so these have not been use further.

    The scales are internet connected and no interaction is needed for normal operation other than placing the bottle on them and removing at an appropriate time. The user does not need to know the measured weight so no display is needed and only a single LED and buzzer are used to give feedback which greatly simplifies the case design.

    The final design consideration was to make it drip proof. The top should either be a solid print or support a coating of epoxy to seal in any electronics, mounting hardware and anything else.

    The load cell was easy, the type found on eBay rated at 5Kg are smaller than the bottle diameter so would fit without too many problems. The NFC readers on the other hand were more problematic. Their are a number on the market similar in design to the AdaFruit PN532 NFC Controller breakout board where the aerial is an extension of the PCB. To use these we would need to extend the top case to accommodate an oversized PCB sticking out the back, this starts to make the design look ugly and clumsy as well as difficult to seal.

    Initially I tried the RC522 type readers from eBay, however these don't appear to support the NFC tag type (NTAG2) that is used by the stick on NFC tags (or at-least the ones I was able to buy easily). Fortunately I found that the PN532 NFC readers sold on eBay were a perfect size (less than 45mm x 45mm) so they would fit nicely underneath a bottle and they are also able to read the NTAG2 tags. As an added bonus they use the same controller as the AdaFruit board so I was able to use the driver developed by AdaFruit. More on the NFC side of things later.

    Battery wise I planned on using a 3000mAh LiPol cell that comes with the Particle Photon power module and the Electron as I have a few of these to hand, again this would fit nicely to one side of the load cell within a diameter that worked for the bottle.

    With the NFC board being smaller than the diameter of the design it would be easy to finish the print with a coat of epoxy resin to provide a drip proof top case.

    Design Software:

    Being a programmer I use OpenSCAD for most of my 3D designs, generally it works well for simple designs like this one and allows for parametric designs. OpenSCAD is open source, licensed under GPL 2.0.

    The stl files are provided and are directly printable by most 3D printers so you don't need OpenSCAD to make the case.

    Case Design:

    Initially I went with a cylindrical design with a square section on the bottom half sticking out backwards to house the electronics. However as with nearly every design things change as you try them out and either don't work or present nicer ways to achieve the end result.

    With the initial design it required 7 wires for the NFC reader and another 4 for the load cell, this very quickly got messy when trying to assemble the scales and was noticeable that those cables would exert strain on the upper half that may effect reliable measurements, additionally with the load cell and NFC being permanently connected to the top half, it made opening the case troublesome and risks the connections of the delicate load cell wires.

    Typically when designing a 3D...

    Read more »

View all 7 project logs

Enjoy this project?

Share

Discussions

Dave wrote 09/19/2018 at 10:02 point

Great project! Have you noticed if your NFC device really go in to the Deep Sleep mode?

I have the same module, v3 red, and in my case it consume 30mA during the Deep Sleep mode ( RSTPD_N pin ).

  Are you sure? yes | no

Stephen Harrison wrote 09/19/2018 at 10:52 point

Hi Dave, thanks for your feedback :-)

Yes it definitely goes into deep sleep mode, the overall system (Photon, NFC, load cell & amp and accelerometer and passives combined draw 530uA when in deep sleet), I've had it running in standby for a long time on a 2000mAh battery which it wouldn't do with a 30mA drain.

As you say, RSTPDN pin is key to deep sleep, however the red NFC PCB has a 10k pull up resistor fitted. You'll need a pull down to keep RSTPDN low (when your processor is sleeping its outputs will float so you need external passives to help), I physically removed the 10k pull up on the PCB to help this situation, then I only needed a week pull down (10k or 100k), however if you leave it in place you need to drop the input voltage to that pin to about 1/3 of 5V, so I used a 2k2 for the times I left the 10k still on the PCB.  But then you've got 12k across the 5v rail all the time which will take >400uA which may or may not be acceptable.

When the NFC board is in deep sleep the yellow LED will go out on it, keep an eye on that.

Hope that helps.

  Are you sure? yes | no

Dave wrote 09/19/2018 at 15:47 point

All you said is correct, i had read you logs.

But in my project i notified something wrong. When i pulled down the RSTPDN pin, the RFID start to draws around 40mA.
I found that schematic online, https://goo.gl/VmDhF , but it is clearly wrong...
So after a fast search, i found this: https://goo.gl/UYfqeu

In the Adafruit board, they done a wrong connection, but at the first looks ( me and you ) we have the same board. 

That is why i asked to you if you had same problem about power consumption.

  Are you sure? yes | no

Stephen Harrison wrote 09/19/2018 at 16:14 point

Are you using an Adafruit board or like me, a cheap one from eBay/AliExpress? It's possible the design changed between mine and yours. (sorry hackaday apparently won't let me reply to your latest comment).

  Are you sure? yes | no

Dave wrote 09/20/2018 at 08:49 point

Don't worry, i think it's a glitch on hackaday.

I use the exactly same board you used in your project, the RFID Module v3, but is the same IC that use the Adafruit in as device.

I think i will need to inspect the schematic tracers by tracers, because my problem is very similar to the Adafruit blog problem.

For now i edited the original code from Adafruit ( the same that you used in your project ) to use the Power Down mode by software: https://goo.gl/3mDtY1
I added two commands: 
- shutDown_button(  wakeUpPin )
- shutDown(void)

But my main goal remain to use the Hard Power Down mode, has you used in your project.

  Are you sure? yes | no

Similar Projects

Does this project spark your interest?

Become a member to follow this project and never miss any updates