Andrei Mehiläinen
-
Spotify display
08/20/2017 at 19:17 • 0 commentsI used the same hardware to build a display which shows currently playing Spotify track.
Of course I used a green display this time. Source code: https://github.com/andrei7c4/espspotifydisplay/
-
Implementing vertical scrolling effect with SSD1322 controller
06/11/2017 at 11:42 • 0 commentsPlease make sure to watch the video demonstrating the functionality of the device and check out the following source code files in order to understand better the description below:
- display.c/h
- SSD1322.c/h
The SSD1322 controller has enough memory to keep two copies of 256x64 pixel frame buffer. Only one of those copies is shown on the display at a time. The second copy sits in the memory just below or above the page being shown. There’s a Set Start Line command, which defines the line (in memory) from which the controller starts to render the content of the memory. When the start line is incremented, the content on the display appears to be scrolling upwards. In the GIF animation below the white area represents the controller memory and the gray area represents the content rendered on the display:
![]()
So, when a new tweet is to be shown, the following happens:
- Draw the tweet into the frame buffer (in ESP8266 memory).
- Send frame buffer to SSD1322 controller, into the memory location which is currently not being displayed.
- Start the timer. Each time the timer is triggered, use Set Start Line command to increment the start line.
- Disable the timer when all 64 lines are scrolled. The new frame buffer is now fully displayed.
The Set Start Line command involves sending only two bytes on SPI bus to SSD1322 controller. This is of course very fast operation and doesn’t load ESP8266 much at all.
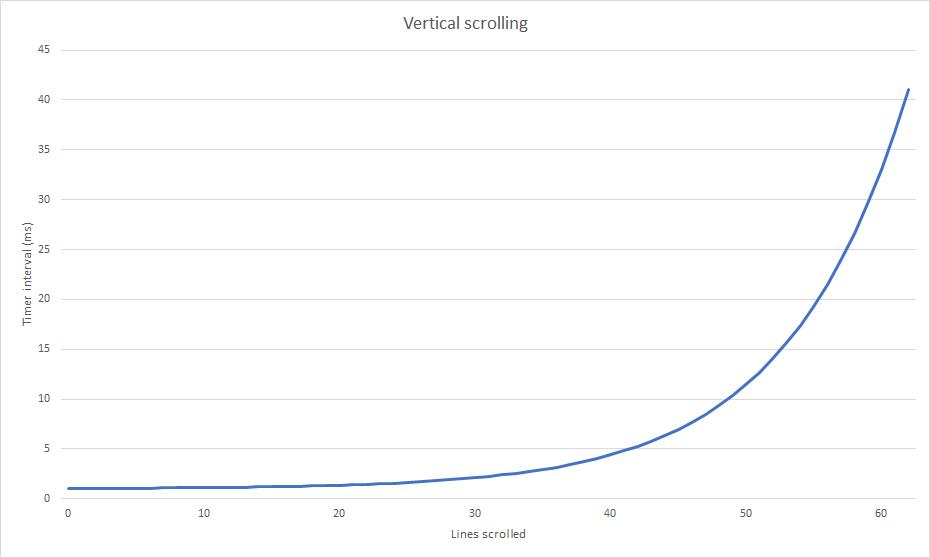
The scrolling effect looks a little bit nicer when its progression is not linear. I used the following Excel formula to pre-calculate timer intervals between each start line increment:
=POWER(2;10*((A1/62)-1))*40+1
The formula produces the following curve:
Pre-calculated interval values are stored in a lookup table. The table is accessed each time the timer is triggered and the new value is used to setup the next timer event. This results in a scrolling effect which slows down exponentially.![]()
-
Using Twitter APIs with ESP8266
06/08/2017 at 21:03 • 0 commentsRequests issued to the Twitter API must be authenticated. There are two ways to authenticate requests:
Application-only authentication is easier to implement, but it doesn’t allow the application to connect to Streaming endpoints. Additionally, it is not possible to post, retweet or like the tweets with this authentication. That’s why, in this project, the user authentication is implemented, which allows application to issue requests on behalf of the user.
Please make sure to check out the following source code files in order to understand better the description below:
- httpreq.c/h
- oauth.c/h
Steps of creating an API request are well described here. Probably the most difficult part is creating a signature, which is described here. To create the signature, we need to collect all the parameters included in the request, percent encode keys and values and then concat them together. The tricky part is that before the concatenation, parameters must be alphabetically sorted. It is not a good idea to implement/use string list sorting on a resource-constrained device such as ESP8266. However, in this application all the possible request parameters are known at the compile time. This allows us to avoid run-time sorting. It is, however, responsibility of the developer to create a list of parameters in alphabetical order before calling formHttpRequest function.
All the communication with Twitter servers happens over HTTPS and thus we need to link SSL library into the project and use espconn_secure_ functions instead of normal espconn_ ones. The limitation of ESP8266 is that when using SSL, it is not possible to establish connection to multiple servers simultaneously. Normally, the device is connected to Streaming API, from which tweets are continuously received. It is possible for user to share, retweet or like the currently shown tweet. So, for example, when the user wants to share a tweet, the following happens:
- Disconnect from the Streaming API server
- Connect to the REST API server
- Form and send HTTP request (direct message with a link to the tweet)
- Receive and parse reply
- Reconnect back to the Streaming API server
- Form and send HTTP request (GET user)
- Continue receiving and parsing incoming tweets
Unfortunately, Espressif SSL implementation is not very robust and from time to time ESP8266 disconnects from the server by itself. This issue is discussed on Espressif forum, but no solution is found yet. Various callback functions are called on disconnection event and thus the application will try to reconnect automatically.
-
Unicode support in this project
06/08/2017 at 20:52 • 0 commentsIn my previous post, we discussed about Unicode support in microcontroller-based devices in general. Now I will describe how the Unicode support is implemented in this project. Please make sure to check out the following source code files in order to understand better the description below:
- fonts.c/h
- files in fonts directory
- strlib.c/h
- conv.c/h
- graphics.c/h
Tweets are received from Twitter REST and Streaming APIs. HTTPS packet payload contains JSON data. Text inside this data is Unicode-encoded and escaped in the following way: \uhhhh (where hhhh is a Unicode code point in hexadecimal format). So e.g. the letter 'Ä' will be presented as \u00c4 and the Cyrillic letter 'Я' will be \u042f.
JSON parser from Contiki OS is used to parse the text out of the JSON data. This parser, however, knows nothing about Unicode escape sequences, so I need to parse and decode them myself. Basically, I search for the string starting with '\u' and followed by the four ASCII-encoded hex digits. I then convert the hex digits into 16-bit value, which represents one character. Letters with Unicode code point value > 0xFFFF are not supported, but that is not a big issue in this project.
Bitmap Font Generator is used to generate a PNG image, which contains all the font block letters. Additionally, an XML description file is generated, which contains information for each letter (position, size, etc.). Those two files are then passed into my font converter application. I will publish the source code for this app on GitHub soon. Font converter generates a C-language array containing bitmap representation and meta info for each letter.
The first two items of this array represent Unicode code points for the first and the last letters in this font block. After those items, comes a list of offsets to each letter. Using those offsets, the code is able to find the letter data inside the font block array. The letter data consists of a four-byte header and a variable length bitmap. The four header bytes are: bitmap width, height, size in 32-bit words and glyph y-offset. The y-offset is needed because the bitmap doesn’t contain any blanking on top of the letter glyph. This way bitmaps consume less space and they are faster to draw. The bitmap data basically contains horizontally packed glyph pixels. The top left pixel is the 7th bit of the first byte, the pixel next to it on the right is the 6th bit and so on.
You may wonder why the font is divided into blocks. This is basically, because many fonts don’t contain all the Unicode letters. I used Arial Unicode MS font in this project. While it contains many Unicode ranges, some (uncommon) ranges are missing. It wouldn’t be wise to have one big array for letters from 0 to 0xFFFF, because there would be "holes" in it and the array would consume more space. That’s why the font is divided into six blocks. Each time the code needs to access some letter, it must iterate over those blocks in order to find the one which contains the letter. This, of course, introduces some overhead, but six blocks seems to be a good trade-off between the speed and the space consumption.
The font blocks are generated in two sizes (10 and 13) and two variants (regular and bold). The CJK block is only generated in size 13, though. All the font blocks together consume about 3.4 MB.
Now, let’s talk about how fonts are embedded in the application binary. If the fonts and the application code would consume together less than 1 MB of space, it would be possible to access the font data directly, in the same way as with any other normal array (with a pointer, for example). This is, however, not the case and that’s why we need to store font arrays in their own binary segment. The limitation of 1 MB comes from the ESP8266. It is only able to directly access 1 MB of the flash space. It is however possible to use spi_flash_read SDK function to read four bytes from any flash address.
The following allows us to store fonts separately from the application code:
- The font array is declared with __attribute__((section(".font.text")))
- The linked script contains the "font" named segment with proper base address and size
- esptool is modified to produce a binary file from the font segment data
That’s why in this project we have three binary segments: two for the application code and one for the fonts. The font segment needs to be flashed only once, if no changes are made to the fonts. After making changes to the application code, you only need to flash the application segments, which is much faster.
So, let’s wrap up the whole process from receiving a tweet to showing it on the display.
- The JSON data containing the tweet is received over HTTPS
- The tweet text, user name and like/retweet counter values are parsed out from the JSON
- Unicode-encoded characters are decoded and the tweet text is converted into a wide character string
- For each character in this string:
- Find the font block character belongs
- Find the character offset and jump to the character data
- Read character bitmap header
- Copy the bitmap to the display frame buffer according to the header values
- Increment the cursor by the width of the character
- Finally, the frame buffer is sent to the display
The process above is a little bit simplified, because additionally, the word wrapping, keywords highlighting and automatic font size selection are performed during the process.
-
Unicode support in microcontroller applications
06/08/2017 at 20:37 • 0 commentsWhile modern operating systems and web browsers provide extensive support for Unicode, which mobile, desktop and web applications can easily utilize, embedded (microcontroller-based) devices have no such luxury. If the device must be able to display characters other than the Basic Latin (ASCII) ones, things gets difficult. There’s no standard way of doing this and the developer must choose the one which fits her application the best.
One solution is to use display module with a controller which has a built-in font library. Popular Hitachi HD44780 controller, for example, has built-in Cyrillic or Japanese (Katakana only) characters and some characters used in European languages (Latin Supplement). Toshiba T6963C controller has only ASCII characters and some characters from Latin Supplement. Some controller chips, such as RA8806, has larger font libraries and include e.g. Chinese fonts. Still, it is hard to find a controller with full Unicode support. And of course, the user is limited with the font type and size predefined by the chip vendor. Relying on those chips inevitably introduce dependencies. Will the display with this chip be available in future? There are also some external font chips, but those has basically the same weaknesses and limitations as the display controllers with built-in fonts.
Another solution is to use third-party graphics library. Some microcontroller vendors provide free graphics libraries with Unicode support. Those libraries are usually non (easily) portable or not legal to use on other vendor devices. Commercial graphics libraries are usually less device specific, but may still be non-portable to a certain device or it may not be easy to add support for a certain display type. In any case, the usage of a third-party library on a resource constrain device should always be carefully considered. Libraries introduce complexity to the software and the risk of hard-to-find bugs grows. Even if the Unicode support is the only thing needed, you would still have to buy and use the whole library.
In the next post, I will describe how I implemented Unicode support in this project.