 Kevin Van Ryckegem
-
1Step 1
Set up your Raspberry Pi. Open a command line, or open an SSH terminal.
-
2Step 2
Move into a directory you want to install the milights-bridge inside.
cd ./scripts/
-
3Step 3
Install milights-bridge
Clone the milights-bridge project from GitHub.
sudo git clone https://github.com/KevinVR/milights-bridge.gitGet into the milights-bridge folder
cd ./milights-bridge/
Ensure NodeJS and NPM are installed. If unsure, run the following commands.
sudo apt-get update
sudo apt-get install nodejs
sudo apt-get install npm
Install the required dependencies (make sure you have NPM installed)
sudo npm install
Copy the example configuration file.sudo cp config.example.js config.jsModify the configuration to suit your needs, follow the instructions within the file.sudo vi config.js
or
sudo nano config.jsTurn on the Milights-Bridge softwaresudo node server.jsYou should see some output from the command line, such as:Setting up EJS... Initialising Milight bridge connection (version v6) Checking for updates... Setting up port 3000 milights-bridge is ready, please open your browser at http://192.168.1.60:3000
Open a browser page to the URL shown in the output.
http://192.168.1.60:3000Test out the milights-bridge features, ensure it works -
4Step 4
Install the ha-bridge software
Follow this guide for setting up ha-bridge. Make sure that you get the latest version of ha-bridge, however (since there could be more features).
Once it is running, come back to this guide.
-
5Step 5
Add your Milight lights to the ha-bridge software
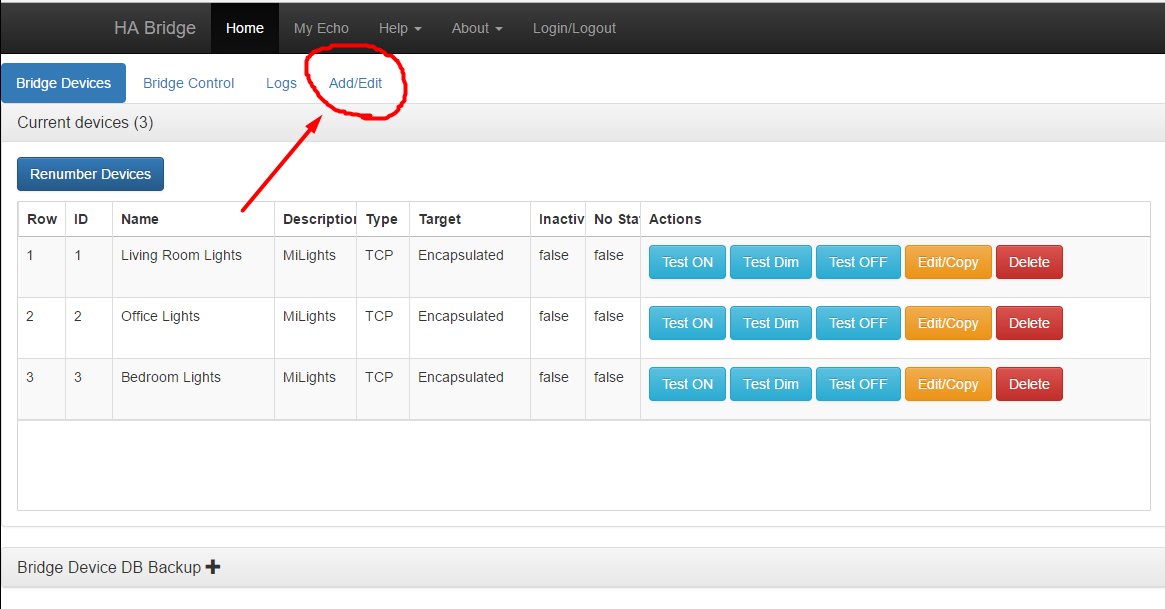
Open up the ha-bridge software in your browser (http://raspberry-pi-IP-address:80/), it runs on port 80 by default.
You'll see a list of bridge devices, click add.
![]()
Set a name and description to your likings.
- Device type: TCP
- Map Type: Hue device
Then there is a place to set "On items". Copy the settings from the below image. Change the IP address to your Raspberry Pi address. The port should be the port you have installed milights-bridge on. Change X in the zone?value={X} to the zone ID of your choice for this device.
![]()
Repeat the same process for dim items, however, the settings are slightly different.
![]()
Repeat the same process for off items.
![]()
Save and repeat for all your Milight zones.
-
6Step 6
Setup the lights in Google Home
Open the Google Home app on your mobile phone. Click the devices button on the right upper corner of the screen. Click the 3 dots on the upper right corner of your Home device, click Settings. You will arrive in the following screen:
![]()
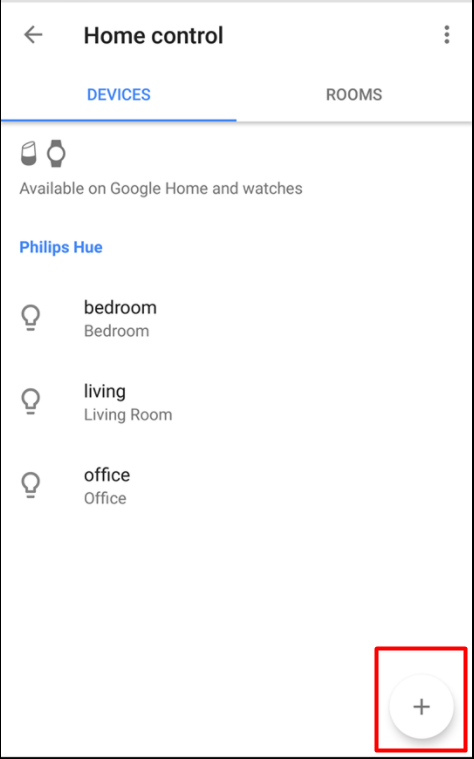
Then click Home control. Click the "+" button on the bottom.
![]()
Choose Philips Hue and continue the Google Home instructions.
![]()
-
7Step 7
Talk to your Google Home!
Hey Google! Turn on living.
Hey Google! Turn off living.
Hey Google! Turn on lights.
Hey Google! Set living brightness to 50%.
Hey Google! Turn off lights.
Congratulations, all is set up! And now you can also enjoy the milights-bridge software as an extra remote control for the milight lights.
An advantage of the milights-bridge app is that, it is fast to load and click. However, the official Milight app is slow (start the app, wait for it to find the bridge, then initialise the bridge). The reason the milights-bridge app is faster, is because it keeps the bridge loaded at all times. So when opening the page, it does not need to load the connection, since it's already loaded.
-
8Step 8
Ensure that milights-bridge is always running.
Install forever.
sudo npm install -g foreverForever can now be used to run milights-bridge.
sudo forever start server.js
sudo forever stop server.js
Add this command to your crontab, to make it run on startup.
sudo crontab -eAdd this line to the end of your crontab.
@reboot forever /path/to/milights-bridge/server.js
How to use your Milight lights with Google Home.
Also works for LimitlessLED, EasyBulb and Milight lights.


Discussions
Become a Hackaday.io Member
Create an account to leave a comment. Already have an account? Log In.
I have the exact same problem. everyting works fine, but when i use the web interface, nothing happens. i tried sniffing packets from the raspberry, and it does not seem to send anything to the wifi-bridge. only traffic is between my pc and the raspberry. my milights and bridges work perfectly otherwise. is it possible further to control multiple wifi-bridges from the raspberry?
Edit: disregarding the lack of packets i could sniff. the milights sometimes react to me sliding the hue slider. but it only seems to activate some of the "modes" of the lights, i still cantr turn on or off or anything else, wich leads me to believe, the program sends some wrong packets to the bridge. i guess we need the creator to step in :-(
Are you sure? yes | no
Thanks for the tutorial! Unfortunately I cannot get this thing to work. The Milight hardware bridge itself is configured to my WLAN network and working, i followed every step of your tutorial, and can access your milights-bridge in the browser. But when I try to click something in the browser tab (e.g. turn lights on/off), nothing happens with my Milights. In the config.js, I changed the IP, but nothing more. What did I do wrong?
Are you sure? yes | no
Same problem ... did you resolve it ?
thx
Are you sure? yes | no