-
Hardware test build
07/23/2017 at 16:08 • 0 commentsFor testing, I'm using an Arduino Nano clone as a microcontroller.
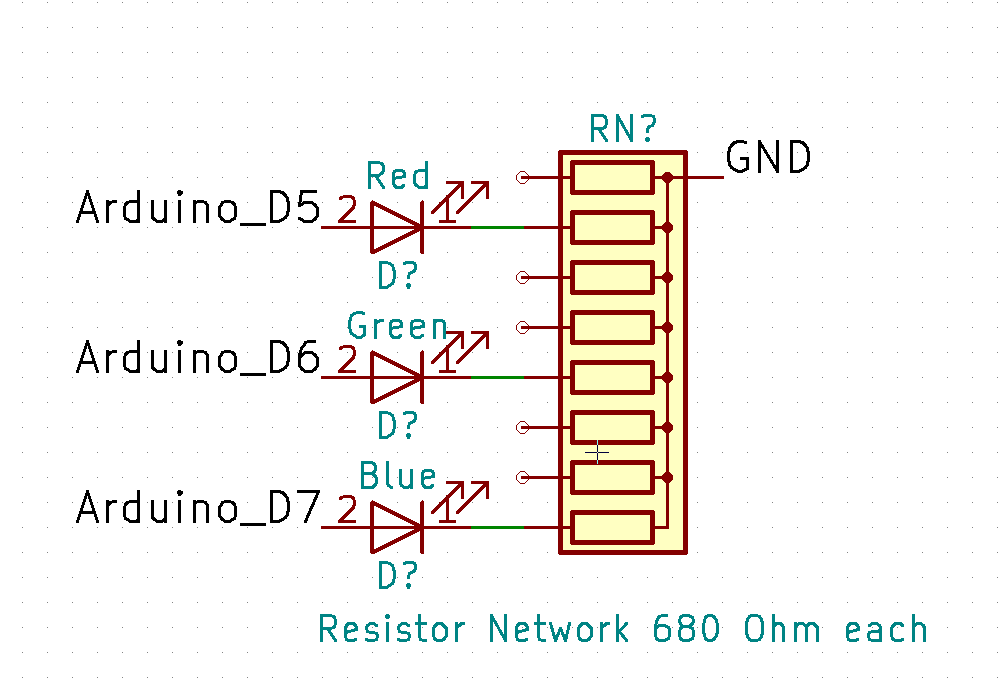
As it is easier to see the individual colors, I used individual LEDs for red, green and blue. They are connected from three digital Pins on the Arduino (D5, D6 and D7) and a resistor network of 680 Ohms, which connects to ground (GND on the Arduino).
The LEDs (from China) I use don't need very high current to light up, but they have different brightness at around same current. That could be fixable by using different resistor values, or using PWM.
I also wrote a simple code to test if everything works. It lights up the LEDs one at a time. (I'm using the Arduino IDE):
void setup(){ pinMode(5,OUTPUT); pinMode(6,OUTPUT); pinMode(7,OUTPUT); } void loop(){ digitalWrite(5,HIGH); digitalWrite(6,LOW); digitalWrite(7,LOW); delay(1000); digitalWrite(5,LOW); digitalWrite(6,HIGH); digitalWrite(7,LOW); delay(1000); digitalWrite(5,LOW); digitalWrite(6,LOW); digitalWrite(7,HIGH); delay(1000); } -
First thoughts
06/12/2017 at 12:51 • 0 commentsThere are two things to think about in this project: Hardware and Software.
The hardware is simple in this case: One RGB-LED or three individual LEDs in three different colors are connected to resistors and a microcontroller (ATTiny?) on analog output.
The important thing on software-side is representing the time on the LED in a format humans can read with easy explanations. Following are my first notices about this.
- There are 12 different hours to display. Assign each one a color. As each LED can be controlled in brightness, it should be easy to find 12 distinguishable colors.
- There are 60 minutes in a hour. Every LED can blink in 4 different patterns, which means 4*4*4=64 different blink combinations. One LED counts quarter hours, and the other two represent a number of minutes in that quarter.
1 RGB LED Clock
A clock showing hours and minutes using only one RGB-LED to display the data
 Paul Schmitz