Roger
Roger-
Luggable PC Mark II Decommissioned
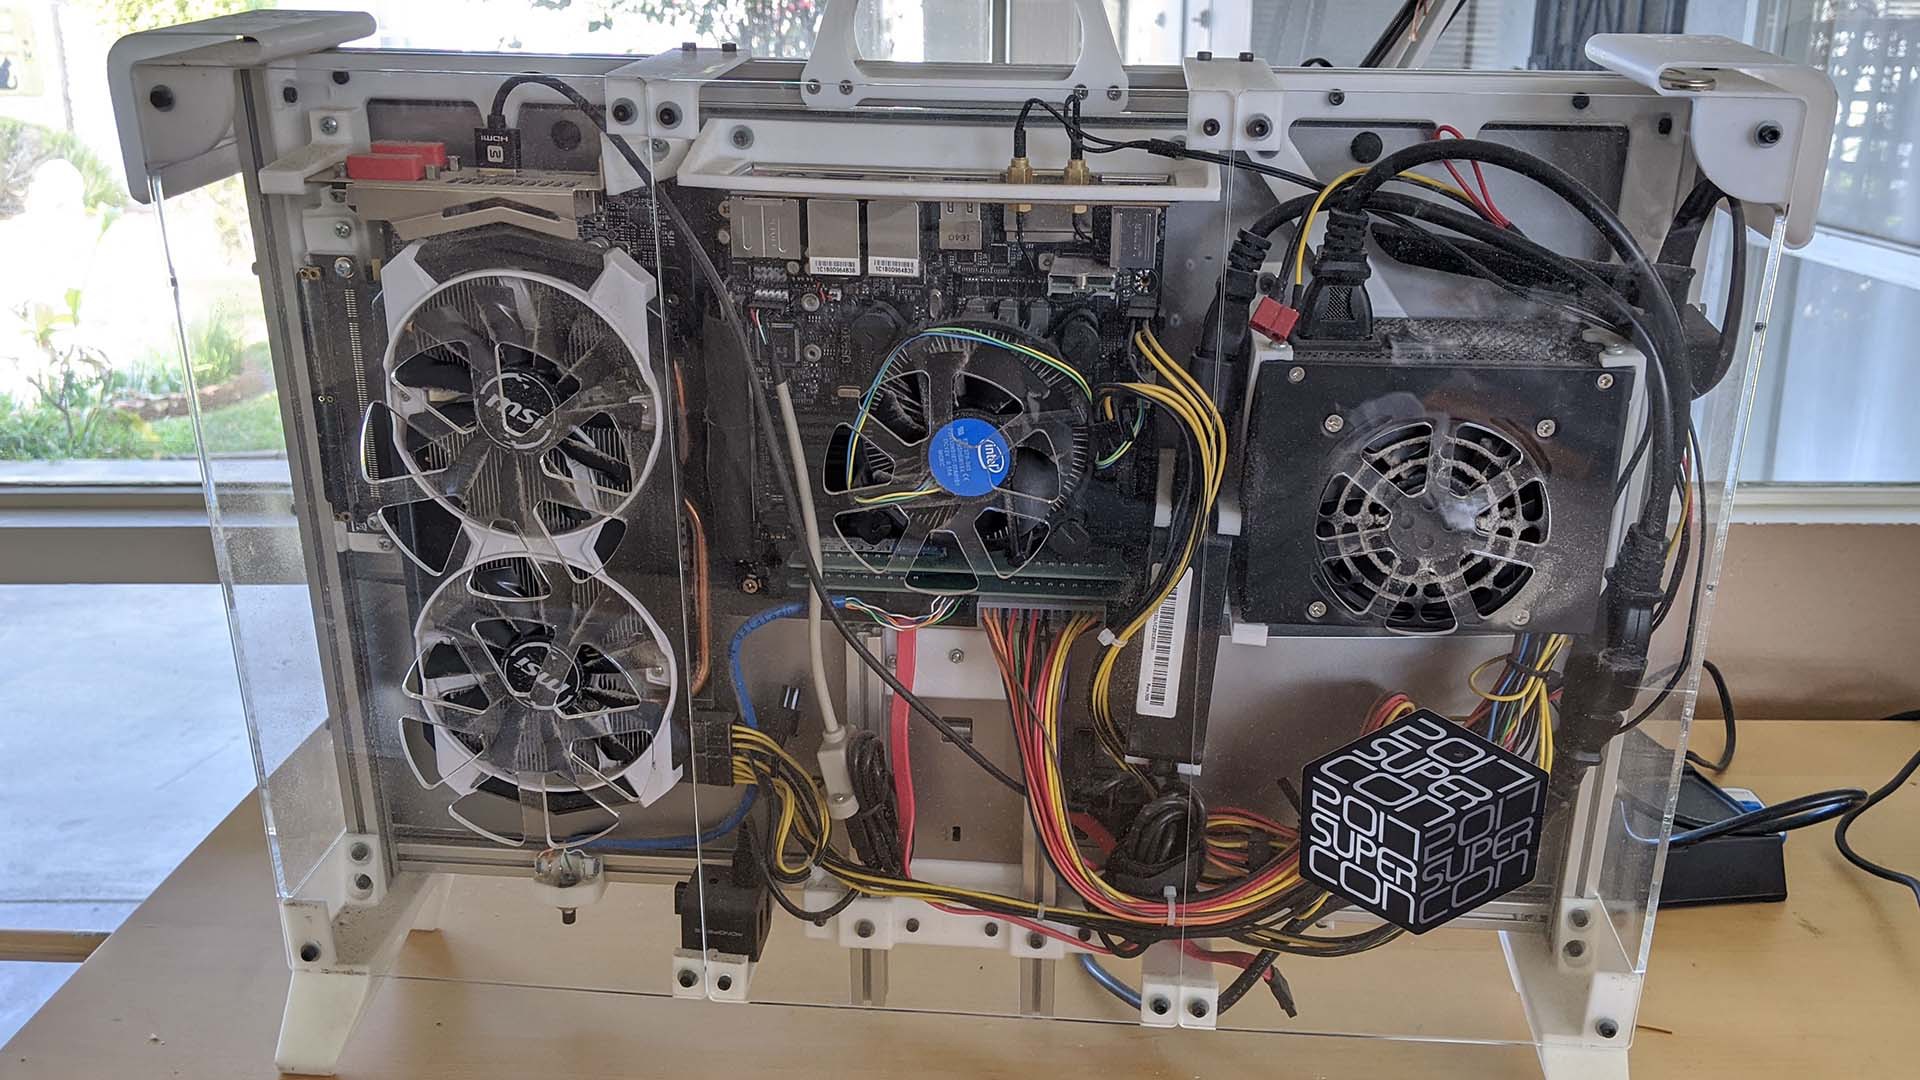
01/13/2020 at 04:13 • 0 commentsThe era of Luggable PC Mark II has come to an end. It has served me well for over two years, during its service collecting a generous coating of dust clearly visible through the clear acrylic panels. (In hindsight, not the best of ideas.) It has also collected an event souvenir in the form of the Hackaday Superconference 2017 sticker, where I had set it on the badge hacking workbench to create my time-lapse video project.
![]()
The point of failure is the video card subsystem, which is the primary purpose of the Luggable PC line of projects. Here’s the output when everything is healthy: the command lspci would include a line for VGA compatible controller: Advanced Micro Devices, Inc. [AMD/ATI]. But sometimes, the video card does not answer to roll call and that line is absent. When this occurs, the system falls back to Intel integrated graphics.
![]()
It’s not clear if the failure originated in the video card, or in the flexible PCI extension ribbon cable that has caused problems in the past. I am tempted to replace the video card now that the cryptocurrency fad has calmed somewhat. High performance video cards are still rather expensive, but at least they are available for purchase! I had always intended to replace the video card in Mark II but the cryptocurrency craze distorted the market so much I ended up buying a laptop for my mobile computing needs. Once I had the laptop, the portability of Mark II was no longer as important.
Another development in hardware are the falling prices of UHD (or 4K) computer monitors, motivating me to move beyond the Lenovo QHD monitor at the heart of Mark II. A new video card and a new monitor working together to deliver UHD resolution at 60Hz was tempting enough. I will be removing the core of the machine (Mini-ITX motherboard, CPU, RAM, and M.2 SSD) into a commodity enclosure instead of building my own, driving a new RTX 2070 video card and UHD monitor. This will serve as my desktop computer until I feel the need to build a Luggable PC Mark III.
-
In A Distorted Computer Component Market, Buying Is Better Than Building
06/03/2018 at 19:36 • 0 commentsThe typical rule of thumb is that building your own computer from components is far cheaper than buying a prebuilt machine. Buying parts from Newegg.com, Amazon, Fry's Electronics, etc. results in a better machine for less money than getting something from Dell. This was certainly true when I embarked on the Luggable PC project but a few notable events have since occurred to make an exception to the rule.
The blockchain fad is the biggest disruption. Cryptocurrency miners' demand for graphics processors drove up their prices tremendously. At the beginning of my Luggable PC project, a NVIDIA 1060 card with 6 GB memory is considered a good mid-range GPU. (Or an entry-level unit for the more demanding world of virtual reality). A desktop 1060 video card was available for around $200 and I expected its price to drop as I designed and built my luggable PC. Instead, it spiked up to over $400 at times and is now hovering around $300.
The second disruption is in 3D-NAND flash memory. It is a big step change in price/performance so flash memory makers had no choice but to switch to 3D NAND technology or risk going out of business long-term. In the short-term, chip fabrication facilities have to be taken offline for this conversion, which meant a shortage of flash memory, 3D and otherwise, across the market. Driving up prices of solid state drives.
The third disruption is in DDR4 memory. There isn't as clearly a single factor here but manufacturing capacity seems to be lagging market demand over the past year or so. Right now, DDR4 memory is nearly double the price of similar capacity DDR3 memory when historically they should be closer to price parity at this stage of technology maturity.
There are a few other factors at play, but the short-term trend is clear: many computer components have risen in price over the past year, counter to the long-term historical trend of ever-cheaper electronics.
Computer manufacturers like Dell deal in large quantities, and therefore they buy through supply contracts whose prices are independent of day-to-day market disruption. The upside of this approach is that, in times of supply shortages, Dell pays far less for their parts than market price.
![]()
Today's example: a particular configuration of Dell Inspiron 15 7000 Gaming laptop is available for $750 after promotional discount codes. Let's look at the components and the current (approximate) market price for their desktop counterparts.
- NVIDIA GTX 1060 with 6GB: Admittedly the laptop variant of this GPU is slightly less capable than its desktop equivalent, but for the purposes of this comparison we'll count it at the full $300.
- Intel Core i5-7300HQ: Again this is a laptop-only part. It is similar to the desktop i5-7400 processor in that they both have a peak speed of 3.5 GHz, so $200.
- 256GB NVMe M.2 SSD: Unlike the other parts, desktop machines are happy to use the exact same M.2 form factor solid state drives using the NVMe interface. 256 is a little cramped but on a laptop it should be fine. (I stuck with 256 until the flash memory crunch eased a bit for me to upgrade to 512.) Let's call it $100.
- 8GB DDR4 memory at 2400MHz: The smaller laptop-sized DDR4 modules are a little more expensive than their desktop counterparts, but we'll round up to $100.
With these rough estimates, we're already up to $700 and we're still missing some major components necessary for a working computer.
- Motherboard with M.2 SSD slot and built-in WiFi: Bottom of the line units are available for $70-80 but a reputable unit will be $100 and up. (It is the backbone of the system so not the best place to economize.)
- Power supply: We can pinch a bit here, reliable though not super powerful units can be had for around $50.
- Display: A 1920x1080 IPS monitor will be around $100.
- Keyboard, Mouse, case (luggable or otherwise) and other miscellaneous parts: Round to $50 for a nice even tally.
That's $1000 to build a desktop or luggable PC with similar specs as this $750 Dell laptop. And while the screen might be physically larger, the whole computer definitely won't be as lightweight and portable. Such laptop-only traits - light weight, tight integration, ability to run on battery - usually demand a price premium over equivalent desktops.
But things are weird in a distorted market.
(Cross-posted to NewScrewdriver.com)
-
Upgrading M.2 SSD on Luggable PC
03/17/2018 at 00:50 • 0 commentsWhen Luggable PC Mark II was constructed in Fall 2017, the industry was experiencing a shortage of flash memory. Most of the fabrication facilities were switching to over to make the next generation "3D NAND" flash, following the lead of industry leaders like Samsung who got their 3D NAND flash up and running first. Taking fabs offline meant a shortage in supply and, with the technical glitches that always come with a big upgrade, the shortage in supply started driving prices upwards.
Industry news sources estimated the supply crunch will ease sometime around first quarter of 2018. So I used a 256GB M.2 SSD already on hand for the project expecting to upgrade later. Well, it's the end of 1Q2018 and prices have indeed started dropping. 256 was getting awfully cramped so even though prices are likely to drop further, today it has dropped enough for impatience to win out. Time to double the capacity with a WDS500G2B0B.
This is a unit from Western Digital's Blue line, the economy alternative to their high performance Black line. From a technical perspective, the biggest differentiation is the NVMe interface used in the Black line. We won't get top of the line performance with a Blue drive, and ~500GB can still feel cramped at times, but it's enough elbow space while we wait for 1TB NVMe 3D NAND SSD prices to drop. (That's a lot of acronyms all strung together...)
The Luggable PC chassis was originally designed for easy SSD replacement by cutting an access port in the back plane to make SSD accessible by removing the monitor. Unfortunately, complications were found after assembly, requiring extra clamps to keep the monitor in place. Which sadly also made it much more difficult to remove, defeating the purpose of the access port. We're back to plan A, removing motherboard to replace the M.2 SSD underneath.
Four screws were removed so we could lift the center panel.
![]()
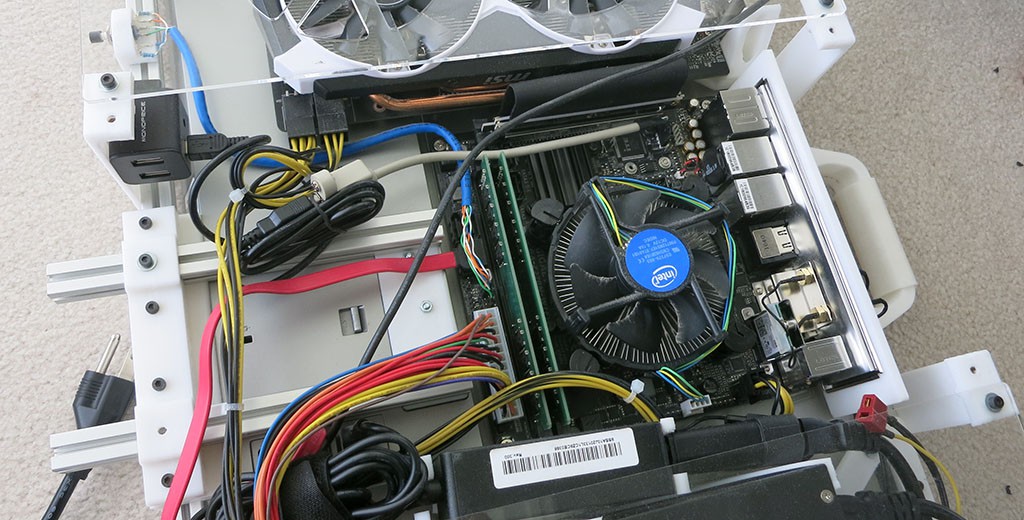
Taking a good look at the insides, we see that one of the monitor mounting screws has gone AWOL. We'll have to replace it during re-assembly.
![]()
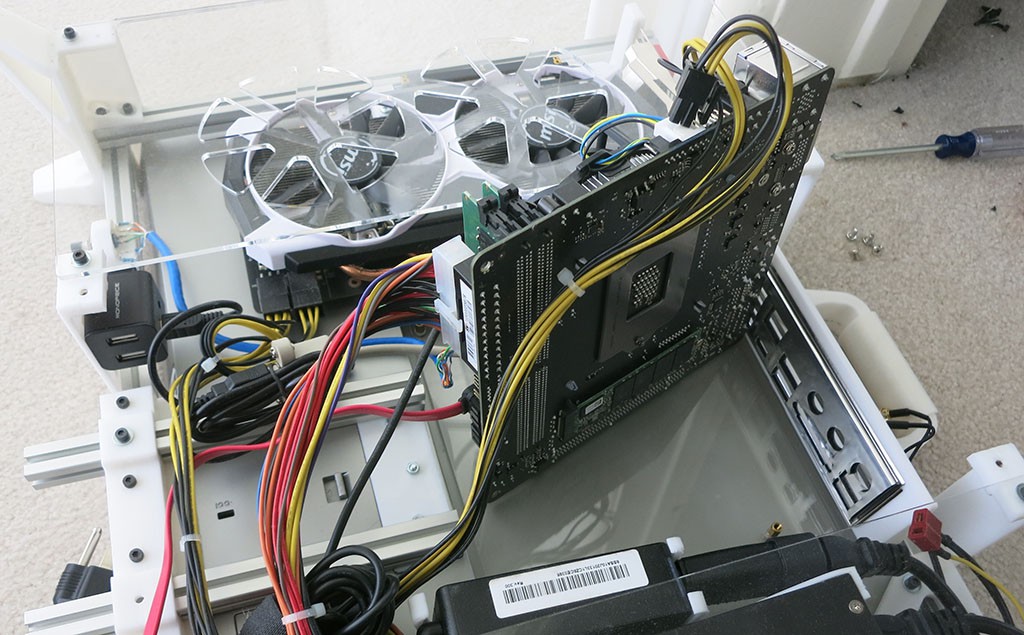
After the wireless network cables were detached, along with the four motherboard mounting screws, carefully lifting the motherboard exposed the M.2 SSD underneath for replacement.
![]()
With the SSD upgraded, the biggest remaining pain point is the old GPU. We've waited six months for the 3D NAND transition to ramp up to drop SSD prices. We're still waiting for the cryptocurrency fad to blow over so we can get a reasonably priced GPU...
(Cross-posted to NewScrewdriver.com)
-
Project Progress Stalled by Cryptocurrency Miners
02/05/2018 at 19:46 • 1 commentA core feature of the Luggable PC is the ability to build a high-end portable machine around a high-end GPU without paying the price premium of a gamer laptop. Unfortunately, due to demand by cryptocurrency miners, prices for discrete GPUs has been distorted for the past several months.
With outrageously expensive discrete GPUs, the price advantage of building a Luggable PC has disappeared. The original plan for this project was to upgrade from this old AMD R9 380 to something modern, verify everything still works, before proceeding. All we have to do is wait out the cryptocurrency craze and we're still waiting.
The R9 380 is roughly comparable to a modern GTX 1060. Laptops with integrated 1060 mobile GPU now cost roughly similar to a Luggable PC with similar specs thanks to inflated GPU prices. If there's an urgent need for a machine with a decent GPU, it now makes more financial sense to buy a gamer laptop.
This craze, in time, will pass. It's a matter of patience waiting for the bubble to burst.
In the meantime our Luggable PC still has the advantage of a far larger screen.
-
Supercon 2017 Fun: The Original Luggable PC
11/17/2017 at 20:45 • 0 commentsI named my Luggable PC project after the original IBM PC clone by Compaq. The Compaq Portable was the computer that started the PC clone market that is still going strong today. It picked up the nickname “luggable PC’ because it was roughly the size and weight of a sewing machine. I’ve seen pictures in books and on web sites, and occasionally I see a unit on display in a museum somewhere. I never expected to see and touch a running unit.
So I was pleasantly surprised (and amazed!) to see one at Hackaday Superconference 2017. It was brought in by Ariane Nazemi, who gave a talk about mechanical keyboards and brought the Compaq as one of his visual aids showing old-school mechanical keyboards. Chatting with Ari I learned one of his hobbies is to restore old computers to running condition. So the original luggable was not just a demonstration piece, it was an actual functional computer.
One of the optional equipment available for the Compaq Portable was a Computer Graphics Adapter. The CGA resolution of 320×200 is has long since been surpassed by modern equipment. But it isn’t very far off from the conference badge camera’s resolution of 128 x 128. And that’s probably why Ari worked to incorporate the Compaq into his badge project. I didn’t want to bother him while he’s focused on getting it to work, but I did ask to take a picture of my Luggable PC sitting next to the original while he worked.
![]()
I had looked forward to his project presentation at the end of the conference, but I missed it because I had to take care of some administrative tasks. Alas.
It was great to have these two sit side-by-side and see over thirty years of progress in PC hardware evolution.
(Cross-posted to NewScrewdriver.com)
-
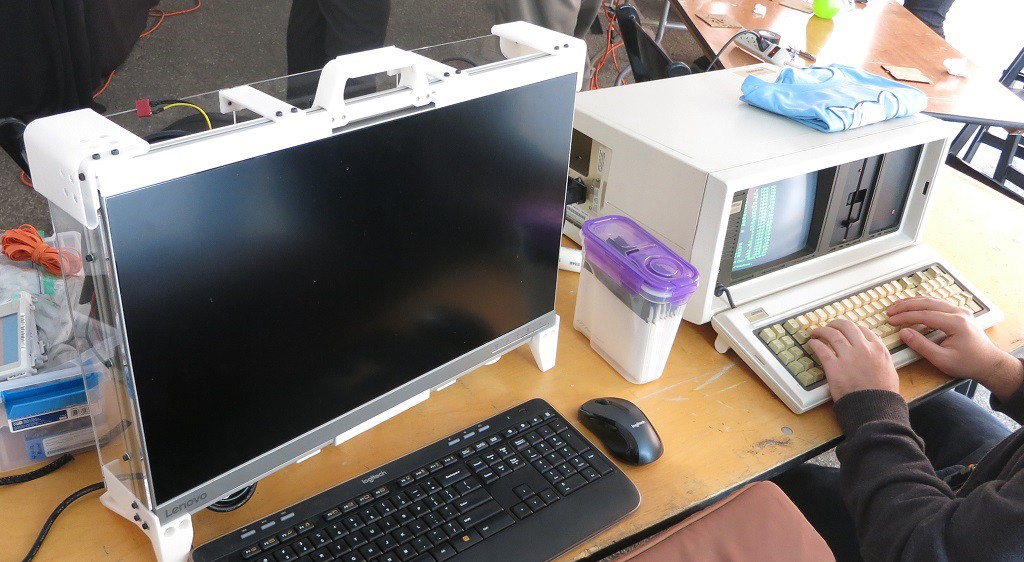
Supercon 2017 Fun: Big Screen + Little Screen
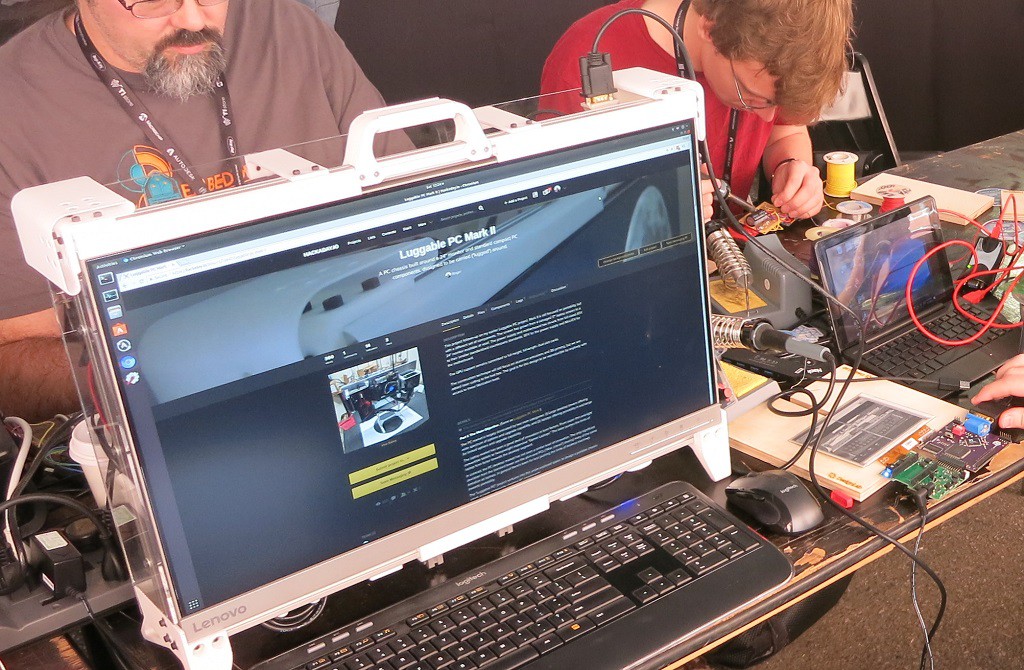
11/15/2017 at 04:04 • 0 commentsI brought my Luggable PC Mark II (Rev B) to the Hackaday Superconference 2017. Its primary purpose was to be my development workstation as I dug into the source code for camera badge hacking. Its secondary purpose was to serve as conversation ice-breaker since the Supercon crowd includes the kind of people who would appreciate it. It accomplished its mission on both fronts!
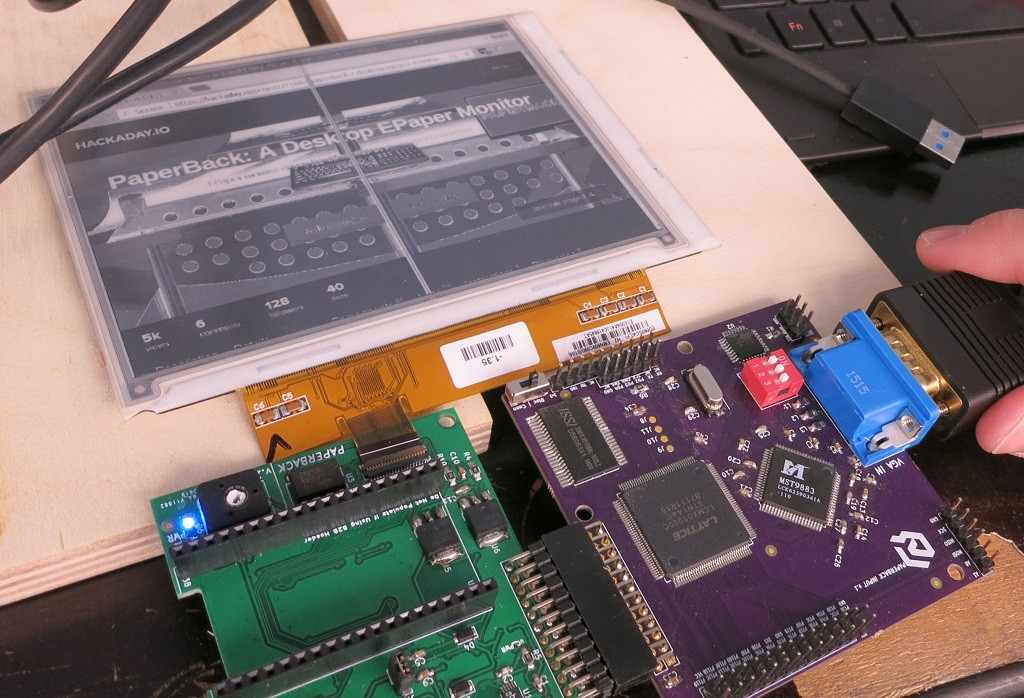
One fun experience that came out of the weekend was sitting down in the badge hacking area next to the person behind the PaperBack project. He thought it was hilarious that I had the biggest screen on the table and his was the smallest. One discussion led to another and we decided it would be fun to have my computer simultaneously drive its big 24″ screen and his 6″ PaperBack screen.
We had to borrow a DVI to VGA connection from another helpful person in the badge hacking area, and there were some further fiddling with wiring connectors and display settings. (Including several reboots between Ubuntu and Windows since they each provide different ways to customize display parameters.) But eventually we got my Luggable PC to talk to his PaperBack as an external display.
![]()
I put our respective Hackaday.io project pages on each of the displays. His PaperBack showing his project page, and my Luggable PC screen showing its own project page.
![]()
This was a completely random project done mostly just to see if it could be done. Exactly the kind of curious exploratory spirit that was pervasive throughout the conference.
(Cross-posted to NewScrewdriver.com)
-
Hackaday LA August Meetup
08/31/2017 at 08:18 • 0 commentsMy self-imposed goal of finishing rev B in time for the Hackaday LA August meetup has been met! Here it is sitting on the show-and-tell table along with projects from other attendees.
![]()
Picture by [SpencerSkelly]
-
Revision B Summary
08/30/2017 at 23:36 • 0 commentsAfter the successful fitment test of Revision A, it's time to get down to business actually building an usable enclosure. For one thing, it actually needs a handle to be luggable and provide some sort of protection for the components instead of leaving them completely exposed to the world.
A rectangular frame built of aluminum extrusion bars will help address both requirements. The top bar will host the carrying handle, and the frame will provide some protection against impact from the top, bottom, and sides. Assembling the frame was occasionally frustrating because M3 nuts easily slid out of their designated position on the aluminum extrusion. I printed some inserts to keep critical individual nuts in place and also printed a strip to keep a set of nuts in formation relative to each other.
Revision A had feet towards the middle and it didn't provide enough left-right stability. Revision B moved the feet out to the bottom left and right corners.
The rear of the enclosure is made of laser-cut acrylic because it was the fastest way to get some coverage for a large plane. (It took a fraction of the time it would take to 3D print an equivalent.) Since acrylic is brittle, this is not a long-term solution but it is good enough for basic protection separating errant fingers and wires from the spinning fan blades.
After everything was assembled and stood upright, things started flexing in response to real-world factors like gravity which were absent from a CAD drawing. I credit the root cause to bad design on my part. In the meantime, in order to salvage rev B I hacked up a fix by printing some flexible brackets using vase mode to keep things in place.
Revision B also taught me the PCI Express extension cable is not designed to be bent around so much. After being bent in many different ways to explore different component layout ideas, it started causing system instability and needed to be replaced.
I have a usable luggable PC now but there are still important goals to work towards for future iterations yet to come. As usual, the links above plus more details (some important, some trivial) are available on the full build blog.
![]()
![]()
-
Revision A Summary
08/30/2017 at 22:28 • 0 commentsThe goals for revision A were modest: just see if everything fits and works together. So a simple skeleton was built for everything to fasten to, in roughly the layout that we'll refine in future revisions. Make sure the simple thing works before we make things complicated. The good news: yes, the simple thing does work.
Highlights from the verbose full build blog:
- I bought the Mini-ITX motherboard before committing to the project.
- The project kickoff post.
- The 24" QHD (2560x1440) IPS monitor Lenovo L24q-20.
- How I decided on using a standard SFX form factor power supply.
- Decided to use a PCI Express extension cable after seeing a riser card wouldn't work for me.
- The fit test is a success.
The bare skeleton weighed in at 16 pounds, I'm optimistic a full enclosure can stay under 20 pounds.
Luggable PC Mark II
A PC chassis built around a 24" monitor and standard compact PC components, designed to be carried ("lugged") around.