mladen
-
See you at 36c3 in Leipzig
12/25/2019 at 23:03 • 0 commentsFolks, if anyone wants to see the Nixie Tap in action, and/or grab a free set of PCBs, drop me an email at: hello@mladendinic.com
See you in Leipzig!
-
Transformer
11/13/2019 at 22:25 • 3 commentsTransformer is custom made, hand wound.
To start, you'll need:
- Ferrites: 2pcs of TDK B66305G0040X127 (E13/7/4 core halves, material N27, 0.04 mm gap)
- Coil Former: B66306C1010T001
- Primary: 0.3mm diameter enamel wire
- Secondary: 0.1mm diameter enamel wire
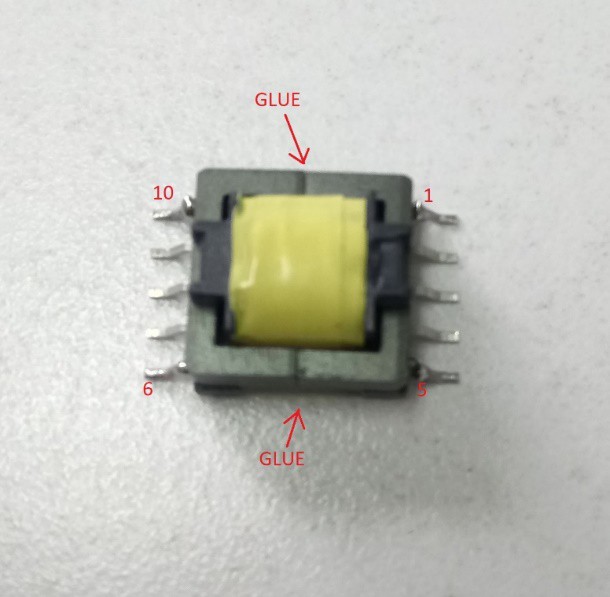
Instructions (warning: CRAPPY PICTURE QUALITY :( )
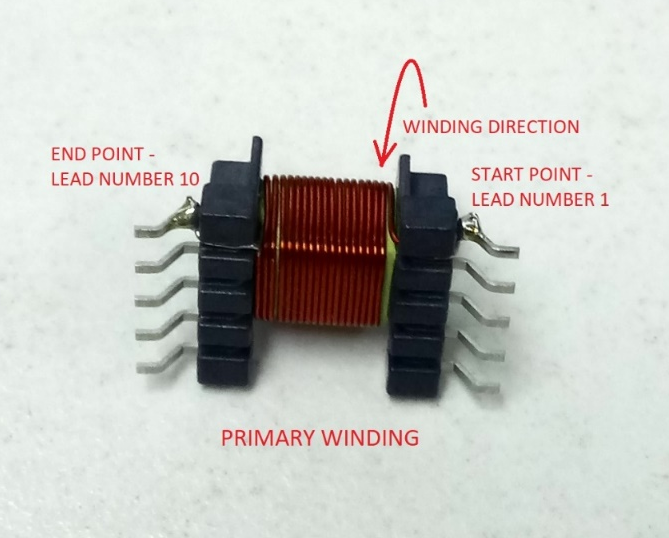
- Wind 15 turns of 0.3 mm Diameter Cu enamelled wire in a single layer for primary winding
- Start with lead number 1 and wind in direction shown on picture below, end on lead number 10
![]()
- Wind 3 to 4 turns of 3M insulating tape on a primary winding
You're done with the primary winding. Now onto the secondary.
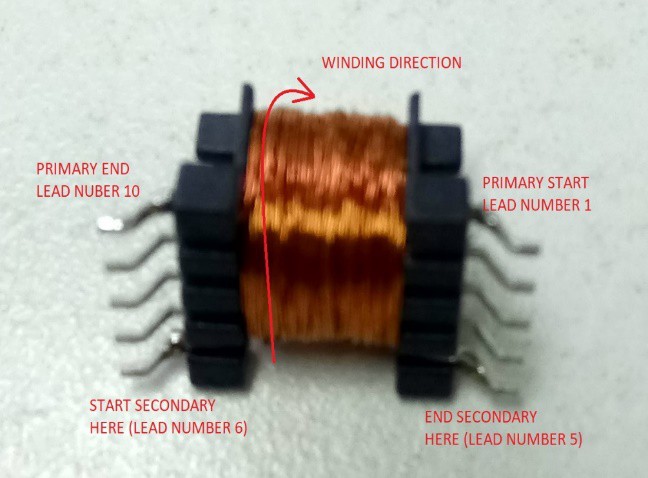
- Wind 200 turns of 0.1 mm enamelled Cu wire for secondary winding
- Start on lead number 6, and keep the same winding direction like on primary winding
![]()
- Apply insulating tape
- Glue core halves with moment glue
![]()
Again, sorry for the eye-cancer-inducing photos, these will have to do the job. For any questions, please write!
-
Crowdsupply campaign is now live!
03/18/2019 at 06:42 • 0 commentsAfter a few months of preparations, I'm happy to say: campaign is live!
Head on over to the Nixie Tap Crowdsupply page, where you'll find pledges for bare kits, black metal Nixie Taps, and walnut Nixie Taps.
![]()
-
Lessons learned, PCB 1.2
02/21/2018 at 16:51 • 0 commentsManufacturability
If you wish to bring the product to market, manufacturability is as important as design itself. It's no good if you have a perfect product that can't be manufactured, or a crappy one that's easy to manufacture.
Having this in mind, my goal for 1.2 version was to eliminate as much through hole parts as possible. Why? Most probably someone will have to solder all through hole parts by hand.
Unfortunately, since no one thought of making SMD Nixie Tubes, some things will have to remain through-hole, and will be soldered manually.
Touch sensor - TTP223
I spent quite a lot of time searching for a solution for touch detection.
First it was the piezo sensor, which was unreliable as a tap detection mechanism (although it meticulously detected beats from music), and then a friend suggested TTP223.
I bought 5 pcs of the red board with a big, inviting, touch circle, for 0.1$ each.
The chip reliably detects my hand at 8 mm distance, through a 6 mm wood panel. Enough said.
ESP-12F module
It works! However...
I learned the hard way that not all modules are equal, and that there is a certain flash mode that you must set (dio, qio), in order that your ESP8266 boots after flashing, and that you don't have a ruined day.
Also, when integrating ESP-12 modules, you should follow Espressif guidelines on PCB design, namely, you should not have copper pour below the module antenna. I left the pour by accident, and now the WiFi signal strength is weaker than it should be.
Future steps
To call it a day, there is only one major change required.
Currently, the device is powered by a 5 V to 170 V DC-DC converter, sourced from eBay. There are no schematics available, so, if anyone wants to reproduce this project, (s)he would have to buy the module directly from eBay.
Furthermore, the dude making the modules can get bored and stop making them. It's not wise to rely on an volatile sources for any kind of volume production.
This calls for a custom designed 5 - 170 V SMPS. Probably flyback topology.
-
Enclosure prototype 2
12/14/2017 at 21:41 • 0 commentsAs always, prototypes should be made fast, cheap and disposable, and designed to fix as much mistakes as possible.
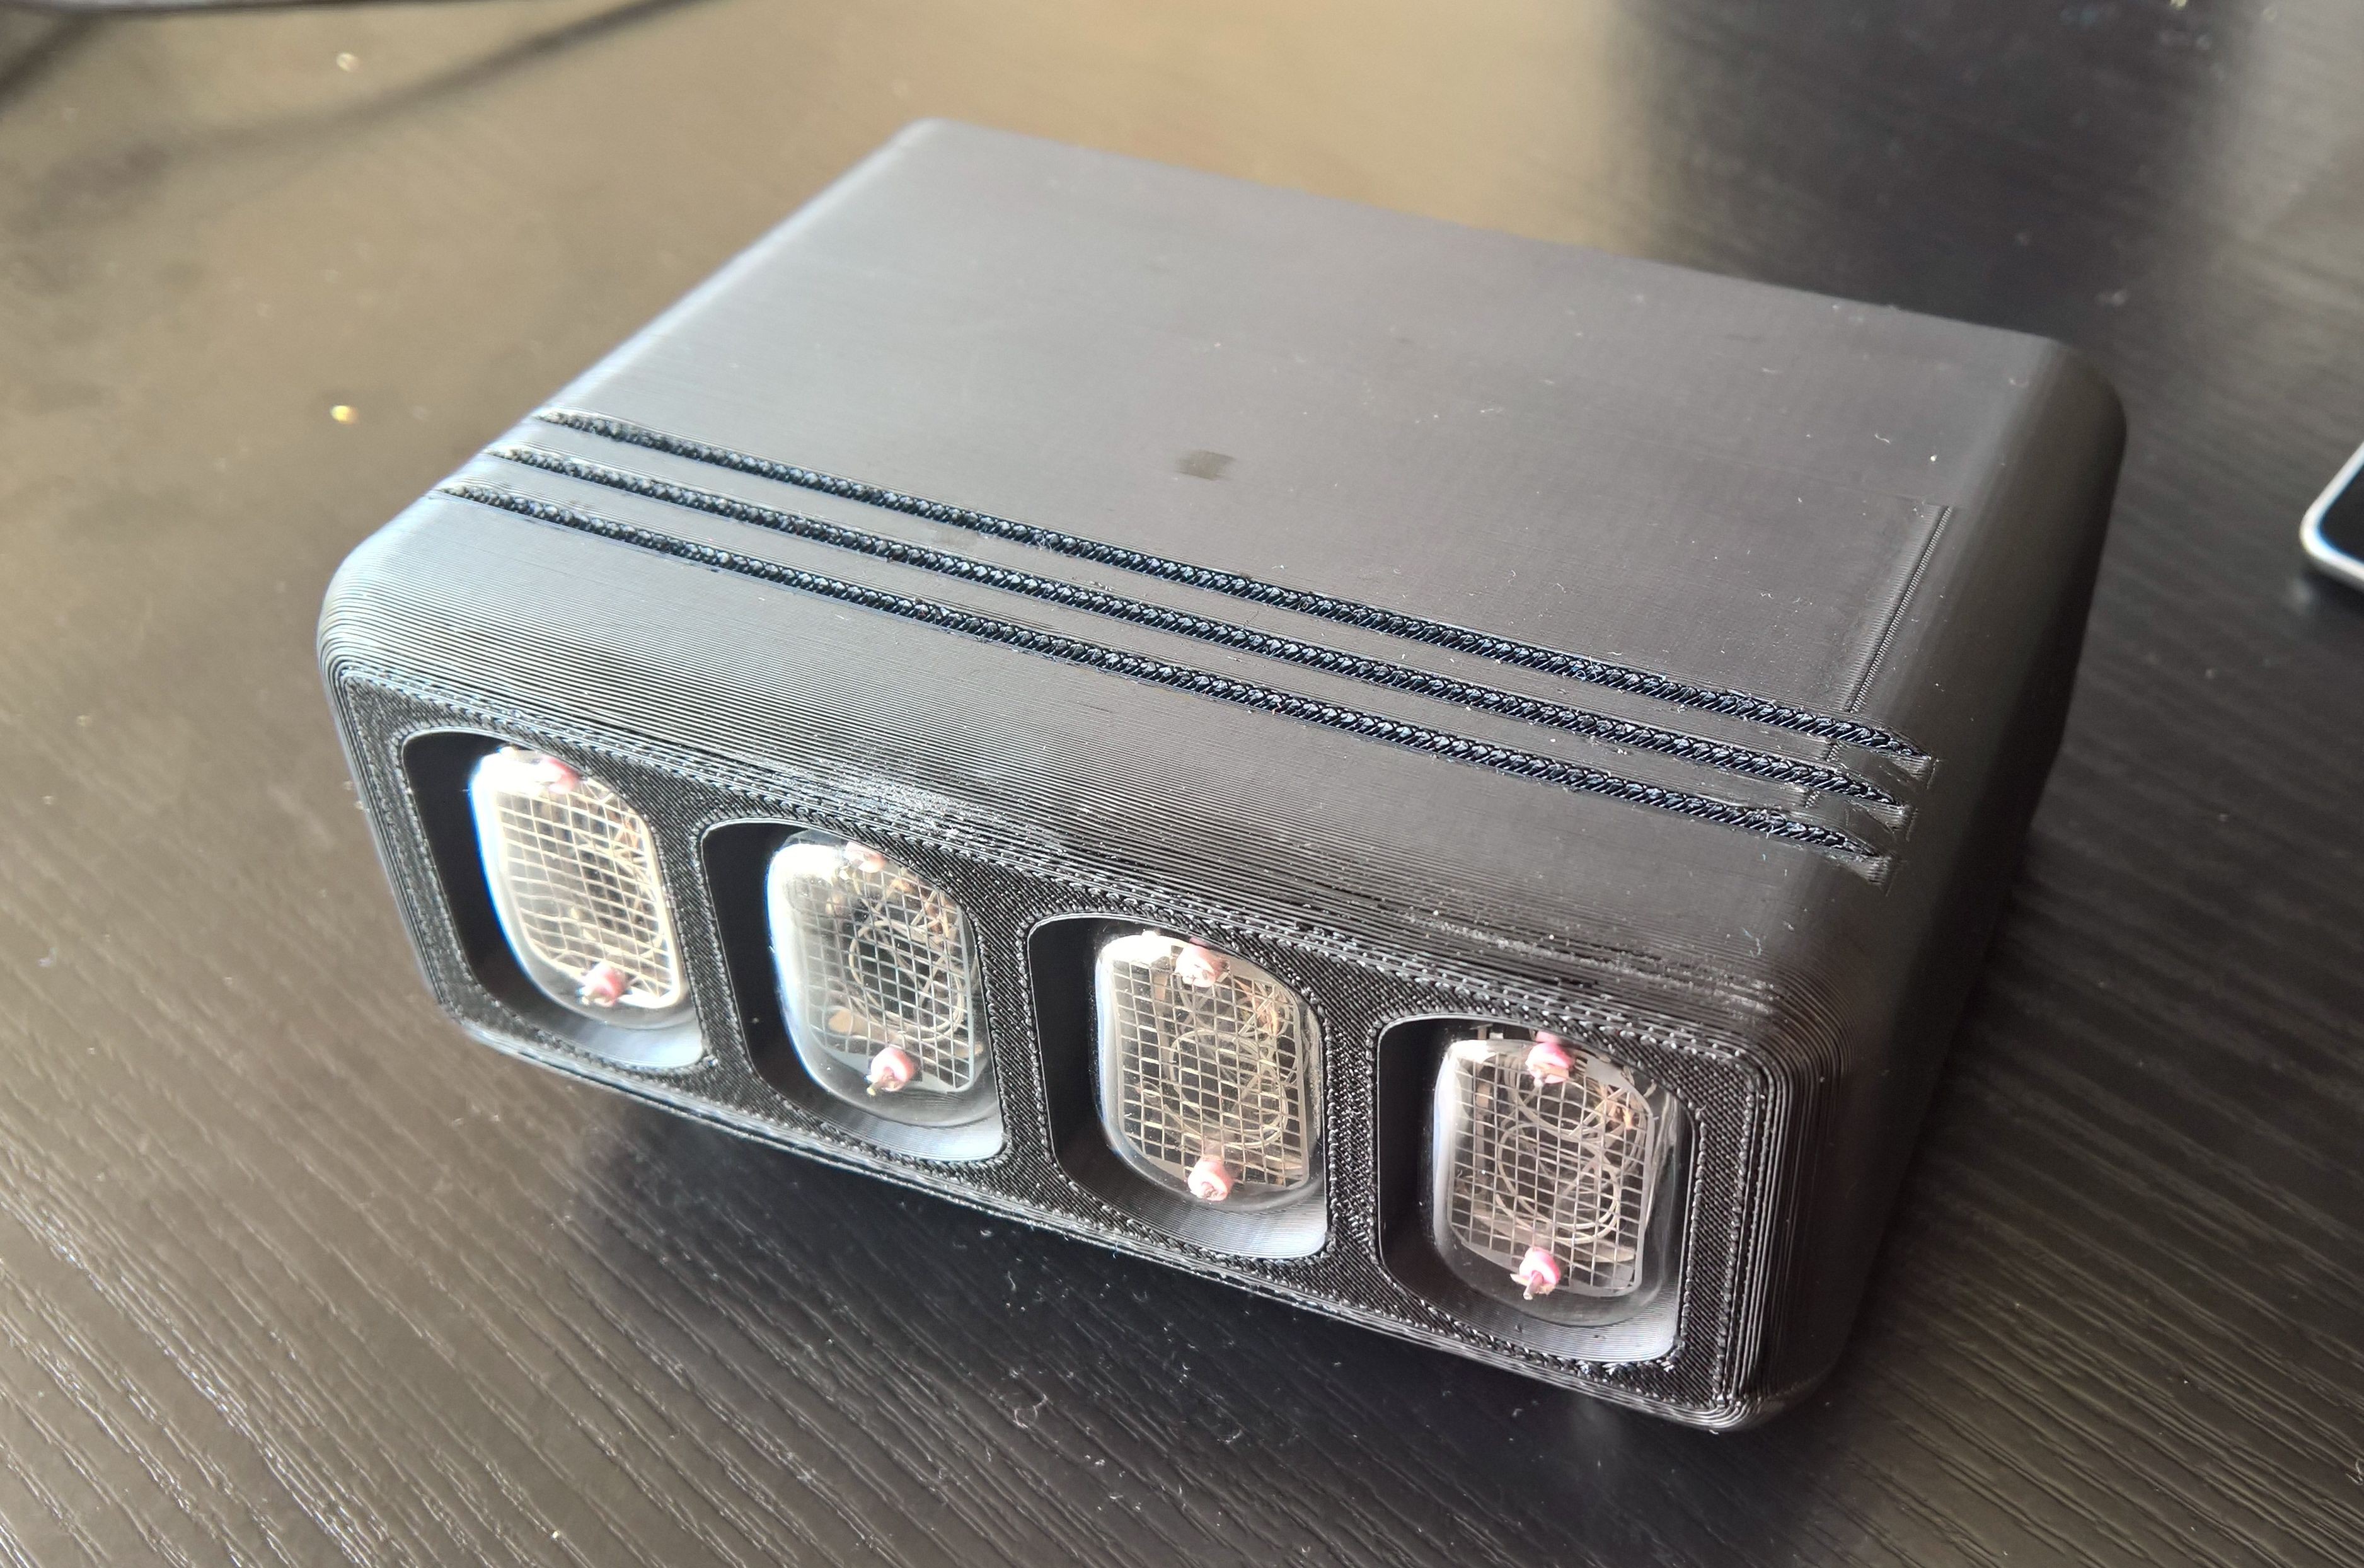
The previous prototype was over-dimensioned, and had really loose tolerances. Also, this enclosure was made in 3d printed plastic, which doesn't really do the Nixies justice.
The priority for Prototype 2 version was to try out different materials, and it turned out successfully.
To make sure that the dimensions were right, an ABS plastic version was produced:

Attempt was made to smooth things out, but I messed up with liberal use of acetone :(
To make the darn thing in wood, I turned to Alibaba, and found some suppliers.
The following wood materials were tested: Mahogany, Black Walnut and Wenge.
Mahogany has an interesting texture:

Wenge is dark, and has some remaining holes from machining, which need to be filled (or maybe not):

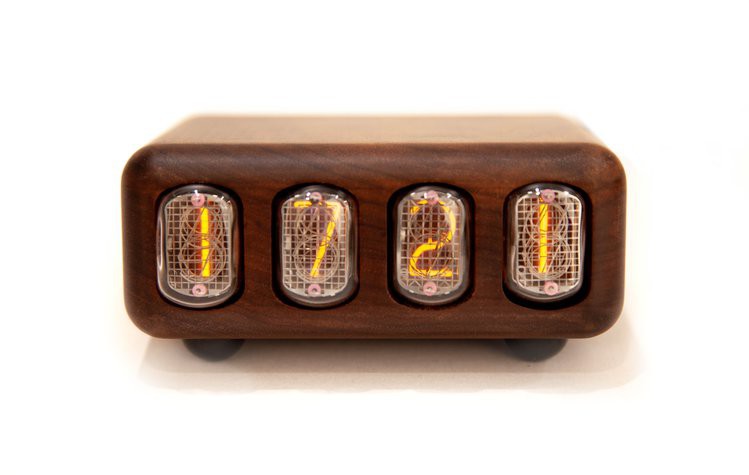
Black Walnut is my favorite, it has a smooth finish:

This was my first attempt to deal with wooden enclosures (so far I only worked with metal), and so far, so good.
I let the manufacturers dictate the finish. Mahogany has no finish (might brush this with some mineral oil), while wenge and black walnut have oil based finish.
-
Piezo sensor considerations
10/15/2017 at 20:56 • 0 commentsPiezoelectric transducers are curious little devices. You can use them both ways, as a vibration source and as a vibration sensor.
In this project, piezo crystal is used as a sort of a "knock" sensor, or a microphone. It’s glued to device walls from the inside.
ESP8266 is continually polling (yeah, not too optimized) the A0 input. When device is tapped with a finger, piezo picks up the vibration, and generates a voltage spike. ESP8266 samples the voltage, and if it's over detection threshold, it considers that a tap event has occurred.
I whipped up a demo code for this feature:
    adc_reading = analogRead(A0);
    if (adc_reading > threshold)
    {
        delay(5);
        adc_reading = analogRead(A0);
        if (adc_reading > threshold)
        {
            display.write(state,state,state,state,1);
        }
    }
The result of this quick'n'dirty code is:
![]() As it can be observed from the video, this interface should be further optimized (skipped detection at 0 and 8). Maybe I need a transistor preamp, since handling this in code is tricky.
As it can be observed from the video, this interface should be further optimized (skipped detection at 0 and 8). Maybe I need a transistor preamp, since handling this in code is tricky. -
Firmware considerations
10/15/2017 at 19:05 • 0 commentsNixie Tap will have 4 "slots" for information display. For the time being, these slots are planned:
- Time
- Date
- Bitcoin value
- Ethereum value
The user knows which slot is currently displayed by observing the blinking dot position.
You'll notice that 50% of slots are taken by cryptocurrency. Hopefully, 4 digits won't be enough to display the price :)
State diagram looks like this:
![]() Basically, it should
be an interrupt driven program. So, let's dive in:
Basically, it should
be an interrupt driven program. So, let's dive in:Prototype features
Final features
init
Connect to WiFI using hardcoded credentials, get NTP time and store onto RTC
Serve a WiFi Manager-like hotspot, for user entry of WiFi credentials
main
Wait for RTC interrupt and poll analog input to detect taps
TBD
RTC interrupt
RTC fires an interrupt every 1s, this signals the main function to refresh display
Display time
Read time from RTC and refresh display
Display date
Read time from RTC and refresh display
Display bitcoin
Not implemented
Read BTC value from Internet and display value
Display ethereum
Not implemented
Read ETH value from Internet and display value
-
Nixie considerations
10/15/2017 at 18:05 • 3 commentsThis project is designed around IN-12B nixies (same as IN-12A but with a decimal dot in front of the number). Its compact size makes this tube perfect for a desktop display application.
To make a Nixie, you take conductors shaped like numbers and place them in a Neon - filled glass tube. When the voltage across conductors gets over a certain threshold (striking voltage), gas around the conductor will light up, due to corona effect.
In principle there are two ways to drive a Nixie:
- direct drive
- multiplexing
In practice, multiplexing uses fewer pins, but may suffer from audible noise, because the nixie is a mechanical beast which can behave like a speaker due to vibrations.
Since I don't want my clock to buzz at me, I opted for a direct drive strategy.
To sustain the digit glow, a sufficient current needs to flow through the tube. Based on the tube datasheet and experimentation, the circuit is currently tuned to the following operating point:
- Anode voltage: 170 V
- Sustain voltage: 130 V
- Digit current: 1.8 mA (this might be too low, datasheets recommend 2-3.5 mA)
- Dot current: 0.2 mA (this might be too low, datasheets recommend less than 0.7 mA)
This is what the schematic for that part looks like:
![]()
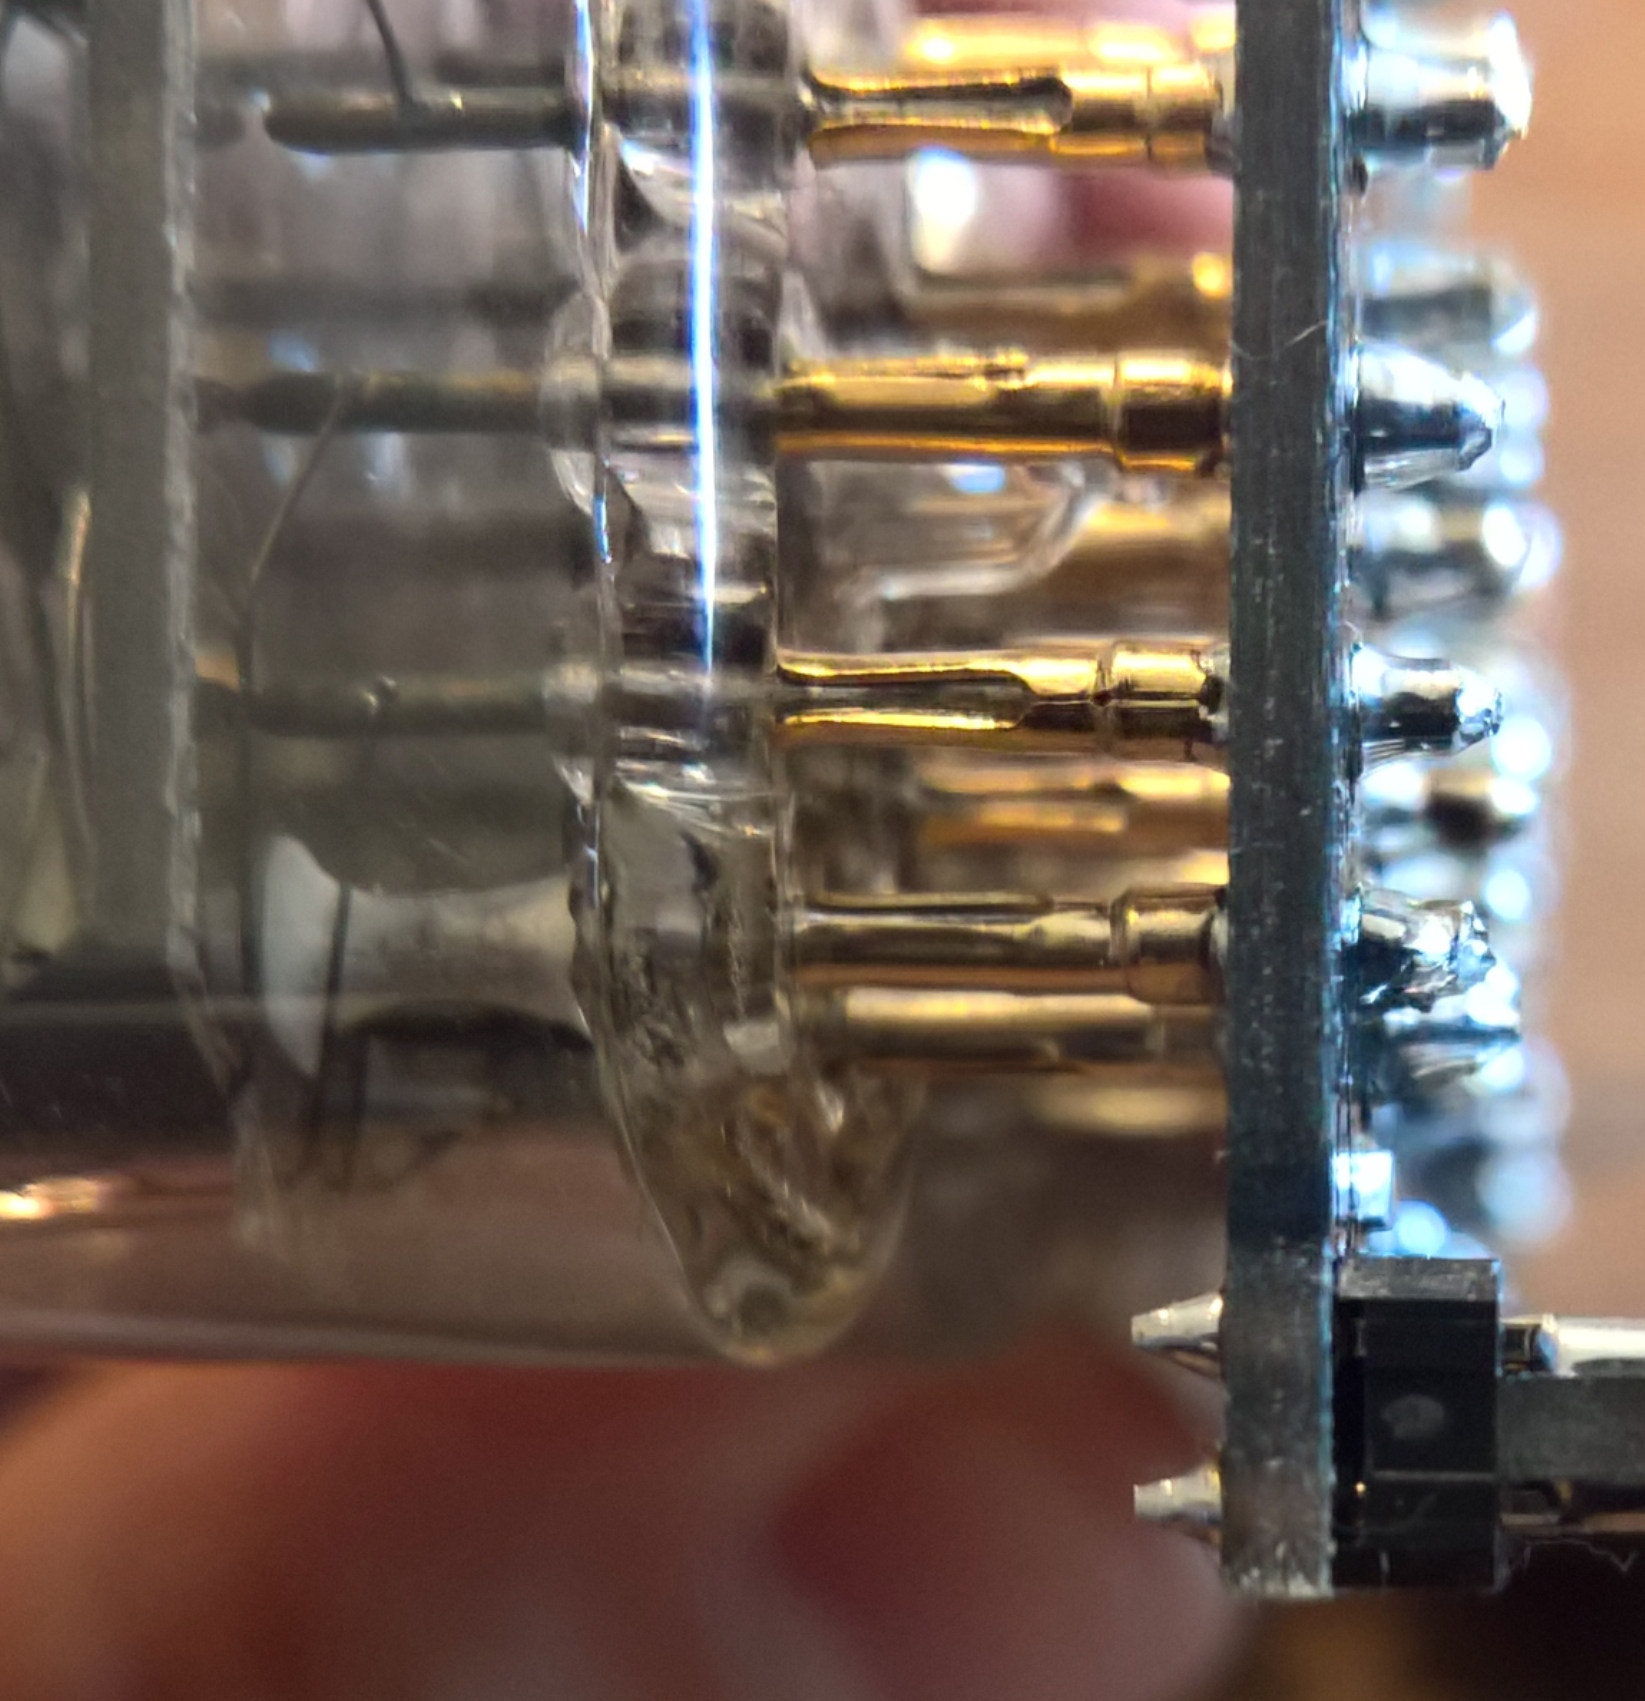
Here I found three options:
- NOS single piece sockets
- Generic 1mm tube pin sockets
- Specialty brand name ~1mm sockets (e.g. HARWIN H3153-01)
NOS single piece sockets have a huge advantage when it comes to PCB assembly. These sockets are held together by some sort of resin, which makes soldering easier. However, they are relatively bulky, and I wanted to stay away from NOS as much as possible.
Generic pin sockets are readily available, cheap, but probably require hand soldering, so this option may end up being more expensive than NOS option. In any case I chose this option:
![]()
Brand name sockets are also an option, but I gave up on these, as they are more expensive than generics.
-
HV driver considerations
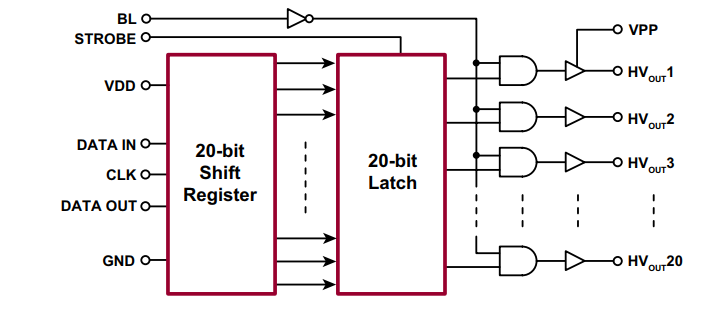
10/15/2017 at 15:57 • 7 commentsESP8266 is low on available GPIO, and since the project needs 11 x 4 = 44 signals, really the only way was to use some sort of a port expander or SPI driver.
Microchip's HV5812 is a nice IC, SPI input, 20 parallel outputs:
![]()
When LOW, HVOUT goes to GND, Nixie sees more than 130 V and turns on. When HIGH, HVOUT goes to ~VPP (in our case 80V). Nixie now has 130 V - 70 V = 60 V on it, which is not sufficient to turn it on.
Now we just connect HV5812 to ESP8266 SPI and all is fine and dandy! But…oh…not so fast:
![]()
Fortunately, there is a component which operates on 3.3V SPI and can output 5V SPI: the jellybean 74HC595!
So, we buy two HV5812 (40 digits) and one HC595 (4 dots), and we get level shifting for free!
Only thing is, HC595 needs external high voltage transistors, such as MMBTA42.
An obvious question pops up: why didn't I use 6 x 74HC595? Why do I need HV5812 ICs when HC595s are available everywhere?
Let's look how much these parts cost:
Price @1 qty
Price @ 100 qty
Price @ 1000 qty
HV5812
2.32
1.75
1.75
74HC595D,118
0.43
0.2
0.10526
MMBTA42
0.17
0.085
0.0357
[units: $, source: Digi-Key]
HV5812 is 5 times more expensive than HC595, and the situation only gets worse at higher quantities. Also, for some reason, Microchip price breaks end at 100 pcs. Maybe they don't like selling high quantities through Digi-Key?
Another funky thing about economies of scale: 1000 pcs of HC595 cost the same as 526 pcs! Go figure.
Let's now compare total cost for two driver solutions (pick and place costs excluded):
- 2 x HV5812 + 1 x HC595 + 4 x MMBTA42
- 6 x HC595 + 44 x MMBTA42
Price @1 qty
Price @ 100 qty
Price @ 1000 qty
Solution 1
5.75
4.04
3.75
Solution 2
10.1
4.94
2.2
[units: $, source: Digi-Key]
Bulk of the cost for Solution 2 is in the transistors, which make up around 75% of the cost for all price breaks.
Solution 1 is the overall winner for lower volume categories. So, HV5812 it is!
-
Enclosure design
10/04/2017 at 18:57 • 2 commentsDevice design will be as simple as possible, so that it can fit any environment: work desk, coffee shop, or library. This means no backlight LEDs, no huge logo, only streamlined material shapes.
So, we need:
- "raw" materials
- streamlined design
- manufacturable design
This log is work in progress.
Prototype 1
The starting idea was to use aluminium and wood, and after short brainstorming this came out:
![]() Natural materials are present, but enclosure is not smooth, and manufacturing is complicated, due to two materials. At the same time, top aluminium plate looks like it's missing something, a CNC marking, which further complicates the manufacturing.
Natural materials are present, but enclosure is not smooth, and manufacturing is complicated, due to two materials. At the same time, top aluminium plate looks like it's missing something, a CNC marking, which further complicates the manufacturing. Prototype 1.1
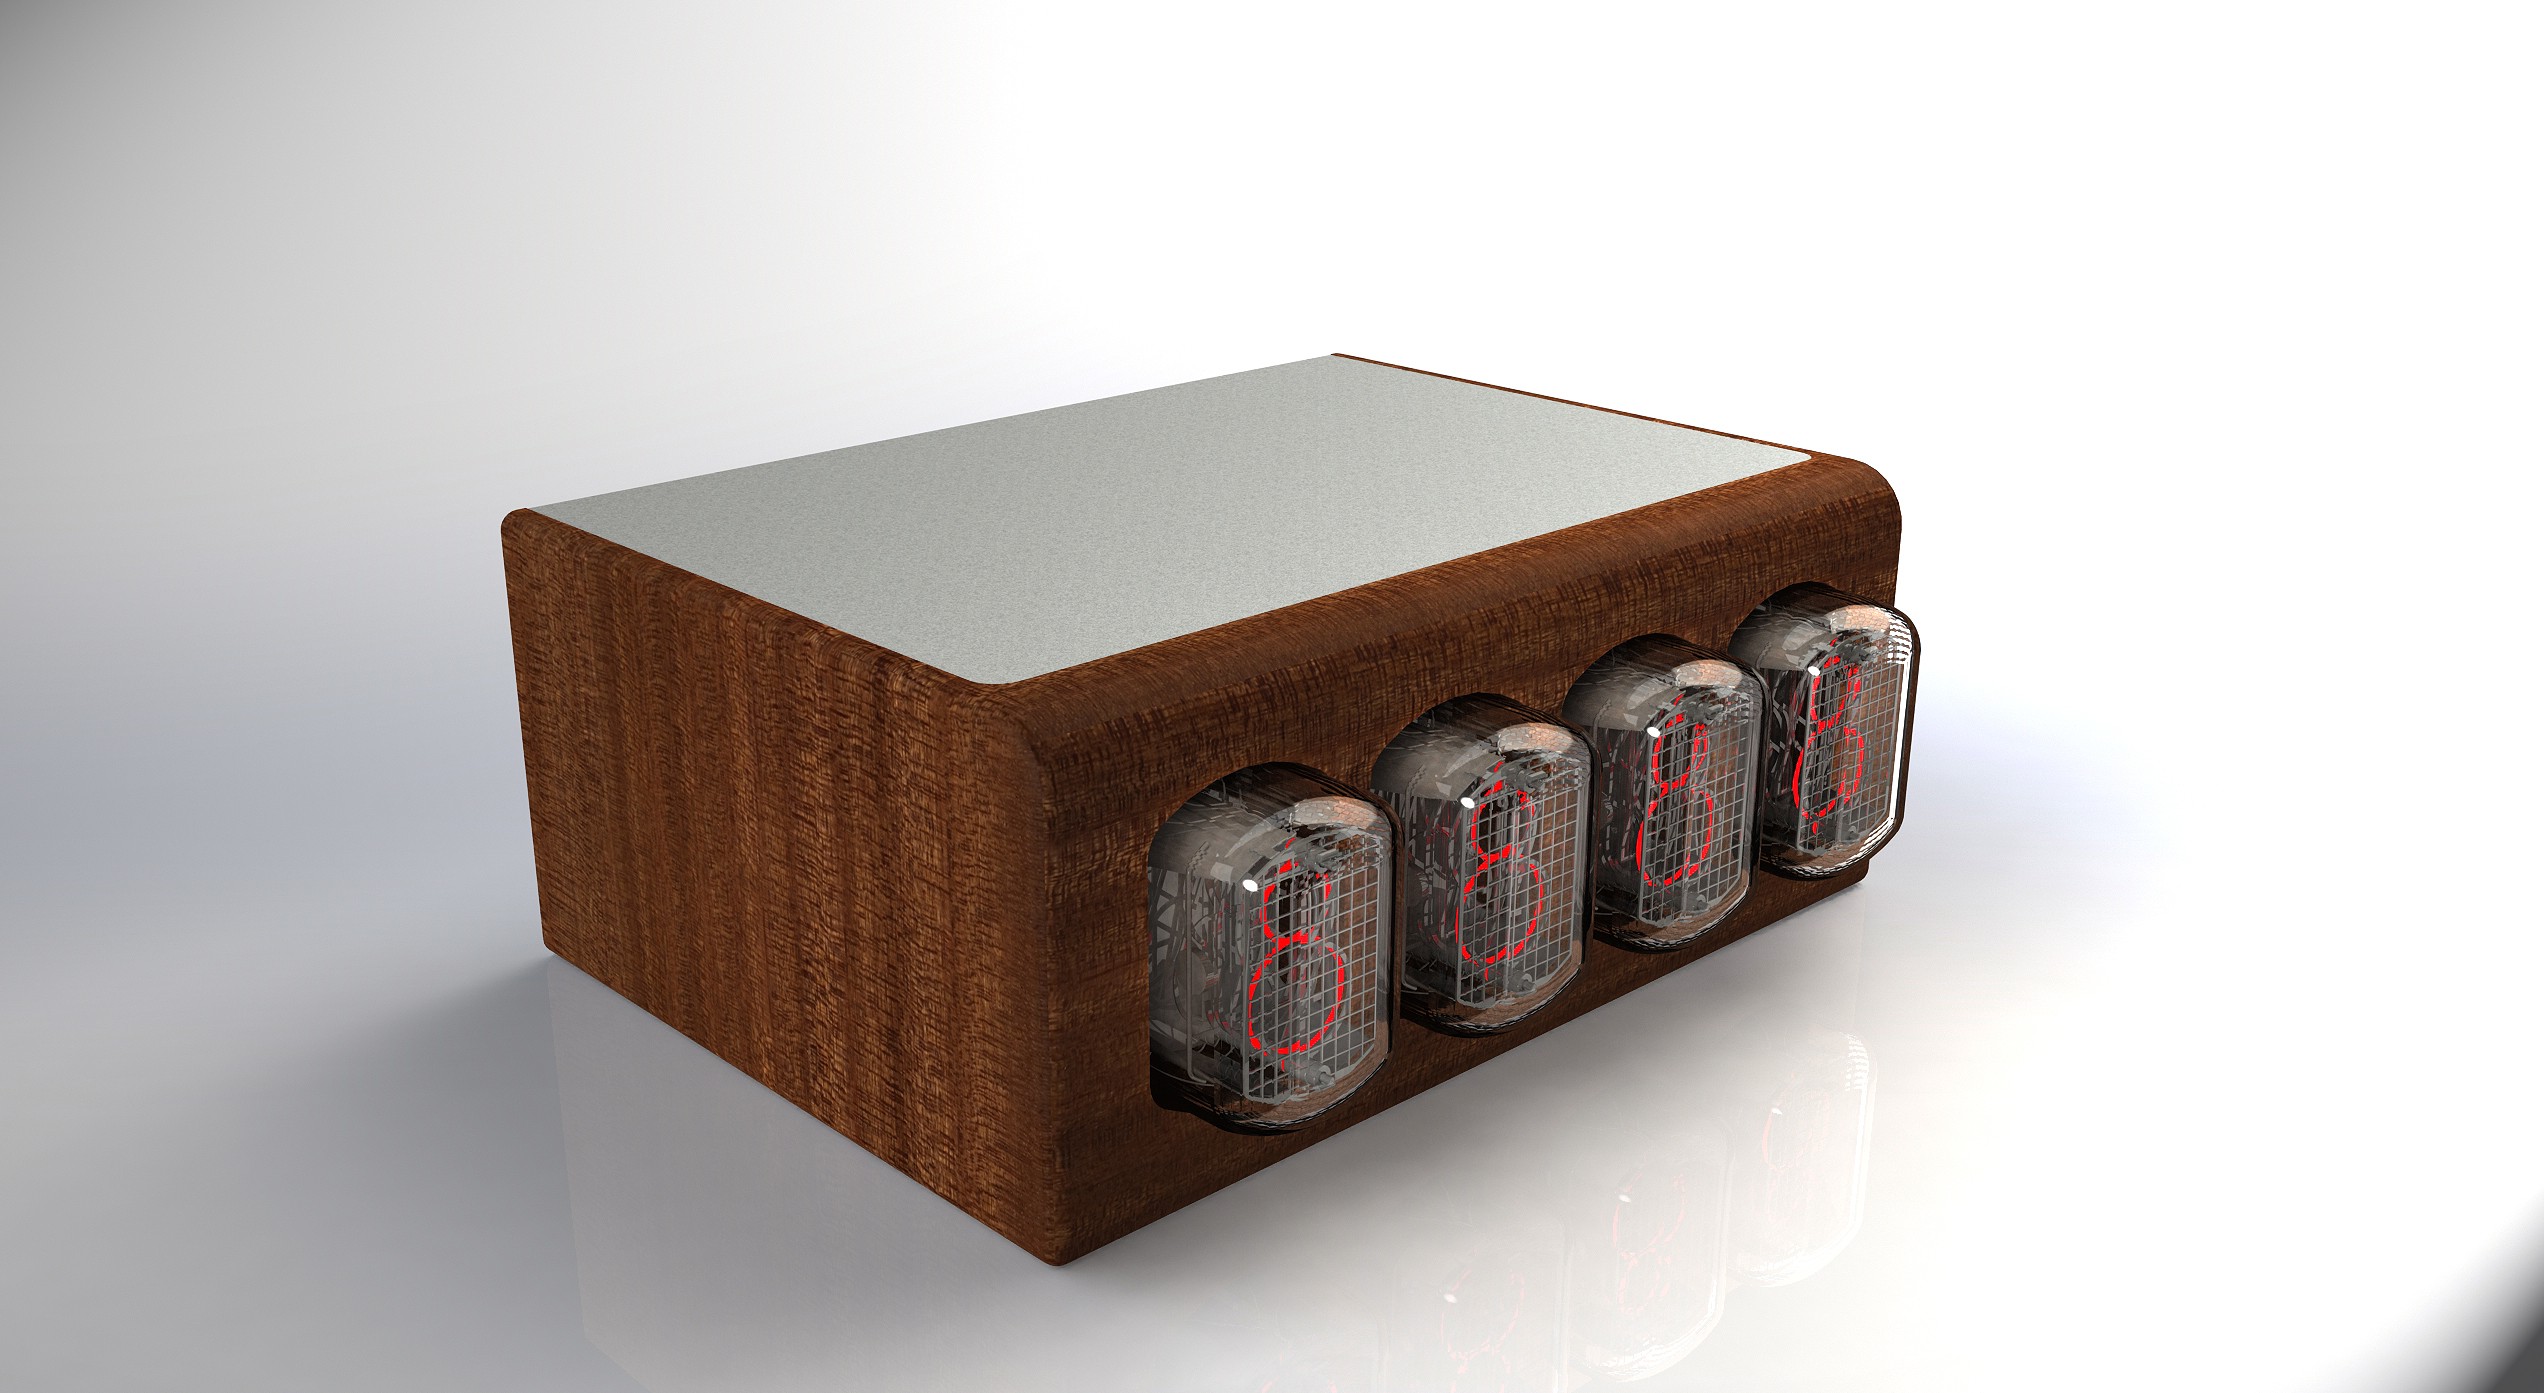
Frustrated by the previous combination of materials, I moved on to a single wood (or Aluminium) block:
![]() Now everything is smooth, manufacturing is simpler. Enclosure can be painted glossy black, or manufactured in a nice wood, such as mahagony, which would give it that nice "Rolls-Royce dashboard" look.
Now everything is smooth, manufacturing is simpler. Enclosure can be painted glossy black, or manufactured in a nice wood, such as mahagony, which would give it that nice "Rolls-Royce dashboard" look.Before plunging in to CNC wood milling, I decided to manufacture this prototype on a 3d printer in a local service in Serbia. After a short wait, it arrived:
![]() This prototype illustrated why you should always prototype before production.
This prototype illustrated why you should always prototype before production. It appears that Nixie cutouts are too big, which means that the whole device can be scaled down a little. Also what became apparent after playing around is that the device itself looks way nicer when tubes are recessed:
![]()
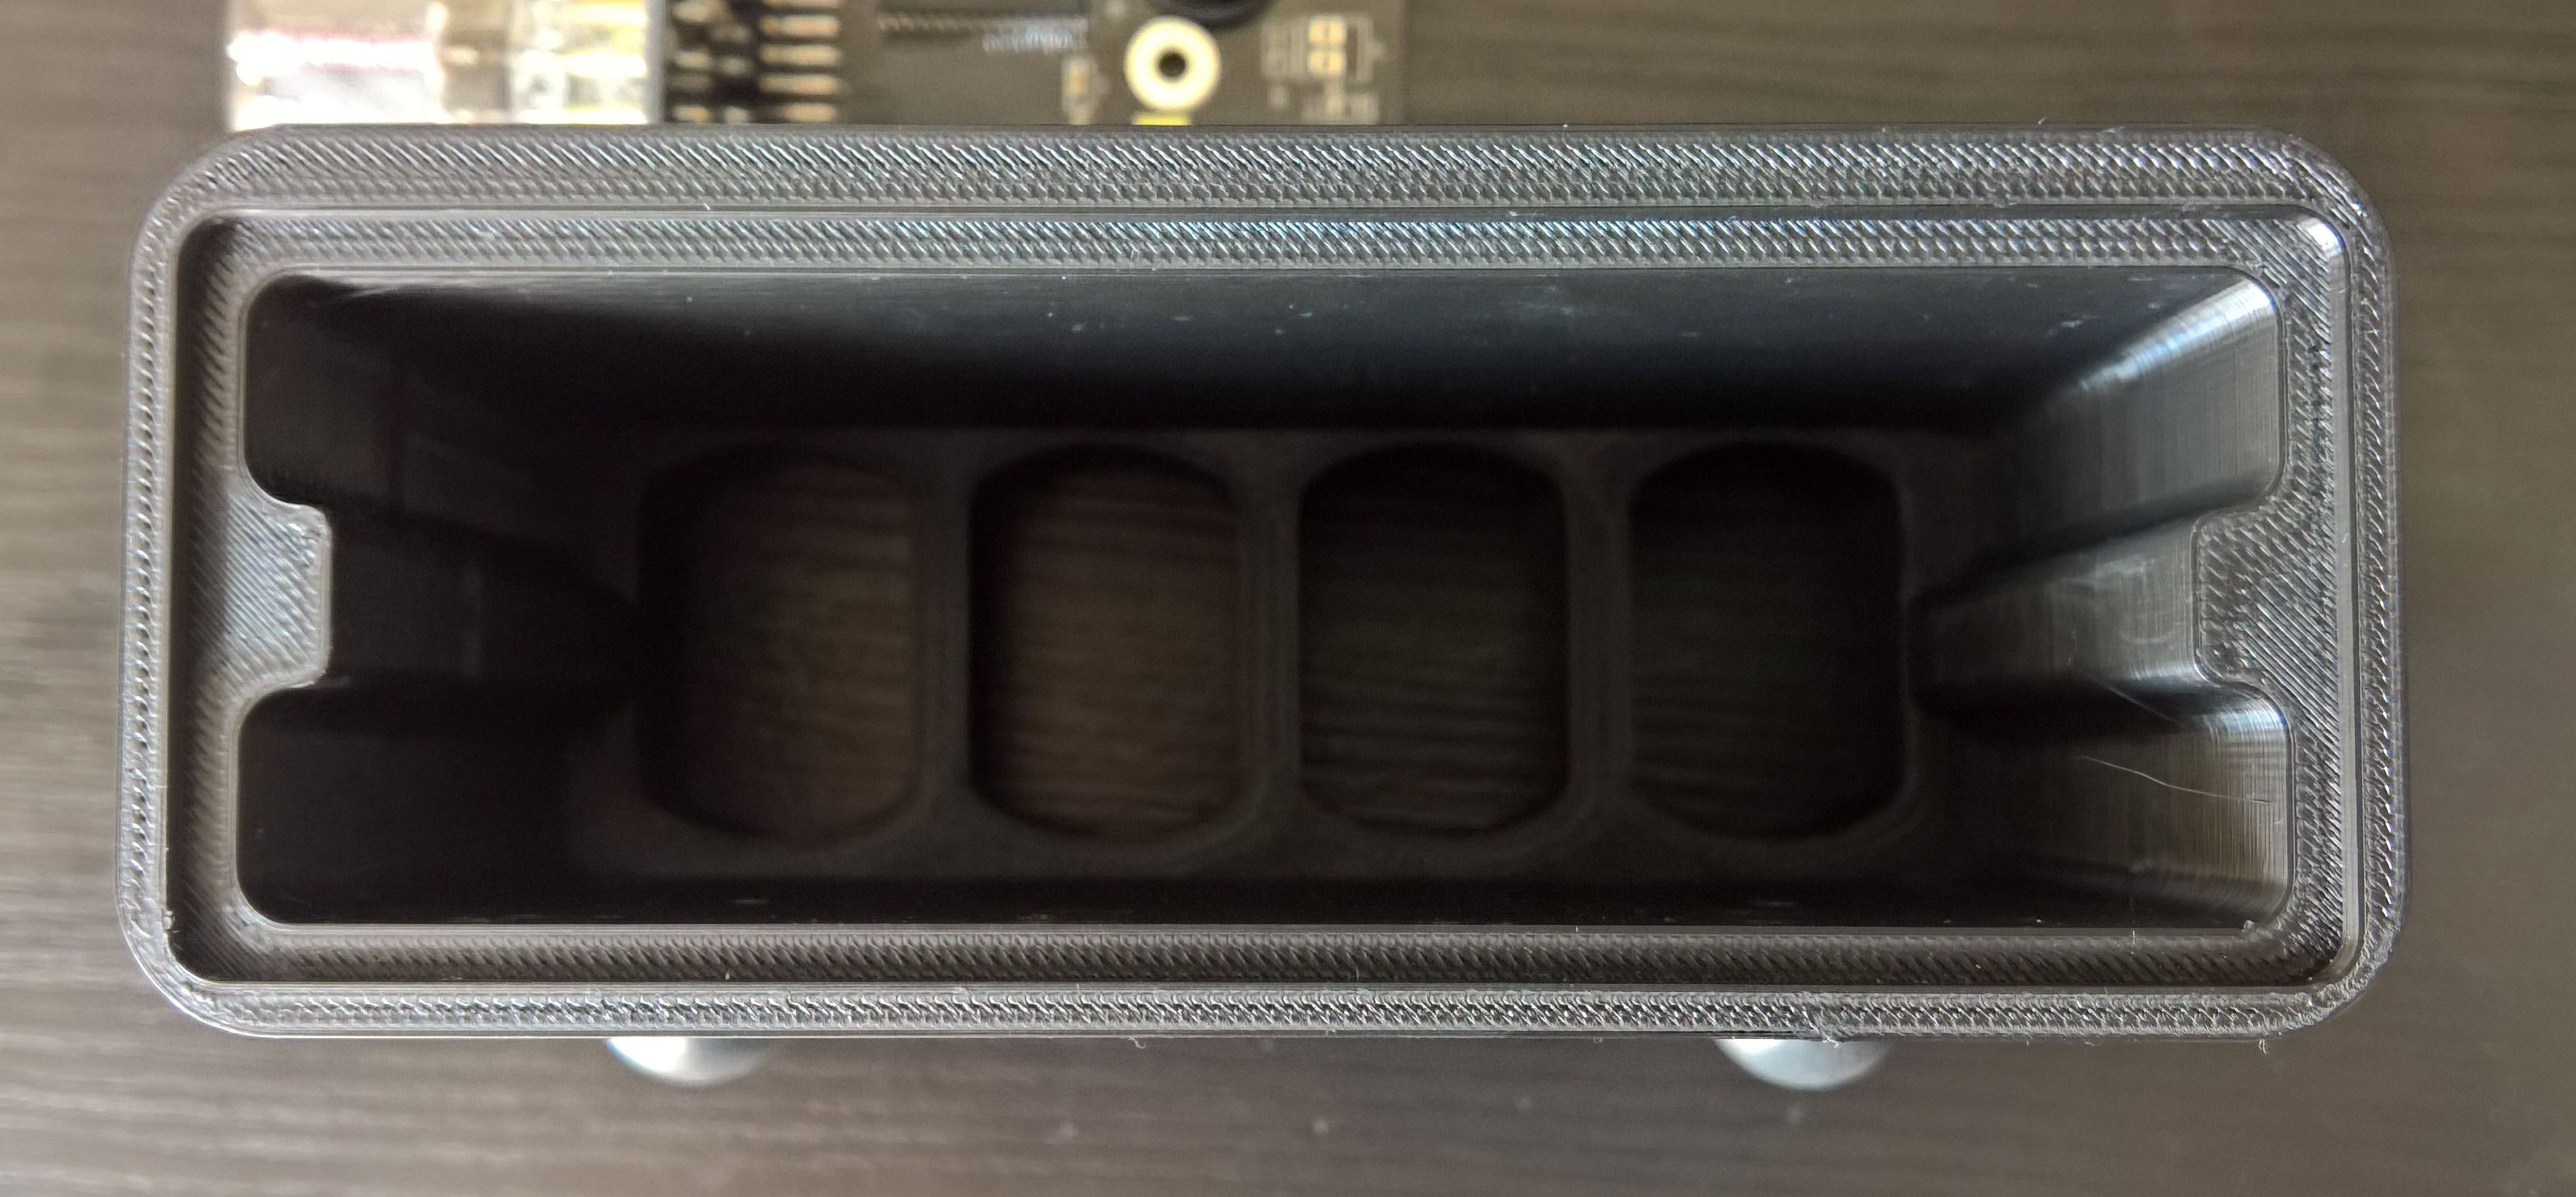
On the rear side, I planned to have a cover plate, made from FR4 or Aluminium. This cover plate is attached to the enclosure via two screws, one for left and one for right side:
![]()
Time to move to Prototype 1.2 version.


 As it can be observed from the video, this interface should be further optimized (skipped detection at 0 and 8). Maybe I need a transistor preamp, since handling this in code is tricky.
 Basically, it should
be an interrupt driven program. So, let's dive in:
Basically, it should
be an interrupt driven program. So, let's dive in: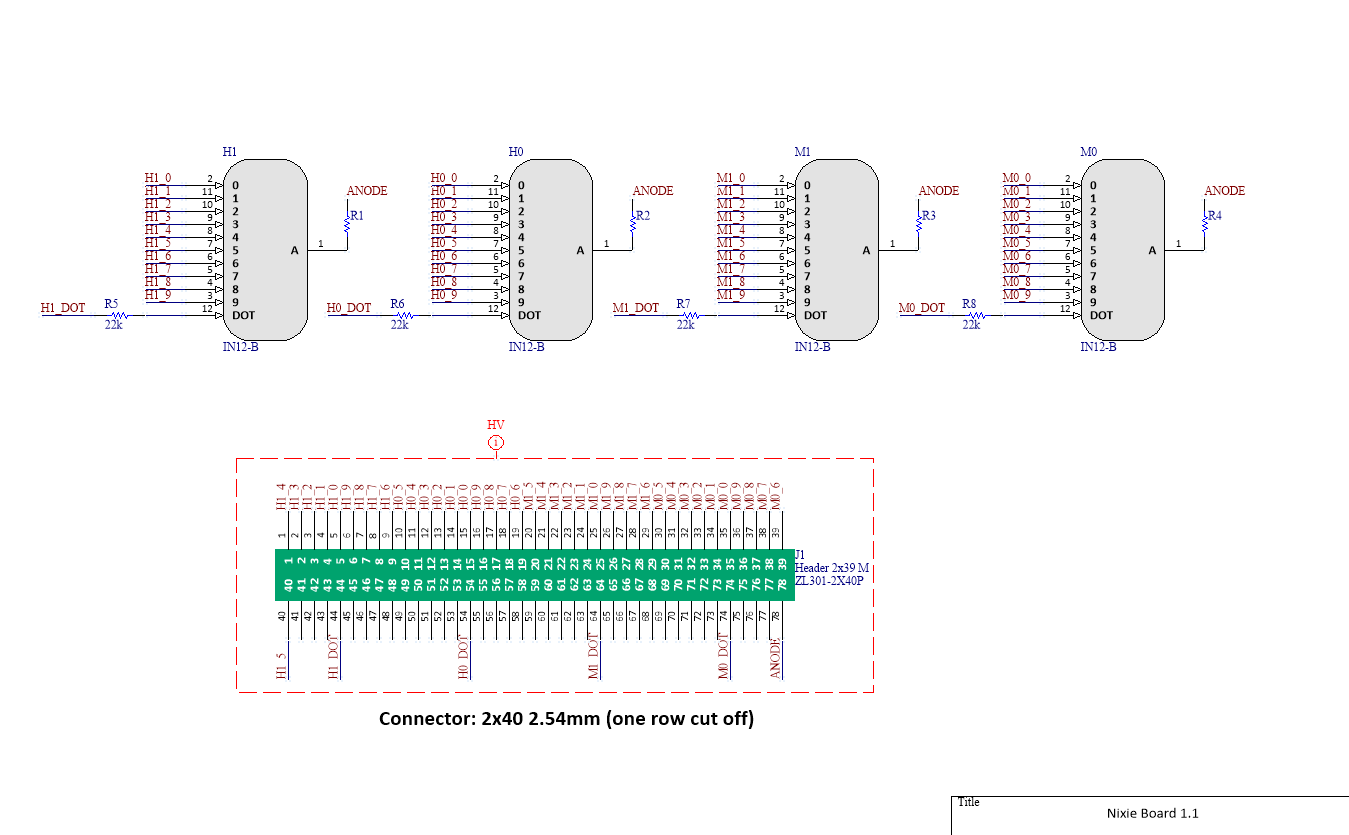

 Natural materials are present, but enclosure is not smooth, and manufacturing is complicated, due to two materials. At the same time, top aluminium plate looks like it's missing something, a CNC marking, which further complicates the manufacturing.
 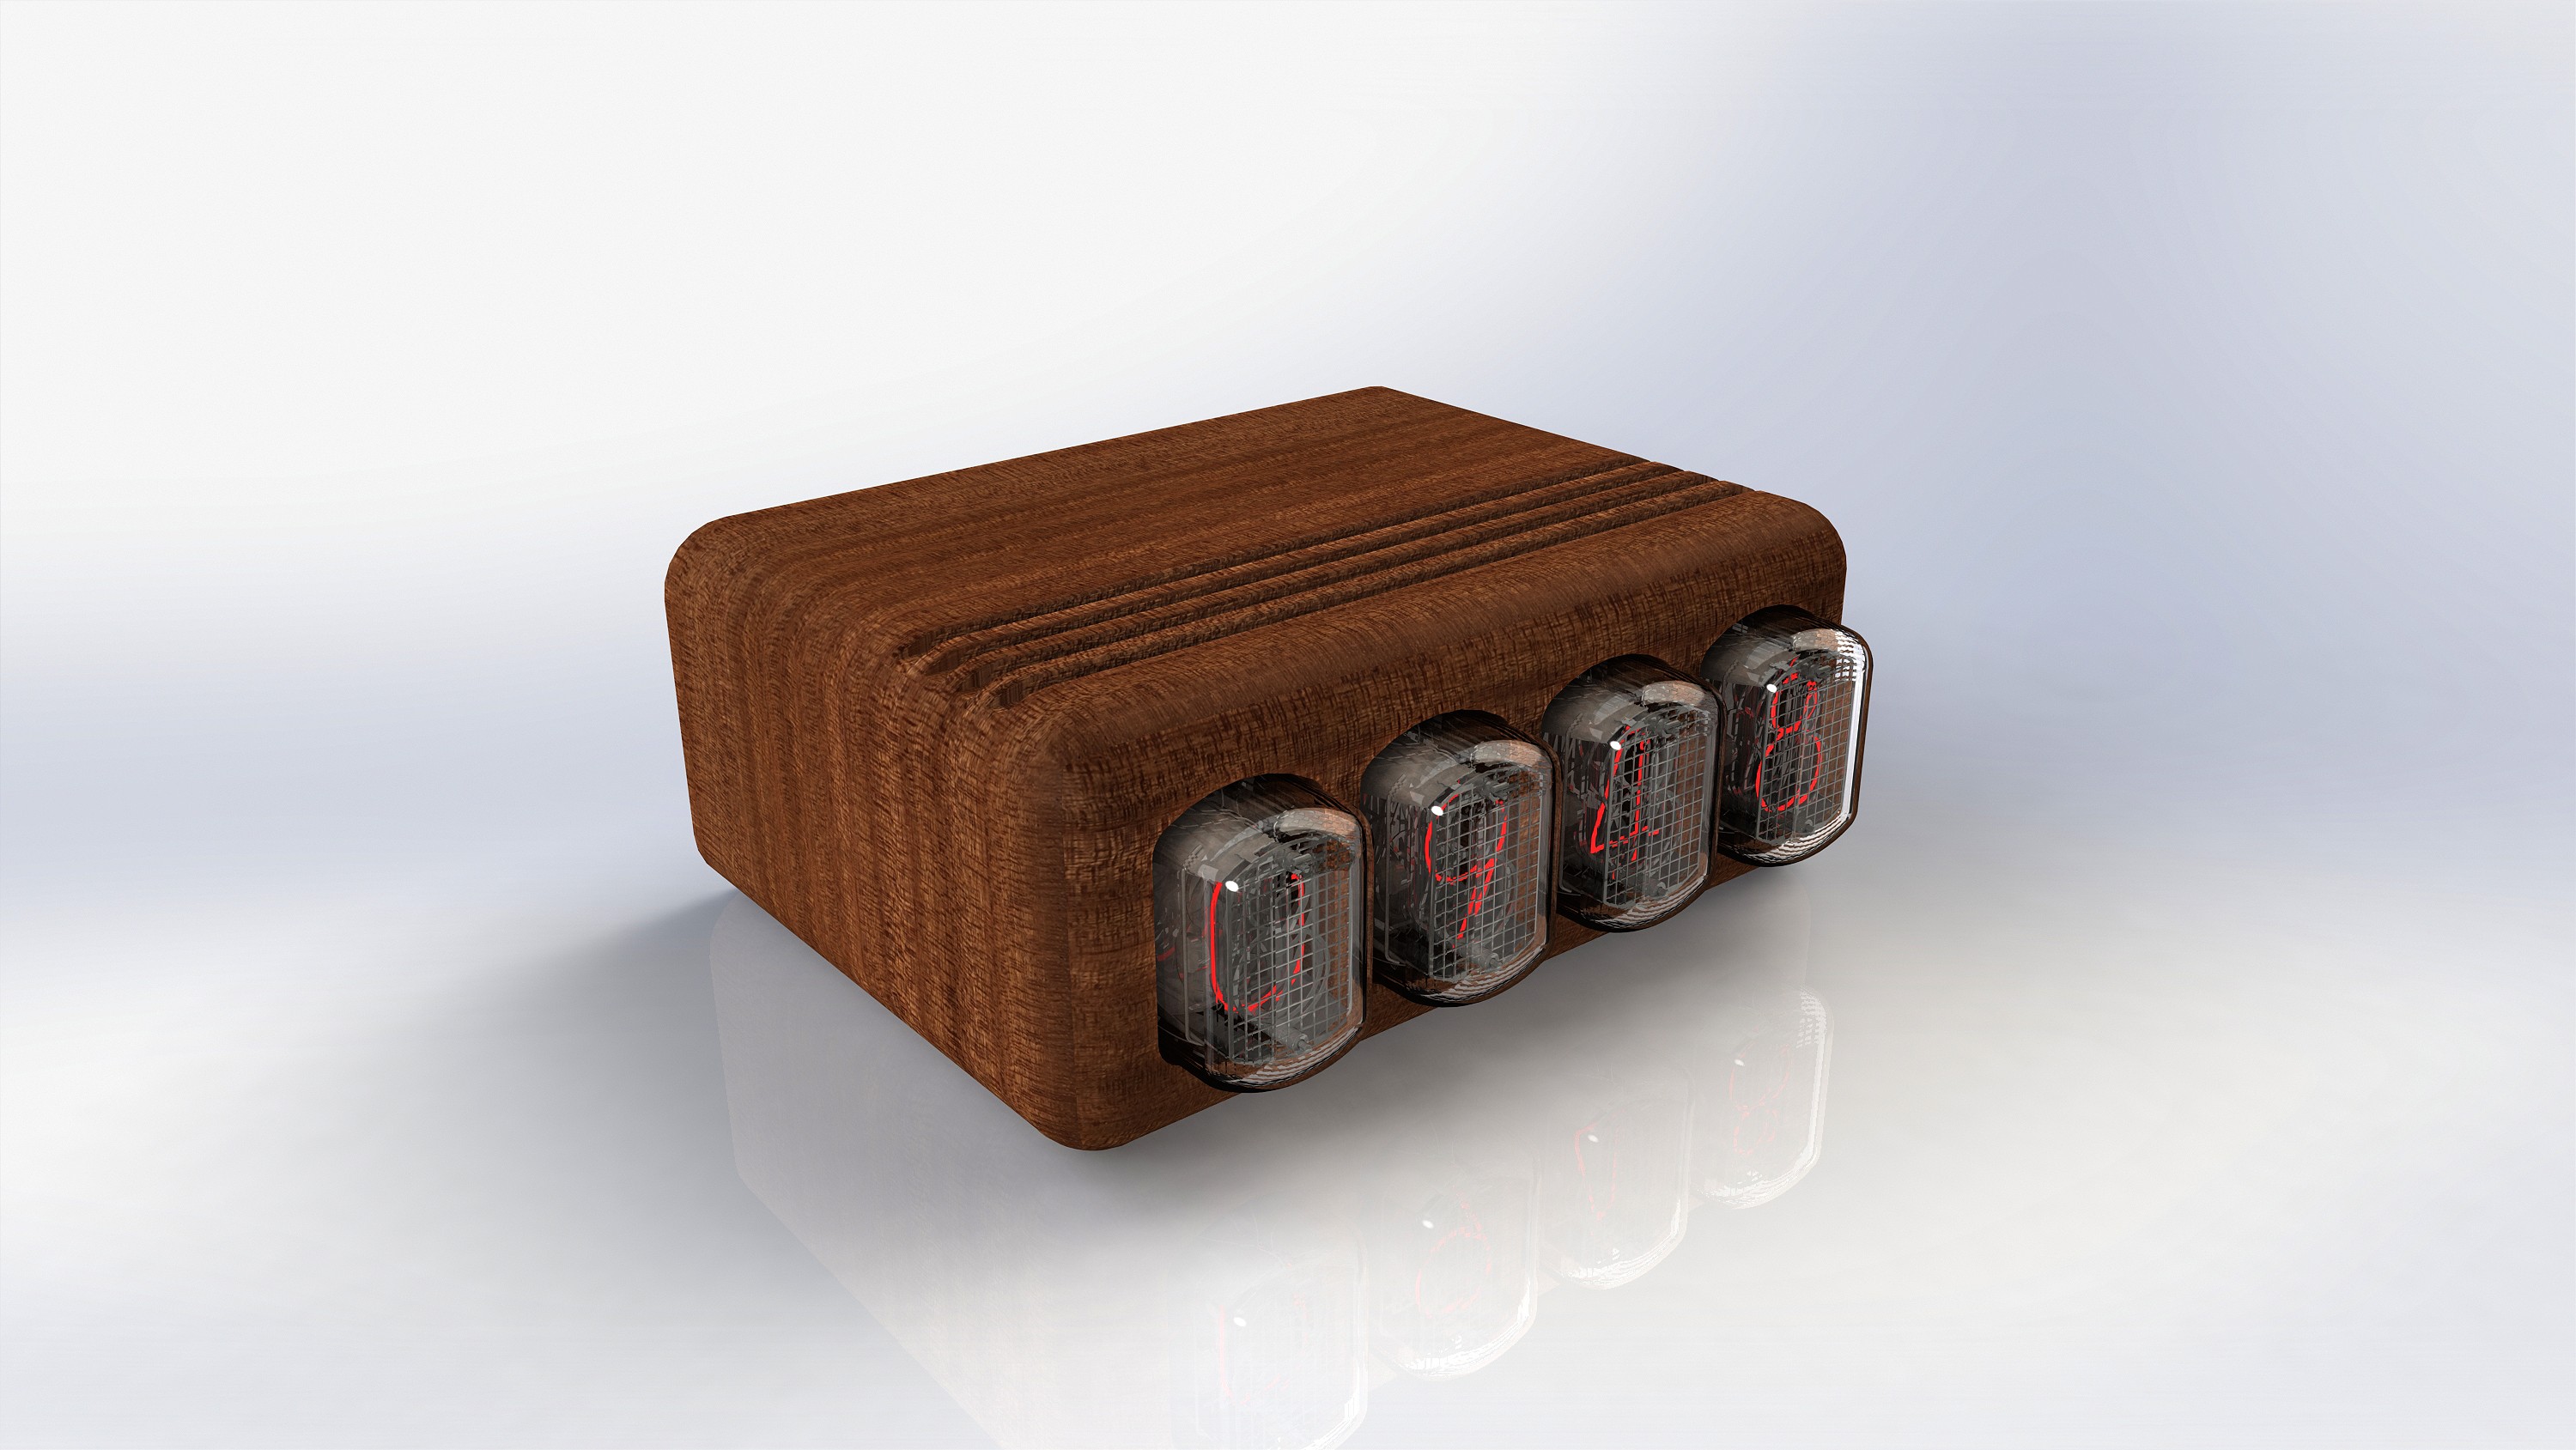 Now everything is smooth, manufacturing is simpler. Enclosure can be painted glossy black, or manufactured in a nice wood, such as mahagony, which would give it that nice "Rolls-Royce dashboard" look.
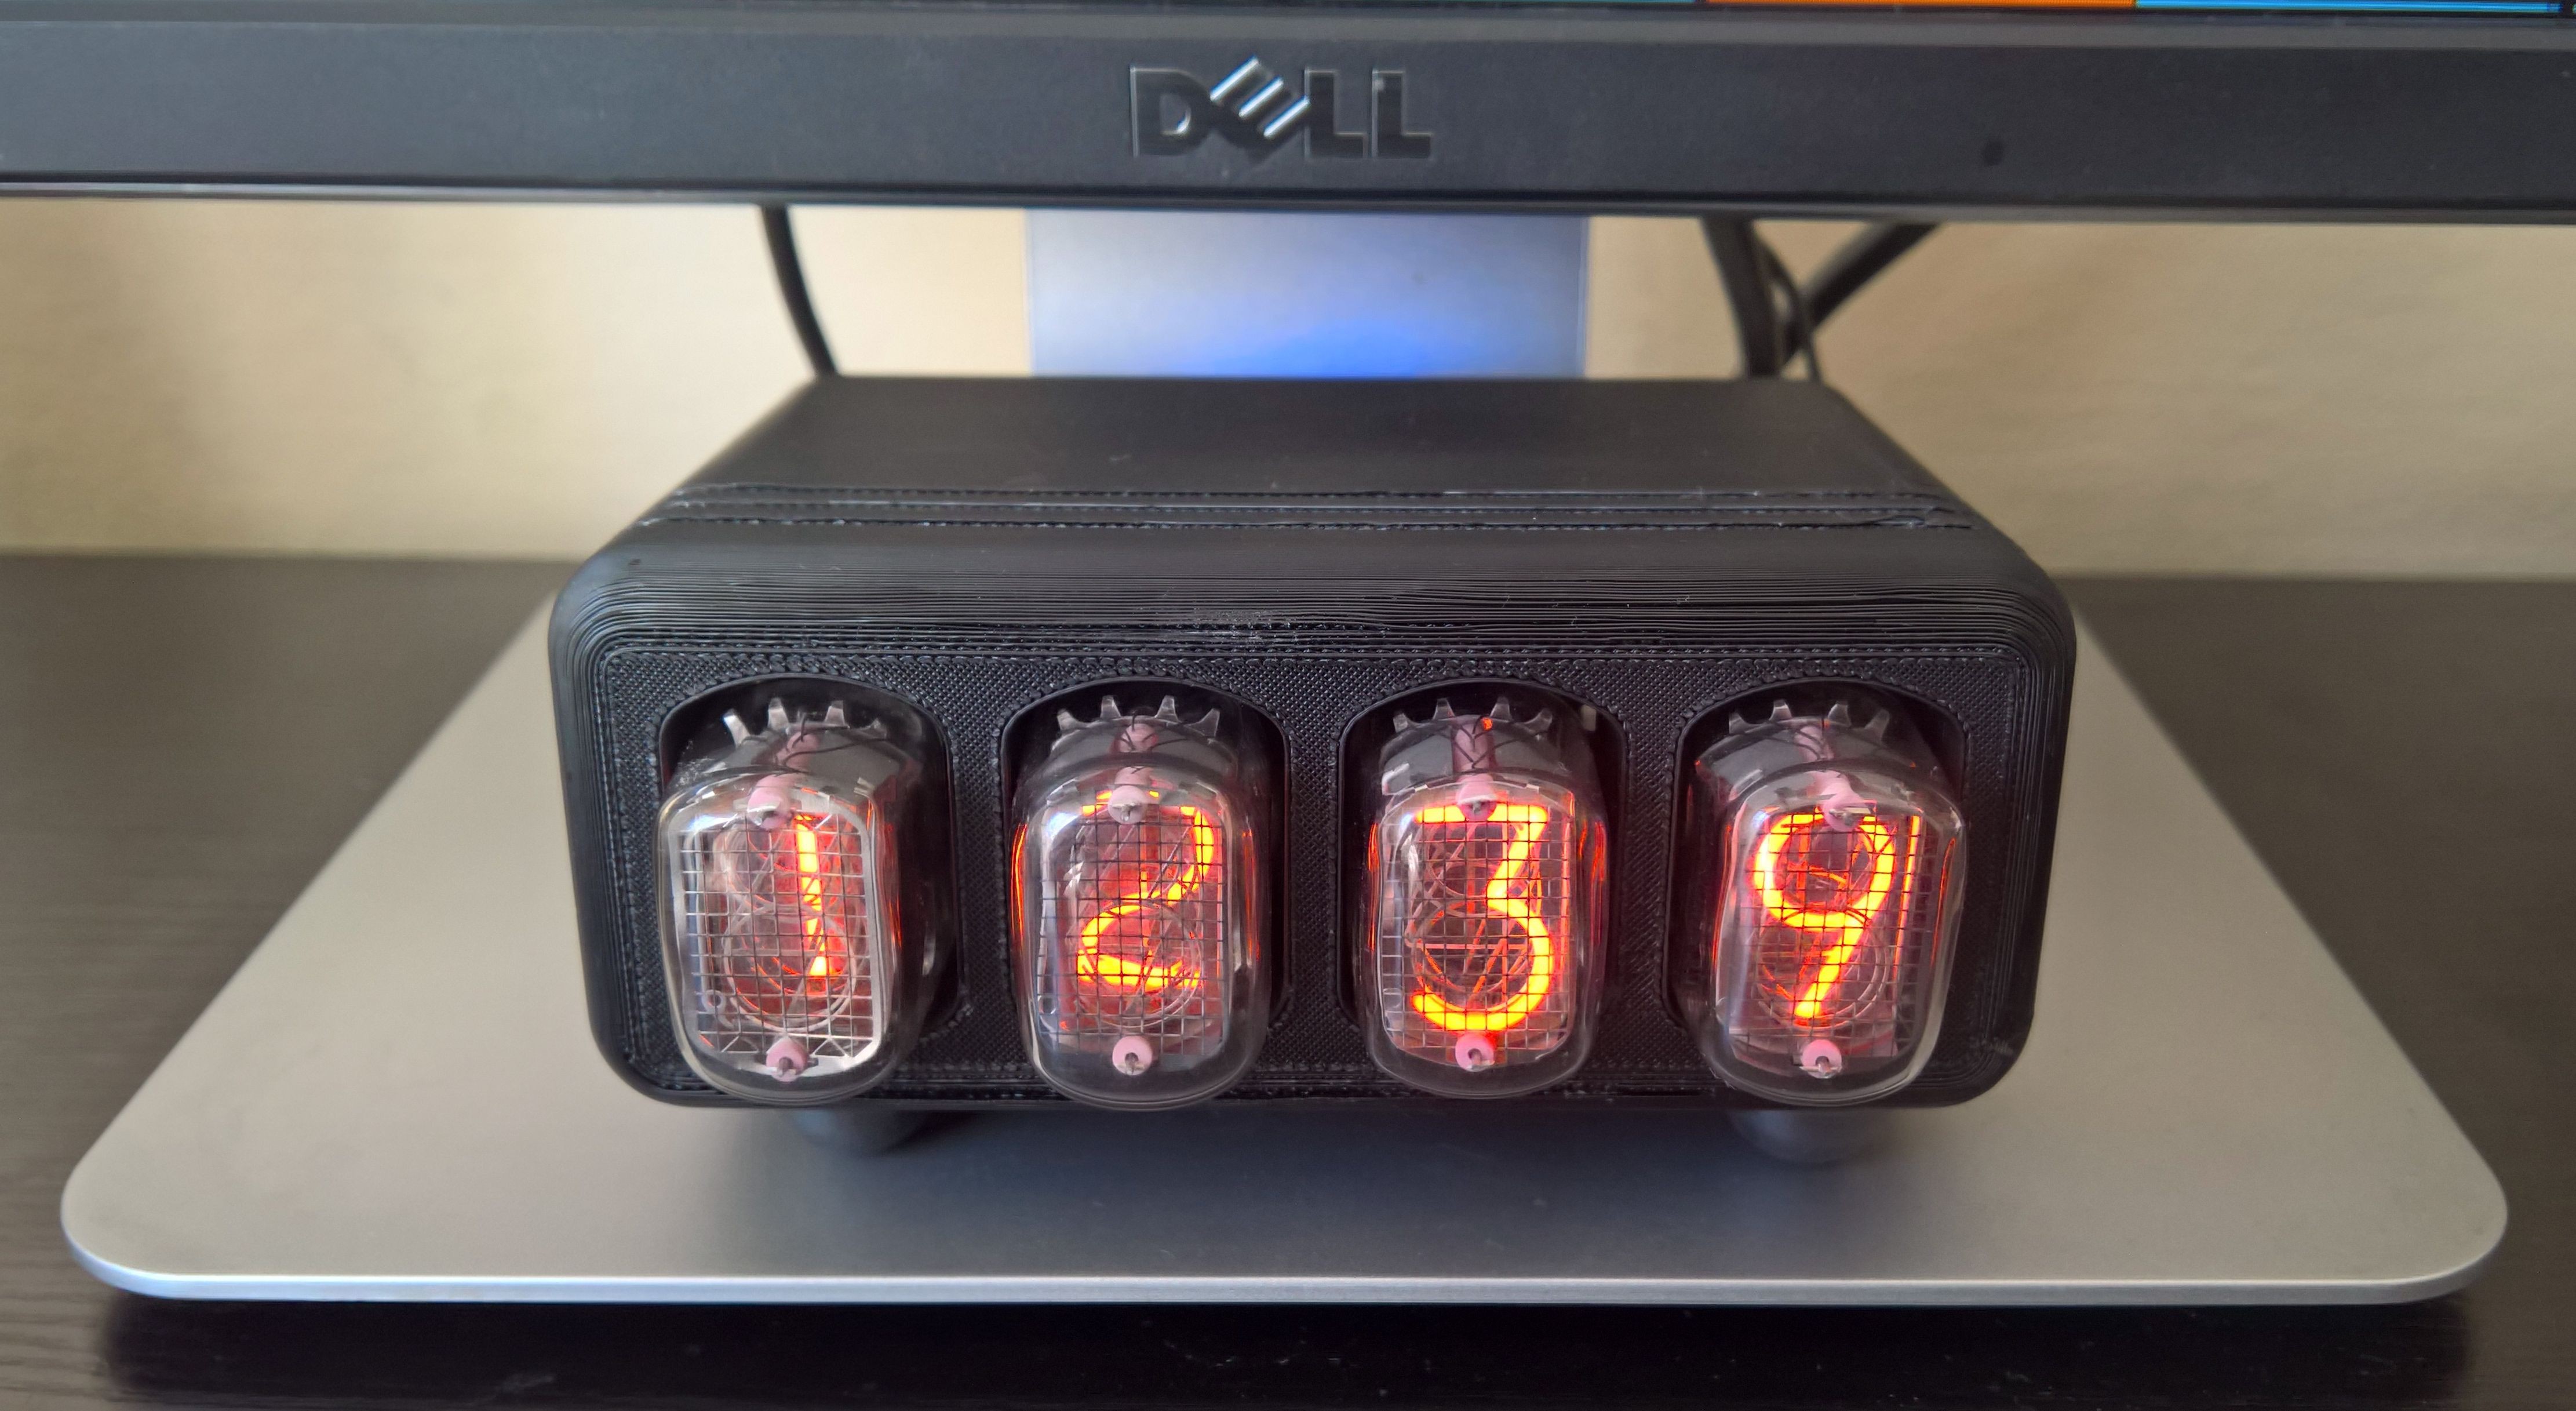 This prototype illustrated why you should always prototype before production.