-
1Finding the Arduino's port number in the NAS
1. Use SSH to get a command prompt in your NAS.
2. type the command:
ls /dev/tty*3. Connect the Arduino
4. type the command:
ls /dev/tty*5. compare the results from step 2 and 4. The extra device that was added in step 4 is your Arduino. Make a note of the port name...we'll use that throughout the rest of the project. It'll probably be ttyACM0 or ttyUSB0
If you don't see your device, you'll need to install a device driver for your device in Linux. That's beyond the scope of this article.
-
2Communication testing
This is a good time to test the linkage between your NAS and the Arduino.
1. download attached BasicSerialTest.ino into the Arduino
2. connect the Arduino to the NAS
3. type the command (use your device port name from the previous step):
screen /dev/ttyUSB0 96004. Review the results for a few minutes. If the results are regular and predictable ("1234567890" every second), you can skip ahead
-
3Fixing corrupted communication
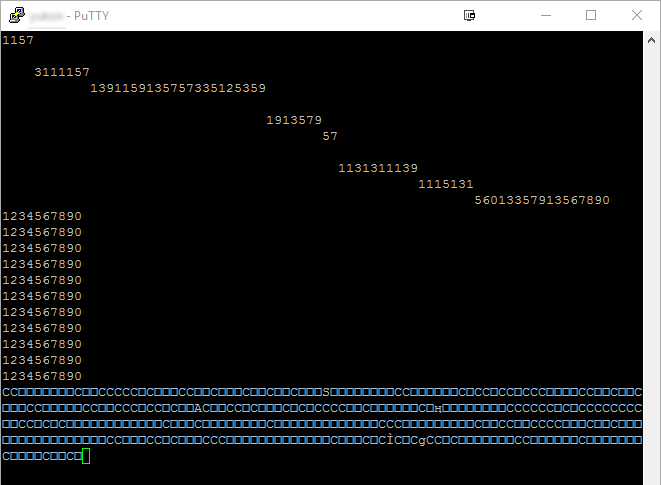
In my case, I got what you see in figure 2 below.
![]()
Figure 2: corrupted communications from the Arduino as seen by the NAS's "screen" command.
We'll cover the causes individually.
The first cause can be that serial ports can be opened by more than one application simultaneously. In my case, I used the following command to see what applications had the Arduino's USB port open:
lsof /dev/ttyUSB0The lsof command showed that an application called "ups_yec" also had the port open. From what I’ve read, ups_yec is a driver for a brand of UPS and it will attempt to use any USB device with the default VendorID/ProductID provided in the OSEPP Arduino Nano. It will open the port and remove characters from the USB port’s buffer and it may also be changing the baud rate.
-
4Solving the conflict with ups_yec
This leaves us with a few options:
- Change the Arduino’s FTDI VendorID/ProductID (you’d need to apply to the FTDI manufacturer for it and prepare driver deployment of some kind)
- Remove or disable ups_yec in some way (there are scripts that control ups_yec)
Getting rid of ups_yec looked like the easiest way. I quickly discovered it’s not trivial to get rid of ups_yec. It will always start when the NAS boots and also will auto-restart if you were to stop it. If you delete it, it’ll be restored after booting.
With QNAP’s assistance, I devised a way to shut down the ups_yec daemon at startup and delete the executable so it can’t auto-start later.
https://wiki.qnap.com/wiki/Running_Your_Own_Application_at_Startup
Create an “autorun.sh” with these contents:
#!/bin/bash
sleep 30
/sbin/daemon_mgr ups_yec stop "/sbin/ups_yec" &
rm /sbin/ups_yec
Note: this will delete /sbin/ups_yec but (in my case, anyway) it would restore it upon reboot if this “autorun.sh” file were absent.
Don’t forget to make the script executable:chmod +x /tmp/config/autorun.shHaving finished this, do the following:
1. reboot the NAS and wait a few minutes after its startup has completed.
2. type the command:
ps | grep ups_yec3. inspect the result for any mention of /sbin/ups_yec.
If the result looks like this, it worked:
![]() If the result looks like this, check your work to ensure the script is flagged as executable and doesn't contain any errors.
If the result looks like this, check your work to ensure the script is flagged as executable and doesn't contain any errors.If your result is correct, proceed to the next step.
-
5Download the sketch into the Arduino
Now's a good time to download the sketch into the Arduino because we'll need to make a modification that makes it harder to download new firmware into the Arduion.
Download the attached NASUPSMonitor.ino into the Arduino.
-
6DTR (Data Terminal Ready) and Arduino
The Arduino is designed to reboot when the attached computer system signals "DTR". This makes reprogramming the Arduino much easier but it becomes a problem for us here because the QNAP NAS is using DTR often.
Here's an article about how you can prevent this:
https://playground.arduino.cc/Main/DisablingAutoResetOnSerialConnection
I removed C4 to prevent this behavior shown below in figure 3.
![]()
Figure 3: a portion of the Arduino Nano's schematic
Having disabled the standard Arduino auto-reset feature, any future updates of the Arduino firmware will require some careful use the Reset button on the Arduino (read the article mentioned above).
-
7Modify the Arduino so it can sense the presence of USB power
You'll need to add a connection from Arduino pin D7 to V+ at the USB connector (connection called "NAS_IS_RUNNING". See figure 4 below. This way, the Arduino can sense the presence of USB power and know when the NAS has turned itself off. The connections for this are extremely small; I suggest some insulated #30 wire.
![]() Figure 4: Arduino modification & connections
Figure 4: Arduino modification & connections -
8Connect the Arduino to the UPS
Make the appropriate cable to connect the Arduino to the UPS. Again, you'll need to ensure that the voltage levels for each signal you plan to user are compatible with your Arduino! In my case, I chose outputs that simply connect to ground when they are activated.
My build (not shown above) included an extra connector so the cable could be disconnected from the Arduino and also the UPS.
Notice the presence of the 9 VDC power source. You probably have one of these in your junk drawer. You could use a different voltage so long as it's suitable for use with the Arduino.
My Back-UPS 450 lists the following pin uses: (I’ll omit the ones we won’t be using)
Pin
In/Out
Purpose, comment
9
N/A
Common (ground)
1
In
Shutdown (must be high at least 500 ms)
3
Out
Shorted to ground when power is out
5
Out
Shorted to ground when battery is low
-
9Needed: a Linux process
We need to prepare some kind of Linux application that opens the USB port to our Arduino and interrogates it.
We need something to make the NAS open the port and ask about the power status. There are a few options:
- Write a clever shell script (harder without “stty” in QNAP Linux)
- Write a Linux application to do this work (possibly have it called by the task scheduler)
The 2nd option seemed the easiest for me since my NAS doesn't include the "stty" application. Had the NAS included the "stty" application, serial communication from a script becomes more problematic.
-
10Preparing a Linux toolchain
I’m no expert in Linux or Linux application development. I don’t normally use Linux so I prepared a Debian Linux virtual machine in VMWare. A person knowing more about Linux would use gcc on the NAS itself.
I chose Debian because it’s closely related to what the NAS itself is using. In my case, the NAS has Intel CPUs and so that simplified the preparation of my toolchain.
You could use “VMware Workstation Player” if you needed to prepare a Linux installation. (Available at: https://www.vmware.com/products/player/playerpro-evaluation.html )
Having Linux installed, download and install “libusbp” (https://github.com/pololu/libusbp ). Libusbp was an easy way to add basic USB support to the application. There may be many better ways to accomplish this.
Link an old UPS to a QNAP NAS
I wanted to have my ancient UPS (uninterruptible power supply) to be able to shut down my NAS when the power goes out.
 If the result looks like this, check your work to ensure the script is flagged as executable and doesn't contain any errors.
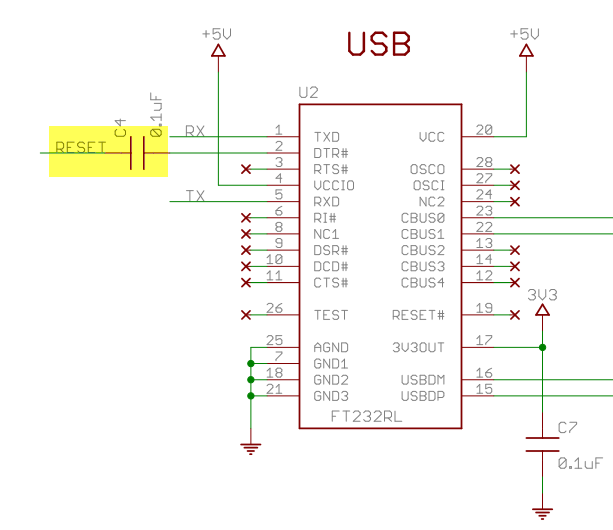
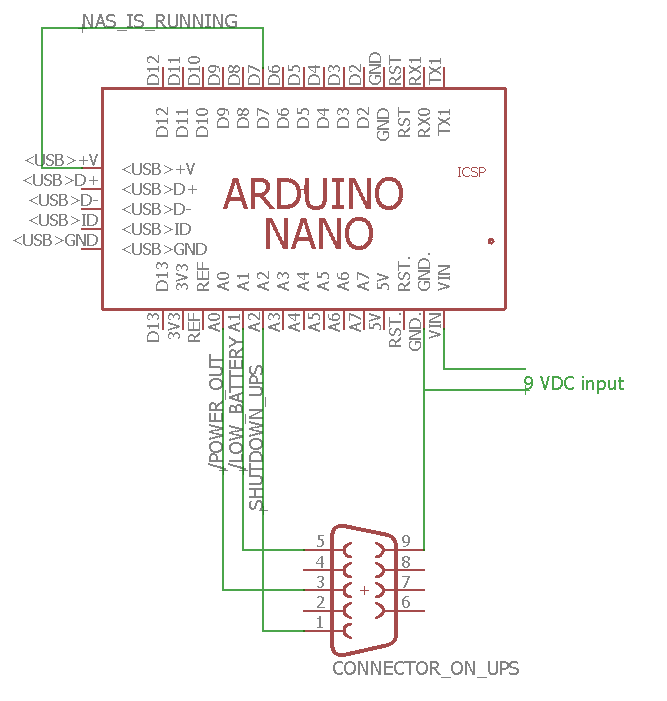 Figure 4: Arduino modification & connections
Discussions
Become a Hackaday.io Member
Create an account to leave a comment. Already have an account? Log In.