Zapp
Zapp-
DC26 Retrospective
09/01/2018 at 04:19 • 0 commentsWow! Another fantastic year. We can’t believe how far we’ve come since our very first badge at DEF CON 24. Watching the other badge makers come up with new and interesting designs has been equally fun.
This year we set out to improve our overall manufacturing process, build a badge with a kickass design (including add-ons), create something folks can learn with, and make people say “WTF?” when they see it.
Looking back, we achieved those goals.

Design
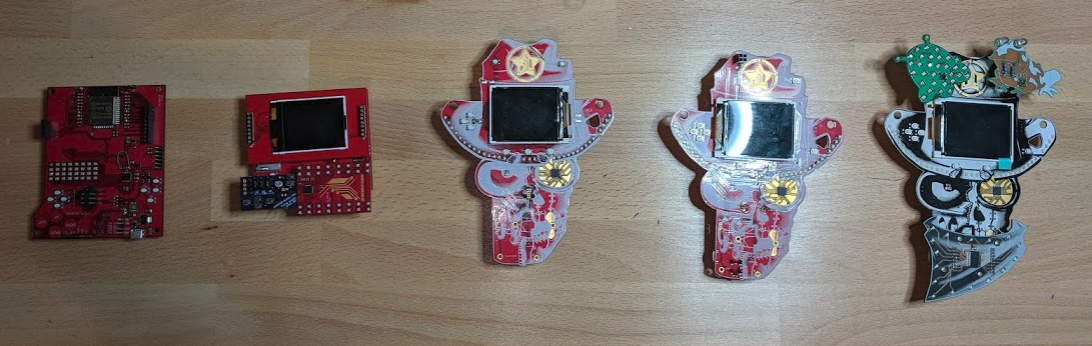
Our design for DEF CON 25 was very popular, using a Fear and Loathing in Las Vegas theme is an easy win. People loved it. We had to up our game. But we struggled to top it. Bender and Hyr0n spent weeks bouncing competing western themes off each other but nothing really clicked. Finally we called in professional help, Doc from the Packet Hacking Village immediately came through and knocked it out of the park. We can’t say enough how grateful we are for his help and his amazing skills.
Zapp worked with him over several weeks to refine the design and shading to optimize the PCB manufacturing process.
Hardware
From a hardware perspective our DEF CON 25 design was relatively simple. We used a wireless module, SD card, screen, and LEDs. At the time it was a complex design for us, just barely testing our skills. For DC26 we felt the need to step it up a notch or three in complexity.
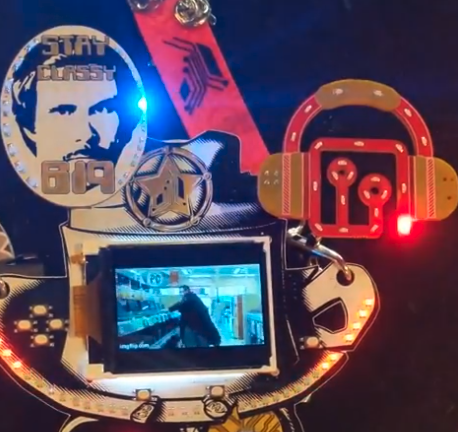
Screen
We upgraded from a 128x128 color LCD to a 220x176 color LCD. The additional pixels required a lot more memory and faster SPI bus to push more pixels to the display. The ESP32 afforded us a 40mhz SPI bus, 4-bit SD card with 40mhz clock. In testing we were able to push the display at 30 FPS or 22Mbps - that’s a lot of Rick Astley. However, due to the notorious SD card, we ended up reducing that to 12 FPS or 9Mbps.
We’re still not sure exactly the part number the screen is. Zapp found one seller on Taobao and the only way he can confirm the part is by looking at the ribbon cable. Still we were able to source enough screens, plus spares, to get the job done.
ESP32
Zapp spent a lot of time this year looking for a new module. While we loved the BMD-300 from Rigado, we needed more RAM and a faster SPI bus. ESP32s seemed popular and the SDK had matured so we bought some dev boards and got to work. There is an impressive ecosystem around the ESP32, lots of great examples (other than the Arduino ones), and Espressif is very actively building the SDK. We ended up with the WROVER32 modules due to the 4MB of RAM critical for LULZCODE and a double buffered display.
From a spec perspective, the ESP32 modules are impressive. Similar ARM modules simply don’t match them on paper. But there’s no such thing as a free lunch and it turns out it’s difficult to make efficient use of all that power.
4MB sounds like a lot but it turns out, the most critical RAM in the ESP32 is the DMA memory. Not only that but the largest users of the RAM are in the SDK. We continually found ourselves competing for DMA memory with ourselves. When we ran out of DMA memory, suddenly our SPI bus stopped working. Wifi seemingly ignored settings to use the 4MB of RAM for its buffers and quickly filled DMA memory causing bling to crash.
On top of that we found the architectural documentation of ESP32 to be lacking. The SDK API is well documented but typical app notes and reference designs/pointers were not available. This caused us to learn lessons like DMA memory the hard way.
Did you know you can’t access NVS from an ISR? We do now.
Did you try extracting our firmware from the chip or anyone else’s using an ESP32? You most likely can. While read back protection is a common practice in the security community, Espressif chooses a scheme called encrypted flash. This prevents read back and you can only do it...3 times before a write fuse is permanently blown. W...T…F…. So imagine if our badge was a real consumer IoT device being sold on shelves? You have to choose between protecting your firmware with readout protection and only 3 security patches in its lifecycle...or letting anyone just grab a copy of your firmware. Not cool.
Also, while the ESP logger is generally good and color codes items, imagine our surprise why (up until a few weeks before the CON with SDK 3.0) that the WiFi logging was grey...and couldn’t be controlled or turned off?... Because they f-ing did not use the logging API. Their closed source WiFi module is tied into the serial bus and does a printf of EVERYTHING to UART. W...T…F…. There was a bash script we found to modify this where it would dump all messages to null, but then how does one debug? Or have to modify the SDK every time they update? So go out and find any consumer IoT devices using Espressif which are older than a few months, you can tap right into the UART and see everything going on with the WiFi stack that they decided to log.
The power draw by the ESP32 to do basic wireless is ridiculously high. Idling our badges pull 100mA at 2.8V. We will give Espressif credit, they released modem sleep in May and we were able to make it work reliably. Prior to modem sleep we were burning 170mA at 2.8V. How we long for an efficient ARM Cortex MCU again… Espressif system in packages are great for prototyping, but not really efficient enough to be using as a wearable on battery power if you expect it to last a few days.
Also a “small” ESP32 binary is 1MB. Yikes.
SD Card
Never again.
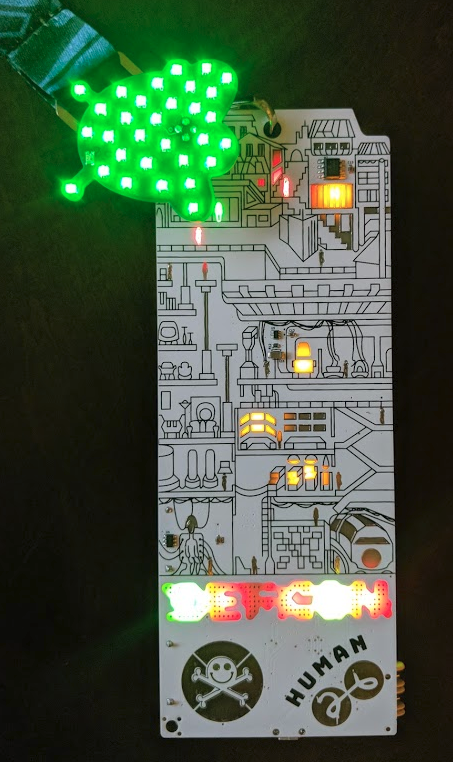
LEDs
After our manufacturing experience with WS2812B (AKA Neopixel) LEDs, we intentionally switched to common anode LEDs. These things cost us about 1 cent each but require a driver. Having been inspired by the Queercon and Mr Robot Badges from DC25 who used similar drivers we selected the IS31FL3736. This ended up driving 31 RGB LEDs and the 3 LEDs in the screen. It also formed the centerpiece of our design, the eye with bloodshot traces.
USB to Serial
To support the B.E.N.D.E.R. game, the serial console had to be accessible. To accomplish this we decided to include a micro USB port. Typically we see folks using FTDI. However, we found the CP2102N from Silabs met our requirements and at a much better price. Not only that, but its drivers come with Linux so users should just be able to plug and go. Windows and OSX require an install (we put the drivers on the SD card and linked to the SiLabs website), but it’s super quick and painless.
Power
A big complaint within the team was the weight of our DC25 badge. We intentionally reduced our badge weight by dropping from 3 AA batteries down to 2 AA batteries. This meant a new voltage regulator but overall weight was reduced by over 20%.
Additionally, our DC25 badges had issues with the VREG letting out the magic smoke, we suspected this was due to excessive current draw when shorted with other badges so a reliable VREG was required.
Following in the footsteps of Queercon we selected the Skyworks AAT1217 3.3v boost regulator These things worked perfectly. As of this time, no badges that we know of failed due to the VREG.
Shitty Add On’s
We designed a handful of shitty add ons, but more importantly did an homage Chris Gammell tutorial of KiCad and the SAO standard: AND!XOR Getting To Shitty.
B.E.N.D.E.R
The Badge Enabled Non Directive Enigma Routine…. B.E.N.D.E.R…. Initially we think the coolest part of this was crowdsourcing the name. Public surveys went out to submit candidate names, then a second round of a downselect was available for the peoples to choose what they liked the best. For those not familiar, B.E.N.D.E.R. is essentially a text based adventure game played over serial. However, the actions one takes in the game affects the operation of the badge hardware itself (e.g. WiFi packets, file manipulation, LED blinks, Screen animations, etc…). The reason for this is that we didn’t want a simple text based adventure game for the lulz, but a way to add some story driven flare and context to our badge hacking challenges. Some may think badges are purely for blinky light eye candy bling and that is simply not the case for AND!XOR. In fact, a big component of what we try to put out there is teaching others some of the foundational hacking principles used in security. We want people to learn something from our puzzles that they can re-use IRL and hopefully be entertained in the process.
Without giving away any big spoilers (one can look into the source code once it is posted or buy us a beer and we’ll talk about it in person…), here are the basics of the game. Once a player logs in they are presented with the situation that they wake up in the middle of the desert, no idea how they got there, at the intersection of two trails. This gives them the option of heading to the North, South, East, or West in order to explore and attempt to beat the challenges of each area. To the North, a hardware hacking puzzle. To the South, a Static Binary Analysis Reverse Engineering puzzle. To the East, a Cryptography puzzle (ya know, Crypto, where you mine a bunch of dogecoin cuz crypto means cryptocurrency). To The West, a Wireless Hacking and Packet Capture puzzle. Once each challenge has been completed, the player would obtain an item useful in the game to assist them in defeating another challenge (or unlocking easter eggs), in addition to a special craft beers the team had been drinking throughout the year while working on the badge. Finally, once all challenges had been completed, the player must go back to the starting Home area and drink from all beers (given their weight and gender/non-gender association) to obtain a BAC of 0.1337.
The response was better than we had expected. Between tweets, DM’s, and talking to people in person at the conference we counted over four dozen people actively hacking away at the challenges. Moreso, they told us how it gave them a reason to try something outside their normal comfort zone and learn something new. Hopefully there were more folks playing than the people who talked to us about it :) However, there is one area where they all failed… because no one beat the game. We were clear before the badge came out, that the overall challenge required a variety of hacking skill sets, which usually one person would not have if they were new to this kind of thing and even when folks are experienced hackers they tend to focus in a single domain. Everyone was heavily encouraged to make friends, team up, or even visit the appropriate villages who are experts of their own domains. Alas, many of the participants did not or we saw requests for collaboration go out when we tweeted the “challenge ends in 48 hours” message. We also know this, because there were many folks so adamant about giving us feedback (and sometimes were also phishing for hints) ;) Collectively they had solved the badge challenge, but individually were on average ¾ of the way there in different areas. We couldn't help but laugh and think “We’ll if you just talked to this person over there, or just tweeted out looking for people to team up, you would win…” In fact, a large group of folks were complimentary in that they either had the East Village or the South Village left to complete the game. A instruction described in the menu of the badge hinted that there was a social challenge of the game, that we expected people would need to make new friends, talk to people, or interact with and learn from the villages. There was even a Reddit thread we found were people suggested teaming up, but it seemed to go stale and die off right before DEF CON started. There was a very low likelihood that anyone would win without socializing and teaming up with other people. We love, absolutely love, how so many people were in to the game and hacking away at it on their own.
Drumroll…. THIS IS WHY YOU ALL FAILED <8
Now there is a prize box sitting back at AND!XOR headquarters (i.e. a van down by the river behind a burning dumpster fire), which no one gets and sits on the shelf until DC27. There are no participation awards in the world of B.E.N.D.E.R. either. We heart you all.
Also, we would like to put an additional thanks to our hacker family out there whom appeared in the game. With permission, we used their digital likeness for lulz and context. In one way or another, they all have been friends, mentors, teachers, accomplices, or just great people who share their knowledge with the community that we always look forward to seeing when we meet up at various cons. So a heartwarming thanks to Viss, Joe Grand, April Wright, Darkmatter, and ArdJect. Our only regret is that we can’t include everyone, but thats why there is always another year with another badge, and another chance for B.E.N.D.E.R. to make a return with some lulzy cameos.
LULZCODE
This was our big “WTF” feature. Based on our lessons learned from TCL from DC25, we set out to develop a full toolchain to make LULZCODE development easy and a core part of the badge. In the end most of the user-facing interaction was handled in LULZCODE. It was amazing to see all the new bling people made in it.
For full documentation see our Geocities page: http://geocities.ws/andnxor/lulzcode/
We have tried to link this through twitter, but apparently it filters geocities as a malicious site… all the better a place to document this part of the project.
We also create an Atom plugin that support code highlighting and completion https://atom.io/packages/atom-lulzcode
A tip for the LULZCODE newbies, read it out loud. It helps.
Additionally we did some live tutorials on writing in lulzcode. It got broken up due to Youtube botz thinking we were violating copyright protection… (lesson learned don't use Youtube to play music in one tab while live streaming Youtube...SMH).
AND!XOR Flappy Bird in LULZCODE Part 1
AND!XOR Flappy Bird in LULZCODE Part 2
Failures
Failures coming out of Macrofab were greatly reduced from last year. Less than 1% are complete failures at this time. Zapp is still going through the badges that need fixing from DEF CON. But by and large the most common failure are SD cards which are easy to fix. We lost a couple screens due to the postal service, and a few LEDs. Ignoring the SD card issue we are satisfied with the badge performance this year.
Miscellany…
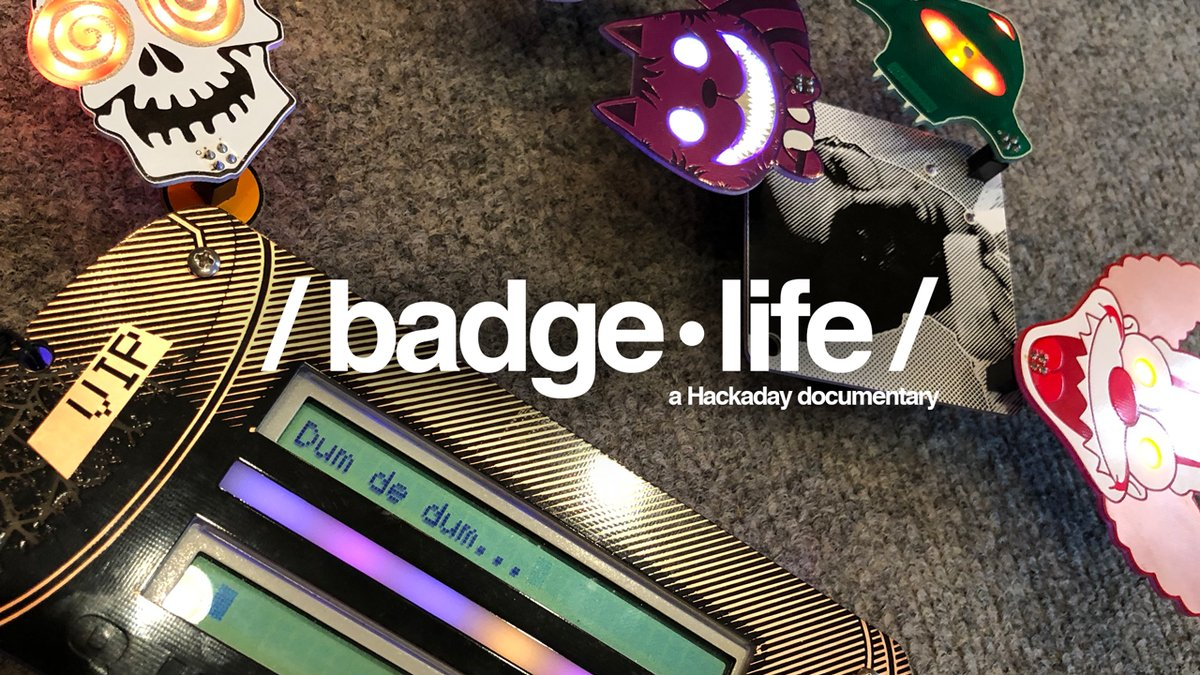
Sophie Kravitz at Hackaday put together a DEF CON badge life documentary interviewing some of the groups who create electronic badges (both official for the conference as well as independent groups like us).
If only Hyr0n didn’t set the world on fire by reminding folks that “gif” is pronounced JIFF (with a soft g)...
Also, it wouldn't’ be DEF CON if we didn’t ask you spend your nights doing some really stupid shit for a blinky trophy. Assisting us this year was F4nci3, our lovable suited director of lulz-gistics. Off the top of our head we can kinda remember…
- A Fancy dance-off with a G-Man
- A Fancy Drink competition judged by @lintile and @f4nci3, based on Taste, Appearance, and Accountrament
“What is a plastic cup, other than a giant straw?”
Charity
It's not just about raising funds to get us to conferences, making badges, teaching folks, and donating booze to parties, but giving back to the community as well. This year we were happy to support three non profits with donations:
- Women In Security and Privacy (WISP) Bronze Level Sponsor
- QueerCON and DCFurs Badge Auction
Next Year
We will be back for our fourth badge next year. Things will change. Our three designs incremented on each other. Expect something different. We do this to learn so we need to find new challenges.
-
LULZCODE
07/19/2018 at 16:15 • 0 commentsRather than repeat a lot of existing information, this serves as a pointer to our online documentation for LULZCODE hosted at geocities and youtube. You WILL need to know this in order to hack the badge ;)
Link: LULZCODE Technical Documentation
Link: YouTube Demonstration - Flappy Bird (Pt 1/2)
Link: YouTube Demonstration - Flappy Bird (Pt 2/2)
(Sorry for two parts, interwebs kept dropping)
LULZCODE IZ DESIGND 2 CONTROL NEARLY ALL ASPECTS OV TEH AN!XOR INDIE BADGE 4 DEF CON 26. 2 ACCOMPLISH DIS WE NEEDD 2 EXTEND LOLCODE 2 MEET R NEEDZ.
HOW IZ LULZCODE DIFFERENT?
NEARLY ALL LOLCODE 1.2 FEATUREZ HAS BEEN CARRID FWD. WE ESSENTIALLY DOUBLD TEH LANGUAGE SIZE 2 MEET R NEEDZ. WAN IMPORTANT FEACHUR DAT WUZ REMOVD WUZ UNICODE AS IT REQUIRD 2 MUTCH FLASH STORAGE. WE ALSO MAK USE OV BUKKITS WHICH R NOT FULLY SUPPORTD IN LOLCODE.WUT IZ LULZCODE 4?
AFTR READIN OVAR TEH LOLCODE SPEC SEVERAL TIEMS AN FIGHTIN BAK TEH TEARS WE REALIZD IT LIKELY TURIN-COMPLETE. IT HAD EVRYTHIN WE NEEDD. EXCEPT IT DIDNT WERK WELL ON MICROCONTROLLR. IN FACT, IT ONLY HAD BASIC USR INPUT AN OUTPUT. 4 R BADGEZ WE NED LANGUAGE DAT LETS US CONTROL TEH LOW-LEVEL PERIFERALS. SO LULZCODE WUZ BORN. AN EXTENSHUN OV LOLCODE 2 SUPPORT MICROCONTROLLERS.LIMITASHUNS
NOT EVRYTHIN WUZ EXPOSD IN LULZCODE. IT TURNS OUT MODIFYIN LANGUAGE IZ LOT OV WERK. RATHR WE TOOK MOAR PRAGMATIC APPROACH AN STARTD WRITIN R BADGE CODE IN LOLCODE DEN EXTENDIN TEH LANGUAGE WHEREVR WE NEEDD IT.LULZCODE MEMS USAGE IZ VRY HIGH. IN FACT AN AVERAGE LULZCODE SCRIPT CAN USE UP 2 100KB OV HEAP MEMS. THAZ 5 TIEMS WUT R FURST BADGE HAD 4 MEMS. 4 DIS REASON WE R RUNNIN TEH BADGE ON AN ESP32-WROVR WHICH GIVEZ US 4MB OV EXTERNAL SPI RAM.
LULZCODE IZ SLOW. VRY SLOW. IZ INTERPRETTIN STRINGS SO LOAD TIEM TAKEZ AWHILE. ONCE TEH PARSE TREE IZ IN MEMS (C ABOOV) ITZ PERFORMANCE IZ K BUT NOT GREAT.
LOLCODE 1.2 SPEC 4 MOAR ON LOLCODE C: HTTPS://GITHUB.COM/JUSTINMEZA/LOLCODE-SPEC/BLOB/MASTAH/V1.2/LOLCODE-SPEC-V1.2.MD
-
Yet another way to debounce a button
05/24/2018 at 15:04 • 0 commentsFirst things first. We did get a small sponsorship in the way of free parts and development kits from Dialog Semiconductor. This occurred after we had designed and prototyped with the Greenpak. This post is not sponsored in any way and our own thoughts / opinions.
Trying something new
If you've heard us speak at various conferences and meetings (Cyphercon, Hackaday Super Conference, Layer One, Macrofab, DC858/619), you undoubtedly heard us mention the desire to use an FPGA in our designs but could never justify it with use cases or functions the user cared about. Just because you can use hardware, doesn't mean you should.
These badge projects are concerted efforts by our team members to expand and learn new things. Now on our third major badge we have a third technique for debouncing. Enter the Greenpak.
Calling it an FPGA is quite a stretch but the methodology is similar.
Last summer I listened to The Amp Hour with Michael Ossman as a special guest. He mentioned wanting to play with Greenpaks and putting them into a development mode that was barely documented to do fun things with it. After some quick research I added it to our ideas list for DC26 and around October timeframe purchased a development kit. Soon after I was blinking LEDs.
Creating a Debouncer
To create the GreenPak logic, a specialized designer must be used. Fortunately the interface is all drag and drop. It takes a little getting used to coming from an EDA tool like Kicad, but isn't the worst. It would be nice to see improvements to how the line junctions are drawn and make them act like other tools, but oh well.
After trying several examples and getting unusually excited by blinky lights, I finally got to work on my primary task, using the Greenpak to debounce 7 buttons while minimizing GPIO usage on our MCU.
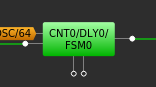
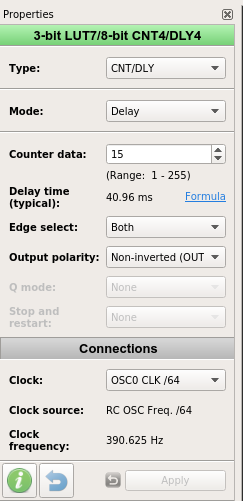
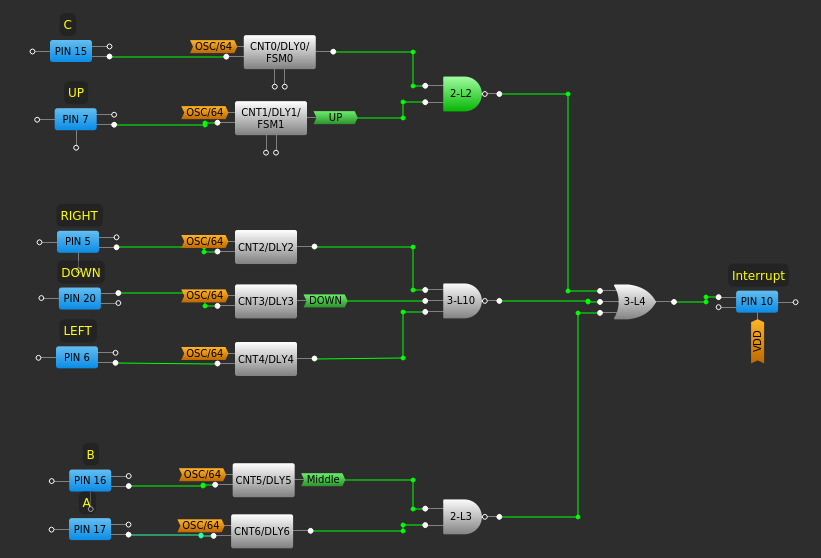
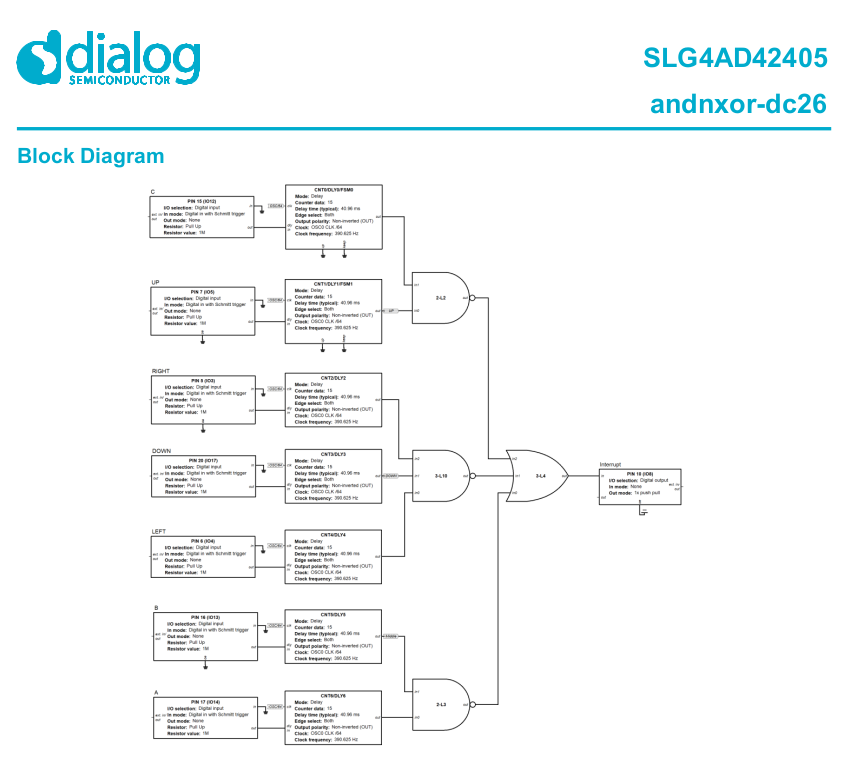
The key is to create a CNT block that is fed by a button.
Each block is multi-purposed. In the components list all available blocks are listed, of these several of the 3-bit and 4-bit LUTs could be repurposed into CNT blocks.The trick to button debouncing is to measure the delay the button stays low. In this case I fed in OSC/64 to get a 390.625 Hz frequency. The counter counts 15 ticks and is helpful enough to provide a typical delay time of 40.96ms, a healthy debounce delay. Note the Non-inverted(OUT) which will send a low signal after 40.96ms (button is connected to GND).Generating an Interrupt
The next step is to combine the outputs of the debouncers into one pin that goes high when any button is pressed. This is also straightforward.
Using a combination of LUTs I'm able to generate the appropriate high value on Pin 10 when any button is pressed. To get this right it took a lot of trial and error as what I thought was appropriate logic usually ended up backwards from what I was expecting.But Wait, How Do You Read the Button State?
This is where the magic of the Greenpak comes into play. I2C.
Pins 8 and 9 on my particular Greenpak are hardwired for I2C. By default the Greenpak will listen for address 0x00, which is a poor design choice for shared buses. It can be overridden in the design tool which is exactly what I did as the Greenpak lives on a shared bus on our badge.
It turns out all the Greenpak is 256 bytes of ROM (writeable once by a dev kit or factory) and 256 bytes of RAM which the ROM is copied into on startup. All LUT states are stored in RAM and addressable over I2C. WOW. You just need to know where to look in the datasheet - it turns out it's more trial and error than I thought.
The CNT blocks from earlier share their output state in a single byte at address 0xF2. Getting the state of each button is a simple bitmask. All the MCU has to do is listen for a rising edge on the interrupt pin then read 0xF2 to check the button states.Getting our own part number
Something completely unexpected, when Dialog flashed our Greenpaks they also generated a unique part number just for our part then shipped us a datasheet. Pretty cool huh?
Sadly the part will not be available for ordering. But the generic version, SLG46537V is available and can be flashed using a dev kit. We're not sure how we'll handle the situation where folks want to make their own badge, but open to ideas.Changing Greenpak Behavior Dynamically
Just as states can be read over I2C, so can configuration be written. In fact, during development we had a minor logic error in the interrupt pin. The interrupt pin was not set to 1x push pull for its output mode and we had already permanently burned the gp5 file to the Greenpak. Womp Womp. 700 times. Double Womp Womp.
The fix was simple. After badge startup, immediately after initializing the Greenpak on I2C (a simple query and ACK to make sure it's there) we write 0x00 to address 0x88 to properly set the configuration of Pin 10. Then everything works from there.
In theory, the entire Greenpak 256 bytes of RAM can be overwritten over I2C. Our original plan was to do just this from the SD card on every start. This created a single point of failure we couldn't accept and instead ended up having the Greenpaks flashed by the factory. In the badge's current boot sequence the SD card isn't guaranteed to be available until very late in the boot. No SD card, no buttons. Alternatively we could embed the 256 bytes of RAM in our firmware and write to the Greenpak early in the boot, which would have worked as well.
We've enjoyed playing with these tiny little devices. Our BOM is slightly reduced as we don't need resistors and capacitors on each button and we got to save some valuable GPIO for other purposes.
-
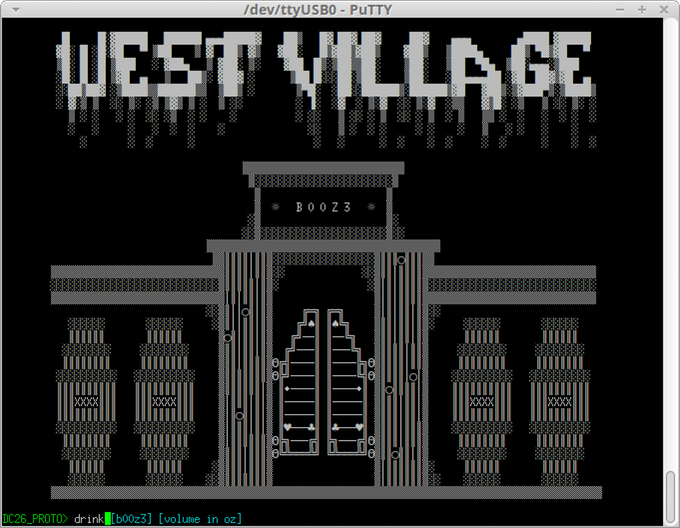
Badge ARG / Console / Command Line Puzzle / Whatevs U Call it
05/14/2018 at 16:04 • 1 commentSo the best way to start this log is brutal honesty, I just don't know what to call it. It could be that I was up late coding the badge and watching Westworld until a few hours before my flight (then decided to pack last minute). It could be due to the morning airport mimosas, ginger-ale, and vodka cheersing my liver at 30000 feet right now too. Probably a combo of "all the above."
There's many different words we all use for the same thing here. Originally, in the Joe Grand days of badgery, you would just hear of them being called hardware hacking challenges. Then it turned into puzzles. Then devices like the Sparkfun Harp started using the term Alternate Reality Gaming (ARG) / Hardware Alternate Reality Prototype (HARP), since it was an electronic hardware based puzzle that went beyond the device using external mediums and a story line to immerse the player in a challenge beyond the puzzle itself. Well this year we've increased the hacker difficulty from simple Easter eggs to actual hacking challenges on the badge, which are accessed through a command line interface / UART console, text based adventure RPG...ARG...thing; think of playing Colossal Cave but your actions in the game use the badge hardware to cause things to happen..in real life. As you can see it's a lot of stuff, but overall it's a bunch of hacker challenges, meant to entice you for some fun, and perhaps the first few people who solve the AND!XOR "thing" will get something special...
Can we agree on wut 2 call this?
But first things first, help us name this shit. Nothing surprises us more than the creativeness of the internet. Do your worst internet, do your worst. We 100% promise to use whatever recieves the most votes, but please lets make it somewhat describe the fact that this is a challenge, a puzzle, a type of ARG, etc... For the purposes of this write up, I'll refer to it simply as "the console."
TAKE A QUICK SURVEY AND LET US KNOW WHAT YOU THINK
Prior Work At Consoling
We have used embedded UART one way or another on our past two badges. We're hackers, we like command like interfaces, especially when it's green on black. DC24 Bender had an integrated console over UART, solving a couple of puzzles and discovering Easter eggs provided unlocks on the badge (more bling, games, etc). Last years DC25 bender built on that concept, except the console was done over wireless from a fone app @bitstr3m wrote, and allowed anyone to wirelessly terminal in to your badge. It dovetailed in to our BOTNET game as a backdoor in about 500 badges with a default root password... but... more people downloaded it AFTER the CON when they got home to mess with the badge than during the CON (we had about 70 people using the wireless console during DC25). So... metrics...lessons learned, going back to an embedded console (non RF based for interfacing) and focusing more on a single player aspect of hacking challenges.
By hacking challenges, we mean that yes you will actually hack the badge. Not dumb shit life hack it "e.g. hack BUTTON with FINGER" (okay there is some of that...) but actually attempt to circumvent the security of the badge presented in this alternate text based world in order to achieve intel and l337ness. I am not going to give hints as to what those types of challenges will be (since that would ruin the surprise), but they involve the various skill-sets you would find throughout the DEF CON Villages. They also are limited to things we can do with our badge, which includes LEDs (blinks, colors), RF, Hardware Interfaces (Shitty, I2C, SPI, JTAG), etc... So if you do not understand how to accomplish a certain type of challenge, this is your queue to go get a bunch of beer / liquor / wine / absinthe / defcoin and approach the nice people at the villages with a "Hey there! Im a padawn Haxor, I would love to learn how to <INSERT SKILL HERE> so I could try and defeat this AND!XOR badge console arg challenge thing, i don't have much, but I would love to give you some drinks if you would be willing to teach me. Or whatevs, you hangry? I can get some ramen or BK Lounge instead xoxoxoxo."
Point is, we want our badge to not only challenge you mentally, but socially. Use it as an excuse to go learn something new, talk to people, attend a new village you've never been to before, admit that you DON'T know everything in the world and would like to learn, and most importantly make some new friends to add to your Hacker family tree.
In the prior years badges, we had implemented the Natural Tiny Shell (NT-Shell). It's free, open source, and very lightweight. Simple concept, but operates like most C frameworks for IO, it's a parser with build in argument handling for command line switches. Essentially allowing you to make an integrated Unix style command line interface.
#include "ntshell.h"
#include "chip.h"
#include "uart.h"
#include "ntlibc.h"

#define UNUSED_VARIABLE(N)  do { (void)(N); } while (0)

static int func_read(char *buf, int cnt, void *extobj)
{
  int i;
  UNUSED_VARIABLE(extobj);
  for (i = 0; i < cnt; i++) {
    buf[i] = uart_getc();
  }
  return cnt;
}

static int func_write(const char *buf, int cnt, void *extobj)
{
  int i;
  UNUSED_VARIABLE(extobj);
  for (i = 0; i < cnt; i++) {
    uart_putc(buf[i]);
  }
  return cnt;
}

static int func_callback(const char *text, void *extobj)
{
  ntshell_t *ntshell = (ntshell_t *)extobj;
  UNUSED_VARIABLE(ntshell);
  UNUSED_VARIABLE(extobj);
  if (ntlibc_strlen(text) > 0) {
    uart_puts("User input text:'");
    uart_puts(text);
    uart_puts("'\r\n");
  }
  return 0;
}

int main(void)
{
  ntshell_t ntshell;
  chip_init();
  uart_init();
  ntshell_init(
      &ntshell,
      func_read,
      func_write,
      func_callback,
      (void *)&ntshell);
  ntshell_set_prompt(&ntshell, "AND!XOR>");
  ntshell_execute(&ntshell);
  return 0;
}
So if you think about it, a text based adventure game is really just a structured set of commands, which parse the inputs, against known values, and default responses, contextually tied into a storyline of some sorts...making shells and embedded consoles the perfect front for designing a console based puzzle around...did i just kill the magic?
ESP-IDF Console
Well this year, we are using the ESP32-WROVER. My god do I miss ARM...but thats another post for another day... A feature of the SDK is that it comes with an embedded console. It's been extended and modified slightly to our needs, but if you look at any of the ESP console examples it becomes pretty clear how it works. For an rpg-adventure type game, Its more contextual that one designs a console around a actions one would use in a storyline for their challenges. Example: part of the player setup in our storyline is getting a sex change (it's not graphic, just a change to a struct member). And yes, it matters for one of the challenges and lets just put this out there: Our badge and humor is not for people who are easily offended (or children). If that bothers you, go read a phone book.
static int gender(int argc, char** argv){
    //This is used to change the players gender, default is non-binary
    bool error_flag = false;

    if(user.GENDER_CHANGE == true){
                //You only get to change your gender once
        printf("  You already changed your gender. Deal with it or restart the game.\n\n");
    }
    else if(argc == 2){
        if ((strcmp(argv[1], "M") == 0)||(strcmp(argv[1], "m") == 0)){
            user.GENDER = 'M';
            user.GENDER_CHANGE = true;
            printf("  Sex change successful: Man-Bot!\n\n");
        }
        else if ((strcmp(argv[1], "F") == 0)||(strcmp(argv[1], "f") == 0)){
            user.GENDER = 'F';
            user.GENDER_CHANGE = true;
            printf("  Sex change successful: Fem-Bot!\n\n");
        }
        else if ((strcmp(argv[1], "N") == 0)||(strcmp(argv[1], "n") == 0)){
            user.GENDER = 'N';
            user.GENDER_CHANGE = true;
            printf("  Sex change successful: NonBinary-Bot!\n\n");
        }
        else error_flag = true;
    }
    else error_flag = true;

    if (error_flag){
        printf("  That doesn't make sense...you must be gender drunk \n\n");
    }
    return 0;
}

static void register_gender(){
    //This is what sets up the output of the HELP command
    const esp_console_cmd_t cmd = {
        .command = "gender",
        .help = "Change your robo-gender to a Fem-bot (F), Man-bot (M), or NonBinary-bot (N) ...you can only do this ONCE!",
        .hint = "[determination F, M, or N]",
        .func = &gender
    };
    ESP_ERROR_CHECK( esp_console_cmd_register(&cmd) );
}
Here's an example console capture, note that I still need to add more context (but am obviously leaving it out to not ruin the surprise of the game).
#ANDNXOR> gender  asdf
    That doesn't make sense...you must be gender drunk

#ANDNXOR> gender  M
    Sex change successful: Man-Bot!

#ANDNXOR> gender  F
    You already changed your gender. Deal with it or restart the game!
So now that you have an idea of what is going on are you interested in what the other console commands are?
- drink [b00z3] [volume in oz]
- drink all the booze
- EX> drink MADEWEST_IPA 11.0
- hack [THING_YOU_SEE with (THING_IN_LOOT || INTEL_YOU_KNOW)]
- hack all the things
- Yes this is a definite play on life hacks. Remember if you are stuck try hacking something with something
- All items which you can interact with ARE_CAPITALIZED_ITEMS but intel is not necessarily capitalized...
- EX> hack BIG_RED_BUTTON with FINGER (because pushing a button is just boring)
- EX> hack PIN_PAD with 1234
- EX> hack TERMINAL with password
- steal [THING}
- steal all the things you find as l00t
- EX> steal WIFI_CACTUS
- l00t
- list the contents of all dat sweet sweet l00t, no arguments needed
- EX> l00t
- look {no args] OR at [THING}
- look around the general area (look with no args)
- look at a specific ITEM for more detailed intel
- EX> look
- EX> look at TERMINAL
- status
- show the status of the player (e.g. name, gender, weight, blood alcohol content...)
- walk [DIRECTION}
- walk to a new location: NORTH, SOUTH, EAST, WEST, or HOME
- alternatively you can simply type a relative direction N, S, E, or W
- Don't let this get confusing, there are five villages corresponding to the locations and those villages share the names of locations. If you are at the HOME village and walk NORTH, you end up at the NORTH village. However, if you are at the NORTH village and "walk SOUTH," you end up back at HOME; i.e. you don't magically teleport to the SOUTH.
- EX> walk NORTH
- EX> N
- gender
- Change your robo-gender to a Fem-bot (F), Man-bot (M), or NonBinary-bot (N)
- You can only do this once
- EX> gender M
- weight
- change your weight [100lb <= w <= 400lb], we support up to the standard 400lb hacker
- You can only do this once
- EX> weight 200
Getting excited yet? Well here's what you need to do so you can setup everything ahead of time (since you lamerz really have nothing going on for the next couple months as it is)
Download The Drivers
One more hardware related detail we haven't mention yet...just cuz everyone goes with FTDI doesn't mean we had to. I mean if everyone was jumping off a cliff would you...well if it was Cliff-CON, a new security conference, I guess we would... but we went with the SiLabs CP2102N. Why? Same reduction in parts and high speed 3M baud rate as the FTDI (which u need for development and flashing firmware), but at a cheaper price. Now the downside...Windows and OSX do not natively include CP210X drivers like they do with FTDI. So if you use Linux, you're cool (for many reasons). But if not, we will include them on our SD card anyway. Note that any security conscious person should not trust drivers just being handed to you on some rogue SD card...cyber pathogens and whatnot. But we're putting them on there anyway, trust us or not, that's your choice.
Drivers for CP2102N USB to Serial
- Linux - None needed, natively works
- Not Linux - https://www.silabs.com/products/development-tools/software/usb-to-uart-bridge-vcp-drivers
- BSD - Get rid of your dumpster fire of an OS
Download and Configure PuTTY
PuTTY is HIGHLY recommended for the full experience of the console. You technically only need a terminal which supports ANSI and ASCII escape sequences, but PuTTY is the only one that Ill just flat out recommend since its pretty much idiot proof. If you use a terminal which doesn't support the escape sequences, nice features like our ANSI graphics, color, and auto-complete wont work. Your funeral..
- Download Directly
- Download from Command Line: sudo apt-get install putty
Configure Putty
- Serial Connection
- Location (whatever your OS mounts it as)
- 115200 Baud
- 8 Data Bits
- 1 Stop Bit
- No Parity
- No Flow Control
- Window Settings (110 Columns x 40 Rows)
- This is important. You want the graphics to display properly and not get cropped.
Quick reminder for folks who do not venture into the land of UART that often...
- Windows: This is your virtual COM port, look under Device Manager
- Linux: typically /dev/ttyUSB0 but make sure youre a member of the dialout group
- OSX: Borrows that stupid serial convention from BSD... /dev/tty.usbserial-SOMETHING_BAUDRATE (you just have to look, plug in, look again and see what appeared).
- drink [b00z3] [volume in oz]
-
Kickstarter Funding Successful
05/11/2018 at 02:21 • 0 commentsIt's been a month since we launched and crowdfunded our DC26 project on Kickstarter. W00t! It was later than last year, so the HaD page being kicked off is happening a bit later, but that's okay :)
So to sum up what we've been working on? Refining the badge-craft, a different take on blinky layout, as well as better silkscreen art from our friend Doc and a western theme. Based on feedback from folks, were upgrading (and completely rewriting) BOTNET from the ground up to be different. Single player games will be on the badge for line con, and a multitude of badge hacking puzzles for your weekend challenge. We are also supporting the #Defcon 26 Shitty Add-Ons interface as well as adding in some secret lulz and hacks for a surprise at the con.
Aside from that...from DC25 until now, we were lucky enough to speak at the Hackaday SuperCon about our thoughts on the engineering process behind making badges and MacroFab had us on their podcast when we went to their fab site in Houston and saw our prototypes being made.
More technical details coming shortly, were getting ready to lock down the functions this month, so in the mean time watch that youtube video and listen to the MEP!