 ninharp
-
1Connect Display to ESP8266
Connect jumper wires to all 5 Pins of the first MAX7219 Display board (On the side where Data In is printed on PCB) and connect the other ends of the jumper wires to the corrosponding pins like described in the table below.
LED Matrix ESP8266 VCC +3.3V GND GND DIN GPIO13 (HSPID) CS Choose free GPIO, e.g. GPIO2 CLK GPIO14 (HSPICLK) -
2Flash the ninHOME Node Firmware
You have more than one option to flash the ninHOME Node Firmware.
- Get the Source Code and compile, afterwards flash with make command 'make flash'
- Flash directly the Binaries with esptool.py or esptool-gui
esptool.py -p /dev/ttyUSB0 -b 230400 write_flash -ff 40m -fm qio -fs 4m 0x00000 0x00000.bin 0xa000 0xa000.bin 0x52000 spiff_rom.bin
-
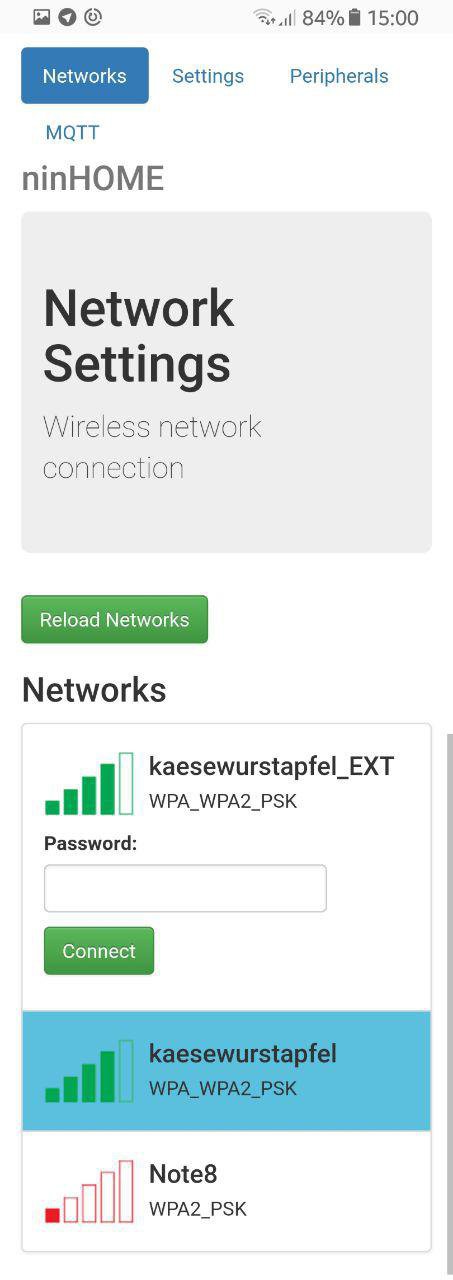
3Setup the ninHOME Node Networking
After flashing the ninHOME Node Firmware and starting up your ESP8266 it won't find any configuration in the SPIFFS so it
will open up a Wifi Access Point which you can connect to, if you havent changed the name in the source it will be called 'ninHOME Configuration'.After you connected to the Access Point you can open up a Browser and got to (if not changed in source)
There you find an overview of the reachable Wifi Networks.
Click on your desired network and give in the Wifi Password, after that reset your ESP8266.
Now your ninHOME Node should be connected to your choosen Wifi Network,
the IP of it you can find in your Router or if you open up a Serial Monitor on the ESP8266.A more easy way will be implemented soon.
![]()
-
4Setting up the Display in ninHOME Node
Connect again to the ninHOME Node but now on your regular Wifi Network with the IP your ESP8266 got
http://<IPofYOUResp8266>
Then you see the Webinterface of ninHOME Node again, there you click on the Periph Setting on the Top Navigation bar.
Scroll down to the MAX7219 Setting and type in the desired topics you want. Also put in on which GPIO you have connected
the MAX7219 Display's Slave Select (SS) Pin and how many 8x8 Elements you have connected.After that click on the checkbox next to the MAX7219 Display to enable this peripheral.
Then click the submit button on the very end of the page, but do not reset the ESP8266 yet.
![]()
-
5Fill in your MQTT Settings
Now click on the MQTT Settings on the Top Navigation bar.
Fill in your MQTT Settings as follows:
MQTT Server is the MQTT Broker Address or IP, even the MQTT Port on the next field.
MQTT UserID is the unique name the client identified by the MQTT Broker, can only be assigned ONE time.
MQTT Login and Password are the credentials you use for your MQTT Broker Login.
LWT Topic is the Topic where the Node should publish its state and its last will and testament.
Command and Publish Topics are general topics for commands or messages (Not used here but should not left empty)
After you have filled in all your settings click on the submit Button.
![]()
-
6Restart and test
Now you can safely restart the ninHOME Node and hopefully it will drive the Display and reacts to the Topics you specified.
You can test it if you use the mosquitto-tools to send a message to the display topic. For example:
mosquitto_pub -h test.mosquitto.com -p 1883 -u ninharp -P ***** -t "client3/display/text" -m "Hello World"Now your display should display the "Hello World" text, if your display got fewer count of chars in your text, the rest of the text won't be shown, but you can enable for example the scrolling to see longer text. For example:
mosquitto_pub -h test.mosquitto.com -p 1883 -u ninharp -P ***** -t "client3/display/scroll" -m 1Now the display should start scrolling. Hopefully ;)
ESP8266 MAX7219 Dot Matrix Display as MQTT Client
A MAX7219 driven Display, controlled by an ESP8266 SoC and MQTT


Discussions
Become a Hackaday.io Member
Create an account to leave a comment. Already have an account? Log In.
Hi. When I save the mqtt settings, after rebooting it has returned to default settings.
Are you sure? yes | no
You can rebuild the source if you have installed the toolchain for esp, the esp open sdk and the Sming Framework. Paths are set in the Makefile. Or you can go to the github page of the source and download the firmware.tar.gz on the root directory, this archive contains a full flashable binary
Are you sure? yes | no
How i can get the binary
Are you sure? yes | no
hello, how can I have the binary file to test please.
Thank you
Are you sure? yes | no
Hi!
beautiful! i would try it, but can't find any files or binary. could you share those files?
Or point me to how to build?
Thank you.
Are you sure? yes | no