-
Matrix driver development process
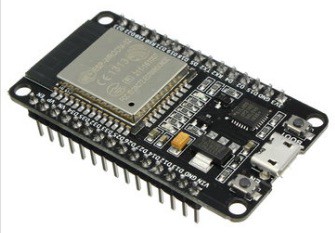
01/06/2018 at 15:13 • 1 commentI had some ESP8266-12E's, but there weren't enough GPIO pins (11) to drive the LED matrix (13 needed). I got one of these standard ESP32 development boards off of eBay.
![]()
This board offered 25 GPIO pins, plenty enough and then some. At this point I didn't want to develop my own breakout for the ESP32 chip, that was not the goal. This board had everything I needed: the required passives (resistances and capacitors), LEDs, buttons, USB to UART converter and the 5V to 3.3V converter.
The driver
The first step was to look around if somebody had already made a driver for this particular chip and peripheral, I found that VGottselig had made exactly that. It was really great to start with something so advanced. However, this library did miss out on some features I wanted: it was hardcoded for 64x32 matrix, it used the Adafruit GFX library which I didn't need as I intended to generate the graphics remotely, it was not prepared for MQTT... so I used it as an inspiration for my own.
The things I mostly took from there were the way the GPIO were defined (much faster than digitalWrite() function), the way the display was updated with a timer/interrupt and the pixel light intensity control.
Performance challenges
I went for the PubSubClient MQTT library for the MQTT part, this library limited a MQTT message to 128 bytes, including the overhead (topic name and whatnot). The LED screen had 32x32=1024 pixels, every pixel needed 3 colours and I wanted 4-bit colour depth (4 bits per pixel colour), that meat 32*32*3*4/8=1536 bytes/message, when rounded up to 2 bytes per pixel: 32*32*2=2048 bytes/message. This wouldn't work, even when I increased the hardcoded limit in the PubSubClient library (the ESP32 crashed).
Fortunately PubSubClient also allowed data streaming. It took some time to figure out how to use this feature, it felt like it was made exactly for this type of use case. Data was simply read into a buffer byte by byte as it came. This technically allowed for unlimited message size (within the ESP32 memory space of course).
I also got into trying to understand how things were organised on the ESP32 execution-wise, as the display update rate had to be really high to avoid visible flicker, but I also needed to dedicate some CPU time for MQTT message reception. The ESP32 uses FreeRTOS, which allows for concurrent task execution. It also has two identical CPUs inside, which share all the memory, this was a really nice feature: I could dedicate one CPU for display and the other for data reception and other tasks (WiFi stuff). Having shared memory meant I could simply write to the display buffer and the screen would update itself as data came in.
Latency challenges
Having done the above I saw that when the screen was updating it didn't do it in one go, I could see the screen updating itself as the bytes came over (slow transfer).
This was no good, it didn't look right to have "scan lines" coming in, this was an issue with data transfer latency, but there was not much that could have been done about it. I measured about 4Hz maximum update rate. So I implemented double buffering: data was coming to a "back buffer" while the display was using a "display buffer" or "front buffer", once all data had been transferred the buffers would switch and the screen would be updated all at once. No more flicker!
The video is in slow motion and in two parts: with single buffer and double buffer. The camera picked up on the refresh rate of the screen, but that's not the important part here as it's invisible to the human eye. The difference is that in the first part, when switching colour, the pixels change gradually from top to bottom, as the incoming data is slower than the screen update rate. In the second part a "background buffer" is filled instead and then the back and front buffers are switched, giving the effect of instant screen update.
Incoming data flicker
There is still a slight flicker every time when data is being received. I don't understand why this happens as everything is timer-based. In the video above, in the second part, you can see the slight slow-down of the screen update rate right before the buffers switch. I only update the screen about once a second and only if the pixels have changed, so mostly this is not an issue.
-
Software to drive the matrix
01/01/2018 at 17:55 • 0 commentsI looked if there was anything done on the software side for something less powerful than a Raspberry Pi. Some hardware is unfortunately very finicky and won't even work and lower clock speeds (WS2812 LED's, OV7670 camera...). Fortunately Adafruit had libraries and examples for Arduinos, unfortunately though the only Arduinos I had on hand were Leonardos (ATmega32U4 based), which were explicitly unsupported for various reasons.
Operation theory
The 32x32 RGB LED matrix is updated row-by-row, over 16 rows, upper and lower part at the same time. There are 6 pins for the color, so 3 for the upper half and 3 for the lower. 4 pins select one of the 16 rows (both for upper and lower matrices) and a clock signal that clocks in the pixel values. Then there are some other pins whose function I haven't quite understood...
Pixel glory!
As my ESP32 hadn't arrived yet I started with the Adafruit's library as an example and wrote a program to drive the matrix from an Arduino Leonardo. The reason they did not support this particular model was because they wanted to remain compatible on a certain number of other models, however the way the Leonardo pins are mapped to the Arduino pinout made it awkward to accommodate the library in a way that would remain maintainable. They did some really clever tricks to speed-up draw time to avoid visible flickering, such as using automatic pointer address increase in assembly (this is cycle counting business right there!).
I really liked the way Adafruit "parallel-banged" the GPIO directly from memory, basically the upper and lower pixel RGB values (6 bits) were stored on a single byte which was directly applied on an entire GPIO port array. This meant a simple loop could just sequentially bang the contents of a 32*32/2=512 byte array to a port without any conditionals or checks, considerably speeding up the screen update rate compared to, say, an RGB object that would define 3 bits per pixel to which the compiler would add all sorts of operations and jumps...
Working example
Finally I got some sort of animation going on:
IoT RGB LED Matrix Controller (ESP32)
This project is about building and programming an ESP32 based controller for a 32x32 RGB LED matrix, controlled from Node-RED over MQTT