bveina
-
first blinky lights.
01/04/2018 at 20:30 • 0 commentsby this point i already had already sent out for a small reel of APA102 addressable leds. my eventual plan is to populate a custom board that will bolt to the acrylic panels. but for now i need to prototype with them. i tried hand soldering some wires, that failed...miserably... I didn't even take photos. i also didnt have any breakout boards for the 6 pin apa102s. but, the 8 pin soic breakouts i made for other things was close enough.

meh... close enough i wired up two together and got down to the business of making a simple hue fader. now, here is where i fell down the rabbit hole. APA102s use RGB to control color, and i wanted Hue, Saturation, Value (HSV). the math to do this isnt particularly complicated, but doing it on an 8 bit processor (like the atmega328p) can be a bit time consuming.
ill save you the rabbit hole: http://www.vagrearg.org/content/hsvrgb has a great write up of the fastest way to get from one to the other. including Open Source code for the atmega328p.
for this first step though a simple modification to the strandTest arduino library from adafruit was enough.
#include <Arduino.h>
#include <Adafruit_DotStar.h>
#include <SPI.h>         // COMMENT OUT THIS LINE FOR GEMMA OR TRINKET

#define NUMPIXELS 2 // Number of LEDs in strip

bool showing;

void setup() {
   uint8_t rgb[3];
   uint8_t val;
   //volatile to force debugger to cache the value.
   volatile uint16_t top,x;


  strip.begin(); // Initialize pins for output
  strip.show();  // Turn all LEDs off ASAP
  for (int i=0;i<NUMPIXELS;i++) strip.setPixelColor(i,0);

  rgb[0]=0x00; // red
  rgb[1]=0xff; // green
  rgb[2]=0x00; // blue

  val=1;
  x=2;
  top=255;

  while(1)
  {
      rgb[x]=rgb[x]+val;
      if (rgb[x]==top)
      {
          //if counting up, now count down.
          if (val==1) { val=-1; top=0; }
          else        { val=1;  top=255;}

          // and modify the next primary color
          if (x==0) x=2;
          else x=x-1;

      }
      strip.setPixelColor(0,strip.Color(rgb[0],rgb[1],rgb[2]));
      // change the RGB order to get an out of phase hue.
      strip.setPixelColor(1,strip.Color(rgb[1],rgb[2],rgb[0]));
      strip.show();
      delay(10);
  }

void loop() {

}
the code replicates the following RGB values.

the acrylic from the last post was hand filed to sit on the leds and that led to:
onto the next acrylic revision.
-
First laser cut prototype
01/04/2018 at 20:02 • 0 commentsdisclaimer: some of these posts are describing things that have already happened. im post documenting alot of things since i think this is a cool project that uses alot of different skills.
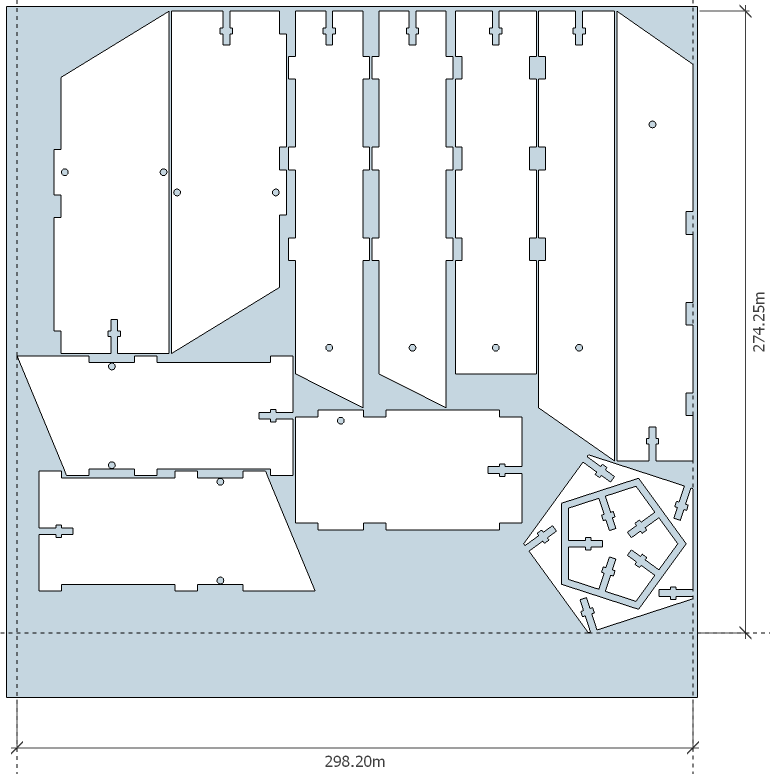
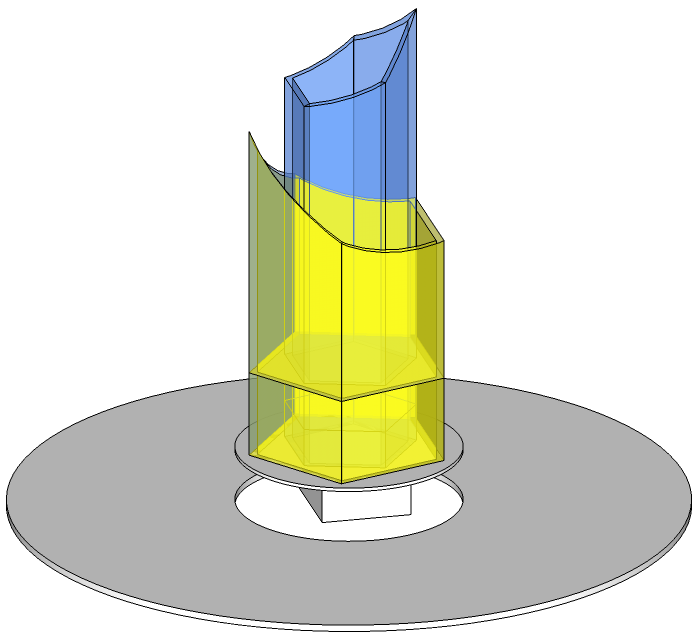
Im a person who really likes to see/touch what im building so the prototype was quick and dirty, i made some basic tabbed panels in sketchup:
![]()
at this point i wasnt worried about kerf, or fit, i just wanted a basic model i could show off to people and get feedback. i also needed to keep everything together, i decided on a captive nut approach and created one piece to hold the inner spire together, another to hold the outer spire together, and for now i just laser cut a base.to bolt everything together.
![]()
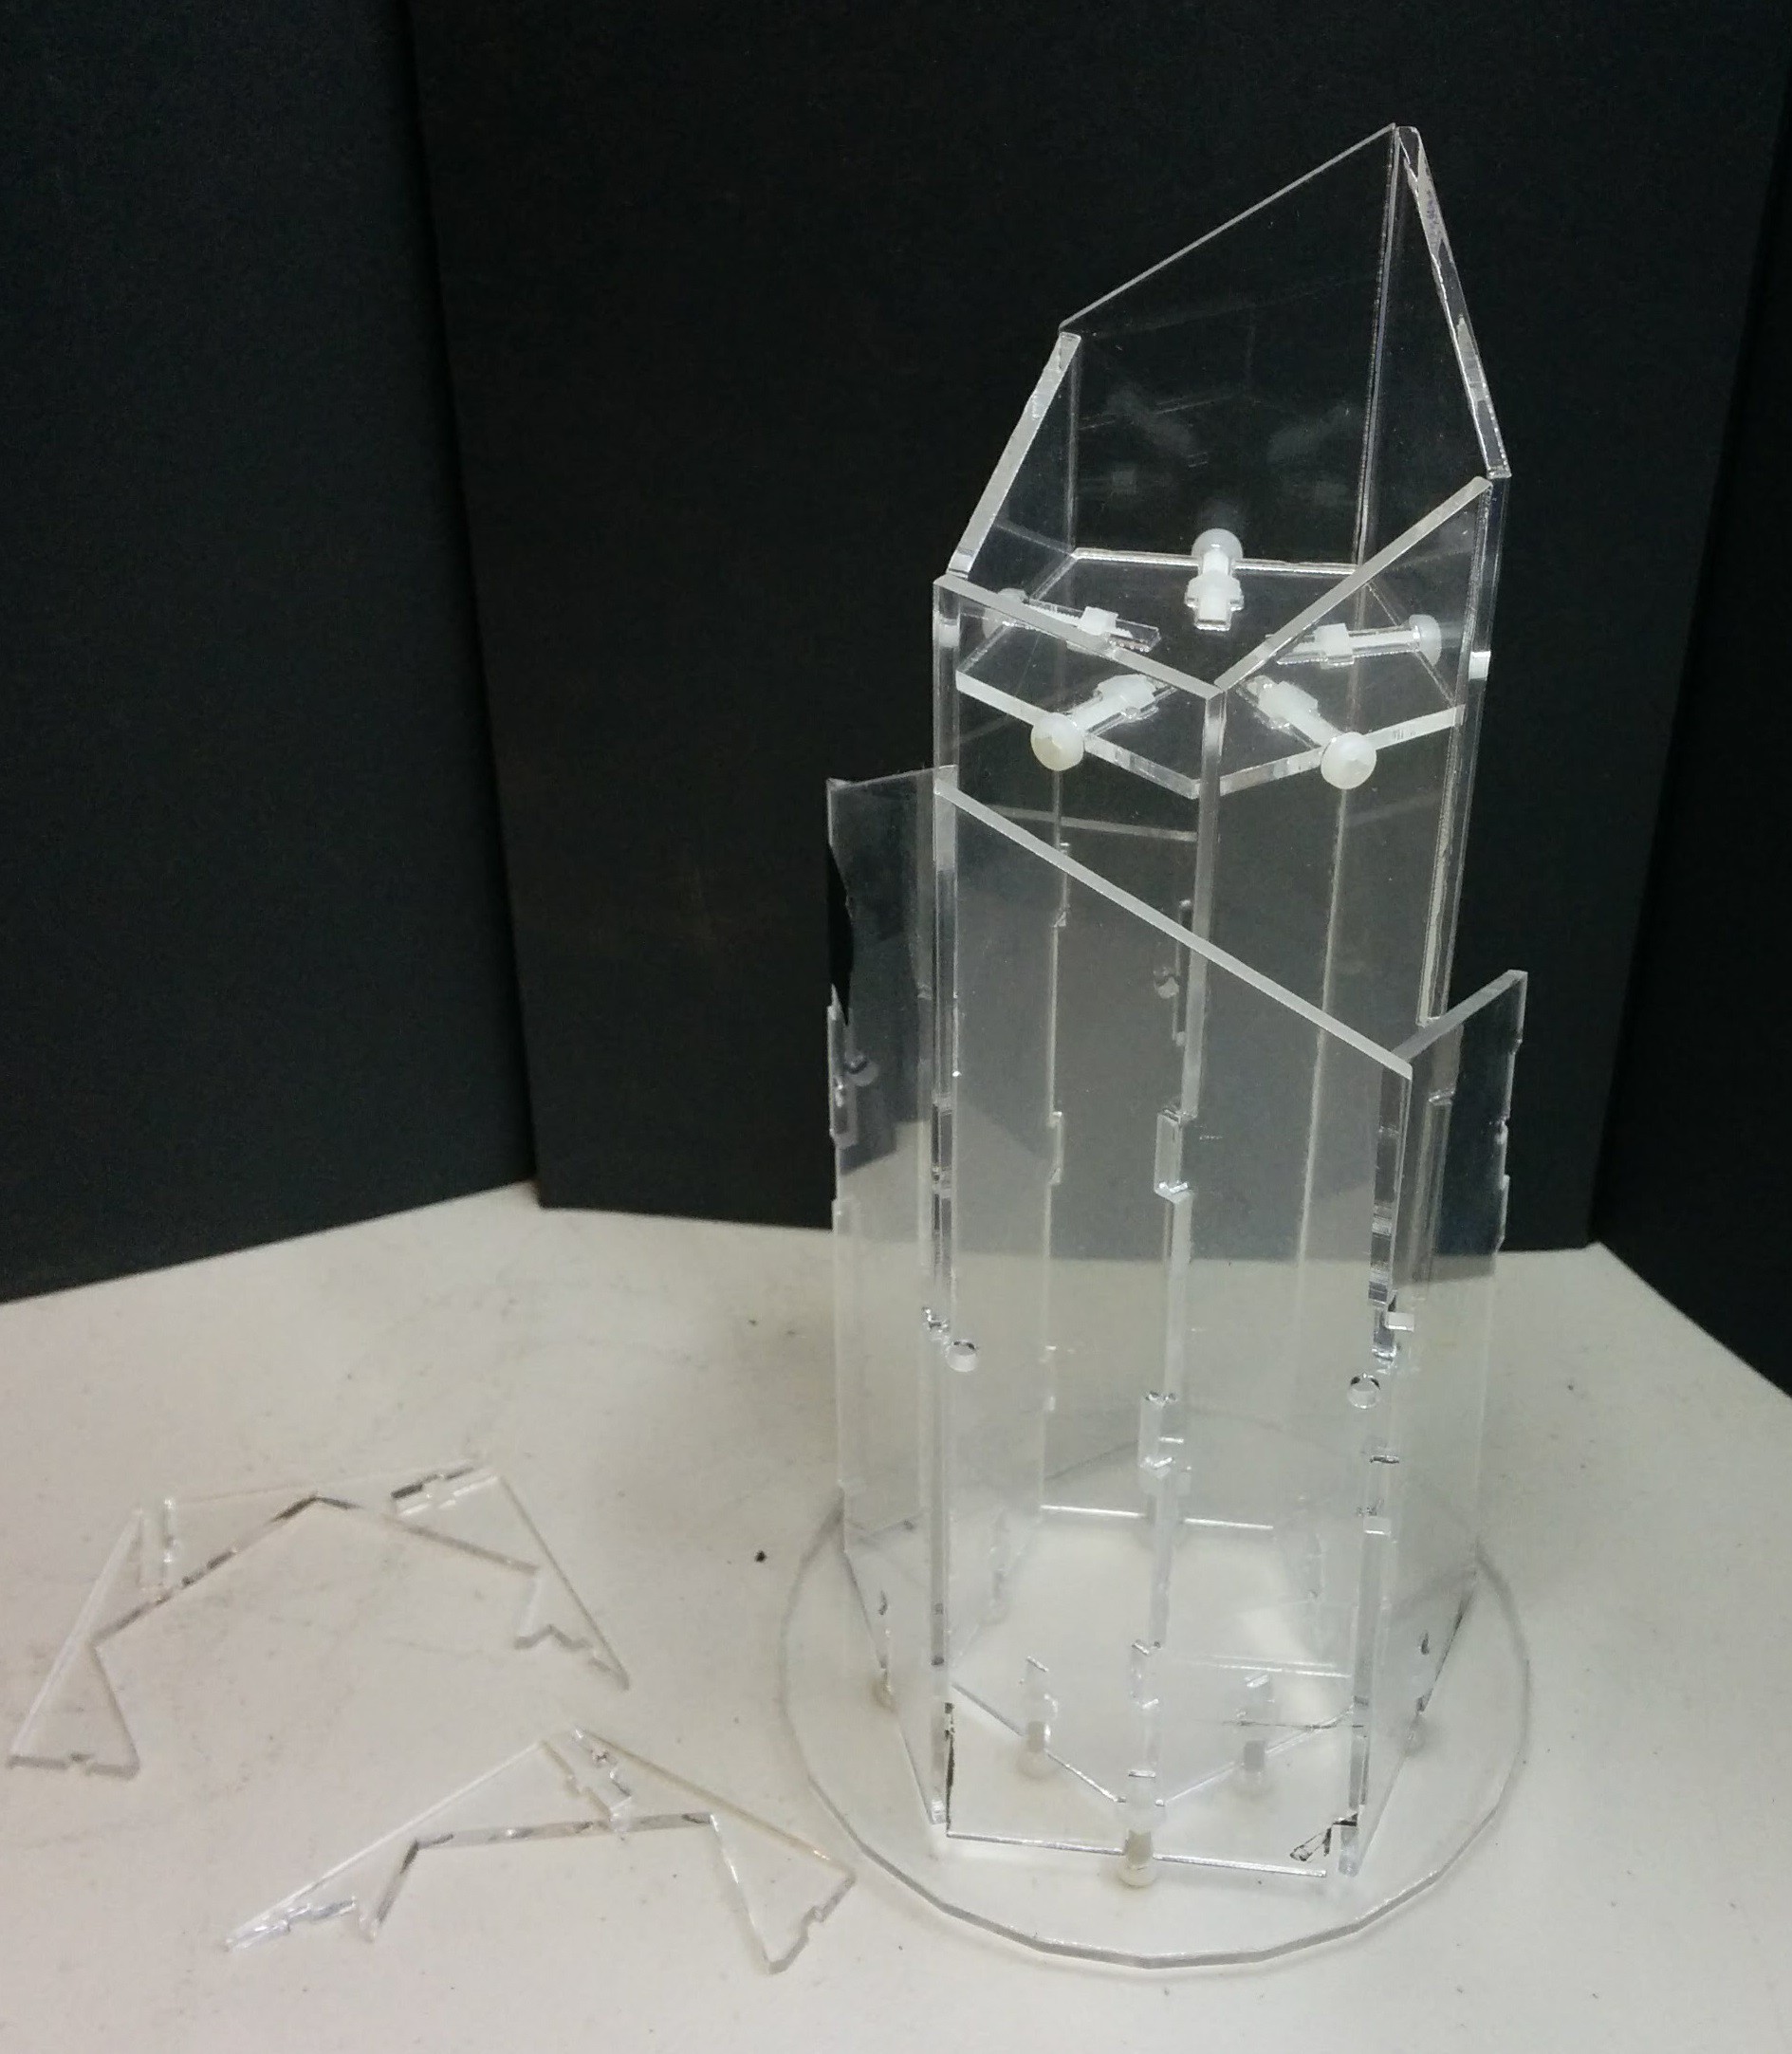
there were some pretty flimsy joints in this setup, especially in the larger pentagon. i didn't have enough room to bolt in the center or bolt on both sides, but offsetting the bolt worked well enough. until, it didn't.
![]()
it worked well enough for a proof of concept but barely. i used M3 nylon nuts and bolts that you can get from the usual sources (aliexpress, amazon, mcmaster). but i have a major redesign before i can get anything more done on the acrylic. it was a bear to get this together at all. next time, blinky lights!
-
Statement of purpose
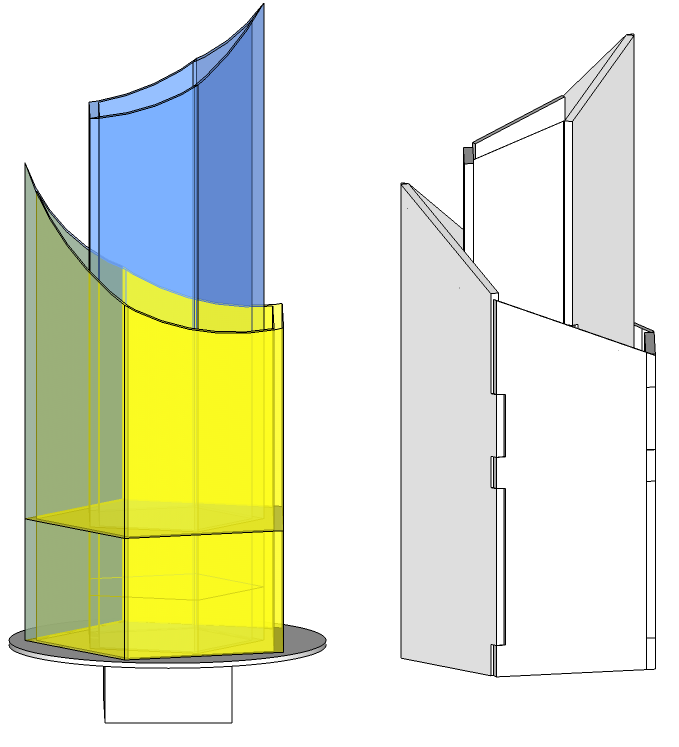
01/04/2018 at 19:09 • 0 commentsI am getting married. now among other things we need centerpieces for the reception. I have a basic idea of what i want, a clear acrylic spire between 6-10 inches tall, under lit with RGB leds. they should blink in time with the band, its an 80's band. yes this is going to be awesome. i did a quick render in sketchup to refine the concept. at a minimum im looking at 100mm circular circuit boards with addressable leds, some kind of wireless modules so they can all stay in sync, and batteries, im leaning towards 2 18650 cells, then lots of laser cut acrylic.
![]()
in the rendering ive added a block for the batteries under the circuit board, and added a ring around the entire thing, succulents will be placed around the entire thing. next time i hope to have some acrylic cut.
A Hacker's Wedding Centerpiece(s)
Im getting married :D. I've been put incharge of making the coolest* centerpieces ever! (*coolest acording to me)