 Thomas
-
1Step 1
We start by setting up the database.
First we need to create a table to store the measured values, you might want to use phpMyadmin or similar:
CREATE TABLE `heating` ( `moment` DATETIME NOT NULL , `duration` DOUBLE NOT NULL , `outside_temp` DOUBLE NOT NULL , `wind` DOUBLE NOT NULL ) -
2Step 2
Get the content of the "www" folder of the GitHub repo. Open "new_value.php" and "ajax.php" and fill in your information wherever you find <YOUR_XXX>.
You have to create an account at openweathermaps.org to get an APPID to be used there (for testing purposes you can remove the APP-ID part from the URL)My heater is consuming 3.6l of oil per hour. The time is measured in seconds, so within "ajax.php" I convert it from seconds to liters, you might want to change this parameter.
$row['output_duration']*0.001 (the code highlighter refused to work here)
After you have filled in your data, upload the files to your webserver.
create a subfolder "js", download jquery-2.1.1 (or a version you prefer, just change the path) and put it in the folder, then upload "js" to the server
You can test the system by calling:
example.com/somepath/new_value.php?o=somelocation&d=200
where "somelocation" is the city where you measure
by visiting
example.com/somepath/
you can see the data you entered
-
3Step 3
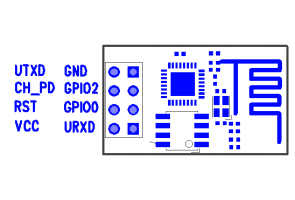
Now we need to connect the ESP8266 to UART, I used a USB to UART converter, the only thing you need to check is that it is 3.3V! if it is 5 V on ANY pin (also TX/RX) you will kill the ESP8266!! So, no 5V Arduinos here! Connect GND and VDD TX and RX. Open a terminal and set it to 115200@8N1. There are different Versions of breakout boards around (~11 currently) Below you find a Pinout of the currently most common ESP8266 breakout. If you have another PSB, check the web for pinouts.
![]()
There are also a few older Firmwares where it is 9600@8N1, if you bought it used it might be something different as the baudrate can be reconfigured.
Now you need to connect CH_PD to VDD. This will activate the ESP8266. Some guys have soldered a bridge between the this pin and VDD. On the terminal you will see some... data... its actually the bootloader on another baudrate so you cant read it. The only thing you should be able to read is a "ready" at the end.
You now can send commands (AT+Commands are on various sites on the web but as there is a lot of dynamic I dont want to post a absolute link: http://lmgtfy.com/?q=esp8266+at+commands) which are followed by a <CR><LF>. The firmware I wrote has a AT+HELP command to list all available commands.Does it work? Great, lets go to the next step
-
4Step 4
Before we can flash the files we need to set the ESP8266 into bootloader mode.
The Device is checking the GPIOs at startup, if it finds a certain configuration it will enter the bootloader mode or load from Flash.
To get into bootloader mode we need to connect GPIO0 to GND and reboot the ESP8266 via power cylce (disconnect power and plug it in again) or by disconnecting CH_PD from VDD and connecting it again. Once you have done so you will notice that you can't send AT commands anymore.
Also you well see again some data which is not readable.The chip is now in bootloader mode.
-
5Step 5
We have the .bin files, the ESP8266 is in bootloader mode... lets flash it!
There are several tools out there to do it.
On linux you might use: https://github.com/esp8266/esp8266-wiki/wiki/UploadingOn windows you also might use https://github.com/esp8266/esp8266-wiki/wiki/Uploading but there are also other tools available:
http://blog.electrodragon.com/cloud-updating-your-wi07c-esp8266-now/
There is a lot of development going on currently (10/2014) so you might search for a another tool if the ones above do not satisfy your needs.
I used the python script and XTCOMWith the toolchain I used we have 2 .bin files right now, you find them in the GitHub repo.
Those bin files will be flashed to different locations in the ESP8266. The flash file goes to 0x00000 the iROM goes to 0x40000. If you use the esptools toolchain the files will be names 0x00000.bin and 0x40000.bin. There are also binary files around where you have only one .bin. those files always go to 0x00000 as they spread over the whole range of addresses.
You might need to restart the ESP8266 after the first .bin to enter bootloader mode again to flash the second file. After you are done you disconnect GPIO0 from GND and restart the ESP8266 to reach the normal mode again.
-
6Step 6
Now that we have the new firmware running we need to configure it.
AT+CWMODE=1
will set the device into Station mode.AT+CWLAP
list the available Access PointsAT+CWJAP="<YOUR_SSID>","<YOUR_PASSWORD>
will connect you to your access point, the information is not lost if the device is repowered.AT+CISTARTLOG="<protocol>","<URL>new_value.php?o=<city>",<port>
Start the data logging on GPIO2, connect GPIO2 to GND for a few seconds and release it -> the information will be send to the serverEXAMPLE:
AT+CSTARTLOG="TCP","example.com/somepath/new_value.php?o=frankfurt",80
if you have set up multiple connections (AT+CIPMUX=1) you have to use
AT+CSTARTLOG=<conid>,"<protocol>","<URL>new_value.php?o=<city>",<port>
-
7Step 7
Set up the relay to measure whatever you want, I will not explain this further, if you dont know how to do it you should probably ask an electrician to do it.
-
8Step 8
If you want to dig deeper you can build your own binaries:
Get the ESP8266 VM image and set up the toolchain.
The VM image can be found at:
https://drive.google.com/folderview?id=0B5bwBE9A5dBXaExvdDExVFNrUXM&usp=sharing
follow the instructions of the readme, there are also instructions on how to compile. This will be explained a bit more detailed in the next step. -
9Step 9
Once you have set up the VM you should try if you can compile the project following the instructions in the readme.
OPTIONAL:
If you wish to use esptools you might want to follow the instructions found at: https://github.com/esp8266/esp8266-wiki/wiki/ToolchainThe process of building and flashing is also explained there.
simple native ESP8266 Smartmeter
Measure the active time of a heater to analyze its behaviour with a ESP8266 without an additional controller.
Discussions
Become a Hackaday.io Member
Create an account to leave a comment. Already have an account? Log In.