deʃhipu
-
Battery Life
03/02/2015 at 16:22 • 0 commentsI get a lot of questions about how long can those tiny robots go on a single battery charge. And I never know what to say, because it depends on what they are doing and the calculations are difficult. So I decided to try and see.
I've set the pure-arduino one, with 180mAh battery, to walk around the table leg in circles at full speed (which is actually pretty slow, with its tiny short legs), and waited until the battery overcharge protection kicked it.
Took exactly 20 minutes -- which is what I gave as a guesstimate to the people before.
I also noticed one nice thing in the process. The robot kept on walking around that table leg, and repeated the same circle for those 20 minutes, without spiraling away in any direction, as I expected it to. This means that whatever inaccuracies it has in its measurements, leg inverse kinematics calculations and mechanical skewing of legs, they are all relatively constant and repeatable. That bodes well for implementing navigation for it.
Now I need to make a similar test with the VoCore version, with video streaming running. The VoCore can suck up to 300mA, but that one has a 350mAh battery, so maybe the time will be similar...
UPDATE: 21 minutes with low-resolution streaming, walking in circles.
-
Exploring Under the Table
02/26/2015 at 17:16 • 0 commentsSo, it seems to be a good decision to use the working gait code from Arduino, and just send high-level commands over the serial to it. At least it gave me a working robot.
Below you can see it exploring my room with its webcam. It's a little dark under the table, and my screen's refresh rate interferes with the camera, but it feels almost like Doom.
-
VoCore Version Rebuild
02/25/2015 at 18:52 • 0 comments![]()
I finally got to rebuilding the VoCore version of pKubik using the new printed circuit board. On the photo, starting from the top, you can see:
- a hat
- battery charging module
- camera module
- battery
- VoCore
- breakout board for the VoCore
- Arduino Pro Mini
- the new board.
I also compiled a new OpenWRT image for it, and made sure everything works as it did before. So now I am where I was a week ago, except with a sturdier and more modular construction.
I also have the gait implementation I wrote for the Arduino-only version, and I'm tempted to drop the Micropython version. Instead just accept commands for the Arduino-controlled gait on the serial, and echo those through ssh from the VoCore.
Oh, I also finally found a good source of rubber for the feet. Old-school bicycle valves used pieces of a small rubber hose. You can still buy them in bike shops today, and they make excellent feet for the robots.
-
Minimal Version Improved
02/23/2015 at 20:19 • 0 commentsSo I worked a little bit on the gait of the minimal version, and also added a piezo buzzer and some sounds (after a while I made it start up muted, the sounds need to be explicitly enabled with the remote, as they are quite annoying). You can also turn while walking and rotate in place, adjust the height of the robot and the spread of its legs, etc.
-
Minimal Version
02/22/2015 at 10:45 • 1 commentSo here's the minimal version of the robot -- only the servos, an Arduino and an IR sensor for control with a TV remote. The gait still needs a little bit of tweaking (and I didn't adjust the trims on the servos), but it still walks pretty well. I also need to add rotation.
This can be used as is, bascially a remote-controlled toy, or you can attach various things to the Arduino (both the serial and the I²C pins are free) to control it in a little bit more intelligent way (like the VoCore + webcam version that I started with). In particular, I'm looking forward to getting that OpenMV board to put it on this thing.
-
Still Alive
02/13/2015 at 22:06 • 0 commentsThe progress on this guy has been kind of slow, and mostly in software. The current status is that I have the video streaming from camera to the web browser working, and I resolved the issue with noise on the serial line that made it impossible for the robot to walk properly (it turned out to be some kernel logs still being output to the serial). There still seems to be some problem either with the leg inverse kinematics, or the walking algorithm, as the legs move a little strange -- this requires further investigation.
I also have no idea for the control scheme. Right now I just start the micropython script from the command line over ssh, but it would be nice to be able to control the robot interactively, possibly through the web page that includes the streamed video. There is a socket library in micropython, so I could just listen for commands on some port, but from JavaScript I can only do HTTP or websocket communication... I need to think about it some more.
As for the twin brother, I'm trying to program it entirely in Arduino, so that it's the cheapest quadruped robot around. If that works, I will add a basic "laser tag" gun to it and try to talk some friends into making their own version, so that we can have a cheap version of the Mech Warfare battles. It will probably be a separate project, though.
-
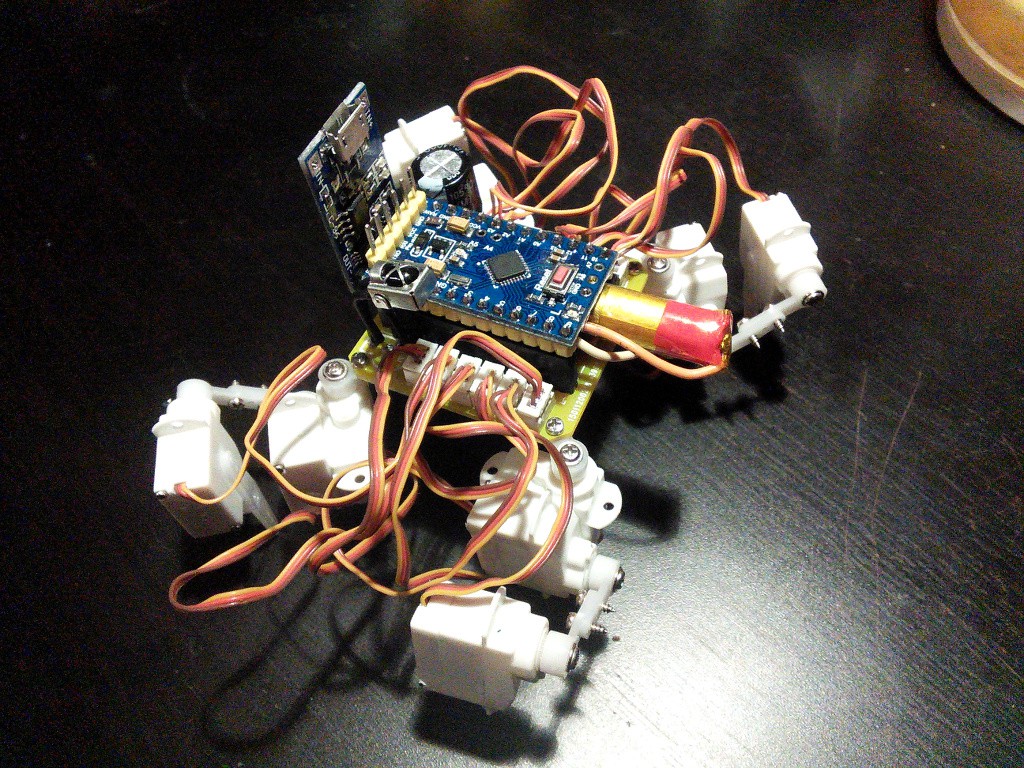
A Twin Brother
01/29/2015 at 18:55 • 0 commentsAnd here it is, an assembled robot, using once of the PCBs. This one only has the Arduino and an IR receiver, no VoCore. I will make a simple remote controlled toy out of it. The vertical board is a battery charger.
![]()
-
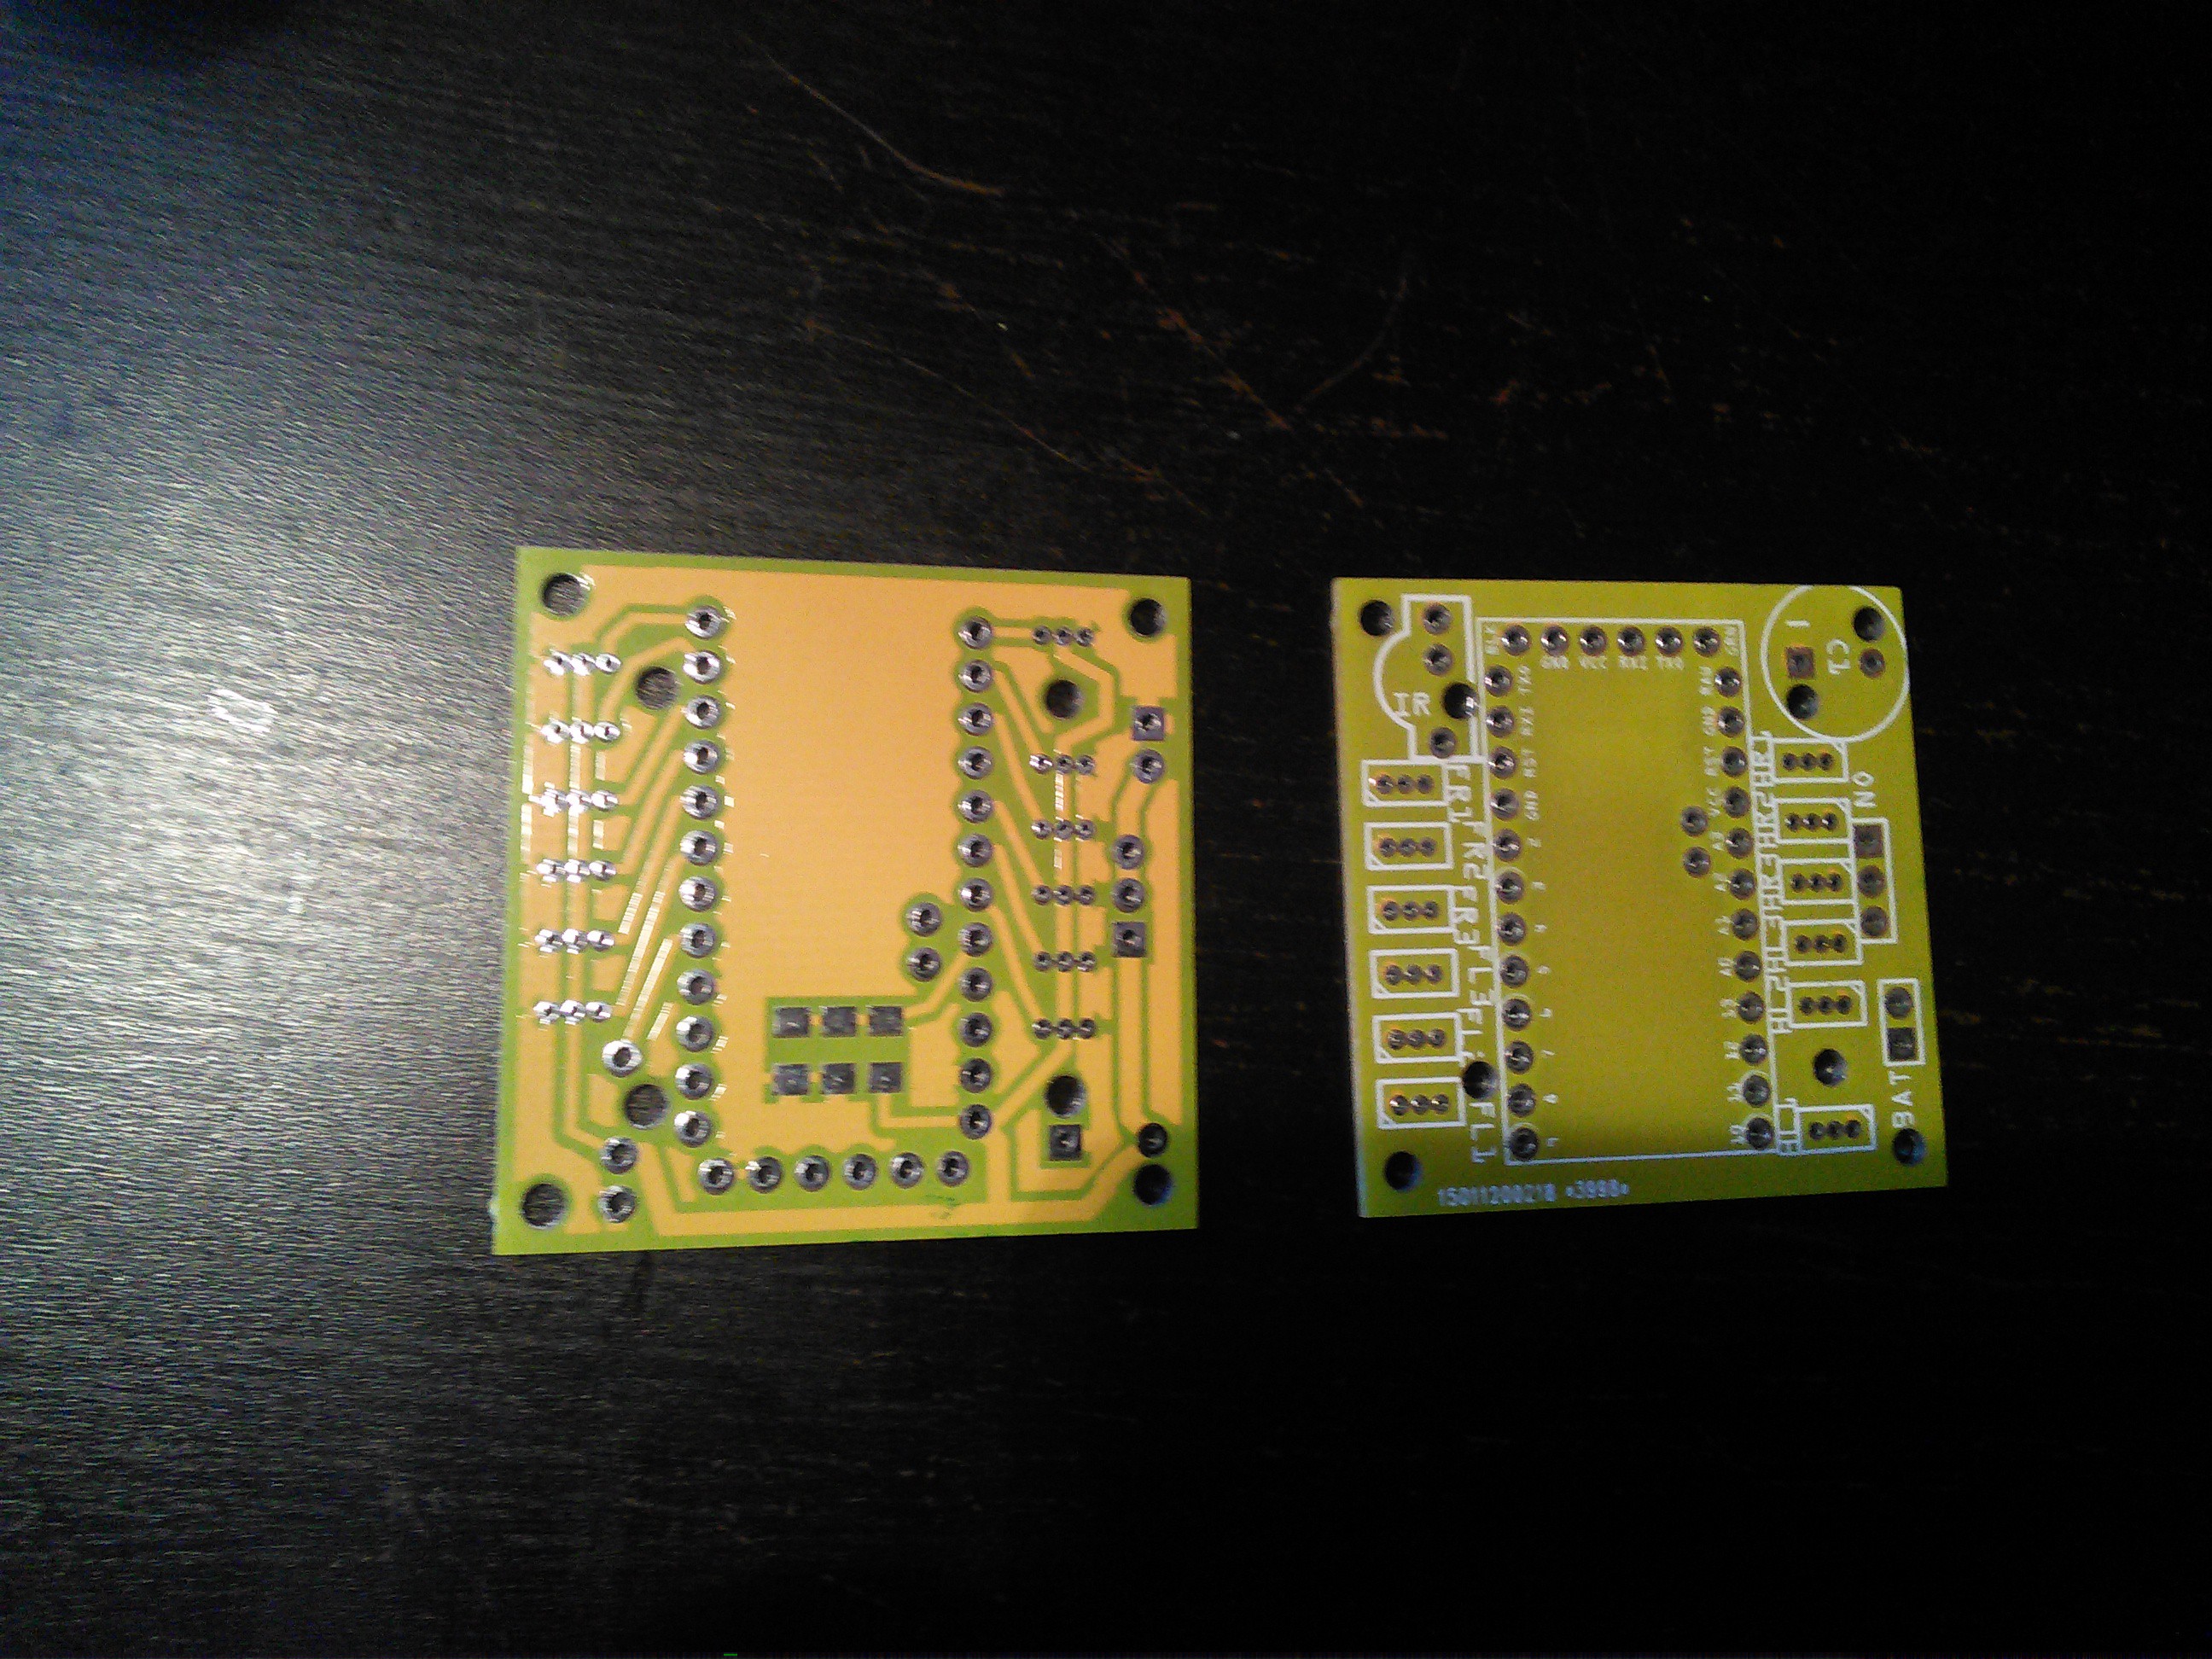
Boards arrived
01/29/2015 at 11:29 • 0 commentsThe PCBs that I ordered from Dirty PCBs just arrived, and they are beautiful! I got 11 of them, and I'm going to try one right away.
![]()
-
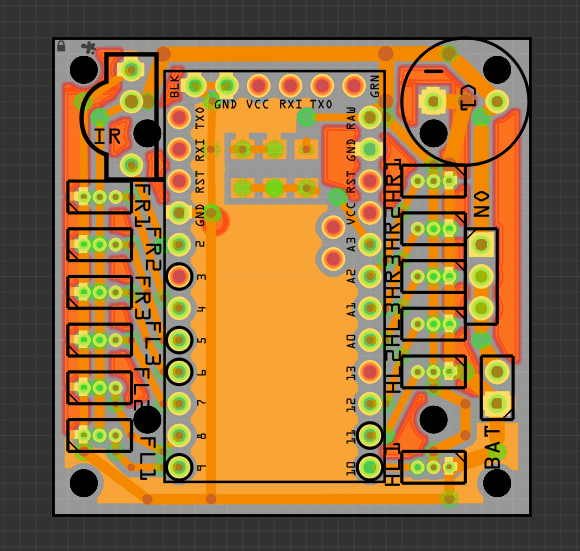
My First PCB
01/14/2015 at 17:34 • 0 commentsThe whole robot building thing is supposed to be a learning experience. So after fumbling with the wires and prototype boards for a while, I decided it's time to try and design an printed circuit board for the robot. The advantage, apart from much better handling the tiny 1.27mm spacing, would be that it could also double as a base for the robot.
After trying my skills with a number of available PCB-designing software (Egale and KiCad, among others), I finally decided to use... Fritzing. Maybe it's not as advanced as the others, but at least has user interface from this millennium, and can generate Gerber files without too much hassle. It's also the only one where I found how to place elements on the board and connect them first, and then create the schematic -- which is much better if I have a choice for using multiple pins for the same thing, and can choose the closest one. It also already came with an Arduino Pro Mini footprint.
The board is pretty simple, it's just has a place to put your Arduino in, and sockets for the servos. There is also room for a big capacitor, a power switch, a battery voltage monitoring circuit, and an optional IR receiver. It can then use just the Arduino for some simple behaviors, or have something smarter (like the VoCore) connected through the UART or I²C.
![]()
-
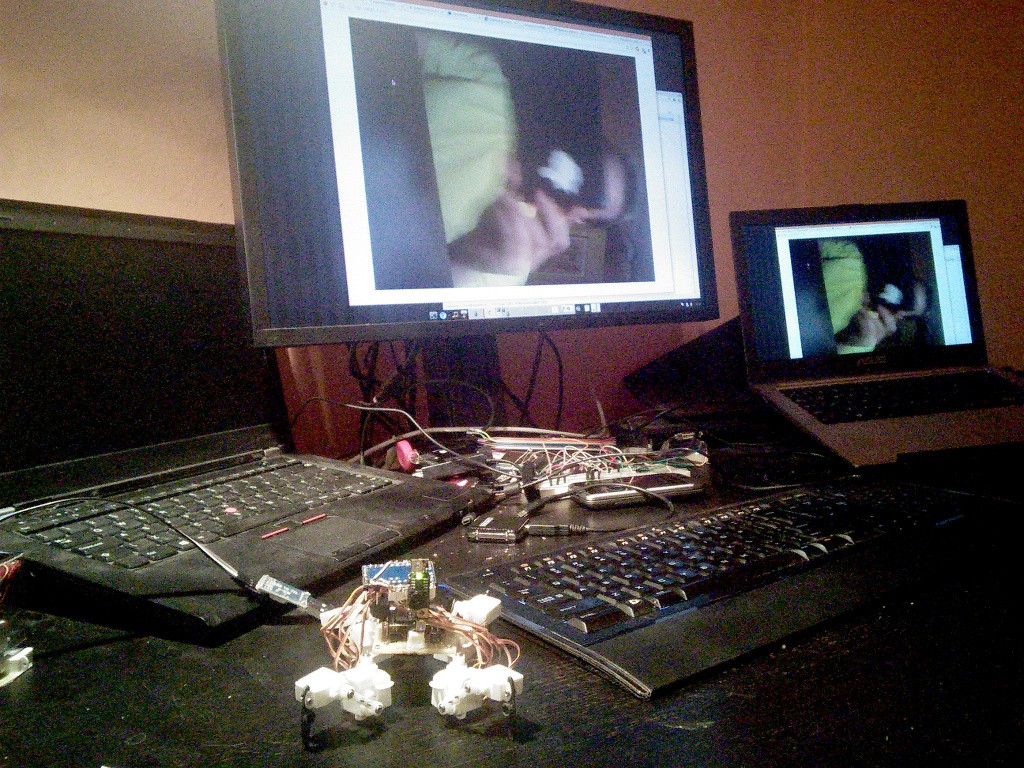
Camera Works!
01/08/2015 at 19:50 • 0 commentsFinally, I got the streaming from camera to work! Look:
![]()
The video is rotated by 90° and quite slow, but that's details that I can handle. The trick was to use an older version of mjpeg-streamer that doesn't segfault in YUV mode.
![]()
I also worked on the physical body of the robot a little bit. Instead of a transparent piece of plastic with everything glued to it, I now have a prototype board with a bunch of sockets and all the wires connecting them. The VoCore, Arduino, camera and battery just plug into that. And the PCB is exactly the right size to serve as a lid for a transparent plastic box. I just have to shave a couple of mm off the top of the camera module...
![]()